


CardLayout(构造)方法:
| 方法 | 说明 |
| public CardLayout() | 创建一个间距大小为0的新卡片布局 |
| public CardLayout(int hgap,int vgap) | 创建一个具有指定水平间距和垂直间距的新卡片布局。水平间距置于左右边缘。垂直间距置于上下边缘 |
| public void first(Container parent) | 翻转到容器的第一张卡片 |
| public void last(Contain parent) | 翻转到容器的最后一张卡片 |
| public void next(Contain parent) | 翻转到指定容器的下一张卡片 |
| public void previous(Contain parent) | 翻转到指定容器的前一张卡片 |
| public void show(Contain parent,String name) | 翻转到使用addLayoutComponent添加到此布局的具有指定name的组件 |
示例:
package com.lc.awt;
import java.awt.BorderLayout;
import java.awt.CardLayout;
import java.awt.Color;
import java.awt.Insets;
import java.awt.event.ActionEvent;
import java.awt.event.ActionListener;
import javax.swing.JButton;
import javax.swing.JFrame;
import javax.swing.JLabel;
import javax.swing.JPanel;
public class CardLayoutDemo extends JFrame {
private JPanel pane = null;
private JPanel p = null;
private CardLayout card = null;
private JButton button_1=null;
private JButton button_2=null;
private JButton b_1=null,b_2=null,b_3=null;
private JPanel p_1=null,p_2=null,p_3=null;
public CardLayoutDemo(){
card = new CardLayout(5,5);
pane = new JPanel(card);
p = new JPanel();
button_1 = new JButton("< 上一步");
button_2 = new JButton("下一步 >");
b_1 = new JButton("1");
b_2 = new JButton("2");
b_3 = new JButton("3");
b_1.setMargin(new Insets(2,2,2,2));
b_2.setMargin(new Insets(2,2,2,2));
b_3.setMargin(new Insets(2,2,2,2));
p.add(button_1);
p.add(b_1);
p.add(b_2);
p.add(b_3);
p.add(button_2);
p_1 = new JPanel();
p_2 = new JPanel();
p_3 = new JPanel();
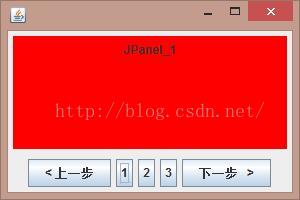
p_1.setBackground(Color.RED);
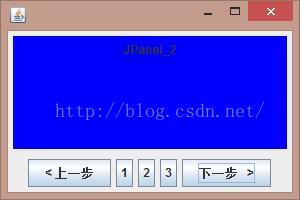
p_2.setBackground(Color.BLUE);
p_3.setBackground(Color.GREEN);
p_1.add(new JLabel("JPanel_1"));
p_2.add(new JLabel("JPanel_2"));
p_3.add(new JLabel("JPanel_3"));
pane.add(p_1,"p1");
pane.add(p_2,"p2");
pane.add(p_3,"p3");
button_1.addActionListener(new ActionListener() {
public void actionPerformed(ActionEvent arg0) {
card.previous(pane);
}
});
button_2.addActionListener(new ActionListener() {
public void actionPerformed(ActionEvent e) {
card.next(pane);
}
});
b_1.addActionListener(new ActionListener() {
public void actionPerformed(ActionEvent e) {
card.show(pane,"p1");
}
});
b_2.addActionListener(new ActionListener() {
public void actionPerformed(ActionEvent e) {
card.show(pane,"p2");
}
});
b_3.addActionListener(new ActionListener() {
public void actionPerformed(ActionEvent e) {
card.show(pane,"p3");
}
});
this.getContentPane().add(pane);
this.getContentPane().add(p,BorderLayout.SOUTH);
this.setSize(300, 200);
this.setVisible(true);
}
public static void main(String[] args) {
new CardLayoutDemo();
}
}
运行结果:


 47
47


 被折叠的 条评论
为什么被折叠?
被折叠的 条评论
为什么被折叠?
 到【灌水乐园】发言


