


基于请求驱动的轻量型Web框架------SpringMVC
- 一级目录
- 一SpringMVC入门
- 二、简单的springMVC架构,基于xml实现
- 三、简单的springMVC架构,基于注解实现
- 三、映射请求参数和请求方法
- 四、数据绑定
- 五、重定向与转发
- 六、mvc:annotation-driven
- 七 全局异常处理器的开发(公共模块)
- 八自定义处理器拦截器
- 九处理静态资源
- 十 springMVC实现restful风格架构
- 十一在restful风格中,关于拦截器拦截URI却不能拦截jsp/html资源名称请求的安全问题的解决
- `将所有的jsp文件放入到WEB-INF文件夹下,这样用户是直接不能访问WEB-INF文件下的jsp文件的。spring mvc的理念也是通过controller里的@RequestMapping来请求相关jsp页面,而非用户直接访问jsp页面。`
一级目录
二级目录
三级目录
一SpringMVC入门
Spring MVC是一种基于Java的实现了Web MVC设计模式的请求驱动类型的轻量级Web 框架,即使用了MVC架构模式的思想,将web 层进行职责解耦,基于请求驱动指的就是使用请求-响应模型,框架的目的就是帮助我们简化开发,Spring Web MVC也是要简化我们日常Web开发的。
1、springmvc能做什么
√让我们能非常简单的设计出干净的Web 层和薄薄的Web 层;
√进行更简洁的Web 层的开发;
√天生与Spring框架集成(如IoC容器、AOP等);
√提供强大的约定大于配置的契约式编程支持;
√能简单的进行Web 层的单元测试;
√支持灵活的URL到页面控制器的映射;
√非常容易与其他视图技术集成,如Velocity、FreeMarker 等等,因为模型数据不放在特定的API 里,而是放在一个
Model里(Map 数据结构实现,因此很容易被其他框架使用);
√非常灵活的数据验证、格式化和数据绑定机制,能使用任何对象进行数据绑定,不必实现特定框架的API;
√提供一套强大的JSP标签库,简化JSP开发;
√支持灵活的本地化、主题等解析;
√更加简单的异常处理;
√对静态资源的支持;
√支持Restful风格。
2、Spring Web MVC处理请求的流程

1、首先用户发送请求—>前端控制器,前端控制器根据请求信息(如URL)来决定选择哪一个页面控制器进行处理并把请求委托给它,即以前的控制器的控制逻辑部分;图中的1、2 步骤;
2、页面控制器接收到请求后,进行功能处理,首先需要收集和绑定请求参数到一个对象,这个对象在Spring Web MVC中叫命令对象,并进行验证,然后将命令对象委托给业务对象进行处理;处理完毕后返回一个ModelAndView(模型数据和逻辑视图名);图中的3、4、5步骤;
3、前端控制器收回控制权,然后根据返回的逻辑视图名,选择相应的视图进行渲染,并把模型数据传入以便视图渲染;图中的步骤6、7;
4、前端控制器再次收回控制权,将响应返回给用户,图中的步骤8;至此整个结束。
3、Spring Web MVC架构

1、首先用户发送请求——>DispatcherServlet,前端控制器收到请求后自己不进行处理,而是委托给其他的解析器进行处理,作为统一访问点,进行全局的流程控制;
2、DispatcherServlet——>HandlerMapping, HandlerMapping 将会把请求映射为HandlerExecutionChain 对象(包含一个Handler 处理器(页面控制器)对象、多个HandlerInterceptor 拦截器)对象,通过这种策略模式,很容易添加新
的映射策略;
3、DispatcherServlet——>HandlerAdapter,HandlerAdapter 将会把处理器包装为适配器,从而支持多种类型的处理器,即适配器设计模式的应用,从而很容易支持很多类型的处理器;
4、HandlerAdapter——>处理器功能处理方法的调用,HandlerAdapter 将会根据适配的结果调用真正的处理器的功能处理方法,完成功能处理;并返回一个ModelAndView 对象(包含模型数据、逻辑视图名);
5、ModelAndView的逻辑视图名——> ViewResolver, ViewResolver 将把逻辑视图名解析为具体的View,通过这种策略模式,很容易更换其他视图技术;
6、View——>渲染,View会根据传进来的Model模型数据进行渲染,此处的Model实际是一个Map数据结构,因此很容易支持其他视图技术;
7、返回控制权给DispatcherServlet,由DispatcherServlet返回响应给用户,到此一个流程结束。
二、简单的springMVC架构,基于xml实现
1、通过maven导入SpringMVC依赖
<?xml version="1.0" encoding="UTF-8"?>
<project xmlns="http://maven.apache.org/POM/4.0.0"
         xmlns:xsi="http://www.w3.org/2001/XMLSchema-instance"
         xsi:schemaLocation="http://maven.apache.org/POM/4.0.0 http://maven.apache.org/xsd/maven-4.0.0.xsd">
    <modelVersion>4.0.0</modelVersion>

    <groupId>org.example</groupId>
    <artifactId>SpringMVC</artifactId>
    <version>1.0-SNAPSHOT</version>

<properties>
    <project.build.sourceEncoding>UTF-8</project.build.sourceEncoding>
    <maven.compiler.source>1.8</maven.compiler.source>
    <maven.compiler.target>1.8</maven.compiler.target>
</properties>
<!--导入spring依赖-->
<dependencies>
    <!-- spring4.3.2 -->
    <!-- spring-context -->
    <dependency>
        <groupId>org.springframework</groupId>
        <artifactId>spring-context</artifactId>
        <version>4.3.2.RELEASE</version>
    </dependency>
    <!-- spring-core -->
    <dependency>
        <groupId>org.springframework</groupId>
        <artifactId>spring-core</artifactId>
        <version>4.3.2.RELEASE</version>
    </dependency>
    <!-- spring-beans -->
    <dependency>
        <groupId>org.springframework</groupId>
        <artifactId>spring-beans</artifactId>
        <version>4.3.2.RELEASE</version>
    </dependency>
    <!-- https://mvnrepository.com/artifact/org.springframework/spring-aop -->
    <dependency>
        <groupId>org.springframework</groupId>
        <artifactId>spring-aop</artifactId>
        <version>4.3.2.RELEASE</version>
    </dependency>
    <!-- https://mvnrepository.com/artifact/org.springframework/spring-aspects -->
    <dependency>
        <groupId>org.springframework</groupId>
        <artifactId>spring-aspects</artifactId>
        <version>4.3.2.RELEASE</version>
    </dependency>
    <!--使用AspectJ方式注解需要相应的包 -->
    <dependency>
        <groupId>org.aspectj</groupId>
        <artifactId>aspectjrt</artifactId>
        <version>1.6.11</version>
    </dependency>
    <!--使用AspectJ方式注解需要相应的包 -->
    <dependency>
        <groupId>org.aspectj</groupId>
        <artifactId>aspectjweaver</artifactId>
        <version>1.6.11</version>
    </dependency>
    <!-- 添加数据库连接池 druid -->
    <dependency>
        <groupId>com.alibaba</groupId>
        <artifactId>druid</artifactId>
        <version>1.1.3</version>
    </dependency>
    <!-- https://mvnrepository.com/artifact/mysql/mysql-connector-java -->
    <dependency>
        <groupId>mysql</groupId>
        <artifactId>mysql-connector-java</artifactId>
        <version>5.1.6</version>
    </dependency>
    <!-- spring-tx 事务控制-->
    <dependency>
        <groupId>org.springframework</groupId>
        <artifactId>spring-tx</artifactId>
        <version>4.3.2.RELEASE</version>
    </dependency>
    <!-- spring-jdbc -->
    <dependency>
        <groupId>org.springframework</groupId>
        <artifactId>spring-jdbc</artifactId>
        <version>4.3.2.RELEASE</version>
    </dependency>
    <!--mybatis-->
    <dependency>
        <groupId>org.mybatis</groupId>
        <artifactId>mybatis</artifactId>
        <version>3.4.5</version>
    </dependency>
    <!-- spring整合mybatis插件包 -->
    <dependency>
        <groupId>org.mybatis</groupId>
        <artifactId>mybatis-spring</artifactId>
        <version>1.3.2</version>
    </dependency>

    <!-- https://mvnrepository.com/artifact/org.springframework/spring-expression -->
    <dependency>
        <groupId>org.springframework</groupId>
        <artifactId>spring-expression</artifactId>
        <version>4.3.2.RELEASE</version>
    </dependency>
    <!-- https://mvnrepository.com/artifact/junit/junit -->
    <dependency>
        <groupId>junit</groupId>
        <artifactId>junit</artifactId>
        <version>4.12</version>
        <scope>compile</scope>
    </dependency>
    <!-- https://mvnrepository.com/artifact/log4j/log4j -->
    <dependency>
        <groupId>log4j</groupId>
        <artifactId>log4j</artifactId>
        <version>1.2.17</version>
    </dependency>
    <!-- 配置servlet -->
    <dependency>
        <groupId>javax.servlet</groupId>
        <artifactId>javax.servlet-api</artifactId>
        <version>3.0.1</version>
        <scope>provided</scope>
    </dependency>
    <!-- 配置jsp -->
    <dependency>
        <groupId>javax.servlet.jsp</groupId>
        <artifactId>javax.servlet.jsp-api</artifactId>
        <version>2.2.1</version>
        <scope>provided</scope>
    </dependency>
    <!-- spring web -->
    <dependency>
        <groupId>org.springframework</groupId>
        <artifactId>spring-web</artifactId>
        <version>4.3.2.RELEASE</version>
    </dependency>
    <!-- spring webmvc -->
    <dependency>
        <groupId>org.springframework</groupId>
        <artifactId>spring-webmvc</artifactId>
        <version>4.3.2.RELEASE</version>
    </dependency>
</dependencies>
如果需要maven运行web项目,需要添加maven的tomcat插件,如果不需要请直接在idea配置本地安装过的tomcat插件.
<build>
        <!-- 配置tomcat插件,web端 -->
        <plugins>
            <plugin>
                <groupId>org.apache.tomcat.maven</groupId>
                <artifactId>tomcat7-maven-plugin</artifactId>
                <version>2.2</version>
                <configuration>
                    <!-- 配置项目的请求路径 -->
                    <path>/mvc</path>
                    <!-- 配置服务器端口号 -->
                    <port>9091</port>
                </configuration>
            </plugin>
        </plugins>
    </build>
</project>
2、web.xml文件中配置前端控制器
(1)加载默认SpringMVC配置文件
<?xml version="1.0" encoding="UTF-8"?>
<web-app xmlns:xsi="http://www.w3.org/2001/XMLSchema-instance" xmlns="http://xmlns.jcp.org/xml/ns/javaee"
         xsi:schemaLocation="http://xmlns.jcp.org/xml/ns/javaee http://xmlns.jcp.org/xml/ns/javaee/web-app_3_1.xsd"
         version="3.1">
    <!-- POST中文乱码过滤器 -->
    <filter>
        <filter-name>CharacterEncodingFilter</filter-name>
        <filter-class>org.springframework.web.filter.CharacterEncodingFilter</filter-class>
        <init-param>
            <param-name>encoding</param-name>
            <param-value>UTF-8</param-value>
        </init-param>
    </filter>

    <filter-mapping>
        <filter-name>CharacterEncodingFilter</filter-name>
        <url-pattern>/*</url-pattern>
    </filter-mapping>
    <!--配置前端控制器-->
    <servlet>
        <servlet-name>DispatcherServlet</servlet-name>
        <servlet-class>org.springframework.web.servlet.DispatcherServlet</servlet-class>
        <!-- 服务器启动创建servlet对象 ,同时加载springmvc配置文件,默认是在WEB-INF下加载一个叫[servlet-name]-servlet.xml-->
        <load-on-startup>1</load-on-startup>
    </servlet>
    <servlet-mapping>
        <servlet-name>DispatcherServlet</servlet-name>
        <url-pattern>/</url-pattern>
    </servlet-mapping>

</web-app>
(2)加载自定义SpringMVC配置文件
<?xml version="1.0" encoding="UTF-8"?>
<web-app xmlns:xsi="http://www.w3.org/2001/XMLSchema-instance" xmlns="http://xmlns.jcp.org/xml/ns/javaee"
         xsi:schemaLocation="http://xmlns.jcp.org/xml/ns/javaee http://xmlns.jcp.org/xml/ns/javaee/web-app_3_1.xsd"
         version="3.1">
    <!-- POST中文乱码过滤器 -->
    <filter>
        <filter-name>CharacterEncodingFilter</filter-name>
        <filter-class>org.springframework.web.filter.CharacterEncodingFilter</filter-class>
        <init-param>
            <param-name>encoding</param-name>
            <param-value>UTF-8</param-value>
        </init-param>
    </filter>

    <filter-mapping>
        <filter-name>CharacterEncodingFilter</filter-name>
        <url-pattern>/*</url-pattern>
    </filter-mapping>
    <!--配置前端控制器-->
    <servlet>
        <servlet-name>DispatcherServlet</servlet-name>
        <servlet-class>org.springframework.web.servlet.DispatcherServlet</servlet-class>
        <!-- 服务器启动创建servlet对象 ,同时加载springmvc配置文件,默认是在WEB-INF下加载一个叫[servlet-name]-servlet.xml-->
        <init-param>
            <param-name>contextConfigLocation</param-name>
            <param-value>classpath:springmvc.xml</param-value>
        </init-param>
        <load-on-startup>1</load-on-startup>
    </servlet>
    <servlet-mapping>
        <servlet-name>DispatcherServlet</servlet-name>
        <url-pattern>/</url-pattern>
    </servlet-mapping>

</web-app>
3、在SpringMVC配置文件中配置HandlerMapping和HandlerAdapter、InternalResourceViewResolver
<?xml version="1.0" encoding="UTF-8"?>
<beans xmlns="http://www.springframework.org/schema/beans"
   xmlns:xsi="http://www.w3.org/2001/XMLSchema-instance"
   xmlns:context="http://www.springframework.org/schema/context"
   xmlns:aop="http://www.springframework.org/schema/aop"
   xsi:schemaLocation="http://www.springframework.org/schema/beans
http://www.springframework.org/schema/beans/spring-beans-4.3.xsd
http://www.springframework.org/schema/context
http://www.springframework.org/schema/context/spring-context-4.3.xsd
http://www.springframework.org/schema/aop
http://www.springframework.org/schema/aop/spring-aop-4.3.xsd">
   <!-- HandlerMapping -->
   <bean class="org.springframework.web.servlet.handler.BeanNameUrlHandlerMapping"/>
   <!-- HandlerAdapter -->
   <bean class="org.springframework.web.servlet.mvc.SimpleControllerHandlerAdapter"/>
   <!-- ViewResolver -->
   <bean class="org.springframework.web.servlet.view.InternalResourceViewResolver">
      <property name="prefix" value="/"/>
      <property name="suffix" value=".jsp"/>
   </bean>
   <!--配置业务控制器-->
   <bean name="/shuang" class="com.alibaba.spring.web.controller.LoginController"></bean>
</beans>
4业务处理器
package baobaobaobao.controller;

import org.springframework.web.servlet.ModelAndView;
import org.springframework.web.servlet.mvc.Controller;

import javax.servlet.http.HttpServletRequest;
import javax.servlet.http.HttpServletResponse;

/**
 * Created by @author LiuChunhang on 2020/4/8.
 */
public class EnUserController implements Controller {

    @Override
    public ModelAndView handleRequest(HttpServletRequest httpServletRequest, HttpServletResponse httpServletResponse) throws Exception {
        ModelAndView modelAndView = new ModelAndView();
        modelAndView.addObject("shuang","hang");
        modelAndView.setViewName("hang");
        return modelAndView;
    }
}
5视图页面hang.jsp
<%@ page contentType="text/html;charset=UTF-8" language="java" %>
<html>
<head>
    <title>测试SpringMVC</title>
</head>
<body>
Hello World
</body>
</html>
6 配置tomcat


7测试

解决tomcat中文乱码:
在 tomcat / conf 目录下,设置 logging.properties ,增加参数 java.util.logging.ConsoleHandler.encoding = GBK

然后重启:

测试成功

三、简单的springMVC架构,基于注解实现
1修改SpringMVC管理bean的配置文件
<?xml version="1.0" encoding="UTF-8"?>
<beans xmlns="http://www.springframework.org/schema/beans"
       xmlns:xsi="http://www.w3.org/2001/XMLSchema-instance"
       xmlns:context="http://www.springframework.org/schema/context"
       xmlns:aop="http://www.springframework.org/schema/aop" xmlns:tx="http://www.springframework.org/schema/tx"
       xsi:schemaLocation="http://www.springframework.org/schema/beans http://www.springframework.org/schema/beans/spring-beans.xsd
      http://www.springframework.org/schema/aop http://www.springframework.org/schema/aop/spring-aop.xsd
      http://www.springframework.org/schema/context
      http://www.springframework.org/schema/context/spring-context.xsd http://www.springframework.org/schema/tx http://www.springframework.org/schema/tx/spring-tx.xsd">
    <!--启用注解扫描-->
    <context:component-scan base-package="baobaobaobao.controller"></context:component-scan>


    <!-- HandlerMapping映射处理器 -->
    <!--Spring3.1开始的注解HandlerMapping -->
    <bean class="org.springframework.web.servlet.mvc.method.annotation.RequestMappingHandlerMapping"></bean>

    <!-- HandlerAdapter处理适配器 -->
    <!--Spring3.1开始的注解HandlerAdapter-->
    <bean class="org.springframework.web.servlet.mvc.method.annotation.RequestMappingHandlerAdapter"></bean>
    <!-- ViewResolver 视图解析器 -->
    <bean class="org.springframework.web.servlet.view.InternalResourceViewResolver">
        <!--前缀,后缀指定跳转的位置,/代表项目根路径-->
        <property name="prefix" value="/"/>
        <property name="suffix" value=".jsp"/>
    </bean>


</beans>
2修改控制器
不用再继承controller,类和方法可以随便写,原来的参数可以不要
package baobaobaobao.controller;

import org.springframework.stereotype.Controller;
import org.springframework.web.bind.annotation.RequestMapping;
import org.springframework.web.servlet.ModelAndView;

/**
 * Created by @author LiuChunhang on 2020/4/8.
 */
@Controller
public class EnUserController{


    @RequestMapping("shuang")
    public ModelAndView handleRequest() throws Exception {
        ModelAndView modelAndView = new ModelAndView();
        modelAndView.addObject("shuang","hang");
        modelAndView.setViewName("shuang");
        return modelAndView;
    }
}
3、注解详解
使用@controller的类会被组件扫描管理器context:component-scan自动扫描管理
Spring MVC 使用 @RequestMapping 注解为控制器指定可以处理哪些 URL 请求,@RequestMapping把请求与处理请求的方法映射在一起。
4、窄化请求映射
(1)@RequestMapping可以修饰控制器类和方法上
类定义处:提供初步的请求映射信息,相对于WEB 应用的根目录下。
方法处:提供进一步的细分映射信息,相对于类定义处的 URL。
若类定义处未标注 @RequestMapping,则方法处标记的 URL 相对于WEB 应用的根目录DispatcherServlet 截获请求后,就通过控制器上@RequestMapping 提供的映射信息确定请求所对应的处理方法。
修饰类:
package baobaobaobao.controller;

import org.springframework.stereotype.Controller;
import org.springframework.web.bind.annotation.RequestMapping;
import org.springframework.web.servlet.ModelAndView;

/**
 * Created by @author LiuChunhang on 2020/4/11.
 */
@Controller
@RequestMapping("manage")
public class ManageController {
    @RequestMapping("dashuang")
    public ModelAndView handleRequest() {
        ModelAndView modelAndView = new ModelAndView();
        modelAndView.addObject("shuang","hang");
        modelAndView.setViewName("shuang");
        return modelAndView;
    }
}

(2)组合使用是“或”的关系
@RequestMapping(value={"/many", “/many2”})多个请求映射到同一个处理方法上,可以用以下两种方法访问:
package baobaobaobao.controller;

import org.springframework.stereotype.Controller;
import org.springframework.web.bind.annotation.RequestMapping;
import org.springframework.web.servlet.ModelAndView;

/**
 * Created by @author LiuChunhang on 2020/4/11.
 */
@Controller
@RequestMapping(value={"/many", "/many2"})
public class ManyController {
    @RequestMapping("dashuang")
    public ModelAndView handleRequest() {
        ModelAndView modelAndView = new ModelAndView();
        modelAndView.addObject("shuang","hang");
        modelAndView.setViewName("shuang");
        return modelAndView;
    }
}


三、映射请求参数和请求方法
@RequestMapping 除了可以使用请求 URL 映射请求外,还可以使用请求方法、请求参数及请求头映射请求。@RequestMapping 的 value、method、params 分别表示请求 URL、请求方法、请求参数的映射条件,他们之间是与的关系,联合使用多个条件可让请求映射更加精确化。
params 支持简单的表达式:
@RequestMapping(value="/update",params="id=100")
id: 表示请求必须包含名为 id的请求参数
!param1: 表示请求不能包含名为 param1 的请求参数
param1 != value1: 表示请求包含名为 param1 的请求参数,但其值不能为 value1
{“param1=value1”, “param2”}: 请求必须包含名为 param1 和param2 的两个请求参数,且 param1 参数的值必须为 value1
请求方法映射限定:默认情况下,处理方法同时支持get和post请求:
@RequestMapping(value="/create", method = RequestMethod.GET)表示该请求只接受GET请求。
@RequestMapping(value="/methodOr", method
= {RequestMethod.POST, RequestMethod.GET})表示该请求可以同时接受POST和GET请求。
请求数据中有指定参数名:
请求中必须包含一个参数名称为create的参数
@RequestMapping(params="create", method=RequestMethod.GET)
请求中必须包含一个参数名称,但是参数名称不是create。
@RequestMapping(params="!create", method=RequestMethod.GET)
请求中必须包含一个参数名称为submitFlag的参数,值必须是create
@RequestMapping(params="submitFlag=create", method=RequestMethod.GET)
请求中必须包含一个参数名称,参数名称是submitFlag,但是值不是create
@RequestMapping(params="submitFlag!=create", method=RequestMethod.GET)
请求中必须包含多个参数
@RequestMapping(params={"test1", "test2=create",”test3!=delete”})
例子:
创建一个dashuang.jsp视图页面,和一个shuang.jsp视图页面
dashuang.jsp
<%@ page contentType="text/html;charset=UTF-8" language="java" %>
<html>
<head>
    <title>测试SpringMVC</title>
</head>
<body>

<form action="/mvc/xiaoshuang" method="post" >
   <input type="submit" value="提交">
</form>

</body>
</html>
shuang.jsp
<%@ page contentType="text/html;charset=UTF-8" language="java" %>
<html>
<head>
    <title>测试SpringMVC</title>
</head>
<body>
${shuang} <br>


</body>
</html>
控制器:
get方法返回dashuang
post方法返回xaioshuang
package baobaobaobao.controller;

import org.springframework.stereotype.Controller;
import org.springframework.web.bind.annotation.RequestMapping;
import org.springframework.web.bind.annotation.RequestMethod;
import org.springframework.web.servlet.ModelAndView;

/**
 * Created by @author LiuChunhang on 2020/4/8.
 */
@Controller
public class EnUserController{
    @RequestMapping(value = "xiaoshuang",method = RequestMethod.GET)
        public ModelAndView handleRequesttwo() {
        ModelAndView modelAndView = new ModelAndView();
        modelAndView.addObject("shuang","dahang");
        modelAndView.setViewName("shuang");
        return modelAndView;
    }

    @RequestMapping(value = "xiaoshuang",method = {RequestMethod.GET,RequestMethod.POST})
    public ModelAndView handleRequest() {
        ModelAndView modelAndView = new ModelAndView();
        modelAndView.addObject("shuang","xiaohang");
        modelAndView.setViewName("shuang");
        return modelAndView;
    }
}
测试:
dashuang.jsp

点击提交:
返回xiaoshuang?name=xiaoshuang
返回值xiaoshuang

四、数据绑定
JaveWeb数据参数四种主要的范围:

1.page: page表示页面范围。 页面范围对应的时间段为:从客户访问一个jsp文件开始,到这个jsp文件执行结束。

2.request:  request表示请求范围。 请求范围时间段为:从客户请求访问一个jsp文件开始,到这个jsp返回响应结果结束,如果这个jsp文件把请求转发给其他web组件,那么知道其他web组件返回响应结果结束。    请求范围是指服务器响应一次客户请求的过程,从servlet容器接收到一个客户请求开始,到返回响应结果结束, 请求范围与servletRequest和servletResponse相对应。

3.session: session表示会话范围。 会话范围对应着整个会话的生存周期。会话范围是指浏览器与一个web应用进行一次会话的过程。具体实现上,会话范围与httpsession对象的生命周期相对应。因此web组件只要共享同一个httpsession对象也就能共享会话范围内的数据。  举例说明: 浏览器进程第一次请求访问应用中一个支持会话的网页,servlet容器驶入寻找请求中表示sessionID的cookie,由于还不存在这样的cookie,所以一个新的会话开始了,创建一个httpsession的对象,然后为它分配唯一的sessionID,并把id作为Cookie放在http响应结果中,当浏览器接收到http响应后,会把sessionID保存的cookie保存在客户端。浏览器进程继续访问应用的任意一个支持会哈德页面,http请求会包含表示sessionID的Cookie,servlet容器试图寻找http请求中sessionID的cookie,找到后可以找到与sessionID匹配的httpSession。

4.application(应用)范围: web应用范围对应整个web应用的生存周期。web应用范围值得是web应用的生命周期,具体实现上web应用范围与servletContext对象的生命周期对应,web应用范围内的共享数据作为servletContext的属性存在。因此web组件只要共享同一个servletContext对象就能共享web应用范围内的共享数据。
1处理方法支持的参数类型
1.ServletRequest/HttpServletRequest 和ServletResponse/HttpServletResponse
参考xml实现mvc
2.InputStream/OutputStream 和Reader/Writer
部分代码:
public void execute(InputStream requestBodyIn,
OutputStream responseBodyOut)throws IOException {
responseBodyOut.write("success".getBytes());
}
requestBodyIn:获取请求的内容区字节流,等价于request.getInputStream();
responseBodyOut:获取相应的内容区字节流,等价于response.getOutputStream()。
reader:获取请求的内容区字符流,等价于request.getReader();
writer:获取相应的内容区字符流,等价于response.getWriter()。
3.WebRequest/NativeWebRequest
WebRequest是Spring Web MVC提供的统一请求访问接口,不仅仅可以访问请求相关数据(如参数区数据、请求头数据,但访问不到Cookie区数据),还可以访问会话和上下文中的数据;NativeWebRequest继承了WebRequest,并提供访问本地Servlet API的方法。
部分代码:
public String webRequest(WebRequest webRequest, NativeWebRequest nativeWebRequest) {
System.out.println(webRequest.getParameter("test"));//①得到请求参数test的值
webRequest.setAttribute("name", "value", WebRequest.SCOPE_REQUEST);//②
System.out.println(webRequest.getAttribute("name", WebRequest.SCOPE_REQUEST));
HttpServletRequest request =
nativeWebRequest.getNativeRequest(HttpServletRequest.class);//③
HttpServletResponse response =
nativeWebRequest.getNativeResponse(HttpServletResponse.class)
;
① webRequest.getParameter:访问请求参数区的数据,可以通过getHeader()访问请求头数据;
② webRequest.setAttribute/getAttribute:到指定的作用范围内取/放属性数据,Servlet定义的三个作用范围
分别使用如下常量代表:
SCOPE_REQUEST :代表请求作用范围;
SCOPE_SESSION :代表会话作用范围;
SCOPE_GLOBAL_SESSION :代表全局会话作用范围,即ServletContext上下文作用范围。
③ nativeWebRequest.getNativeRequest/nativeWebRequest.getNativeResponse:得到本地的ServletAPI。
4.重要HttpSession(此处的session永远不为null)
注意:session 访问不是线程安全的,如果需要线程安全,需要设置AnnotationMethodHandlerAdapter 或
RequestMappingHandlerAdapter 的synchronizeOnSession属性为true,即可线程安全的访问session。
5 表单实体对象
package baobaobaobao.ennity;

/**
 * Created by @author LiuChunhang on 2020/4/12.
 */
public class EnUser {
    private String name;
    private int age;

    public EnUser() {
        super();
    }

    public EnUser(String name, int age) {
        this.name = name;
        this.age = age;
    }

    @Override
    public String toString() {
        return "EnUser{" +
                "name='" + name + '\'' +
                ", age=" + age +
                '}';
    }

    public String getName() {
        return name;
    }

    public void setName(String name) {
        this.name = name;
    }
}
  @RequestMapping(value = "hang",method = {RequestMethod.GET,RequestMethod.POST})
    public String test(EnUser enUser){
        System.out.println("啦啦啦啦啦啦啦啦啦啦啦啦");
        System.out.println(enUser);
        return "temp";
    }
}//controller方法的返回值除了modelandview也可以为string,意义为视图的名字
temp.jsp


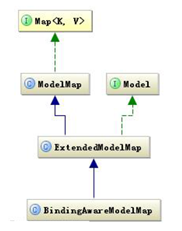
6.模型Model、Map、ModelMap
Spring Web MVC 提供Model、Map或ModelMap让我们能去暴露渲染视图需要的模型数据。
虽然此处注入的是三个不同的类型(Model model, Map model2, ModelMap model3),但三者是同一个对象,页面取值都在request中。


2@RequestParam通过url绑定单个请求参数值
@RequestParam用于将请求参数区数据映射到功能处理方法的参数上。
不指定入参名称
public String requestparam(@RequestParam String username)
如果请求中包含参数(如/requestparam?username=zhang),则自动传入。
如果请求中不包含参数(如/requestparam?username=zhang),则报错。
指定入参名称:
public String requestparam2(@RequestParam("username") String username)''
如果请求中包含username 参数(如/requestparam?username=zhang),则自动传入。
如果请求中不包含username 参数(如/requestparam?username=zhang),则报错。
@RequestParam注解主要有哪些参数:
value:参数名字,即入参的请求参数名字,如username表示请求的参数区中的名字为username的参数的值将传入;
required:是否必须,默认是true,表示请求中一定要有相应的参数,否则将报400错误码;
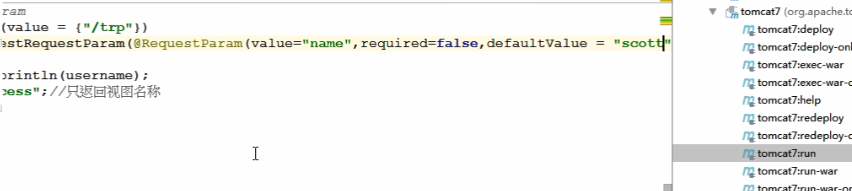
defaultValue:默认值,表示如果请求中没有同名参数时的默认值
public String requestparam5(@RequestParam(value="username", required=true, defaultValue="zhang") String username)
例子1(传参)如下:


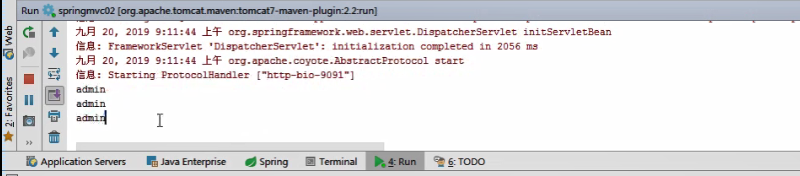
例子2(不传参resuqire=false)如下:


例子3(默认参数)如下:


3@PathVariable 通过URI 绑定多个模板参数
@PathVariable用于将请求URL中的模板变量映射到功能处理方法的参数上。
@RequestMapping(value="/users/{userId}/topics/{topicId}")
public String test(
@PathVariable(value=“userId”) int userId,
@PathVariable(value=“topicId”) int topicId){
…
}
如请求的 URL 为“控制器URL/users/123/topics/456”,则自动将URL 中模板变量{userId}和{topicId}绑定到通过@PathVariable注解的同名参数上,即入参后userId=123、topicId=456。
例子如下:


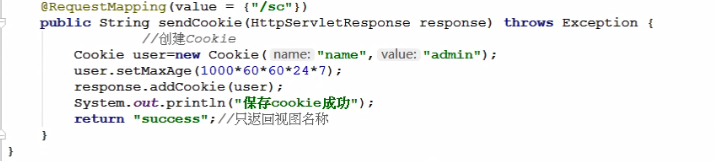
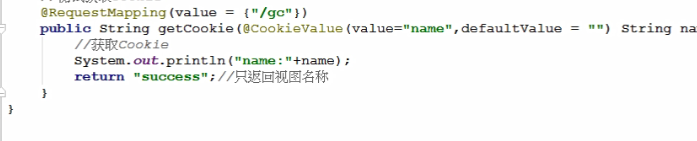
4@CookieValue 绑定Cookie数据值
Cookie有唯一值,储存session id

官方解释cookie

@CookieValue用于将请求的Cookie数据映射到功能处理方法的参数上。
public String test(@CookieValue(value=“JSESSIONID”, defaultValue="") String sessionId){
…
}
如上配置将自动将JSESSIONID 值入参到sessionId参数上,defaultValue 表示Cookie 中没有JSESSIONID 时默认为空。
传入参数类型也可以是javax.servlet.http.Cookie类型:
public String test2(@CookieValue(value=“JSESSIONID”, defaultValue="") Cookie sessionId){
…
}
浏览器获取cookie:


向服务器发送cookie:

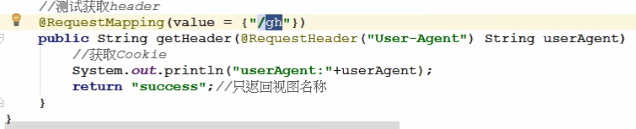
5@RequestHeader 绑定请求头数据
@RequestHeader 用于将请求的头信息区数据映射到功能处理方法的参数上。
@RequestMapping(value="/header")
public String test(@RequestHeader("User-Agent")
String userAgent,@RequestHeader(value="Accept") String[] accepts){
......
}
如上配置将自动将请求头“User-Agent”值入参到userAgent 参数上,并将“Accept”请求头值入参到accepts参数上。
@RequestHeader 也拥有和@RequestParam相同的三个参数,含义一样。
例子如下:


6命令对象入参/表单入参
@RequestMapping(value = { "/dept" })
//参数为对象类型,可直接接收请求中的参数
	public ModelAndView dept(DeptEntity dept) {
		System.out.println("dept:" + dept);
		// 模型试图对象
		ModelAndView mav = new ModelAndView();
		mav.setViewName("update");
		return mav;
	}
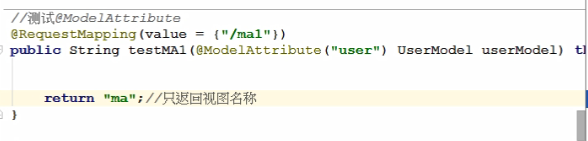
7@ModelAttribute
1.绑定请求参数到命令对象:放在功能处理方法的入参上时,用于将多个请求参数绑定到一个命令对象,从而简化绑定流程,而且自动暴露为模型数据用于视图页面展示时使用;
@RequestMapping(value = { "/ma" })
public ModelAndView ma(@ModelAttribute("dept") DeptEntity dept,Map map) {.........}
@ModelAttribute("dept") DeptEntity dept等价于
model.addObject(“dept”,obj);
@ModelAttribute它的作用是将该绑定的命令对象以“dept”为名称添加到模型对象中供视图页面展示使用。我们此时可以在视图页面使用${dept.dname}来获取绑定的命令对象的属性。
例子如下:
下图 UserModel为实体类.


2.暴露表单引用对象为模型数据:放在处理器的一般方法(非功能处理方法)上时,是为表单准备要展示的表单引用对象,该方法在执行功能处理方法(@RequestMapping 注解的方法)之前,自动添加到模型对象中,用于视图页面展示时使用或在处理方法中使用;
	@ModelAttribute("dept")
	public DeptEntity getDept(String dno) {
		DeptEntity dept=new DeptEntity();
		dept.setDno(Integer.parseInt(dno));
		return dept;
}
如上代码会在执行功能处理方法之前执行,并将其自动添加到模型对象中。
1、先于处理方法执行
2、把方法的返回值放入model中
3、可以通过参数接收表单对象
例子如下:


3.暴露@RequestMapping 方法返回值为模型数据:放在功能处理方法的返回值上时,是暴露功能处理方法的返回值为模型数据,用于视图页面展示时使用。
@RequestMapping(value = { "/returnDept" })
Public @ModelAttribute("dept")  DeptEntity returnDept() {
		DeptEntity dept = new DeptEntity();
		dept.setDno(304);
		dept.setDname("大数据部");
		dept.setDloc("长江");
		return dept;
	}
此时没有设置viewname,该
如何跳转?
RequestToViewNameTranslator类:用于直接将请求转换为逻辑视图名。
默认实现为DefaultRequestToViewNameTranslator。
DefaultRequestToViewNameTranslator:将请求URL转换为逻辑视图名,默认规则如下:
http://localhost:9080/web 上下文/list -------> 逻辑视图名为list
http://localhost:9080/web 上下文/list.html -------> 逻辑视图名为list(默认删除扩展名)
http://localhost:9080/web 上下文/user/list.html -------> 逻辑视图名为user/list
1.把处理方法中的命令对象,放到model中。
2.把非处理方法的返回值,放到model中,必须注意该方法先于处理方法执行,同时其参数可以封装表单参数。
3.把处理方法的返回值,放入model中。
例子如下:


8@SessionAttributes 绑定命令对象到session(了解)
有时候我们需要在多次请求之间保持数据,一般情况需要我们明确的调用HttpSession的API来存取会话数据,如多步骤提交的表单。Spring Web MVC提供了@SessionAttributes进行请求间透明的存取会话数据。
//1、在控制器类头上添加@SessionAttributes注解
@SessionAttributes(value = {“user”})
public class SessionAttributeController
//2、@ModelAttribute注解的方法进行表单引用对象的创建
@ModelAttribute(“user”) //
public UserModel initUser()
//3、@RequestMapping注解方法的@ModelAttribute注解的参数进行命令对象的绑定
@RequestMapping("/session1") //
public String session1(@ModelAttribute(“user”) UserModel user)
//4、通过SessionStatus的setComplete()方法清除@SessionAttributes指定的会话数据
@RequestMapping("/session2") //
public String session(@ModelAttribute(“user”) UserModel user, SessionStatus status) {
if(true) { //④
status.setComplete();
}
return “success”;
}
@SessionAttributes(value = {"user"})含义:
@SessionAttributes(value = {“user”}) 标识将模型数据中的名字为“user” 的对象存储到会话中(默认HttpSession),此处value指定将模型数据中的哪些数据(名字进行匹配)存储到会话中,此外还有一个types属性表示模型数据中的哪些类型的对象存储到会话范围内,如果同时指定value和types属性则那些名字和类型都匹配的对象才能存储到会话范围内。
由@SessionAttributes引发的异常:
如果在处理类定义处标注了@SessionAttributes(“xxx”),则尝试从会话中获取该属性,并将其赋给该入参,然后再用请求消息填充该入参对象。如果在会话中找不到对应的属性,则抛出 HttpSessionRequiredException 异常。
@Controller
@RequestMapping("/user")
@SessionAttributes(“user”)
public class UserController {
@ModelAttribute(“user”)
public User getUser(){
User user = new User();
return user;
}
@RequestMapping(value = “/user”)
public String handle71(@ModelAttribute(“user”) User user){
…
}
@RequestMapping(value = “/handle72”)
public String handle72(ModelMap modelMap,SessionStatus sessionStatus){
…
}
}
9关于 cookie Session token 你知道多少?
1.什么是cookie?
Cookie 技术产生源于 HTTP 协议在互联网上的急速发展。随着互联网时代的策马奔腾,带宽等限制不存在了,人们需要更复杂的互联网交互活动,就必须同服务器保持活动状态(简称:保活)。

Cookie 是在 HTTP 协议下,服务器或脚本可以维护客户工作站上信息的一种方式。Cookie 是由 Web 服务器保存在用户浏览器(客户端)上的小文本文件,它可以包含有关用户的信息。无论何时用户链接到服务器,Web 站点都可以访问 Cookie 信息.
2…Cookie时效性
Cookie的默认时效为Session,也就是说浏览器关闭,Cookie会和session一起失效,但是Cookie的有效时间是可以设置的。

Cookie有一个属性expires,设置其值为一个时间,那么当到达此时间后,此cookie失效。
非持久化

持久化

3Okhttp框架
Okhttp是一款相当经典的网络框架,它的API可以通过OkhttpClient中的CookieJar或者拦截器去管理Cookie的。

我们在构建单例OkhttpClient的时候,设置cookiejar或者拦截器,然后具体的操作(保存Cookie,取Cookie),Okhttp框架就会帮我们自动管理Cookie。
4session 请求是无状态,会话才是有状态
**SpringMVC使用session的两种方式
1入参 httpsession
2@sessionattribute注解与@modelattribute注解搭配,把model里面的数据放到session中**
Session是一个会话,会话就是Session。Session是对于服务端来说的,Session是服务器和客户端建立连接时添加的一个客户端连接标志,最终在服务器软件(Apache、Tomcat、JBoss)转化为一个临时的Cookie发送给客户端,当客户端第一次请求服务器时,会检查是否携带了这个Session(临时Cookie),如果没有则会添加Session,如果有就拿出这个Session来做相关操作。

那么为什么会出现session会话,它出现的机理是什么?

我们都知道,用浏览器打开一个网页,用到的是HTTP协议,了解计算机的应该都知道这个协议,它是无状态的,什么是无状态呢?就是说这一次请求和上一次请求是没有任何关系的,互不认识的,没有关联的。但是这种无状态的的好处是快速。所以就会带来一个问题就是,我希望几个请求的页面要有关联,比如:我在www.a.com/login里面登陆了,我在www.a.com/index 也希望是登陆状态,但是,这是2个不同的页面,也就是2个不同的HTTP请求,这2个HTTP请求是无状态的,也就是无关联的,所以无法单纯的在index中读取到它在login中已经登陆了!

那怎么办呢?方法一是这2个页面我都去登陆一遍吧,方法二是用笨方法这2个页面都去查询数据库,如果有登陆状态,就判断是登陆的了。这种查询数据库的方案虽然可行,但是每次都要去查询数据库不是个事,会造成数据库的压力。 所以正是这种不方便之处,一个新的客户端存储数据方式出现了:cookie。

cookie是把少量的信息存储在用户自己的电脑上,它在一个域名下是一个全局的,只要设置它的存储路径在域名www.a.com下 ,那么当用户用浏览器访问时,就可以从这个域名的任意页面读取cookie中的信息。所以就很好的解决了我在www.a.com/login页面登陆了,我也可以在www.a.com/index获取到这个登陆信息了。同时又不用反复去查询数据库。 虽然这种方案很不错,也很快速方便,但是由于cookie 是存在用户端,而且它本身存储的信息容量也有限,最关键是用户可以是可见的,并可以随意的修改,很不安全。那如何又要安全,又可以方便的全局读取信息呢?于是,这个时候,一种新的存储会话机制:session 诞生了。

Session 就是在一次会话中解决2次HTTP的请求的关联,让它们产生联系,让2两个页面都能读取到找个这个全局的session信息。session信息存在于服务器端,所以也就很好的解决了安全问题。

每个Session 有一个唯一的Session id。 Session的超时也是由服务器来控制。我们一般都会把Session和Cookie放在一起来说,它们具体的区别和联系这里我就不多说了,可以看上面。Cookie分为内存中Cookie(也可以说是进程中Cookie)和硬盘中Cookie。大部分的Session机制都使用进程中Cookie来保存Session id的,关闭浏览器后这个进程也就自动消失了,进程中的Cookie自然就消失了,那么Session id也跟着消失了,再次连接到服务器时也就无法找到原来的Session了。

也有使用硬盘中Cookie,比如说CSDN的“记住我一周”,或者我们的购物车信息可以在切换不同浏览器时依然可用。这就要用到我们上文提到的另一种Cookie了——硬盘中Cookie,这时Session id将长期保存在硬盘上的Cookie中,直到失效为止。
5 token
token是用户身份的验证方式,我们通常叫它:令牌。

最简单的token组成:

uid(用户唯一的身份标识)

time(当前时间的时间戳)

sign(签名,由token的前几位+盐以哈希算法压缩成一定长的十六进制字符串,可以防止恶意第三方拼接token请求服务器)。

还可以把不变的参数也放进token,避免多次查库。

应用场景:

1):当用户首次登录成功(注册也是一种可以适用的场景)之后, 服务器端就会生成一个 token 值,这个值,会在服务器保存token值(保存在数据库中),再将这个token值返回给客户端.

2):客户端拿到 token 值之后,进行本地保存。(SP存储是大家能够比较支持和易于理解操作的存储)

3):当客户端再次发送网络请求(一般不是登录请求)的时候,就会将这个 token 值附带到参数中发送给服务器.

4):服务器接收到客户端的请求之后,会取出token值与保存在本地(数据库)中的token值做对比

对比一:如果两个 token 值相同, 说明用户登录成功过!当前用户处于登录状态!

对比二:如果没有这个 token 值, 则说明没有登录成功.

对比三:如果 token 值不同: 说明原来的登录信息已经失效,让用户重新登录.
6cookie和session的区别

7session和token的区别

五、重定向与转发
SpringMVC默认情况下是服务器端跳转,向jsp页面中跳转,一般情况下,控制器方法返回字符串类型的值会被当成逻辑视图名处理;如果返回的字符串中带 forward: 或 redirect:前缀时,SpringMVC 会对他们进行特殊处理:
将 forward: 和redirect: 当成指示符,其后的字符串作为 URL 来处理。
redirect:success.jsp:会完成一个到 success.jsp 的重定向的操作,不经过试图解析器处理。
forward:success.jsp:会完成一个到 success.jsp 的转发操作。
@RequestMapping(value= {"/jumpOne"})
public String jumpOne() {
	return "forward:one.jsp";
}

@RequestMapping(value= {"/jumpTwo"})
public String jumpTwo() {
	return "redirect:two.jsp";
}
总结:
1.从地址栏显示来说
forward是服务器请求资源,服务器直接访问目标地址的URL,把那个URL的响应内容读取过来,然后把这些内容再发给浏览器.浏览器根本不知道服务器发送的内容从哪里来的,所以它的地址栏还是原来的地址
redirect是服务端根据逻辑,发送一个状态码,告诉浏览器重新去请求那个地址.所以地址栏显示的是新的URL
2.从数据共享来说
forward:转发页面和转发到的页面可以共享request里面的数据
redirect:不能共享数据
3.从运用地方来说
forward:一般用于用户登陆的时候,根据角色转发到相应的模块
redirect:一般用于用户注销登陆时返回主页面和跳转到其它的网站等
4.从效率来说
forward:高
redirect:低
六、mvc:annotation-driven
1mvc:annotation-driven/注解简介
mvc:annotation-driven/注解的作用?
<mvc:annotation-driven /> 注解会自动注册
RequestMappingHandlerMapping、RequestMappingHandlerAdapter 与
ExceptionHandlerExceptionResolver 三个bean。
还将提供以下支持:
支持使用 ConversionService 实例对表单参数进行类型转换
支持使用 @NumberFormat annotation、@DateTimeFormat注解完成数据类型的格式化
支持使用 @Valid 注解对 JavaBean 实例进行 JSR 303 验证
支持使用 @RequestBody 和 @ResponseBody 注解(json序列化)。
比如直接使用@ResponseBody时,报Description The origin server did not find a current representation for the target resource or is not willing to disclose that one exists.
导入命名空间:

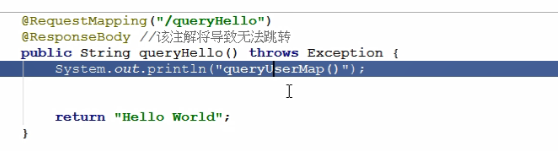
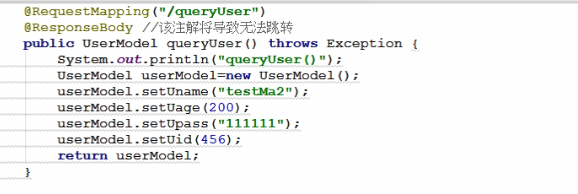
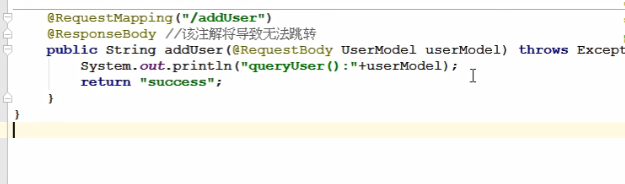
2java各种类型对象转换json @ResponseBody 该注解导致无法跳转
jackson-annotations-2.9.0.jar,
jackson-core-2.9.0.jar,
jackson-databind-2.9.0.jar
添加依赖:
<!--data-->
<dependency>
    <groupId>com.fasterxml.jackson.core</groupId>
    <artifactId>jackson-databind</artifactId>
    <version>2.9.0</version>
</dependency>
<!-- https://mvnrepository.com/artifact/com.fasterxml.jackson.core/jackson-core -->
<dependency>
    <groupId>com.fasterxml.jackson.core</groupId>
    <artifactId>jackson-core</artifactId>
    <version>2.9.0</version>
</dependency>
<!-- https://mvnrepository.com/artifact/com.fasterxml.jackson.core/jackson-annotations -->
<dependency>
    <groupId>com.fasterxml.jackson.core</groupId>
    <artifactId>jackson-annotations</artifactId>
    <version>2.9.0</version>
</dependency>
方法声明:把一个对象转换成json
@RequestMapping("/jsonObj")
@ResponseBody//该方法的返回值会被转换成json
public DeptEntity objToJson() {
DeptEntity dept = new DeptEntity();
dept.setDno(5000);
dept.setDname(“采买部”);
dept.setDloc(“天津”);
return dept;
}
方法声明:把一个Listd对象转换成json
@RequestMapping("/jl")
@ResponseBody
public List jsonList() throws Exception {
List list=new ArrayList();
DeptEntity dept =new DeptEntity();
dept.setDno(300);
dept.setDname(“scott”);
dept.setDloc(“北京”);
	DeptEntity dept1 =new DeptEntity();
	dept1.setDno(400);
	dept1.setDname("tiger");
	dept1.setDloc("上海");

	list.add(dept);
	list.add(dept1);
	return list;
}
例子如下:
1String转json

2model转json

3List转json


4map转json


3使用fastjson转json(了解)
导入依赖:
<!-- https://mvnrepository.com/artifact/com.alibaba/fastjson -->
<dependency>
    <groupId>com.alibaba</groupId>
    <artifactId>fastjson</artifactId>
    <version>1.2.40</version>
</dependency>
测试方法:
@RequestMapping(value= {"/fastJson"})
	public void  fastJson(HttpServletResponse response) {
		//设置响应类型
		response.setContentType("application/json; charset=utf-8");
		//设置页面不缓存
		response.setHeader("Pragma", "No-cache");
		response.setHeader("Cache-Control", "no-cache");
		//
		DeptForm dept=new DeptForm();
		dept.setDeptno(100);
		dept.setDname("大数据100部");
		dept.setLoc("阿里巴巴");
		//JsonUtil.toJson(response, dept);
		try {
			//把object转json
			String json=JSON.toJSONString(dept);
			PrintWriter out =response.getWriter();
			out.println(json);
			out.close();
		} catch (IOException e) {
			e.printStackTrace();
		}
	}
工具类:JsonHelper、JsonUtil
4json转java对象@requestbody
1.@requestBody注解常用来处理content-type不是默认的application/x-www-form-urlcoded编码的内容,比如说:application/json或者是application/xml等。一般情况下来说常用其来处理application/json类型。
2.通过@requestBody可以将请求体中的JSON字符串绑定到相应的bean上,当然,也可以将其分别绑定到对应的字符串上。


七 全局异常处理器的开发(公共模块)
java把异常作为一种类,当做对象来处理。
所有异常类的基类是Throwable类
两大子类分别是Error和Exception。

系统错误由Java虚拟机抛出,用Error类表示。Error类描述的是内部系统错误,例如Java虚拟机崩溃。这种情况仅凭程序自身是无法处理的,在程序中也不会对Error异常进行捕捉和抛出。

异常(Exception)又分为RuntimeException(运行时异常)和CheckedException(检查时异常),两者区别如下:

RuntimeException:程序运行过程中才可能发生的异常。一般为代码的逻辑错误。例如:类型错误转换,数组下标访问越界,空指针异常、找不到指定类等等。
CheckedException:编译期间可以检查到的异常,必须显式的进行处理(捕获或者抛出到上一层)。例如:IOException, FileNotFoundException等等。
springmvc提供一个HandlerExceptionResolver接口,自定义全局异常处理器必须要实现这个接口。
1自定义异常
package baobaobaobao.exception;

/**
 * Created by @author LiuChunhang on 2020/4/16.
 */
public class CustomException extends RuntimeException {
    //描述异常信息
    public String message;
    public CustomException(String message) {
        //调用父类的构造方法
        super(message);
        this.message = message;
    }
    @Override
    public String getMessage() {
        return message;
    }


}
2自定义全局异常处理器
package baobaobaobao.exception;

import org.springframework.web.servlet.HandlerExceptionResolver;
import org.springframework.web.servlet.ModelAndView;

import javax.servlet.http.HttpServletRequest;
import javax.servlet.http.HttpServletResponse;

/**
 * Created by @author LiuChunhang on 2020/4/16.
 */
public class CustomExceptionResolver implements HandlerExceptionResolver {
    @Override
    public ModelAndView resolveException(HttpServletRequest httpServletRequest, HttpServletResponse httpServletResponse, Object handler, Exception e) {
        //java多态
        RuntimeException c =null;
        //如果抛出的是系统自定义的异常则直接转换
        if(e instanceof RuntimeException) {
            //java多态
             c = new CustomException(e.toString());
             //打印异常类型
             System.out.println("系统已知错误:"+"\n"+c.getMessage());
             //打印异常信息
             System.out.println("异常信息如下:");
             e.printStackTrace();

        } else {
            c = new CustomException("系统未知错误");
            System.out.println(c.getMessage());
        }
        //向前台返回错误信息
        ModelAndView modelAndView = new ModelAndView();
        modelAndView.addObject("exceptionmessage", c.getMessage());
        //页面转发exception.jsp的内容,地址栏中的地址不变.
        modelAndView.setViewName("exception");

        return modelAndView;

    }
}
3配置全局异常处理器
 <!--在springmvc配置文件中配置项目的全局异常-->
    <bean class="baobaobaobao.exception.CustomExceptionResolver"></bean>
4测试
我们来自己设置一个异常来测试全局异常控制器是否起作用
例如撤销entity层的无参构造方法来模拟构造器异常
会出现异常的实体类:

dao层:
package baobaobaobao.dao;

import baobaobaobao.entity.EnUser;

import java.util.List;

/**
 * Created by @author LiuChunhang on 2020/4/6.
 */
public interface EnuserDaoo {

    public int  insertone(EnUser enuser);
    public List<EnUser> selectall();
}
service层
package baobaobaobao.service;

import baobaobaobao.entity.EnUser;

import java.util.List;

/**
 * Created by @author LiuChunhang on 2020/4/14.
 */
public interface SSMServiceface {
    public List<EnUser> Selectinsert(EnUser enUser);
    //插入成功并查询的业务
}
package baobaobaobao.service;

import baobaobaobao.dao.EnuserDaoo;
import baobaobaobao.entity.EnUser;
import org.springframework.beans.factory.annotation.Autowired;
import org.springframework.stereotype.Service;
import org.springframework.transaction.annotation.Transactional;

import java.util.List;

/**
 * Created by @author LiuChunhang on 2020/4/14.
 */
@Service
public class SSMService implements SSMServiceface {
    @Autowired
    public EnuserDaoo enuserDaoo;

    public EnuserDaoo getEnuserDaoo() {
        return enuserDaoo;
    }

    public void setEnuserDaoo(EnuserDaoo enuserDaoo) {
        this.enuserDaoo = enuserDaoo;
    }

    @Override
    @Transactional //事务管理
    public List<EnUser> Selectinsert(EnUser enUser) {
        if (enuserDaoo.insertone(enUser)>0){
            List<EnUser> selectall = enuserDaoo.selectall();
            System.out.println("插入成功并查询");
            for(EnUser list:selectall){
                System.out.println(list);
            }

            return enuserDaoo.selectall();
        }else {
            System.out.println("插入失败");
            return null;
        }

    }
}
controller层:
package baobaobaobao.controller;

import baobaobaobao.entity.EnUser;
import baobaobaobao.service.SSMServiceface;
import org.springframework.beans.factory.annotation.Autowired;
import org.springframework.web.bind.annotation.RequestMapping;
import org.springframework.web.bind.annotation.RequestMethod;
import org.springframework.web.bind.annotation.RestController;

import java.util.List;

/**
 * Created by @author LiuChunhang on 2020/4/14.
 */
@RestController //该类下的所有方法返回json值@restcontroller=controller+responsebody,依然限制不会跳转,直接返回json数据
public class ExceptionController {
    @Autowired
    public SSMServiceface ssmService;  //必须遵从java的多态,需用使用接口名的引用,否则会报异常

    public SSMServiceface getSsmService() {
        return ssmService;
    }

    public void setSsmService(SSMServiceface ssmService) {
        this.ssmService = ssmService;
    }


    @RequestMapping(value = "xiaohang",method = {RequestMethod.GET,RequestMethod.POST})
    public List<EnUser> SSMtest (){
        EnUser enUser = new EnUser(2322,"333333","1998","222222",0);
        List<EnUser> list = ssmService.Selectinsert(enUser);
        return list;

    }

}
浏览器无构造器异常测试:

浏览器有构造器异常测试(地址栏不变):

构造器异常信息在控制器中打印:

八自定义处理器拦截器
**Spring Web MVC 的处理器拦截器(即拦截器)类似于Servlet 开发中的过滤器Filter,用于对处理器进行预处理和后处理,
注意:拦截器只针对tomcat项目根路径目录下的URL起着拦截作用!!!
。
拦截器通常一般指的是通过拦截从浏览器发往服务器的一些请求来完成某些功能的一段程序代码一般在一个请求发生之前,发生时,发生后我们都可以对请求进行拦截。**
1、常见应用场景
1、日志记录:记录请求信息的日志,以便进行信息监控、信息统计、计算PV(Page View,访问量)等。
2、权限检查:如登录检测,进入处理器检测检测是否登录,如果没有直接返回到登录页面;
3、性能监控:有时候系统在某段时间莫名其妙的慢,可以通过拦截器在进入处理器之前记录开始时间,在处理完后记录结束时间,从而得到该请求的处理时间(如果有反向代理,如apache 可以自动记录);
4、通用行为:读取cookie 得到用户信息并将用户对象放入请求,从而方便后续流程使用,还有如提取Locale、Theme信息等,只要是多个处理器都需要的即可使用拦截器实现。
2、拦截器接口HandlerInterceptor
public interface HandlerInterceptor {
boolean preHandle(HttpServletRequest request, HttpServletResponse response,Object handler)throws Exception;

void postHandle(HttpServletRequest request, HttpServletResponse response,Object handler, ModelAndView modelAndView)throws Exception;

void afterCompletion(HttpServletRequest request, HttpServletResponse response,Object handler, Exception ex)throws Exception;

}
preHandle:预处理回调方法,实现处理器的预处理(如登录检查),第三个参数为响应的处理器(Controller 实现);
返回值:
true:表示继续流程(如调用下一个拦截器或处理器);
false:表示流程中断(如登录检查失败),不会继续调用其他的拦截器或处理器,此时我们需要通过response来产生响应;
postHandle:后处理回调方法,实现处理器的后处理(但在渲染视图之前),此时我们可以通过modelAndView(模型和视图对象)对模型数据进行处理或对视图进行处理,modelAndView也可能为null。
afterCompletion:整个请求处理完毕回调方法,即在视图渲染完毕时回调,如性能监控中我们可以在此记录结束时间并输出消耗时间,还可以进行一些资源清理,类似于try-catch-finally中的finally,但仅调用处理器执行链中preHandle
返回true的拦截器的afterCompletion。
3、拦截器适配器
有时候我们可能只需要实现三个回调方法中的某一个,如果实现HandlerInterceptor 接口的话,三个方法必须实现,不管你需不需要,此时spring 提供了一个HandlerInterceptorAdapter 适配器(一种适配器设计模式的实现),允许我们只实现需要的回调方法。


4、实现登录拦截
如果用户没有登录,不允许访问update、delete、insert、select
package baobaobaobao.interceptor;

import org.springframework.web.servlet.HandlerInterceptor;
import org.springframework.web.servlet.ModelAndView;

import javax.servlet.http.HttpServletRequest;
import javax.servlet.http.HttpServletResponse;
import javax.servlet.http.HttpSession;

/**
 * Created by @author LiuChunhang on 2020/4/15.
 */
//自定义拦截器
public class LoginInterceptor implements HandlerInterceptor {
    @Override
    public boolean preHandle(HttpServletRequest httpServletRequest, HttpServletResponse httpServletResponse, Object o) throws Exception {
        // 获取请求路径
        String uri = httpServletRequest.getRequestURI();

        if (uri.contains("login")) {// 登录操作
            System.out.println("uri包含login,放行.");
            return true;
        } else {// 非登录操作,需要验证是否登录过
            // 1表示已经登录 0表示未登录
            System.out.println("uri不包含login");
            HttpSession session = httpServletRequest.getSession();
            String attribute = (String) session.getAttribute("status");
            System.out.println("登录状态:"+attribute);
            if ("1".equals(attribute)) {
                return true;
            }else {
                System.out.println("uri:"+uri+"\n"+"拦截器①已拦截");
                httpServletResponse.sendRedirect("login");
                return false;
            }
        }

    }


    @Override
    public void postHandle(HttpServletRequest httpServletRequest, HttpServletResponse httpServletResponse, Object o, ModelAndView modelAndView) throws Exception {

    }

    @Override
    public void afterCompletion(HttpServletRequest httpServletRequest, HttpServletResponse httpServletResponse, Object o, Exception e) throws Exception {

    }
}
5、配置拦截器
案例:
  <!-- 配置拦截器(多个) -->
    <mvc:interceptors>
        <!-- 配置1个拦截器 -->
        <mvc:interceptor>
            <!-- 拦截路径 -->
            <mvc:mapping path="/**/*" />
            <!-- 排除拦截 -->
            <mvc:exclude-mapping path="/**/*.js"/>
            <mvc:exclude-mapping path="/**/*.css"/>
            <mvc:exclude-mapping path="/**/*.pnf"/>
            <mvc:exclude-mapping path="/**/*.jpg"/>
            <mvc:exclude-mapping path="/**/*.ico"/>
            <mvc:exclude-mapping path="/**/font/*"/>
            <bean class="baobaobaobao.interceptor.LoginInterceptor"></bean>
        </mvc:interceptor>
        <!-- 配置2个拦截器(备用) -->
        <mvc:interceptor>
            <!-- 拦截路径 -->
            <mvc:mapping path="/" />
            <!-- 排除拦截 -->
            <mvc:exclude-mapping path="/"/>
            <bean class="baobaobaobao.interceptor.XInterceptor"></bean>
        </mvc:interceptor>
    </mvc:interceptors>
6测试
 @RequestMapping(value = "index",method = {RequestMethod.GET,RequestMethod.POST})
    public String test(){
        System.out.println("开始请求index页面");
        System.out.println("啦啦啦啦啦啦啦啦啦啦");
        return "temp";
    }
   @RequestMapping(value = "login",method = {RequestMethod.GET,RequestMethod.POST})
    public ModelAndView login(HttpSession httpSession){
        //登录之后设置登录状态,也可以设置session过期时长
        httpSession.setAttribute("status", "1");
        ModelAndView modelAndView = new ModelAndView();
        modelAndView.setViewName("login");
        return modelAndView;
    }

因为检测到没有登录,所以访问控制器映射的 uri(mvc/index),会被拦截器拦截,重定向到mvc/login:

控制器打印

九处理静态资源
优雅的 REST 风格的资源URL 不希望带 .html 或 .do 等后缀若将 DispatcherServlet 请求映射配置为 /,则 Spring MVC 将捕获WEB 容器的所有请求,包括静态资源的请求, SpringMVC 会将他们当成一个普通请求处理,因找不到对应处理器将导致错误。
需要配置标签mvc:annotation-driven</mvc:annotation-driven>
1.静态资源在webapp下
<mvc:resources location="/images/"  mapping="/images/**" />
<mvc:resources location="/js/"  mapping="/js/**" />
说明:
location元素:表示webapp目录下(即服务器根目录)的images包下的所有文件;
mapping元素:表示以/images开头的所有请求路径,如/images/a 或者/images/a/b
2.静态资源在resources下(idea下maven环境)
<mvc:resources mapping="/images/**" location="classpath:images/" />
<mvc:resources mapping="/js/**" location="classpath:js/" />
- 页面访问,例如拦截器拦截请求跳转到 login.jsp页面,如果没有配置静态资源映射,那么系统将访问不到静态资源请求.
login.jsp
 <link rel="stylesheet" type="text/css" href="layui/css/layui.css" media="all">
 <link rel="stylesheet" type="text/css" href="css/login.css" media="all">
 <script type="text/javascript" src="layui/lay/dest/layui.all.js"></script>
 <script type="text/javascript" src="js/login.js"></script>
 <script type="text/javascript" src="js/jparticle.jquery.js"></script>

4. 页面访问,例如拦截器拦截请求跳转到 login.jsp页面,如果配置静态资源映射,那么系统将能使用静态资源渲染请求页面,.
login.jsp
 <link rel="stylesheet" type="text/css" href="layui/css/layui.css" media="all">
 <link rel="stylesheet" type="text/css" href="css/login.css" media="all">
 <script type="text/javascript" src="layui/lay/dest/layui.all.js"></script>
 <script type="text/javascript" src="js/login.js"></script>
 <script type="text/javascript" src="js/jparticle.jquery.js"></script>
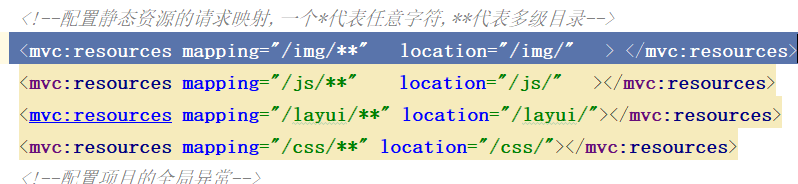
 <!--配置静态资源的请求-->
    <mvc:resources mapping="/img/**"   location="/img/"   > </mvc:resources>
    <mvc:resources mapping="/js/**"    location="/js/"   ></mvc:resources>
    <mvc:resources mapping="/layui/**" location="/layui/"></mvc:resources>
    <mvc:resources mapping="/css/**" location="/css/"></mvc:resources>

十 springMVC实现restful风格架构
1什么是restful架构
RESTful架构风格规定,数据的元操作,即CRUD(create, read, update和delete,即数据的增删查改)操作,分别对应于HTTP方法:GET用来获取资源,POST用来新建资源(也可以用于更新资源),PUT用来更新资源,DELETE用来删除资源,这样就统一了数据操作的接口,仅通过HTTP方法,就可以完成对数据的所有增删查改工作。
HTTP1.1协议中定义了8中请求类型:
OPTIONS:返回服务器针对特定资源所支持的HTTP请求方法。也可以利用向Web服务器发送'*'的请求来测试服务器的功能性。
HEAD:向服务器索要与GET请求相一致的响应,只不过响应体将不会被返回。这一方法可以在不必传输整个响应内容的情况下,就可以获取包含在响应消息头中的元信息。
GET:向特定的资源发出请求。
POST:向指定资源提交数据进行处理请求(例如提交表单或者上传文件)。数据被包含在请求体中。POST请求可能会导致新的资源的创建和/或已有资源的修改。
PUT:向指定资源位置上传其最新内容。
DELETE:请求服务器删除Request-URI所标识的资源。
TRACE:回显服务器收到的请求,主要用于测试或诊断。
CONNECT:HTTP/1.1协议中预留给能够将连接改为管道方式的代理服务器。
在HTTP 协议里面,四个表示操作方式的动词:GET、POST、PUT、DELETE。
它们分别对应四种基本操作:
1、GET  ====== 获取资源
2、POST  ====== 新建资源
3、PUT   ====== 更新资源
4、DELETE====== 删除资源
2资源的访问定位
可以用一个URI(统一资源定位符)指向资源,即每个URI都对应一个特定的资源。要获取这个资源,访问它的URI就可以,因此URI就成了每一个资源的地址或识别符。
一般的,每个资源至少有一个URI与之对应,最典型的URI即URL。
十一在restful风格中,关于拦截器拦截URI却不能拦截jsp/html资源名称请求的安全问题的解决
如果在 webapp下有静态资源,那么完全可以直接使用 地址根路径+静态资名称去直接访问,这不符合 restful风格uri对应静态文件的设计规范,同时也造成了系统的不安全性,例如:
1访问控制器映射的 uri(mvc/index),会被拦截器拦截,重定向到mvc/login:
参考上面我讲的拦截器的例子

2若是uri直接访问静态资源,springMVC的拦截器只会拦截controller上的映射请求,则不会拦截该请求,该访问会造成系统安全问题

3解决方案
springmvc 拦截器,不拦截jsp文件
spring mvc的拦截器只拦截controller不拦截jsp文件,如果不拦截jsp文件也会给系统带安全性问题。
解决方案有:
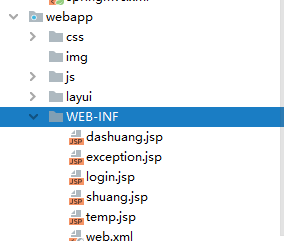
将所有的jsp文件放入到WEB-INF文件夹下,这样用户是直接不能访问WEB-INF文件下的jsp文件的。spring mvc的理念也是通过controller里的@RequestMapping来请求相关jsp页面,而非用户直接访问jsp页面。
将静态文件转移到WEBINF下之后,注意修改 jsp页面静态文件的请求路径
①如果 已经在springnvc配置文件中配置了<mvc:resources mapping="/js/**" location="/js/" > </mvc:resources> 静态资源映射,则jsp文件中的静态资源的请求不用 返回上一级路径,如果返回,则会访问不到静态资源!

②如果 没有配置<mvc:resources mapping="/js/**" location="/js/" > </mvc:resources>静态资源映射,
则需要在jsp中返回上一层目录


 218
218


 被折叠的 条评论
为什么被折叠?
被折叠的 条评论
为什么被折叠?
 到【灌水乐园】发言


