


0.注解位置
@Service,@Repository不能写在接口上,需要写在接口的实现类上,@Autowired注入的时候,可以用接口注入,也可以用接口的实现类注入。
一:@Service,@Repository不能写在接口上,需要写在接口的实现类上。
二:@Autowired注入的时候,可以用接口注入,也可以用接口的实现类注入。
三:如果使用接口注入,并且接口有多个实现类,那么必须配合@Qualifier(value = “bean别名”)使用,指定具体的bean,需要在注入的实现类上面加上别名,例如@Repository(“accountDaoImpl”)
四:
ApplicationContext bean = new AnnotationConfigApplicationContext(SpringConfig.class);
方式一 :bean.getBean(父接口.class)
方式二:bean.getBean(实现类.class)
方式三:bean.getBean(" 实现类名称(Bean名称)")
//根据bean名称
IEmpBean test1 =(IEmpBean) bean.getBean("empBeanImpl");
//根据父接口.class
IEmpBean test2 =(IEmpBean) bean.getBean(IEmpBean.class);
//根据实现类.class
IEmpBean test3 =(IEmpBean) bean.getBean(EmpBeanImpl.class);
        System.out.println(test1);
        System.out.println(test2);
        System.out.println(test3);

/*
cn.i_Bean的生命周期.impl.EmpBeanImpl@5b8dfcc1
cn.i_Bean的生命周期.impl.EmpBeanImpl@5b8dfcc1
cn.i_Bean的生命周期.impl.EmpBeanImpl@5b8dfcc1
*/
1、SpringMVC的概念
每个新的技术出现都是为了解决传统的技术解决问题存在的弊端或者不足。在之前我们如果我们要将表单中的数据插入到数据库,要在控制层中取得表单的数据:
①使用request内置对象的getParamter()方法取得参数,
②getParameter()方法取得参数还需要做一次类型转换(Integer.paraseInt())
③取得之后还需要将这些值进行再保存到vo类对象中,如果你的vo类中的属性是非String类型
以上遇到的麻烦就是我们之前使用传统的servlet必须要经历的步骤。这些步骤是比较麻烦的,而且重复的,之前的操作还没有考虑到数据的验证等,如果考虑到这些问题会变得更加麻烦,于是就出现了管理控制层的框架,其中使用最为广泛也是最受欢迎的目前来说是SpringMVC,在SpringMVC出现之前还出现另外一个框架—Struts2)。在现在的新项目中都不使用Struts2了(因为存在很多弊端),而是使用SpringMVC,但是在一些老项目中还能看到Struts2。
<!-- lombok:pojo实体类 -->
    <dependency>
      <groupId>org.projectlombok</groupId>
      <artifactId>lombok</artifactId>
      <version>1.18.22</version>
    </dependency>
2、Spring和SpringMVC的联系
Spring(ioc容器)管理的是service和dao层的bean的生命周期,还实现了面向切面的编程(AOP)、以及事务管理都交给Spring的ioc去处理,它是一个IOC容器,本质上这个ioc容器也是一个对象。
SpringMVC是管理controller(控制层)的容器,但是SpringMVC容器是Spring容器的子容器,SpringMVC容器对于Spring容器来说是不可读的(不可见的),而Spring容器对于SpringMVC子容器来说是可见的。

我们之前使用spring的时候是直接在主方法中对Spring的功能进行测试的,在开发中Spring的ioc一定的上下文环境一定是web容器(比如tomcat容器和jetty)。
3、SpringMVC环境搭建
3.1 SpringMVC的开发包
<!--SpringMVC的开发包-->
    <dependency>
      <groupId>org.springframework</groupId>
      <artifactId>spring-webmvc</artifactId>
      <version>5.2.22.RELEASE</version>
    </dependency>
3.2 web,xml文件下配置
需要在web.xml文件中进行SpringMVC的配置
<?xml version="1.0" encoding="UTF-8"?>
<web-app xmlns="http://xmlns.jcp.org/xml/ns/javaee"
         xmlns:xsi="http://www.w3.org/2001/XMLSchema-instance"
         xsi:schemaLocation="http://xmlns.jcp.org/xml/ns/javaee
         http://xmlns.jcp.org/xml/ns/javaee/web-app_4_0.xsd"
         version="4.0">
  <!-- Spring的主配置文件 -->
  <context-param>
    <param-name>contextConfigLocation</param-name>
    <param-value>classpath:applicationContext.xml</param-value>
  </context-param>

<!--配置Spring的监听器:一旦web容器启动就会根据各种配置创建Spring的ioc容器-->
  <listener>
    <listener-class>org.springframework.web.context.ContextLoaderListener</listener-class>
  </listener>

<!--配置SpringMVC的servlet-->
  <servlet>
    <servlet-name>dispatcher</servlet-name>
    <servlet-class>org.springframework.web.servlet.DispatcherServlet</servlet-class>
    <!--SpringMVC也有自己的配置文件名字习惯叫做dispatcher-servlet.xml-->
    <init-param>
      <param-name>contextConfigLocation</param-name>
      <param-value>classpath:dispatcher-servlet.xml</param-value>
    </init-param>
  </servlet>
  <!--配置映射关系-->
  <servlet-mapping>
    <servlet-name>dispatcher</servlet-name>
    <!--所有的以action结尾的路径都交给DispatcherServlet去处理-->
    <!--<url-pattern>*.action</url-pattern>-->
    <url-pattern>/</url-pattern>
  </servlet-mapping>
</web-app>
以上的配置表示只要是*.action路径的请求就交给“DispatcherServlet”进行处理·SpringMVC也需要自己的配置文件,dispatcher-servlet.xml
3.3 dispatcher-servlet.xml文件
需要在dispatcher-servlet.xml文件中进行相关的与SpringMVC有关的配置因为在使用SpringMCV的时候要取得controller对象,那么需要使用到注解,还要包扫描。
编辑springmvc的配置文件(dispatcher-servlet.xml)
<?xml version="1.0" encoding="UTF-8"?>
<beans xmlns="http://www.springframework.org/schema/beans"
       xmlns:xsi="http://www.w3.org/2001/XMLSchema-instance"
       xmlns:context="http://www.springframework.org/schema/context"
       xsi:schemaLocation="http://www.springframework.org/schema/beans
       http://www.springframework.org/schema/beans/spring-beans.xsd
       http://www.springframework.org/schema/context
       http://www.springframework.org/schema/context/spring-context.xsd">
<!--指定出控制器所在的包-->
    <context:component-scan base-package="cn.mbzvip.controller"/>
<!--定义一个视图解析器的bean会在你访问的资源前面加上你指定的前缀同时在后面加上你指定后缀-->
    <bean class="org.springframework.web.servlet.view.InternalResourceViewResolver">
        <property name="prefix" value="/WEB-INF/pages/"/>
        <property name="suffix" value=".jsp"/>
    </bean>
</beans>
3.4 将项目部署到web容器


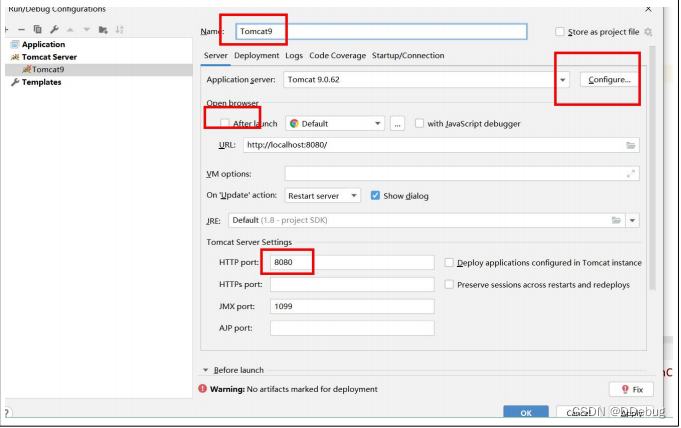
第一个框为自己的服务定义名称,第二个红框选择你tomcat服务器的安装路路径,第三个红框是你的网页路径(我的端口是8080),配置好之后点击篮筐选项出现如下界面:


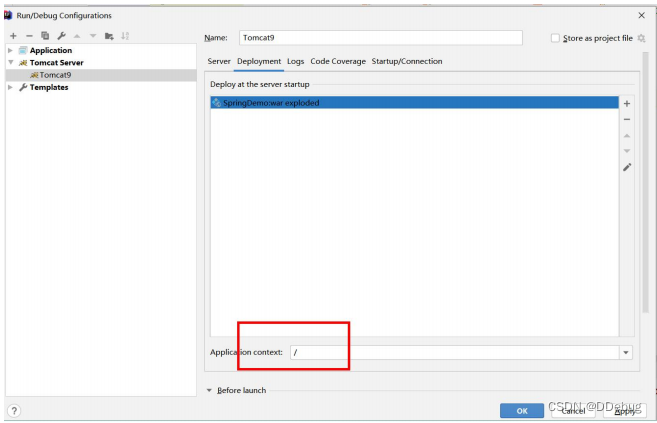
红框中的路径就是我们访问项目的路径,我们要将这个路径改为简洁的路径“/”如下:
3.5 编写控制器
package cn.qf.controller;

import org.springframework.stereotype.Controller;
import org.springframework.web.bind.annotation.RequestMapping;
import org.springframework.web.bind.annotation.ResponseBody;

@Controller
@RequestMapping("/emp") //定义父路径
public class EmpController {
    @ResponseBody  //可以将数据以json格式返回给前端
    @RequestMapping("/index")
    public Object index(){
        System.out.println("访问到控制器!");
        return "这是第一个SpringMVC程序";
    }
}
3.6 解决中文乱码
之前在学习Servlet的时候,我们自己定义过滤器来解决,现在Springmvc中专门定义字符编码处理的过滤器,我们直接使用就行了。
直接使用SpringMVC中提供的一个专门处配置理编码的类实现,需要在web.xml文件中进行过滤器的配置
<!--处理字符编码的过滤器-->
  <filter>
    <filter-name>Encoding</filter-name>
    <filter-class>org.springframework.web.filter.CharacterEncodingFilter</filter-class>
    <init-param>
      <param-name>encoding</param-name>
      <param-value>utf-8</param-value>
    </init-param>
  </filter>
  <filter-mapping>
    <filter-name>Encoding</filter-name>
    <url-pattern>/*</url-pattern>
  </filter-mapping>
不行,换方式
@Controller
@RequestMapping(value = "/emp",produces ="application/json;charset=utf-8") //定义父路径
public class EmpController {
    @ResponseBody  //可以将数据以json格式返回给前端
    @RequestMapping("/index")
    public Object index(){
        System.out.println("访问到控制器!");
        return "这是第一个SpringMVC程序";
    }
}
或者(正常不管)

4、SpringMVC中的跳转
服务端跳转(转发)、客户端跳转(重定向)
在之前的学习中我们需要在控制器(servlet)的方法中实现跳转,使用Servlet的时候实现客户端跳转使用的resp.sendRedicrect()方法,实现服务器端跳转使用的是“req.getRequestDispatcher(“/路径”).forward(req,resp)”,那么SpringMVC中的跳转更简单,也分为服务器端跳转和客户端跳转,实现的方式有多种,常用的有两种:返回String类型方式、返回ModelAndView的方式。
4.1 返回ModelAndView的方式
- 实现服务端跳转(转发)
package cn.qf.controller;

import org.springframework.stereotype.Controller;
import org.springframework.web.bind.annotation.RequestMapping;
import org.springframework.web.bind.annotation.ResponseBody;
import org.springframework.web.servlet.ModelAndView;
/**
 * 该注解表示当前这个类是一个控制器
 * 当容器扫描到有该注解的类则使用该类创建一个控制器的对象保存到容器中(SpringMVC容器)
 */
@Controller
@RequestMapping(value = "/emp", produces = "application/json;charset=utf-8") //定义父路径+字符编码格式
public class EmpController {
    @ResponseBody  //可以将数据以json格式返回给前端
    @RequestMapping("/index")
    public Object index() {
        System.out.println("访问到控制器!");
        return "这是第一个SpringMVC程序";
    }

    /**
     * 1.返回ModelAndView的方式-实现跳转
     *
     * @return org.springframework.web.servlet.ModelAndView
     **/
    @RequestMapping("/ModelAndViewTest")
    public ModelAndView firstRequest() {
        //ModelAndView封装了之前的request的保存信息的功能
        //ModelAndView封装了之前使用request的服务端跳转的功能
        ModelAndView model = new ModelAndView();
        model.addObject("msg", "这是第一个SpringMVC程序");
        //如果表示跳转的路径为index但是因为我们配置前缀和后缀所以会自动增加一些前缀(WEB-INF/pages)后缀就是.jsp
        /**
         * 实现服务端跳转 ModelAndView.setViewName();
         * */
        model.setViewName("/client_server/server.jsp");
        return model;
    }
}
以上的地浏览器地址栏信息没有改变,那么可以推测是一个服务器端跳转,服务跳转还有一个特征是能在jsp页面中将保存在request内置对象的数据取得
- 获取jsp页面传递数据
 /**
     *  jsp页面中将保存在request内置对象的数据取得
     * @return org.springframework.web.servlet.ModelAndView
     **/
    @RequestMapping("/addEmp")
    public ModelAndView addEmp(Integer id,String name,Integer deptid,String gender,Double salary){
        //直接使用并且不用数据类型转换
        Emp emp = new Emp();
        emp.setId(id);
        emp.setName(name);
        emp.setDeptid(deptid);
        emp.setGender(gender);
        emp.setSalary(salary);
        System.out.println(emp);
        //跳转到emp.jsp页面
        ModelAndView modelAndview = new ModelAndView();
        //保存数据信息
        modelAndview.addObject("empInfo",emp);
        //服务端跳转
        modelAndview.setViewName("/emp.jsp");
        return modelAndview;
    }
访问地址:
http://localhost:8080/emp/addEmp?id=12&deptid=4&salary=1234
页面结果:
emp信息
Emp{id=12, name='null', deptid=4, gender='null', salary=1234.0}
- 实现客户端跳转(重定向)
model.setViewName(“redirect:http://localhost:8080/client_server/client.jsp”);
/**
     * 1.返回ModelAndView的方式-实现跳转
     *
     * @return org.springframework.web.servlet.ModelAndView
     **/
    @RequestMapping("/ModelAndViewTest")
    public ModelAndView firstRequest() {
        //ModelAndView封装了之前的request的保存信息的功能
        //ModelAndView封装了之前使用request的服务端跳转的功能
        ModelAndView model = new ModelAndView();
        model.addObject("msg", "这是第一个SpringMVC程序");
        //如果表示跳转的路径为index但是因为我们配置前缀和后缀所以会自动增加一些前缀(WEB-INF/pages)后缀就是.jsp
        /**
         * 实现服务端跳转(转发) ModelAndView.setViewName();
         * */
        //model.setViewName("/client_server/server.jsp");

        /**
         * 实现客户端跳转(重定向)ModelAndView.setViewName();
         * */
        model.setViewName("redirect:http://localhost:8080/client_server/client.jsp");
        return model;
    }
-
数据的传递问题
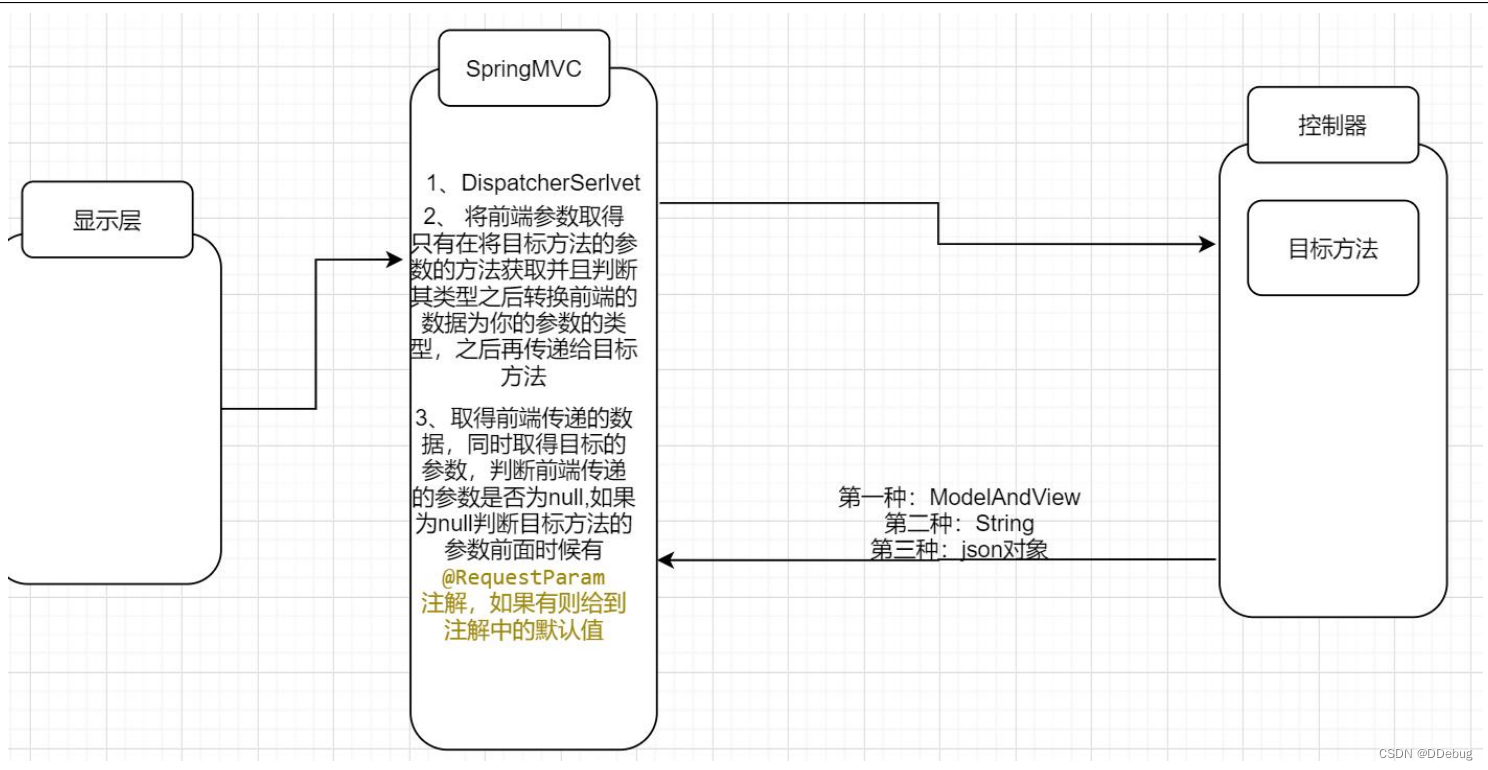
  前端传递过来的数据只能是以字符串类型的形式出现,后端取得对应的类型就是String.

  但是现在使用了SpringMVC之后,前端传递参数到控制器中的方法之前,SpringMVC会先判断你的目标方法的参数的类型,之后将前端取得数据(String)转换成你的目标方法的数据类型,所以你在目标方法中就可以取得你自己需要数据类型了。
(注:方法中的参数不能为基本数据类型,全部改为包装类,因为当没有接收到参数时,会默认参数为""/null,基本数据类型不能默认为null,就会报错)

4.2 String类型的方式实现跳转
- 服务端server跳转(转发)
访问路径:http://localhost:8080/emp/StringTest?id=1&name=liu&deptid=2&salary=123
/**
     *  2.返回String类型的方式-实现跳转
     * @return org.springframework.web.servlet.ModelAndView
     **/
@RequestMapping("/StringTest")
public String addEmp02(Integer id,String name,Integer deptid,Double salary){
    //直接使用并且不用数据类型转换
    Emp emp = new Emp();
    emp.setId(id);
    emp.setName(name);
    emp.setDeptid(deptid);
    emp.setSalary(salary);
    System.out.println(emp);
    //跳转到emp.jsp页面
    ModelAndView modelAndview = new ModelAndView();
    //保存数据信息
    modelAndview.addObject("empInfo",emp);
    //服务端跳转
    modelAndview.setViewName("/emp.jsp");
    return "/emp.jsp";
}
上面这种方式无法获取到medelAndview对象中的数据
返回String类型的数据实现服务器端跳转,如果要保存一个自定义的信息到request内置对象,那么还需要在方法中增加Model参数,保存自定义的信息到Model对象
Model.addAttribute(“key”,value[object]);
/**
     *  2.返回String类型的方式-实现跳转
     * @return org.springframework.web.servlet.ModelAndView
     **/
    @RequestMapping("/StringTest")
    public String addEmp02(Integer id, String name, Integer deptid, Double salary, Model model){
        //直接使用并且不用数据类型转换
        Emp emp = new Emp();
        emp.setId(id);
        emp.setName(name);
        emp.setDeptid(deptid);
        emp.setSalary(salary);
        System.out.println(emp);
        //保存数据信息
        model.addAttribute("empInfo",emp);
        return "/emp.jsp";
    }

- 客户端跳转 (重定向)
/**
     *  2.返回String类型的方式-实现跳转
     * @return org.springframework.web.servlet.ModelAndView
     **/
    @RequestMapping("/StringTest")
    public String addEmp02(Integer id, String name, Integer deptid, Double salary, Model model){
        //直接使用并且不用数据类型转换
        Emp emp = new Emp();
        emp.setId(id);
        emp.setName(name);
        emp.setDeptid(deptid);
        emp.setSalary(salary);
        System.out.println(emp);
        //保存数据信息
        model.addAttribute("empInfo",emp);
        //return "/emp.jsp";
        //客户端跳转:重定向
        return "redirect:/emp.jsp";
    }
以上的两种方式实现了跳转,使用返回ModelAndView和返回String类型的方式
4.3 总结返回三种类型
目标方法的返回值的类型有三种(先返回给SpringMVC框架):
-
第一种:ModelAndView,当mvc框架接受到ModelAndView对象之后,会将该对象中保存的数据取出来保存到reuqest内置对象,之后再将ModelAndView对象的vieName的值取得,使用reuqest的服务端跳转的方法进行跳转。
-
第二种:返回String类型,当mvc接收到String类型的时候,会将这个字符串作为服务端跳转的路径,最终是给到,转发:req.getRequestDispatcher().forward(); 可以自己设置为重定向:
return “redirect:/路径”;
-
第三种:返回json格式的数据,如果是这种情况本质是在mvc中使用HttpServletResponseresp内置对象的方法直接输出给前端(resp.getWriter().print())需要添加注解 @ResponseBody
5、SpringMVC参数的传递问题
参数传递就是从前端将数据传递给控制器的方法(目标方法),这些方法的参数类型分为基本数据类型和引用数据类型(String和自定义类型)。
路径问题
- <base href=“/”> <%-- 基路径 --%> 从0808后面重新开始输入–而不是在地址栏地址后追加
< img src=“${ }”> : 地址栏后续追加
< img src=“/${ }”> :0808后根路径开始(基路径)
-
2.<form action=“/xxx”
-
${pageContext.request.contextPath}
<%@ page contentType="text/html;charset=UTF-8" language="java" %>
<html>
<head>
    <title>Title</title>
</head>
<body>
    <form action="/emp/formTest" method="post">
        <fieldset>
            <legend>请填写表单</legend>
            编号:<input type="text" name="id" placeholder="1001"> <br>
            姓名:<input type="text" name="name" placeholder="李连杰" ><br>
            部门id:<input type="text" name="deptid" placeholder="3" ><br>
            性别:<input type="radio" name="gender" value="女">女
                <input type="radio" name="gender" value="男">男<br>
            工资:<input type="text" name="salary" placeholder="5000.00" ><br>
            <input type="submit" value="提交">
            <input type="reset" name="重置"><br>
        </fieldset>
    </form>

    <h1>emp信息</h1>
    <h3>${empInfo}</h3>
</body>
</html>
5.1 基本数据类型传递
在前端传递过来数据就是字符串数据类型,在之前需要我们在控制器中进行类型的转换。
- 注意参数类型,如果是基本数据类型,就必须传递对应的数据过来,因为基本数据类型的数据SpringMVC在给其赋值是null值时会报错!!
**@RequestParam(defaultValue)**注解:如果传参为空给形参设置默认值
/**
     *  SpringMVC参数的传递问题
     *  1.@RequestParam(defaultValue = "1")默认值注解的使用
     * @return java.lang.String
     **/
    @RequestMapping("/formTest")
    public String formTest(@RequestParam(defaultValue = "1")Integer id,
                           @RequestParam(defaultValue = "4") Integer deptid,
                           @RequestParam(defaultValue = "60000")Double salary,
                           String name,String gender, Model model){
        //直接使用并且不用数据类型转换
        Emp emp = new Emp(id,name,deptid,gender,salary);
        System.out.println(emp);
        //保存数据信息
        model.addAttribute("empInfo",emp);
        return "/emp.jsp";
    }
表单中的name属性值要和控制器方法中的参数名称对应(保持一致),但是如果在某些时候不需要传递参数,那么控制器中取得的参数就是为null,这种情况下可能会导致空指针异常的出现,为了避免空指向异常的出现则可以给定默认值。
5.2 控制器方法的参数是自定义
/**
     *  SpringMVC参数的传递问题
     *    2.方法的参数是自定义
     * @return java.lang.String
     **/
    @RequestMapping("/formTest2")
    @ResponseBody //表示返回值为json格式的字符串,直接响应给前端
    public String formTest(Emp emp){
        System.out.println(emp);
        //保存数据信息
        return "/emp.jsp";
    }
如果目标方法是自定义类型则要求,表单中提交的数据的时候name属性值要自定义类型的属性名一致。
使用反射取得的参数类型,如果是自定义类型,则继续使用反射取得该类型的所有参数的名称以及名字,之后和表单提交的数据的名字进行对别,比对成功则为该属性赋值最后传递给你目标方法的数据就是一个完整对象
5.3 Sprin日期参数的处理
在开发中会遇到从页面传递一个日期类型的数据到控制器,这种情况如果不进行相关的处理,则会出错。
<form action="/emp/formTest3" method="post">
    <fieldset>
        <legend>时间配置</legend>
        入职时间:<input type="date" name="data" value="9999">
        <input type="submit" value="提交">
        <input type="reset" name="重置"><br>
    </fieldset>
</form>
/**
     * SpringMVC参数的传递问题
     * 3.时间参数的设置
     *
     * @return java.lang.String
     **/
    @RequestMapping("/formTest3")
    @ResponseBody //表示返回值为json格式的字符串,直接响应给前端
    public String formTest(Date data) {
        String time = new SimpleDateFormat("yyy-MM-dd").format(data);
        System.out.println(time);
        //保存数据信息
        return "add Success成功!";
    }

/**
报错:
	Cannot convert value of type 'java.lang.String' to required type 'java.util.Date': no matching editors or conversion strategy found
*/
- 需要在控制器中增加一个专门负责类型转换处理的方法。
/**
     * 控制器中增加一个专门负责类型转换处理的方法。
     * */
    @InitBinder
    public void initBinder(WebDataBinder webDataBinder){
        SimpleDateFormat sdf = new SimpleDateFormat("yyy-MM-dd");
        //true-表示日期可以为空
        webDataBinder.registerCustomEditor(Date.class,new CustomDateEditor(sdf,true));
    }
5.4 获取Servlet的内置对象
很多时候需要在控制器中取得内置对象,比如要实现登录操作则需要使用session内置对象,在实现上传的时候需要使用application内置对象等操作。
在SpringMVC中取得内置对象非常简单,只需要在方法中将参数传递即可。
- 首先需要导入Servlet的2个依赖
<!--servlet依赖-->
    <dependency>
      <groupId>javax.servlet</groupId>
      <artifactId>servlet-api</artifactId>
      <version>2.3</version>
    </dependency>
    <!-- servlet注解开发需要的jar文件
https://mvnrepository.com/artifact/javax.servlet/javax.servlet-api-->
    <dependency>
      <groupId>javax.servlet</groupId>
      <artifactId>javax.servlet-api</artifactId>
      <version>3.1.0</version>
      <scope>provided</scope>
    </dependency>
 @RequestMapping("/ServletTest")
    @ResponseBody//表示返回值为json格式的字符串直接响应给前端
    public String servletTest(Emp emp, HttpServletRequest request, HttpServletResponse response){
        //取得session内置对象
        System.out.println("Session对象的id:"+request.getSession().getId());
        //取得application内置对象
        System.out.println("取得ServletContext对象:"+request.getSession().getServletContext());
        return "获取域对象成功!";
    }
6、资源的处理
6.1 静态资源处理
什么是静态资源?比如前端js/css/图片/静态页面(html页面),这些资源都属于静态资源。(jsp页面是动态资源)
观察之前的web.xml配置 :以上的配置会所有的请求都会被DispatcherServlet这个类拦截,包括静态资源,比如图片、js、css、html等文件等都会被拦截
<!--配置SpringMVC的servlet-->
  <servlet>
    <servlet-name>dispatcher</servlet-name>
    <servlet-class>org.springframework.web.servlet.DispatcherServlet</servlet-class>
    <!--SpringMVC也有自己的配置文件名字习惯叫做dispatcher-servlet.xml-->
    <init-param>
      <param-name>contextConfigLocation</param-name>
      <param-value>classpath:dispatcher-servlet.xml</param-value>
    </init-param>
  </servlet>
  <!--配置映射关系-->
  <servlet-mapping>
    <servlet-name>dispatcher</servlet-name>
    <!--所有的以action结尾的路径都交给DispatcherServlet去处理-->
    <!--<url-pattern>*.action</url-pattern>-->
    <url-pattern>/</url-pattern>
  </servlet-mapping>
<url-pattern> / </url-pattern>此时使用 “/” 配置会将所有的请求交给“DispatcherServlet”,我们要求对静态资源放行,有两种解决方案:
- 方案一:在dispatcher-servlet.xml文件中增加配置(SpringMVC配置文件中增加配置)
<!--命名空间与规范-->
xmlns:mvc="http://www.springframework.org/schema/mvc"
http://www.springframework.org/schema/mvc
https://www.springframework.org/schema/mvc/spring-mvc.xsd


<!-- 开启MVC注解驱动 -->
    <MVC:annotation-driven/>
<!--如果是静态资源则交给Tomcat处理,而不是“DispatcherServlet”处理-->
	<mvc:default-servlet-handler/>
现在就能访问到静态资源了,静态资源还包括了*.css、*.js等其他文件格式。
- 方案二:需要在dispatcher-servlet.xml(SpringMVC配置文件)文件中增加配置
<!--
    对静态资源放行的配置mapping="/static/**:只要static下的所有资源都可以访问
    location="/static/":映射路径,该路径要和静态资源所在的文件夹名称一致
-->
    <mvc:resources mapping="/static/**" location="/static/"/>
location=“/static/”:静态资源文件位置static这个文件夹下。 mapping=“/static/**”:映射相对路径,只要是这个路径就会认为是要访问static文件夹下的静态资源,就会放行
总结:
方法1:采用<mvc:default-servlet-handler/>
在springMVC-servlet.xml中配置<mvc:default-servlet-handler/>后,会在SpringMVC上下文中定义一个org.springframework.web.servlet.resource.DefaultServletHttpRequestHandler,它会像一个检查员,对进入DispatcherServlet的URL进行筛查,如果发现是静态资源的请求,就将该请求转由Web应用服务器默认的Servlet处理,如果不是静态资源的请求,才由DispatcherServlet继续处理。
方法2:采用<mvc:resources/>
<mvc:default-servlet-handler/>将静态资源的处理经由SpringMVC框架交回Web应用服务器处理。而<mvc:resources/>更进一步,由SpringMVC框架自己处理静态资源
6.2 jsp页面的安全访问
在正常的情况下用户是不能直接访问jsp页面的,而是通过先访问控制器,然后取得数据之后再跳转到jsp页面,如果要求用户不能直接访问,就要将jsp保存到WEB-INF下,在该文件夹下的资源是不能直接从浏览器中通过地址访问的(404)。
@RequestMapping("test")
public String test(){
    //直接跳转到jsp页面(这是服务端跳转的一种方式)
    return "/WEB-INF/securidy.jsp";
}
以上是在控制中跳转到securidy.jsp,是没有任何问题的,但是有人认为“/WEB-INF/pages/emp.jsp”路径编写比较麻烦,于是提出了前缀和后缀指定概念,如果要实现前后缀的自动增加需要使用到一个类“InternalResourceViewResolver”,该类需要在配置文件中进行注册。
<!--定义一个视图解析器的bean会在你访问的资源前面加上你指定的前缀同时在后面加上你指定后缀-->
    <bean class="org.springframework.web.servlet.view.InternalResourceViewResolver">
        <property name="prefix" value="/"/>
        <property name="suffix" value=".jsp"/>
    </bean>
6.3 资源文件的管理
在之前我们见过database.properties文件,我们还说过可以使用资源文件管理路径信息,在项目中会出现很多的资源文件,比如说保存提示信息的资源文件、数据库信息资源文件、数据验证规则的资源文件等等。
- 读取资源文件信息Spring提供了一个org.springframework.context.support.ResourceBundleMessageSource类进行处理,但是我们要使用该类注册bean到容器中
<!-- 指定资源文件的位置
    <context:property-placeholder location="classpath:"/>、
    不需要:ResourceBundleMessageSource类会在创建bean时property注入set资源文件名称
    -->

<!-- 注册ResourceBundleMessageSource类的Bean -->
    <bean id="messageSource" class="org.springframework.context.support.ResourceBundleMessageSource">
        <property name="basename">
            <array>
                <value>Message</value> <!--指定资源文件的名字-->
            </array>
        </property>
        <!-- <property name="defaultEncoding" value="utf-8"/>-->
    </bean>
以上的<value>Message</value>表示的是资源文件的名称,没有扩展名的,默认就是properties。
在之前我们使用的表示数据库连接信息的资源文件并没有在程序中读取,仅仅是在配置文件中使用“${db.user}”形式去引用,如果要读取资源文件需要使用到一个类“ResourceBundleMessageSource”而且要在配置文件中进行注册
- 编写Message.properties 文件
emp.add={0}{1}成功
- 编写读取资源的文件的方法
/**
	老方法
*/
package cn.qf.utils;
public class GetSource {
    /**
     * @param key: 表示资源文件中的信息的key值
     * @param arg: 表示一个数组,数组中的数据可以填充资源文件中的占位符
     *    Locale.getDefault() :取得本地系统的语言环境信息(zh_CN:简体中文)
     * @return java.lang.String
     **/
    public static String getMessage(String key,String...arg){
        ClassPathXmlApplicationContext context2= new ClassPathXmlApplicationContext("dispatcher-servlet.xml");
        ResourceBundleMessageSource messageSource =(ResourceBundleMessageSource) context2.getBean("messageSource");
        String message = messageSource.getMessage(key,arg, Locale.getDefault());
        return message;
    }
}


public class GetSourceTest {
    public static void main(String[] args) {
        System.out.println("工具类测试:"+GetSource.getMessage("emp.add.success", "测试", "获取"));
    }
}
Stringkey:表示资源文件中的信息的key值
args:表示一个数组,数组中的数据可以填充资源文件中的占位符
Locale.getDefault():取得本地系统的语言环境信息(zh_CN:简体中文)
上面的方法可以实现读取资源文件中的信息了,但是这种操作属于公共的操作,因为可能很多类中都要进行读取,既然是公共的操作就应该抽象到父类或者一个单独工具类中去实现。
- 定义控制层公共的父类
package cn.qf.controller;
import org.springframework.beans.factory.annotation.Autowired;
import org.springframework.beans.propertyeditors.CustomDateEditor;
import org.springframework.context.MessageSource;
import org.springframework.web.bind.WebDataBinder;
import org.springframework.web.bind.annotation.InitBinder;
import java.text.SimpleDateFormat;
import java.util.Date;
import java.util.Locale;

public class BeanController {
    @Autowired  //在容器中查找一个和该类匹配的bean注入(byType)
    private MessageSource messageSource;
    /**
     * 获取资源文件(Message.properties)内容的方法
     * @param key: 健值
     * @param args: 资源文件中的占位符
     *     Locale.getDefault() :取得本地系统的语言环境信息(zh_CN:简体中文)
     * @return java.lang.String
     **/
    public String getMes(String key,Object...args){
        return this.messageSource.getMessage(key,args, Locale.getDefault());
    }

    /**
     * 控制器中增加一个专门负责时间类型转换处理的方法。【固定用法】
     * */
    @InitBinder
    public void initBinder(WebDataBinder webDataBinder){
        SimpleDateFormat sdf = new SimpleDateFormat("yyy-MM-dd");
        //true-表示日期可以为空
        webDataBinder.registerCustomEditor(Date.class,new CustomDateEditor(sdf,true));
    }
}
- 在子类中读取资源文件Message.properties信息,子类基础BeanController
/**
     * 获取资源文件中的数据
     * @return java.lang.String
     **/
    @RequestMapping("/getMsg")
    @ResponseBody //表示返回值为json格式的字符串直接响应给前端
    public String getMsg(){
        //取得资源文件的信息//"emp.add.success":表示资源文件中key的值,
        // null:表示要传递给资源文件填充的数据
        // Locale.getDefault():取得本地操作系统的语言环境(zh_CN:简体中文环境)
        System.out.println(GetSource.getMessage("emp.add.success", "工具类", "测试"));
        String mes = super.getMes("emp.add.success", "雇员", "添加");
        return mes;
    }
使用super调用父类中的方法进行资源信息的读取如果是出现读取的数据中文乱码,则应该修改项目的文件编码

7、文件上传
7.1 文件上传准备
文件上传大部分项目都必备的功能,要实现文件的上传需要使用之前的基础知识,io流的知识,思想和之前学习io的时候将文件从一个盘符拷贝另外一个盘符下的思想是一样的,只不过现在多了一些类来进行辅助。
使用SpringMVC进行文件的上传需要使用到的类:CommonsMultipartFile和CommonsMultipartResolver,后面的这个类需要在配置文件中进行注册,会自动调用其中的方法。
- CommonsMultipartFile类中的方法:
- getContentType():【取得上传的文件mine(image/jpg、image/png、image/gif)类型,可以根据这个内容取得文件的后缀名,使用字符串的split(“/”)[1]。】
- isEmpty()【判断上传的文件是否为空,如果没有选中文件的时候该方法返回的值就是true】
- getSize()【取得上传文件的大小】
- getInputStream()throwsIOException【取得上传文件对应的输入流对象】
- getOriginalFilename()【取得上传文件的原始名称】
CommonsMultipartFile类是在控制器的上传的方法中要定义的参数类型。还有“CommonsMultipartResolver”类需要在配置文件中进行注册,该类中我们要关注的方法:
-
CommonsMultipartResolver
- setMaxUploadSize(longmaxUploadSize)【指定上传文件的最大内存】
- setMaxInMemorySize(intmaxInMemorySize)【指定在进行文件传输的过程中允许读取到内存的最大内容】
-
导入需要的开发包
<!-- 文件上传开发包 -->
    <dependency>
      <groupId>commons-fileupload</groupId>
      <artifactId>commons-fileupload</artifactId>
      <version>1.4</version>
    </dependency>
    <dependency>
      <groupId>commons-io</groupId>
      <artifactId>commons-io</artifactId>
      <version>2.7</version>
    </dependency>


<!-- 忽略 -->
<!-- 注册文件上传:CommonsMultipartResolver 的Bean-->
    <bean id="multipartResolver"
    class="org.springframework.web.multipart.commons.CommonsMultipartResolver">
        <!--单位是kb1024*1024*5=5M-->
        <property name="maxUploadSize" value="5242800"></property>
        <property name="maxInMemorySize" value="1048576"></property>
    </bean>
7.2 文件上传的实现
之前我们实现上传的时候只是在控制器中取得上传文件的基本信息,还没有将文件保存到项目的文件夹下,这次课我们来具体实现,上传应该是公共的操作,应该定义在父类中,现在的父类是BaseController。
-
编写上传操作
一般保存的文件名称不会使用原始的名称,因为可能会出现多个用户的文件名称一致。于是要编写一个生成新的文件名的方法,但是后缀不能改(在BaseController增加方法)
/**
     * 生成新名称
     *
     * @param file:
     * @return java.lang.String
     **/
    protected String createNewFileName(MultipartFile file) {
        if (file != null) {
            return UUID.randomUUID().toString().replace("-", "")
                    + "." + file.getOriginalFilename().split("\\.")[1];
        } else {
            return null;
        }
    }

    /**
     * 实现文件保存
     *
     * @param newFileName:
     * @param request:
     * @param file:
     **/
    public void saveFile(String newFileName, HttpServletRequest request, MultipartFile file) {
        /**
         * 通常
         * request.getSession().getServletContext().getRealPath()来获取网站的物理路径。
         * 例如myWeb项目的物理路径被配置在E:/aaa下,那么我们使用getRealPath()得到的就是“E:/aaa”。
         *
         * getRealPath("/upload")也可以有参数,作用就是获取在项目根路径下的子文件夹的物理路径。
         * 即E:/aaa/upload。
         *
         * */
        //取得文件保存的路径信息
        String rootPath = request.getSession().getServletContext().getRealPath("/");
        String pathName = rootPath + getDir() + newFileName;
        try {
            file.transferTo(new File(pathName));
        } catch (IOException e) {
            e.printStackTrace();
        }
    }

    //自定义文件保存父目录
    public abstract String getDir();
- 在子类中进行文件的上传
/**
     * 文件上传
     * @param file:
     * @param request:
     * @return org.springframework.web.servlet.ModelAndView
     **/
    @RequestMapping("/upload")
    public ModelAndView upload(MultipartFile file,HttpServletRequest request){
        //定义文件新名称
        String newFileName = createNewFileName(file);
        System.out.println(newFileName);
        //取得文件信息
        super.saveFile(newFileName,request,file);
        ModelAndView modelAndView = new ModelAndView("/emp.jsp");
        modelAndView.addObject("filepath",newFileName);
        modelAndView.addObject("msg","上传照片成功!");
        return modelAndView;
    }

    @Override
    public String getDir() {
        return "emp/";
    }
<%-- enctype="multipart/form-data"是上传二进制数据; --%>
    <form action="/emp/upload" method="post" enctype="multipart/form-data">
        <fieldset>
            <legend>照片上传</legend>
            照片:<input type="file" name="file">
            <input type="submit" value="提交">
            <input type="reset" name="重置"><br>
        </fieldset>
    </form>
    <h3>${msg}</h3>
    <img   height="500px" width="300px" src="${filepath}">
注意:
1、实现文件上传的过程可能会因为你的操作系统没有给你操作的权限导致出现出现异常,遇到这种情况你只能去折腾你自己的操作系统。
2、在以后的开发中一般文件上传都是有单独文件存储服务器去保存你的文件的,不会把你的文件和项目保存一个地方,文件存储服务器有的企业是自己的搭建的,有的直接用第三方的(比如说阿里云的oss)
7.3 删除上传的文件
/**  BeanController
     * 删除文件夹中的文件内容
     * @param request:
     * @param fileName:
     **/
    public boolean deleteFile(HttpServletRequest request,String fileName){
        /**
         * 通常
         * request.getSession().getServletContext().getRealPath()来获取网站的物理路径。
         * 例如myWeb项目的物理路径被配置在E:/aaa下,那么我们使用getRealPath()得到的就是“E:/aaa”。
         *
         * getRealPath("/upload")也可以有参数,作用就是获取在项目根路径下的子文件夹的物理路径。
         * 即E:/aaa/upload。
         *
         * */
        Boolean fal = false;
        String pathName = request.getSession().getServletContext().getRealPath("/")+this.getDir()+fileName;
        //new MultipartFile()
        File file = new File(pathName);
        if(file.exists()){
            fal = file.delete();
        }
        return fal;
    }


/**  EnpController
     * 删除用户以及照片
     * @param request:
     * @param Id:
     * @return java.lang.String
     **/
    @RequestMapping("/delete")
    @ResponseBody
    public String deleteEmp(HttpServletRequest request, Integer Id) {
        //完善:根据Id取得雇员的照片名称
        String fileName = "1c6d0b1977d541bb809fdaa1ab1dd6c8.jpg";
        //删除数据库中的信息
        //删除照片
        boolean b = super.deleteFile(request, fileName);
        if (b) {
            return "删除成功!";
        } else {
            return "删除失败!";
        }
    }
8、全局异常统一处理
如果某些程序出现了异常,我们可以将这些异常交给指定的异常处理类去进行处理,而不是走默认的处理,因为默认的处理用户体验感不好。
在之前的一个同学面试的时候问了:Spring处理统一异常的时候使用的是哪一个类?在spring中提供一个类可以实现全局的异常处理。
DEMO:如果上传的文件过大(观察问题)
<!-- 注册文件上传:CommonsMultipartResolver 的Bean-->
    <bean id="multipartResolver"
    class="org.springframework.web.multipart.commons.CommonsMultipartResolver">
        <!--单位是kb1024*1024*5=5M-->
        <property name="maxUploadSize" value="5242800"></property>
        <property name="maxInMemorySize" value="1048576"></property>
    </bean>
此时如果文件过大,前端页面就出现了以上的错误,影响了使用体验。

最好的方式是如果出现了这样的异常跳转到一个错误页面在页面上,提示用户出现问题的原因,需要在配置文件中注册一个类
“org.springframework.web.servlet.handler.SimpleMappingExceptionResolver”
<!-- 统一处理异常类的信息 -->
    <bean class="org.springframework.web.servlet.handler.SimpleMappingExceptionResolver">
        <property name="exceptionMappings">
            <props>
                <!--不能有空格-->
                <prop key="org.springframework.web.multipart.MaxUploadSizeExceededException">
                    /errors/upload_errors.jsp
                </prop>
            </props>
        </property>
    </bean>
<html>
<head>
    <title>Title</title>
</head>
<body>
    <h3>Errors:Maximum upload size of 5242800 bytes exceeded</h3>
    <h4>上传文件过大!</h4>
</body>
</html>
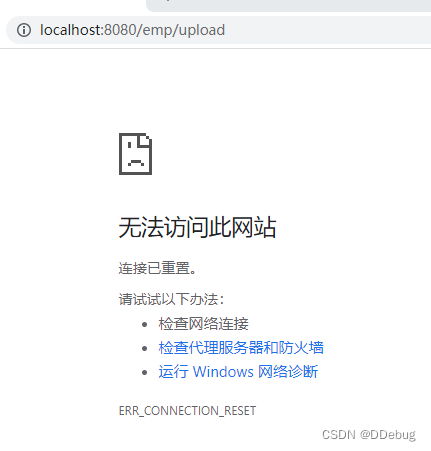
- 测试:现在还不能跳转到错误页面,原因是异常是交给tomcat管理,我们要让tomcat支持任何大小的文件上传,需要修改tomcat的server.xml文件
修改tomcat的server.xml文件
<Connectorport="8080"protocol="HTTP/1.1"connectionTimeout="20000"redirectPort="8443"maxSwallowSize="-1"/>
到现在来说:上传功能才算完成,必须能够熟练写下来!
全局异常处理的流程就是:如果发现抛出了对应的异常,则使用我们配置的全局异常处理类进行处理,原理还是AOP编程,就类似于之前我们分析的抛出异常通知。
9、拦截器Interceptor
9.1 基本概念
之前我们使用过滤器可以拦截请求,对请求进行相关处理,但是过滤器对请求的处理很有限,比如我们如果要在过滤器中进行数据验证,只能验证数据是否为空(不能获取到目标方法的各种信息),如果要实现数据的合法性验证就无法实现了。
此时拦截器就登场了(在到达目标方法之前可以取得目标方法的信息)。
拦截器是基本上所有项目都会使用到技术,所谓的拦截器就是用户和控制器之间的一个屏障,这个屏障可以对用户的请求进行拦截,拦截之后可以进行数据的验证,保证到了控制器的数据都是合法的、安全的,当然还有其他很多应用场景,比如性能检测(可以统计出一个请求耗费的时间)等。

9.2 HandlerInterceptor接口与HandlerMethod
如果要实现拦截器需要使用到一个接口:org.springframework.web.servlet.HandlerInterceptor 在该接口中要关注的方法如下:
jdk1.8的新特性。查看 handlerIntercepter的接口方法都有default修饰。即使不重写也不会报错的
- 【在进入控制器之前要执行的方法】
boolean pre Handle (HttpServletRequest request,HttpServletResponse response,Object handler)
- 【执行完毕了目标方法中的代码,但是还没有返回到显示层,可以改变目标方法的ModelAndView中的信息】
public void postHandle(HttpServletRequest reques, HttpServletResponse response, Object handler,ModelAndView modleAndView)throws Exceptio
- 【目标方法执行完毕,返回到显示层之后,执行的方法】
public void afterCompletion(HttpServletRequest request , HttpServletResponse response,Object handler ,Exception ex)
以上的三个方法中,第一个最有用,因为第一个方法是在执行目标方法之前执行的,可以进行数据的验证,验证完毕完毕之后再到控制器中。
DEMO:
- 定义一个拦截器
package cn.qf.interceptor;

import org.springframework.web.servlet.HandlerInterceptor;
import org.springframework.web.servlet.ModelAndView;
import javax.servlet.http.HttpServletRequest;
import javax.servlet.http.HttpServletResponse;
/**
 * Validation 验证,确认 Interception拦截器
 **/
public class ValidationInterceptor implements HandlerInterceptor {
    @Override
    public boolean preHandle(HttpServletRequest request, HttpServletResponse response, Object handler) throws Exception {
        System.out.println("Interception拦截器【boolean preHandle: 进入目标方法之前执行!】" + handler.getClass());
        //true :表示放行!
        return true;
    }

    @Override
    public void postHandle(HttpServletRequest request, HttpServletResponse response, Object handler, ModelAndView modelAndView) throws Exception {
        System.out.println("Interception拦截器【void posHandle: 执行完目标方法但是还没返回 时执行!】" + handler.getClass());
    }

    @Override
    public void afterCompletion(HttpServletRequest request, HttpServletResponse response, Object handler, Exception ex) throws Exception {
        System.out.println("Interception拦截器【执行完毕目标方法并且已经返回完成】" + handler.getClass());
    }
}
- dispatch-servlet.xml中配置拦截器的拦截路径和bean对象
<!-- (dispatch-servlet.xml)拦截器的配置 -->
    <mvc:interceptors>
        <mvc:interceptor>
            <mvc:mapping path="/emp/**/*"/>
            <bean class="cn.qf.interceptor.ValidationInterceptor"></bean>
        </mvc:interceptor>
    </mvc:interceptors>
- 访问目标控制器触发拦截器触发效果

现在要关注的是“HandlerMethod”,在我们进行数据验证需要取得用户提交的数据就要使用到该类型,在该类型中的方法如下:
-
【取得目标控制器对象】
public Object getBean()
-
【取得目标控制器的Class类类型】
public Class<?> getBeanType()
-
【取得目标控制器中要访问的方法,就是目方法】
public Method getMethod()
-
【取得目标方法的参数列表信息】
public MethodParameter[] getMethodParamenters()
返回值是“MethodParameter”类型的数组,在该类型中要关注的方法如下:
-
[取得的是参数的名称]
public String getParameterName()
-
[取得参数的类型的Class类对象]
public Class<?> getParameterType()
以上的方法是必须要记住的,因为要使用拦截器实现数据的验证操作就要使用到该类。
-
9.3 拦截器Interceptor实现数据验证
数据验证是大部分项目都要实现的,不但要在前端进行数据验证,还要在后端进行数据验证(数据双验证),目的防止恶意用户绕开表单的直接向服务器提交数据,如果防止这样的问题就需要在后端也进行数据的验证,也就是我们说的数据的双验证,在后端如果要进行数据的验证就可以使用拦截器实现也可以使用其他框架实现。
DEMO:使用拦截器实现数据的验证
- 1.在资源文件(Message.properties)中定义验证规则:
#定义验证规则 rules:规则
EmpController.insert.rules=ename:string|empno:int|sal:double|hiredate:date
#定义错误提示信息
emp.id.insert.error=编号必须为整数
emp.name.insert.error=用户名不能为空
emp.salary.insert.error=薪资必须为小数
emp.hiredate.insert.error=日期格式为{yyyy-MM-dd}
- 2.在配置文件中指定资源文件的位置
这里获取外部资源文件利用的是 Spring提供的ResouceBundleMessageSource类
(一般是在Spring的配置文件applicationContext.xml中进行配置)
<!-- 注册ResourceBundleMessageSource类的Bean -->
    <bean id="messageSource" class="org.springframework.context.support.ResourceBundleMessageSource">
        <property name="basename">
            <array>
                <value>Message</value> <!--指定资源文件的名字-->
            </array>
        </property>
        <!-- <property name="defaultEncoding" value="utf-8"/>-->
    </bean>
public abstract class BeanController {
    @Autowired  //在容器中查找一个和该类匹配的bean注入(byType)
    private MessageSource messageSource;
    /**
     * 获取资源文件(Message.properties)内容的方法
     * @param key: 健值
     * @param args: 资源文件中的占位符
     *     Locale.getDefault() :取得本地系统的语言环境信息(zh_CN:简体中文)
     * @return java.lang.String
     **/
    public String getMes(String key,Object...args){
        return this.messageSource.getMessage(key,args, Locale.getDefault());
    }
}
- 3.在拦截器中读取验证规则
编写拦截器
/**
 * 表单验证!!
 */
public class ValidationInterceptor implements HandlerInterceptor {
    @Override                                                 /*页面跳转时使用*/
    public boolean preHandle(HttpServletRequest request, HttpServletResponse response, Object handler) throws Exception {
        //向下转型
        HandlerMethod handlerMethod = (HandlerMethod) handler;
        /*//取得验证规则
        // 第一步:组装出验证规则的key的具体内容
        //EmpController---  getSimpleName()
        String rulesKey = handlerMethod.getBean().getClass().getSimpleName() + "." + "insert.rules";
        //cn.qf.controller.EmpController ---getName()
        String rulesKey1 = handlerMethod.getBean().getClass().getName() + "." + "insert.rules";
        //EmpController ----getBeanType()
        String rulesKey2 = handlerMethod.getBeanType().getSimpleName() + "." + "insert.rules";
        ;
        //第二步:使用反射技术调用目标控制器Controller父类的getMsg方法来获取资源文件的信息
        Method getMesMethod = handlerMethod.getBean().getClass().getMethod("getMes", String.class, Object[].class);
        String rulesValue = (String) getMesMethod.invoke(handlerMethod.getBean(), rulesKey2,null);
        System.out.println("取得的验证规则为: " + rulesValue);*/

        //取得保存错误性息的Map
        Map<String,Object> errorMsgMap = ValidationUtil.validate(handlerMethod,request);
        //size>0:表示存在错误信息
        if (errorMsgMap.size()==0) return true;
        //错误信息存入域对象中
        request.setAttribute("errors",errorMsgMap);
        //跳转至emp页面,显示错误信息
        request.getRequestDispatcher("/emp.jsp").forward(request,response);
        return false;
    }
编写一个数据验证的类(供给拦截器进行调用)
package cn.qf.utils;
import org.springframework.web.method.HandlerMethod;
import javax.servlet.http.HttpServletRequest;
import java.lang.reflect.Method;
import java.util.HashMap;
import java.util.Map;
/**
 * 专门负责数据验证的类
 * 在这里我们要大量的使用到正则表达式
 * */
public class ValidationUtil {
    /** 验证字符串是为null
     * @param str:
     * @return boolean 合格返回true
     **/
    public static boolean isString(String str){
        if(str.equals("") || str==null) return false;
        return true;
    }

    //验证是否为正整数
    public  static boolean isInt(String str){
        if (!isString(str)) return false;
        // \\d+:表示任意位数的整数的正则表达式
        return str.matches("\\d+");
    }
    //验证小数:要求小数点后面必须有两位小数
    public static boolean isDouble(String str){
        if (isString(str))
            //表示要求小数位数为两位的数据
            return str.matches("\\d+\\.\\d{2}");
        return false;
    }

    public static boolean isDate(String str){
        if(isString(str))
            //简单格式的验证
            return str.matches("\\d{4}-\\d{2}-\\d{2}");
        return false;
    }

    public static Map<String,Object> validate(HandlerMethod handlerMethod, HttpServletRequest request) throws Exception{
        Map<String,Object> errors = new HashMap<>();

        //取得验证规则
            String rulesKey = (String) handlerMethod.getBeanType().getSimpleName()+".insert.rules";
            //Method getMsg = handlerMethod.getBean().getClass().getMethod("getMsg", String.class, Object[].class);
            //String rulesValue = (String)getMsg.invoke(rulesKey, null);
        String msg = getMsg(handlerMethod, rulesKey);
        //拆分验证规则,根据|符号进行拆分
        String[] arr = msg.split("\\|");
        for(String arrEach : arr){
            //继续拆分数组中的每个数据
            String[] kv = arrEach.split(":");
            String paramName = kv[0];
            String paramValues = kv[1];
            //取得客户端传递的参数的值
            String validate = request.getParameter(paramName);
            //验证数据是否合法
            switch(paramValues){
                case "int":{
                    if(!isInt(validate)) errors.put(paramName,getMsg(handlerMethod,"emp.id.insert.error"));
                    break;
                }
                case "string":{
                    if (!isString(validate)) errors.put(paramName,getMsg(handlerMethod,"emp.name.insert.error"));
                    break;
                }
                case "double":{
                    if(!isDouble(validate)) errors.put(paramName,getMsg(handlerMethod,"emp.salary.insert.error"));
                    break;
                }
                case "date":{
                    if (!isDate(validate)) errors.put(paramName,getMsg(handlerMethod,"emp.hiredate.insert.error"));
                }
            }
        }
        return errors;
    }

    /** 该方法调用目标控制器的父类的getMsg()方法取得资源文件中信息
     * @param handlerMethod:
     * @param msgKey:
     * @return java.lang.String
     **/
    public static String getMsg(HandlerMethod handlerMethod,String msgKey)throws Exception{
        Method getMsg = handlerMethod.getBean().getClass().getMethod("getMes", String.class, Object[].class);
        String message = (String)getMsg.invoke(handlerMethod.getBean(),msgKey, null);
        return message;
    }
}
jsp表单数据
 <form action="/emp/add" method="post">
        <fieldset>
            <legend>请填写表单</legend>
            编号:<input type="text" name="id" placeholder="1001"> <span style="color: orange">${errors["id"]}</span><br>
            姓名:<input type="text" name="name" placeholder="苏苏" ><span style="color: orange">${errors["name"]}</span><br>
            部门:<input type="text" name="deptid" placeholder="3" ><br>
            性别:<input type="radio" name="gender" value="女">女
                <input type="radio" name="gender" value="男">男<br>
            工资:<input type="text" name="salary" placeholder="5000.00" ><span style="color: orange">${errors["salary"]}</span><br>
            入职时间<input type="date" name="hiredate"><span style="color: orange">${errors["hiredate"]}</span><br>
            <input type="submit" value="提交">
            <input type="reset" name="重置"><br>
        </fieldset>
    </form>

- 配置拦截器
(需要配置在SpringMVC的配置文件中dispatcher-servler.xml)
<!-- (dispatch-servlet.xml)拦截器的配置 -->
    <mvc:interceptors>
        <mvc:interceptor>
            <mvc:mapping path="/emp/**/*"/>
            <bean class="cn.qf.interceptor.TestInterceptor"></bean>
        </mvc:interceptor>
        <mvc:interceptor>
            <mvc:mapping path="/emp/add"/>
            <bean class="cn.qf.interceptor.ValidationInterceptor"></bean>
        </mvc:interceptor>
    </mvc:interceptors>
9.4 过滤器和拦截器的区别(面)
-
实现原理不同(了解)
过滤器和拦截器底层实现方式大不相同,过滤器,是基于函数回调的,拦截器则是基于7Java的反射机制(动态代理)实现的。 -
使用范围不同
我们看到过滤器实现的是javax.servlet.Filter接口,而这个接口是在Servlet规范中定义的,也就是说过滤器Filter的使用要依赖于Tomcat等容器,导致它只能在web程序中使用。
拦截器(Interceptor)它是一个Spring组件,并由Spring容器管理,并不依赖Tomcat等容器,是可以单独使用的。 -
触发时机不同
过滤器Filter是在请求进入容器后,但在进入servlet之前进行预处理。
拦截器Interceptor是在请求进入servlet后,在进入Controller之前进行预处理的,Controller中渲染了对应的视图之后请求结束。
[外链图片转存失败,源站可能有防盗链机制,建议将图片保存下来直接上传(img-CbrhQ9tE-1668010269449)(file://C:/Users/ich%20liebe%20Dich/Desktop/SpringMVC/images/14.png?lastModify=1667721395)]
servlet : SpringMVC的servlet :org.springframework.web.servlet.DispatcherServlet
Dispatcher : 调度器,分配器 (配置在web.xml配置文件中的)
<servlet>
    <servlet-name>dispatcher</servlet-name>
    <servlet-class>org.springframework.web.servlet.DispatcherServlet</servlet-class>
    <!--SpringMVC也有自己的配置文件名字习惯叫做dispatcher-servlet.xml-->
    <init-param>
      <param-name>contextConfigLocation</param-name>
      <param-value>classpath:dispatcher-servlet.xml</param-value>
    </init-param>
  </servlet>
  <!--配置映射关系-->
  <servlet-mapping>
    <servlet-name>dispatcher</servlet-name>
    <!--所有的以action结尾的路径都交给DispatcherServlet去处理-->
    <!--<url-pattern>*.action</url-pattern>-->
    <url-pattern>/</url-pattern>
  </servlet-mapping>
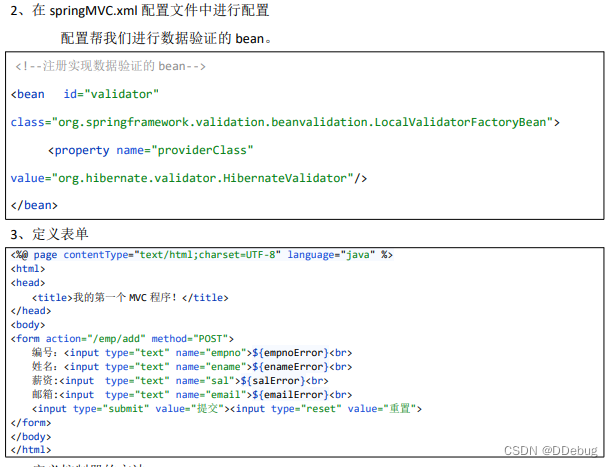
9.5 第三方框架数据验证(了解)
上节课我们使用了SpringMVC的拦截器实现数据的验证,本次课我们使用第三方工具实现数据验证,使用Hibernate-validator(这是实现后端数据验证的一个框架)实现。
1、 导入验证需要的开发包 pom.xml (maven文件)
<!-- 数据验证(除:Interceptor),第三方框架 -->
    <!-- https://mvnrepository.com/artifact/org.hibernate.validator/hibernate-validator -->
    <dependency>
      <groupId>org.hibernate.validator</groupId>
      <artifactId>hibernate-validator</artifactId>
      <version>6.0.0.Final</version>
    </dependency>
    <!-- https://mvnrepository.com/artifact/org.jboss.logging/jboss-logging -->
    <dependency>
      <groupId>org.jboss.logging</groupId>
      <artifactId>jboss-logging</artifactId>
      <version>3.2.1.Final</version>
    </dependency>
    <!--https://mvnrepository.com/artifact/javax.validation/validation-api-->
    <dependency>
      <groupId>javax.validation</groupId>
      <artifactId>validation-api</artifactId>
      <version>2.0.0.CR2</version>
    </dependency>


10、Restful风格
10.1 Restful风格的概念
在之前的开发中有人质疑请求路径处理比较复杂,比如说要对雇员的数据进行操作,需要根据编号删除雇员和根据编号取得雇员,路径的设置分别设置为:
查询:/emp/get?empno=1(查询编号为1的雇员的信息)
删除:/emp/delete?empno=1(删除编号为1的雇员的信息)
路径的不同是为了区分是要删除还是查询,此时有人就希望使用同一个路径能实现多种操作,比如希望“emp/1”路径能处理删除或者查询操作(表示根据编号查询或者删除数据),要实现这样需求就要使用到http的不同的请求模式作为区分。
在之前我们知道的模式有post和get,除此之外还有put、delete等等,同一个路径可以使用不同的请求模式,然后在后端指定不同的方法接受不同请求模式的请求。
请求路径是一样的,但是使用不同的http请求模式来进行用户要实现的操作(crud)的区分,这种方式就叫做restful风格。
注意:restful风格一般会结合json、ajax使用。
DEMO : 实现 restful 风格
- 1.下载支持restful
 <!-- Restful风格的开发包  -->
    <dependency>
      <groupId>com.fasterxml.jackson.core</groupId>
      <artifactId>jackson-core</artifactId>
      <version>2.13.3</version>
    </dependency>
    <dependency>
      <groupId>org.codehaus.jackson</groupId>
      <artifactId>jackson-core-asl</artifactId>
      <version>1.9.13</version>
    </dependency>
    <dependency>
      <groupId>com.fasterxml.jackson.core</groupId>
      <artifactId>jackson-annotations</artifactId>
      <version>2.13.3</version>
    </dependency>
    <dependency>
      <groupId>com.fasterxml.jackson.core</groupId>
      <artifactId>jackson-databind</artifactId>
      <version>2.13.3</version>
    </dependency>
    <dependency>
      <groupId>org.codehaus.jackson</groupId>
      <artifactId>jackson-xc</artifactId>
      <version>1.9.13</version>
    </dependency>
- 2.获取前端传递的参数
如果使用restful风格,控制器的中的方法有所改变,调整控制器的代码。
package cn.qf.controller.restful;

import cn.qf.pojo.Emp;
import org.springframework.web.bind.annotation.*;
@RestController  //复合注解等价于@Controller+@ResponseBody
//@Controller
//@ResponseBody
public class RestfulType {
    @PostMapping("restful") //处理post请求
    public Object add(Emp emp){
        System.out.println("要添加的雇员:"+emp);
        return "添加成功!";
    }

    @PutMapping("restful") //处理put请求
    public Object update(Emp emp){
        System.out.println("要更新的雇员的信息:"+emp);
        return"更新成功";
    }
    //之前:emp?cp=11&ls=10&kw=A
    //现在:emp/11/10/A
   @GetMapping(value = "restful/{cp}/{ls}/{kw}",produces = "application/json;charset=utf-8") //处理get请求,分页查询
    public Object getAllSplit(@PathVariable("cp") Integer cp,
                              @PathVariable("ls") Integer ls,
                              @PathVariable("kw") String kw){
        System.out.println("查询条件:"+cp+"|"+ls+"|"+kw);
        return"查询成功!";
    }

    @DeleteMapping("restful/{id}") //处理delete请求
    public Object delete(@PathVariable("id") Integer id){
        return "删除成功!";
    }
}
数据可以获取但是,在控制器中没有找到返回的路径,此时会在控制器中进行跳转,但是restful的风格主要是和ajax和json结合使用,希望的是将信息返回给客户端,而不是希望跳转。
在之前如果要将后端的数据输出到前端使用的是response内置对象取得PintWiter对象,之后在调用该对象的print()方法输出,下面我们使用restful风格实现。
现在只需要在方法上打上注解**@ResponseBody**即可。出现了中文乱码,如果要解决中文乱码可以增加
1.在类名上方
**@RequestMapping(produces = “text/html;charset=utf-8”)**配置
2.在方法上方
@GetMapping(value = “restful/{cp}/{ls}/{kw}”,produces = “application/json;charset=utf-8”)
符合注解
@RestController = @ResponseBody + @Controller
package cn.qf.controller.restful;

import cn.qf.pojo.Emp;
import org.springframework.web.bind.annotation.*;
@RestController  //复合注解等价于@Controller+@ResponseBody
//@Controller
//@ResponseBody
@RequestMapping(produces = "text/html;charset=utf-8")
public class RestfulType {
    @PostMapping("restful") //处理post请求
    public Object add(Emp emp) {
        System.out.println("要添加的雇员:" + emp);
        return "添加成功!";
    }

    @PutMapping("restful") //处理put请求
    public Object update(Emp emp) {
        System.out.println("要更新的雇员的信息:" + emp);
        return "更新成功";
    }

    //之前:emp?cp=11&ls=10&kw=A
    //现在:emp/11/10/A
    //@GetMapping(value = "restful/{cp}/{ls}/{kw}",produces = "application/json;charset=utf-8") //处理get请求,分页查询
    @GetMapping("restful/{cp}/{ls}/{kw}")
    public Object getAllSplit(@PathVariable("cp") Integer cp,
                              @PathVariable("ls") Integer ls,
                              @PathVariable("kw") String kw) {
        System.out.println("查询条件:" + cp + "|" + ls + "|" + kw);
        return "查询成功!";
    }

    @DeleteMapping("restful/{id}") //处理delete请求
    public Object delete(@PathVariable("id") Integer id) {
        return "删除成功!";
    }


     /**  有时间属性的需要添加
     * 控制器中增加一个专门负责时间类型转换处理的方法。【固定用法】
     * */
    @InitBinder
    public void initBinder(WebDataBinder webDataBinder){
        SimpleDateFormat sdf = new SimpleDateFormat("yyy-MM-dd");
        //true-表示日期可以为空
        webDataBinder.registerCustomEditor(Date.class,new CustomDateEditor(sdf,true));
    }
}
接下来解决这个问题:后端的控制器中没有处理对应请求的方法。
10.2 Restful风格实现CRUD
上节课我们分析了restful风格的基本概念以及传参方式,以及以下几个注解:
@RestController
@ResponseBody
@PostMapping
DEMO:实现Restful的CRUD
- 1.导入Jquery的开发包

<base href="/">
<script src="static/js/myjquery.js"></script>
<script src="static/js/emp.js"></script>
- 2.定义操作Emp的.jsp页面
<%@ page contentType="text/html;charset=UTF-8" language="java" %>
<html>
<head>
    <base href="/">
    <script src="static/js/myjquery.js"></script>
    <script src="static/js/emp.js"></script>
    <title>Title</title>
</head>
<body>

<form action="javaScript:void(0)"  id="myForm" method="post">
    <fieldset>
        <legend>请填写表单</legend>
        编号:<input type="text" name="id" placeholder="1001"> <span style="color: orange"></span><br>
        姓名:<input type="text" name="name" placeholder="苏苏"><span style="color: orange"></span><br>
        部门:<input type="text" name="deptid" placeholder="3"><br>
        性别:<input type="radio" name="gender" value="女">女
        <input type="radio" name="gender" value="男">男<br>
        工资:<input type="text" name="salary" placeholder="5000.00"><span style="color: orange"></span><br>
        入职时间<input type="date" name="hiredate"><span style="color: orange"></span><br>
        <%--<input type="submit" value="提交">
        <input type="reset" name="重置"><br>--%>
    </fieldset>
    <button id="addEmp">添加雇员信息</button>
    <button id="removeEmp">删除雇员信息</button>
    <button id="updateEmp">修改雇员信息</button>
    <button id="getEmp">取得信息</button>
</form>
</body>
</html>
- VO对象
package cn.qf.pojo;
import lombok.Data;
import lombok.ToString;
import java.util.Date;
@Data
@ToString
public class Emp {
    private Integer id;
    private String name;
    private Integer deptid;
    private String gender;
    private Double salary;
    private Date hiredate;

    public Emp() {
    }
    public Emp(Integer id, String name, Integer deptid, String gender, Double salary) {
        this.id = id;
        this.name = name;
        this.deptid = deptid;
        this.gender = gender;
        this.salary = salary;
    }
}
- 3.定义rustful_emp.jsp的jquery文件
$(function () {
    //绑定事件-->添加雇员的信息
    $("#addEmp").click(function () {
        //取得表单中的数据 serialize()
        let formData = $("#myForm").serialize();
        console.log(formData)
        //发送异步请求
        $.ajax({
            type:"Post",
            url:"/restful",
            data:formData,
            success:function (data) {
                alert(data);
            }
        })
    })
})
传输的数据:serialize( ) 经过分析发现了不属于restful风格。
DEMO:使用restful风格实现
//取得表单中的数据 serialize()
let formData = $("#myForm").serialize();
//由于serialize()方法进行了encodeURIComponent方法编码,所以这里打印formData的话,你会看见中文乱码。
//使用decodeURIComponent(进行解码,中文即可正常显示。
formData = decodeURIComponent(formData,true);
- 将数据以Json(k:v,K2:v2)格式传输
$(function () {
    //绑定事件-->添加雇员的信息
    $("#addEmp").click(function () {
        //取得表单中的数据 serialize()
        let formData = $("#myForm").serialize();
        /**
        	传输数据转为json格式--【必须Post请求】
        	JSON.stringify({})
        */

        //由于serialize()方法进行了encodeURIComponent方法编码,所以这里打印formData的话,你会看见中文乱码。
        //使用decodeURIComponent(进行解码,中文即可正常显示。
        formData = decodeURIComponent(formData,true);

        console.log(formData)
        console.log(formdataToJson(formData))
        //发送异步请求
        $.ajax({
            type:"Post",
            url:"restful",
            /*数据为k=v格式,非json格式K:v,非Restful格式/d/d/d/*/
            //data:formData,
            //指定提交数据为json格式
            contentType:"application/json;charset=utf-8",
            data:formdataToJson(formData),
            success:function (data) {
                alert(data);
            }
            /** 获取前端数据定义为json格式!!! */
            dataType:"json";
        })
    })

    /*将表单中的数据转换为json对象*/
    function formdataToJson(formData) {
        let jsonObj = "{";
        let params = formData.split("&");
        for (let i = 0; i < params.length; i++) {
            let key = "\"" + params[i].split("=")[0] + "\"";
            let value = "\"" + params[i].split("=")[1] + "\"";
            jsonObj += key + ":" + value + ",";
        }
        //去除末尾最后一个","  并在末尾加上"}"
        jsonObj = jsonObj.substr(0, jsonObj.length - 1);
        jsonObj += "}";
        return jsonObj;
    }
})
后端添加注解**@RequestBody**可以接收json格式数据
@RestController  //复合注解等价于@Controller+@ResponseBody
//@Controller
//@ResponseBody
@RequestMapping(produces = "text/html;charset=utf-8")
public class RestfulType {
    @PostMapping("restful") //处理post请求
    public Object add(@RequestBody Emp emp) { //@RequestBody可以接收json格式的数据
        System.out.println("要添加的雇员:" + emp);
        return "添加成功!";
    }
}
注意:如果控制器的方法的参数前使用@RequestBody注解,参数要遵循json格式。
11、实现ssm整合
以前有一个组合叫做ssh,它是spring+struts2+hibernate,是这三个技术的组合。
使用Spring管理mybatis的开发之后会使得mybatis变得更为简单,在之前需要在mybatis.cfg.xml文件中使用mapper节点为每一个vo类的映射文件指定路径信息;而且需要为dao层的接口编写实现类;在之前可能要在业务层的实现类的方法中实现事务的回滚等操作,业务层我们不再关注连接取得和关闭以及事务的回滚,现在使用Spring集成之后就不需要在做上面的操作了,而是在配置文件中进行了统一的管理(也可以使用注解,但是在事务的处理上来说使用配置文件的形式更为直观)
11.1 使用注解方式配置Spring(准备)
annotation :注解
在SpringMVC项目的基础上
要将applicationContext.xml配置文件去掉,该配置文件中的内容使用配置类来替代它。现在要先启动tomcat。
1. web.xml配置
【旧的】 web.xml配置文件
<?xml version="1.0" encoding="UTF-8"?>
<web-app xmlns="http://xmlns.jcp.org/xml/ns/javaee"
         xmlns:xsi="http://www.w3.org/2001/XMLSchema-instance"
         xsi:schemaLocation="http://xmlns.jcp.org/xml/ns/javaee
         http://xmlns.jcp.org/xml/ns/javaee/web-app_4_0.xsd"
         version="4.0">
  <!-- Spring的主配置文件 -->
  <context-param>
    <param-name>contextConfigLocation</param-name>
    <param-value>classpath:applicationContext.xml</param-value>
  </context-param>

<!--配置Spring的监听器:一旦web容器启动就会根据各种配置创建Spring的ioc容器-->
  <listener>
    <listener-class>org.springframework.web.context.ContextLoaderListener</listener-class>
  </listener>

<!--配置SpringMVC的servlet-->
  <servlet>
    <servlet-name>dispatcher</servlet-name>
    <servlet-class>org.springframework.web.servlet.DispatcherServlet</servlet-class>
    <!--SpringMVC也有自己的配置文件名字习惯叫做dispatcher-servlet.xml-->
    <init-param>
      <param-name>contextConfigLocation</param-name>
      <param-value>classpath:dispatcher-servlet.xml</param-value>
    </init-param>
  </servlet>
  <!--配置映射关系-->
  <servlet-mapping>
    <servlet-name>dispatcher</servlet-name>
    <!--所有的以action结尾的路径都交给DispatcherServlet去处理-->
    <!--<url-pattern>*.action</url-pattern>-->
    <url-pattern>/</url-pattern>
  </servlet-mapping>
</web-app>
【新】web.xml配置文件
<?xml version="1.0" encoding="UTF-8"?>
<web-app xmlns="http://xmlns.jcp.org/xml/ns/javaee"
         xmlns:xsi="http://www.w3.org/2001/XMLSchema-instance"
         xsi:schemaLocation="http://xmlns.jcp.org/xml/ns/javaee
         http://xmlns.jcp.org/xml/ns/javaee/web-app_4_0.xsd"
         version="4.0">
  <!-- Spring的主配置文件 --><!-- 注解配置类对象 -->
  <context-param>
    <param-name>contextClass</param-name>
    <param-value>
      org.springframework.web.context.support.AnnotationConfigWebApplicationContext
    </param-value>
  </context-param>
<!--指定标注了@Configuration的类,多个可以用逗号分隔-->
  <context-param>
    <param-name>contextConfigLocation</param-name>
    <param-value>cn.qf.config.AppConfig</param-value>
  </context-param>

<!--配置Spring的监听器:一旦web容器启动就会根据各种配置创建Spring的ioc容器-->
  <listener>
    <listener-class>org.springframework.web.context.ContextLoaderListener</listener-class>
  </listener>


    <!--配置SpringMVC的servlet-->
  <servlet>
    <servlet-name>dispatcher</servlet-name>
    <servlet-class>org.springframework.web.servlet.DispatcherServlet</servlet-class>
    <!--SpringMVC也有自己的配置文件名字习惯叫做dispatcher-servlet.xml-->
    <init-param>
      <param-name>contextConfigLocation</param-name>
      <param-value>classpath:dispatcher-servlet.xml</param-value>
    </init-param>
  </servlet>
  <!--配置映射关系-->
  <servlet-mapping>
    <servlet-name>dispatcher</servlet-name>
    <!--所有的以action结尾的路径都交给DispatcherServlet去处理-->
    <!--<url-pattern>*.action</url-pattern>-->
    <url-pattern>/</url-pattern>
  </servlet-mapping>
</web-app>
2. 整合开发包 s+s+m
<?xml version="1.0" encoding="UTF-8"?>

<project xmlns="http://maven.apache.org/POM/4.0.0" xmlns:xsi="http://www.w3.org/2001/XMLSchema-instance"
  xsi:schemaLocation="http://maven.apache.org/POM/4.0.0 http://maven.apache.org/xsd/maven-4.0.0.xsd">
  <modelVersion>4.0.0</modelVersion>

  <groupId>org.example</groupId>
  <artifactId>mms_program</artifactId>
  <version>1.0-SNAPSHOT</version>
  <packaging>war</packaging>

  <name>mms_program Maven Webapp</name>
  <!-- FIXME change it to the project's website -->
  <url>http://www.example.com</url>

  <properties>
    <project.build.sourceEncoding>UTF-8</project.build.sourceEncoding>
    <maven.compiler.source>1.8</maven.compiler.source>
    <maven.compiler.target>1.8</maven.compiler.target>
  </properties>

  <dependencies>
    <dependency>
      <groupId>junit</groupId>
      <artifactId>junit</artifactId>
      <version>4.11</version>
      <scope>test</scope>
    </dependency>

<!-- 导入spring和mybatis整合的开发包 -->
    <dependency>
      <groupId>org.mybatis</groupId>
      <artifactId>mybatis</artifactId>
      <version>3.5.5</version>
    </dependency>
<!--要实现mybatis和spring整合需要使用到该开发包-->
    <dependency>
      <groupId>org.mybatis</groupId>
      <artifactId>mybatis-spring</artifactId>
      <version>2.0.7</version>
    </dependency>

    <!--spring的核心组件的开发包,核心工具类都在该jar下面了-->
    <dependency>
      <groupId>org.springframework</groupId>
      <artifactId>spring-core</artifactId>
      <version>5.2.22.RELEASE</version>
    </dependency>
    <!--管理spring容器中的对象的依赖包-->
    <dependency>
      <groupId>org.springframework</groupId>
      <artifactId>spring-beans</artifactId>
      <version>5.2.22.RELEASE</version>
    </dependency>
    <!--为spring的所有程序运行提供了上下文环境-->
    <dependency>
      <groupId>org.springframework</groupId>
      <artifactId>spring-context</artifactId>
      <version>5.2.22.RELEASE</version>
    </dependency>
      <!--导入事务的依赖-->
    <dependency>
        <groupId>org.springframework</groupId>
        <artifactId>spring-tx</artifactId>
        <version>5.3.13</version>
    </dependency>


    <!-- spring日志打印的3个jar包 -->
    <dependency>
      <groupId>commons-logging</groupId>
      <artifactId>commons-logging</artifactId>
      <version>1.1.3</version>
    </dependency>
    <dependency>
      <groupId>org.slf4j</groupId>
      <artifactId>slf4j-api</artifactId>
      <version>1.7.21</version>
    </dependency>
    <dependency>
      <groupId>org.slf4j</groupId>
      <artifactId>slf4j-log4j12</artifactId>
      <version>1.7.21</version>
    </dependency>

    <!--SpringMVC的开发包-->
    <dependency>
      <groupId>org.springframework</groupId>
      <artifactId>spring-webmvc</artifactId>
      <version>5.2.22.RELEASE</version>
    </dependency>

    <!--servlet依赖-->
    <dependency>
      <groupId>javax.servlet</groupId>
      <artifactId>servlet-api</artifactId>
      <version>2.3</version>
    </dependency>
    <!-- servlet注解开发需要的jar文件
https://mvnrepository.com/artifact/javax.servlet/javax.servlet-api-->
    <dependency>
      <groupId>javax.servlet</groupId>
      <artifactId>javax.servlet-api</artifactId>
      <version>3.1.0</version>
      <scope>provided</scope>
    </dependency>
    <dependency>
      <groupId>org.junit.jupiter</groupId>
      <artifactId>junit-jupiter</artifactId>
      <version>5.4.2</version>
      <scope>compile</scope>
    </dependency>


    <!-- 文件上传开发包 -->
    <dependency>
      <groupId>commons-fileupload</groupId>
      <artifactId>commons-fileupload</artifactId>
      <version>1.4</version>
    </dependency>
    <dependency>
      <groupId>commons-io</groupId>
      <artifactId>commons-io</artifactId>
      <version>2.7</version>
    </dependency>

    <!-- lombok:pojo下的实体类 -->
    <dependency>
      <groupId>org.projectlombok</groupId>
      <artifactId>lombok</artifactId>
      <version>1.18.22</version>
    </dependency>
  </dependencies>
3. 开启注解驱动和包扫描
- 配置开发 (配置文件开发)
( applicationContext.xml文件–Spring的配置文件中)
<!--开启注解配置的支持-->
    <context:annotation-config/>

<!--包扫描配置-->
    <context:component-scan base-package="cn.qf"/>
- 注解开发
package cn.qf.config;

import org.springframework.context.annotation.Configuration;
import org.springframework.context.annotation.EnableAspectJAutoProxy;
import org.springframework.stereotype.Component;
import org.springframework.transaction.annotation.EnableTransactionManagement;

@Configuration //表示这是一个配置类
@EnableTransactionManagement //开启事务支持(需要导入依赖)
@Component("cn.qf") //开启包扫描
@EnableAspectJAutoProxy(proxyTargetClass = true)//使用cglib代理
public class AppConfig {
}
4.指定数据库连接的资源文件的地址
方式一:配置文件开发( applicationContext.xml文件–Spring的配置文件中)
<!-- 指定资源文件的位置
<context:property-placeholder location="classpath:"/>、
不需要:ResourceBundleMessageSource类会在创建bean时property注入set资源文件名称
-->
<!-- 注册ResourceBundleMessageSource类的Bean -->
<bean id="messageSource" class="org.springframework.context.support.ResourceBundleMessageSource">
<property name="basename">
<array>
<value>Message</value> <!--指定资源文件的名字-->
</array>
</property>
<!-- <property name="defaultEncoding" value="utf-8"/>-->
</bean>
<!-- 数据库连接性息外部文件导入 -->
<!-- 指定资源文件地址 -->
<context:property-placeholder location="classpath:dataSource.properties"></context:property-placeholder>
<!--
配置数据源bean,可以使用数据源对象取得连接
class:在java文件中导入DriverManagerDataSource查看详细地址
set注入:属性值查看DriverManagerDataSource类中的属性或者其父类、接口的属性-->
<bean id="dataSource" class="org.springframework.jdbc.datasource.DriverManagerDataSource">
<property name="username" value="${jdbc.user}"></property>
<property name="password" value="${jdbc.password}"></property>
<property name="url"
value="${jdbc.jdbcUrl}">
</property>
<property name="driverClassName" value="${jdbc.driverClass}"></property>
</bean>
<!--配置数据源对象 : 阿里巴巴推出的连接池工具druid连接池(数据源的配置)<beanname="dataSource"class="com.alibaba.druid.pool.DruidDataSource"init-method="init"destroy-method="close">
-->
<!-- 修改主配置文件 :使用c3p0连接池
<bean id="c3p0DataSource02" class="com.mchange.v2.c3p0.ComboPooledDataSource">
-->
<!-- 资源文件 -->
jdbc.jdbcUrl=jdbc:mysql://192.168.226.128:3306/TestLiu?useSSL=false&Unicode=true&characterEncoding=UTF-8
jdbc.user=root
jdbc.password=Lcj1024..
jdbc.driverClass=com.mysql.jdbc.Driver
jdbc.maxPoolSize=100
jdbc.minPoolSize=10
jdbc.initialPoolSize=20
jdbc.maxIdleTime=10000
5.配置druid连接池(数据源的配置)
在之前我们使用dbcp、c3p0、Proxypool等连接池,今天使用另外一个连接池,该连接池就是Druid,是阿里巴巴推出的连接池工具,性能高,而还能很好的实现性能监控(比如某个方法执行用了多长时间都可以统计出来,每个sql语句的执行时间也可以统计出来),于是现在使用的越来越广泛。
- 在子pom文件中导入驱动包(连接驱动包)和连接池的开发包
<!--数据库连接驱动包-->
    <dependency>
      <groupId>mysql</groupId>
      <artifactId>mysql-connector-java</artifactId>
      <version>5.1.43</version>
    </dependency>
    <!-- Druid 连接池的开发 -->
    <dependency>
      <groupId>com.alibaba</groupId>
      <artifactId>druid</artifactId>
      <version>1.2.10</version>
    </dependency>
- AppConfig注解类开发
@Configuration //表示这是一个配置类
//@EnableTransactionManagement //开启事务支持(需要导入依赖)
@Component("cn.qf") //开启包扫描
@EnableAspectJAutoProxy(proxyTargetClass = true)//使用cglib代理
public class AppConfig {
    /**可以获取资源信息的类*/
    @Bean
    public static PropertySourcesPlaceholderConfigurer placeholderConfigurer()  {
        //可以获取资源文件信息的类
        PathMatchingResourcePatternResolver resolver = new PathMatchingResourcePatternResolver();
        PropertySourcesPlaceholderConfigurer placeholderConfigurer=new PropertySourcesPlaceholderConfigurer();
        try {
            placeholderConfigurer.setLocations(
                    resolver.getResources("classpath:*.properties"));
        } catch (IOException e) {
            e.printStackTrace();
        }
        return placeholderConfigurer;
    }

    /**
     * 配置数据源对象(Spring-jdbc提供DriverManagerDataSource)
     *   还可以使用druid连接池
     *  需要导入依赖
     * @return DataSource
     **/
    @Bean
    public DataSource dataSource() {
        //使用Spring-jdbc的DriverManagerDataSource
        /*DriverManagerDataSource driverManagerDataSource = new DriverManagerDataSource();
        driverManagerDataSource.setUrl("jdbc:mysql://192.168.226.128:3306/TestLiu?useSSL=false&Unicode=true&characterEncoding=UTF-8");
        driverManagerDataSource.setUsername("root");
        driverManagerDataSource.setDriverClassName("com.mysql.jdbc.Driver");
        driverManagerDataSource.setPassword("Lcj1024..");
        return driverManagerDataSource;*/

        //还可以使用druid连接池
        DruidDataSource dataSource = new DruidDataSource();
        dataSource.setUrl("jdbc:mysql://192.168.226.128:3306/Test?useSSL=false&Unicode=true&characterEncoding=UTF-8");
        dataSource.setUsername("root");
        dataSource.setDriverClassName("com.mysql.jdbc.Driver");
        dataSource.setPassword("Lcj1024..");
        return dataSource;
    }
}
- 测试取得连接
package cn.qf.test;
import org.springframework.context.annotation.AnnotationConfigApplicationContext;
import javax.sql.DataSource;
/**
 * @className: TestDataSource
 * @Author: ich liebe Dich
 * @Date: 2022/11/7 17:07
 * @Version: 1.0
 */
public class TestDataSource {
    public static void main(String[] args) {
        AnnotationConfigApplicationContext annotationConfigApplicationContext = new AnnotationConfigApplicationContext("cn.qf.config");
        DataSource dataSource = (DataSource) annotationConfigApplicationContext.getBean(DataSource.class);
        System.out.println(dataSource);
    }
}


/*测试结果:
{
	CreateTime:"2022-11-07 17:16:36",
	ActiveCount:0,
	PoolingCount:0,
	CreateCount:0,
	DestroyCount:0,
	CloseCount:0,
	ConnectCount:0,
	Connections:[]
}
*/

6.注册SqlSessionFactory的bean
也就是需要把创建SqlSession对象的工厂注册到容器中。该bean负责生产SqlSession连接对象
- 配置文件开发
<!-- -注册SqlSessionFactory工厂 -->
    <bean id="sqlSessionFactory" class="org.mybatis.spring.SqlSessionFactoryBean">
    <property name="dataSource" ref="dataSource"/>
    <!--在之前单独使用mybatis需要在mybaits.cfg.xml文件中使用mapper节点指定每一个vo类对应的映射文件的路径,
    如果类比较多的时候就显得比较繁杂于是在Spring中使用如下配置就可以默认指定这些映射文件的路径,
    但是映射文件的名称要和vo类的名称一样
    -->
        <property name="mapperLocations" value="classpath:mapper/*.xml"/>
        <!--指定mybatis的主配置文件的地址-->
        <property name="configLocation" value="classpath:mybatis.cfg.xml"/>
    </bean>

<!--配置dao层的接口实现类自动生成-->
    <bean class="org.mybatis.spring.mapper.MapperScannerConfigurer">
        <!--指定dao层的接口所在包-->
        <property name="basePackage" value="cn.mbzvip.dao"/>
        <property name="sqlSessionFactoryBeanName" value="sqlSessionFactory"/>
    </bean>
- 使用注解开发
@Configuration //表示这是一个配置类
//@EnableTransactionManagement //开启事务支持(需要导入依赖)
@Component("cn.qf") //开启包扫描
@EnableAspectJAutoProxy(proxyTargetClass = true)//使用cglib代理
public class AppConfig {


    /**
     * 可以获取资源信息的类
     */
    @Bean
    public static PropertySourcesPlaceholderConfigurer placeholderConfigurer() {
        //可以获取资源文件信息的类
        PathMatchingResourcePatternResolver resolver = new PathMatchingResourcePatternResolver();
        PropertySourcesPlaceholderConfigurer placeholderConfigurer = new PropertySourcesPlaceholderConfigurer();
        try {
            placeholderConfigurer.setLocations(
                    resolver.getResources("classpath:*.properties"));
        } catch (IOException e) {
            e.printStackTrace();
        }
        return placeholderConfigurer;
    }

    /**
     * 配置数据源对象(Spring-jdbc提供DriverManagerDataSource)
     * 还可以使用druid连接池
     * 需要导入依赖
     *
     * @return DataSource
     **/

    @Bean
    public DataSource dataSource() {
        //使用Spring-jdbc的DriverManagerDataSource
        /*DriverManagerDataSource driverManagerDataSource = new DriverManagerDataSource();
        driverManagerDataSource.setUrl("jdbc:mysql://192.168.226.128:3306/TestLiu?useSSL=false&Unicode=true&characterEncoding=UTF-8");
        driverManagerDataSource.setUsername("root");
        driverManagerDataSource.setDriverClassName("com.mysql.jdbc.Driver");
        driverManagerDataSource.setPassword("Lcj1024..");
        return driverManagerDataSource;*/

        //还可以使用druid连接池
        DruidDataSource dataSource = new DruidDataSource();
        dataSource.setUrl("jdbc:mysql://192.168.226.128:3306/Test?useSSL=false&Unicode=true&characterEncoding=UTF-8");
        dataSource.setUsername("root");
        dataSource.setDriverClassName("com.mysql.jdbc.Driver");
        dataSource.setPassword("Lcj1024..");
        return dataSource;
    }

    @Bean
    public SqlSessionFactoryBean sqlSessionFactoryBean() throws Exception {
        SqlSessionFactoryBean factoryBean = new SqlSessionFactoryBean();
        PathMatchingResourcePatternResolver resolver = new PathMatchingResourcePatternResolver();
        factoryBean.setMapperLocations(resolver.getResources("classpath:mapper/*.xml"));
        factoryBean.setDataSource(dataSource());
        factoryBean.setConfigLocation(resolver.getResource("classpath:mybatis.cfg.xml"));
        return factoryBean;
    }
}
7.Spring自动实现IDAO
在之前的开发中需要为数据层的每个接口定义实现类,但是使用Spring之后不再去手工定义了会自动实现。
package cn.qf.config;

import com.alibaba.druid.pool.DruidDataSource;
import org.apache.ibatis.session.SqlSessionFactory;
import org.mybatis.spring.SqlSessionFactoryBean;
import org.mybatis.spring.mapper.MapperScannerConfigurer;
import org.springframework.context.annotation.Bean;
import org.springframework.context.annotation.Configuration;
import org.springframework.context.annotation.EnableAspectJAutoProxy;
import org.springframework.context.support.PropertySourcesPlaceholderConfigurer;
import org.springframework.core.io.support.PathMatchingResourcePatternResolver;
import org.springframework.stereotype.Component;

import javax.sql.DataSource;
import java.io.IOException;

/**
 * @className: AppConfig
 * @Author: ich liebe Dich
 * @Date: 2022/11/7 11:19
 * @Version: 1.0
 */

@Configuration //表示这是一个配置类
//@EnableTransactionManagement //开启事务支持(需要导入依赖)
@Component("cn.qf") //开启包扫描
@EnableAspectJAutoProxy(proxyTargetClass = true)//使用cglib代理
public class AppConfig {


    /**
     * 可以获取资源信息的类
     */
    @Bean
    public static PropertySourcesPlaceholderConfigurer placeholderConfigurer() {
        //可以获取资源文件信息的类
        PathMatchingResourcePatternResolver resolver = new PathMatchingResourcePatternResolver();
        PropertySourcesPlaceholderConfigurer placeholderConfigurer = new PropertySourcesPlaceholderConfigurer();
        try {
            placeholderConfigurer.setLocations(
                    resolver.getResources("classpath:*.properties"));
        } catch (IOException e) {
            e.printStackTrace();
        }
        return placeholderConfigurer;
    }

    /**
     * 配置数据源对象(Spring-jdbc提供DriverManagerDataSource)
     * 还可以使用druid连接池
     * 需要导入依赖
     *
     * @return DataSource
     **/

    @Bean
    public DataSource dataSource() {
        //使用Spring-jdbc的DriverManagerDataSource
        /*DriverManagerDataSource driverManagerDataSource = new DriverManagerDataSource();
        driverManagerDataSource.setUrl("jdbc:mysql://192.168.226.128:3306/TestLiu?useSSL=false&Unicode=true&characterEncoding=UTF-8");
        driverManagerDataSource.setUsername("root");
        driverManagerDataSource.setDriverClassName("com.mysql.jdbc.Driver");
        driverManagerDataSource.setPassword("Lcj1024..");
        return driverManagerDataSource;*/

        //还可以使用druid连接池
        DruidDataSource dataSource = new DruidDataSource();
        dataSource.setUrl("jdbc:mysql://192.168.226.128:3306/Test?useSSL=false&Unicode=true&characterEncoding=UTF-8");
        dataSource.setUsername("root");
        dataSource.setDriverClassName("com.mysql.jdbc.Driver");
        dataSource.setPassword("Lcj1024..");
        return dataSource;
    }

    @Bean
    public SqlSessionFactoryBean sqlSessionFactoryBean() throws Exception {
        SqlSessionFactoryBean factoryBean = new SqlSessionFactoryBean();
        PathMatchingResourcePatternResolver resolver = new PathMatchingResourcePatternResolver();
        factoryBean.setMapperLocations(resolver.getResources("classpath:mapper/*.xml"));
        factoryBean.setDataSource(dataSource());
        factoryBean.setConfigLocation(resolver.getResource("classpath:mybatis.cfg.xml"));
        return factoryBean;
    }
   /**
     * 自动生成实现类
     * @return org.mybatis.spring.mapper.MapperScannerConfigurer
     **/
    @Bean
    public MapperScannerConfigurer mapperScannerConfigurer(){
        MapperScannerConfigurer mapperScannerConfigurer = new MapperScannerConfigurer();
        mapperScannerConfigurer.setBasePackage("cn.qf.dao");
        mapperScannerConfigurer.setSqlSessionFactoryBeanName("sqlSessionFactory");
        return mapperScannerConfigurer;
    }
}
12、bean的生命周期
- UserServiceImpl.class—>
- BeanDefinition(对未来要创建bean的信息的描述)—>
- 通过反射调用构造方法(推断构造方法)---->
- 新生对象---->
- 依赖注入(属性填充)—>
- 检查是否实现Aware等接口(BeanNameAware/BeanFactoryAware)—>
- 初始化前(检查属性是否有@PostConstruct–>
- 检查是否要执行postProcessbeforeInitializition方法)---->
- 初始化(检查是否实现InitializingBean,会调用afterPropertiesSet方法)---->
- 初始化后(postProcesseAfterInitializition())—>
- bean就绪了----保存到map单例池中—>
- 使用完了就销毁了(检查实现了销毁的方法)
在这里插入图片描述
1.配置类
package i_Bean的生命周期.cofig;
@Configuration //配置类
@EnableTransactionManagement //开启事务管理支持(必须要有事务管理器)
@ComponentScan("i_Bean的生命周期") //开启包扫描
@EnableAspectJAutoProxy(proxyTargetClass = true) //使用cglib代理
public class SpringConfig {

    /**
     * Spring-jdbc提供的事务管理器
     * transaction-事务
     *
     * @return org.springframework.transaction.PlatformTransactionManager
     **/
    @Bean
    public PlatformTransactionManager transactionManager() {
        DataSourceTransactionManager dataSourceTransactionManager = new DataSourceTransactionManager();
        dataSourceTransactionManager.setDataSource(dataSource());
        return dataSourceTransactionManager;
    }

    /**
     * 配置数据源对象(Spring-jdbc提供DriverManagerDataSource)
     *
     * @return DataSource
     **/
    @Bean
    public DataSource dataSource() {
        //使用Spring-jdbc的DriverManagerDataSource
        DriverManagerDataSource driverManagerDataSource = new DriverManagerDataSource();
        driverManagerDataSource.setUrl("jdbc:mysql://192.168.226.128:3306/TestLiu?useSSL=false&Unicode=true&characterEncoding=UTF-8");
        driverManagerDataSource.setUsername("root");
        driverManagerDataSource.setDriverClassName("com.mysql.jdbc.Driver");
        driverManagerDataSource.setPassword("Lcj1024..");
        return driverManagerDataSource;
    }
}


<!-- 配置了Config需要依赖 -->
    <dependency>
      <groupId>org.springframework</groupId>
      <artifactId>spring-aop</artifactId>
      <version>4.3.12.RELEASE</version>
    </dependency>

    <dependency>
      <groupId>org.springframework</groupId>
      <artifactId>spring-aspects</artifactId>
      <version>4.3.12.RELEASE</version>
    </dependency>
2.BeanNameAware接口的实现
- 在启动的时候要获取到bean的名字就需要实现BeanNameAware接口,在Spring和dubbo整合的时候可能用到(微服务)
- Imp包中的注入类对象
package cn.i_Bean的生命周期.impl;
import cn.i_Bean的生命周期.IEmpBean;
import org.springframework.beans.factory.BeanNameAware;
import org.springframework.stereotype.Component;
@Component
//@Repository
public class EmpBeanImpl implements IEmpBean, BeanNameAware {
    private String beanName;

    @Override
    public void iMethod() {
        System.out.println("当前正在创建bean的名字"+beanName);
    }
   /**
    * 注入Bean对象类实现BeanNameAware接口
    * @param name:
    **/
    @Override
    public void setBeanName(String name) {
        System.out.println("【BeanNameAware】创建Bean的name时会回调!可自定义名字!");
        this.beanName=name;
    }
}


/** 测试类 */
public class TestBean {
    public static void main(String[] args) {
        ApplicationContext bean = new AnnotationConfigApplicationContext(SpringConfig.class);
        IEmpBean empBean =(IEmpBean) bean.getBean(EmpBeanImpl.class);
        empBean.iMethod();
        System.out.println(empBean.getClass());
    }
}

/*
【BeanNameAware】创建Bean的name时会回调!可自定义名字!
当前正在创建bean的名字empBeanImpl
class cn.i_Bean的生命周期.impl.EmpBeanImpl
*/
3.BeanFactoryAware接口
- 创建OrderImp,生成Bean对象
package cn.i_Bean的生命周期.impl;
@Component
@Scope("prototype")  //注解多例对象
public class OrderBeanImpl implements IOrderBean {}
- EmpBean中 @Autowired 注入OrderBean对象
package cn.i_Bean的生命周期.impl;
import cn.i_Bean的生命周期.IEmpBean;
import cn.i_Bean的生命周期.IOrderBean;
import org.springframework.beans.factory.BeanNameAware;
import org.springframework.beans.factory.annotation.Autowired;
import org.springframework.stereotype.Component;
@Component
//@Repository
public class EmpBeanImpl implements IEmpBean, BeanNameAware {
    private String beanName;

    /** 注入OrderBean */
    @Autowired
    private IOrderBean orderBean;
	/** 输出注入的orderBean对象 */
    @Override
    public void iMethod() {
        System.out.println(orderBean);
    }

   /**
    * 注入Bean对象类实现BeanNameAware接口
    * @param name:
    **/
    @Override
    public void setBeanName(String name) {
        System.out.println("【BeanNameAware】创建Bean的name时会回调!可自定义名字!");
        this.beanName=name;
    }
}
- 测试类
public class TestBean {
    public static void main(String[] args) {
        ApplicationContext bean = new AnnotationConfigApplicationContext(SpringConfig.class);
        IEmpBean empBean1 =(IEmpBean) bean.getBean(EmpBeanImpl.class);
        IEmpBean empBean2 =(IEmpBean) bean.getBean(EmpBeanImpl.class);
        IEmpBean empBean3 =(IEmpBean) bean.getBean(EmpBeanImpl.class);
        empBean1.iMethod();
        empBean2.iMethod();
        empBean3.iMethod();
    }
}

/* 结果:
cn.i_Bean的生命周期.impl.OrderBeanImpl@67c27493
cn.i_Bean的生命周期.impl.OrderBeanImpl@67c27493
cn.i_Bean的生命周期.impl.OrderBeanImpl@67c27493
*/
因为我们获取的EmpBean一直是保持的同一个对象不变,所以其属性值OrderBean对象也是同一份不会改变,
先在将EmpBeanImpl.class实现BeanFactoryAware接口,实现接口中的setBeanFactory(BeanFactory beanFactory)方法,可以获得BeanFactory
- EmpBeanImpl
package cn.i_Bean的生命周期.impl;
@Component
//@Repository
public class EmpBeanImpl implements IEmpBean, BeanNameAware , BeanFactoryAware {
    private String beanName;
    private BeanFactory beanFactory;

    /** 注入OrderBean */
    @Autowired
    private IOrderBean orderBean;

    @Override
    public void iMethod() {
        //System.out.println(orderBean);
       /** 利用BeanFactory获取OrderBean */  System.out.println(beanFactory.getBean("orderBeanImpl"));
    }

   /**
    * 注入Bean对象类实现BeanNameAware接口
    * @param name:
    **/
    @Override
    public void setBeanName(String name)  {
        System.out.println("【BeanNameAware】创建Bean的name时会回调!可自定义名字!");
        this.beanName=name;
    }
    /**
     * 创建Bean时获取beanFactory
     * @param beanFactory:
     **/
    @Override
    public void setBeanFactory(BeanFactory beanFactory) throws BeansException {
        System.out.println("【BeanFactoryAware】创建bean时会回调beanFactory");
        this.beanFactory= beanFactory;
    }
}
- Test
public class TestBean {
    public static void main(String[] args) {
        ApplicationContext bean = new AnnotationConfigApplicationContext(SpringConfig.class);
        IEmpBean empBean1 =(IEmpBean) bean.getBean(EmpBeanImpl.class);
        IEmpBean empBean2 =(IEmpBean) bean.getBean(EmpBeanImpl.class);
        IEmpBean empBean3 =(IEmpBean) bean.getBean(EmpBeanImpl.class);
        empBean1.iMethod();
        empBean2.iMethod();
        empBean3.iMethod();
    }
}

/* 测试
cn.i_Bean的生命周期.impl.OrderBeanImpl@5b8dfcc1
cn.i_Bean的生命周期.impl.OrderBeanImpl@2f9f7dcf
cn.i_Bean的生命周期.impl.OrderBeanImpl@747ddf94
*/
4. @PostConstruct注解
@PostConstruct注解
- pojo实体类
@Data
@ToString
@Component
public class Admin {
    private String name;
    private Integer age;
    private String job;
}
- EmpBeanImpl.class
@Component
//@Repository
public class EmpBeanImpl implements IEmpBean, BeanNameAware , BeanFactoryAware {
    /**
     * @Autowired: 注入一个实体类对象,该实体类对象没有创建bean
     *  需要做到不报错,就要在注入前传入数据
     * */
    @Autowired
    private Admin admin;
    /**
     * 该注解在 @Autowired 注入之前调用,会初始化bean对象
     */
    @PostConstruct
    public void initAdmin(){
        this.admin.setName("小明");
        this.admin.setAge(12);
        this.admin.setJob("java开发工程师");
    }

    @Override
    public void iMethod() {
        //System.out.println(orderBean);
        //System.out.println(beanFactory.getBean("orderBeanImpl"));
        System.out.println("输出empBean对象的Admin属性的值"+admin);
    }
    private String beanName;
    private BeanFactory beanFactory;

    /** 注入OrderBean */
    @Autowired
    private IOrderBean orderBean;


   /**
    * 注入Bean对象类实现BeanNameAware接口
    * @param name:
    **/
    @Override
    public void setBeanName(String name)  {
        System.out.println("【BeanNameAware】创建Bean的name时会回调!可自定义名字!");
        this.beanName=name;
    }
    /**
     * 创建Bean时获取beanFactory
     * @param beanFactory:
     **/
    @Override
    public void setBeanFactory(BeanFactory beanFactory) throws BeansException {
        System.out.println("【BeanFactoryAware】创建bean时会回调beanFactory");
        this.beanFactory= beanFactory;
    }
}
5.BeanPostProcessor的使用
- java
package cn.i_Bean的生命周期.cofig;
@Component
public class MyBeanPostProcessor implements BeanPostProcessor {
    @Override
    public Object postProcessBeforeInitialization(Object bean, String beanName) throws BeansException {
        System.out.println("【BeanPostProcessor接口】-->postProcessBeforeInitialization方法");
        System.out.println("本次执行对象为Name="+beanName);
        return bean;
    }

    @Override
    public Object postProcessAfterInitialization(Object bean, String beanName) throws BeansException {
        System.out.println("【BeanPostProcessor接口】-->postProcessAfterInitialization方法");
        System.out.println("本次执行对象为Name="+beanName);
        return bean;
    }
}
- Test
public class TestBean {
    public static void main(String[] args) {
        ApplicationContext bean = new AnnotationConfigApplicationContext(SpringConfig.class);
        IEmpBean empBean = (IEmpBean) bean.getBean(EmpBeanImpl.class);
        empBean.iMethod();
    }
}

/*【BeanPostProcessor接口】-->postProcessAfterInitialization方法
本次执行对象为Name=empBeanImpl
DEBUG [main] - Creating shared instance of singleton bean 'empController'
【BeanPostProcessor接口】-->postProcessBeforeInitialization方法
本次执行对象为Name=empController
【BeanPostProcessor接口】-->postProcessAfterInitialization方法
本次执行对象为Name=empController
DEBUG [main] - Creating shared instance of singleton bean 'restfulType'
【BeanPostProcessor接口】-->postProcessBeforeInitialization方法
本次执行对象为Name=restfulType
【BeanPostProcessor接口】-->postProcessAfterInitialization方法
本次执行对象为Name=restfulType
输出empBean对象的Admin属性的值Admin(name=小明, age=12, job=java开发工程师)

Process finished with exit code 0
*/
应用场景:比如一个接口有多个实现类,此时我们在取得这个实现类bean的时候如果通过byType的方式去获取,就需要使用相关的一些注解让部分实现类的bean,放弃候选权,这种助处理方式不够灵活。
那么则可以自定义一个注解,只要在需要的属性上打上这个注解,就可以指定要哪个实现类的bean了。
@Autowired 注入之前调用,会初始化bean对象
*/
@PostConstruct
public void initAdmin(){
this.admin.setName(“小明”);
this.admin.setAge(12);
this.admin.setJob(“java开发工程师”);
}
@Override
public void iMethod() {
    //System.out.println(orderBean);
    //System.out.println(beanFactory.getBean("orderBeanImpl"));
    System.out.println("输出empBean对象的Admin属性的值"+admin);
}
private String beanName;
private BeanFactory beanFactory;

/** 注入OrderBean */
@Autowired
private IOrderBean orderBean;
/**
* 注入Bean对象类实现BeanNameAware接口
* @param name:
/
@Override
public void setBeanName(String name) {
System.out.println(“【BeanNameAware】创建Bean的name时会回调!可自定义名字!”);
this.beanName=name;
}
/
* 创建Bean时获取beanFactory
* @param beanFactory:
**/
@Override
public void setBeanFactory(BeanFactory beanFactory) throws BeansException {
System.out.println(“【BeanFactoryAware】创建bean时会回调beanFactory”);
this.beanFactory= beanFactory;
}
}
## 5.BeanPostProcessor的使用

- java

```java
package cn.i_Bean的生命周期.cofig;
@Component
public class MyBeanPostProcessor implements BeanPostProcessor {
    @Override
    public Object postProcessBeforeInitialization(Object bean, String beanName) throws BeansException {
        System.out.println("【BeanPostProcessor接口】-->postProcessBeforeInitialization方法");
        System.out.println("本次执行对象为Name="+beanName);
        return bean;
    }

    @Override
    public Object postProcessAfterInitialization(Object bean, String beanName) throws BeansException {
        System.out.println("【BeanPostProcessor接口】-->postProcessAfterInitialization方法");
        System.out.println("本次执行对象为Name="+beanName);
        return bean;
    }
}
- Test
public class TestBean {
    public static void main(String[] args) {
        ApplicationContext bean = new AnnotationConfigApplicationContext(SpringConfig.class);
        IEmpBean empBean = (IEmpBean) bean.getBean(EmpBeanImpl.class);
        empBean.iMethod();
    }
}

/*【BeanPostProcessor接口】-->postProcessAfterInitialization方法
本次执行对象为Name=empBeanImpl
DEBUG [main] - Creating shared instance of singleton bean 'empController'
【BeanPostProcessor接口】-->postProcessBeforeInitialization方法
本次执行对象为Name=empController
【BeanPostProcessor接口】-->postProcessAfterInitialization方法
本次执行对象为Name=empController
DEBUG [main] - Creating shared instance of singleton bean 'restfulType'
【BeanPostProcessor接口】-->postProcessBeforeInitialization方法
本次执行对象为Name=restfulType
【BeanPostProcessor接口】-->postProcessAfterInitialization方法
本次执行对象为Name=restfulType
输出empBean对象的Admin属性的值Admin(name=小明, age=12, job=java开发工程师)

Process finished with exit code 0
*/
应用场景:比如一个接口有多个实现类,此时我们在取得这个实现类bean的时候如果通过byType的方式去获取,就需要使用相关的一些注解让部分实现类的bean,放弃候选权,这种助处理方式不够灵活。
那么则可以自定义一个注解,只要在需要的属性上打上这个注解,就可以指定要哪个实现类的bean了。
spring的一些底层还有很多,比如以及缓存、二级缓存、三级缓存这些概念背下来就行了。没这么多时间来一一研究。


 999
999


 被折叠的 条评论
为什么被折叠?
被折叠的 条评论
为什么被折叠?
 到【灌水乐园】发言


