


1. XFire介绍
XFire和Axis都是新一代的java web服务框架。XFire提供了非常方便的API,使用这些API可以开发面向服务(SOA)的程序。他比axis性能要高,支持各种标准,性能优良,基于低内存的STAX模型,也是其于流的XML。
• 支持多个重要的Web Service标准,包括SOAP、WSDL、WS-I Basic Profile、 WSAddressing、WS-Security等
• 高性能的SOAP栈
• 可选的绑定(binding)方式,如POJO、XMLBeansJAXB1.1、JAXB2.0、CastorJiBX等
• 支持JSR181 API
• 多种传输方式,如HTTP、JMS、XMPP、In-JVM等
• 灵活的接口
• 支持多个容器,如Spring、Pico
关于XFire就知道这么多,关于它的更祥细的资料或更深层次东西,就不去研究了,当然关于webservice的基本的知识还要学习的。作为技术人员不能光知其然,不知其所以然。(行了,又废话了)。
2. 准备
在开始介绍开发实例之前,你首先要准备工具有:eclipse、Myeclipse、weblogic8,当然你也可以自己下载最新xfire。http://repository.codehaus.org/org/codehaus/xfire/xfire-distribution/1.2.6/xfire-distribution-1.2.6.zip都准备好了 ,那就正式开工吧!
3. 开发
l 服务端
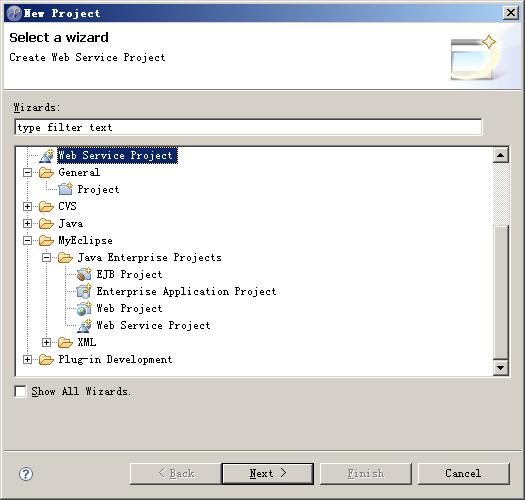
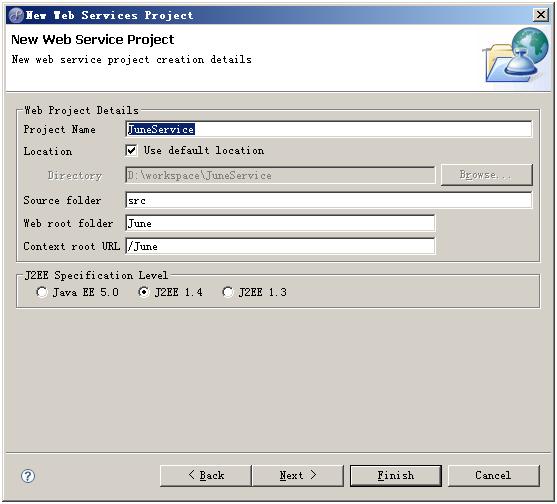
首先,eclipse新建一个webservice工程
工程名字就叫JuneService,web root、content root都为June
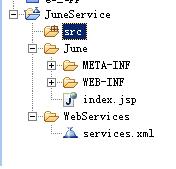
一路next后,点击”Finish”,会看到如下结构,有了工具就是好,什么东西都自己生成,那先看看WEB-INF/web.xml都生成了什么吧。。
<?xml version="1.0" encoding="UTF-8"?>
<web-app xmlns="http://java.sun.com/xml/ns/j2ee"
xmlns:xsi="http://www.w3.org/2001/XMLSchema-instance" version="2.4"
xsi:schemaLocation="http://java.sun.com/xml/ns/j2ee http://java.sun.com/xml/ns/j2ee/web-app_2_4.xsd">
<servlet>
<servlet-name>XFireServlet</servlet-name>
<servlet-class>
org.codehaus.xfire.transport.http.XFireConfigurableServlet
</servlet-class>
<load-on-startup>0</load-on-startup>
</servlet>
<servlet-mapping>
<servlet-name>XFireServlet</servlet-name>
<url-pattern>/services/*</url-pattern>
</servlet-mapping>
<welcome-file-list>
<welcome-file>index.jsp</welcome-file>
</welcome-file-list>
</web-app>
在这个web.xml文件中定义了一个 XfireServlet,它负责提供Web Services,并提供
每个Web Service的WSDL。如果你发布了一个Web Service,比如叫JuneService,你
就可以通过网址http://<server_url[:port]>/<context>/ services/JuneService来访问这个Web Service,并且通过网址http://<server_url[:port]>/<context>/
services/BookService?WSDL得到这个Web Service的WSDL信息。
在源文件夹WEB-INF/src下新建一个java package:com.june,在这个package下新建一个接口JuneService,(往往很多文章在介绍某项技术怎么用时,都会用helloworld这个例子,这个例子确实应用广泛,不过,咱换一种例子,或都另一种方式的HelloWorld)
这个接口定义了只定义了一个addDate方法。这个方法要求传入一个整数的参数,返回类型为一个字符串,用来得到当的时间的加上n天以后的日期,也很简单吧。。
package com.june;
public interface JuneService {
public String addDate(int d);
}
最写一个实现这个接口的类
package com.june;
import java.util.Calendar;
public class JuneServiceImpl implements JuneService {
public String addDate(int d) {
Calendar cal = Calendar.getInstance();
cal.add(Calendar.DATE, d);
SimpleDateFormat dateFormat = new SimpleDateFormat();
dateFormat.applyPattern("yyyy年MM月dd日");
return dateFormat.format(cal.getTime());
}
}
实现的很简单,就是加上天数后,直接tostring反回就可以了。
现在看来很简单吧,webserice的类跟普通的没有什么区别。好,继续吧。在WebServices目录下有一个services.xml文件,他就是用来发布你上面的这两个类做为webservice的,好,我们来配置一下这个文件。
<?xml version="1.0" encoding="UTF-8"?>
<beans xmlns="http://xfire.codehaus.org/config/1.0">
<service>
<name>HelloService</name>
<namespace>http://services.june.come/JuneService</namespace>
<serviceClass>
com.june.JuneService
</serviceClass>
<implementationClass>
com.june.JuneServiceImpl
</implementationClass>
</service>
</beans>
好了,services.xml配置好了,关于services.xml配置结构这里也不说明了,大家可以去查资料,这里能说明问题就行了,那我就开始发布我们的webservice吧!说明一点,如果使用的不是eclipse工具,你可能要手动装services.xml文件考到WEB-INF/classes/META-INF/xfire下面。但是myeclipe都不用你关心这些事情,它替你搞定。
那就先发布到weblogic上,启动服务。在地址里输入http://localhost:7001/June/services
就可以看到我们的服务了,可是这是在其它web容器,但是在weblogic8上就不行,会出现如下的错误:org.springframework.beans.factory.BeanDefinitionStoreException: Error registering bean with name 'xfire.typeMappingRegistry' defined in class path resource [org/codehaus/xfire/spring/xfire.xml]: Class that bean class [org.codehaus.xfire.aegis.type.DefaultTypeMappingRegistry] depends on not found; nested exception is java.lang.NoClassDefFoundError: null
这个问题是怎么会事,难道是配置错了,可是查来查去没有什么错误呀。那到google上找(真不知道现在程序员如果没有Google会是什么样?),找了好长时间,终于在xfire的官网上找到相关的资料。如下:
XFire requires a newer version of the javax.xml.namespace.QName than is included in weblogic.jar. The QName jar can be found here
To override the weblogic.jar with your own QName.jar, your need to do the following:
Add the QName JAR file (qname.jar) into the WEB-INF/lib folder in your WAR file
Add a file weblogic.xml into the WEB-INF folder in your WAR file
Below is an example weblogic.xml file:
<!DOCTYPE weblogic-web-app PUBLIC
"-//BEA Systems, Inc.//DTD Web Application 8.1//EN"
"http://www.bea.com/servers/wls810/dtd/weblogic810-web-jar.dtd">
<weblogic-web-app>
<container-descriptor>
<prefer-web-inf-classes>true</prefer-web-inf-classes>
</container-descriptor>
</weblogic-web-app>
The purpose of the weblogic.xml file is to tell WebLogic that the the WEB-INF/lib folder should take precedence over the global weblogic.jar file. This allows you to override the system classloader with your own application-specific JAR files.
The other solution is to put qname.jar at the beginning of WLS classpath in startweblogic batch file.
Qname.jar 下载地址:http://docs.codehaus.org/download/attachments/27836/qname.jar?version=1
原来发生错误原因,是因为weblogic.jar包的qname.jar太旧了,确切的说是 qname.class,好那就按照解决方法做,把qname.jar加到工程中,在weblogic server也加上qname.jar,还要在startweblogic.cmd的classpath里加放%WL_HOME%/server/lib/qname.jar,或是直接替换weblogic.jar里的qname.class,这样启动时就会用这个新包了。加入weblogic.xml就是要用户自己的jar先于系统的jar加载。好了,再重启一下服务。
再输入地址http://localhost:7001/June/services,好,终于看我们期盼已久的界面了。这样我们webservice服务就发布成功了。
l 客户端
有了服务端,那我们就应用一下,下面我们来做webservice的客户端。
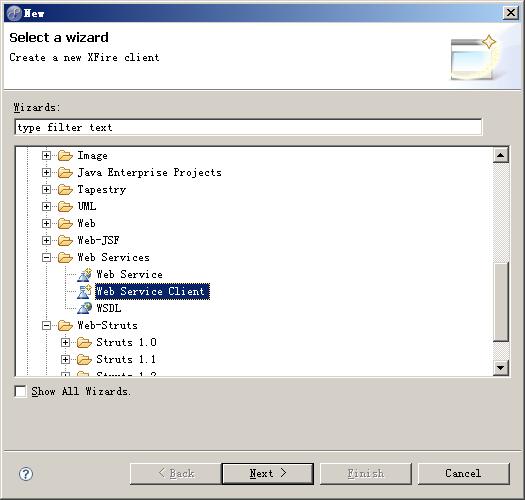
首先建一个java application工程。就叫JuneClient吧,这个工程很简单,什么也没有,那我先建一下src源目录,并做为建我们的java package com.june,client来做为webservice的客户端。在工程上右键new->others选择webservice client.
然后,next按照提示来设置。
Wsdl url填写刚发布成功的webservice的地址http://localhost:7001/June/services/JuneService?wsdl
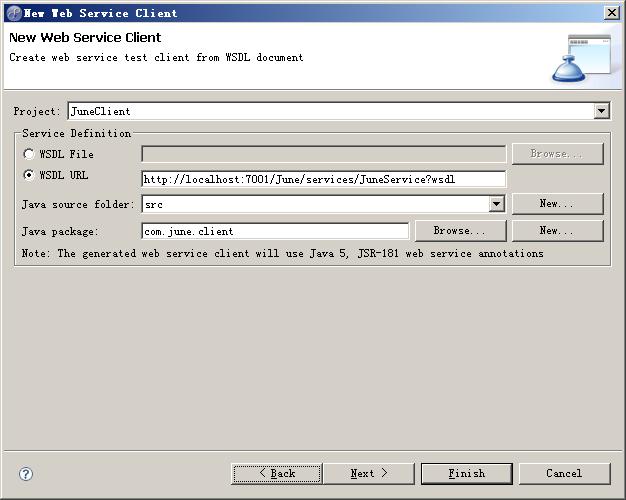
这一步next,我这里的eclipse会报web 服务描述语言有错误,直接finish就OK了
这样,myeclipse就会自动生成客户端所需要的程序,有了工具确实是很方便,这样确实提高了开发效率,但是也造成了许多程序员没有工具就不会写程序,工具一通搞定,具体里面的关系也不用管,我觉得程序员不光要会用工具,还要知道工具怎么来实现的,为什么要设置这一步,在没有工具情况下,我应该先从那做起,明白原理后,再利于工具,才能对你有所提高。才能提高对整个系统的整体把握。不光要知其然,还要知其所然,这才是搞技术应有的态度。(哎,又废话了)
既然,自动生成了客户端程序,我们就来测试一下我们的webservice。
package com.june.client;
import com.june.client.JuneServiceClient;
import com.june.client.JuneServicePortType;
public class JuneClientMain {
public static void main(String[] args) {
JuneServiceClient client = new JuneServiceClient();
JuneServicePortType juneService = client.getJuneServiceHttpPort();
// 调用服务
String result = juneService.addDate(21);
System.out.println(result);
}
}
以上为通过webservice客户端调用web服务的一个例子,我调用webservice的addDate()方法,参数传入21,然后运行这个程序。也就是说通过webservice应该返回当前日期加上21天那天的日期是多少,结果是:2008年08月08日。正好是北京奥运会的日子,好日子呀,哈哈。。
好了,其实webservice在好多地方都可以布署,也可以在web应用下,也可以桌面应用,C++、C#、VB等等。只要你提供相应的WSDL,告诉调用者相应的接口方法,只需传入相应的参数,就能得到你想要的结果。
关键点:
l XFire、myeclipse、
l Weblogic8配置,qname.jar,startWebLogic.cmd
l Web服务描述语言
l Webservice客户端调用


 4056
4056


 被折叠的 条评论
为什么被折叠?
被折叠的 条评论
为什么被折叠?
 到【灌水乐园】发言


