


测试机器
src: 192.16 8.100.138
dst: 192.168.100.51
PG:18 for linux
测试过程:
1. 138上创建testbench2 库,并使用pgbench创建测试表
testbench=# create database testbench2;
CREATE DATABASE

pgbench -i -s 100 -d testbench2
2. 创建publication,将public的schema下的表都pub出去
testbench2=#create publication pub_138_testbench2_public_schema for tables in schema public;

CREATE PUBLICATION

//从pg_publication中可以查询到该发布的信息

testbench2=# select * from pg_publication;
-[ RECORD 1 ]+---------------------------------
oid          | 22138
pubname      | pub_138_testbench2_public_schema
pubowner     | 10
puballtables | f
pubinsert    | t
pubupdate    | t
pubdelete    | t
pubtruncate  | t
pubviaroot   | f
pubgencols   | n

查看哪个表空间被发布了

select oid,pnpubid,pnnspid::regnamespace from pg_publication_namespace ;
  oid  | pnpubid | pnnspid
-------+---------+---------
 22139 |   22138 | public

查看现有发布的表以及字段,针对于tables in schema 发布的,需要到
pg_publication_tables中查询,因为无法指定字段信息,因此attnames包括了表的所有字段

testbench2=# select * from pg_publication_tables ;
             pubname              | schemaname |    tablename     |             attnames             | rowfilter
----------------------------------+------------+------------------+----------------------------------+-----------
 pub_138_testbench2_public_schema | public     | pgbench_accounts | {aid,bid,abalance,filler}        |
 pub_138_testbench2_public_schema | public     | pgbench_branches | {bid,bbalance,filler}            |
 pub_138_testbench2_public_schema | public     | pgbench_history  | {tid,bid,aid,delta,mtime,filler} |
 pub_138_testbench2_public_schema | public     | pgbench_tellers  | {tid,bid,tbalance,filler}        |
(4 rows)

另外一个记录pub表信息的视图是pg_publication_rel
记录了单个发布表的信息,包括了发布了那些字段以及where条件,从其表结构中就能看出来
\d pg_publication_rel
          Table "pg_catalog.pg_publication_rel"
 Column  |     Type     | Collation | Nullable | Default
---------+--------------+-----------+----------+---------
 oid     | oid          |           | not null |
 prpubid | oid          |           | not null |
 prrelid | oid          |           | not null |
 prqual  | pg_node_tree | C         |          |
 prattrs | int2vector   |           |          |
3. 由于逻辑复制不支持ddl(除了truncate),所以需要将表结构先导入到51上
pg_dump -h 192.168.100.138 -d testbench2 -s -n public |psql -d testbench2

创建一个订阅

with 后面的参数,可以参考https://www.postgresql.org/docs/18/sql-createsubscription.html

binary参数允许使用copy binary方式快速初始化数据
create subscription sub_138_testbench2 connection 'host=192.168.100.138 port=8432 user=postgres password=Super123 dbname=testbench2' publication pub_138_testbench2_public_schema with(binary=true);
4. 查看同步状态
select * from pg_subscription_rel;
srsubid | srrelid | srsubstate | srsublsn
---------+---------+------------+------------
21204 | 21191 | r | 8/1B8F8CB8
21204 | 21194 | r | 8/1B8F8CF0
21204 | 21187 | r | 8/1B8F8D28
21204 | 21183 | r | 8/1B8F8D28
最终srsubstate的状态变成ready,表示同步初始化数据完成,而且为数据初始化同步所创建的slot也会被同步删除,如果是别的状态,表示初始化同步并没有完成,而且其创建的slot也不会被删除,这时候可以查看sub端的日志。
下面两个例子:
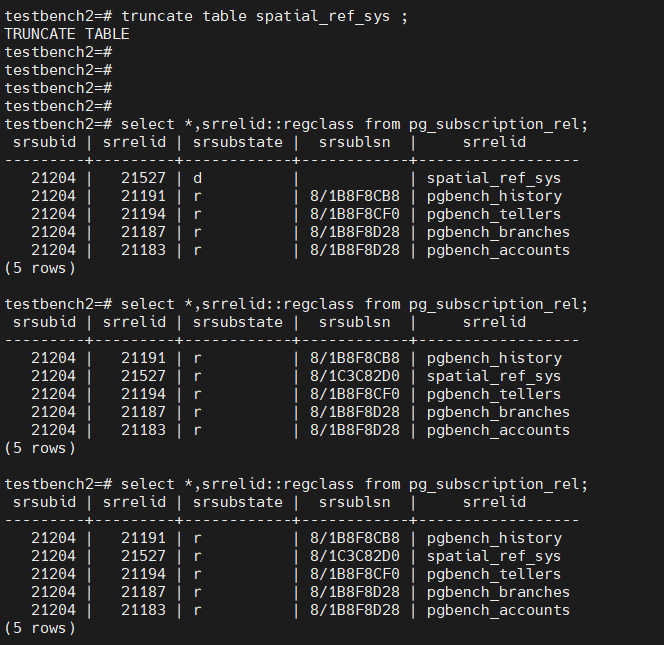
1. 源端和目标端都创建了postgis到public的schema中,因此两端都创建了spatial_ref_sys表,并且都包含是数据。
2. 目标端创建sub之后,spatial_ref_sys表也会参与同步,但是数据已经存在了,因此在初始化过程中会产生主键冲突,在sub端日志会体现,所以状态不会是r。
3. 解决方案是将目标端spatial_ref_sys表清空,并刷新sub,让其重启同步。
更多的srsubstate可以参考https://www.cnblogs.com/wy123/p/18946661
5. 在138上创建postgis,可以看到spatial_ref_sys也自动参与到了pub了。
testbench2=# select * from pg_publication_tables;
             pubname              | schemaname |    tablename     |                  attnames                   | rowfilter
----------------------------------+------------+------------------+---------------------------------------------+-----------
 pub_138_testbench2_public_schema | public     | pgbench_accounts | {aid,bid,abalance,filler}                   |
 pub_138_testbench2_public_schema | public     | pgbench_branches | {bid,bbalance,filler}                       |
 pub_138_testbench2_public_schema | public     | pgbench_history  | {tid,bid,aid,delta,mtime,filler}            |
 pub_138_testbench2_public_schema | public     | pgbench_tellers  | {tid,bid,tbalance,filler}                   |
 pub_138_testbench2_public_schema | public     | spatial_ref_sys  | {srid,auth_name,auth_srid,srtext,proj4text} |
但是由于sub端并没有相应的表结构(因为没有创建postgis), 所以该表也不会初始化同步。
在sub端的日志中有体现,如下

并且这个错误如果没有解除的话,logical replication apply worker进程会定期被logical replication launcher。
在pub端的日志中并不会记录类似错误,但是也可以体现在slot上,每次创建sub对象的时候,会同步创建一个slot,与sub对象同名
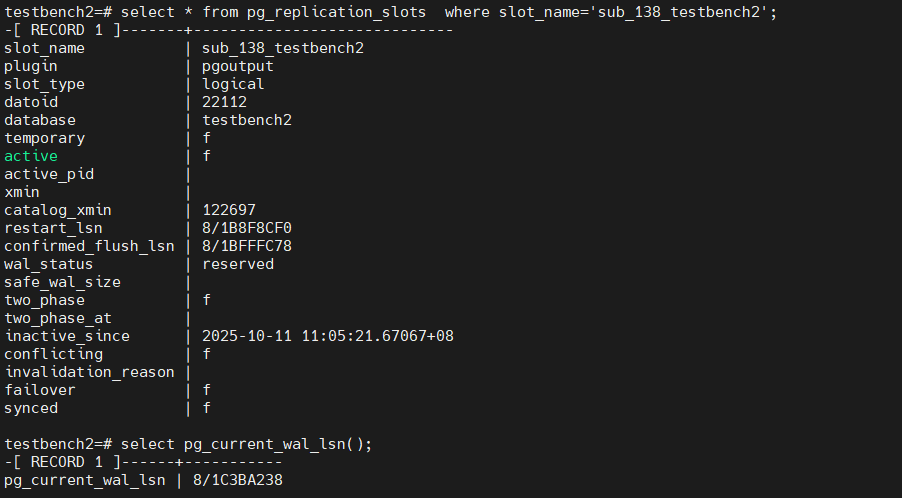
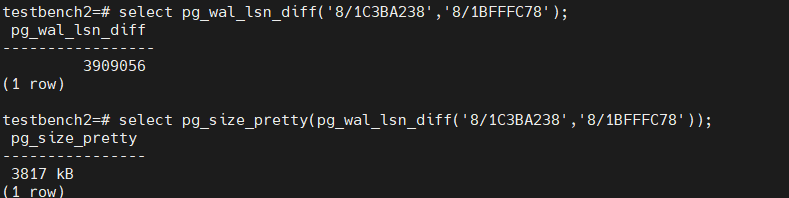

意味着上图的日志文件之后的文件都需要保留,这个很容易打爆存储。
6. 解决
在sub端也创建postgis扩展后,并刷新
alter subscription sub_138_testbench2 refresh publication;
这样会重新初始化同步数据,但是由于spatial_ref_sys已经存在数据,所以sub端会报主键冲突错误

从初始化视图中也能看出来其状态
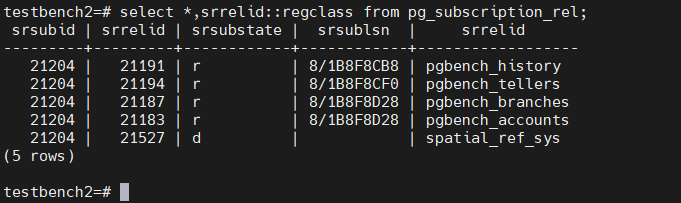
sub端手动删除spatial_ref_sys,完成同步,并且sub端日志也不在报错
方法2:
忽略错误,有两种方法可以忽略该错误
1. 从日志中找到发生错误的lsn

其confirm_lsn同日志中一致
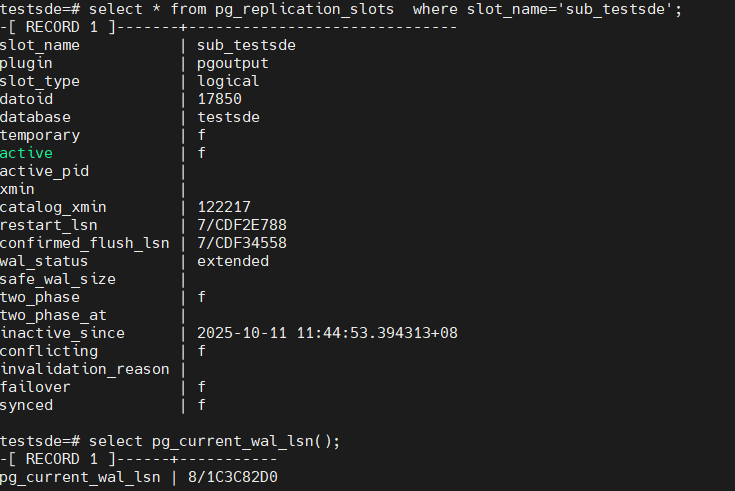
2. 忽略该lsn
ALTER SUBSCRIPTION sub_testsde SKIP (lsn = '7/CDF34558');
ALTER SUBSCRIPTION
3. 查看slot信息
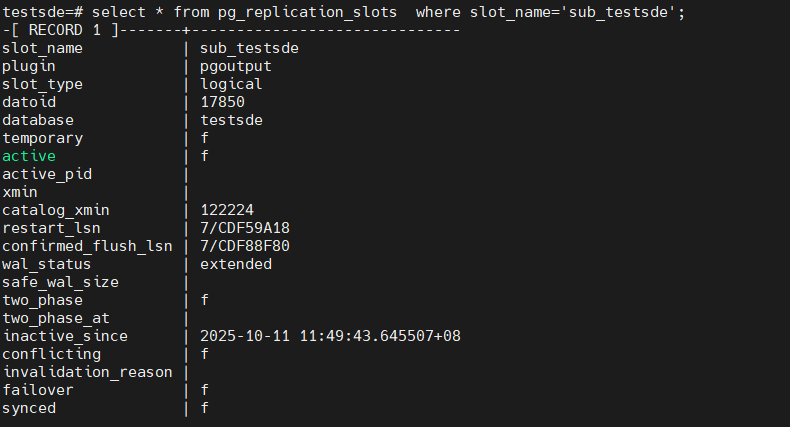
可以看到又卡在下一个事务上了,从日志中也能看到

4. 我们直接忽略所有的错误
ALTER SUBSCRIPTION sub_testsde set (DISABLE_ON_ERROR = 'on');
查看slot的conform_lsn信息
5. 从sub的日志中能看到orgin名字和lsn
使用下面函数推进
select pg_replication_origin_advance('pg_19788','7/CE6BC428');
pg_replication_origin_advance
-------------------------------

(1 row)

重新启用
alter subscription sub_testsde enable;
6. 如果还有冲突还需要继续推进
下一个测试:
发布一张表的某几个字段,然后添加字段,是否会同步过去
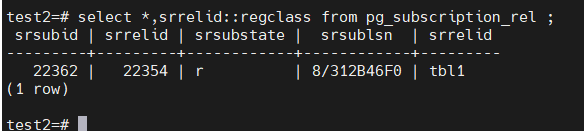
138上创建一个新库,test2
创建了表tbl1如下
建表,发布,插入数据
create table tbl1(id int primary key ,info1 text);


create publication pub_test2_tbl1 for table tbl1(id,info1);

insert into tbl1 select id ,md5(random()::text) from generate_series(1,2000000) as id;
51上,建表,建订阅
create table tbl1 (id int primary key,info1 text);

create subscription sub_138_test2 connection 'dbname=test2 host=192.168.100.138 port=8432 user=postgres password=Super123' publication pub_test2_tbl1 with (binary=true);
但是发现表并没有同步过来,查看51上的日志,发现如下warning

发现是max_logical_replication_workers 参数不够了
该参数默认是4, logical replication apply worker 也占用这个参数指标,系统中已经有有5个subscription,因此不够了。
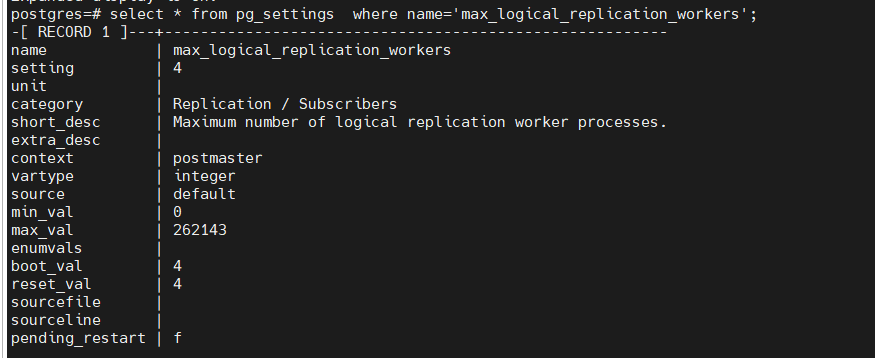
该参数是postmaster级别的,修改后需要重启db。
当然了可以删除某个sub来释放。
我们采取释放其中某一个sub来解决这个问题
![]()

可以看到释放后,sub_138_test2同步立刻就开始了,并且很快完成
138 表上添加一个字段,并更新值
pub和sub端都增加字段
alter table tbl1 add info2 text;

更新发布

alter publication pub_test2_tbl1 set table tbl1 (id,info1,info2);

更新订阅
alter subscription sub_138_test2 refresh publication ;


update tbl1 set info2=md5(random()::text);
当然了,发布的时候可以不指定字段,这样添加字段就会自动同步过去。
streaming 参数测试
sub端可以指定streaming参数,具体说明如下
Specifies whether to enable streaming of in-progress transactions for this subscription. The default value is parallel, meaning incoming changes are directly applied via one of the parallel apply workers, if available. If no parallel apply worker is free to handle streaming transactions then the changes are written to temporary files and applied after the transaction is committed. Note that if an error happens in a parallel apply worker, the finish LSN of the remote transaction might not be reported in the server log.
If set to on, the incoming changes are written to temporary files and then applied only after the transaction is committed on the publisher and received by the subscriber.
If set to off, all transactions are fully decoded on the publisher and only then sent to the subscriber as a whole.
默认是parallel,并行的意思,实时变化的数据通过parallel apply worker进程传送到sub端,如果没有可用的parallel apply workers,则先写到pub端的临时文件中$PGDATA/base/pgsql_tmp。
设置为on, 实时变化的数据先写到sub端的临时文件中$PGDATA/base/pgsql_tmp中,等后续事务提交或者回滚,sub端根据实际情况进行处理
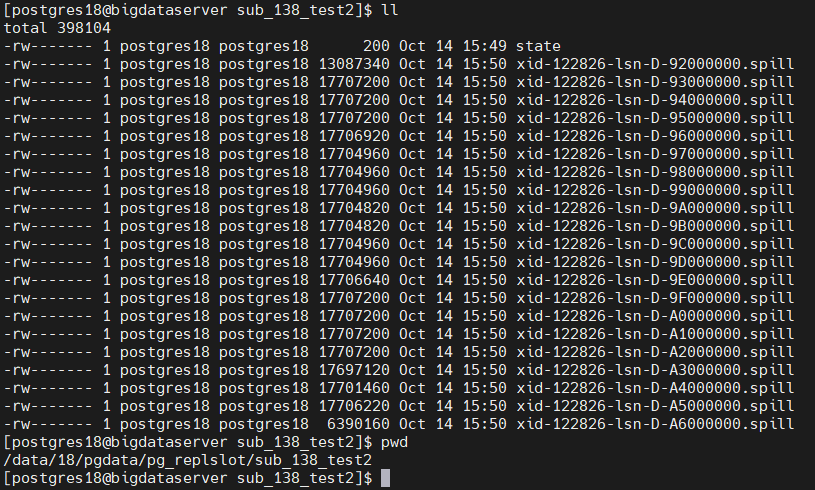
是指为off, 所有的数据全部解码之后放到pub端的$PGDATA/pg_replslot中,再根据后续事务提交或者回滚进行处理
测试过程如下:
parallel模式
1. alter subscription sub_138_test2 set(streaming=parallel);
2. pub端
begin;
insert into tbl2 select id,md5(random()::text) from generate_series(1,3000000) as id;
delete from tbl2;
insert into tbl2 select id,md5(random()::text) from generate_series(1,3000000) as id;
delete from tbl2;
commit;
3.
pub端
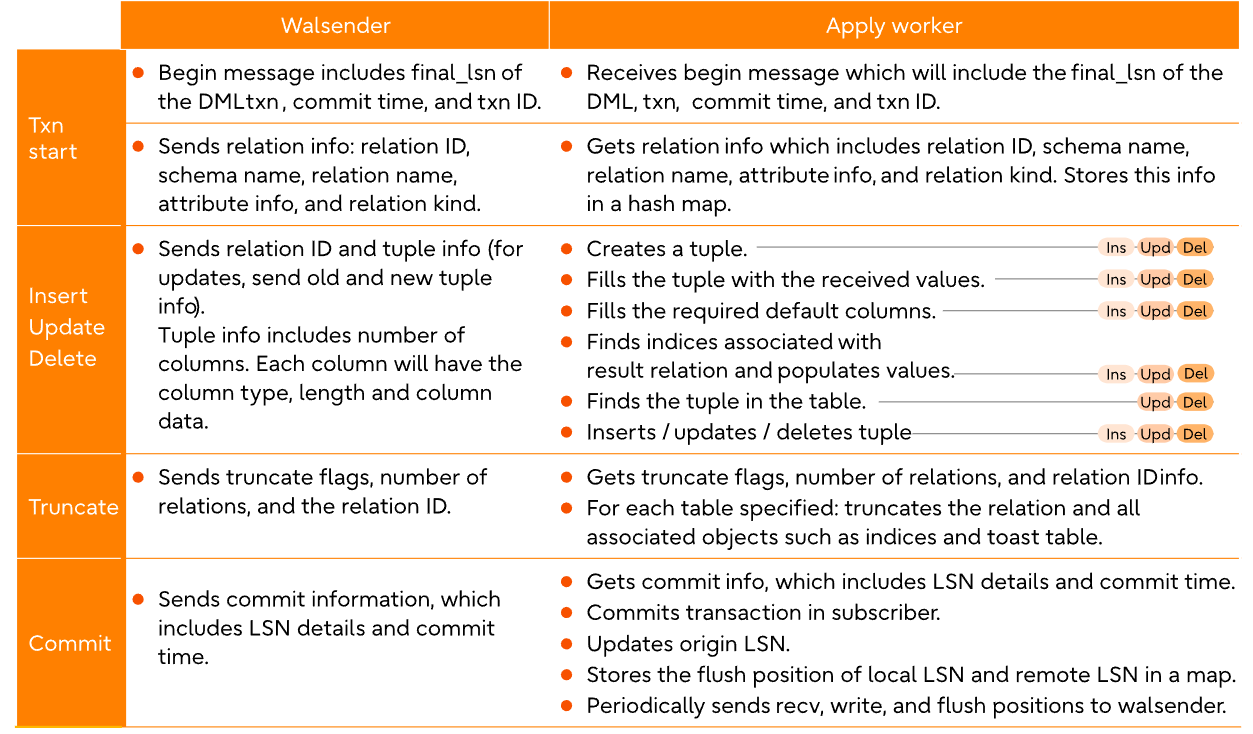
walsender 输送数据
![]()
logical parallel apply 正常接收数据,并进行应用
![]()
4.pub和sub端几乎是实时更新,包括大小。
on模式
1. alter subscription sub_138_test2 set(streaming=on);
2. pub端
begin;
insert into tbl2 select id,md5(random()::text) from generate_series(1,3000000) as id;
delete from tbl2;
insert into tbl2 select id,md5(random()::text) from generate_series(1,3000000) as id;
delete from tbl2;
3.
pub 端wal sender正常发送变化数据
![]()
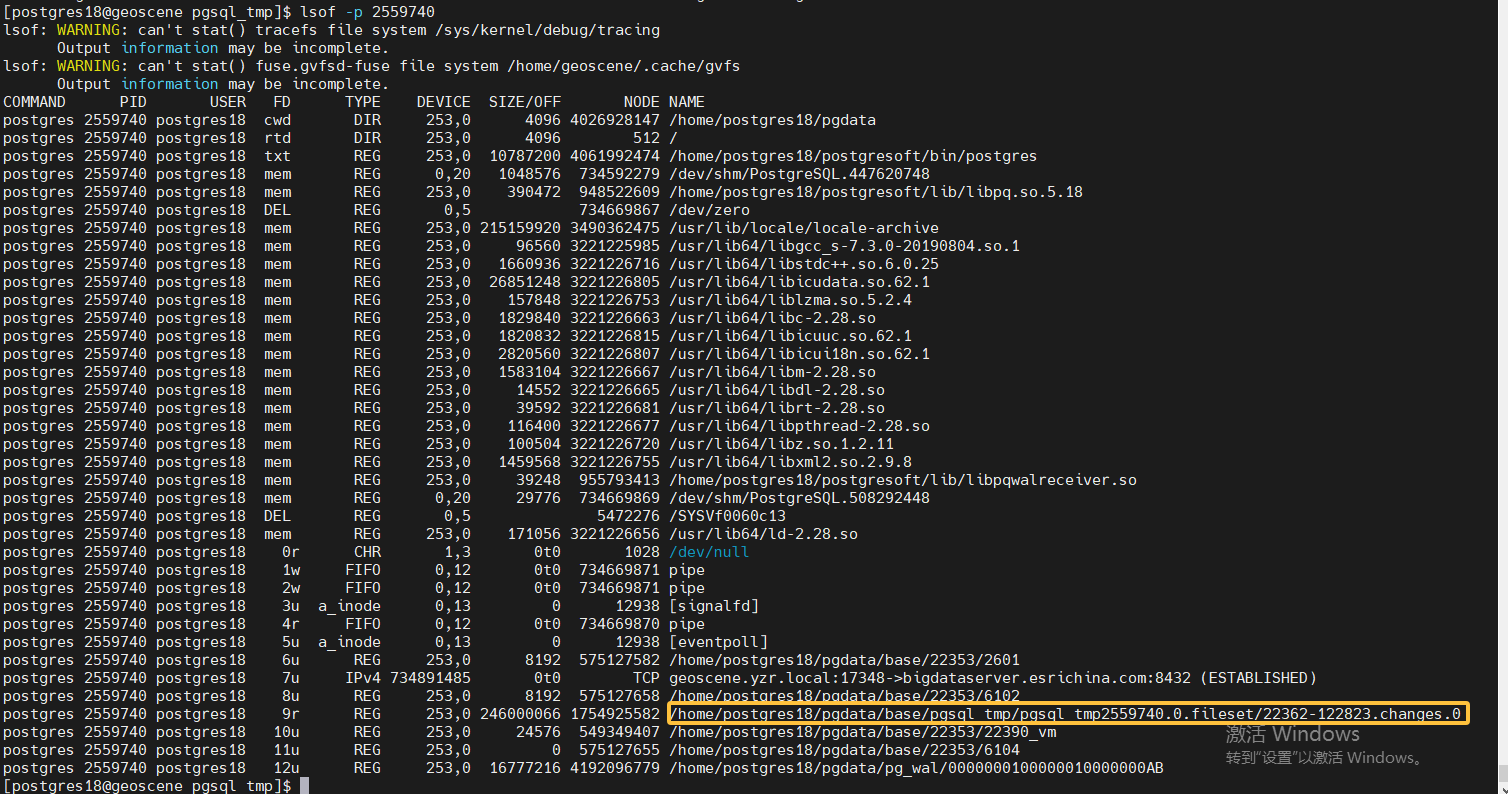
sub端,apply worker也正常接收数据,但是并没有直接应用到相应的表上,而是存储到了
$PGDATA/base/pgsql_tmp目录中
![]()
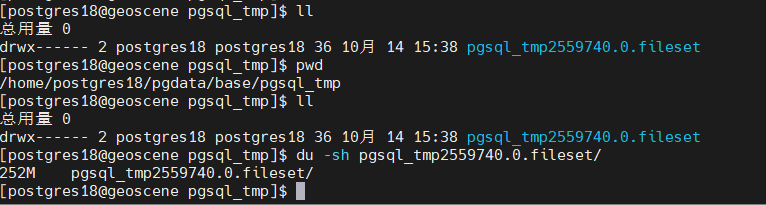
sub端实际表并没有发生任何变化
4. pub端提交
commit
5. sub端,从tmp目录中读取数据,并应用到实际的表中
6. 应用完后,删除临时文件
off模式
1. alter subscription sub_138_test2 set(streaming=off);
2. pub端
begin;
delete from tbl2;
3.
wal sender在正常发送数据,但是实际并没有发送给sub端,而是把数据写到了pub端的某个目录中,如下所示
![]()
sub端的logical parallel apply worker并没有工作
4. pub端
commit.
5. sub端启动,从pub端的wal sender进程开始接收数据,并将其应用到实际表中。
![]()


 1037
1037

 被折叠的 条评论
为什么被折叠?
被折叠的 条评论
为什么被折叠?
 到【灌水乐园】发言


