
shape是用来设置背景图、按钮等样式的一种方法
MainActivity
public class MainActivity extends AppCompatActivity implements View.OnClickListener {
private Button mBtn5;
@Override
protected void onCreate(Bundle savedInstanceState) {
super.onCreate(savedInstanceState);
setContentView(R.layout.activity_main);
mBtn5 = (Button) findViewById(R.id.button_dialog5);
mBtn5.setOnClickListener(this);
}
@Override
public void onClick(View v) {
switch (v.getId()) {
case R.id.button_dialog5:
showMydialog();
break;
default:
break;
}
}
private void showMydialog() {
dialog = new Dialog(MainActivity.this, R.style.NoDialogTitle);
LayoutInflater inflater = getLayoutInflater();
View dialogView = inflater.inflate(R.layout.my_dialog, null);
TextView textViewTitle = (TextView) dialogView.findViewById(R.id.textview_title);
TextView textViewMessage = (TextView) dialogView.findViewById(R.id.textview_message);
Button button_cancel = (Button) dialogView.findViewById(R.id.button_cancel);
Button button_ok = (Button) dialogView.findViewById(R.id.button_ok);
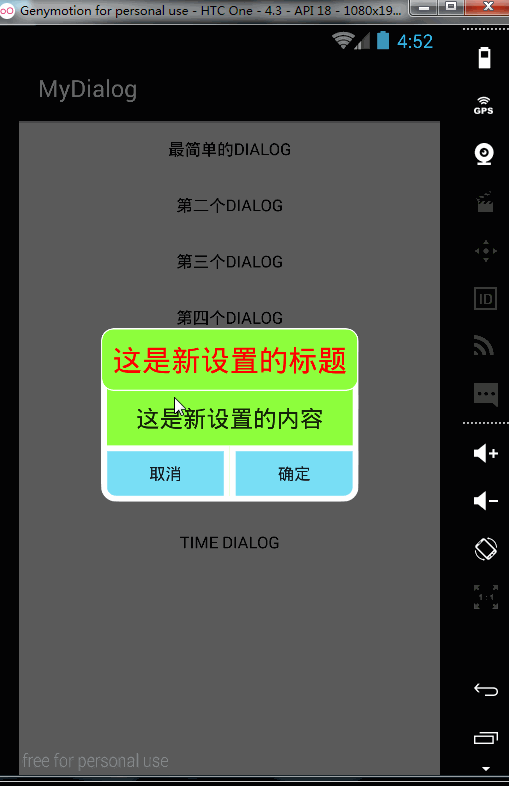
textViewTitle.setText("这是新设置的标题");
textViewMessage.setText("这是新设置的内容");
button_cancel.setOnClickListener(new View.OnClickListener() {
@Override
public void onClick(View v) {
dialog.dismiss();
}
});
button_ok.setOnClickListener(new View.OnClickListener() {
@Override
public void onClick(View v) {
Toast.makeText(getApplicationContext(), "点击的是确定", Toast.LENGTH_SHORT).show();
dialog.dismiss();
}
});
dialog.setContentView(dialogView);
dialog.show();
}
}
my_dialog.xml
<?xml version="1.0" encoding="utf-8"?>
<LinearLayout xmlns:android="http://schemas.android.com/apk/res/android"
android:layout_width="match_parent"
android:layout_height="match_parent"
android:orientation="vertical"
android:background="@drawable/dialog_background">
<TextView
android:id="@+id/textview_title"
android:layout_width="match_parent"
android:layout_height="wrap_content"
android:text="我是一个标题"
android:background="@drawable/dialog_title_background"
style="@style/myTextView"
/>
<TextView
android:id="@+id/textview_message"
android:layout_width="match_parent"
android:layout_height="wrap_content"
android:text="我是内容"
android:gravity="center"
android:textSize="20sp"
android:padding="10dp"/>
<LinearLayout
android:layout_width="match_parent"
android:layout_height="wrap_content">
<Button
android:id="@+id/button_cancel"
android:layout_width="0dip"
android:layout_height="wrap_content"
android:layout_weight="1"
android:background="@drawable/btn_right_background"
android:text="取消"/>
<Button
android:id="@+id/button_ok"
android:layout_width="0dip"
android:layout_height="wrap_content"
android:layout_weight="1"
android:background="@drawable/btn_left_background"
android:text="确定"/>
</LinearLayout>
</LinearLayout>
btn_left_background.xml
<?xml version="1.0" encoding="utf-8"?>
<selector xmlns:android="http://schemas.android.com/apk/res/android">
    <item android:drawable="@drawable/btn_left_pressed" android:state_pressed="true"/>
    <item android:drawable="@drawable/btn_left_normal"/>
</selector>
btn_left_normal.xml
<?xml version="1.0" encoding="utf-8"?>
<shape xmlns:android="http://schemas.android.com/apk/res/android">
<corners android:bottomRightRadius="@dimen/corners"/>
<solid android:color="#79DFF6"/>
<stroke android:color="@android:color/white" android:width="5dp"/>
</shape>
btn_left_pressed.xml
<?xml version="1.0" encoding="utf-8"?>
<shape xmlns:android="http://schemas.android.com/apk/res/android">
    <corners android:bottomRightRadius="@dimen/corners"/>
    <solid android:color="#30AEE8"/>
    <stroke android:color="@android:color/white" android:width="5dp"/>
</shape>
btn_right_background.xml
<?xml version="1.0" encoding="utf-8"?>
<selector xmlns:android="http://schemas.android.com/apk/res/android">
    <item android:drawable="@drawable/btn_right_pressed" android:state_pressed="true"/>
    <item android:drawable="@drawable/btn_right_normal"/>
</selector>
btn_right_normal.xml
<?xml version="1.0" encoding="utf-8"?>
<shape xmlns:android="http://schemas.android.com/apk/res/android">
    <corners android:bottomLeftRadius="@dimen/corners"/>
    <solid android:color="#79DFF6"/>
    <stroke android:color="@android:color/white" android:width="5dp"/>
</shape>
btn_right_pressed.xml
<?xml version="1.0" encoding="utf-8"?>
<shape xmlns:android="http://schemas.android.com/apk/res/android">
    <corners android:bottomLeftRadius="@dimen/corners"/>
    <solid android:color="#30AEE8"/>
    <stroke android:color="@android:color/white" android:width="5dp"/>
</shape>
dialog_background.xml
<?xml version="1.0" encoding="utf-8"?>
<shape xmlns:android="http://schemas.android.com/apk/res/android">
    <corners android:radius="15dp"/>
    <solid android:color="#8dff3d"/>
    <stroke android:color="@android:color/white" android:width="5dp"/>
</shape>
dialog_title_background.xml
<?xml version="1.0" encoding="utf-8"?>
<shape xmlns:android="http://schemas.android.com/apk/res/android">
    <corners android:radius="@dimen/corners"/>
    <solid android:color="#8dff3d"/>
    <stroke android:color="@android:color/white" android:width="1dp"/>
</shape>
styles.xml
<resources>
<!-- Base application theme. -->
<style name="AppTheme" parent="Theme.AppCompat.Light.DarkActionBar">
<!-- Customize your theme here. -->
</style>
<style parent="@android:Theme.Dialog" name="NoDialogTitle">
<item name="android:windowFrame">@null</item>
<item name="android:windowNoTitle">true</item>
<item name="android:windowBackground">@android:color/transparent</item>
<item name="android:windowIsFloating">true</item>
<item name="android:windowContentOverlay">@null</item>
</style>
<style name="myTextView">
<item name="android:textColor">#ff0000</item>
<item name="android:textSize">25sp</item>
<item name="android:padding">10dp</item>
</style>
</resources>
运行图
双彩虹


 964
964

 被折叠的 条评论
为什么被折叠?
被折叠的 条评论
为什么被折叠?
 到【灌水乐园】发言


