


类似BS模式,客户端发送任务请求给服务端,服务端将处理结果返回给客户端。 redis负责消息的存储和转发。
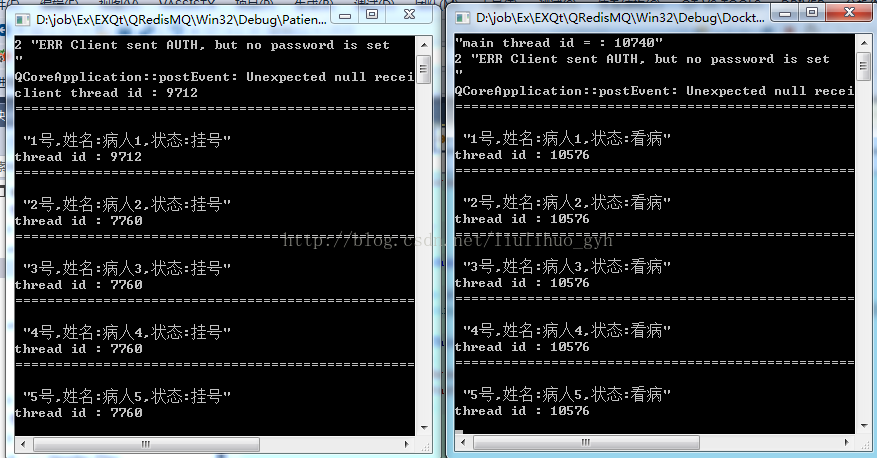
仿真病人挂号看病,Patient进程进行挂号,Doctor进程进行看病 ,程序代码如下:
Patient
Patient.h:
#include <QObject>

class QRedis;

class Patient : public QObject
{
	Q_OBJECT

public:
	Patient(QObject *parent = nullptr);
	~Patient();

public slots:
	void pushTask(); //push任务

private:
	void popResult(); //pop结果
	QRedis * m_redis;
};
#include "patient.h"
#include "qredis.h"
#include <QTimer>
#include <QEventLoop>
#include <QThread>

static const QString KEYTASK = "MARKTASK";
static const QString KEYRESULT = "MARKRESULT";

Patient::Patient(QObject *parent)
	: QObject(parent)
{
	//初始化通道
	m_redis = new QRedis(this);
	m_redis->connectHost("127.0.0.1", 6379);
	m_redis->auth("1234");

	qDebug() << "client thread id :" << int(QThread::currentThreadId());

	//轮询任务
	QTimer * timer = new QTimer(this);
	connect(timer, &QTimer::timeout, this, &Patient::popResult);
	timer->start(20);

	m_redis->del(KEYRESULT);
	m_redis->del(KEYTASK);
	pushTask();
}

Patient::~Patient()
{
}

void Patient::pushTask()
{
	static int i = 0;
	QString task = QStringLiteral("%1号,姓名:%2,状态:%3").arg(++i).arg(QStringLiteral("病人%1").arg(i)).arg(QStringLiteral("挂号"));
	qDebug() <<"========================================================\n\n"<< task;
	qDebug() << "thread id :" << int(QThread::currentThreadId());
	qint64 ret = m_redis->rpush(KEYTASK, task);
}

void Patient::popResult()
{
	QString state;
	QString taskData = m_redis->lpop(KEYRESULT);
	if (taskData.compare("nil", Qt::CaseInsensitive) == 0 || taskData.isEmpty())
	{
		return;
	}
	QEventLoop loop;
	QTimer::singleShot(5000, &loop, &QEventLoop::quit);
	loop.exec();
	pushTask();
}
#include <QtCore/QCoreApplication>
#include <QDebug>
#include <QThread>
#include "patient.h"

int main(int argc, char *argv[])
{
	QCoreApplication a(argc, argv);

	qDebug() << QString("main thread id = : %1").arg(int(QThread::currentThreadId()));

	QThread patientThread;
	Patient patient;
	patient.moveToThread(&patientThread);
	patientThread.start();
	return a.exec();
}
/Docktor/
Docktor.h
#pragma once

#include <QObject>

class QRedis;

class Docktor : public QObject
{
	Q_OBJECT

public:
	Docktor(QObject *parent = nullptr);
	~Docktor();

public slots:
	void popTask(); //pop任务

private:
	void pushResult(const QString &task); //push结果

	QRedis * m_redis;
};
Docktor.cpp
#include "docktor.h"
#include "qredis.h"
#include <QTimer>
#include <QEventLoop>
#include <QThread>

static const QString KEYTASK = "MARKTASK";
static const QString KEYRESULT = "MARKRESULT";

Docktor::Docktor(QObject *parent)
	: QObject(parent)
{
	//初始化通道
	m_redis = new QRedis(this);
	m_redis->connectHost("127.0.0.1", 6379);
	m_redis->auth("1234");

	QTimer * timer = new QTimer(this);
	connect(timer, &QTimer::timeout, this, &Docktor::popTask);
	timer->start(20);
}

Docktor::~Docktor()
{
}

void Docktor::popTask()
{
	//获取任务
	QString taskData = m_redis->lpop(KEYTASK);
	if (taskData.compare("nil", Qt::CaseInsensitive) == 0 || taskData.isEmpty())
	{
		//qDebug() <<  QString("wait..............................");
		return;
	}
	//处理任务
	pushResult(taskData);
}

void Docktor::pushResult(const QString &task)
{
	QStringList taskDatas = task.split(",");
	QString state = taskDatas.at(2);
	taskDatas.removeLast();
	taskDatas.append(QStringLiteral("状态:看病"));
	//push处理结果
	qDebug() <<"========================================================\n\n" << taskDatas.join(",");
	qDebug() << "thread id :" << int(QThread::currentThreadId());
	qint64 ret = m_redis->rpush(KEYRESULT, taskDatas.join(","));
}
#include <QtCore/QCoreApplication>
#include <QDebug>
#include <QThread>
#include "docktor.h"

int main(int argc, char *argv[])
{
	QCoreApplication a(argc, argv);
	qDebug() << QString("main thread id = : %1").arg(int(QThread::currentThreadId()));

	QThread docktorThread;
	Docktor docktor;
	docktor.moveToThread(&docktorThread);
	docktorThread.start();
	return a.exec();
}
/截图/


 706
706

 被折叠的 条评论
为什么被折叠?
被折叠的 条评论
为什么被折叠?
 到【灌水乐园】发言


