


Navigation
方便管理Fragment
(1)方便我们管理Fragment页面的切换。
(2)可视化的页面导航图,便于理清页面间的关系。
(3)通过destination和action完成页面间的导航
(4)类型安全的参数传递
(5)通过NavigationUI类,对底部导航,抽屉菜单,ActionBar的菜单导航
进行统一的管理。
(6)支持深层链接Deeplink
Navigation的使用
Navigation的三个主要元素:Navigation Graph、NavHostFragment、NavController.(下文会有说明作用)
当要切换Fragment时,使用NavController对象,控制跳转到Navigation Graph中的指定Fragment,并展示到容器NavHostFragment里。
步骤:
1.引入依赖
	//java引入
    implementation 'androidx.navigation:navigation-fragment:2.3.2'
    implementation 'androidx.navigation:navigation-ui:2.3.2'
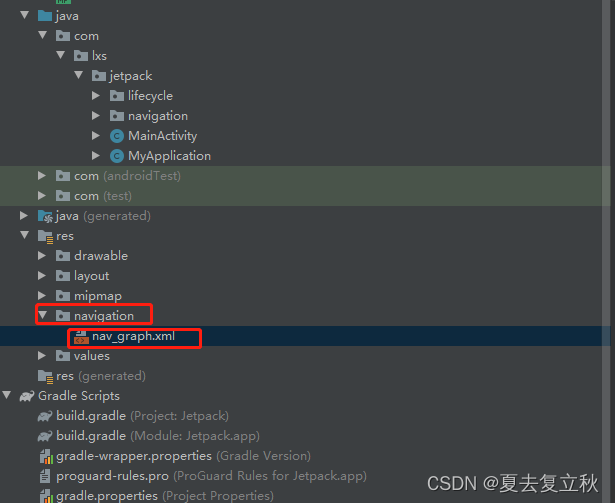
2.新建nav_graph.xml
在res下面创建navigation文件夹(名称固定),并创建navigation文件 nav_graph.xml;
2. 声明HostFragment
在MainActivity的layout布局里声明HostFragment
新建MainActivity,无需做任何操作
public class MainActivity extends AppCompatActivity {
    private static String TAG =MainActivity.class.getSimpleName();

    @Override
    protected void onCreate(Bundle savedInstanceState) {
        super.onCreate(savedInstanceState);
        setContentView(R.layout.activity_main);
        Log.i(TAG,"onCreate");

    }

}
在activity_main.xml中引用fragment
<?xml version="1.0" encoding="utf-8"?>
<LinearLayout xmlns:android="http://schemas.android.com/apk/res/android"
    xmlns:app="http://schemas.android.com/apk/res-auto"
    xmlns:tools="http://schemas.android.com/tools"
    android:layout_width="match_parent"
    android:layout_height="match_parent"
    tools:context=".MainActivity">

<fragment
    android:id="@+id/nav_host_fragment_container"
    android:name="androidx.navigation.fragment.NavHostFragment"
    app:naGraph = "@navigation/nav_graph"
    android:layout_width="match_parent"
    android:layout_height="match_parent"
    />
</LinearLayout>
对应的XML文件里面我们并没有引用我们自己将要创建的Fragment,而是引用了一个NavHostFragment ,NavHostFragment是我们引入的Navigation组件提供的一个Fragment,其实现了NavHost接口,可以将它理解为系统默认的一个Fragment模板,或者是当前Fragment的容器。
app:navGraph 的作用就是NavHostFragment 与导航图相关联工作由它完成,在navigation中完成到目的视图导航。
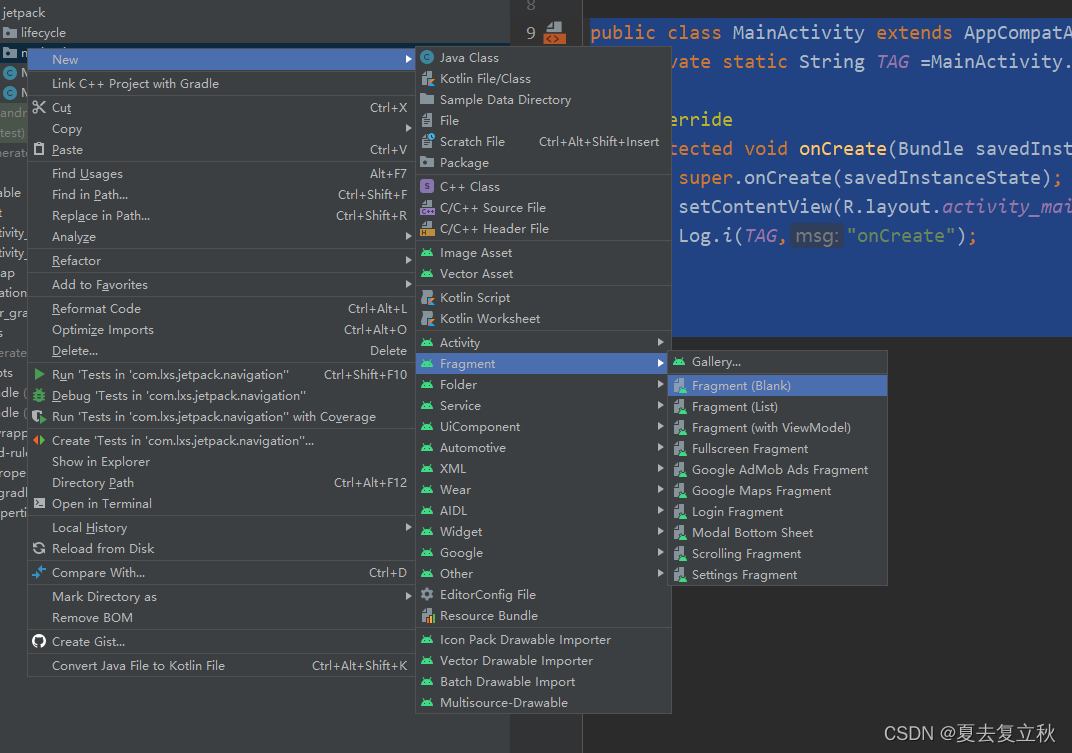
3. 建立Fragment
新建两个要展示的firstFragment与secondFragment
无需修改新建的两个Fragment
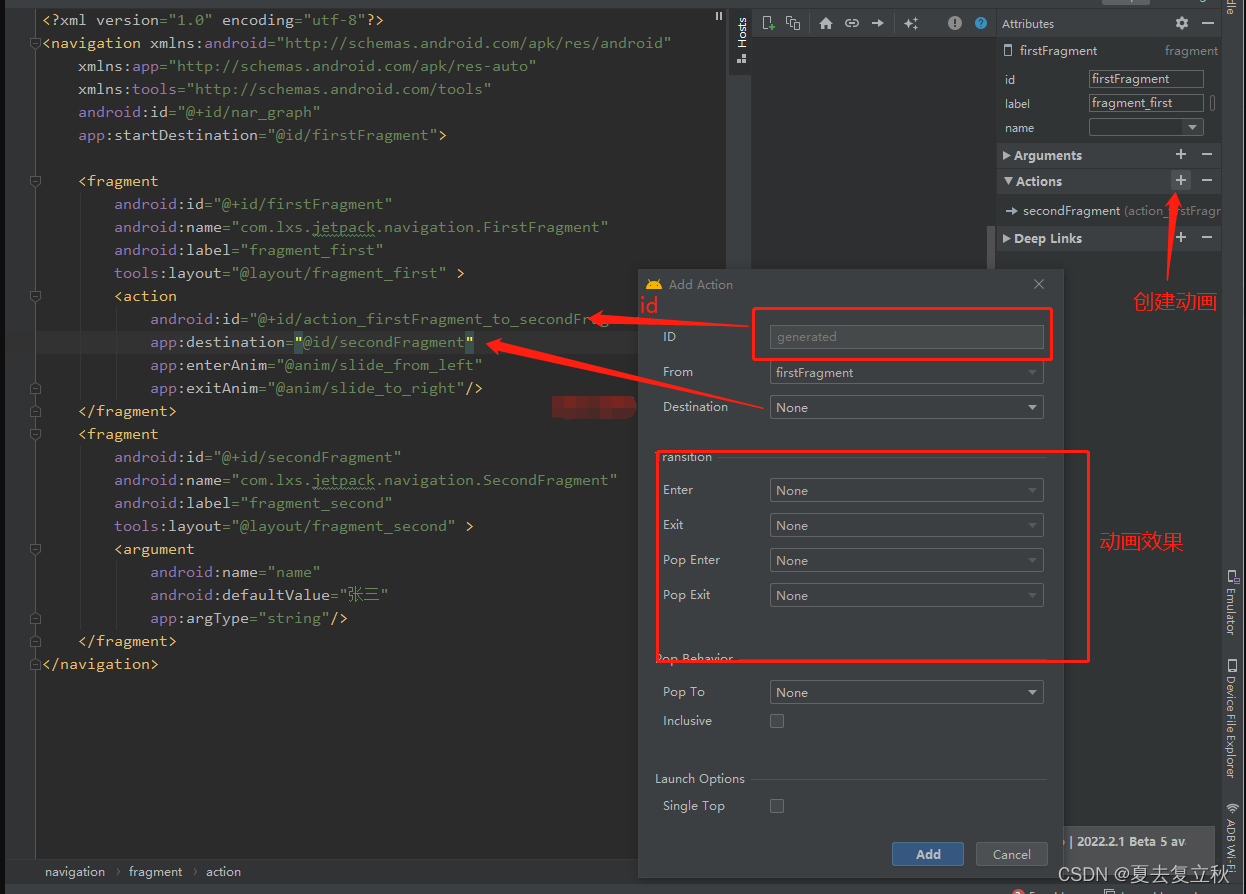
4. 生成action
连线从firstFragment到secondFragment,生成一个页面跳转的action.
① 关联fragment与nar_graph.xml

② 调整两个fragment位置,nar_graph.xml就变成了如下图所示
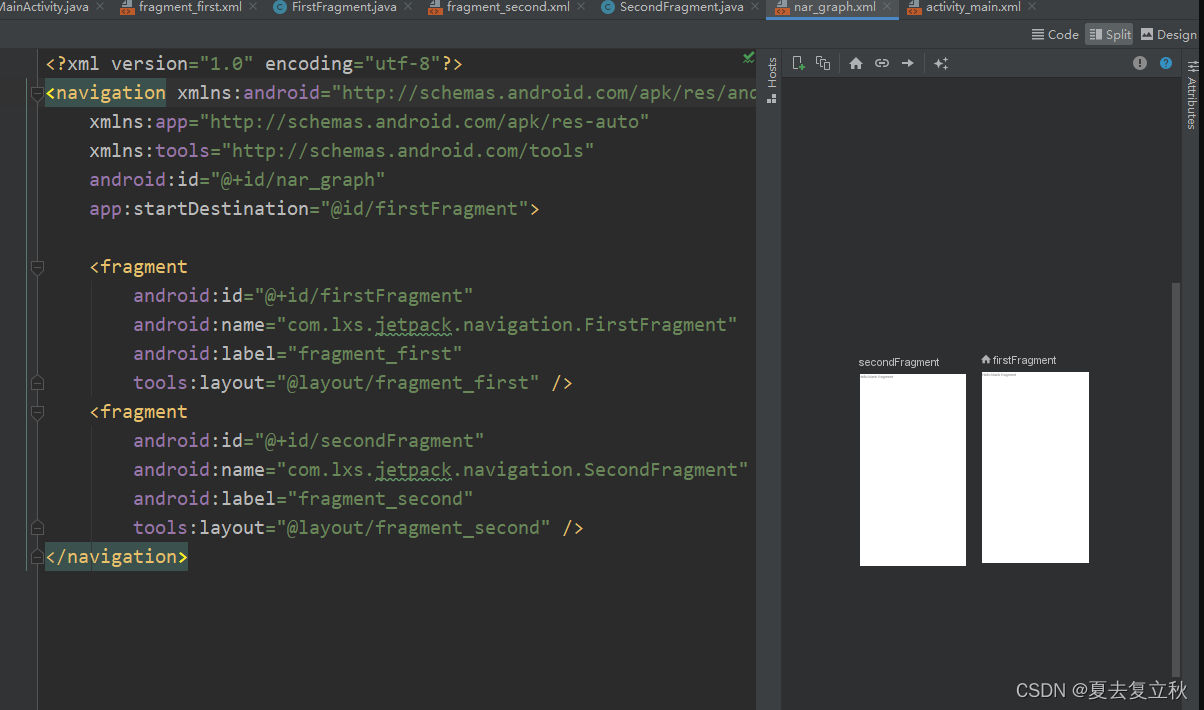
③ 在desig模式中连线firstFragment到secondFragment即可生成如下代码
<?xml version="1.0" encoding="utf-8"?>
<navigation xmlns:android="http://schemas.android.com/apk/res/android"
xmlns:app="http://schemas.android.com/apk/res-auto"
xmlns:tools="http://schemas.android.com/tools"
android:id="@+id/nar_graph"
app:startDestination="@id/firstFragment">
<fragment
android:id="@+id/firstFragment"
android:name="com.lxs.jetpack.navigation.FirstFragment"
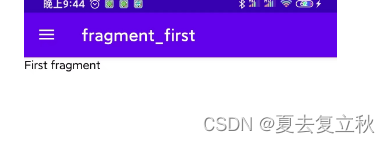
android:label="fragment_first"
tools:layout="@layout/fragment_first" >
<action
android:id="@+id/action_firstFragment_to_secondFragment"
app:destination="@id/secondFragment" />
</fragment>
<fragment
android:id="@+id/secondFragment"
android:name="com.lxs.jetpack.navigation.SecondFragment"
android:label="fragment_second"
tools:layout="@layout/fragment_second" />
</navigation>
我们可以发现所有的Fragment都在nar_graph.xml中,不难猜测三个主要元素之一的Navigation Graph即为:一个包含所有导航相关信息的 XML 资源,包含所有被管理的 Fragment,起始目标,换页目标,返回目标。
5.跳转
在firstfragment的单击响应函数里,使用NavController 处理切换fragment到SecondFragment:
FirstFragment.java :
public class FirstFragment extends Fragment {

    // TODO: Rename parameter arguments, choose names that match
    // the fragment initialization parameters, e.g. ARG_ITEM_NUMBER
    private static final String ARG_PARAM1 = "param1";
    private static final String ARG_PARAM2 = "param2";

    // TODO: Rename and change types of parameters
    private String mParam1;
    private String mParam2;

    public FirstFragment() {
        // Required empty public constructor
    }

    /**
     * Use this factory method to create a new instance of
     * this fragment using the provided parameters.
     *
     * @param param1 Parameter 1.
     * @param param2 Parameter 2.
     * @return A new instance of fragment FirstFragment.
     */
    // TODO: Rename and change types and number of parameters
    public static FirstFragment newInstance(String param1, String param2) {
        FirstFragment fragment = new FirstFragment();
        Bundle args = new Bundle();
        args.putString(ARG_PARAM1, param1);
        args.putString(ARG_PARAM2, param2);
        fragment.setArguments(args);
        return fragment;
    }

    @Override
    public void onCreate(Bundle savedInstanceState) {
        super.onCreate(savedInstanceState);
        if (getArguments() != null) {
            mParam1 = getArguments().getString(ARG_PARAM1);
            mParam2 = getArguments().getString(ARG_PARAM2);
        }
    }

    @Override
    public View onCreateView(LayoutInflater inflater, ViewGroup container,
                             Bundle savedInstanceState) {
        // Inflate the layout for this fragment
        View rootView = inflater.inflate(R.layout.fragment_first, container, false);
        Button btToSecond = rootView.findViewById(R.id.btToSecond);
        btToSecond.setOnClickListener(new View.OnClickListener() {
            @Override
            public void onClick(View view) {
                NavController navController = Navigation.findNavController(view);
                navController.navigate(R.id.action_firstFragment_to_secondFragment);
            }
        });
        return rootView;
    }
}
fragment_first.xml:
<?xml version="1.0" encoding="utf-8"?>
<FrameLayout xmlns:android="http://schemas.android.com/apk/res/android"
    xmlns:tools="http://schemas.android.com/tools"
    android:layout_width="match_parent"
    android:layout_height="match_parent"
    tools:context=".navigation.FirstFragment">

    <!-- TODO: Update blank fragment layout -->
    <TextView
        android:layout_width="match_parent"
        android:layout_height="match_parent"
        android:text="@string/hello_blank_fragment" />
    <Button
        android:layout_gravity="center"
        android:id="@+id/btToSecond"
        android:layout_width="wrap_content"
        android:layout_height="wrap_content"
        android:text="跳转到第二个SecondFragment" />

</FrameLayout>
NavController是用来控制Navigation的操作,管理应用导航的对象,实现Fragment之间的跳转等操作。
NavController提供了一个方法navigate,
Navigation传递参数
方式一
使用bundle带参数跳转,使用的是navigate( int resId, Bundle args)方法
传递参数:
 btToSecond.setOnClickListener(new View.OnClickListener() {
            @Override
            public void onClick(View view) {
                NavController navController = Navigation.findNavController(view);
                Bundle bundle = new Bundle();
                bundle.putString("name","张三");
                navController.navigate(R.id.action_firstFragment_to_secondFragment,bundle);
            }
        });
接受参数:
    @Override
    public View onCreateView(LayoutInflater inflater, ViewGroup container,
                             Bundle savedInstanceState) {
        // Inflate the layout for this fragment
        View view = inflater.inflate(R.layout.fragment_second,container, false);

        Bundle bundle = getArguments();
        if(bundle!=null){
            String name =bundle.getString("name");
            TextView tvTest = view.findViewById(R.id.tv_test);
            tvTest.setText(name);
        }

        return view;
    }
方式二
使用Google官方支持的safeArgs插件
(1)在Project 的build.gradle 的dependencies中添加
buildscript {
    repositories {
        google()
        jcenter()
    }
    dependencies {
      	...
        classpath "androidx.navigation:navigation-safe-args-gradle-plugin:2.3.0"
    }
}
(2) 在app下的build.gradle的plugins下添加
plugins {
    ...
    id 'androidx.navigation.safeargs'
}
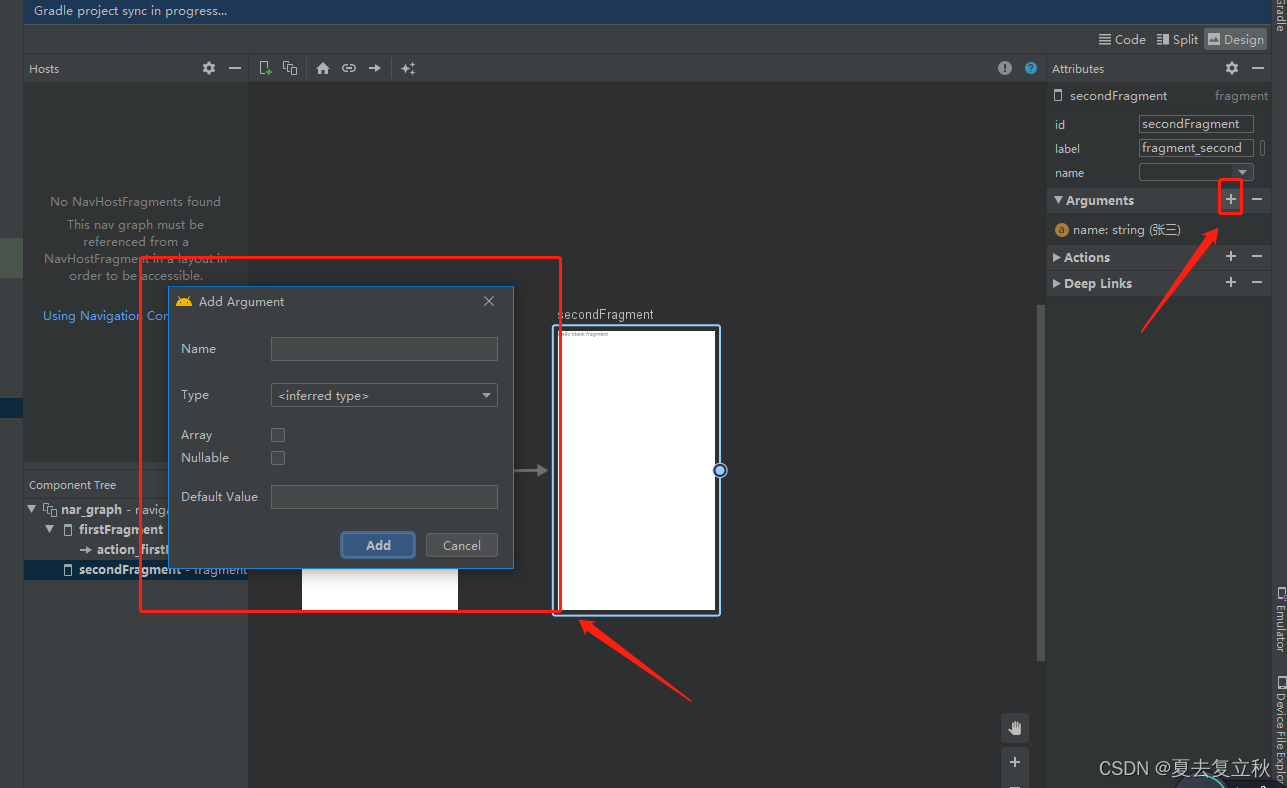
(3) 回到nav_graph.xml 文件在目标Fragment 中添加argument,比如我们要从firstFragment跳转到secondFragment,则在secondFragment页面中写入argument,包括传递的参数名,默认值,以及对应的数据类型
    <fragment
        android:id="@+id/secondFragment"
        android:name="com.lxs.jetpack.navigation.SecondFragment"
        android:label="fragment_second"
        tools:layout="@layout/fragment_second" >
        <argument
            android:name="name"
            android:defaultValue="张三"
            app:argType="string"/>
    </fragment>
也可以操作界面,进入design模式,选中目标Fragment,点击右侧的Attributes,点击Arguments的+号,就可以添加对应参数
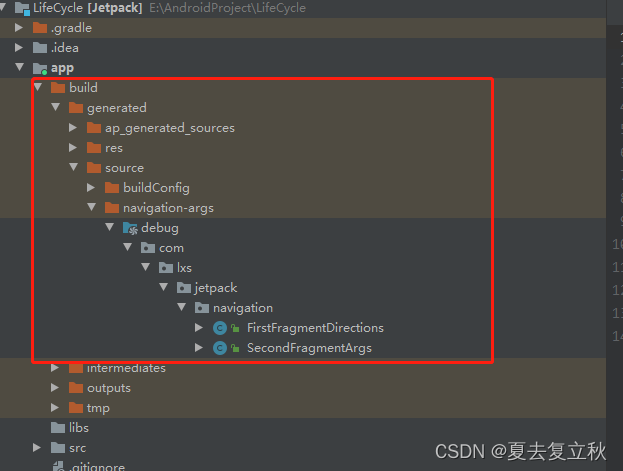
(4)添加参数之后我们重新build项目我们就可以在app->build->generated->source->navigation-args->debug->com.lxs.jetpack.navigation文件夹下找到一个SecondFragmentArgs文件,这个文件就是用来传递参数的
传递参数方式
 btToSecond.setOnClickListener(new View.OnClickListener() {
            @Override
            public void onClick(View view) {


                NavController navController = Navigation.findNavController(view);
                //使用safe args传递参数
                Bundle bundle = new SecondFragmentArgs.Builder().setName("张三").build().toBundle();
                //传递多个参数
                // Bundle bundle =new SecondFragmentArgs.Builder().setName("张三").setAge("22").build().toBundle();
                navController.navigate(R.id.action_firstFragment_to_secondFragment,bundle);


               /* Bundle bundle = new Bundle();
                bundle.putString("name","张三");
                navController.navigate(R.id.action_firstFragment_to_secondFragment,bundle);*/
            }
        });
接受参数方式
 public View onCreateView(LayoutInflater inflater, ViewGroup container,
                             Bundle savedInstanceState) {
        // Inflate the layout for this fragment
        View view = inflater.inflate(R.layout.fragment_second,container, false);

        //通过safe args接受参数
        Bundle bundle = getArguments();
        if(bundle!=null){
            String name = SecondFragmentArgs.fromBundle(getArguments()).getName();
            //int age = SecondFragmentArgs.fromBundle(getArguments()).getAge();
            TextView tvTest = view.findViewById(R.id.tv_test);
            tvTest.setText(name);
        }

       /* Bundle bundle = getArguments();
        if(bundle!=null){
            String name =bundle.getString("name");
            TextView tvTest = view.findViewById(R.id.tv_test);
            tvTest.setText(name);
        }*/

        return view;
    }
使用Safe Args传递参数可以确保数据的安全,这是Google官方建议的。
Fragment跳转动画
参数介绍
| 属性 | 详情 |
|---|---|
| enterAnim | 跳转时的目标页面动画 |
| exitAnim | 跳转时的原页面动画 |
| popEnterAnim | 返回退时的目标页面动画 |
| popExitAnim | 返回时的原页面动画 |
常用动画属性和设置:
| 属性 | 含义 |
|---|---|
| alpha | 透明度 |
| scale | 大小缩放 |
| translate | 位移 |
| rotate | 旋转 |
| 属性 | 含义 |
|---|---|
| android:duration | 动画时长 |
| fromXX | 开始状态 |
| toXX | 结束状态 |
我们可以根据自己需求创建不同的动画,我现在想要一个目标动画从左边进入,原动画从右边消失的动画效果,创建了两个动画如下:
slide_from_left.xml:
<?xml version="1.0" encoding="utf-8"?>
<set xmlns:android="http://schemas.android.com/apk/res/android">
    <translate
        android:duration="300"
        android:fromXDelta="-100%"
        android:toXDelta="0%">
    </translate>
</set>
slide_to_left.xml:
<?xml version="1.0" encoding="utf-8"?>
<set xmlns:android="http://schemas.android.com/apk/res/android">
    <translate
        android:duration="300"
        android:fromXDelta="0"
        android:toXDelta="100%">
    </translate>
</set>
添加到action中
<?xml version="1.0" encoding="utf-8"?>
<navigation xmlns:android="http://schemas.android.com/apk/res/android"
    xmlns:app="http://schemas.android.com/apk/res-auto"
    xmlns:tools="http://schemas.android.com/tools"
    android:id="@+id/nar_graph"
    app:startDestination="@id/firstFragment">

    <fragment
        android:id="@+id/firstFragment"
        android:name="com.lxs.jetpack.navigation.FirstFragment"
        android:label="fragment_first"
        tools:layout="@layout/fragment_first" >
        <action
            android:id="@+id/action_firstFragment_to_secondFragment"
            app:destination="@id/secondFragment"
            app:enterAnim="@anim/slide_from_left"
            app:exitAnim="@anim/slide_to_right"/>
    </fragment>
    <fragment
        android:id="@+id/secondFragment"
        android:name="com.lxs.jetpack.navigation.SecondFragment"
        android:label="fragment_second"
        tools:layout="@layout/fragment_second" >
        <argument
            android:name="name"
            android:defaultValue="张三"
            app:argType="string"/>
    </fragment>
</navigation>
我们也可以使用design模式添加动画
使用NavigationUI管理AppBar
Fragment的切换,除了Fragment页面本身的切换,还可以通过NavigationUI可以将导航组件与UI关联起来,在导航时自动更新UI。
1.ActionBar
对于使用了含有ActionBar主题的Activity,我们可以通过NavigationUI的setupActionBarWithNavController()方法绑定ActionBar:
        navController = Navigation.findNavController(this,R.id.nav_host_fragment_container);
        NavigationUI.setupActionBarWithNavController(this, navController);
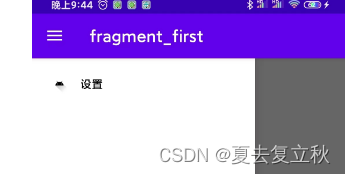
我们以在页面右上角加入一个设置页面为例
1)在res下建立menu文件夹。新建一个menu_fragment.xml
<?xml version="1.0" encoding="utf-8"?>
<menu xmlns:android="http://schemas.android.com/apk/res/android">

    <item android:title="设置"
        android:icon="@mipmap/ic_launcher"
        android:id="@+id/settingFragment"/>
</menu>
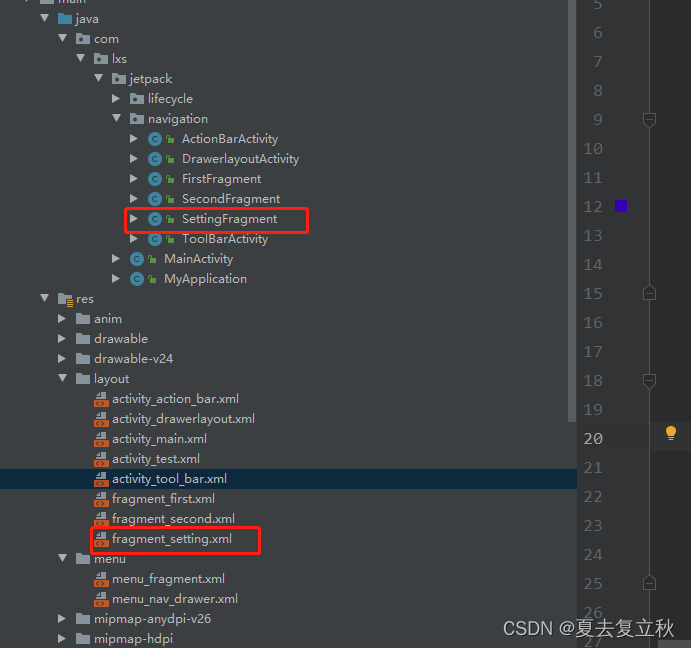
2)新建SettingFragment 和对应xml,无需修改
3)nav_graph.xml中添加SettingFragment
    <fragment
        android:id="@+id/settingFragment"
        android:name="com.lxs.jetpack.navigation.SettingFragment"
        android:label="fragment_setting"
        tools:layout="@layout/fragment_setting" />
4)新建一个ActionBarActivity,在Activity中将NavController与ActionBar绑定
5)在MainActivity中重写onCreateOptionsMenu()与onOptionsItemSelected()方法
6)如果想要左上角Back键生效,则需要通过AppBarConfiguration可以设置ActionBar,使用NavigationUI.navigateUp()返回
ActionBarActivity:
public class ActionBarActivity extends AppCompatActivity {
    NavController navController;
    private AppBarConfiguration appBarConfiguration;

    @Override
    protected void onCreate(Bundle savedInstanceState) {
        super.onCreate(savedInstanceState);
        setContentView(R.layout.activity_action_bar);
        navController = Navigation.findNavController(this,R.id.nav_host_fragment_container);

        //NavController与ActionBar绑定
        NavigationUI.setupActionBarWithNavController(this, navController);
        appBarConfiguration = new AppBarConfiguration.Builder(navController.getGraph()).build();

    }
    /**
     * 加载menu_fragment.xml
     * @param menu
     * @return
     */
    @Override
    public boolean onCreateOptionsMenu(Menu menu) {
        getMenuInflater().inflate(R.menu.menu_fragment,menu);
        return super.onCreateOptionsMenu(menu);
    }

    /**
     * 处理单击菜单项,使用NavigaitonUI进行fragment的切换和管理
     * @param item
     * @return
     */
    @Override
    public boolean onOptionsItemSelected(@NonNull MenuItem item) {
        return NavigationUI.onNavDestinationSelected(item,navController) ||super.onOptionsItemSelected(item);
    }

    /**
     * 左上角的返回按钮被点击时调用到
     */
    @Override
    public boolean onSupportNavigateUp()
    {
        return NavigationUI.navigateUp(navController, appBarConfiguration) || super.onSupportNavigateUp();
    }
}
activity_action_bar.xml:
<?xml version="1.0" encoding="utf-8"?>
<LinearLayout xmlns:android="http://schemas.android.com/apk/res/android"
    xmlns:app="http://schemas.android.com/apk/res-auto"
    xmlns:tools="http://schemas.android.com/tools"
    android:layout_width="match_parent"
    android:layout_height="match_parent"
    tools:context=".navigation.ActionBarActivity">
    <fragment
        android:id="@+id/nav_host_fragment_container"
        android:name="androidx.navigation.fragment.NavHostFragment"
        app:navGraph="@navigation/nav_graph"
        android:layout_width="match_parent"
        android:layout_height="match_parent"
        />
</LinearLayout>
这就是NavigationUI操作ActionBar。
2.ToolBar
Toolbar是Android 5.0中新引入的一个控件,其出现的目的就是为了取代ActionBar
注意,如果使用Toolbar替代ActionBar,你只能使用Theme.AppCompat中没有ActionBar的主题或者
直接继承Activity,否则会造成冲突出错!
对于没有使用含有ActionBar主题的Activity,我们可以通过NavigationUI的setupWithNavController()方法绑定Toolbar。
(1)新建一个没有ActionBar的ToolBarActivity,即在AndroidManifest.xml中设计其主题为NoActionBar的主题
<activity android:name=".navigation.ToolBarActivity" android:theme="@style/Theme.Toolbar"></activity>
<style name="Theme.Toolbar" parent="Theme.MaterialComponents.DayNight.NoActionBar">
        <!-- Primary brand color. -->
        <item name="colorPrimary">@color/purple_500</item>
        <item name="colorPrimaryVariant">@color/purple_700</item>
        <item name="colorOnPrimary">@color/white</item>
        <!-- Secondary brand color. -->
        <item name="colorSecondary">@color/teal_200</item>
        <item name="colorSecondaryVariant">@color/teal_700</item>
        <item name="colorOnSecondary">@color/black</item>
        <!-- Status bar color. -->
        <item name="android:statusBarColor" tools:targetApi="l">?attr/colorPrimaryVariant</item>
        <!-- Customize your theme here. -->
    </style>
(2)在activity_tool_bar.xml中加入Toolbar控件
<?xml version="1.0" encoding="utf-8"?>
<LinearLayout xmlns:android="http://schemas.android.com/apk/res/android"
    xmlns:app="http://schemas.android.com/apk/res-auto"
    xmlns:tools="http://schemas.android.com/tools"
    android:layout_width="match_parent"
    android:layout_height="match_parent"
    tools:context=".navigation.ToolBarActivity"
    android:orientation="vertical">
    <androidx.appcompat.widget.Toolbar
        android:id="@+id/toolBar"
        android:layout_gravity="end"
        android:background="@color/purple_700"
        android:layout_width="match_parent"
        android:layout_height="wrap_content"
        app:menu="@menu/menu_fragment" />
    <fragment
        android:id="@+id/nav_host_fragment_container"
        android:name="androidx.navigation.fragment.NavHostFragment"
        app:navGraph="@navigation/nav_graph"
        android:layout_width="match_parent"
        android:layout_height="match_parent"
        app:layout_constraintTop_toBottomOf="@+id/toolBar"
        />
</LinearLayout>
(3)ToolBarActivity中绑定Toolbar,然后使用 NavigationUI.setupWithNavController()
public class ToolBarActivity extends AppCompatActivity {
    Toolbar toolbar;
    NavController navController;
    AppBarConfiguration appBarConfiguration;
    @Override
    protected void onCreate(Bundle savedInstanceState) {
        super.onCreate(savedInstanceState);
        setContentView(R.layout.activity_tool_bar);
        toolbar = findViewById(R.id.toolBar);
        navController = Navigation.findNavController(this,R.id.nav_host_fragment_container);
        appBarConfiguration = new AppBarConfiguration.Builder(navController.getGraph()).build();

        /*appBarConfiguration = new AppBarConfiguration.Builder(navController.getGraph())
                .setFallbackOnNavigateUpListener(new AppBarConfiguration.OnNavigateUpListener() {
                    // 给AppBar的返回键设置备用监听事件。NavController.navigateUp()返回false时触发,例如处于start destination时NavController.navigateUp()返回false
                    public boolean onNavigateUp() {
                        // 自定义AppBar的返回箭头事件
                        // 例如可以为 requireActivity().onBackPressed();
                        return true;
                    }
                }).build();*/
        toolbar.setOnMenuItemClickListener(item -> {
            NavigationUI.onNavDestinationSelected(item, navController);
            return true;
        });
        NavigationUI.setupWithNavController(toolbar, navController, appBarConfiguration);

    }
    /**
     * 左上角的返回按钮被点击时调用到
     */
    @Override
    public boolean onSupportNavigateUp()
    {
        return NavigationUI.navigateUp(navController, appBarConfiguration) || super.onSupportNavigateUp();
    }
}
使用NavigationUI管理Fragment
上文的管理App bar 其实也算是管理Fragment,我们还可以使用抽屉菜单(DrawLayout+ NavigationView)和底部菜单(BottomNavigationView)
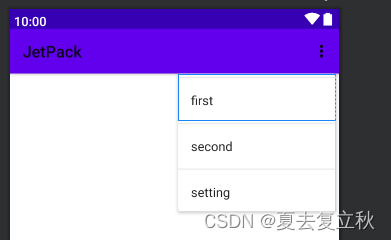
1.抽屉菜单
(1)新建一个menu,当然也可以使用上面在管理ActionBar时采用的menu_fragment.xml,为了简单我们都会使用SettingFragment做为菜单例子,为了容易区分,我们新建一个menu,menu_nav_drawer.xml
<?xml version="1.0" encoding="utf-8"?>
<menu xmlns:android="http://schemas.android.com/apk/res/android">
        <item
            android:id="@+id/settingFragment"
            android:icon="@drawable/ic_launcher_foreground"
            android:title="设置" />

</menu>
(2) 新建一个DrawerLayoutActivity,防止和前面的activity混淆,在DrawerLayoutActivity实例化NavController和配置AppBarConfiguration,同上文一样
(3) 绑定NavigationView,使用NavigationUI.setupWithNavController()绑定NavigationView 和NavController
DrawerLayoutActivity
public class DrawerlayoutActivity extends AppCompatActivity {
    private AppBarConfiguration appBarConfiguration;
    private NavController navController;
    @Override
    protected void onCreate(Bundle savedInstanceState) {
        super.onCreate(savedInstanceState);
        setContentView(R.layout.activity_drawerlayout);
        DrawerLayout drawerLayout = findViewById(R.id.drawerLayout);
         navController = Navigation.findNavController(this, R.id.nav_host_fragment_container);

        //绑定当前的ActionBar,除此之外NavigationUI还能绑定Toolbar和CollapsingToolbarLayout
        //绑定后,系统会默认处理ActionBar左上角区域,为你添加返回按钮,将所切换到的Fragment在导航图里的name属性中的内容显示到Title
        //.setDrawerLayout(drawerLayout)后才会出现菜单按钮
        appBarConfiguration = new AppBarConfiguration.Builder(navController.getGraph()).setOpenableLayout(drawerLayout).build();
        NavigationUI.setupActionBarWithNavController(this, navController, appBarConfiguration);

        //设置左侧菜单,
        NavigationView navigationView = findViewById(R.id.navigation_view);
        NavigationUI.setupWithNavController(navigationView, navController);
    }

    /**
     * 左上角的菜单被点击时调用到
     */
    @Override
    public boolean onSupportNavigateUp()
    {
        return NavigationUI.navigateUp(navController, appBarConfiguration) || super.onSupportNavigateUp();
    }
}
activity_drawerlayout.xml:
<?xml version="1.0" encoding="utf-8"?>
<androidx.drawerlayout.widget.DrawerLayout xmlns:android="http://schemas.android.com/apk/res/android"
    xmlns:app="http://schemas.android.com/apk/res-auto"
    xmlns:tools="http://schemas.android.com/tools"
    android:layout_width="match_parent"
    android:layout_height="match_parent"
    tools:context=".navigation.DrawerlayoutActivity"
    android:id="@+id/drawerLayout">
    <fragment
        android:id="@+id/nav_host_fragment_container"
        android:name="androidx.navigation.fragment.NavHostFragment"
        app:navGraph="@navigation/nav_graph"
        android:layout_width="match_parent"
        android:layout_height="match_parent"
        />
    <com.google.android.material.navigation.NavigationView
        android:id="@+id/navigation_view"
        android:layout_width="wrap_content"
        android:layout_height="match_parent"
        android:layout_gravity="start"
        app:menu="@menu/menu_nav_drawer"/>
</androidx.drawerlayout.widget.DrawerLayout>
我们就可以得到一个抽屉菜单如下图所示
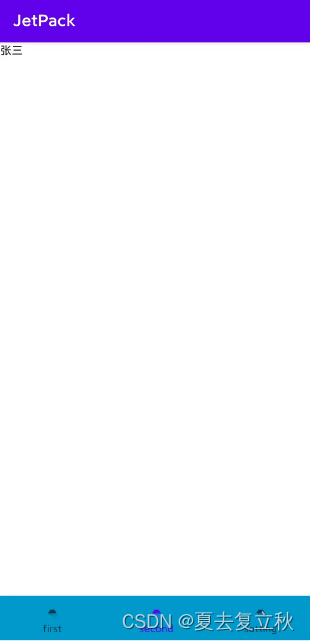
2.底部菜单
底部菜单实际就是底部导航栏,采用BottomNavigationView
(1)在menu目录下新建一个menu_bottom.xml,三个item分别是FirstFragment,SecondFragment,SettingFragment
menu_bottom.xml:
<?xml version="1.0" encoding="utf-8"?>
<menu xmlns:android="http://schemas.android.com/apk/res/android">
    <item
        android:id="@id/firstFragment"
        android:icon="@drawable/ic_launcher_foreground"
        android:title="first"/>
    <item
        android:id="@+id/secondFragment"
        android:icon="@drawable/ic_launcher_foreground"
        android:title="second"/>
    <item
        android:id="@+id/settingFragment"
        android:icon="@drawable/ic_launcher_foreground"
        android:title="setting"/>
</menu>
(2)新建BottomNavigationActivity,绑定BottomNavigationView
BottomNavigationActivity
public class BottomNavigationActivity extends AppCompatActivity {

    @Override
    protected void onCreate(Bundle savedInstanceState) {
        super.onCreate(savedInstanceState);
        setContentView(R.layout.activity_bottom_navigation);
        NavController navController = Navigation.findNavController(this, R.id.nav_host_fragment_container);

        //设置底部菜单
        BottomNavigationView bottomNavigationView = findViewById(R.id.bottom_navigation);
        NavigationUI.setupWithNavController(bottomNavigationView, navController);
    }
}
activity_bottom_navigation.xml
<?xml version="1.0" encoding="utf-8"?>
<androidx.constraintlayout.widget.ConstraintLayout xmlns:android="http://schemas.android.com/apk/res/android"
    xmlns:app="http://schemas.android.com/apk/res-auto"
    xmlns:tools="http://schemas.android.com/tools"
    android:layout_width="match_parent"
    android:layout_height="match_parent"
    tools:context=".navigation.BottomNavigationActivity">
    <RelativeLayout
        android:layout_width="match_parent"
        android:layout_height="match_parent">

        <fragment
            android:id="@+id/nav_host_fragment_container"
            android:name="androidx.navigation.fragment.NavHostFragment"
            android:layout_width="match_parent"
            android:layout_height="match_parent"
            app:defaultNavHost="true"
            app:layout_constraintBottom_toBottomOf="parent"
            app:layout_constraintLeft_toLeftOf="parent"
            app:layout_constraintRight_toRightOf="parent"
            app:layout_constraintTop_toTopOf="parent"
            app:navGraph="@navigation/nav_graph"/>

        <com.google.android.material.bottomnavigation.BottomNavigationView
            android:id="@+id/bottom_navigation_view"
            android:layout_width="match_parent"
            android:layout_height="wrap_content"
            android:layout_alignParentBottom="true"
            android:background="@android:color/holo_blue_dark"
            app:menu="@menu/menu_bottom"/>

    </RelativeLayout>

</androidx.constraintlayout.widget.ConstraintLayout>
底部菜单页面如图所示
DeepLink的使用
我们上面说了Navigation的优点,提供对深层链接(DeepLink)的支持,我们可以通过PendingIntent或者一个URL链接,直接跳转到应用程序的某个destination(Fragment/Activity)
1.显式DeepLink
显式DeepLink通过Pendingtent导航到特定的目的地,我们通过一个常用的通知栏的Notification来实现
1) 创建一个DeeplinkActivity,无需做任何操作,在其layout视图中加入fragment,创建一个新的Navigation相关xml资源nav_graph_deeplink.xml,与fragment绑定
activity_deep_link.xml:
<?xml version="1.0" encoding="utf-8"?>
<androidx.constraintlayout.widget.ConstraintLayout xmlns:android="http://schemas.android.com/apk/res/android"
    xmlns:app="http://schemas.android.com/apk/res-auto"
    xmlns:tools="http://schemas.android.com/tools"
    android:layout_width="match_parent"
    android:layout_height="match_parent"
    tools:context=".navigation.DeepLinkActivity">

    <fragment
        android:id="@+id/nav_host_fragment_container"
        android:name="androidx.navigation.fragment.NavHostFragment"
        android:layout_width="match_parent"
        android:layout_height="match_parent"
        app:defaultNavHost="true"
        app:layout_constraintBottom_toBottomOf="parent"
        app:layout_constraintLeft_toLeftOf="parent"
        app:layout_constraintRight_toRightOf="parent"
        app:layout_constraintTop_toTopOf="parent"
        app:navGraph="@navigation/nav_graph_deeplink"/>
</androidx.constraintlayout.widget.ConstraintLayout>
2)我们创建一个DeepLinkFragment,在其中构造一个PendingIntent
    /**
     * 通过PendingIntent设置,当通知被点击后需要跳转到哪个destination,以及传递的参数
     * */
    private PendingIntent getPendingIntent()
    {
        if(getActivity() != null) {

        Bundle bundle = new Bundle();
        bundle.putString("params", "To DeepLink Destination");
        return Navigation
                .findNavController(getActivity(), R.id.nav_host_fragment_container)
                .createDeepLink()
                .setGraph(R.navigation.nav_graph_deeplink)
                .setDestination(R.id.settingFragment)
                .setArguments(bundle)
                .createPendingIntent();
        }
        return null;
    }
| 方法 | 含义 |
|---|---|
| .setGraph(int navGraphId) | 设置目的地所在导航图 |
| .setDestination(int destId) | 设置/添加目的地 |
| .setArguments(Bundle args) | 给目的地传递参数 |
| .createPendingIntent() | 构造PendingIntent |
createDeepLink()实际上返回的就是带NavController参数的NavDeepLinkBuilder的构造方法,即NavDeepLinkBuilder(NavController navController)。
还有一个是带context参数的构造方法我们可以直接这样写(举栗,未写入运行代码):
PendingIntent pendingIntent = new NavDeepLinkBuilder(context)
    .setGraph(R.navigation.nav_graph_deeplink)
    .setDestination(R.id.settingFragment)
    .setArguments(bundle)
    .createPendingIntent();
3)在DeepLinkFragment创建一个发送通知的点击事件sendNotification()
public void sendNotification() {
        if(getActivity() == null) {
            return;
        }
        if(Build.VERSION.SDK_INT>=Build.VERSION_CODES.O){
            int importance = NotificationManager.IMPORTANCE_DEFAULT;
            NotificationChannel channel = new NotificationChannel(CHANNEL_ID,"ChannelName",importance);
            channel.setDescription("显式深层链接测试");
            NotificationManager notificationManager = getActivity().getSystemService(NotificationManager.class);
            notificationManager.createNotificationChannel(channel);
        }
        NotificationCompat.Builder builder = new NotificationCompat.Builder(getActivity(),CHANNEL_ID)
                .setSmallIcon(R.drawable.ic_launcher_foreground)
                .setContentTitle("DeepLink")
                .setContentText("深层链接测试")
                .setPriority(NotificationCompat.PRIORITY_DEFAULT)
                .setContentIntent(getPendingIntent())
                .setAutoCancel(true);
        NotificationManagerCompat notificationManagerCompat = NotificationManagerCompat.from(getActivity());
        notificationManagerCompat.notify(notificationId,builder.build());
    }
完整的DeepLinkFragment为
public class DeepLinkFragment extends Fragment {

    // TODO: Rename parameter arguments, choose names that match
    // the fragment initialization parameters, e.g. ARG_ITEM_NUMBER
    private static final String ARG_PARAM1 = "param1";
    private static final String ARG_PARAM2 = "param2";

    // TODO: Rename and change types of parameters
    private String mParam1;
    private String mParam2;

    public DeepLinkFragment() {
        // Required empty public constructor
    }

    /**
     * Use this factory method to create a new instance of
     * this fragment using the provided parameters.
     *
     * @param param1 Parameter 1.
     * @param param2 Parameter 2.
     * @return A new instance of fragment DeepLinkFragment.
     */
    // TODO: Rename and change types and number of parameters
    public static DeepLinkFragment newInstance(String param1, String param2) {
        DeepLinkFragment fragment = new DeepLinkFragment();
        Bundle args = new Bundle();
        args.putString(ARG_PARAM1, param1);
        args.putString(ARG_PARAM2, param2);
        fragment.setArguments(args);
        return fragment;
    }

    @Override
    public void onCreate(Bundle savedInstanceState) {
        super.onCreate(savedInstanceState);
        if (getArguments() != null) {
            mParam1 = getArguments().getString(ARG_PARAM1);
            mParam2 = getArguments().getString(ARG_PARAM2);
        }
    }

    @Override
    public View onCreateView(LayoutInflater inflater, ViewGroup container,
                             Bundle savedInstanceState) {
        // Inflate the layout for this fragment
       View view = inflater.inflate(R.layout.fragment_deep_link, container, false);
       view.findViewById(R.id.sendNotification).setOnClickListener(new View.OnClickListener() {
           @Override
           public void onClick(View v) {
               sendNotification();
           }
       });
       return view;
    }
    private static final String CHANNEL_ID = "1";
    private static final int notificationId = 0;
    /**
     * 通过PendingIntent设置,当通知被点击后需要跳转到哪个destination,以及传递的参数
     * */
    private PendingIntent getPendingIntent()
    {
        if(getActivity() != null) {

        Bundle bundle = new Bundle();
        bundle.putString("params", "To DeepLink Destination");
        return Navigation
                .findNavController(getActivity(), R.id.nav_host_fragment_container)
                .createDeepLink()
                .setGraph(R.navigation.nav_graph_deeplink)
                .setDestination(R.id.settingFragment)
                .setArguments(bundle)
                .createPendingIntent();
        }
        return null;
    }

    public void sendNotification() {
        if(getActivity() == null) {
            return;
        }
        if(Build.VERSION.SDK_INT>=Build.VERSION_CODES.O){
            int importance = NotificationManager.IMPORTANCE_DEFAULT;
            NotificationChannel channel = new NotificationChannel(CHANNEL_ID,"ChannelName",importance);
            channel.setDescription("显式深层链接测试");
            NotificationManager notificationManager = getActivity().getSystemService(NotificationManager.class);
            notificationManager.createNotificationChannel(channel);
        }
        NotificationCompat.Builder builder = new NotificationCompat.Builder(getActivity(),CHANNEL_ID)
                .setSmallIcon(R.drawable.ic_launcher_foreground)
                .setContentTitle("DeepLink")
                .setContentText("深层链接测试")
                .setPriority(NotificationCompat.PRIORITY_DEFAULT)
                .setContentIntent(getPendingIntent())
                .setAutoCancel(true);
        NotificationManagerCompat notificationManagerCompat = NotificationManagerCompat.from(getActivity());
        notificationManagerCompat.notify(notificationId,builder.build());
    }
  }
对应的layout 文件
fragment_deep_link.xml:
<?xml version="1.0" encoding="utf-8"?>
<FrameLayout xmlns:android="http://schemas.android.com/apk/res/android"
    xmlns:tools="http://schemas.android.com/tools"
    android:layout_width="match_parent"
    android:layout_height="match_parent"
    tools:context=".navigation.DeepLinkFragment">

    <!-- TODO: Update blank fragment layout -->
    <Button
        android:id="@+id/sendNotification"
        android:layout_gravity="center"
        android:text="send Notification"
        android:layout_width="wrap_content"
        android:layout_height="wrap_content"
        >

    </Button>

</FrameLayout>
3) 在我们新建的这个nav_graph_deeplink.xml中加入两个fragment: deeplinkFragment,settingFragment,其中settingFragment (上文实现过)为我们使用DeepLink所要到达的目的地
nav_graph_deeplink.xml:
<?xml version="1.0" encoding="utf-8"?>
<navigation xmlns:android="http://schemas.android.com/apk/res/android"
    xmlns:app="http://schemas.android.com/apk/res-auto"
    xmlns:tools="http://schemas.android.com/tools"
    android:id="@+id/nar_graph"
    app:startDestination="@id/deeplinkFragment">
    <fragment
        android:id="@+id/deeplinkFragment"
        android:name="com.lxs.jetpack.navigation.DeepLinkFragment"
        android:label="fragment_deeplink"
        tools:layout="@layout/fragment_deep_link" >
    </fragment>
    <fragment
        android:id="@+id/settingFragment"
        android:name="com.lxs.jetpack.navigation.SettingFragment"
        android:label="fragment_setting"
        tools:layout="@layout/fragment_setting" >
    </fragment>
</navigation>
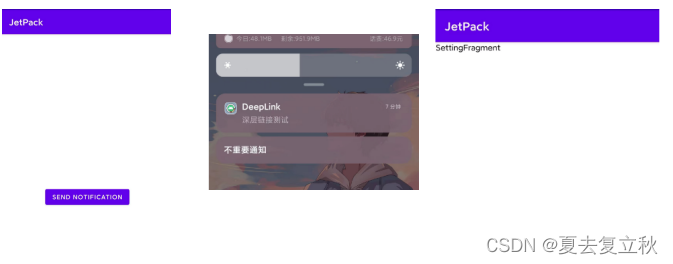
运行,我们点击对应的发送通知按钮,就可以看到在通知栏中会出现一个消息通知,点击此消息通知就可以跳转到我们的settingFragment
1.隐式DeepLink
我们在nav_graph_deeplink.xml中给目的地添加deeplink元素隐式声明Deeplink
<?xml version="1.0" encoding="utf-8"?>
<navigation xmlns:android="http://schemas.android.com/apk/res/android"
    xmlns:app="http://schemas.android.com/apk/res-auto"
    xmlns:tools="http://schemas.android.com/tools"
    android:id="@+id/nar_graph"
    app:startDestination="@id/deeplinkFragment">


    <fragment
        android:id="@+id/deeplinkFragment"
        android:name="com.lxs.jetpack.navigation.DeepLinkFragment"
        android:label="fragment_deeplink"
        tools:layout="@layout/fragment_deep_link" >
    </fragment>
    <fragment
        android:id="@+id/settingFragment"
        android:name="com.lxs.jetpack.navigation.SettingFragment"
        android:label="fragment_setting"
        tools:layout="@layout/fragment_setting" >
        <deepLink app:uri="https://lxs.com/ceshi/"/>
       <!--<deepLink app:uri="https://lxs.com/ceshi/"
            app:action="android.intent.action.MY_ACTION"
            app:mimeType="type/test"/>-->
    </fragment>
</navigation>
uri、action、mimeType可以三选一,只有uri能传递参数,这里我们只用Uri
uri可以携带参数比如:https://lxs.com/ceshi/{name}?id={id}
name 为路径参数,id为查询参数,如果缺少参数则使用该uri会导航到应用,但不会导航到任何目的地
我们还需要在对应的AndroidManifest.xml文件的Activity内添加nav-graph元素
<activity android:name=".navigation.DeepLinkActivity">
            <nav-graph android:value="@navigation/nav_graph_deeplink"/>
        </activity>
调用
应用内
        NavDeepLinkRequest request = NavDeepLinkRequest.Builder
                .fromUri((Uri.parse("https://lxs.com/ceshi/")))
                .build();
        NavHostFragment.findNavController(this).navigate(request);
应用外
我们可以新创建一个App,然后在App中添加一个TextView:
<TextView
    android:layout_width="wrap_content"
    android:layout_height="wrap_content"
    android:autoLink="web"
    android:text="https://github.com/baiyazi/"/>
运行我们看到一个可以点击的链接:

点击链接,我们就可以看到
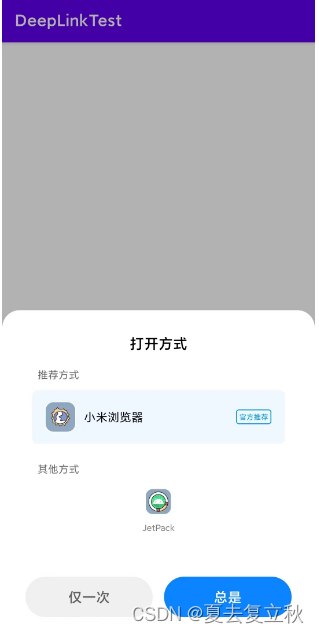
我们选择JetPack ,我们就可以进入到目的地settingFragment。


 被折叠的 条评论
为什么被折叠?
被折叠的 条评论
为什么被折叠?
 到【灌水乐园】发言


