


运行环境:
tomcat :apache-tomcat-6.0.26 CXF :apache-cxf-2.7.8IDE :springsource
下面的实例是基于spring的web工程,CXF框架实现的webservice将会通过spring配置文件来发布
1、新建一个web工程,导入CXF jar包
到CXF官网(官网下载地址:http://cxf.apache.org/download.html)下载CXF压缩包,我下载的是apache-cxf-2.7.8
将 apache-cxf-2.7.8\lib 目录下所有的jar包直接拷贝到新建的web工程的WEB-INF/lib的目录下(或者右击工程 --> Build Path ---> Configure Build Path... 添加jar包)
2、在 web.xml 文件下配置spring listener 和 CXF servlet
<?xml version="1.0" encoding="UTF-8"?>
<web-app xmlns:xsi="http://www.w3.org/2001/XMLSchema-instance"
	xmlns="http://java.sun.com/xml/ns/javaee"
	xsi:schemaLocation="http://java.sun.com/xml/ns/javaee http://java.sun.com/xml/ns/javaee/web-app_3_0.xsd"
	id="WebApp_ID" version="3.0">
	<context-param>
		<param-name>contextConfigLocation</param-name>
		<param-value>WEB-INF/beans.xml</param-value>
	</context-param>

	<listener>
		<listener-class>org.springframework.web.context.ContextLoaderListener</listener-class>
	</listener>

	<servlet>
		<servlet-name>CXFServlet</servlet-name>
		<servlet-class>org.apache.cxf.transport.servlet.CXFServlet</servlet-class>
	</servlet>
	<servlet-mapping>
		<servlet-name>CXFServlet</servlet-name>
		<url-pattern>/*</url-pattern>
	</servlet-mapping>

</web-app>新建一个Person实体类
package com.cxf.entity;

public class Person
{
	private String firstName;
	private String lastName;
	public String getFirstName()
	{
		return firstName;
	}
	public void setFirstName(String firstName)
	{
		this.firstName = firstName;
	}
	public String getLastName()
	{
		return lastName;
	}
	public void setLastName(String lastName)
	{
		this.lastName = lastName;
	}


}
新建webservice服务类接口, 注意接口上面要注明webservice的注解,在服务接口中可用注解指定soap报文中参数和结果名称
package com.cxf.service;

import javax.jws.WebParam;
import javax.jws.WebResult;
import javax.jws.WebService;

import com.cxf.entity.Person;

@WebService
public interface HappyNewYear
{
	public @WebResult(name = "Greet") String sayHello(@WebParam(name = "friend") Person person);
}
package com.cxf.service.impl;

import javax.jws.WebService;
import com.cxf.entity.Person;
import com.cxf.service.HappyNewYear;

@WebService(endpointInterface = "com.cxf.service.HappyNewYear")
public class HappyNewYearImpl implements HappyNewYear
{

	public String sayHello(Person person)
	{
		return "Hello, " + person.getFirstName() + " " + person.getLastName() + "! Happy new year!";
	}

}
注意:
1) 需要import三个CXF的xml文件
2) implementor指定的是wenservice服务实现类
<?xml version="1.0" encoding="UTF-8"?>
<beans xmlns="http://www.springframework.org/schema/beans"
	xmlns:xsi="http://www.w3.org/2001/XMLSchema-instance" xmlns:jaxws="http://cxf.apache.org/jaxws"
	xsi:schemaLocation="
        http://www.springframework.org/schema/beans
        http://www.springframework.org/schema/beans/spring-beans.xsd
        http://cxf.apache.org/jaxws
        http://cxf.apache.org/schemas/jaxws.xsd">
	<import resource="classpath:META-INF/cxf/cxf.xml" />
	<import resource="classpath:META-INF/cxf/cxf-extension-soap.xml" />
	<import resource="classpath:META-INF/cxf/cxf-servlet.xml" />

	<jaxws:endpoint id="greetServicce" implementor="com.cxf.service.impl.HappyNewYearImpl"
		address="/greetServicce" />
</beans>
补充:WebService在测试过程中需要捕获http请求和响应的xml报文,可以使用工具捕获http请求,也可以添加CXF配置
在发布服务的配置文件中,可以添加拦截器配置,CXF提供了一些默认的拦截器实现(下面配置的拦截器用于在控制台输出请求和响应的信息,包含xml报文)
<?xml version="1.0" encoding="UTF-8"?>
<beans xmlns="http://www.springframework.org/schema/beans"
	xmlns:xsi="http://www.w3.org/2001/XMLSchema-instance" xmlns:jaxws="http://cxf.apache.org/jaxws"
	xsi:schemaLocation="
        http://www.springframework.org/schema/beans
        http://www.springframework.org/schema/beans/spring-beans.xsd
        http://cxf.apache.org/jaxws
        http://cxf.apache.org/schemas/jaxws.xsd">
	<import resource="classpath:META-INF/cxf/cxf.xml" />
	<import resource="classpath:META-INF/cxf/cxf-extension-soap.xml" />
	<import resource="classpath:META-INF/cxf/cxf-servlet.xml" />

	<bean id="logInbound" class="org.apache.cxf.interceptor.LoggingInInterceptor"/>
	<bean id="logOutbound" class="org.apache.cxf.interceptor.LoggingOutInterceptor"/>

	<jaxws:endpoint id="greetServicce" implementor="com.cxf.service.impl.HappyNewYearImpl"
		address="/greetServicce" >
		<jaxws:inInterceptors>
     		 <ref bean="logInbound"/>
    	</jaxws:inInterceptors>

		<jaxws:outInterceptors>
			<ref bean="logOutbound"/>
		</jaxws:outInterceptors>

	</jaxws:endpoint>
</beans>
5、run and test
右击工程 --> Run As --> Run On Server
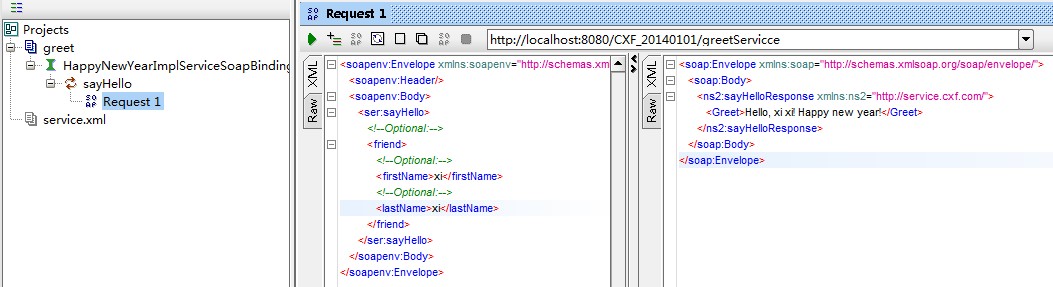
启动完成后可以在浏览器中输入地址:http://localhost:8080/CXF_20140101/greetServicce?wsdl 查看服务发布的wsdl文件
将生成的WSDL文件导入到soupUI 中,测试服务,下图能看出,服务能够正常调用
总结:
基于web和Spring框架的CXF webservice和普通的不使用spring框架的CXF webService对比有以下几个优点
1) 服务的发布不需要手动写方法发布,直接在spring的配置文件中配置即可
2) 服务发布的URL也无需指定全路径,直接配置一个工程的相对路径即可
3) 服务的调用由CXF的servlet自动拦截


 204
204

 被折叠的 条评论
为什么被折叠?
被折叠的 条评论
为什么被折叠?
 到【灌水乐园】发言


