


IP、子网掩码、网关、DNS、端口号
网络的基本概念
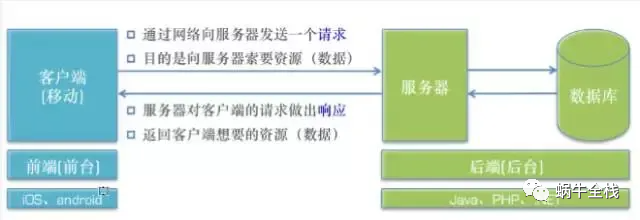
客户端:应用 C/S(客户端/服务器) B/S(浏览器/服务器)
服务器:为客户端提供服务、数据、资源的机器
请求:客户端向服务器索取数据
响应:服务器对客户端请求作出反应,一般是返回给客户端数据
URL
Uniform Resource Locator(统一资源定位符)
网络中每一个资源都对应唯一的地址——URL
IP 、子网掩码 、路由器 、DNS
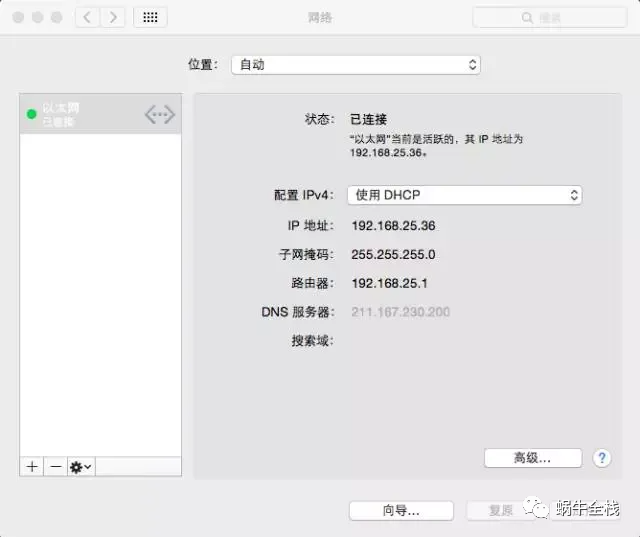
IP地址
IP地址是IP协议提供的一种统一的地址格式,它为互联网上的每一个网络和每一台主机分配一个逻辑地址,以此来屏蔽物理地址(每个机器都有一个编码,如MAC上就有一个叫MAC地址的东西)的差异。是32位二进制数据,通常以十进制表示,并以“.”分隔。IP地址是一种逻辑地地址,用来标识网络中一个个主机,在本地局域网上是惟一的。
IP
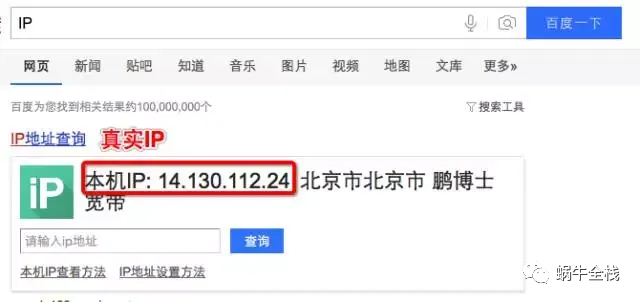
IP(网络之间互连的协议)它是能使连接到网上的所有计算机网络实现相互通信的一套规则,规定了计算机在因特网上进行通信时应当遵守的规则。任何厂家生产的计算机系统,只要遵守IP协议就可以与因特网互连互通。IP地址有唯一性,即每台机器的IP地址在全世界是唯一的。这里指的是网络上的真实IP它是通过本机IP地址和子网掩码的"与"运算然后再通过各种处理算出来的(要遵守TCP协议还要加报文及端口什么的,我没有细追究,现在还用不上,反正暂时知道被处理过的就行了),顺便教大家查自己真实IP的方法:
子网掩码
要想理解什么是子网掩码,就不能不了解IP地址的构成。互联网是由许多小型网络构成的,每个网络上都有许多主机,这样便构成了一个有层次的结构。IP地址在设计时就考虑到地址分配的层次特点,将每个IP地址都分割成网络号和主机号两部分,以便于IP地址的寻址操作。IP地址的网络号和主机号各是多少位呢?如果不指定,就不知道哪些位是网络号、哪些是主机号,这就需要通过子网掩码来实现。什么是子网掩码子网掩码不能单独存在,它必须结合IP地址一起使用。子网掩码只有一个作用,就是将某个IP地址划分成网络地址和主机地址两部分子网掩码的设定必须遵循一定的规则。与IP地址相同,子网掩码的长度也是32位,左边是网络位,用二进制数字“1”表示;右边是主机位,用二进制数字“0”表示。假设IP地址为“192.168.1.1”子网掩码为“255.255.255.0”。其中,“1”有24个,代表与此相对应的IP地址左边24位是网络号;“0”有8个,代表与此相对应的IP地址右边8位是主机号。这样,子网掩码就确定了一个IP地址的32位二进制数字中哪些是网络号、哪些是主机号。这对于采用TCP/IP协议的网络来说非常重要,只有通过子网掩码,才能表明一台主机所在的子网与其他子网的关系,使网络正常工作。常用的子网掩码有数百种,这里只介绍最常用的两种子网掩码。
子网掩码是“255.255.255.0”的网络:
最后面一个数字可以在0~255范围内任意变化,因此可以提供256个IP地址。但是实际可用的IP地址数量是256-2,即254个,因为主机号不能全是“0”或全是“1”。
子网掩码是“255.255.0.0”的网络:
后面两个数字可以在0~255范围内任意变化,可以提供255²个IP地址。但是实际可用的IP地址数量是255²-2,即65023个。
IP地址的子网掩码设置不是任意的。如果将子网掩码设置过大,也就是说子网范围扩大,那么,根据子网寻径规则,很可能发往和本地主机不在同一子网内的目标主机的数据,会因为错误的判断而认为目标主机是在同一子网内,那么,数据包将在本子网内循环,直到超时并抛弃,使数据不能正确到达目标主机,导致网络传输错误;如果将子网掩码设置得过小,那么就会将本来属于同一子网内的机器之间的通信当做是跨子网传输,数据包都交给缺省网关处理,这样势必增加缺省网关(文章下方有解释)的负担,造成网络效率下降。因此,子网掩码应该根据网络的规模进行设置。如果一个网络的规模不超过254台电脑,采用“255.255.255.0”作为子网掩码就可以了,现在大多数局域网都不会超过这个数字,因此“255.255.255.0”是最常用的IP地址子网掩码;假如在一所大学具有1500多台电脑,这种规模的局域网可以使用“255.255.0.0”。
网关
网关实质上是一个网络通向其他网络的IP地址。比如有网络A和网络B,网络A的IP地址范围为“192.168.1.1~192.168.1.254”,子网掩码为255.255.255.0;网络B的IP地址范围为“192.168.2.1~192.168.2.254”,子网掩码为255.255.255.0。在没有路由器的情况下,两个网络之间是不能进行TCP/IP通信的,即使是两个网络连接在同一台交换机(或集线器)上,TCP/IP协议也会根据子网掩码(255.255.255.0)判定两个网络中的主机处在不同的网络里。而要实现这两个网络之间的通信,则必须通过网关。如果网络A中的主机发现数据包的目标主机不在本地网络中,就把数据包转发给它自己的网关,再由网关转发给网络B的网关,网络B的网关再转发给网络B的某个主机。网络B向网络A转发数据包的过程也是如此 所以说,只有设置好网关的IP地址,TCP/IP协议才能实现不同网络之间的相互通信。那么这个IP地址是哪台机器的IP地址呢?网关的IP地址是具有路由功能的设备的IP地址,具有路由功能的设备有路由器、启用了路由协议的服务器(实质上相当于一台路由器)、代理服务器(也相当于一台路由器)。
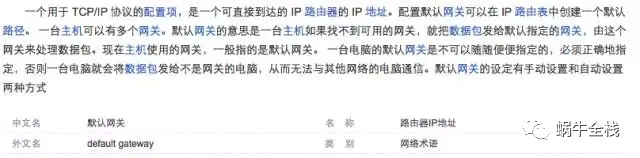
路由器(Windows下叫默认网关,网关就是路由,路由就是网关不要蒙)
如果搞清了什么是网关,默认网关也就好理解了。就好像一个房间可以有多扇门一样,一台主机可以有多个网关。默认网关的意思是一台主机如果找不到可用的网关,就把数据包发给默认指定的网关,由这个网关来处理数据包。现在主机使用的网关,一般指的是默认网关。下方是百度百科给出的解释
如何设置默认网关 一台电脑的默认网关是不可以随随便便指定的,必须正确地指定,否则一台电脑就会将数据包发给不是网关的电脑,从而无法与其他网络的电脑通信。默认网关的设定有手动设置和自动设置两种方式。
手动设置:手动设置适用于电脑数量比较少、TCP/IP参数基本不变的情况,比如只有几台到十几台电脑。因为这种方法需要在连入网络的每台电脑上设置“默认网关”,非常费劲,一旦因为迁移等原因导致必须修改默认网关的IP地址,就会给网管带来很大的麻烦,所以不推荐使用。需要特别注意的是:默认网关必须是电脑自己所在的网段中的IP地址,而不能填写其他网段中的IP地址。
自动设置:自动设置就是利用DHCP服务器来自动给网络中的电脑分配IP地址、子网掩码和默认网关。这样做的好处是一旦网络的默认网关发生了变化时,只要更改了DHCP服务器中默认网关的设置,那么网络中所有的电脑均获得了新的默认网关的IP地址。这种方法适用于网络规模较大、TCP/IP参数有可能变动的网络。另外一种自动获得网关的办法是通过安装代理服务器软件(如MS Proxy)的客户端程序来自动获得,其原理和方法和DHCP有相似之处。由于篇幅所限,就不再详述了。
缺省网关
缺省网关(Default Gateway)是计算机网络中一个如何将数据包转发到其他网络中的节点。在一个典型的TCP / IP网络,节点(如服务器、工作站和网络设备)都有一个定义的默认路由设置(指向默认网关)。可以在没有特定路由的情况下,明确出发送数据包的下一跳IP地址。下方是百度百科给出的解释:

可以看出缺省网关就是默认网关,那么有人会说既然有一样为什么又凭空多出来一个缺省网关,我的理解是这样的,应该说默认网关是缺省网关的一个子集。缺省网关有一个定义的默认路由设置(指向默认网关),缺省网关就相当于一个代理服务器暂时管理发送的数据包,当发送到目标主机时先由目标主机的缺省网关接收再找到对应的默认网关,就相当于缺省网关是父类,默认网关是子类~~
DNS服务器
域名服务器(Domain Name Server)。在Internet上域名与IP地址之间是一一对应的,域名虽然便于人们记忆,但机器之间只能互相认识IP地址,它们之间的转换工作称为域名解析,域名解析需要由专门的域名解析服务器来完成,DNS就是进行域名解析的服务器。
DHCP服务器
DHCP指的是由服务器控制一段IP地址范围,客户机登录服务器时就可以自动获得服务器分配的IP地址和子网掩码。提升地址的使用率。
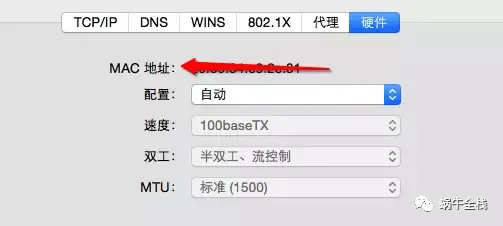
MAC地址
MAC地址就如同我们身份证上的身份证号码,具有全球唯一性。(知道这个就行了,不用往下看了)MAC(Media Access Control,介质访问控制)地址
前24位叫做组织唯一标志符(Organizationally Unique Identifier,即OUI),是由IEEE的注册管理机构给不同厂家分配的代码,区分了不同的厂家。
后24位是由厂家自己分配的,称为扩展标识符。同一个厂家生产的网卡中MAC地址后24位是不同的。
网卡的物理地址通常是由网卡生产厂家烧入网卡的EPROM(一种闪存芯片,通常可以通过程序擦写),它存储的是传输数据时真正赖以标识发出数据的电脑和接收数据的主机的地址。
也就是说,在网络底层的物理传输过程中,是通过物理地址来识别主机的,它一定是全球唯一的。比如,著名的以太网卡,其物理地址是48bit(比特位)的整数,如:44-45-53-54-00-00,以机器可读的方式存入主机接口中。以太网地址管理机构(除了管这个外还管别的)(IEEE)(IEEE:电气和电子工程师协会)将以太网地址,也就是48比特的不同组合,分为若干独立的连续地址组,生产以太网网卡的厂家就购买其中一组,具体生产时,逐个将唯一地址赋予以太网卡。
在一个稳定的网络中,IP地址和MAC地址是成对出现的。如果一台计算机要和网络中另一外计算机通信,那么要配置这两台计算机的IP地址,MAC地址是网卡出厂时设定的,这样配置的IP地址就和MAC地址形成了一种对应关系。在数据通信时,IP地址负责表示计算机的网络层地址,网络层设备(如路由器)根据IP地址来进行操作;MAC地址负责表示计算机的数据链路层地址,数据链路层设备(如交换机)根据MAC地址来进行操作。IP和MAC地址这种映射关系由ARP(Address Resolution Protocol,地址解析协议)协议完成。
服务器
服务器的分类
按照软件开发阶段来分,服务器可以大致分为2种
(1)远程服务器
别名:外网服务器、正式服务器
使用阶段:应用上线后使用的服务器
使用人群:供全体用户使用
速度:服务器的性能、用户的网速
(2)本地服务器
别名:内网服务器、测试服务器
使用阶段:应用处于开发、测试阶段使用的服务器
使用人群:仅供公司内部的开发人员、测试人员使用
速度:由于是局域网,所以速度飞快,有助于提高开发测试效率
本地服务器的选择
远程服务器就是本地内网服务器开放外网访问而已
如果处于学习、开发阶段,自己搭建一个本地服务器即可
端口号
端口包括物理端口和逻辑端口。物理端口是用于连接物理设备之间的接口,逻辑端口是逻辑上用于区分服务的端口。TCP/IP协议中的端口就是逻辑端口,通过不同的逻辑端口来区分不同的服务。端口有什么用呢?我们知道,一台拥有IP地址的主机可以提供许多服务,比如Web服务、FTP服务、SMTP服务等,这些服务完全可以通过1个IP地址来实现。那么,主机是怎样区分不同的网络服务呢?显然不能只靠IP地址,因为IP 地址与网络服务的关系是一对多的关系。实际上是通过“IP地址+端口号”来区 分不同的服务的。
公认端口(Well-Known Ports)
这类端口也常称之为"常用端口"。这类端口的端口号从0到1023,它们紧密绑定于一些特定的服务。通常这些端口的通信明确表明了某种服务的协议,这种端口是不可再重新定义它的作用对象。80端口实际上总是HTTP通信所使用的,而23号端口则是Telnet服务专用的。
注册端口(Registered Ports)
端口号从1025到49151。分配给用户进程或应用程序。这些进程主要是用户选择安装的一些应用程序,而不是分配好的公认端口的常用程序。
动态和/或私有端口(Dynamic and/or Private Ports)
之所以称为动态端口,因为它一般不固定分配某种服务,而是动态分配。
Internnet是如何工作的
以下文章来自:https://www.hp.com/us-en/shop/tech-takes/how-does-the-internet-work
How does the internet work?
Now that you have some background on the evolution of the internet, let’s tackle the question at hand: “how does the internet work?”
The internet is a worldwide computer network that transmits a variety of data and media across interconnected devices. It works by using a packet routing network that follows Internet Protocol (IP) and Transport Control Protocol (TCP) [5].
TCP and IP work together to ensure that data transmission across the internet is consistent and reliable, no matter which device you’re using or where you’re using it.
When data is transferred over the internet, it’s delivered in messages and packets. Data sent over the internet is called a message, but before messages get sent, they’re broken up into tinier parts called packets.
These messages and packets travel from one source to the next using Internet Protocol (IP) and Transport Control Protocol (TCP). IP is a system of rules that govern how information is sent from one computer to another computer over an internet connection.
Using a numerical address (IP Address) the IP system receives further instructions on how the data should be transferred.
The Transport Control Protocol (TCP) works with IP to ensure transfer of data is dependable and reliable. This helps to make sure that no packets are lost, packets are reassembled in proper sequence, and there’s no delay negatively affecting the data quality.
Wondering how the internet works from browser launch to search results? Let’s go over the process step-by-step [7] [8] [9].
WHEN YOU TYPE IN A WEB ADDRESS INTO YOUR BROWSER...
Step 1: Your PC or device is connected to the web through a modem or router. Together, these devices allow you to connect to other networks around the globe [6].
Your router enables multiple computers to join the same network while a modem connects to your ISP (Internet Service Provider) which provides you with either cable or DSL internet.
Step 2: Type in a web address, known as a URL (Uniform Resource Locator). Each website has its own unique URL that signals to your ISP where you want to go.
Step 3: Your query is pushed to your ISP which connects to several servers which store and send data like a NAP Server (Network Access Protection) and a DNS (Domain Name Server).
Next, your browser looks up the IP address for the domain name you typed into your search engine through DNS. DNS then translates the text-based domain name you type into the browser into the number-based IP address.
Example: Google.com becomes 64.233.191.255
Step 4: Your browser sends a Hypertext Transfer Protocol (HTTP) request to the target server to send a copy of the website to the client using TCP/IP.
Step 5: The server then approves request and sends a “200 OK” message to your computer. Then, the server sends website files to the browser in the form of data packets.
Step 6: As your browser reassembles the data packets, the website loads allowing you to learn, shop, browse, and engage.
Step 7: Enjoy your search results!
The future of the internet
Whether you’re searching for information on how the internet works, streaming your favorite movie, or browsing the internet for travel deals, it’s undeniable that the internet takes us places, and it’s going to continue to do so!
While it might not seem like the internet is changing now, chances are, we’ll look back and see how far we’ve come, the differences in how we use this technology, and ultimately, we’ll find that we, too, are a part of the internet’s history.
[1] Pew Internet; Internet/Broadband Fact Sheet
[2] Walt Howe; A Brief History of the Internet
[3] Money; Here's How Many Internet Users There Are
[4] Cisco; Internet of Things
[5] Lifewire; TCP (Transmission Control Protocol) Explained
[6] Mozilla; How the Web works
[7] How Stuff Works; How does the Internet work?
[8] How to Geek; How Does the Internet Work?
[9] Medium, How Does The Internet Work
A brief history of the internet
Philosophers and authors have conceptualized a shared repository of world knowledge for centuries. How did we get to the internet we know today?
MAJOR BREAKTHROUGHS [2]
October 29, 1969: ARPANET (later renamed internet) created a successful connection between University of California Los Angeles and the Stanford Research Institute.
Late 1960s: Libraries automate and network catalogs independent of ARPANET.
1970s: Transport Control Protocol and Internet Protocol (TCP/IP) is established, allowing for internet technology to mature. The invention of these protocols helped to standardize how information was sent and received over the web.
1986: National Science Foundation funded NSFNET, which is the 56 Kbps backbone of the internet. There were commercial restrictions in place at this time because federal funds were being used to run and maintain it.
1991: User-friendly internet interface was created.
July 1992: Delphi became the first national commercial online service to offer internet access.
May 1995: All commercial use limitations on the internet disappear. This allowed the internet to diversify and grow rapidly.
1997: WiFi was invented.
1998: Windows 98 hit the market.
2007: Widespread smartphone adoption.
2009: 4G network is introduced.
Today: 3 billion people use the internet. [3]
2030: 7.5 billion projected internet users and 500 billion devices connected to the internet. [4]
HOW DOES THE INTERNET WORK?
The internet is a worldwide computer network that transmits a variety of data and media across interconnected devices. It works by using a packet routing network that follows Internet Protocol (IP) and Transport Control Protocol (TCP). [5]
MESSAGES + PACKETS
Data sent over the internet is called a message
Before messages get sent, they’re broken up into tiny parts called packets
INTERNET PROTOCOL (IP)
Rules that govern how information is sent from one computer to another computer over an internet connection
Specifies how computers should send information to other computers by sending data with an attached numerical address (IP Address)
Public IP Address: Accessible over the internet
Private IP Address: Assigned to a device on a closed network such as a home or business network that’s not accessible over the internet
TRANSPORT CONTROL PROTOCOL (TCP)
Works with IP to ensure transfer of data is dependable and reliable
No packets lost, no delay negatively affecting data quality, packets reassembled in proper sequence
What happens when you surf the internet...
Step 1: Your PC or device is connected to the web through a modem or router, which allows it to connect to other networks around the globe. [6]
A router allows for multiple computers to join the same network while a modem connects to your Internet Service Provider (ISP) which provides either cable or DSL internet.
Your personal PC is called a client as opposed to a server.
Client computers connect to the internet through an ISP.
Example: Your phone connected to a mobile network or your laptop connected to WiFi.
Servers are computers directly connected to the internet.
Example: Computers that store web pages, sites, or applications.
Step 2: Type in a web address, known as a URL. URL stands for Uniform Resource Locator.
Step 3: Your query is processed and pushed to your ISP. Your ISP has multiple servers which store and send data like a NAP Server (Network Access Protection) and a DNS (Domain Name Server).
Your browser looks up the IP address for the domain name you typed into your browser through DNS.
DNS translates the text-based domain name you type into the browser into the number-based IP address.
Example: Google.com becomes 64.233.191.255
Step 4: Browser sends a Hypertext Transfer Protocol (HTTP) request to the target server to send a copy of the website to the client using TCP/IP.
HTTP: Language used for internet communication.
HTTPS: Secure version of HTTP, all communications between your browser and website are encrypted.
Step 5: Server approves request and sends a “200 OK” message to client computer. Then, the server sends web page files to browser in the form of data packets.
Step 6: Web page loads as your browser reassembles packets.
Step 7: Enjoy browsing the internet! [7] [8] [9]
从数据包的角度详细解析
以下文章来自:https://www.homenethowto.com/advanced-topics/traffic-example-the-full-picture/
Traffic example, the full picture
In this section we will do a complete step-by-step walkthrough of a traffic example, showing which steps that a computer will go through when it wants to communicate over a computer network. This example will incorporate a lot of information from the other sections and serves as an all-inclusive example.
Most people are surprised to see how many steps that are involved for a computer to be able to just send out a simple packet, and there are lots of steps that are completely hidden to a regular user and which you would never know about unless you knew about them beforehand.
If you have read through most of this website then you probably already have an idea about the number of steps that might be included in this walkthrough.
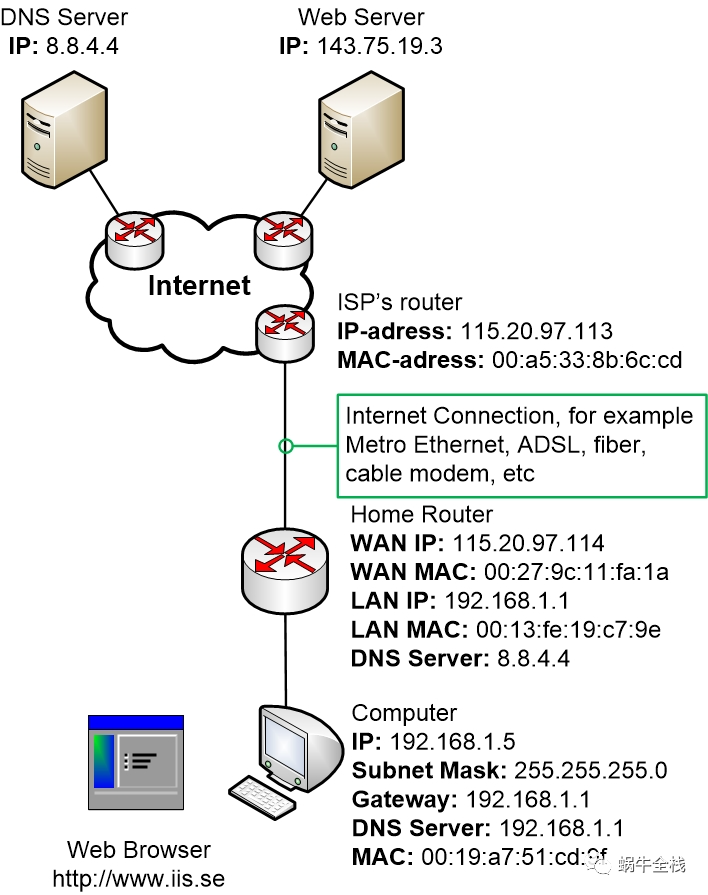
In the example below we will display a small home network where a computer has just booted up. The computer has a manually configured IP address and has not yet communicated on the network. A user sits down by the computer and opens up a Web Browser and tries to browse to www.iis.se
First let’s have a look at the whole picture. This image shows the network topology in the example. Within a lot of the steps, we will zoom in on just the most relevant part of the network to avoid having to draw the whole picture every single time.
Now let’s start with the traffic example walkthrough!
Step 1: The computer wants to send traffic
A computer connected to the home network has just booted up. The computer has a manually configured IP address, Subnet Mask, DNS server and a Default Gateway. Both the DNS server and the Default Gateway address is pointing at the LAN IP address of the home router.
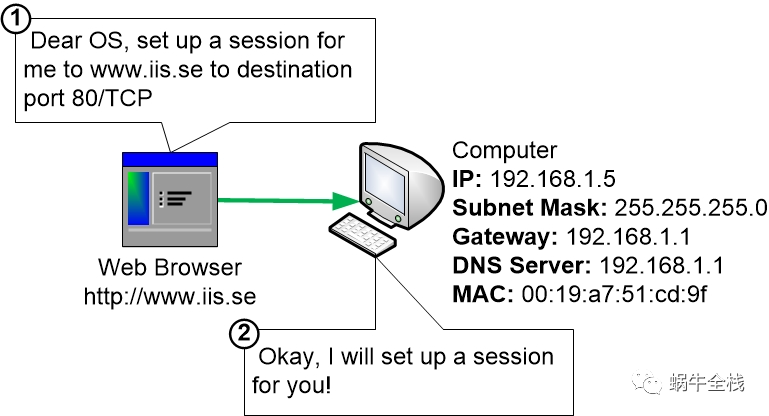
The user of the computer opens a web browser and goes to www.iis.se
The first thing that happens is that the Web Browser instructs the OS on the computer to set up the communication between the computer and www.iis.se
Step 2: DNS
This part is divided into numerous sub-steps
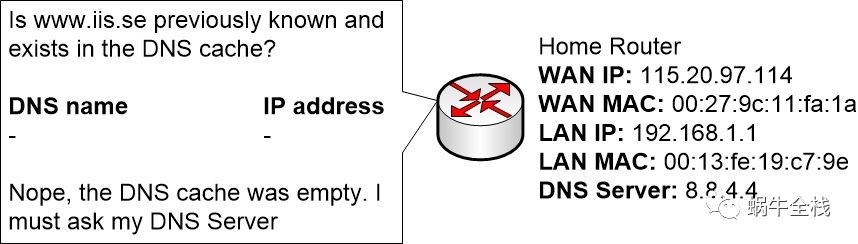
Step 2a: DNS cache
The computer OS checks its DNS cache to see if it already knows what IP address that www.iis.se has got. Since the computer just started up and it hasn’t previously contacted www.iis.se the DNS cache is completely empty.
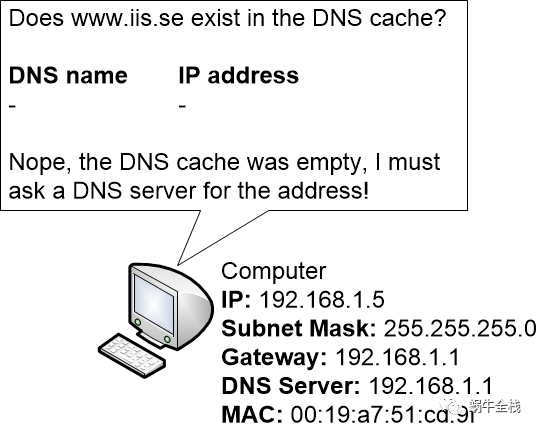
The computer must now ask its DNS server what IP address that www.iis.se has got.
Step 2b: Putting a DNS query together
The computer will construct a DNS query that it can send off to the DNS server, 192.168.1.1, that it is configured to use.
The destination address of the DNS query is 192.168.1.1, and the source IP address is the IP address of the computer itself, 192.168.1.5
DNS uses UDP as its transport protocol. The destination port for DNS queries is 53/UDP. Later when the DNS query reaches the DNS server the DNS server will be able to tell by looking at the destination port 53/UDP that the message is intended for a DNS server program, and can forward the message to the running DNS program.
The computer OS must also randomise a source port which is also written into the message.
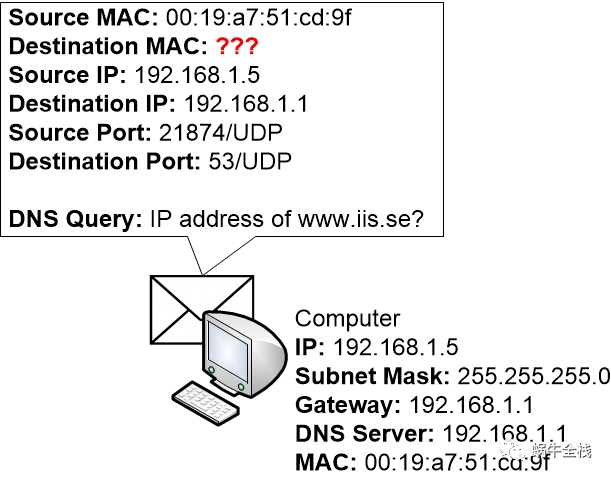
But when the computer puts the DNS query together it notices that it must check what destination MAC address that it should send the packet to.
So for now, the OS puts the packet in a queue in memory and then starts working on figuring out what destination MAC address to use.
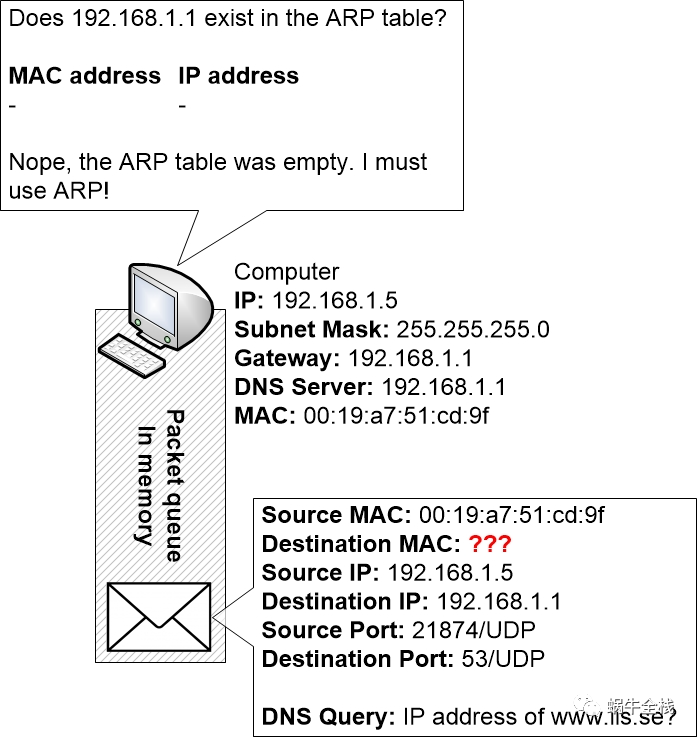
Step 2c: Check the ARP table for a valid MAC address
The computer will now check its ARP table to see if it knows what MAC address that is associated with the IP address of the router, 192.168.1.1
But the computer has a completely empty ARP table since it just booted up and hasn’t yet learned any ARP entries.
Step 2d: ARP request to the network
Now the computer must construct an ARP request to the rest of the network. The request will be sent to destination MAC address FF:FF:FF:FF:FF:FF which is the broadcast address. The result is that every other computer and device on the LAN will receive the request and read the contents.
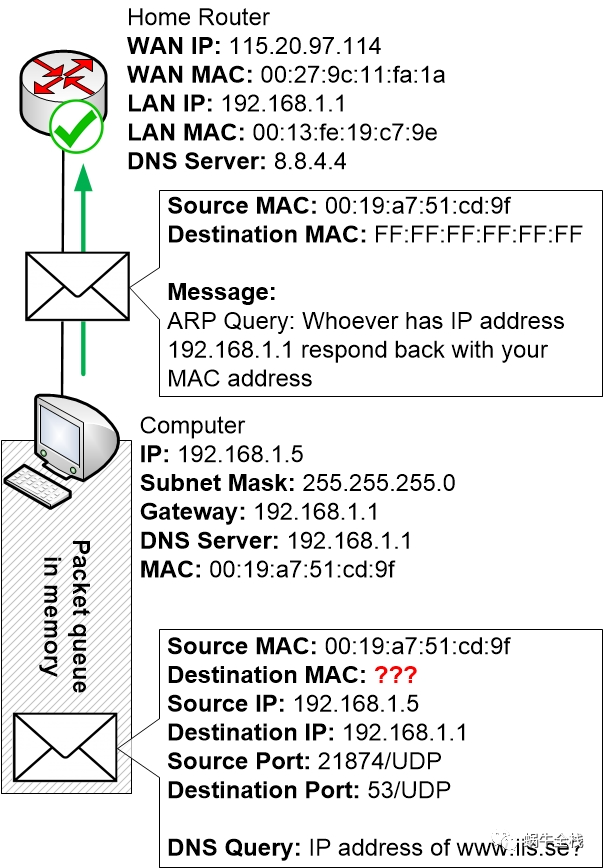
The home router receives the ARP request and reads the message since the request is sent to the broadcast MAC address FF:FF:FF:FF:FF:FF
The home router can see in the message that the computer is asking for the device with IP address 192.168.1.1. Because the router is configured to use that IP address the home router will respond to this message by constructing an ARP reply and sending it back to the computer.
Step 2e: ARP reply from the router
When the ARP reply is received by the computer the OS will read the reply. It will enter the reply into its ARP table to remember for a few minutes which MAC address that is associated with 192.168.1.1
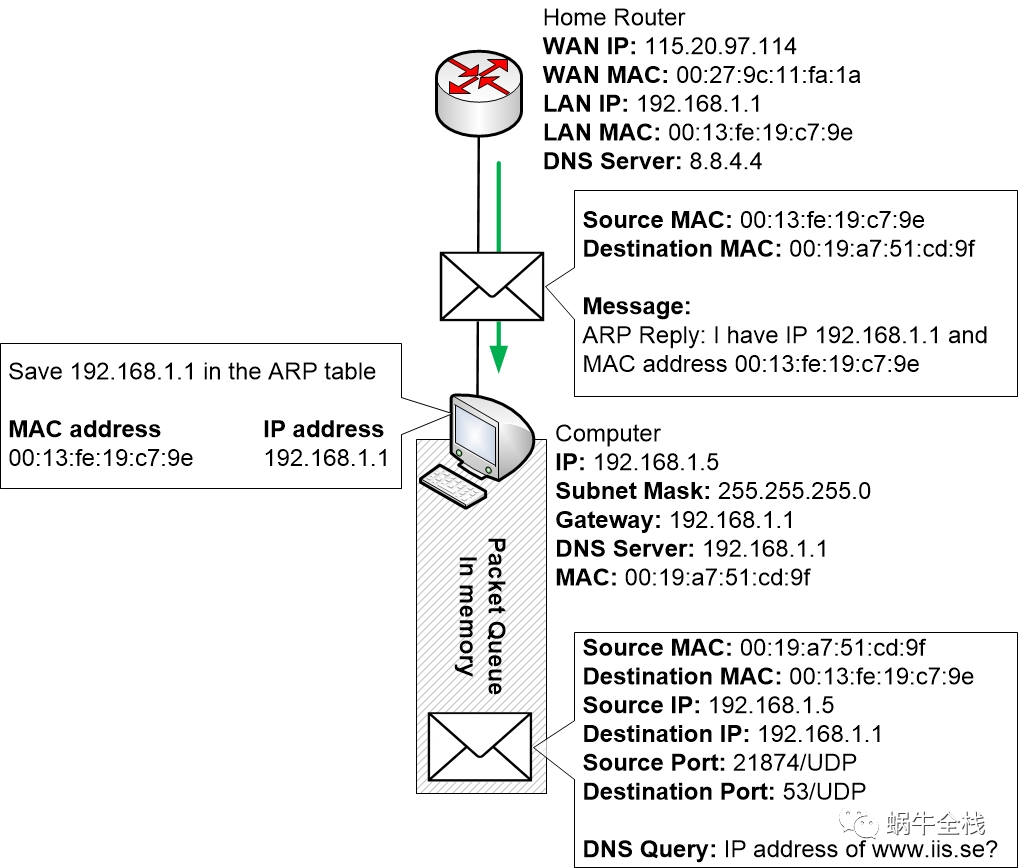
Now the computer finally has gathered all the information it requires to be able to send off the DNS message.
Step 2f: Send off the DNS query
The DNS query is now going to be sent from the computer to the DNS server, which exists as a service that is running on the home router 192.168.1.1
The home router receives the query, sees that it is a DNS query aimed at the router’s own IP address and MAC address, and understands that it must handle this DNS query and send back an answer.

Step 2g: The home router checks its DNS cache
The home router is a DNS server, but it is also dependent on other DNS servers on the Internet. The home router can’t know every single DNS address on the Internet. Instead, it will ask those DNS servers that are responsible for different domains (such as example.com) as needed.
The home router also has a DNS cache just like the computer. Every time the home router handles a DNS query from a computer it will also save the DNS reply in its own DNS cache for some time. This is to avoid having to handle the same DNS queries over and over and to speed up the response time.
In this case, the home router hasn’t gotten any question about www.iis.se in a long time so it doesn’t exist in the DNS cache on the router. Therefore, the router must ask its configured DNS servers on the Internet to answer this DNS query.
Step 2h: The home router prepares and sends away its DNS query
Now the router prepares a DNS query that it will send to its DNS server. The router learned about available DNS servers via DHCP from the Internet Service Provider when the home router first booted up and got its own public IP address from the ISP.
So the home router will prepare a DNS query for transmission by putting the query inside a UDP message with destination port 53/UDP and a random UDP source port. It will then put the message inside an IP packet. The IP packet is sent from the home router’s public IP address to the DNS server address.
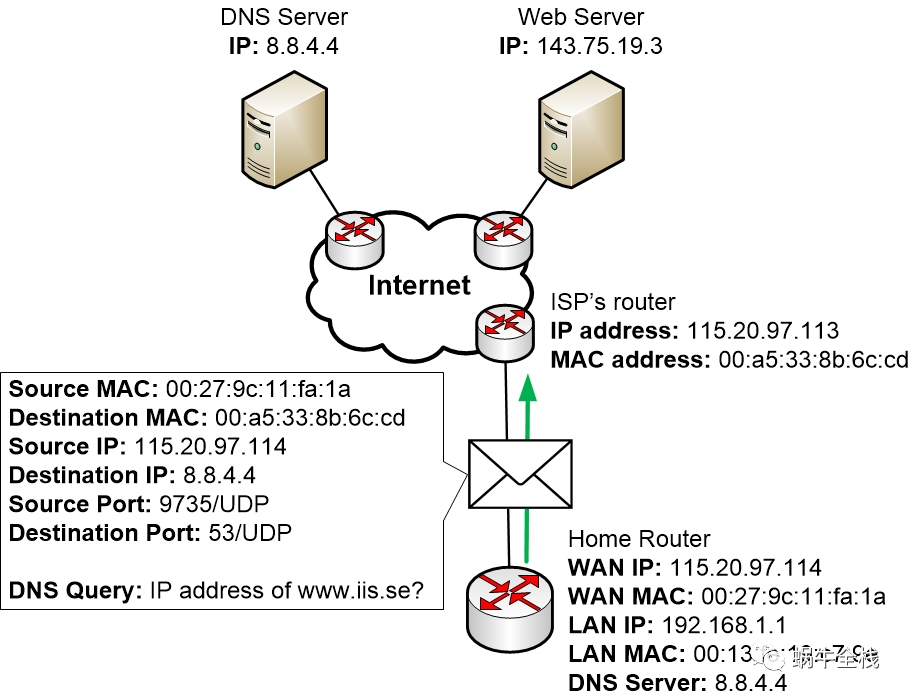
When the home router has prepared the packet and is ready to send it, then the home router will look in its routing table to see which way it should send the packet. It can see in the routing table that the best path to the inside LAN 192.168.1.0 is via the LAN ports, but this packet should be sent to another IP network on the Internet. So the home router picks the WAN port as the best destination.
At this stage of the process, it is possible that the home router would have to perform an ARP request to find out which MAC address of the next hop router 115.20.97.113, but we assume that the home router already has got this information in its ARP cache.
Step 2i: The DNS query is routed over the Internet
Here a number of steps have been somewhat simplified and shortened.
Each router on the Internet that receives the DNS request will perform the following:
Receive the packet
Looks at the destination IP address to see where the packet is going
Looks in its routing table to see which path that is best for the packet
Removes the old MAC addresses from the packet and adds new ones. It will use its own MAC address on the outbound interface as the Source MAC address for the traffic, and will put the next-hop router’s MAC address as the destination MAC address
Sends off the packet to the next hop router
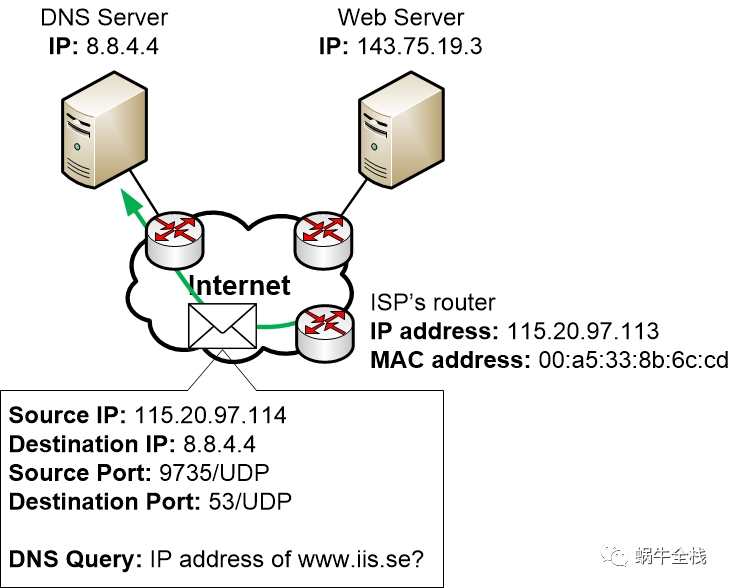
Step 2j: The DNS server responds
Eventually, the packet reaches the DNS server which will handle the packet and prepare a response.
Just like a regular computer the server has an IP address, a Subnet Mask and a Default Gateway. So it works in much the same way as a regular computer.
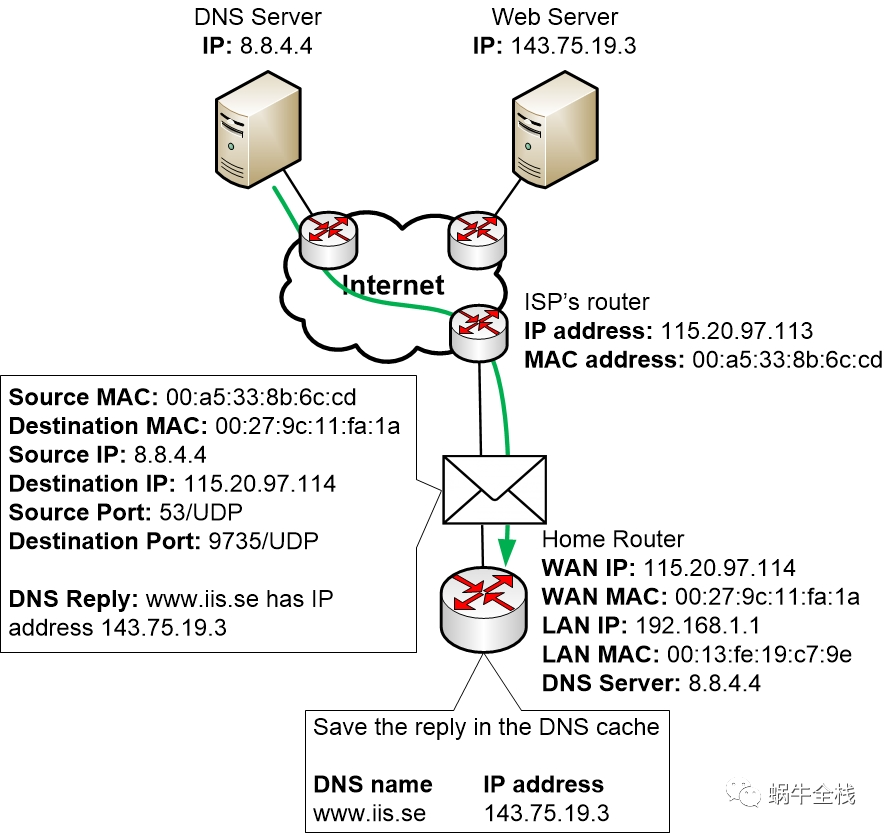
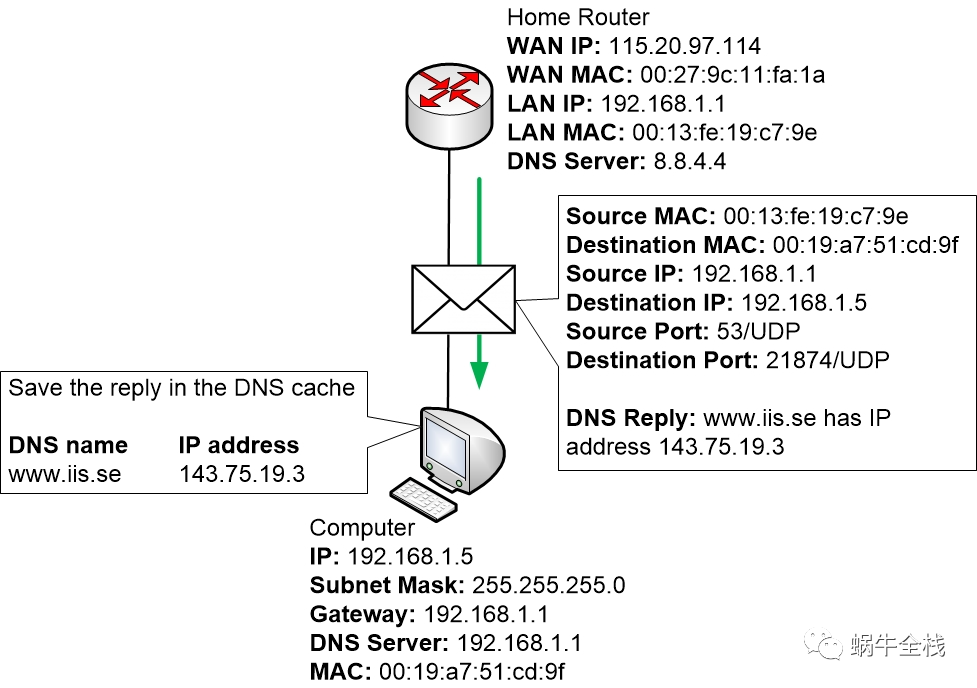
Step 2k: The home router can send a DNS reply to the computer
Now after receiving the DNS reply from the DNS server, the home router can finally create a DNS reply and send it to the computer to let the computer know which IP address that www.iis.se has got.
Step 3: The computer sets up a session to www.iis.se
During this part, a lot of things happen at once.
Mainly the computer will initialise something called a “TCP 3-way Handshake” which is a setup phase of TCP communication that consists of three messages between the computer and the server. When TCP is being used, as is the case with web browsing, TCP always tries to make sure that everything works as well as possible which includes setting up a session via a handshake. This is done to prepare the server for an incoming session and to decide which ports that should be used for the communication.
The TCP 3-way Handshake consists of three messages:
The first one is sent from the computer and is called “SYN” which stands for Synchronise. It lets the other side know that we want to synchronise settings for a TCP session. The message also contains the random source TCP port that the computer has chosen.
The second message is the reply back from the server and is called “SYN-ACK”, which stands for Synchronise Acknowledgement. This simply means that the server acknowledges that it received the message and that it also is prepared to set up a session for communication
The third message is sent by the computer and finalises the session by sending “ACK” or Acknowledgement. This means that everything is now fully prepared.
The computer has got the correct ARP information for the IP address of the home router in its ARP cache. So the computer can send off any packets it wants to the Internet via the home router without first having to go through ARP lookups.
But this is also the first time so far in this example that the computer wants to communicate directly with something that is located beyond the router. The TCP 3-way handshake will take place directly between the computer and the Web Server on the Internet.
Earlier during the DNS lookup process, the computer just talked with the Home Router. The home router, in turn, talked with the DNS servers on the Internet. But no communication was travelling directly between the computer and any IP address on the Internet.
The difference is that now that the computer wants to communicate directly with something on the Internet then the home router has to perform Address Translation for the traffic.
Step 3a: The computer sends a TCP SYN message
Here we take a closer look at what happens when the computer is establishing the TCP session by initializing the TCP 3-way handshake.
To do so, the computer OS will randomise a TCP source port that it will use for the communication. Then it assembles the TCP SYN message and sends it to the Web Server. The TCP message doesn’t contain any other data. It is just an empty TCP message.
When the TCP SYN message passes through the router the router will perform NAT on the message. The router will also save information about the performed NAT in its NAT table so that it can keep track of the session and perform reverse NAT on any replies.
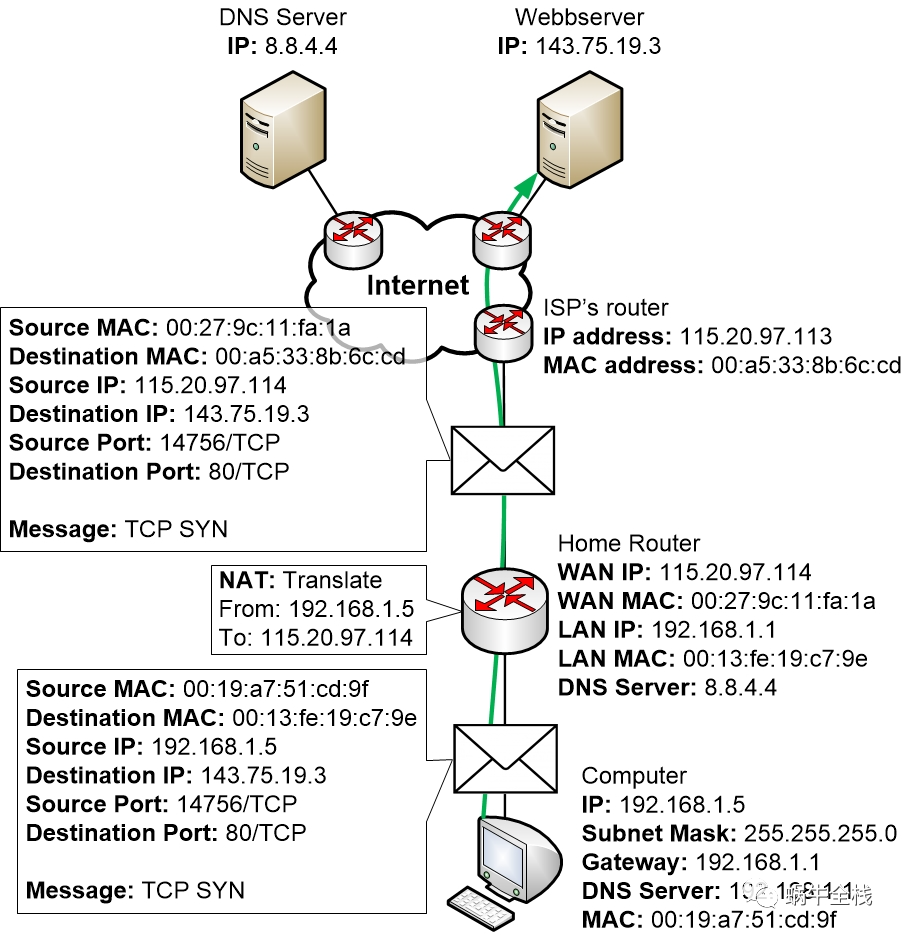
The picture shows a TCP SYN travelling from the computer to the web server
“I would like to synchronise a TCP session with you”
Step 3b: The Web Server replies with TCP SYN-ACK
Here you can see the returning TCP SYN-ACK response from the Web Server to the computer:
“Okay, I’m good to set up a session and I confirm that I got your message”
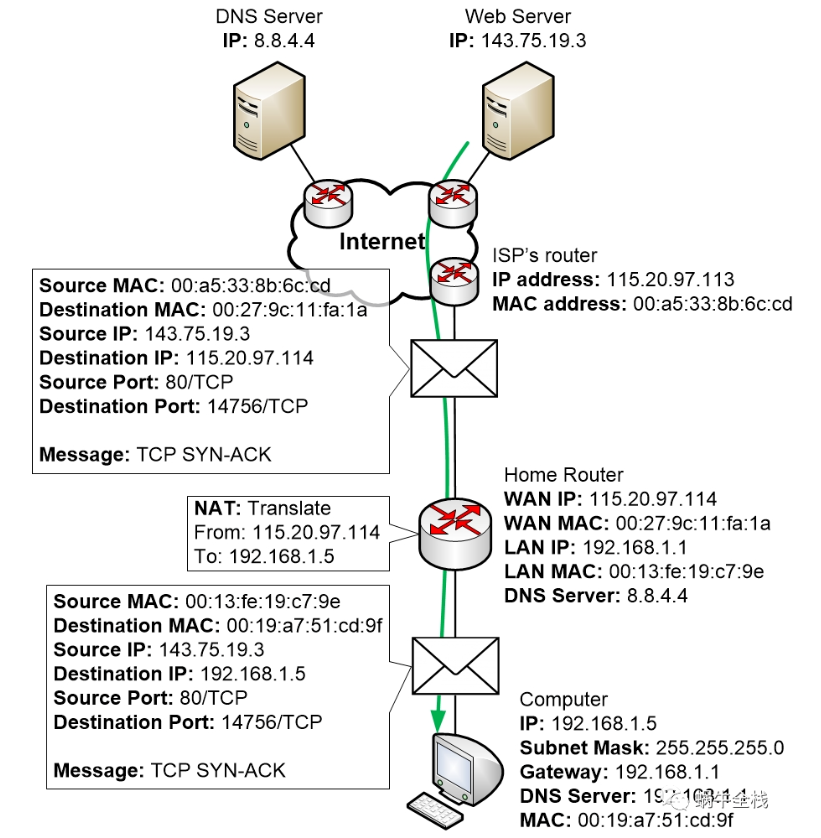
The packet matches the NAT table entry on the router so that the router can see which LAN computer it should forward the packet to and how it should perform NAT on the packet.
Step 3c: The computer sends a TCP ACK
Finally, a TCP ACK is sent from the computer to the Web Server
“Then I confirm that from now on we have established a session!”
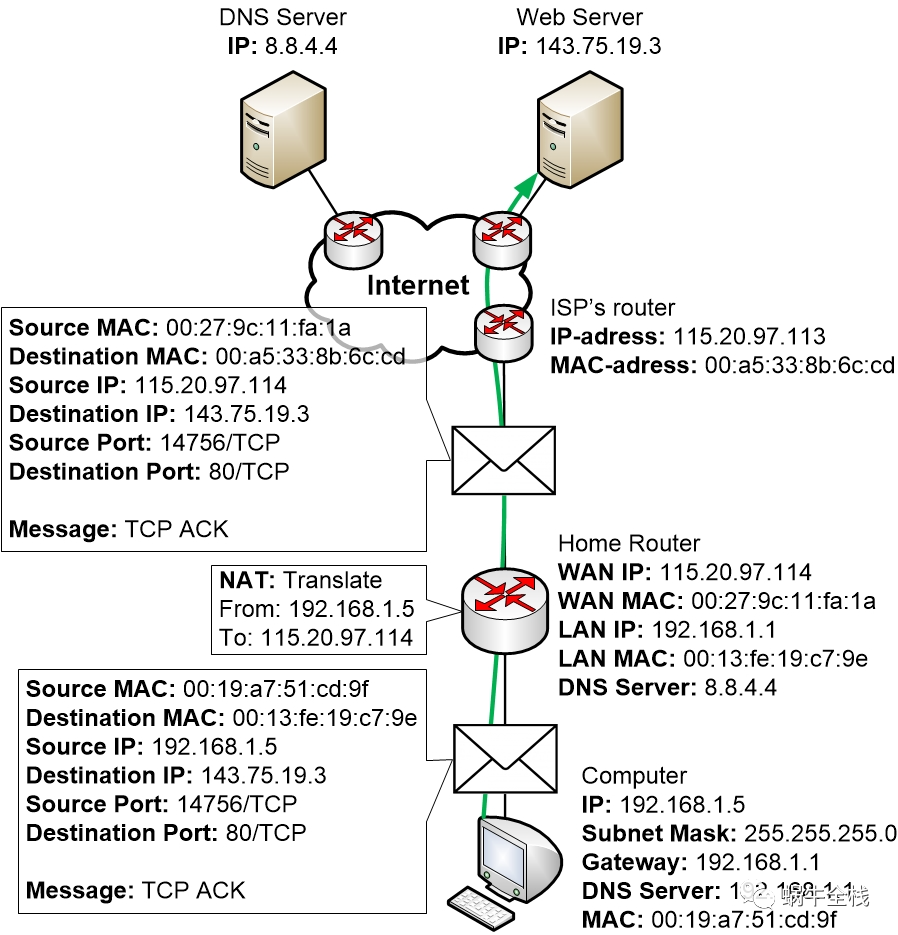
As long as the computer and the server keep on communicating with each other they will keep using the same session for the communication. This also includes using the same TCP ports, which lets all devices along the way keep track of the session, the address translation and so on.
The session could last just long enough to download the web page, or the web server and the computer could choose to keep the session alive for longer in case the user wants to keep browsing around on the web pages.
Step 4: The web browser talks with the Web Server
Once the TCP session is established by the OS then the OS will let the Web Browser know that it is now alright for it to start communicating with the Web Server.
The web browser will do this by using the HTTP protocol, which is the standard protocol for transferring web pages on the Internet
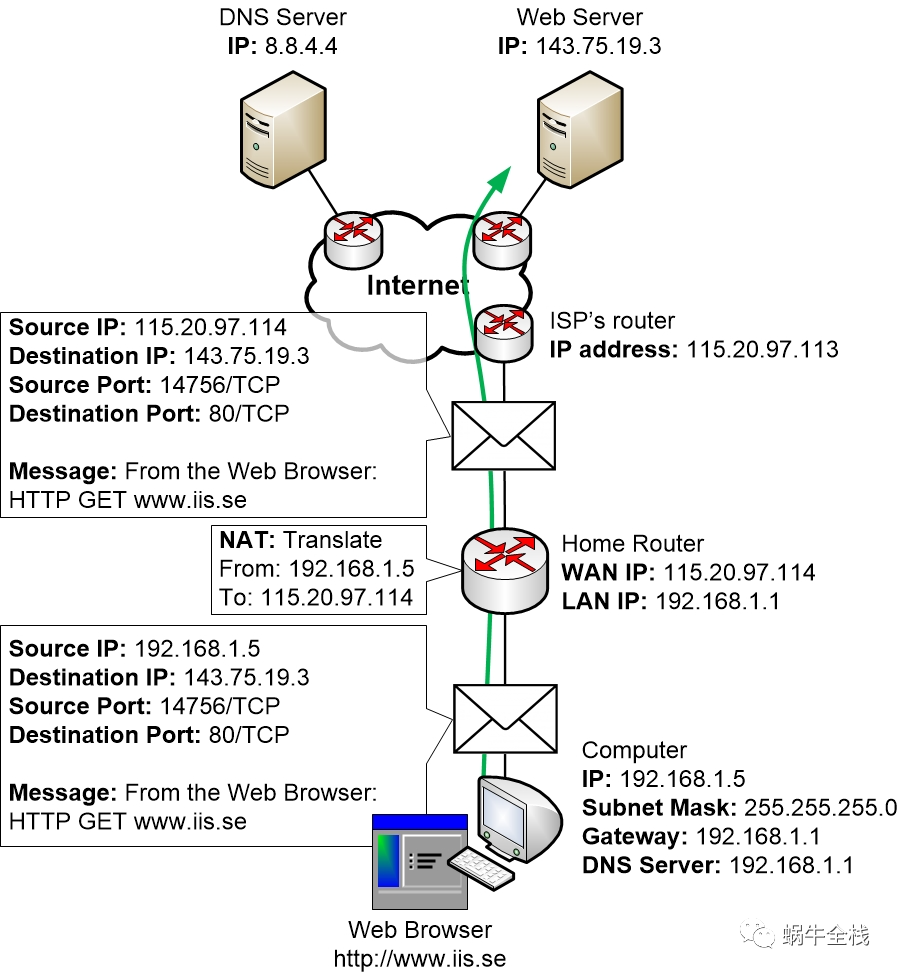
This also means that we have concluded the example including most steps that are involved with setting up the communication. From now on the computer and the server can communicate with each other to transmit the web pages until they are done. Then they can choose to end the session by sending a so-called TCP RESET message if they want, which lets all devices know that the session has now ended.
网络常用命令
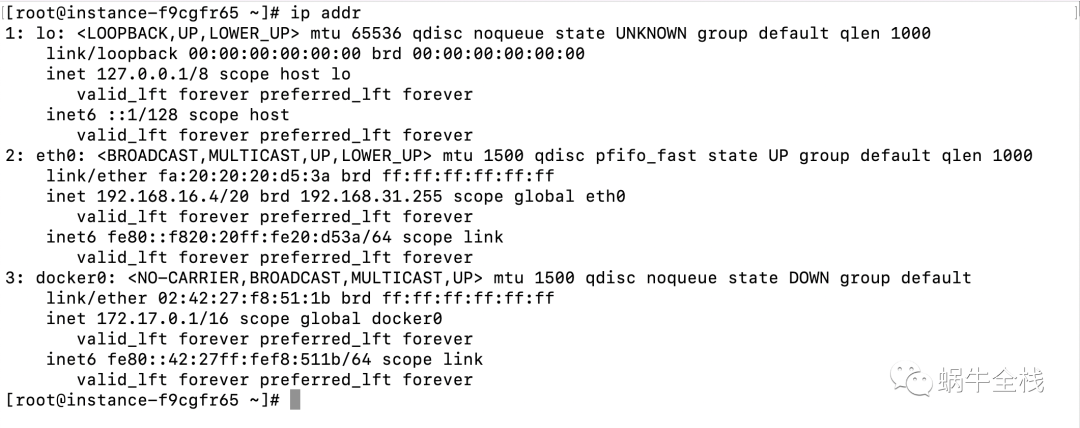
IP地址查看
Windows
ipconfigLinux/Mac
ifconfig
ip addr
测试网络联通性
ping命令(测试IP可达性)

telnet命令(测试端口的连通性)

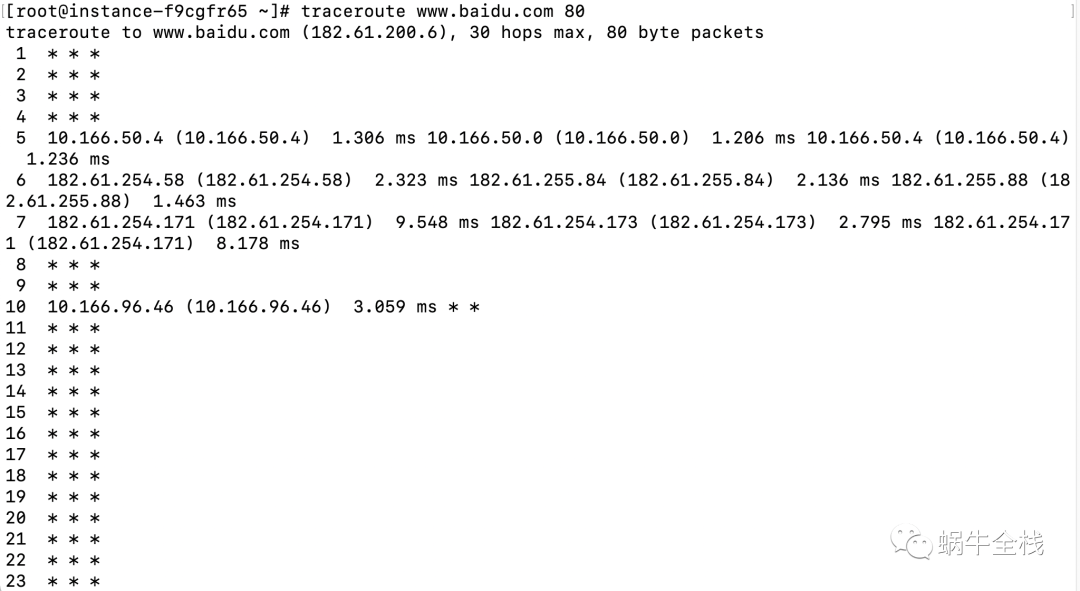
traceroute命令(主要用于路径的探测和跟踪。Linux上可以看到从本地到远程经过的路径)
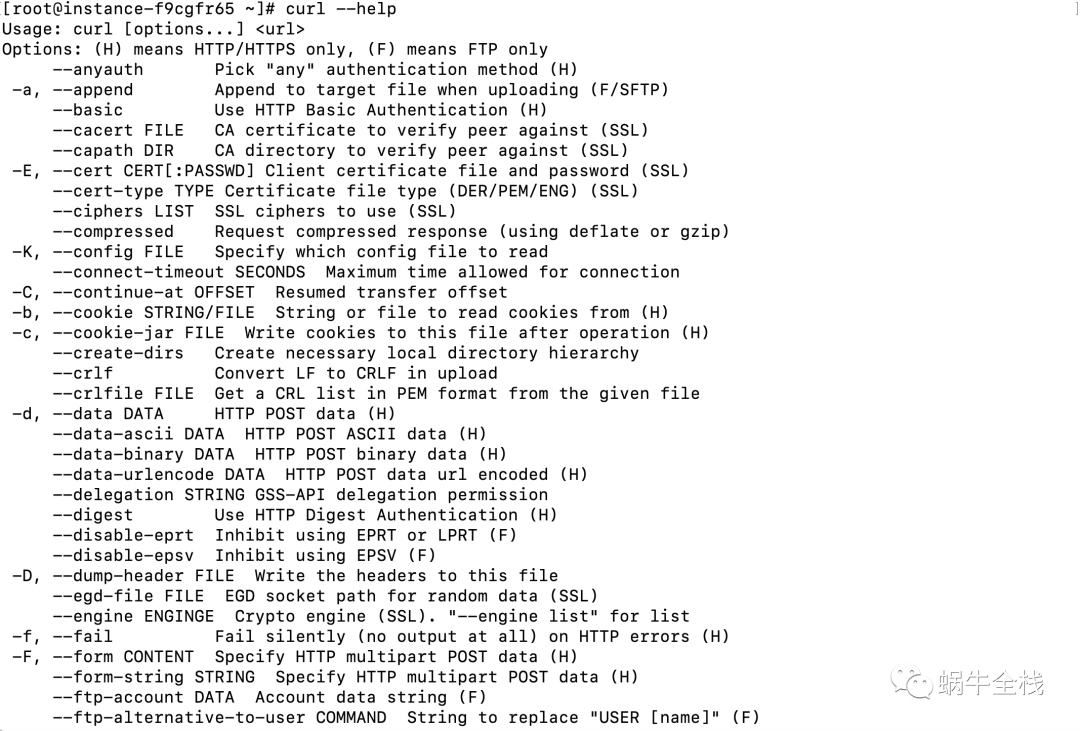
curl命令(请求web服务的)


 1727
1727


 被折叠的 条评论
为什么被折叠?
被折叠的 条评论
为什么被折叠?
 到【灌水乐园】发言


