


今天是阳历3月8号,在此祝所有女士们节日快乐啊,本来我是不知道今天是节日的,早晨上班,看见领导在群里发红包,这年头,谁还看红包上写的啥,年会开挂抢红包,都没抢多少,二话没说就抢了,后来才看到红包上的内容,祝所有女生节日快乐,男生自觉点...,我也是醉了,文字太长,没看见,最后又加了点钱发回去了。真尴尬,高潮是,我抢了发回去了吧,还有男生抢,都跟我一样啊,看不见嘛。唉,这年头,也是,没办法,看见红包就想抢,根本不考虑,关键是根本没时间考虑,考虑考虑钱就跑别人钱包里去了。呵呵... 好了入正题吧。
本篇文章我将向大家初步了解Jack大神基于编译时注解处理器开发的Butterknife,做为后续源码讲解的基础。我不会将分析Butterknife源码写在一篇文章中,因为内容有点多,可能大家看着看着就懵了,或者失去兴致了,所以我把它拆分一下。本系类针对截止2017.3.7最新版本。最后我会把整个加完详细注释的Butterknife源码上传到网络供大家下载参考,文章最后会附上下载地址。
相信只要你是Android攻城狮,您肯定或多或少对Butterknife有所了解,甚至已经用到了如火纯清的地步,那么你了解它的内部实现吗,今天雷哥就带你一步一步的扒了她,彻底的明白她是啥样的。本篇文章为初入篇,但也需要你对Java注解有一定的了解,如果你还不了解可以看看我的上一篇文章:http://blog.csdn.net/liuyonglei1314/article/details/59494503 这篇文章里详细讲解了自定义注解、运行时注解处理方法,这篇文章开始带你了解另一种注解处理方式:编译时注解,基于AbstractProcessor。如何去实现一个自己的AbstractProcessor这里就不讲了,网上也有例子,无非就是配置+实现。本系列中会设计到javax.lang.model.element.*里边的一些类,还有javapoet的一些使用方法,不了解的可以通过其他一些博文先做一下了解,本文中我也会多多少少讲解一些。
我不会将butterknife中所有支持的注解全部讲解,因为首先有点多,然后也没有必要,你了解了一个,其他的就知道是怎么实现的了。本文将带大家简单了解一下butterknife架构及AbstractProcessor类,还有butterknife内部实现涉及到的一些不常用的类。后续文章我将会详细总结我们最常用且最具代表性的两个注解实现原理:@BindView、@OnClick。下篇文章会涉及到编译时解析保存注解信息、生成对应Java文件、前台调用ButterKnife.bind(this)发生了什么,如何跟编译时生成Java文件建立连接等内容。
我们首先了解一下AbstractProcessor,这是个神马东西?这是Java提供给我们的一个编译时注解处理器,在程序编译时编译器会检查AbstractProcessor的子类,并且调用该类型的process函数,然后将添加了该处理器支持注解的所有元素都传递到process函数中,使得开发人员可以在编译器进行相应的处理,例如,根据注解生成新的Java类,这也就是EventBus3.0以上版本、Retrofit、Dragger等开源库的基本实现方式。我们需要继承AbstractProcessor然后重写它的 init(ProcessingEnvironment env)、getSupportedAnnotationTypes()、process(Set<? extends TypeElement> elements, RoundEnvironment env)等方法,重点说一下两个方法getSupportedAnnotationTypes()方法中设置我们要处理的注解类,process(...)方法为具体处理类。
好了我们先从github上边down一份ButterKnife下来,看一下它的一个目录结构,如下:

可以看到她有以下几个包:
butterknife:对外的api,我们在acitivity中用到的ButterKnife.bind()就在这个包里;如下:
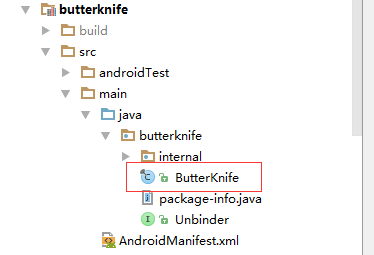
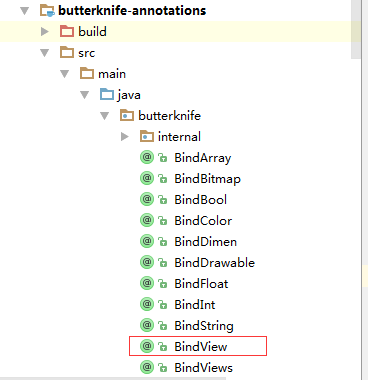
butterknife-anotations:我们用到的所有的注解都在这个包下定义;如下:
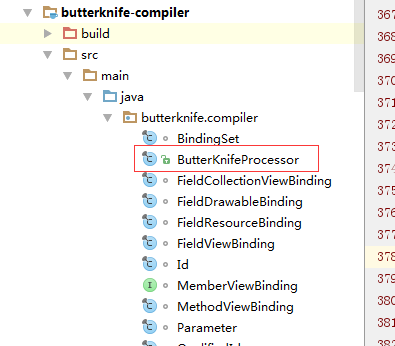
butterknife-compiler:真正逻辑的实现包;继承AbstractProcessor的类就在这个包下边,还包含一些辅助类;如下:
butterknife-gradle-plugin:自定义的gradle插件,辅助生成有关代码;
butterknife-integration-test:一些测试用例;
butterknife-lint:lint检查;
sample:包中的一个使用例子。
重要的就是前三个。下边我们在compiler包中找到ButterKnifeProcessor看看它是如何实现的吧。
先看一下它的init()方法实现:
@Override
public synchronized void init(ProcessingEnvironment env) {
    super.init(env);

    //SDK兼容处理;
    String sdk = env.getOptions().get(OPTION_SDK_INT);
    if (sdk != null) {
        try {
            this.sdk = Integer.parseInt(sdk);
        } catch (NumberFormatException e) {
            env.getMessager()
                    .printMessage(Kind.WARNING, "Unable to parse supplied minSdk option '"
                            + sdk
                            + "'. Falling back to API 1 support.");
        }
    }

    elementUtils = env.getElementUtils();
    typeUtils = env.getTypeUtils();
    filer = env.getFiler();
    try {
        //processingEnv:工具框架提供的处理环境。获取JavacTrees;
        trees = Trees.instance(processingEnv);
    } catch (IllegalArgumentException ignored) {
    }
}
在init方法中对主要就是获取了几个辅助类:elementUtils、typeUtils、filer,有些不是特别重要的逻辑在这里就不讲解了,我已经添加了注释信息。再看一下她添加支持注解类的方法getSupportedAnnotationTypes():
@Override
public Set<String> getSupportedAnnotationTypes() {
    Set<String> types = new LinkedHashSet<>();
    for (Class<? extends Annotation> annotation : getSupportedAnnotations()) {
        types.add(annotation.getCanonicalName());
    }
    return types;
}
private Set<Class<? extends Annotation>> getSupportedAnnotations() {
    Set<Class<? extends Annotation>> annotations = new LinkedHashSet<>();

    annotations.add(BindArray.class);
    annotations.add(BindBitmap.class);
    annotations.add(BindBool.class);
    annotations.add(BindColor.class);
    annotations.add(BindDimen.class);
    annotations.add(BindDrawable.class);
    annotations.add(BindFloat.class);
    annotations.add(BindInt.class);
    annotations.add(BindString.class);
    annotations.add(BindView.class);
    annotations.add(BindViews.class);
    annotations.addAll(LISTENERS);

    return annotations;
}
添加了所有到目前位置Butterknife所支持的自定义注解类,看一下LISTENERS是啥:
private static final List<Class<? extends Annotation>> LISTENERS = Arrays.asList(//
        OnCheckedChanged.class, //
        OnClick.class, //
        OnEditorAction.class, //
        OnFocusChange.class, //
        OnItemClick.class, //
        OnItemLongClick.class, //
        OnItemSelected.class, //
        OnLongClick.class, //
        OnPageChange.class, //
        OnTextChanged.class, //
        OnTouch.class //
);
没错,是到目前为止Butterknife支持的一些事件类型的注解类,以上这些类在butterknife-annotions包下都能找到。这样通过以上步骤,就告诉了编译器我们在这个注解处理器中所有要处理的注解类。接着我们再看一下最重要的方法:process(...)方法:
@Override
public boolean process(Set<? extends TypeElement> elements, RoundEnvironment env) {
    //注解的一系列处理,最终返回bindingMap;
    Map<TypeElement, BindingSet> bindingMap = findAndParseTargets(env);

    //循环生成对应类对象;
    for (Map.Entry<TypeElement, BindingSet> entry : bindingMap.entrySet()) {
        TypeElement typeElement = entry.getKey();
        BindingSet binding = entry.getValue();

        JavaFile javaFile = binding.brewJava(sdk);
        try {
            javaFile.writeTo(filer);
        } catch (IOException e) {
            error(typeElement, "Unable to write binding for type %s: %s", typeElement, e.getMessage());
        }
    }

    return false;
}
看到这里你可能有些不知所措,因为里边有一些一般开发中很少用到的类,比如这个TypeElement,这个类就位于javax.lang.model.element;包下边,先看一个例子明白几个概念:
public class Person{              //TypeElement
Private String personName;       //VariableElement
Private int personAge;	       //VariableElement
Public Person(){}		       //ExecuteableElement
Public void setName(String name) //ExecuteableElement
this.personName=name;
}
通过这个例子我们就对TypeElement、VariableElement、ExecuteableElement有一定的了解了,他们都是Element的子类,可以看出一个类对于Element来说,是由不同子类构成的,TypeElement对应类,VariableElement对应成员变量,ExecuteableElement对应构造函数或者方法。在这里我只讲这么多,不是重点。
回到process()方法中第一行代码Map<TypeElement, BindingSet> bindingMap = findAndParseTargets(env);通过调用findAndParseTargets(env)方法返回了一个key为TypeElment,键为BindingSet类型的Map,TypeElment不说了,BindingSet是什么呢?他保存了我们在解析完所有注解后生成多个java类文件时,每一个Java类文件信息,包括文件名称、文件源码等,现在只需要知道这些就行。For()循环里边的代码就是生出文件逻辑,后便会说到。看一下findAndParseTargets(env)的实现:
/**
 * 处理各种butterknife支持的注解;
 *
 * @param env 环境辅助类;
 * @return 处理好的一个Map,键:注解外部类TypeElement;值与之对应的BindingSet;BindingSet包含了要生成类的一切信息;
 */
private Map<TypeElement, BindingSet> findAndParseTargets(RoundEnvironment env) {
    Map<TypeElement, BindingSet.Builder> builderMap = new LinkedHashMap<>();
    Set<TypeElement> erasedTargetNames = new LinkedHashSet<>();

    scanForRClasses(env);
...//省略了很多解析注解类代码,这里只列出@BindView、LISTENERS


    // Process each @BindView element.
/**
 * 处理BindView(R.id.btn)注解;
 * 1.做了一系列验证;如:private static修饰符判断、@BindView必须作用在View上或者interface上等等;
 * 2.id的处理;生成QualifiedId、缓存等;
 * 3.builder创建;一个id是否注解了多次
 * 4.@Nullable处理,创建FieldViewBinding存入builder,将enclosingElement存入erasedTargetNames;
 */
for (Element element : env.getElementsAnnotatedWith(BindView.class)) {
    // we don't SuperficialValidation.validateElement(element)
    // so that an unresolved View type can be generated by later processing rounds
    try {
        parseBindView(element, builderMap, erasedTargetNames);
    } catch (Exception e) {
        logParsingError(element, BindView.class, e);
    }
}
// Process each annotation that corresponds to a listener.
for (Class<? extends Annotation> listener : LISTENERS) {
    findAndParseListener(env, listener, builderMap, erasedTargetNames);
}
// Associate superclass binders with their subclass binders. This is a queue-based tree walk
// which starts at the roots (superclasses) and walks to the leafs (subclasses).
//builderMap===(EnclosingElement,BindingSet.Builder)
//父类的处理,生成BindingSet存入bindingMap返回;
Deque<Map.Entry<TypeElement, BindingSet.Builder>> entries =
        new ArrayDeque<>(builderMap.entrySet());
Map<TypeElement, BindingSet> bindingMap = new LinkedHashMap<>();
while (!entries.isEmpty()) {
    Map.Entry<TypeElement, BindingSet.Builder> entry = entries.removeFirst();

    //(EnclosingElement,BindingSet.Builder)
    TypeElement type = entry.getKey();
    BindingSet.Builder builder = entry.getValue();

    //erasedTargetNames里是否保存了type的父类,有直接返回,没有返回null;
    TypeElement parentType = findParentType(type, erasedTargetNames);
    // erasedTargetNames里没有保存type父类;
    if (parentType == null) {
        bindingMap.put(type, builder.build());
    } else {
        //erasedTargetNames保存了type父类;
        BindingSet parentBinding = bindingMap.get(parentType);
        if (parentBinding != null) {
            builder.setParent(parentBinding);
            bindingMap.put(type, builder.build());
        } else {
            // Has a superclass binding but we haven't built it yet. Re-enqueue for later.
            entries.addLast(entry);
        }
    }
}

return bindingMap;
}
到这里终于看到我们的@BindView与保存@OnClick的LISTENERS了,在findAndParseTargets(RoundEnvironment env)方法的开始生成了两个对象一个Map 及builderMap,一个Set及erasedTargetNames,这两个对象会贯穿注解的整个解析过程,可以看到下边解析每一个注解类都把他们俩传进去了,erasedTargetNames保存的是注解外部类对应的TypeElement,如果你不明白这句话,下边马上会给你解释。builderMap的key为我们注解对象的外部类的TypeElement,如我们在一个Activity中用@BindView注解了一个Button btn,key就是Activity类对应的TypeElement,erasedTargetNames中保存的也是他,value为生成的BindingSet.Builder实例,Builder为BindingSet的内部类,辅助后期创建BindingSet对象。到现在你只要明白,我们在一个Activity中使用了ButterKnife支持的注解,就会对应一个BindingSet,一个BindingSet对应一个后期生成的Java文件。而BindingSet的创建需要一个内部Builder辅助。for()循环后边的代码就是根据builderMap中value信息生成对应的BindingSet(builder.build()方法中生成),保存到bindingMap返回,经过这个方法就会完成了ButterKnife注解的解析与封装,然后回到process()方法,根据每一个BindingSet通过filer辅助类生成对应的java类。这里只是简单的说一下流程,下篇文章将详细讲解其实现流程。这篇文章你明白这些就可以了。先写到这里。
注释好的源码下载地址:


 801
801

 被折叠的 条评论
为什么被折叠?
被折叠的 条评论
为什么被折叠?
 到【灌水乐园】发言


