


0. Maven的好处
- 节省磁盘空间
- 可以一键构建
- 可以跨平台
- 应用在大型项目时可以提高开发效率
1. Maven安装
-
去官网http://maven.apache.org/download.cgi下载最新版
Maven的压缩文件,并解压 -
在环境变量中添加本机中
Maven的路径

-
打开cmd测试
mvn -version会出现maven版本与本地jdk版本

-
进入maven目录下的
conf打开settings.xml进行配置- 在
settings下配置本地仓库maven的本地仓库目录<localRepository>C:\jarHouse\maven_repository</localRepository>,默认情况本地仓库目录在用户目录下 - 配置阿里云镜像,可以提高jar包的下载速度
<mirrors> <!-- mirror | Specifies a repository mirror site to use instead of a given repository. The repository that | this mirror serves has an ID that matches the mirrorOf element of this mirror. IDs are used | for inheritance and direct lookup purposes, and must be unique across the set of mirrors. | <mirror> <id>mirrorId</id> <mirrorOf>repositoryId</mirrorOf> <name>Human Readable Name for this Mirror.</name> <url>http://my.repository.com/repo/path</url> </mirror> --> <mirror> <!--该镜像的id--> <id>nexus-aliyun</id> <!--该镜像用来取代的远程仓库,central是中央仓库的id--> <mirrorOf>central</mirrorOf> <name>Nexus aliyun</name> <!--该镜像的仓库地址,这里是用的阿里的仓库--> <url>http://maven.aliyun.com/nexus/content/groups/public</url> </mirror> </mirrors>- 配置默认的jdk版本
<profile> <id>JDK1.8</id> <activation> <activeByDefault>true</activeByDefault> </activation> <properties> <maven.compiler.source>1.8</maven.compiler.source> <maven.compiler.target>1.8</maven.compiler.target> <maven.compiler.compilerVersion>1.8</maven.compiler.compilerVersion> <encoding>UTF-8</encoding> </properties> </profile> - 在
-
将maven中央仓库添加到书签,以后查找自己需要的jar包可以去中央仓库 https://mvnrepository.com/
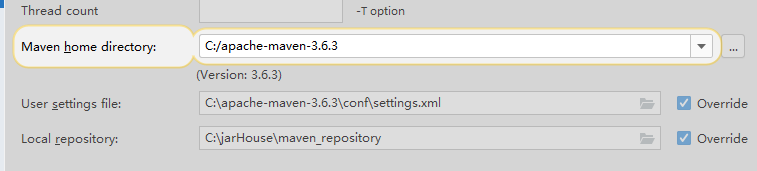
2. idea集成maven
-
打开settings 将本机中maven的信息加入到 maven的相关配置中
-
配置自动下载文档

-
配置jre

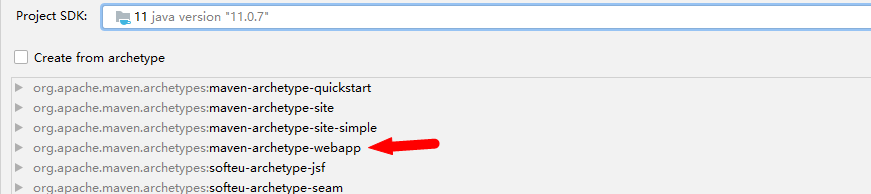
3. 创建maven项目
可以创建空项目或者webapp
4. 父子工程pom配置
工程与模块的区别:
- 工程不等于完整的项目,模块也不等于完整的项目,一个完整的项目看的是代码,代码完整,就可以说这是一个完整的项目,和此项目是什么没有关系
- 工程天生只能使用自己内部的资源,工程天生是独立的,后天可以和其他工程或者模块建立关联关系
- 模块天生不是独立的,模块天生是属于父工程的,模块一旦创建,所有父工程的资源都可以使用
父子工程之间: 子模块天生继承父工程,可以使用父工程的所有资源
子模块之间: 子模块之间天生是没有任何关系的,需要后天引入依赖
父子工程直接不用建立关系,继承关系是先天的,不需要手动建立
平级之间的引用叫依赖,依赖不是先天的,需要后天建立
作用域为test的junit从父工程传递到dao中是不可以使用的

4.1 父模块中可以看到其子模块
将父模块打包方式设置为pom
	<modules>
        <module>dao</module>
        <module>service</module>
        <module>web</module>
    </modules>
    <packaging>pom</packaging>
4.2 统一管理jar包版本
	<!-- 统一管理jar包版本 -->
    <properties>
        <project.build.sourceEncoding>UTF-8</project.build.sourceEncoding>
        <maven.compiler.source>1.8</maven.compiler.source>
        <maven.compiler.target>1.8</maven.compiler.target>
        <spring.version>5.0.2.RELEASE</spring.version>
        <slf4j.version>1.6.6</slf4j.version>
        <log4j.version>1.2.12</log4j.version>
        <shiro.version>1.2.3</shiro.version>
        <mysql.version>8.0.18</mysql.version>
        <mybatis.version>3.4.5</mybatis.version>
        <spring.security.version>5.0.1.RELEASE</spring.security.version>
    </properties>
4.3 锁定jar包版本
	<!-- 锁定jar包版本 -->
    <dependencyManagement>
        <dependencies>
            <dependency>
                <groupId>org.springframework</groupId>
                <artifactId>spring-context</artifactId>
                <version>${spring.version}</version>
            </dependency>
        <dependencies>
    <dependencyManagement>
4.4 tomcat7插件
Maven中集成了tomcat7插件,在ssm阶段都是可以使用的,到SpringBoot阶段可以使用springboot集成的tomcat
启动tomcat命令为 mvn tomcat7:run
	<!-- tomcat7插件 -->
    <build>
        <plugins>
            <plugin>
                <groupId>org.apache.tomcat.maven</groupId>
                <artifactId>tomcat7-maven-plugin</artifactId>
                <version>2.2</version>
                <configuration>
                    <!-- 访问项目的端口号 -->
                    <port>80</port>
                    <!-- 项目访问路径-->
                    <path>/mavenSplit</path>
                </configuration>
            </plugin>
        </plugins>
    </build>
父子工程打包顺序(SSM)
- 执行
clean命令 - 先分别将除web外的子模块(打包方式为jar)
install到本地 packageweb模块(打包方式为war)- web模块下的的
target中有已经打好的war包
父子工程打包顺序(Spring Boot)
- 执行
clean命令 - 在web模块中添加spring boot的web打包依赖
<build> <plugins> <plugin> <groupId>org.springframework.boot</groupId> <artifactId>spring-boot-maven-plugin</artifactId> </plugin> </plugins> </build> packageweb模块- web模块下的的
target中有已经打好的jar包


 271
271


 被折叠的 条评论
为什么被折叠?
被折叠的 条评论
为什么被折叠?
 到【灌水乐园】发言


