


keepalived+nginx高可用配置说明(亲验)
keepalived和nginx的安装及原理分析不再叙述,如需了解自行查阅资料。本文主要对keepalived和nginx的配置文件进行说明、搭建高可用集群说明及验证(原理还是需要了解的)。
主要分为以下3大步进行部署及验证:
1.分别验证应用服务器1、应用服务器2部署的应用是否能够正常访问。
2.分别验证主、备nginx负载访问应用是否能正常访问。
3.通过keepalived虚拟ip来验证nginx负载应用是否正常以及其高可用。
资源说明如下(用四台服务器做高可用模拟):
应用服务器1:192.168.144.129  应用端口:8080
应用服务器2:192.168.144.130  应用端口:8080
keepalived+nginx服务器 主:192.168.144.131
keepalived+nginx服务器 备:192.168.144.132
1.应用可用性验证(测试应用自行准备,也可直接用Tomcat替代之)
应用服务器1:192.168.144.129 应用端口:8080

应用服务器2:192.168.144.130 应用端口:8080
2.nginx配置文件修改(修改之前备份,良好习惯):/usr/local/nginx/conf/nginx.conf
为了看得清晰些,保留了主要配置及说明
主:192.168.144.131
#工作进程:值越大,处理的并发越多,处理并发数的配置 CPU核心数,(双核4线程,可以设置为4)
worker_processes  2;

events {
    #单个工作进程可以允许同时建立外部连接的数量,connections不是随便设置的,而是与两个指标有重要关联,一是内存,二是操作系统级别的“进程最大可打开文件数”,可通过 ulimit -n 命令查询。
    worker_connections  1024;
}

http {
    include       mime.types;
    default_type  application/octet-stream;
    sendfile        on;
    keepalive_timeout  65;

    #需要负载的服务器地址及端口配置
    upstream demo {
       #两台应用服务器ip及地址
       server 192.168.144.130:8080;
       server 192.168.144.129:8080;
    }
    server {
        #nginx监听的端口,通过nginx访问用8088端口
        listen       8088;
        #主机名
        server_name  192.168.144.131;

        #访问地址包含/nginx/走如下负载,默认的是:/
        location ~ /nginx/ {
            root   html;
            #注意:demo需要和upstream 后的值一致
            proxy_pass http://demo;
            index  index.html index.htm;
        }

        #location ~ /getSystemHostIp {
        #    root   html;
        #    proxy_pass http://192.168.144.129:8080;
        #    index  index.html index.htm;
        #}

        error_page   500 502 503 504  /50x.html;
        location = /50x.html {
            root   html;
        }
}
备:192.168.144.132
#工作进程:值越大,处理的并发越多,处理并发数的配置 CPU核心数,(双核4线程,可以设置为4)
worker_processes  2;

events {
    #单个工作进程可以允许同时建立外部连接的数量,connections不是随便设置的,而是与两个指标有重要关联,一是内存,二是操作系统级别的“进程最大可打开文件数”,可通过 ulimit -n 命令查询。
    worker_connections  1024;
}

http {
    include       mime.types;
    default_type  application/octet-stream;
    sendfile        on;
    keepalive_timeout  65;

    #需要负载的服务器地址及端口配置
    upstream demo {
       #两台应用服务器ip及地址
       server 192.168.144.130:8080;
       server 192.168.144.129:8080;
    }
    server {
        #nginx监听的端口,通过nginx访问用8088端口
        listen       8088;
        #主机名
        server_name  192.168.144.132;

        #访问地址包含/nginx/走如下负载,默认的是:/
        location ~ /nginx/ {
            root   html;
            #注意:demo需要和upstream 后的值一致
            proxy_pass http://demo;
            index  index.html index.htm;
        }

        #location ~ /getSystemHostIp {
        #    root   html;
        #    proxy_pass http://192.168.144.129:8080;
        #    index  index.html index.htm;
        #}

        error_page   500 502 503 504  /50x.html;
        location = /50x.html {
            root   html;
        }
}
改完配置均需重启nginx或重新加载nginx,命令见开头链接
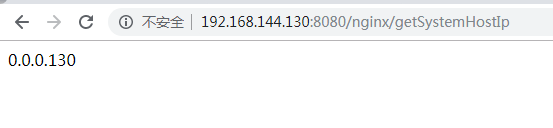
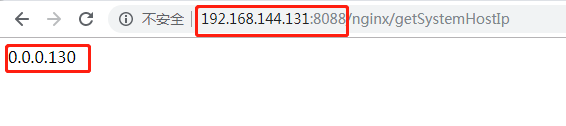
分别通过主、备nginx访问应用验证负载,效果如下:
主:192.168.144.131:8088

备:192.168.144.132:8088


3.keepalived健康检查nginx脚本服务脚本:作用是nginx意外停止后keepalived使其自动启动
主、备相同(本人脚本路径):/usr/local/src/nginx_check_new.sh
nginx_check_new.sh内容:如果文件格式为“doc”需要改为“unix”,命令:dos2unix nginx_check_new.sh
nxPidNum=`ps -C nginx --no-header |wc -l`
keepalivedPidNum=`ps -C keepalived --no-header |wc -l`
if [ $nxPidNum -eq 0 ];then
    /usr/local/nginx/sbin/nginx
    sleep 3
    if [ `ps -C nginx --no-header |wc -l` -eq 0 ];then
       killall keepalived
    elif [ $keepalivedPidNum -eq 0 ];then
       service keepalived start
    fi
elif [ $keepalivedPidNum -eq 0 ];then
    service keepalived start
fi
需要给脚本赋可执行权限:chmod +x nginx_check_new.sh
keepalived配置文件内容(修改之前备份,良好习惯):/etc/keepalived/keepalived.conf
为了看得清晰些,保留了主要配置及说明,健康检查采用TCP_CHECK,使用vrrp_script及track_script方式并未生效,这里不做叙述
主:192.168.144.131
! Configuration File for keepalived

global_defs {
   notification_email {
     acassen@firewall.loc
     failover@firewall.loc
     sysadmin@firewall.loc
   }
   notification_email_from Alexandre.Cassen@firewall.loc
   smtp_server 192.168.144.131
   smtp_connect_timeout 30
   router_id LVS_DEVEL131      #全网唯一标识,不可重复
}

vrrp_instance VI_1 {
    state MASTER               #主:MASTER,备BACKUP
    interface ens33            #本机网卡
    virtual_router_id 51       #路由标识:主备值一样
    priority 100               #检验次数,值 主>从
    advert_int 1
    authentication {
        auth_type PASS
        auth_pass 1111
    }
    virtual_ipaddress {
        192.168.144.111        #虚拟ip
    }
}

virtual_server 192.168.144.111 8099 {   #虚拟ip
    delay_loop 6
    lb_algo rr
    lb_kind NAT
    persistence_timeout 5
    protocol TCP

    real_server 192.168.144.131 8099 {  #本机IP
        weight 1
        notify_down /usr/local/src/nginx_check_new.sh #当8099端口关闭执行脚本
        TCP_CHECK {
            connect_timeout 3    #连接超时时间3秒
            nb_get_retry 3  #重连次数3次
            delay_before_retry 3  #重连间隔3秒
            connect_port 8088  #监听8088端口
        }
    }
}
备:192.168.144.132
! Configuration File for keepalived

global_defs {
   notification_email {
     acassen@firewall.loc
     failover@firewall.loc
     sysadmin@firewall.loc
   }
   notification_email_from Alexandre.Cassen@firewall.loc
   smtp_server 192.168.144.132
   smtp_connect_timeout 30
   router_id LVS_DEVEL132  #全网唯一标识,不可重复
}

vrrp_instance VI_1 {
    state BACKUP           #主:MASTER,备BACKUP
    interface ens33        #本机网卡
    virtual_router_id 51   #路由标识:主备值一样
    priority 99            #检验次数,值 主>从
    advert_int 1
    authentication {
        auth_type PASS
        auth_pass 1111
    }
    virtual_ipaddress {
        192.168.144.111    #虚拟ip
    }
}

virtual_server 192.168.144.111 8099 {    #虚拟ip
    delay_loop 6
    lb_algo rr
    lb_kind NAT
    persistence_timeout 5
    protocol TCP

    real_server 192.168.144.132 8099 {  #本机IP
        weight 1
        notify_down /usr/local/src/nginx_check_new.sh #当8099端口关闭执行脚本
        TCP_CHECK {
            connect_timeout 3    #连接超时时间3秒
            nb_get_retry 3  #重连次数3次
            delay_before_retry 3  #重连间隔3秒
            connect_port 8088  #监听8088端口
        }
    }
}
修改配置后重新启动keepalived即可,命令见文章头部链接
通过keepalived配置的虚拟ip验证应用连通性


连通性没问题,继续验证高可用性:
1.首先查看主、备的机器的查看ip地址信息:由下图可看出目前通过192.168.144.111访问进去的真实主机是192.168.144.131
主:ip地址信息 
备:ip地址信息

2.将主:192.168.144.131的keepalived及nginx停掉(命令见文章首链接),再次查看主、备的ip地址信息:
主:ip地址信息

备:ip地址信息

由上图可看出目前通过192.168.144.111访问进去的真实主机是192.168.144.132,自动跳转成功,通过192.168.144.111访问应用也没问题:


现重新启动主:192.168.144.131 的keepalived及nginx,在次验证看看192.168.144.111访问应用路由的真实地址是192.168.144.131还是192.168.144.132?
当然是192.168.144.131,因为前面keepalived设置的主机权重大于备机:下图位置

到此,所有部署及验证过程结束,成功实现了keepalived+nginx的高可用。


 761
761


 被折叠的 条评论
为什么被折叠?
被折叠的 条评论
为什么被折叠?
 到【灌水乐园】发言


