


一,新建Servlet,命名为IdentityServlet,用于生成验证码。在web.xml中配置映射地址为"/demo/IdentityServlet"。代码如下:
public class IdentityServlet extends HttpServlet {
	private static final long serialVersionUID = 1L;

	// 获取随机颜色
    private Color getRandColor(int fc, int bc) {
        Random random = new Random();
        if (fc > 255)
            fc = 255;
        if (bc > 255)
            bc = 255;
        int r = fc + random.nextInt(bc - fc);
        int g = fc + random.nextInt(bc - fc);
        int b = fc + random.nextInt(bc - fc);
        return new Color(r, g, b);
    }

    /**
     * @see HttpServlet#HttpServlet()
     */
    public IdentityServlet() {
        super();
        // TODO Auto-generated constructor stub
    }

	/**
	 * @see HttpServlet#doGet(HttpServletRequest request, HttpServletResponse response)
	 */
	protected void doGet(HttpServletRequest request, HttpServletResponse response) throws ServletException, IOException {

		response.setContentType("image/jpeg");
        // 在内存中创建图像
        int width = 90;
        int height = 35;
        BufferedImage image = new BufferedImage(width, height, BufferedImage.TYPE_INT_RGB);
        // 获取图形上下文
        Graphics g = image.getGraphics();
        // 随机类
        Random random = new Random();
        // 设定背景
        g.setColor(getRandColor(200, 250));
        g.fillRect(0, 0, width, height);
        // 设定字体
        g.setFont(new Font("Times New Roman", Font.PLAIN, 30));
        // 随机产生干扰线
        g.setColor(getRandColor(160, 200));
        for (int i = 0; i < 100; i++) {
            int x = random.nextInt(width);
            int y = random.nextInt(height);
            int xl = random.nextInt(12);
            int yl = random.nextInt(12);
            g.drawLine(x, y, x + xl, y + yl);
        }
        // 随机产生4位验证码
        String[] codes = { "0", "1", "2", "3", "4", "5", "6", "7", "8", "9", "A", "B", "C", "D", "E", "F", "G", "H",
                "I", "J", "K", "L", "M", "N", "O", "P", "Q", "R", "S", "T", "U", "V", "W", "X", "Y", "Z", "a", "b", "c",
                "d", "e", "f", "g", "h", "i", "j", "k", "l", "m", "n", "o", "p", "q", "r", "s", "t", "u", "v", "w", "x",
                "y", "z" };
        String code = "";
        for (int i = 0; i < 4; i++) {
            String str = codes[random.nextInt(codes.length)];
            code += str;
            // 将认证码显示到图象中
            g.setColor(new Color(50 + random.nextInt(110), 20 + random.nextInt(110), 30 + random.nextInt(110)));
            // 调用函数出来的颜色相同,可能是因为种子太接近,所以只能直接生成
            g.drawString(str, 18 * i + 13, 27); // 文字间距*i+距离左边距,上边距
        }
        HttpSession session = request.getSession(true);
        // 将认证码存入SESSION
        session.setAttribute("code", code);
        // 图象生效
        g.dispose();
        // 输出图象到页面
        ImageIO.write(image, "JPEG", response.getOutputStream());
        // 加上下面代码,运行时才不会出现java.lang.IllegalStateException: getOutputStream() has
        // already been called ..........等异常
        response.getOutputStream().flush();
        response.getOutputStream().close();
        response.flushBuffer();

	}

	/**
	 * @see HttpServlet#doPost(HttpServletRequest request, HttpServletResponse response)
	 */
	protected void doPost(HttpServletRequest request, HttpServletResponse response) throws ServletException, IOException {
		this.log("执行doPost方法");
	}
}二,新建Servlet,命名为CheckCodeServlet,用于验证传进来的验证码是否正确。在web.xml中配置映射地址为"/demo/CheckCodeServlet"。代码如下:
public class CheckCodeServlet extends HttpServlet {
private static final long serialVersionUID = 1L;
/**
* @see HttpServlet#HttpServlet()
*/
public CheckCodeServlet() {
super();
// TODO Auto-generated constructor stub
}
/**
* @see HttpServlet#doGet(HttpServletRequest request, HttpServletResponse response)
*/
protected void doGet(HttpServletRequest request, HttpServletResponse response) throws ServletException, IOException {
request.setCharacterEncoding("utf-8");
String inCode = request.getParameter("input_code");
HttpSession session = request.getSession();
int result = 0;
if(session.getAttribute("code").toString().equalsIgnoreCase(inCode)){
result = 1;
}
response.setCharacterEncoding("utf-8");
response.setContentType("text");
PrintWriter out = response.getWriter();
out.println(result);
out.flush();
}
/**
* @see HttpServlet#doPost(HttpServletRequest request, HttpServletResponse response)
*/
protected void doPost(HttpServletRequest request, HttpServletResponse response) throws ServletException, IOException {
// TODO Auto-generated method stub
doGet(request, response);
}
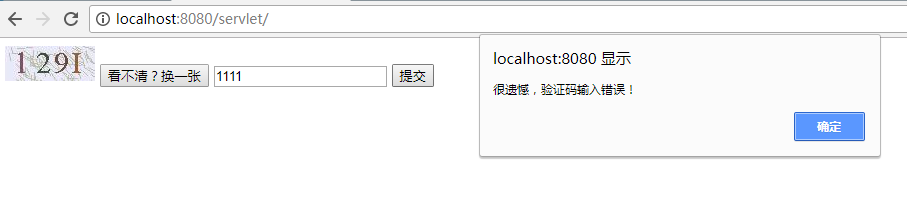
}三、前台页面代码如下
<body>
  	<img alt="" src="/servlet/demo/IdentityServlet" id="identity" />
  	<input type="button" value="看不清?换一张" οnclick="reloadImage()">
  	<input type="text" id="input_code">
  	<button type="button" id="submit_btn">提交</button>
  	<script src="http://cdn.static.runoob.com/libs/jquery/1.10.2/jquery.min.js"></script>
  	<script type="text/javascript">
  		//重新加载验证码
  		function reloadImage()
  		{
  			document.getElementById("identity").src = "/servlet/demo/IdentityServlet?ts="+new Date().getTime();
  		}
  		//提交验证码
  		$('#submit_btn').click(function(){
  			//异步请求(Ajax)
            $.post("/servlet/demo/CheckCodeServlet",{"input_code":$("#input_code").val()},function(rlt){
                if(rlt==1)
                {
                    alert("恭喜你,验证码输入正确!");
                }
                else
                {
                    alert("很遗憾,验证码输入错误!");
                }
            })
  		});

  	</script>
  </body>
四、运行结果


 4881
4881

 被折叠的 条评论
为什么被折叠?
被折叠的 条评论
为什么被折叠?
 到【灌水乐园】发言


