


提示:react
文章目录
前言
提示:react
一、react staging
%PUBLIC_URL%:全局变量:指向public文件夹
1.1 三个步骤
- 引入react核心包
- 引入react_doc
- 引入App.jsx
- render组建
二、组件开发
2.1 分析

代码框架:拆出4个组件,每个组件对应一个文件夹。
2.2 实现静态组件
1)结构拆分
每个组件增加拆分好的div
2)样式拆分
2.3 动态实现组件
状态信息放父组件中,pops传值
兄弟组件可以发布肯订阅传值
声明:state = {todos:[{}]}
传值:
render(){
 const {todos} = this.state
 return (
 	<List todos={todos} />
 )
 }
接值:
render(){
 const {todos} = this.props
 return (
 	<ul>
 		{
 			todos.map( (todo) =>{
 				return <Item />
			)
		}
	</ul>
 )
 }


文本框加键盘事件:
 handleKeyUp = (event)=>{
        //简便方法,结构赋值
        const{target,keyCode} = event;
        //绑定事件的元素和要操作的元素是同一个元素,就不用src,可以用event参数
        if(keyCode !== 13) return
        console.log(target.value)
    }
onKeyUp={this.handleKeyUp}
import {nanoid} from 'nanoid'
delete 删除对象元素
let obj = {a:1 ,b:2}
delete obj.a
console.log(obj)
if(comfirm("是否确认删除吗?")) //unexpected 不被期待的
webstore 代码片段模板

3 axios
3.1 跨域配置
原理:客户端会开一个代理服务,请求转发到跨域服务器,请求会优先访问public目录下的文件路径,如果请求的地址在项目资源不存在,则访问跨域服务器。
3.2 实现方案
3.2.1 配置proxy属性
package.json中配置:“proxy”: “http://localhost:5000”,ajax请求地址需要指向自己服务器路径和端口(‘http://localhost:3000/students’)
3.2.2 创建setupProxy.js文件
3.3 实现一个查询小案例
3.3.1 html 迁移到 react项目
class 改成 className
style=‘width: 100px’ 改 style={{width: ‘100px’}}(注意:大括号里面是json格式)
迁移div时注意有没有样式写死的id
启动react是否正常访问
3.3.2 拆分组件
1) 定义components
警告:Using target="_blank" without rel=“noreferrer”
img elements must have an alt prop, either with meaningful text, or an empty string for decorative images
2) input标签给组件赋值
//获取用户输入数据,html标签给模块属性赋值 :ref 属性
console.log(this.keyWordElement.value)
<input ref={c => this.keyWordElement = c} type="text" placeholder="输入关键词点击搜索"/>
3)连续结构赋值,重命名 ,但拿不到中间对象
//获取用户输入数据,html标签给模块属性赋值 :ref 属性
  console.log(this.keyWordElement.value)
  //连续结构赋值
  const {keyWordElement:{value}} = this;
  console.log(value,"连续结构赋值")
  //连续结构赋值,重命名
  const {keyWordElement:{value:aaa}} = this;
  console.log(aaa,"连续结构赋值,重命名")
3.3.2 请求三部曲
- 给谁发
- 什么方式
- 参数是啥
4 消息订阅与发布
- 安装pubsub-js库
2)那个组件用状态就写在那个组件中
3)组件订阅消息
import React, {Component} from 'react';
import PubSub from 'pubsub-js'
import './index.css'
class List extends Component {
    state = {
        users:[],
        isFirst:true,
        isLoading:false,
        err:'',
    }
    componentDidMount() {
        this.token = PubSub.subscribe('github_search',(_,stateObj) =>{
            this.setState(stateObj)
        })
    }
    componentWillUnmount() {
        PubSub.unsubscribe(this.token)
    }
    render() {
        const {users,isFirst,isLoading,err} = this.state
        return (
            <div className="row">
                {
                    isFirst ? <h2>欢迎使用,输入关键字,随后点击搜索</h2> :
                        isLoading ? <h2>Loging ...</h2> :
                            err ? <h2>{err}</h2> :
                    users.map((userObj) =>{
                       return <div key={userObj.id} className="card">
                            <a href={userObj.html_url} target="_blank" rel="noreferrer">
                                <img src={userObj.avatar_url} style={{width: '100px'}} alt="head_pho"/>
                            </a>
                            <p className="card-text">{userObj.login}</p>
                        </div>
                    })
                }
            </div>
        );
    }
}

export default List;
4) 发布消息
PubSub.publish(‘github_search’,{isFirst: false,isLoading: true})
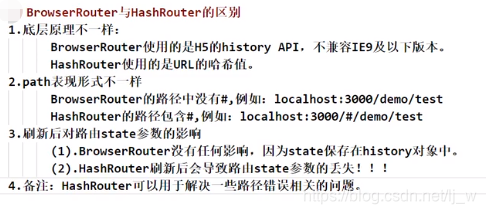
4 router
4.1 原理
用到了BOM中的属性和方法:
1)使得sap虽然地址栏的url改变,页面并不跳转。
2)坚听地址栏(路由栈的变化)变化,匹配相应的组件切换。
4.2 重定向路由
全没匹配到的情况,可以走重定向路由,跳转到默认路由上
4.3 二级路由
二级路由必须前面加上上级路由的路径,才能保证全路由样式不缺失。
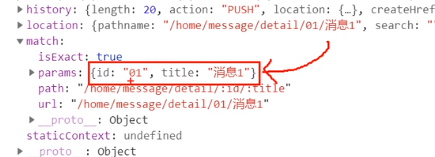
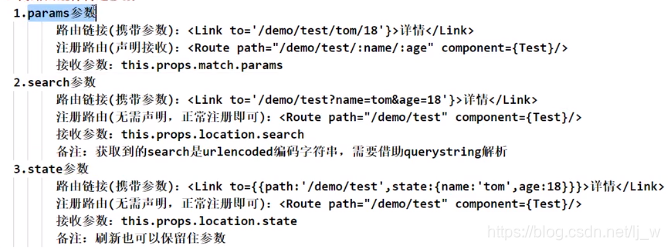
路由传参
1)携带params参数:
<Link to = {/home/message/detail${msg.id}/${msg.title}}>{msg.title}`}
接收:
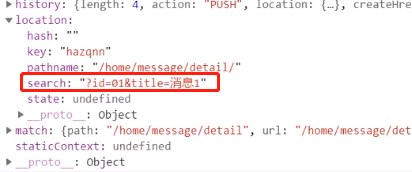
- search参数:无需声明接收
1)?id=KaTeX parse error: Expected 'EOF', got '&' at position 9: {msg.id}&̲title={msg.title}
2)接收路由search参数:
利用querystring库解析参数:url encoding编码格式。
qs.springify(obj) //对象转url编码格式
qs.parse(obj)//url 转对象
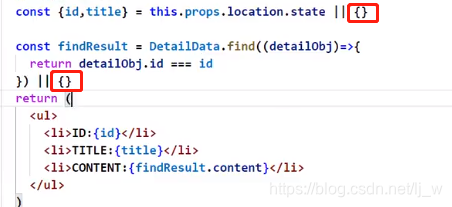
3)state属性传值
react-router-dom->一直操作bom的history
由于state属性在history中,所以刷新浏览器不会丢失数据。


4.4 push 和 replace 模式
1)默认push模式
2)子路由一般需要replace模式替换栈顶,否则后退不能一下回到主模块
<Link replace={true}
4.5 编程式路由导航
需求:卡片组件3秒后跳转到下一个标签页,即没有路由标签。
借助路由的history.replace函数可以实现路由跳转,
传参数:onClick={() => this.pushShow(msg.id,msg.title)} 高阶方式,直接调用匿名函数
setTimeout(() =>{this.props.history.push(‘home/message’)},2000)
只有路由组件才有history
4.6 让一般组件也能用路由组件api
vue中不区分一般组件和路由组件,都有hisotry
- 用react-router-dom withRouter
- 函数暴漏 withRouter(Header)的返回值。


 1540
1540


 被折叠的 条评论
为什么被折叠?
被折叠的 条评论
为什么被折叠?
 到【灌水乐园】发言


