iOS开发 UIBezierPath曲线动画

基础知识
使用UIBezierPath可以创建基于矢量的路径 此类是Core Graphics的封装。使用这个类可以定义简单的形状  如椭圆、矩形或者有多个直线和曲线段组成的形状等。
UIBezierPath是CGPathRef数据类型的封装,如果是基于矢量形状的路径,都用直线和曲线去创建,我们使用直线段创建矩形和多边形,使用曲线去创建圆弧圆或者其他的复杂的曲线形状。
使用UIBezierPath画图的步骤:
1.创建一个基于UIBezierPath的对象
2.调用-moveToPoint设置初始线段的起点。
3.添加线或者曲线去定义一个或者多个子路径
4.改变UIBezierPath对象跟绘图相关的属性,如 我们可以设置画笔的属性填充样式等等。

UIBezierPath创建方法

    + (instancetype)bezierPath;

因为这个工厂方法创建的对象,我们可以根据我们的需要任意定制样式,

可以画任何我们想画的图形。

    + (instancetype)bezierPathWithRect:(CGRect)rect;

这个工厂方法根据一个矩形画贝塞尔曲线。

    + (instancetype)bezierPathWithOvalInRect:(CGRect)rect;

这个工厂方法根据一个矩形画内切曲线。通常用它来画圆或者椭圆。

    + (instancetype)bezierPathWithRoundedRect:(CGRect)rect

      cornerRadius:(CGFloat)cornerRadius;

    + (instancetype)bezierPathWithRoundedRect:(CGRect)rect

    byRoundingCorners:(UIRectCorner)corners

          cornerRadii:(CGSize)cornerRadii;

以上两个方法都可以画矩形

1.这个工厂方法画矩形 但是这个矩形是可以画圆角的 第一个参数是矩形 第二个参数是圆角大小。

2.这个工厂方法画矩形 可以指定某一个角画成圆角 可以用来给UIView扩展添加圆角方法。

    + (instancetype)bezierPathWithArcCenter:(CGPoint)center

    radius:(CGFloat)radius

      startAngle:(CGFloat)startAngle

        endAngle:(CGFloat)endAngle

        clockwise:(BOOL)clockwise;

画圆弧 参数如下

center:弧线所在圆的圆心

radius:弧线所在圆的半径

startAngle:开始角度值

 endAngle:弧线结束角度值

clockwise:是否顺时针画弧线

- (UIBezierPath *)bezierPathByReversingPath

创建 并返回一个与当前路径相反的新的贝塞尔路径对象 

    + (instancetype)bezierPathWithCGPath:(CGPathRef)CGPath;


通过一个CGPath来创建一个贝塞尔路径对象

创建路径

- (void)moveToPoint:(CGPoint)point

将接收器的当前点移动到指定位置。

- (void)addLineToPoint:(CGPoint)point

附加一条直线到接收器的路径。

- (void)addArcWithCenter:(CGPoint)center radius:(CGFloat)radius startAngle:(CGFloat)startAngle endAngle:(CGFloat)endAngle clockwise:(BOOL)clockwise

追加一个弧到接收器的路径。


- (void)addCurveToPoint:(CGPoint)endPoint controlPoint1:(CGPoint)controlPoint1 controlPoint2:(CGPoint)controlPoint2

追加一个一次Bezier曲线到接收器的路径。


- (void)addQuadCurveToPoint:(CGPoint)endPoint controlPoint:(CGPoint)controlPoint

追加一个二次Bezier曲线到接收器的路径。

- (void)closePath

关闭最近添加的子路径。


- (void)removeAllPoints

删除从接收点开始的所有的点,有效地删除所有子路径。

- (void)appendPath:(UIBezierPath *)bezierPath

追加指定的路径对象的内容到接收器的路径。

@property(nonatomic) CGPathRef CGPath

路径的核心绘图的表示。

@property(nonatomic, readonly) CGPoint currentPoint

图形路径中的当前点。(只读)


访问绘图属性

@property(nonatomic) CGFloat lineWidth

path的行宽

@property(nonatomic) CGLineCap lineCapStyle线条拐角

当填充时 路径结束点的路径形状 举例子说 圆形的顶部等。

@property(nonatomic) CGLineJoin lineJoinStyle

终点处理  

@property(nonatomic) CGFloat miterLimit

设置线段链接处的样式

@property(nonatomic) CGFloat flatness

确定弯曲路径段的绘制精度的因素。


@property(nonatomic) BOOL usesEvenOddFillRule

一个bool值 指定even-odd规则是否在path可用

- (void)setLineDash:(const CGFloat *)pattern count:(NSInteger)count phase:(CGFloat)phase

设置path的接触样式。

- (void)getLineDash:(CGFloat *)pattern count:(NSInteger*)count phase:(CGFloat *)phase

获取path的线接触样式


画路径


- (void)fill

用当前绘图属性绘制当前被路径包围的区域

- (void)fillWithBlendMode:(CGBlendMode)blendMode alpha:(CGFloat)alpha

用指定的混合模式和透明度值来描绘受接收路径所包围的区域。

- (void)stroke

利用当前绘图属性沿着接收器的路径绘制一行

- (void)strokeWithBlendMode:(CGBlendMode)blendMode alpha:(CGFloat)alpha

使用指定的混合模式和透明度值沿着接收器路径。绘制一行


裁剪路径


- (void)addClip

剪切被接收者路径包围的区域 该路径是带有剪切路径的当前绘图上下文。使得其成为我们当前的剪切路径、


检测

- (BOOL)containsPoint:(CGPoint)point

返回一个布尔值,该值指示接收器所包含的区域是否包含指定的点。

@property(readonly, getter=isEmpty) BOOL empty

一个布尔值,该值指示路径是否有任何有效的元素。(只读)

@property(nonatomic, readonly) CGRect bounds

路径的包围矩形。(只读)

提交变换


- (void)applyTransform:(CGAffineTransform)transform

用指定的仿射变换矩阵变换路径中的所有点。

常数

enum{

UIRectCornerTopLeft= 1 << 0,

UIRectCornerTopRight= 1 << 1,

UIRectCornerBottomLeft= 1 << 2,

UIRectCornerBottomRight= 1 << 3,

UIRectCornerAllCorners= ~0

};

typedefNSUInteger UIRectCorner;


矩形的角。

UIRectCornerTopLeft        左上角

UIRectCornerTopRight       右上角

UIRectCornerBottomLeft     左下角

UIRectCornerBottomRight    右下角

UIRectCornerAllCorners     所有的角。


小例子

以下方法均在drawRect方法中调用

画三角形

[objc]  view plain  copy
 print ? 在CODE上查看代码片 派生到我的代码片
  1. -(void)drawTriangle  
  2. {  
  3.     //创建路径对象  
  4.     UIBezierPath * path = [UIBezierPath bezierPath];  
  5.       
  6.     //path的设置  
  7.     [path moveToPoint:CGPointMake(2020)];  
  8.     [path addLineToPoint:CGPointMake(self.frame.size.width - 4020)];  
  9.     [path addLineToPoint:CGPointMake(self.frame.size.width / 2self.frame.size.height - 20)];  
  10.     //闭合曲线 调用closePath自动生成 也可以调用-addLineToPoint:生成。  
  11.     [path closePath];  
  12.       
  13.     //设置填充颜色  
  14.     UIColor * color = [UIColor redColor];  
  15.     [color set];  
  16.     [path fill];  
  17.       
  18.     //设置画笔颜色  
  19.     UIColor * strokeColor = [UIColor blueColor];  
  20.     [strokeColor set];  
  21.     //根据设置的各个点连线  
  22.     [path stroke];  
  23.   
  24.     path.lineWidth = 1.2;  
  25. }  


其中设置画笔颜色通过set方法。

如果我们需要设置填充颜色,那么需要在设置画笔颜色之前先设置填充颜色,否则画笔颜色就被填充颜色取代了。也就是说 如果要让填充颜色和画笔颜色不一样 那么必须先设置填充颜色再设置画笔颜色。


画矩形

[objc]  view plain  copy
 print ? 在CODE上查看代码片 派生到我的代码片
  1. -(void)drawRectangle  
  2. {  
  3.     CGRect rect = CGRectMake(3030200200);  
  4.     UIBezierPath * path = [UIBezierPath bezierPathWithRect:rect];  
  5.     path.lineWidth = 1.2;  
  6.     path.lineCapStyle = kCGLineCapRound;  
  7.     path.lineJoinStyle = kCGLineJoinBevel;  
  8.       
  9.     //设置填充颜色  
  10.     UIColor *fillColor = [UIColor greenColor];  
  11.     [fillColor set];  
  12.     [path fill];  
  13.       
  14.     UIColor *strokeColor = [UIColor blueColor];  
  15.     [strokeColor set];  
  16.     [path stroke];  
  17. }  


lineCapStyle属性是用来设置线条拐角冒的样式的

/* Line cap styles. */

typedef CF_ENUM(int32_t, CGLineCap) {
    kCGLineCapButt,
    kCGLineCapRound,
    kCGLineCapSquare
};

第一个是默认的,第二个是轻微圆角,第三个是正方形

lineJoinStyle属性是用来设置两条线连结点的样式,其中也有三个选择:

/* Line join styles. */

typedef CF_ENUM(int32_t, CGLineJoin) {
    kCGLineJoinMiter,
    kCGLineJoinRound,
    kCGLineJoinBevel
};

第一个默认表示斜接,第二个圆滑衔接,第三个斜角衔接。

画圆


[objc]  view plain  copy
 print ? 在CODE上查看代码片 派生到我的代码片
  1. -(void)drawCircle  
  2. {  
  3.     CGRect rect = CGRectMake(2020200200);  
  4.     UIBezierPath * path = [UIBezierPath bezierPathWithOvalInRect:rect];  
  5.     //设置填充颜色  
  6.     UIColor * fillColor = [UIColor greenColor];  
  7.     [fillColor set];  
  8.     [path fill];  
  9.       
  10.     //设置画笔颜色  
  11.     UIColor * strokeColor = [UIColor blueColor];  
  12.     [strokeColor set];  
  13.     [path stroke];  
  14. }  


画椭圆

[objc]  view plain  copy
 print ? 在CODE上查看代码片 派生到我的代码片
  1. -(void)drawEllipse  
  2. {  
  3.     CGRect rect = CGRectMake( 2020200100);  
  4.     UIBezierPath * path = [UIBezierPath bezierPathWithOvalInRect:rect];  
  5.       
  6.     UIColor * fillColor = [UIColor redColor];  
  7.     [fillColor set];  
  8.     [path fill];  
  9.       
  10.     UIColor * strokeColor = [UIColor greenColor];  
  11.     [strokeColor set];  
  12.     [path stroke];  
  13. }  


画带圆角的矩形

[objc]  view plain  copy
 print ? 在CODE上查看代码片 派生到我的代码片
  1. -(void)drawRoundRect  
  2. {  
  3.     CGRect rect = CGRectMake(2020200200);  
  4.     UIBezierPath * path = [UIBezierPath bezierPathWithRoundedRect:rect cornerRadius:15];  
  5.     UIColor * fillColor = [UIColor redColor];  
  6.     [fillColor set];  
  7.     [path fill];  
  8.       
  9.     UIColor * strokeColor = [UIColor greenColor];  
  10.     [strokeColor set];  
  11.     [path stroke];  
  12. }  


画指定几个圆角的矩形

[objc]  view plain  copy
 print ? 在CODE上查看代码片 派生到我的代码片
  1. -(void)drawSomeRoundRect  
  2. {  
  3.     CGRect rect = CGRectMake(2020200200);  
  4.     UIBezierPath * path = [UIBezierPath bezierPathWithRoundedRect:rect byRoundingCorners:UIRectCornerBottomRight | UIRectCornerTopLeft cornerRadii:CGSizeMake(3010)];  
  5.       
  6.     UIColor * fillColor = [UIColor redColor];  
  7.     [fillColor set];  
  8.     [path fill];  
  9.       
  10.     UIColor * strokeColor = [UIColor grayColor];  
  11.     [strokeColor set];  
  12.     [path stroke];  
  13. }  


画圆弧

画弧前,我们需要了解其参考系,如下图(图片来自网络):


[objc]  view plain  copy
 print ? 在CODE上查看代码片 派生到我的代码片
  1. -(void)drawARCPath  
  2. {  
  3.     const CGFloat pi = M_PI;  
  4.     NSLog(@"%f",pi);  
  5.     CGPoint center = CGPointMake(self.frame.size.width * 0.5self.frame.size.height * 0.5);  
  6.     CGFloat end = DefreesToRadius(140) ;  
  7.     NSLog(@"%f",end);  
  8.     UIBezierPath * path = [UIBezierPath bezierPathWithArcCenter:center radius:100 startAngle:0 endAngle:end clockwise:YES];  
  9.       
  10.     UIColor * fillColor = [UIColor redColor];  
  11.     [fillColor set];  
  12.     [path fill];  
  13.     path.lineCapStyle = kCGLineCapRound;  
  14.     path.lineJoinStyle = kCGLineJoinRound;  
  15.     path.lineWidth = 5.0;  
  16.     UIColor * strokeColor = [UIColor blueColor];  
  17.     [strokeColor set];  
  18.     [path stroke];  
  19. }  


画二次贝塞尔曲线

先来学习一下关于控制点,如下图(图片来自网络):


- (void)addQuadCurveToPoint:(CGPoint)endPoint controlPoint:(CGPoint)controlPoint

参数说明:

endPoint:终端点<br/>
controlPoint:控制点,对于二次贝塞尔曲线,只有一个控制点

[objc]  view plain  copy
 print ? 在CODE上查看代码片 派生到我的代码片
  1. -(void)drawBezierPath  
  2. {  
  3.     UIBezierPath * path = [UIBezierPath bezierPath];  
  4.       
  5.     [path moveToPoint:CGPointMake(30200)];  
  6.     [path addQuadCurveToPoint:CGPointMake(10020) controlPoint:CGPointMake(1010)];  
  7.     UIColor * strokeColor = [UIColor redColor];  
  8.     [strokeColor set];  
  9.     [path stroke];  
  10. }  


画二次贝塞尔曲线的步骤:

  1. 先设置一个起始点,也就是通过-moveToPoint:设置
  2. 调用-addQuadCurveToPoint:controlPoint:方法设置终端点和控制点,以画二次曲线
这个样式看起来很像 sin 或者 cos 函数吧?这两个只是特例而已,其实可以画任意图形,只是想不到,没有做不到的。

画三次贝塞尔曲线

贝塞尔曲线必定通过首尾两个点,称为端点;中间两个点虽然未必要通过,但却起到牵制曲线形状路径的作用,称作控制点。关于三次贝塞尔曲线的控制器,看下图:
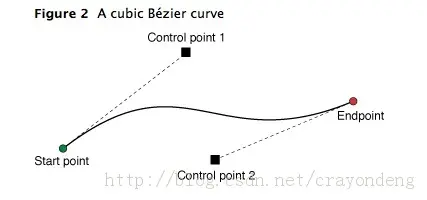

image

提示:其组成是起始端点+控制点1+控制点2+终止端点

如下方法就是画三次贝塞尔曲线的关键方法,以三个点画一段曲线,一般和-moveToPoint:配合使用。

- (void)addCurveToPoint:(CGPoint)endPoint 
          controlPoint1:(CGPoint)controlPoint1 
          controlPoint2:(CGPoint)controlPoint2

[objc]  view plain  copy
 print ? 在CODE上查看代码片 派生到我的代码片
  1. - (void)drawThirdBezierPath {  
  2.     UIBezierPath *path = [UIBezierPath bezierPath];  
  3.       
  4.     // 设置起始端点  
  5.     [path moveToPoint:CGPointMake(20150)];  
  6.       
  7.     [path addCurveToPoint:CGPointMake(300150)  
  8.             controlPoint1:CGPointMake(1600)  
  9.             controlPoint2:CGPointMake(160250)];  
  10.       
  11.     path.lineCapStyle = kCGLineCapRound;  
  12.     path.lineJoinStyle = kCGLineJoinRound;  
  13.     path.lineWidth = 5.0;  
  14.       
  15.     UIColor *strokeColor = [UIColor redColor];  
  16.     [strokeColor set];  
  17.       
  18.     [path stroke];  
  19. }  


我们需要注意,这里确定的起始端点为(20,150),终止端点为(300, 150),基水平方向是一致的。控制点1的坐标是(160,0),水平方向相当于在中间附近,这个参数可以调整。控制点2的坐标是(160,250),如果以两个端点的连线为水平线,那么就是250-150=100,也就是在水平线下100。这样看起来就像一个sin函数了。

评论
添加红包

请填写红包祝福语或标题

红包个数最小为10个

红包金额最低5元

当前余额3.43前往充值 >
需支付:10.00
成就一亿技术人!
领取后你会自动成为博主和红包主的粉丝 规则
hope_wisdom
发出的红包
实付
使用余额支付
点击重新获取
扫码支付
钱包余额 0

抵扣说明:

1.余额是钱包充值的虚拟货币,按照1:1的比例进行支付金额的抵扣。
2.余额无法直接购买下载,可以购买VIP、付费专栏及课程。

余额充值