综述
对于前面一些的ipc过程都是Service与客户端进行通信。那么在不同应用之间ipc可以采用哪些方式呢?首先我们会想到ContentProvider,因为我们平时获取手机上的联系人,图片等等都是通过ContentProvider得到的。ContentProvider是Android的四大组件之一。翻译成中文为内容提供者,也就是可以将自己的数据提供给别的应用进行使用。那么我们现在就来看一下ContentProvider的使用方法。
ContentProvider的用法
ContentProvider的用法其实也很简单。当我们的两个应用需要进行数据共享的时候,我们就可以利用ContentProvider为所需要共享的数据定义一个Uri,然后其他应用通过Context获得ContentResolver并将数据的Uri传入即可。对于ContentProvider最重要的就是他的数据模型(data model)和Uri。那么我们现在就先看一下他的数据模型和这个URI是什么。
数据模型
在ContentProvider中数据的存储也是为所有的共享数据创建了一个表。比如说我们的一个应用对其他应用提供了员工信息。那么下面这张表就体现出了ContentProvider中的数据在表中的存储情况。
| id | woekNum | name | department |
|---|---|---|---|
| 1 | 1001 | 张三 | 销售部 |
| 2 | 1002 | 李四 | 人事部 |
| 3 | 1003 | 王五 | 研发部 |
| 4 | 1004 | 小明 | 研发部 |
| 5 | 1005 | 小强 | 销售部 |
在这个表中,id为主键,workNum,name,department分别对应着员工的工号,姓名,部门。每一行表示一条记录,对应着一个实例,每一列代表着某个数据。不过有一点要注意,ContentProvider中的主键不是必需的,并且它不需要使用ID作为一个主键的列名。
URI
URI的全称为Uniform Resource Identifier(统一资源标识符)。是一个用于标识资源名称的字符串。 这种标识允许我们对任何(包括本地和互联网)的资源通过特定的协议进行交互。而每个ContentProvider都会对外提供一个公开的URI来标识自己的数据集。当管理多个数据集时,将会为每个数据集分配一个独立的URI。对于ContentProvider所提供的URI的格式如下。
| content://[Authority]/[path] |
|---|
在这里说明一下:
1. 所有ContentProvider所提供的URI都是以”content://”开头。
2. 我们创建一个ContentProvider都会为对他指定一个Authority,也对应着URI中的Authority。
3. path为资源路径。它表示所请求的资源的类型。
使用案例
那么现在我们用一个例子来说明一下这个ContentProvider是如何使用的。在这里我们使用两个应用。第一个应用通过使用ContentProvider对外提供员工信息。而第二个应用来获取这个员工信息。
那么现在我们首先看一下第一个应用程序。在这里我们创建一个SQLite数据库,将员工信息存入数据库中。
我们首先简单的创建一个Sqlite数据库。
package com.example.ljd.employee;

import android.content.Context;
import android.database.sqlite.SQLiteDatabase;
import android.database.sqlite.SQLiteOpenHelper;

public class EmployeeDBHelper extends SQLiteOpenHelper {

    private final static String DB_NAME = "myDatabase.db";
    private final static int DB_VERSION = 1;
    public static final String EMPLOYEE_TABLE_NAME = "employee";

    private String CREATE_BOOK_TABLE = "CREATE TABLE IF NOT EXISTS "
            + EMPLOYEE_TABLE_NAME + " (id INTEGER PRIMARY KEY,"
            +"workNum TEXT,"+ "name TEXT,"+"department TEXT)";

    public EmployeeDBHelper(Context context) {
        super(context, DB_NAME, null, DB_VERSION);
    }

    @Override
    public void onCreate(SQLiteDatabase db) {
        db.execSQL(CREATE_BOOK_TABLE);
    }

    @Override
    public void onUpgrade(SQLiteDatabase db, int oldVersion, int newVersion) {

    }
}
然后我们创建一个EmployeeProvider类,这个继承ContentProvider。我们看一下这个EmployeeProvider。
package com.example.ljd.employee;

import android.content.ContentProvider;
import android.content.ContentValues;
import android.content.UriMatcher;
import android.database.Cursor;
import android.database.sqlite.SQLiteDatabase;
import android.net.Uri;
import android.support.annotation.Nullable;

public class EmployeeProvider extends ContentProvider {
    private SQLiteDatabase mDb;
    private static final String AUTHORITY = "com.example.ljd.employee.EmployeeProvider";
    private static final int EMPLOYEE_URI_CODE = 0;
    private static final UriMatcher sUriMatcher = new UriMatcher(UriMatcher.NO_MATCH);

    static {
        sUriMatcher.addURI(AUTHORITY, "employee", EMPLOYEE_URI_CODE);
    }

    @Override
    public boolean onCreate() {
        insertDataToDb();
        return true;
    }

    @Nullable
    @Override
    public Cursor query(Uri uri, String[] projection, String selection, String[] selectionArgs, String sortOrder) {
        String tableName = getTableName(uri);
        if (tableName == null) {
            throw new IllegalArgumentException("Unsupported URI: " + uri);
        }
        Cursor cursor = mDb.query(tableName, projection, selection, selectionArgs, null, null, sortOrder, null);
        return cursor;
    }

    @Nullable
    @Override
    public String getType(Uri uri) {
        return null;
    }

    @Nullable
    @Override
    public Uri insert(Uri uri, ContentValues values) {
        String table = getTableName(uri);
        if (table == null) {
            throw new IllegalArgumentException("Unsupported URI: " + uri);
        }
        mDb.insert(table, null, values);
        getContext().getContentResolver().notifyChange(uri, null);
        return uri;
    }

    @Override
    public int delete(Uri uri, String selection, String[] selectionArgs) {
        String table = getTableName(uri);
        if (table == null) {
            throw new IllegalArgumentException("Unsupported URI: " + uri);
        }
        int count = mDb.delete(table, selection, selectionArgs);
        if (count > 0) {
            getContext().getContentResolver().notifyChange(uri, null);
        }
        return count;
    }

    @Override
    public int update(Uri uri, ContentValues values, String selection, String[] selectionArgs) {
        String table = getTableName(uri);
        if (table == null) {
            throw new IllegalArgumentException("Unsupported URI: " + uri);
        }
        int row = mDb.update(table, values, selection, selectionArgs);
        if (row > 0) {
            getContext().getContentResolver().notifyChange(uri, null);
        }
        return row;
    }

    private void insertDataToDb() {
        mDb = new EmployeeDBHelper(getContext()).getWritableDatabase();
        mDb.execSQL("delete from " + EmployeeDBHelper.EMPLOYEE_TABLE_NAME);
        mDb.execSQL("insert into employee values(1,'1001','张三','销售部');");
        mDb.execSQL("insert into employee values(2,'1002','李四','人事部');");
        mDb.execSQL("insert into employee values(3,'1003','王五','研发部');");
        mDb.execSQL("insert into employee values(4,'1004','小明','研发部');");
        mDb.execSQL("insert into employee values(5,'1005','小强','销售部');");
    }

    private String getTableName(Uri uri) {
        String tableName = null;
        if (sUriMatcher.match(uri) == EMPLOYEE_URI_CODE){
            tableName = EmployeeDBHelper.EMPLOYEE_TABLE_NAME;
        }
        return tableName;
    }
}
在这里我们实现了ContentProvider的六个抽象方法。在onCreate方法中,用于创建一个ContentProvider,在这里我们对数据库进行初始化操作。而getType方法中用来返回Uri请求所对应的MIME类型。而后剩下的四个方法中也就是对应的”CRUD”操作,也就是数据的增删改查功能。
然后我们还需要在AndroidManifest中注册这个ContentProvider。
<provider
    android:name=".EmployeeProvider"
    android:authorities="com.example.ljd.employee.EmployeeProvider"
    android:exported="true"
    android:permission="com.example.ljd.employee.provider" />
authorities: 这个属性是ContentProvider的唯一标识,通过过这个属性外部应用才能访问我们的ContentProvider,也就是说authorities是唯一的。而且这个authorities也是我们Uri里面的authorities。
export: 设为true的时候表示当前ContentProvider可以被其它应用使用。任何应用可以使用Provider通过URI 来获得它,也可以通过相应的权限来使用Provider。设为false的时候表示当前ContentProvider不能被其它应用使用。
permission: 为我们的ContentProvider设置权限从而避免任何应用都能访问我们的ContentProvider。
所以现在我们还需要为我们的应用设置权限。
<permission android:name="com.example.ljd.employee.provider"
    android:protectionLevel="normal"/>
对于这个应用程序我们只需要在创建一个空白的Activity启动即可,在这个Activity里面不需要做任何的操作。然后我们现在看一下第二个应用是如何获取ContentProvider中数据的。
首先我们需要创建一个Employee实体类。
package com.example.ljd.client;

public class Employee {
    private int id;
    private String workNum;
    private String name;
    private String department;

    public int getId() {
        return id;
    }

    public void setId(int id) {
        this.id = id;
    }

    public String getWorkNum() {
        return workNum;
    }

    public void setWorkNum(String workNum) {
        this.workNum = workNum;
    }

    public String getName() {
        return name;
    }

    public void setName(String name) {
        this.name = name;
    }

    public String getDepartment() {
        return department;
    }

    public void setDepartment(String department) {
        this.department = department;
    }


    @Override
    public String toString(){
        return String.format("workNum:%s, name:%s, department:%s",
                getWorkNum(),getName(),getDepartment());
    }
}
然后我们在看一下是如何ContentProvider中的数据进行操控的。
package com.example.ljd.client;

import android.content.ContentResolver;
import android.content.ContentValues;
import android.content.Context;
import android.database.Cursor;
import android.net.Uri;
import android.util.Log;

import java.util.ArrayList;
import java.util.List;

public class HandleProvider {
    private static Context mContext;
    private static HandleProvider mInstance;
    private static Uri mEmployeeUri;
    private static final String EMPLOYEE_CONTENT_URI = "content://com.example.ljd.employee.EmployeeProvider/employee";

    private HandleProvider(Context mContext) {
        this.mContext = mContext.getApplicationContext();
        mEmployeeUri = Uri.parse(EMPLOYEE_CONTENT_URI);
    }

    public static HandleProvider getInstance(Context context) {
        if (mInstance == null) {
            synchronized (HandleProvider.class) {
                if (mInstance == null) {
                    mInstance = new HandleProvider(context);
                }
            }
        }
        return mInstance;
    }

    public void delete() {
        ContentResolver contentResolver = mContext.getContentResolver();
        String where = "id=?";
        String[] where_args = {"7"};
        contentResolver.delete(mEmployeeUri, where, where_args);
    }

    public void update() {
        ContentResolver contentResolver = mContext.getContentResolver();
        ContentValues values = new ContentValues();
        values.put("name", "梁山伯");
        String where = "id=?";
        String[] where_args = {"1"};
        contentResolver.update(mEmployeeUri, values, where, where_args);
    }

    public void create() {
        ContentValues values = new ContentValues();
        values.put("id", 7);
        values.put("workNum", "1006");
        values.put("name", "张三丰");
        values.put("department", "研发部");
        mContext.getContentResolver().insert(mEmployeeUri, values);
    }

    public List<String> query() {
        List<String> list = new ArrayList<>();
        Cursor cursor = mContext.getContentResolver().query(mEmployeeUri, new String[]{"id", "workNum", "name", "department"}, null, null, null);

        while (cursor.moveToNext()) {
            Employee employee = new Employee();
            employee.setId(cursor.getInt(0));
            employee.setWorkNum(cursor.getString(1));
            employee.setName(cursor.getString(2));
            employee.setDepartment(cursor.getString(3));
            String str = employee.toString();
            list.add(str);
            Log.d("mainActivity", "query employee:" + str);
        }
        cursor.close();
        return list;
    }

}
我们只需要在Activity使用这些方法即可。
package com.example.ljd.client;

import android.support.v7.app.AppCompatActivity;
import android.os.Bundle;
import android.view.View;
import android.widget.LinearLayout;
import android.widget.TextView;

import java.util.List;

import butterknife.Bind;
import butterknife.ButterKnife;
import butterknife.OnClick;

public class MainActivity extends AppCompatActivity {

    @Bind(R.id.show_linear)
    LinearLayout showLinear;

    @Override
    protected void onCreate(Bundle savedInstanceState) {
        super.onCreate(savedInstanceState);
        setContentView(R.layout.activity_main);
        ButterKnife.bind(this);

    }

    @Override
    protected void onDestroy() {
        super.onDestroy();
        ButterKnife.unbind(this);
    }

    @OnClick({R.id.insert_button,R.id.delete_button,R.id.update_button,R.id.query_button,R.id.clear_button})
    public void onClickButton(View view){
        switch (view.getId()){
            case R.id.insert_button:
                HandleProvider.getInstance(this).create();
                break;
            case R.id.delete_button:
                HandleProvider.getInstance(this).delete();
                break;
            case R.id.update_button:
                HandleProvider.getInstance(this).update();
                break;
            case R.id.query_button:

                List<String> list = HandleProvider.getInstance(this).query();
                for (int i = 0;i<list.size();i++){
                    TextView textView = new TextView(this);
                    textView.setText(list.get(i));
                    showLinear.addView(textView);
                }
                TextView lineText = new TextView(this);
                lineText.setText("-----------------------");
                showLinear.addView(lineText);
                break;
            case R.id.clear_button:
                showLinear.removeAllViews();
                break;
            default:
                break;
        }
    }
}
由于在ContentProvider中添加了权限,所以要为我们这个应用添加使用权限。
<uses-permission android:name="com.example.ljd.employee.provider"/>最后在看一下我们的布局代码。
<?xml version="1.0" encoding="utf-8"?>
<LinearLayout xmlns:android="http://schemas.android.com/apk/res/android"
    xmlns:tools="http://schemas.android.com/tools"
    android:layout_width="match_parent"
    android:layout_height="match_parent"
    android:orientation="vertical"
    android:paddingBottom="@dimen/activity_vertical_margin"
    android:paddingLeft="@dimen/activity_horizontal_margin"
    android:paddingRight="@dimen/activity_horizontal_margin"
    android:paddingTop="@dimen/activity_vertical_margin"
    tools:context="com.example.ljd.client.MainActivity">
    <LinearLayout
        android:layout_width="match_parent"
        android:layout_height="wrap_content"
        android:orientation="horizontal">
        <Button
            android:id="@+id/insert_button"
            android:layout_width="match_parent"
            android:layout_height="match_parent"
            android:layout_weight="1"
            android:text="@string/insert"/>
        <Button
            android:id="@+id/delete_button"
            android:layout_width="match_parent"
            android:layout_height="match_parent"
            android:layout_weight="1"
            android:text="@string/delete"/>
    </LinearLayout>

    <LinearLayout
        android:layout_width="match_parent"
        android:layout_height="wrap_content"
        android:orientation="horizontal">
        <Button
            android:id="@+id/update_button"
            android:layout_width="match_parent"
            android:layout_height="wrap_content"
            android:layout_weight="1"
            android:text="@string/update"/>
        <Button
            android:id="@+id/query_button"
            android:layout_width="match_parent"
            android:layout_height="wrap_content"
            android:layout_weight="1"
            android:text="@string/query"/>
    </LinearLayout>

    <Button
        android:id="@+id/clear_button"
        android:layout_width="match_parent"
        android:layout_height="wrap_content"
        android:text="@string/clear"/>

    <ScrollView
        android:layout_width="match_parent"
        android:layout_height="match_parent">
        <LinearLayout
            android:id="@+id/show_linear"
            android:layout_width="match_parent"
            android:layout_height="match_parent"
            android:orientation="vertical">
        </LinearLayout>
    </ScrollView>
</LinearLayout>
演示
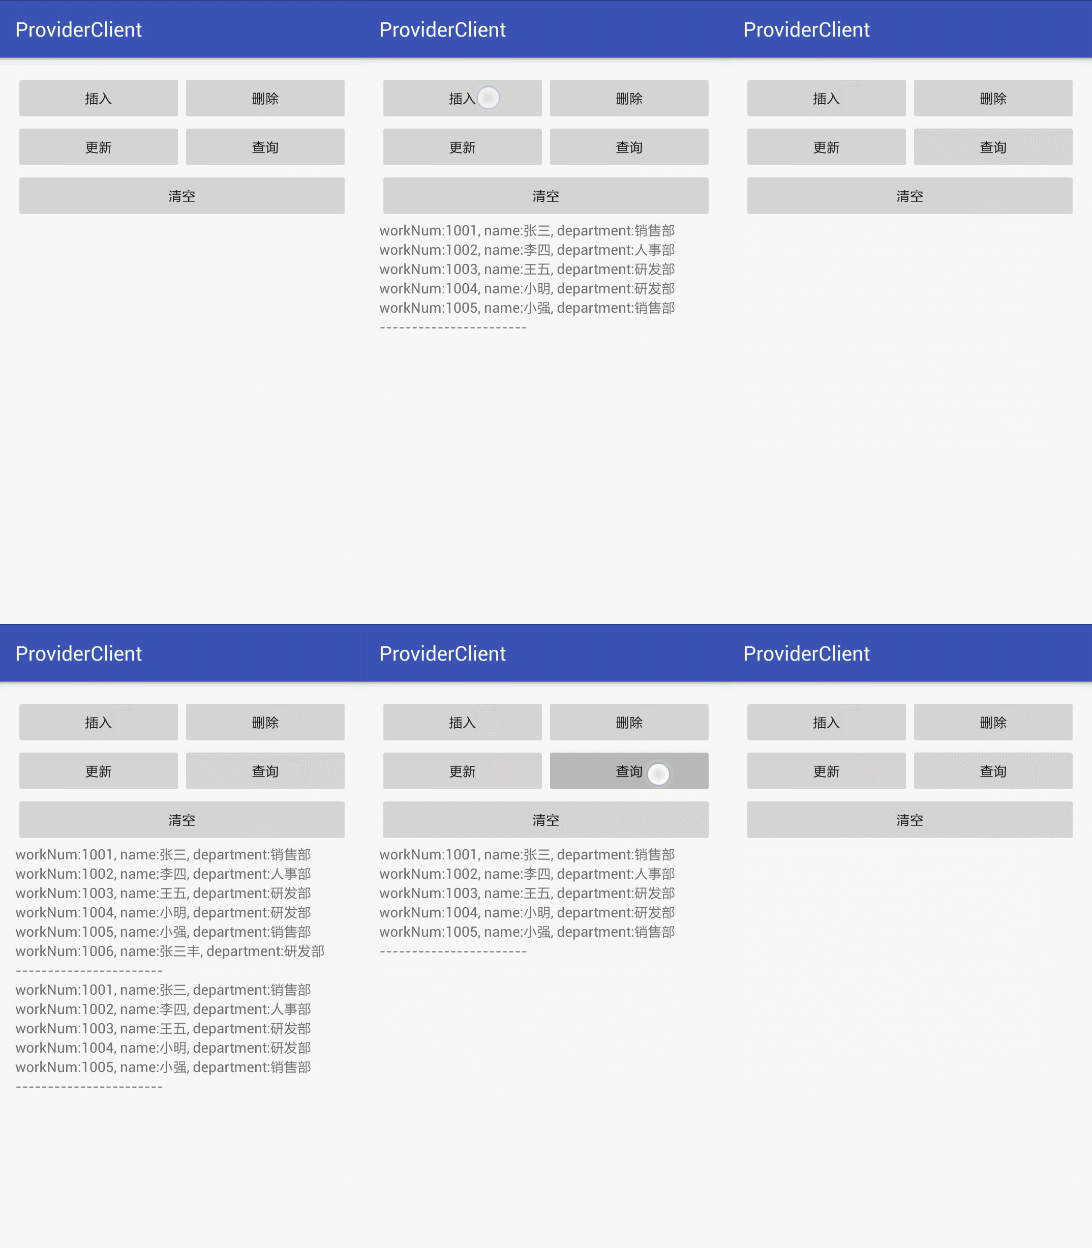
在这里我们看一下效果演示。
插入:我们将一个名叫张三丰的员工通过ContentProvider插入到数据库中。
删除:我们将上面插入的张三丰这个员工删除。
更新:我们将张三改名为梁山伯。
总结
在这里我们介绍了ContentProvider的使用方法,而在Android系统中为我们提供ContentProvider组件本身就是用来跨进程访问数据的。其实在Android应用的四大组件当中可以用于进程间通信的不止ContentProvider一个。那么另外一个是谁呢,在下一篇中会进行详细介绍。


 1248
1248

 被折叠的 条评论
为什么被折叠?


