


【spring boot结合rabbit mq 到点执行,可精确到秒】
创建队列枚举
public enum QueueEnum {

    /**
     * 各种异步消息频道
     */
    TEST(1,"test","队列频道"),
    DELAY_TEST(2,"delay_test","延迟延迟频道"),
     ;
    private Integer code;
    private String channel;
    private String desc;

    QueueEnum(Integer code, String channel, String desc) {
        this.code = code;
        this.channel = channel;
        this.desc = desc;
    }

    public Integer getCode() {
        return code;
    }

    public void setCode(Integer code) {
        this.code = code;
    }

    public String getChannel() {
        return channel;
    }

    public void setChannel(String channel) {
        this.channel = channel;
    }

    public String getDesc() {
        return desc;
    }

    public void setDesc(String desc) {
        this.desc = desc;
    }

    public static String findChannelByCode(Integer code) {
        QueueEnum[] queueEnums = QueueEnum.values();
        for (QueueEnum queueEnum : queueEnums) {
            if (code == queueEnum.getCode()) {
                return queueEnum.getChannel();
            }
        }
        return "";
    }
}
创建自定义的队列消息pojo
import java.io.Serializable;
import java.time.LocalDate;

/**
 *
 * 队列消息
 *
 * 注意:涉及序列化问题,请勿将此类移动与修改
 * @author linjianhui
 */
public class QueueMessage implements Serializable {

    private static final long serialVersionUID = 1L;
	//自定义的队列枚举
    private QueueEnum queueEnum;
    private String activityId;
    /**
     * 任务日期- yyyy-MM-dd
     * 任务日期- yyyy-MM-dd HH:mm:ss
     */
    private String taskDate;

    private String msgId;


    public String getActivityId() {
        return activityId;
    }

    public String getTaskDate() {
        return taskDate==null? LocalDate.now().toString():taskDate;
    }

    public void setQueueEnum(QueueEnum queueEnum) {
        this.queueEnum = queueEnum;
    }

    public void setActivityId(String activityId) {
        this.activityId = activityId;
    }

    public void setTaskDate(String taskDate) {
        this.taskDate = taskDate;
    }

    public String getMsgId() {
        return msgId;
    }

    public void setMsgId(String msgId) {
        this.msgId = msgId;
    }

    public QueueEnum getQueueEnum() {
        return queueEnum;
    }

    public QueueMessage() {
    }

    public QueueMessage(QueueEnum queueEnum, String activityId) {
        this.queueEnum = queueEnum;
        this.activityId = activityId;
    }

    public QueueMessage(QueueEnum queueEnum, String activityId,String msgId) {
        this.queueEnum = queueEnum;
        this.activityId = activityId;
        this.msgId=msgId;
    }

    @Override
    public String toString() {
        final StringBuilder sb = new StringBuilder("QueueMessage{");
        sb.append("queueEnum=").append(queueEnum);
        sb.append(", activityId='").append(activityId).append('\'');
        sb.append(", taskDate='").append(taskDate).append('\'');
        sb.append(", mgsId='").append(msgId).append('\'');
        sb.append('}');
        return sb.toString();
    }
创建队列和延迟队列
import org.springframework.amqp.core.Binding;
import org.springframework.amqp.core.BindingBuilder;
import org.springframework.amqp.core.DirectExchange;
import org.springframework.amqp.core.Queue;
import org.springframework.beans.factory.annotation.Qualifier;
import org.springframework.context.annotation.Bean;
import org.springframework.context.annotation.Configuration;
import org.springframework.core.annotation.Order;

import java.util.HashMap;

@Configuration
//保证队列的创建优先于监听队列
@Order(1)
public class TestRabbitConfig {


    @Bean("testQueue")
    public Queue testQueue() {
        return new Queue(QueueEnum.TEST.getChannel());
    }

    @Bean("testExchange")
    public DirectExchange testExchange() {
        return new DirectExchange(QueueEnum.TEST.getChannel());
    }

    /**
     * 将队列绑定到exchange,使用指定的路由key
     * @return
     */
    @Bean
    Binding bindingtestQueueToExchange(@Qualifier("testQueue") Queue testQueue, @Qualifier("testExchange")DirectExchange testExchange) {
        return BindingBuilder.bind(testQueue).to(testExchange).with(QueueEnum.TEST.getChannel());
    }
    /**
     * 描述:定义延迟更新队列【死信队列】
     *  当队列到期后就会通过死信交换机和路由key,路由到指定队列
     * x-message-ttl 消息定时时间
     * x-max-length  队列最大长度
     * x-dead-letter-exchange:出现dead letter之后将dead letter重新发送到指定exchange
     * x-dead-letter-routing-key:出现dead letter之后将dead letter重新按照指定的routing-key发送
     * @param
     * @return
     */
    @Bean("delayTestQueue")
    public Queue delayTestQueue() {
        HashMap<String, Object> arguments = new HashMap<>(4);
        //设置延15天
       // arguments.put("x-message-ttl", 15*24*6*10*60*1000);//需要时可以打开
        // x-message-ttl这个设置对队列中所有的消息有效【属于队列级别】
        //如果你想要【为每个消息动态设置过期时间】,你需要在【消息级别】设置Time To Live (TTL)。在Spring AMQP中,你可以通过设置MessageProperties的expiration属性来实现这一点:
        //在convertAndSend传入MessagePostProcessor实现类,覆盖其方法postProcessMessage(Message message),使用message.getMessageProperties().setExpiration(delayInMs+"");来为消息单独设置过期时间
       // arguments.put("x-message-ttl", 10*60*1000);//10分钟
        arguments.put("x-max-length", 500000);
        arguments.put("x-dead-letter-exchange", QueueEnum.TEST.getChannel());
        arguments.put("x-dead-letter-routing-key", QueueEnum.TEST.getChannel());
        return new Queue(QueueEnum.DELAY_TEST.getChannel(), true, false, false, arguments);
    }

    /**
     * 描述:定义延迟更新队列交换机
     * @param
     * @return
     */
    @Bean("delayTestExchange")
    public DirectExchange delayTestExchange() {
        return new DirectExchange(QueueEnum.DELAY_TEST.getChannel());
    }
    /**
     * 描述:绑定延迟更新队列到exchange
     * @param
     * @return
     */
    @Bean
    Binding bindingDelayTestQueueToExchange(@Qualifier("delayTestQueue")Queue delayTestQueue, @Qualifier("delayTestExchange")DirectExchange delayTestExchange) {
        return BindingBuilder.bind(delayTestQueue).to(delayTestExchange).with(QueueEnum.DELAY_TEST.getChannel());
    }
发送mq 消息
import com.alibaba.fastjson.JSON;
import com.project.utils.StringUtil;
import lombok.extern.slf4j.Slf4j;
import org.springframework.amqp.AmqpException;
import org.springframework.amqp.core.Message;
import org.springframework.amqp.core.MessagePostProcessor;
import org.springframework.amqp.rabbit.core.RabbitTemplate;
import org.springframework.beans.factory.annotation.Autowired;
import org.springframework.stereotype.Component;

import java.time.Duration;
import java.time.LocalDateTime;

/**
 * 描述:发送消息
 */
@Component
@Slf4j(topic = "sendMqTask")
public class SendMqMessage {

    @Autowired
    RabbitTemplate rabbitTemplate;

    public void sendTestMessage(QueueMessage queueMessage) {
        String messageId = StringUtil.getUniqueId("mq-");
        queueMessage.setMsgId(messageId);
        rabbitTemplate.convertAndSend(queueMessage.getQueueEnum().getChannel(), queueMessage.getQueueEnum().getChannel(), queueMessage, new MessagePostProcessor() {
            @Override
            public Message postProcessMessage(Message message) throws AmqpException {
                // 计算时间差
                long delayInMs = Duration.between(LocalDateTime.now(), DateTimeUtil.fromString2LocalDateTime(queueMessage.getTaskDate())).toMillis();
                //如果你想要为每个消息动态设置过期时间,你需要在【消息级别:更加细粒度控制】设置Time To Live (TTL)。在Spring AMQP中,你可以通过设置MessageProperties的expiration属性来实现这一点:
                //在convertAndSend传入MessagePostProcessor实现类,覆盖其方法postProcessMessage(Message message),使用message.getMessageProperties().setExpiration(delayInMs+"");来为消息单独设置过期时间
                //这里,expiration属性的值是以毫秒为单位的过期时间戳。当这个时间戳过去后,消息就会变为死信
                //这样每条消息都有自己的过期时间,不用受死信队列的x-message-ttl的影响,死信队列的x-message-ttl这个设置对队列中所有的消息有效【队列级别】
                //在RabbitMQ中,如果同时在队列级别和消息级别设置了TTL(x-message-ttl 和 expiration 属性),那么将会遵循以下原则:
                // 1. 消息级别的TTL(expiration)优先:如果消息自身携带了TTL属性,那么即使队列设置了x-message-ttl,也会以消息本身的TTL为准。消息过期后,会被当作死信处理。
                // 2. 队列级别的TTL(x-message-ttl)作为默认值:只有当消息没有携带TTL属性时,才会使用队列级别的x-message-ttl作为消息的过期时间。
                // 因此,在你的场景中,如果同时设置了队列级别的x-message-ttl和消息级别的message.getMessageProperties().setExpiration(delayInMs+""),那么将会以消息级别的TTL为准。

                //设置消息多长时间后过期
                message.getMessageProperties().setExpiration(delayInMs+"");
                return message;
            }
        });
    }
}
接收mq 消息
import com.rabbitmq.client.Channel;
import lombok.extern.slf4j.Slf4j;
import org.apache.ibatis.exceptions.PersistenceException;
import org.mybatis.spring.MyBatisSystemException;
import org.springframework.amqp.core.Message;
import org.springframework.amqp.rabbit.annotation.RabbitHandler;
import org.springframework.amqp.rabbit.annotation.RabbitListener;
import org.springframework.beans.factory.annotation.Autowired;
import org.springframework.beans.factory.annotation.Value;
import org.springframework.core.annotation.Order;
import org.springframework.jdbc.CannotGetJdbcConnectionException;
import org.springframework.stereotype.Component;

import java.io.IOException;
import java.time.LocalDateTime;
import java.util.Arrays;
import java.util.concurrent.TimeUnit;

/**
 * 描述:消息消费监听
 */
@Component
@Order(2)
@Slf4j(topic = "receiveMqTask")
public class ReceiveMqMessage {
   // private static final Logger MQ_LOG = LoggerFactory.getLogger("mqTask");

    @Value("${spring.profiles.active}")
    private String active;

    /**
     * 判断是否是正式环境
     *
     * @return
     */
    private boolean isProdEnv() {
        return "prod".equals(active);
    }

    /**
     * 判断是否是测试环境
     *
     * @return
     */
    private boolean isTestEnv() {
        return "test".equals(active);
    }

    /**
     * 监听消息队列
     * @param queueMessage
     * @param message : org.springframework.amqp.core.Message
     * @param channel : com.rabbitmq.client.Channel
     */
    @RabbitListener(queues = ApiConstants.TEST)
    @RabbitHandler
    public void test(QueueMessage queueMessage, Message message, Channel channel) {
        String env=isProdEnv()?"正式":isTestEnv()?"测试":active;
        log.info("====={}== test Mq Message={}",env, queueMessage);
        // String consumerTag = message.getMessageProperties().getConsumerTag();
        long deliveryTag = message.getMessageProperties().getDeliveryTag();
        try {
            System.out.println("发送时间是:"+ queueMessage.getTaskDate());
            System.out.println("当前时间是:"+ LocalDateTime.now().toLocalDate()+" "+LocalDateTime.now().toLocalTime());
            // 手动ACK
            try {
                channel.basicAck(deliveryTag, false);
            } catch (IOException e) {
                log.error("MQ手动ACK错误: ", e);
            }
        } catch (Exception e) {
           log.error("test queue 失败");
        }
    }
}
DateTimeUtil
/**
 * 日期工具类
 */
public class DateTimeUtil {
 /**
     * yyyy-MM-dd HH:mm:ss
     */
    public static final String FORMAT_DATETIME = "yyyy-MM-dd HH:mm:ss";
 /**
     * discription:
     */
    public static String getLocalDateTime(LocalDateTime localDateTime) {
        DateTimeFormatter df = DateTimeFormatter.ofPattern(DateTimeUtil.FORMAT_DATETIME);
        if (localDateTime != null) {
            String localTime = df.format(localDateTime);
            return localTime;
        }
        return null;
    }
}
测试
@RestController
@RequestMapping(value = "/test")
public class TestController {

    @Autowired
    private SendMqMessage sendMqMessage;

    @RequestMapping(value = "/testMqMessage", method = RequestMethod.GET)
    public ResultEntity testMqMessage(@RequestParam(value = "second",defaultValue = "20",required = false) Long second){
        QueueMessage queueMessage = new QueueMessage(QueueEnum.DELAY_TEST,"123");
		//设置20秒后更新【默认】
		queueMessage.setTaskDate(DateTimeUtil.getLocalDateTime(LocalDateTime.now().plusSeconds(second)));
        sendMqMessage.sendTestMessage(queueMessage);
        return "发送成功";
    }
}
注意点
//如果你想要为每个消息动态设置过期时间,你需要在【消息级别:更加细粒度控制】设置Time To Live (TTL)。在Spring AMQP中,你可以通过设置MessageProperties的expiration属性来实现这一点:

//在convertAndSend传入MessagePostProcessor实现类,覆盖其方法postProcessMessage(Message message),使用message.getMessageProperties().setExpiration(delayInMs+"");来为消息单独设置过期时间

//这里,expiration属性的值是以毫秒为单位的过期时间戳。当这个时间戳过去后,消息就会变为死信

//这样每条消息都有自己的过期时间,不用受死信队列的x-message-ttl的影响,死信队列的x-message-ttl这个设置对队列中所有的消息有效【队列级别】

//在RabbitMQ中,如果同时在队列级别和消息级别设置了TTL(x-message-ttl 和 expiration 属性),那么将会遵循以下原则:

// 1. 消息级别的TTL(expiration)优先:如果消息自身携带了TTL属性,那么即使队列设置了x-message-ttl,也会以消息本身的TTL为准。消息过期后,会被当作死信处理。

// 2. 队列级别的TTL(x-message-ttl)作为默认值:只有当消息没有携带TTL属性时,才会使用队列级别的x-message-ttl作为消息的过期时间。

// 因此,在你的场景中,如果同时设置了队列级别的x-message-ttl和消息级别的message.getMessageProperties().setExpiration(delayInMs+""),那么将会以消息级别的TTL为准。
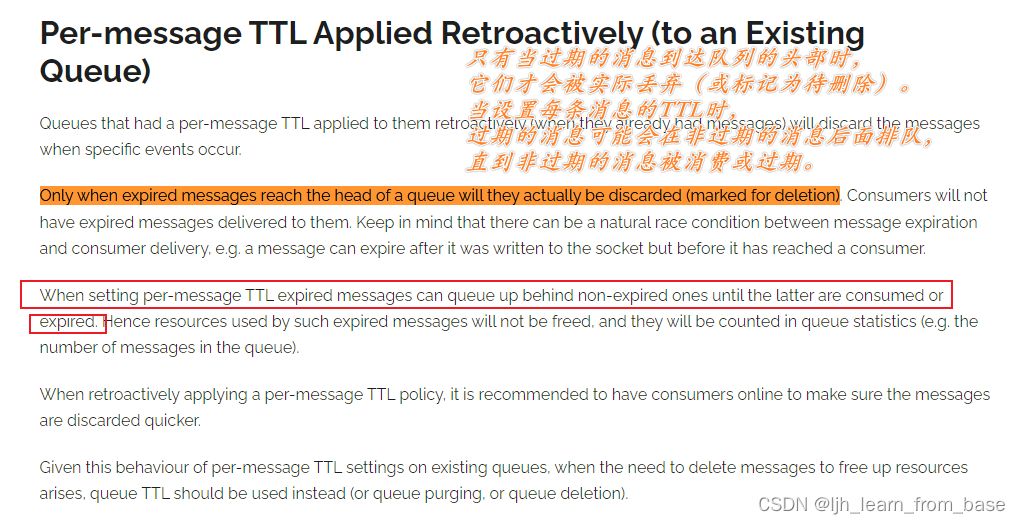
【必看】使用消息级别的TTL存在的缺陷
只有当过期时消息到达队列时头部时,
它们才会撤实际丢弃(或标记为得删除)
当设置每条消息的TTL时,
过期的消息可能会在非过期的消息后面排队,直到轮到它为队列的头部
也就是说:如果消息前面还有消息,并不会到点执行
解决方案:使用redisson的延迟队列方案
Redisson实现延迟队列的原理
Redisson是一个基于Redis的Java驻内存数据网格,它为Redis提供了丰富的Java数据结构和并发集合,
同时也提供了实现分布式延迟队列的功能。
通过Redisson的RDelayedQueue或RLockDelayedQueue,可以轻松地创建和使用延迟队列。
Redisson实现延迟队列的原理是利用Redis的有序集合(Sorted Set)和发布/订阅(Pub/Sub)机制,将延迟消息存储在有序集合中,每个消息都有一个到期时间的分数(score)。Redisson还提供定时任务去扫描有序集合,当消息到期时,将消息发布到订阅的通道,从而实现消息的延迟投递。
使用Redisson实现分布式延迟队列的优势包括:
利用Redis的高效性能和可靠性。
Java API封装良好,易于集成到Spring Boot等Java应用程序中。
支持多节点集群部署,提供高可用性。
在实际应用场景中,根据项目的具体需求和技术栈,Redisson实现的延迟队列也是一个非常实用的选择
具体代码
编写常量,定义队列名称
public class Constants {
public static final String QUEUE_TASK_1 = "queue_task_1";
public static final String QUEUE_TASK_2 = "queue_task_2";
}
编写RedissonDelayedQueueService
import org.redisson.api.RBlockingDeque;
import org.redisson.api.RDelayedQueue;
import org.redisson.api.RedissonClient;
import org.springframework.beans.factory.annotation.Autowired;
import org.springframework.stereotype.Service;

import java.util.concurrent.TimeUnit;

@Service
public class RedissonDelayedQueueService {

    @Autowired
    private RedissonClient redissonClient;

    /**
     * 添加延时任务到队列,没有会创建该队列
     * @param e 泛型参数
     * @param delay 延迟时间
     * @param timeUnit 延迟时间的单位
     * @param queueName 队列名称{@link Constants }
     * @param <E>
     * @see RedissonDelayedQueueListener#sendMessageForTaskListener()
     * @see RedissonDelayedQueueListener#cancelForTaskListener()
     */
    public <E> void addToQueue(E e, long delay, TimeUnit timeUnit, String queueName) {
        RBlockingDeque<E> blockingDeque = redissonClient.getBlockingDeque(queueName);
        RDelayedQueue<E> delayedQueue = redissonClient.getDelayedQueue(blockingDeque);
        delayedQueue.offer(e, delay, timeUnit);
    }

    /**
     * @param queueName {@link Constants }
     * @param <E>
     */
    public <E> RBlockingDeque<E> getQueue(String queueName) {
        RBlockingDeque<E> blockingDeque = redissonClient.getBlockingDeque(queueName);
        RDelayedQueue<E> delayedQueue = redissonClient.getDelayedQueue(blockingDeque);
        return blockingDeque;
    }

    /**
     *
     * @param redisKey
     * @param queueName {@link Constants }
     * @param <E>
     */
    public <E> void removeQueueElement(E redisKey, String queueName) {
        RBlockingDeque<E> blockingDeque = redissonClient.getBlockingDeque(queueName);
        RDelayedQueue<E> delayedQueue = redissonClient.getDelayedQueue(blockingDeque);
        delayedQueue.remove(redisKey);
    }

}
编写RedissonDelayedQueueListener
import lombok.extern.slf4j.Slf4j;
import org.redisson.api.RBlockingDeque;
import org.springframework.beans.factory.annotation.Autowired;
import org.springframework.beans.factory.annotation.Value;
import org.springframework.stereotype.Component;

import javax.annotation.PostConstruct;
import java.util.concurrent.ExecutorService;
import java.util.concurrent.LinkedBlockingQueue;
import java.util.concurrent.ThreadPoolExecutor;
import java.util.concurrent.TimeUnit;

@Slf4j
@Component
public class RedissonDelayedQueueListener {
    @Autowired
    private RedissonDelayedQueueService redissonDelayedQueueService;


    /**
     * 创建一个线程池,核心线程为2,最大线程数为2,队列容量为1
     * 当有多个线程时
     */
    private static final ExecutorService singlePoolExecutor=new ThreadPoolExecutor(2, 2,0L, TimeUnit.MILLISECONDS, new LinkedBlockingQueue<Runnable>(1));


    @Value("${spring.profiles.active}")
    private String active;

    /**
     * 判断是否是正式环境
     *
     * @return
     */
    private boolean isProdEnv() {
        return "prod".equals(active);
    }

    /**
     * 判断是否是测试环境
     *
     * @return
     */
    private boolean isTestEnv() {
        return "test".equals(active);
    }

    /**
     * 示例:任务开始前n小时,发送消息推送
     */
    @PostConstruct
    public void sendMessageForTaskListener() {
        String env=isProdEnv()?"正式":isTestEnv()?"测试":active;
        RBlockingDeque<String> blockingDeque = redissonDelayedQueueService.getQueue(Constants.QUEUE_TASK_1);
        singlePoolExecutor.execute(()->{
            while (true){
                try {
                    String taskId= blockingDeque.take();
                    //加入后续逻辑处理:

                    log.info("sendMessageForTaskListener获取到订单队列:{}",taskId);
                } catch (InterruptedException e) {
                    log.error("消费异常",e);
                }
            }
        });
    }


    /**
     * 示例:到达指定时间点,还没达到对应的操作,取消业务任务:如:取消订单等
     */
    @PostConstruct
    public void cancelForTaskListener() {
        String env=isProdEnv()?"正式":isTestEnv()?"测试":active;
        RBlockingDeque<String> blockingDeque = redissonDelayedQueueService.getQueue(Constants.QUEUE_TASK_2);
        //使用线程池开启一个线程,不断循环监听
        singlePoolExecutor.execute(()->{
            while (true){
                try {
                    String taskId= blockingDeque.take();
                   //加入后续逻辑处理:

                    log.info("cancelForTaskListener获取到订单队列:{}",taskId);
                } catch (InterruptedException e) {
                    log.error("消费异常",e);
                }
            }
        });
    }
}


 548
548


 被折叠的 条评论
为什么被折叠?
被折叠的 条评论
为什么被折叠?
 到【灌水乐园】发言


