


好了,在这里,我将要研究一下 Spring 并且仿照 一个 Spring 中所谓的Ioc 。我没有去看一行 Spring 的源代码,我是完全意义上的中国式仿造。 也请大家不要见笑.
这里我们不研究别人的,我们用自己的头脑想想应该如何去做
这叫春去冬来,^ * ^。
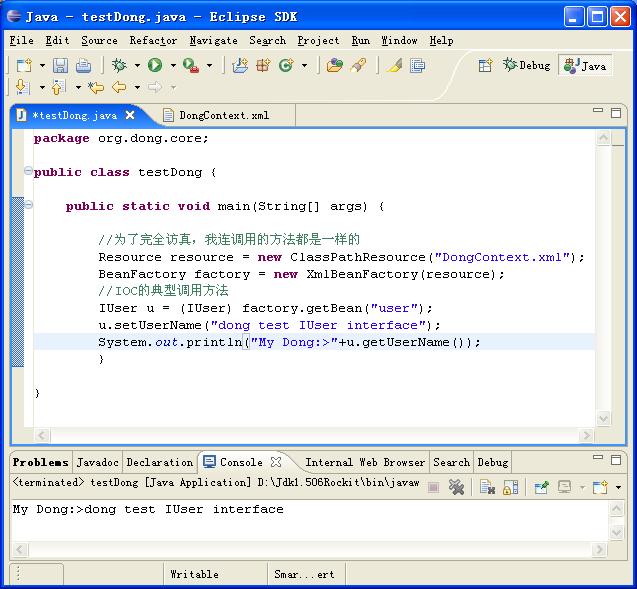
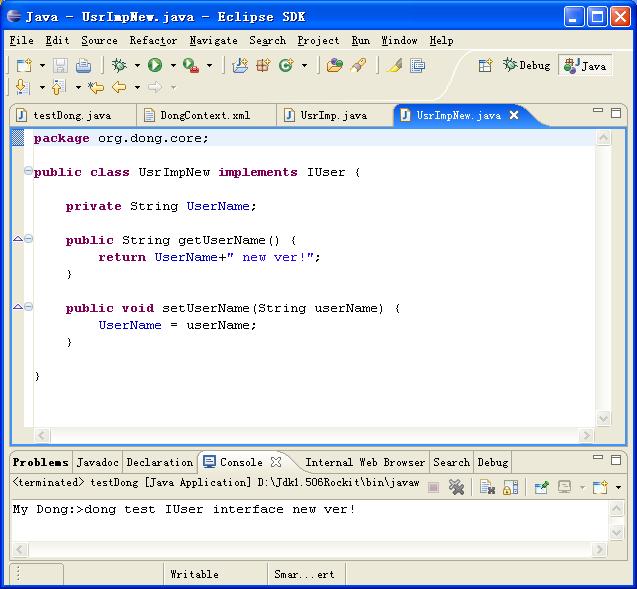
先给大家看一个我完成后的程序的截图吧。这个完全实现了我上面提到的两点目标。
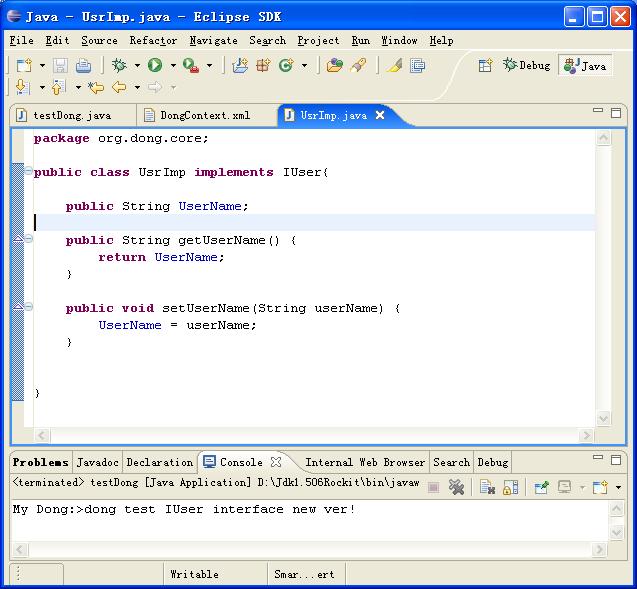
首先我们用user 这个bean
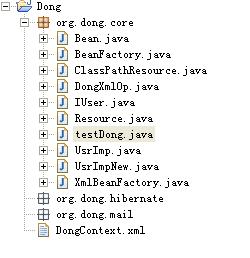
我将用我一如既往的图解方法演示如何制作我们的Dong的。由于贴图的方式比较慢,要完全操作一次,所以,请大家稍微耐心点。
//这个是 Resurce 接口而已咯
public interface Resource {
public String GetResPath();//只定义了这么一个方法,研究而已。
}
==============================================
private String ResPath; //定义一个属性.
ResPath = xmlpath;//设置资源位置的 构造器;
}
public String GetResPath() {
return ResPath; //返回资源地址
}
//是否是最简单的实现而已,我们这里只做理论研究,商业完善的事情以后再做.
===================================================
//同样BeanFactory 也是个接口。
package org.dong.core;
public interface BeanFactory {
Object getBean(String string);//还是定义一个方法,研究研究
}
4 XmlBeanFactory.java
=============================================================
package org.dong.core;
//这个实现就是我们的最核心的内容了,说穿了吧,学习曲线很平吧
public class XmlBeanFactory implements BeanFactory {
private String ResPath;
private static DongXmlOp XmlOp;
public XmlBeanFactory(Resource Res) {
ResPath = Res.GetResPath();
XmlOp = new DongXmlOp(ResPath);
}
public Object getBean(String string) {
Bean tmpBean;
tmpBean = XmlOp.GetBeanByID(string);
try {
Class rtnClass = Class.forName(tmpBean.getBeanClass());
//tempBean.getBeanClass()="user" or "userNew" in the DongContext.xml
Object rtnInstance= rtnClass.newInstance();
//在这里就可以实现Singleton了,呵呵,把这个Object保存在一个List里久可以咯.
//下次再getbean的时候先看看List里有没有就可以了
//这里是最重要的一句话,反射的精髓
return rtnInstance;
} catch (Exception e) {
System.err.println(e);
}
return tmpBean;
}
}
=============================================================
还有一个自己写的一个文件操作类,来解释那个特定的XML,当然XML的解析就值得我们去研究两天了,所以在这里我自己写了一个,发明了一个轮子,好用又方便,半小时搞定。
============================================================
package org.dong.core;
import java.io.BufferedReader;
import java.io.FileNotFoundException;
import java.io.FileReader;
import java.io.IOException;
import java.util.ArrayList;
// Michael yao
// 2006-4-25**11:56:02
//
public class DongXmlOp {
private static StringBuffer FileContent = new StringBuffer();
private static String XmlPath;
public DongXmlOp(String ResPath) {
XmlPath = ResPath; //这里是构造器
}
public static StringBuffer ReadXml() {//把XML读入StringBuffer
try {
StringBuffer rtnBuf = new StringBuffer(); // 返回一个StringBuffer
// rtnBuf
FileReader fr = new FileReader(XmlPath);
//其实就是FileReader的用法,很好用,这个轮子我就收下了
BufferedReader br = new BufferedReader(fr);
//其实就是BufferedReader的用法,也很好用
String line = br.readLine();
while (line != null) {
rtnBuf.append(line);
line = br.readLine();
}
br.close();
fr.close();
return rtnBuf;//这里返回
} catch (FileNotFoundException e) {
System.err.println(e);
} catch (IOException e) {
// TODO Auto-generated catch block
System.err.println(e);
}
return null;
}
// Michael yao
// 2006-4-25**11:55:37
// Email:myao@
public Bean GetBeanByID(String id) {
//这里是解释XML到一个自定义的Bean类的方法,代码混乱了一点,没什么东西
FileContent = ReadXml();
StringBuffer beanContent = new StringBuffer();
Bean tmpbean = new Bean();
String BeanStartTag = "<bean ";
String BeanEndTag = "</bean>";
String IDtag = "id=/"" + id + "/"";
//在java " 的表示方法就是 /" 这点注意了。
int pos = 0;
pos = FileContent.indexOf(IDtag, pos);
int end = FileContent.indexOf(BeanEndTag, pos);
beanContent.append(BeanStartTag + FileContent.substring(pos, end)
+ BeanEndTag);
String BeanClass = null;
String ClassTag = "class=/"";
String PropertyTag = "<property ";
pos = 0;
pos = beanContent.indexOf(ClassTag, pos) + ClassTag.length();
end = beanContent.indexOf("/"", pos);
BeanClass = beanContent.substring(pos, end);
ArrayList tmpList = new ArrayList();
String[] para = new String[2];
pos = 1;
int pos1 = 0;
while (pos > 0) { //获得属性为一个ArrayList
pos = beanContent.indexOf(PropertyTag, pos) + PropertyTag.length();
if (pos < PropertyTag.length())
break;
pos = beanContent.indexOf("name=/"", pos) + 6;
end = beanContent.indexOf("/"", pos);
para[0] = beanContent.substring(pos, end);// 属性名称
pos1 = beanContent.indexOf("<value>", end) + 7;
end = beanContent.indexOf("</value>", pos1);
para[1] = beanContent.substring(pos1, end);// 属性名称
tmpList.add(para);
}
tmpbean.setBeanClass(BeanClass);
tmpbean.setBeanPropertys(tmpList);
return tmpbean;//踢出去,哈哈
}
}
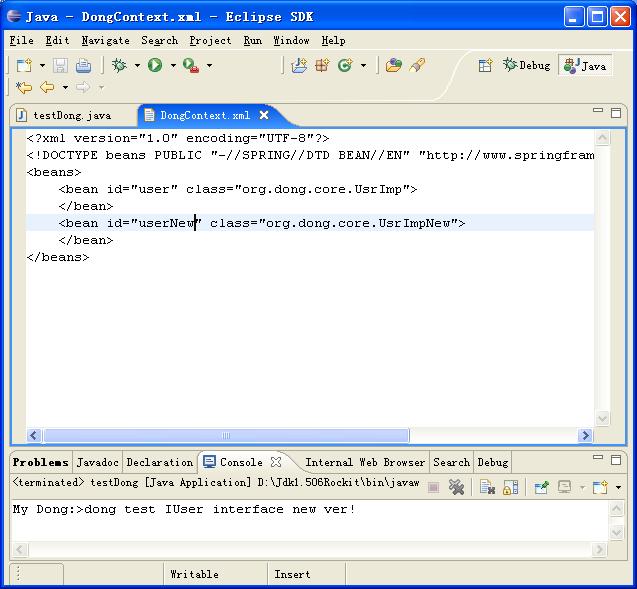
<!DOCTYPE beans PUBLIC "-//SPRING//DTD BEAN//EN" "http://www.springframework.org/dtd/spring-beans.dtd">
<beans>
<bean id="user" class="org.dong.core.UsrImp">
</bean>
<bean id="userNew" class="org.dong.core.UsrImpNew">
</bean>
</beans>
=========================================================================
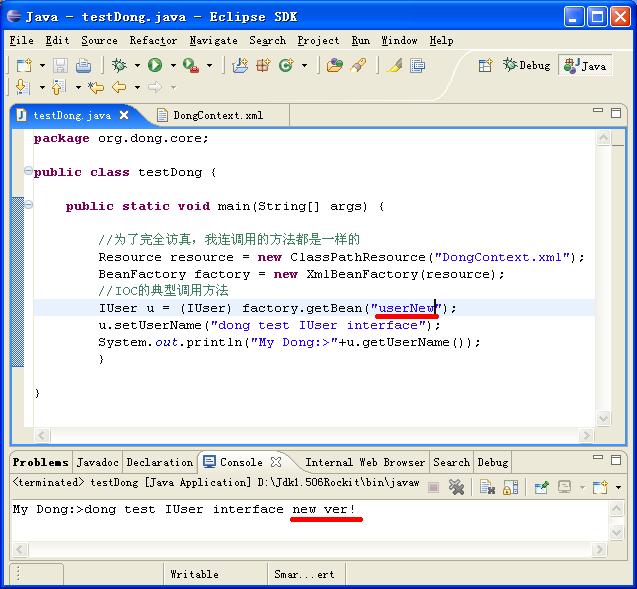
//知道为什么要基于Interface来编了?还没有么?看下面的黑体字
看看这几句
package org.dong.core;
public class testDong {
public static void main(String[] args) {
//为了完全访真,我连调用的方法都是一样的
Resource resource = new ClassPathResource("DongContext.xml");
BeanFactory factory = new XmlBeanFactory(resource);
//IOC的典型调用方法
IUser u = (IUser) factory.getBean("userNew");
//如果采用常规的方法写程序,在这里光调用就可以 invoke死你
//给您一个常规调用的方法看看,用Interface的思想就可以把mothod 和 invoke 两个东西以及“参数设置”完全绕过去,真是优雅的方法!!!!
/*
String str = "Rstay";
String content = "Michael test Jvm " ;
String impClass = "myao.testRef";
Class params[] = new Class[1];
try {
Class c = Class.forName(impClass);
rfservice a = (rfservice)c.newInstance();
params[0]= Class.forName("java.lang.String");
Method m1 = c.getMethod(str, params);
Object argss[] = new Object[1];
argss[0] = content;
System.out.println(m1.invoke(a, argss));
} catch (Throwable e) {
System.err.println(e);
}
*/
u.setUserName("dong test IUser interface");
System.out.println("My Dong:>"+u.getUserName());
}
}
import java.util.ArrayList;
public class Bean {
Bean(){
}
private String BeanClass = null;
private String BeanMethod = null;
private ArrayList BeanPropertys = new ArrayList();
public String getBeanClass() {
return BeanClass;
}
public void setBeanClass(String beanClass) {
BeanClass = beanClass;
}
public String getBeanMethod() {
return BeanMethod;
}
public void setBeanMethod(String beanMethod) {
BeanMethod = beanMethod;
}
public ArrayList getBeanPropertys() {
return BeanPropertys;
}
public void setBeanPropertys(ArrayList beanPropertys) {
BeanPropertys = beanPropertys;
}
}
==========================================================


 60
60


 被折叠的 条评论
为什么被折叠?
被折叠的 条评论
为什么被折叠?
 到【灌水乐园】发言


