


参考文章:
We can divide the process of image augmentation into four steps:
1.导入albumentations和 a library库以从磁盘读取图像(例如,OpenCV)。
2.Define an augmentation pipeline 管道.
3.Read images from the disk.
4.Pass images to the augmentation pipeline and receive augmented images.
Step 1. Import the required libraries.
- Import Albumentations
import albumentations as A- Import a library to read images from the disk. In this example, we will use OpenCV. It is an open-source computer vision library that supports many image formats. Albumentations has OpenCV as a dependency, so you already have OpenCV installed.
import cv2Step 2. Define an augmentation pipeline.
To define an augmentation pipeline, you need to create an instance实例 of the Compose class. As an argument to the Compose class, you need to pass a list of augmentations you want to apply. A call to Compose will return返回 a transform function转换函数 that will perform image augmentation执行图像增强.
Let's look at an example:
transform = A.Compose([
    A.RandomCrop(width=256, height=256),
    A.HorizontalFlip(p=0.5),
    A.RandomBrightnessContrast(p=0.2),
])
To create an augmentation, you create an instance of the required augmentation class and pass augmentation parameters to it. A.RandomCrop receives two parameters, height and width. A.RandomCrop(width=256, height=256) means that A.RandomCrop will take an input image, extract a random patch with size 256 by 256 pixels from it and then pass the result to the next augmentation in the pipeline (in this case to A.HorizontalFlip).
A.HorizontalFlip in this example has one parameter named p. p is a special parameter that is supported by almost all augmentations扩充. It controls the probability of applying the augmentation. p=0.5 means that with a probability of 50%, the transform will flip the image horizontally, and with a probability of 50%, the transform won't modify the input image.
A.RandomBrighntessContrast in the example also has one parameter, p. With a probability of 20%, this augmentation will change the brightness 亮度和对比度 and contrast of the image received from A.HorizontalFlip. And with a probability of 80%, it will keep the received image unchanged.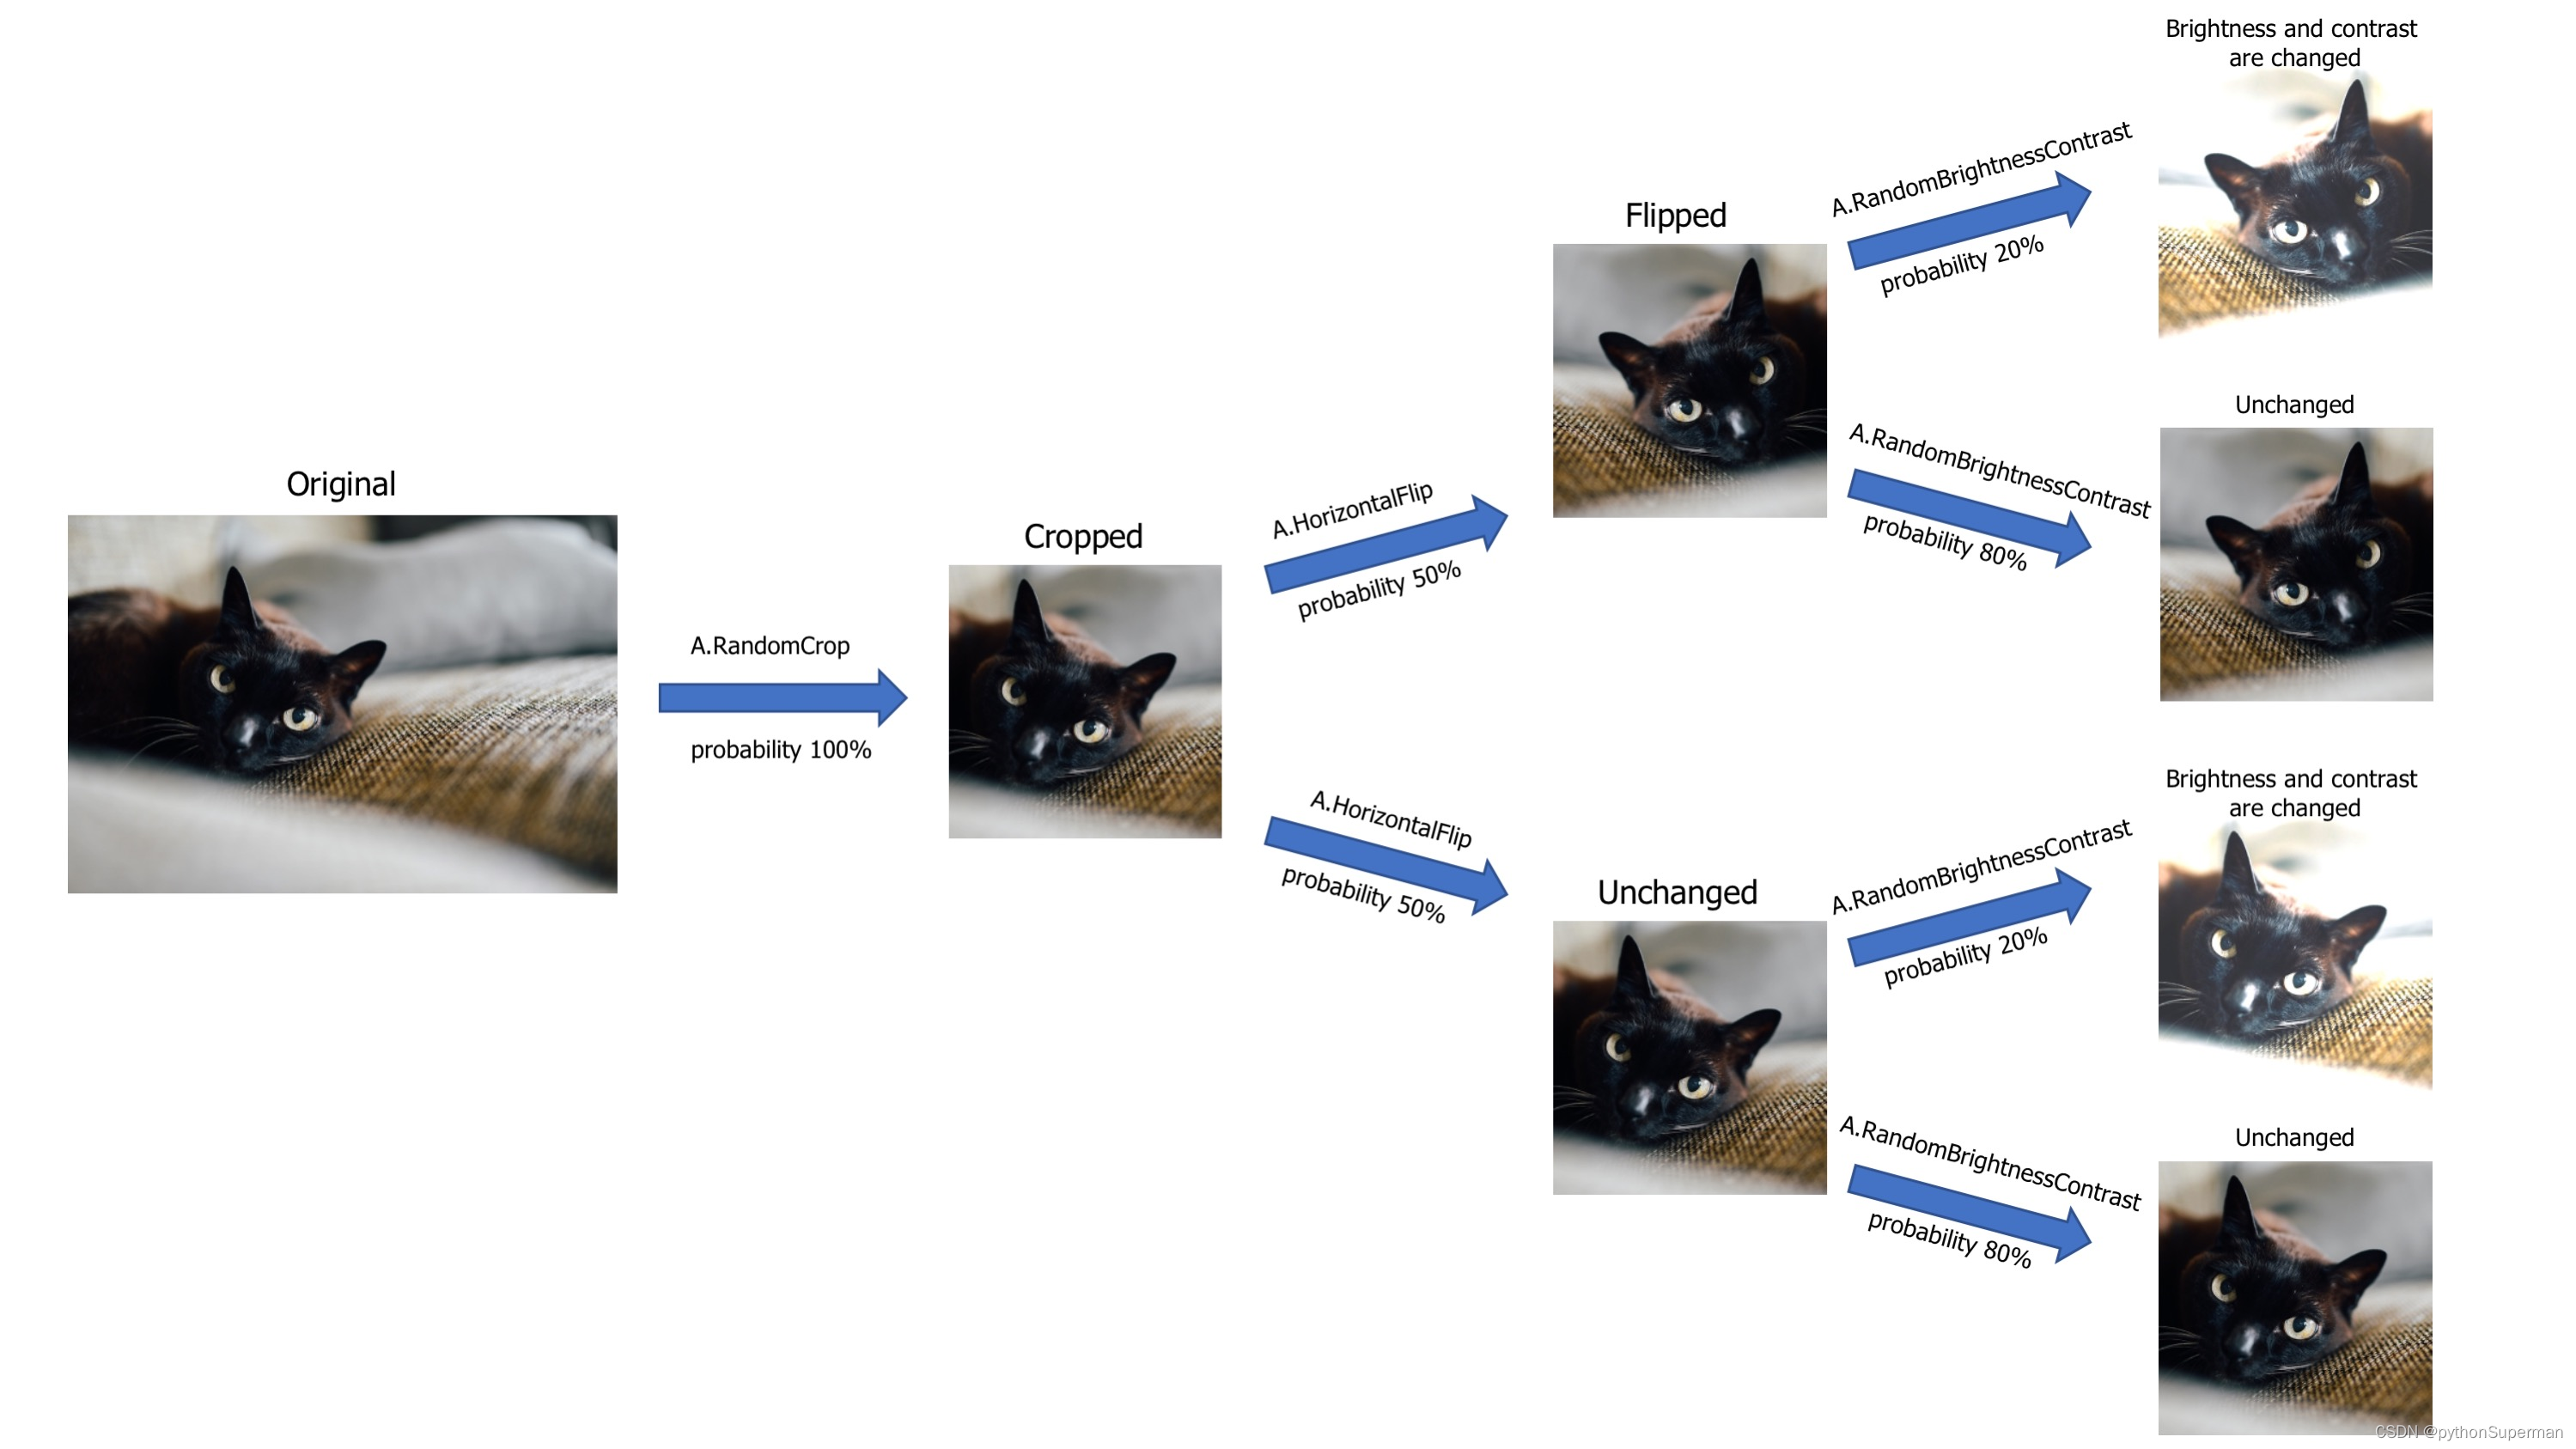
A visualized version of the augmentation pipeline. You pass an image to it, the image goes through all transformations, and then you receive an augmented image from the pipeline.
Step 3. Read images from the disk.
To pass an image to the augmentation pipeline, you need to read it from the disk. The pipeline expects to receive an image in the form of a NumPy array. If it is a color image, it should have three channels in the following order: Red, Green, Blue (so a regular RGB image).
To read images from the disk, you can use OpenCV - a popular library for image processing. It supports a lot of input formats and is installed along with Albumentations 并与相册一起安装 since Albumentations utilizes that library under the hood for a lot of augmentations.因为相册在后台使用该库进行大量扩充
To import OpenCV
import cv2To read an image with OpenCV
image = cv2.imread("/path/to/image.jpg")
image = cv2.cvtColor(image, cv2.COLOR_BGR2RGB)
Note the usage of cv2.cvtColor. For historical reasons, OpenCV reads an image in BGR format (so color channels of the image have the following order 以下顺序: Blue, Green, Red). Albumentations uses the most common and popular RGB image format. So when using OpenCV, we need to convert the image format to RGB explicitly.
Besides OpenCV, you can use other image processing libraries.
Pillow
Pillow is a popular Python image processing library.
- Install Pillow
pip install pillow
- Import Pillow and NumPy (we need NumPy to convert a Pillow image to a NumPy array. NumPy is already installed along with Albumentations).
from PIL import Image
import numpy as np
- Read an image with Pillow and convert it to a NumPy array.
pillow_image = Image.open("image.jpg")
image = np.array(pillow_image)
Step 4. Pass images to the augmentation pipeline and receive augmented images.
To pass an image to the augmentation pipeline you need to call the transform function created by a call to A.Compose at Step 2. In the image argument to that function, you need to pass an image that you want to augment.
transformed = transform(image=image)transform will return a dictionary with a single key image. Value at that key will contain an augmented image一个带有单个关键字图像的字典.
transformed_image = transformed["image"]To augment the next image, you need to call transform again and pass a new image as the image argument:
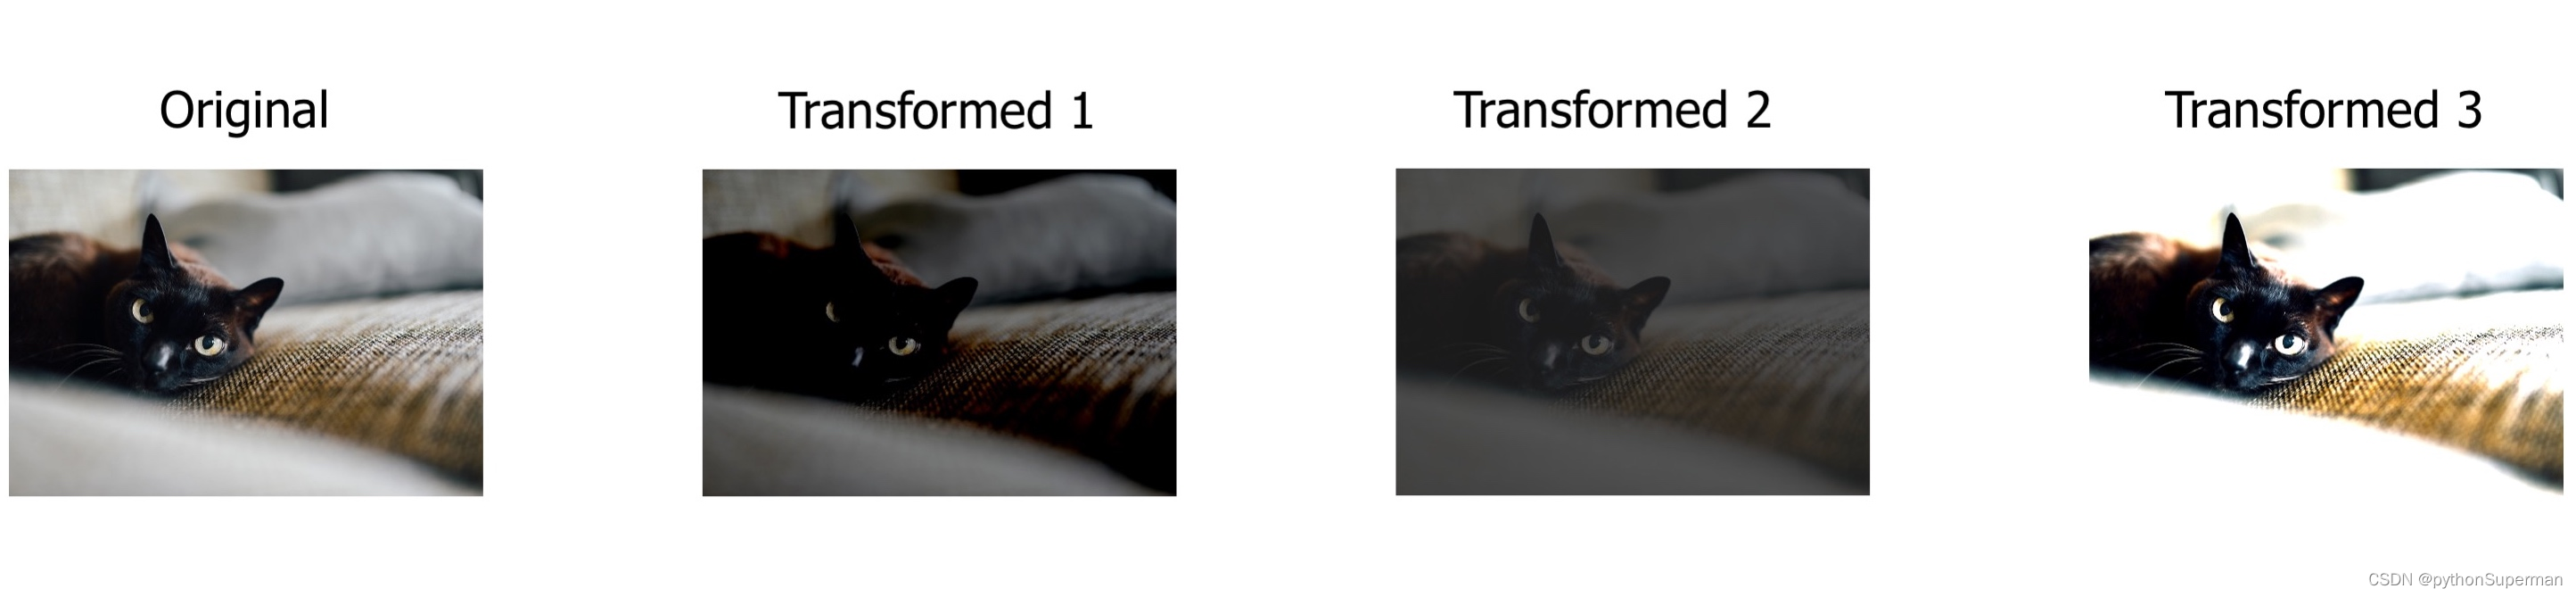
another_transformed_image = transform(image=another_image)["image"]如果您多次调用同一个输入图像进行转换,每次都会得到不同的输出图像。
transform = A.Compose([
    A.RandomBrightnessContrast(brightness_limit=1, contrast_limit=1, p=1.0),
])
transformed_image_1 = transform(image=image)['image']
transformed_image_2 = transform(image=image)['image']
transformed_image_3 = transform(image=image)['image']


 被折叠的 条评论
为什么被折叠?
被折叠的 条评论
为什么被折叠?
 到【灌水乐园】发言


