


手头上有个树莓派4B,4G运存的,正好可以试试用Ollama部署一个AI本地模型来运行,在结合VOSK的语音模型来实现语音输入,话不多说开始实现
首先先在你的树莓派上安装好ollama的,这玩意可以用来留专门的接口方便运行ai大模型,要在树莓派上运行得专门去下载arm64的版本,官网的版本好像不匹配,直接去ollama的Github仓库拉下指定版本的就好了
curl -L -o ollama-linux-arm64.tar.gz https://github.com/ollama/ollama/releases/download/v0.6.5/ollama-linux-arm64.tar.gz如果配置了镜像源也网络超时下载不下来你还不会配置VPN去访问GitHub,可以用手头上的Windows设备,直接去Releases · ollama/ollama找到下图的
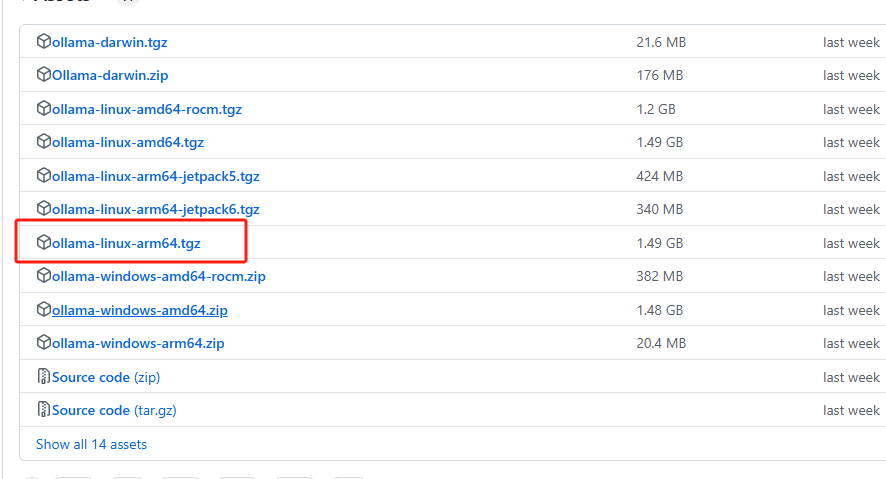 下载下来,然后保证树莓派和你的Windows电脑连接到同一局域网下使用scp协议传输到树莓派上解压就好,下载完之后在文件夹打开cmd或者powershell;记得替换你的文件名称和你的ip地址,文件地址最好就选择用户名下的bin目录;
scp ollama.tgz lllj@192.168.1.10:/home/lllj/bin解压解压
tar -xvzf ollama-linux-arm64.tar.gz
解压完成后执行
file ~/bin/ollama如果是,有这个ARM aarch64字样就说明你没下载错,下载错别的版本如X86就无法在树莓派上运行了;
/home/lllj/bin/ollama: ELF 64-bit LSB pie executable, ARM aarch64, version 1 (GNU/Linux), dynamically linked, interpreter /lib/ld-linux-aarch64.so.1, for GNU/Linux 3.7.0, Go BuildID=Jb7nnLF3PBdftdQyWPtl/Xws92QMEVy2RnYED8DB6/VjT4-i1w34fsPZfQ4byW/0e8rJIANWdvOj-svqwUA, BuildID[sha1]=ad716f4cd9e63506e872e50e2133aa76d8015565, stripped执行以下命令开启ollama服务,接下来就可以拉模型下来了;
ollama serve另开一个终端,ollama serve保持运行,输入命令;默认拉取的是qwen0.5b的模型,你也可以指定拉取别的模型,但是0.5b就已经让树莓派4b运行的有点吃力了;
ollama pull qwen接下来就是漫长的等待,Ollama部署大模型的好处就是不用像docker那么麻烦,适合我这种小白,使用Ollama只要对特定的本地端口(127.0.0.1:11434)发送Json结构体发请求,然后等待AI的回复就可以;
当拉取完模型之后,就可以直接执行,
ollama run qwen:0.5b为了方便以后直接运行我写了一个简单的shell脚本,先执行
sudo nano run_ollama.sh输入以下命令,按下Ctrl+O,按回车确认,按Ctrl+X退出,以后直接跑这个shell脚本就行;
#!/bin/sh

ollama serve &

sleep 3
ollama run qwen:0.5b
echo "########### finish ############"

sleep 9999d
接下来就可以直接在终端和ai模型对话了;当然我也用qt写了一个交互界面,在终端聊天就显得有点糙了,源码在我的代码仓库:llljllj/LlamaBerry: Local AI voice chat model developed based on Raspberry Pi,原理就是使用Qprocess模拟终端输入命令执行我的shell脚本,再用QNetworkAccessManager发http请求发个json结构体给127.0.0.1:11434本地端口交互就可以了,不过这个初始版本有点low;但是还是把vosk语音交互模型先部署好;
为啥不用Openai的Whisper,因为这玩意一直识别不出来我在说什么,只能去用vosk发现效果也还可以;可以不用编译vosk的api,因为里面的Kaldi太大了,树莓派有点吃不消而且也用不上,直接拉一个支持识别中文的小模型下来就行,下面是官网;
和上面一样,找到,这个小模型足够了,用scp发给你的树莓派并且解压;
因为你没有编译VOSK的api所以没法直接用c++调这个模型,但是可以直接通过python的虚拟环境安装个vosk的库就行,这玩意就没有Kaldi,下载速度很快;
如果你没有virtualenv,先下载
python3 -m pip install virtualenv
然后建一个自己的虚拟环境,并激活;
#创建虚拟环境
virtualenv myenv
#激活
source myenv/bin/activate
然后直接下vosk的库就ok
sudo pip install vosk我自己的库环境如下,缺什么下什么
(voskenv) lllj@raspberrypi:~/bin $ pip list
Package            Version
------------------ ---------
certifi            2025.1.31
cffi               1.17.1
charset-normalizer 3.4.1
idna               3.10
pip                23.0.1
pycparser          2.22
requests           2.32.3
setuptools         66.1.1
srt                3.5.3
tqdm               4.67.1
urllib3            2.4.0
vosk               0.3.45
websockets         15.0.1
直接写段python的代码调这个模型,把你录音的wav转化为txt看看效果,当然你要注意你ai模型的位置,还有树莓派的3.5毫米耳机孔不支持麦克风录制,只能用usb的接口接麦克风录制;
#录音
arecord -D plughw:1,0 -f cd -t wav -d 10 -r 44100 test.wav
#python调vosk
import vosk
from vosk import Model, KaldiRecognizer
import wave
import os
import json

# 加载模型
model_path = "../vosk-model-small-cn-0.22"
model = Model(model_path)

# 初始化识别器
rec = KaldiRecognizer(model, 16000)

# 音频路径
audio_path = 'out.wav'
output_text_path = 'out.txt'

# 检查音频是否存在
if not os.path.exists(audio_path):
    print(f"音频文件 {audio_path} 不存在!")
    exit(1)

full_text = []  # 用于累积识别内容

# 打开音频
with wave.open(audio_path, 'rb') as wave_file:
    while True:
        data = wave_file.readframes(4000)
        if len(data) == 0:
            break
        if rec.AcceptWaveform(data):
            partial_result = rec.Result()
            text = json.loads(partial_result).get('text', '')
            if text:
                full_text.append(text)

    # 最后处理 FinalResult
    final_result = rec.FinalResult()
    final_text = json.loads(final_result).get('text', '')
    if final_text:
        full_text.append(final_text)

# 保存到 out.txt
with open(output_text_path, 'w', encoding='utf-8') as f:
    f.write(' '.join(full_text))

print(f"识别内容已保存到 {output_text_path}")
接下来就可以直接在QT C++里直接调这个python文件来用,我用的python库比较麻烦,python库的slots和QT库的slots宏冲突了只能先取消QT的宏定义,引入python库之后恢复定义,当然也可以直接用Qprocess模拟终端命令,这样也方便一点
//ollama.h
#pragma once
#include <QTextCodec>
#include <QWidget>
#include <QPushButton>
#include <QLineEdit>
#include <QTextEdit>
#include <QVBoxLayout>
#include <QProcess>
#include <QNetworkAccessManager>
#include <QNetworkReply>
#include <QLabel>
#include <QPixmap>
#include <QTimer>
#ifdef slots
#undef slots
#endif

extern "C" {
    #include <Python.h>
}

#define slots Q_SLOTS  // 恢复宏定义


class AiChatWindow : public QWidget
{
    Q_OBJECT

public:
    AiChatWindow(QWidget *parent = nullptr);
    QNetworkReply* currentReply = nullptr;

private slots:
    void onStartClicked();
    void onSendClicked();
    void onReplyFinished(QNetworkReply *reply);
    void onProcessOutput();
    void onReplyStreamReady();
    void onVoiceInputClicked();
    void onWhisperFinished();

private:
    QPushButton *voiceButton;
    QPushButton *startButton;
    QPushButton *sendButton;
    QLineEdit *inputBox;
    QTextEdit *outputArea;
    QLabel *process_pic;
    QProcess process;
    QNetworkAccessManager *networkManager;
    QStringList history;
    QString lastUserInput;
    QString fullResponse;
};
//ollama.cpp
#include "ollama.h"
#include <QJsonDocument>
#include <QJsonObject>
#include <QNetworkRequest>
#include <QDebug>
#include <QThread>
#include <QDir>
AiChatWindow::AiChatWindow(QWidget *parent) : QWidget(parent)
{
voiceButton = new QPushButton("语音转文字", this);
connect(voiceButton, &QPushButton::clicked, this, &AiChatWindow::onVoiceInputClicked);
startButton = new QPushButton("启动qwen", this);
inputBox = new QLineEdit(this);
inputBox->setPlaceholderText("输入你的问题");
sendButton = new QPushButton("发送", this);
outputArea = new QTextEdit(this);
outputArea->setReadOnly(true);
process_pic = new QLabel(this);
QVBoxLayout *vlayout = new QVBoxLayout;
vlayout->addWidget(startButton);
vlayout->addWidget(inputBox);
vlayout->addWidget(sendButton);
vlayout->addWidget(outputArea);
vlayout->addWidget(voiceButton);
QHBoxLayout *hlayout = new QHBoxLayout(this);
hlayout->addLayout(vlayout);
hlayout->addWidget(process_pic);
process_pic->setStyleSheet("border: 2px solid red;");
QPixmap pixmap("/home/lllj/Desktop/ollama_qt_cpp/LlamaBerry/1.jpg");
process_pic->setPixmap(pixmap);
process_pic->setFixedSize(600, 800);
process_pic->setScaledContents(true);
this->setStyleSheet(R"(
QWidget {
background-color: #0f111a; /* 深色背景 */
color: #ffffff; /* 默认字体白色 */
font-family: 'Roboto', 'Noto Sans CJK SC', sans-serif;
font-size: 14px;
}
QPushButton {
min-height: 36px;
padding: 8px 16px;
border-radius: 8px;
background: qlineargradient(x1:0, y1:0, x2:1, y2:1,
stop:0 #00c6ff, stop:1 #0072ff);
color: white;
font-weight: bold;
border: 1px solid #00c6ff;
}
QPushButton:hover {
background: qlineargradient(x1:0, y1:0, x2:1, y2:1,
stop:0 #0072ff, stop:1 #00c6ff);
}
QPushButton:pressed {
background-color: #003d99;
}
QLineEdit {
background: rgba(255,255,255,0.05);
border: 1px solid #00c6ff;
border-radius: 8px;
padding: 8px;
color: #00eaff;
selection-background-color: #005f87;
selection-color: white;
}
QTextEdit {
background: rgba(255,255,255,0.05);
border: 1px solid #00c6ff;
border-radius: 8px;
padding: 10px;
color: #00eaff;
font-family: Consolas, 'Courier New', monospace;
font-size: 14px;
}
QScrollBar:vertical {
width: 8px;
background: #1e1f29;
}
QScrollBar::handle:vertical {
background: #00c6ff;
min-height: 20px;
border-radius: 4px;
}
QScrollBar::handle:vertical:hover {
background: #00eaff;
}
)");
networkManager = new QNetworkAccessManager(this);
inputBox->setAttribute(Qt::WA_InputMethodEnabled, true);
connect(inputBox, &QLineEdit::returnPressed, this, &AiChatWindow::onSendClicked);
connect(startButton, &QPushButton::clicked, this, &AiChatWindow::onStartClicked);
connect(sendButton, &QPushButton::clicked, this, &AiChatWindow::onSendClicked);
connect(networkManager, &QNetworkAccessManager::finished, this, &AiChatWindow::onReplyFinished);
}
void AiChatWindow::onVoiceInputClicked()
{
outputArea->append("开始录音中...");
// Step 1: 录音
QString recordCommand = "arecord -D hw:0,0 -f S16_LE -r 16000 -c 1 -d 5 /home/lllj/Desktop/ollama_qt_cpp/LlamaBerry/out.wav";
QProcess::execute(recordCommand);
outputArea->append("录音结束,正在识别...");
// Step 2: 调用 Python 脚本进行语音识别
QString pythonScript = "/home/lllj/Desktop/ollama_qt_cpp/LlamaBerry/vosktest.py";
QProcess process;
process.start("python3", QStringList() << pythonScript);
process.waitForFinished(); // 等待 Python 进程执行完毕
// 等待 out.txt 文件出现
QString outputPath = "/home/lllj/Desktop/ollama_qt_cpp/LlamaBerry/out.txt";
QFile file(outputPath);
int timeout = 5000; // 最多等5秒
int elapsed = 0;
while (!file.exists() && elapsed < timeout) {
QThread::msleep(100); // 休眠100ms
elapsed += 100;
}
// 确保在文件不存在时重新启动识别
if (!file.exists()) {
outputArea->append("未生成 out.txt 文件,可能是识别过程出错!");
return;
}
// 继续打开读取
if (file.open(QIODevice::ReadOnly | QIODevice::Text)) {
QString recognizedText = file.readAll();
outputArea->append("语音识别结果:" + recognizedText);
// 将识别结果作为问题输入到文本框
inputBox->setText(recognizedText);
onSendClicked(); // 自动发送
file.close();
// 识别完删除 out.txt
file.remove();
} else {
outputArea->append("无法读取识别结果");
}
}
void AiChatWindow::onWhisperFinished()
{
QString textPath = QDir::homePath() + "/Desktop/ollama_qt_cpp/LlamaBerry/input.wav.txt";
QFile file(textPath);
if (file.open(QIODevice::ReadOnly | QIODevice::Text)) {
QString content = QString::fromUtf8(file.readAll()).trimmed();
file.close();
if (!content.isEmpty()) {
inputBox->setText(content);
outputArea->append("识别结果: " + content);
onSendClicked();
} else {
outputArea->append("语音识别失败:空内容。");
}
} else {
outputArea->append("无法读取识别结果文件!");
}
}
void AiChatWindow::onStartClicked()
{
QString scriptPath = QDir::homePath() + "/Desktop/ollama-chatgpt-web/run_ollama.sh";
process.setWorkingDirectory(QDir::homePath() + "/Desktop/ollama-chatgpt-web");
process.start(scriptPath);
if (process.waitForStarted()) {
outputArea->append(" 已尝试启动 run_ollama.sh...");
connect(&process, &QProcess::readyReadStandardOutput, this, &AiChatWindow::onProcessOutput);
} else {
outputArea->append(" 启动失败!请检查路径或权限。");
}
}
void AiChatWindow::onProcessOutput()
{
QByteArray output = process.readAllStandardOutput();
outputArea->append("[AI 启动日志] " + QString::fromUtf8(output));
}
void AiChatWindow::onSendClicked()
{
QString userInput = inputBox->text().trimmed();
if (userInput.isEmpty()) {
outputArea->append("请输入内容再发送!");
return;
}
outputArea->append("你: " + userInput+"\n"+"LJ:");
inputBox->clear();
QPixmap pixmap("/home/lllj/Desktop/ollama_qt_cpp/LlamaBerry/think.jpg");
process_pic->setPixmap(pixmap);
process_pic->setFixedSize(600, 800);
process_pic->setScaledContents(true);
QJsonObject json;
json["model"] = "qwen:0.5b";
json["prompt"] = userInput;
json["stream"] = true; // 开启流式
QNetworkRequest request(QUrl("http://localhost:11434/api/generate"));
request.setHeader(QNetworkRequest::ContentTypeHeader, "application/json");
QJsonDocument doc(json);
QByteArray data = doc.toJson();
// 保存 reply 对象用于后续处理
currentReply = networkManager->post(request, data);
// 绑定 readyRead 信号用于处理流式响应
connect(currentReply, &QNetworkReply::readyRead, this, &AiChatWindow::onReplyStreamReady);
// 最终完成时释放资源
connect(currentReply, &QNetworkReply::finished, currentReply, &QNetworkReply::deleteLater);
}
void AiChatWindow::onReplyStreamReady()
{
static QString pendingText;
static QTimer *timer = nullptr;
while (currentReply->bytesAvailable()) {
QByteArray chunk = currentReply->readLine().trimmed();
if (chunk.isEmpty()) continue;
QJsonParseError err;
QJsonDocument doc = QJsonDocument::fromJson(chunk, &err);
if (err.error == QJsonParseError::NoError && doc.isObject()) {
QString content = doc["response"].toString();
pendingText += content;
}
}
if (!timer) {
timer = new QTimer(this);
connect(timer, &QTimer::timeout, this, [=]() mutable {
if (!pendingText.isEmpty()) {
QString nextChar = pendingText.left(1);
pendingText.remove(0, 1);
outputArea->moveCursor(QTextCursor::End);
outputArea->insertPlainText(nextChar);
} else {
timer->stop();
}
});
}
if (!timer->isActive()) {
timer->start(20); //
}
}
void AiChatWindow::onReplyFinished(QNetworkReply *reply)
{
if (reply->error()) {
outputArea->append("\n网络错误:" + reply->errorString());
} else {
outputArea->append("\n[流式回复结束]\n");
QPixmap pixmap("/home/lllj/Desktop/ollama_qt_cpp/LlamaBerry/1.jpg");
process_pic->setPixmap(pixmap);
process_pic->setFixedSize(600, 800);
process_pic->setScaledContents(true);
}
reply->deleteLater();
}源码都在 llljllj/LlamaBerry: Local AI voice chat model developed based on Raspberry Pi
使用qmake生成makefile,再make后运行编译出来的文件即可;
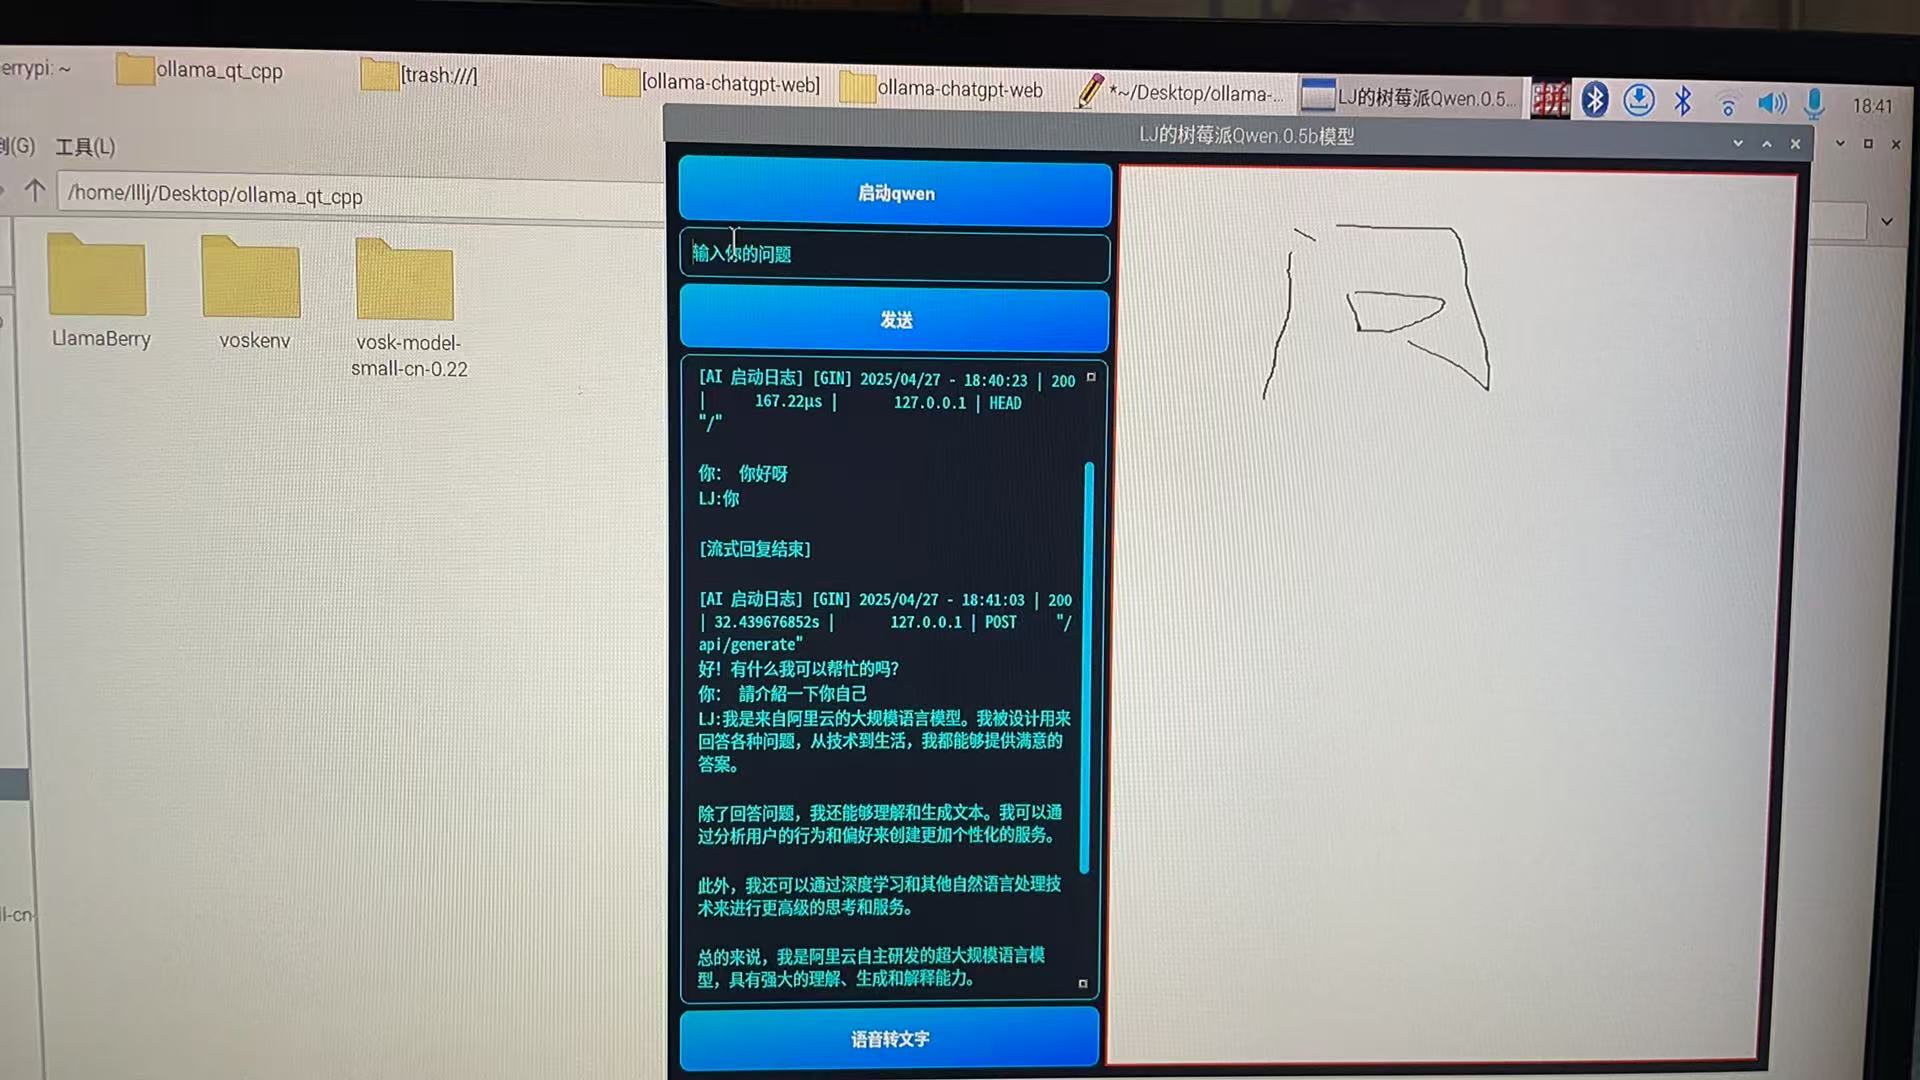
总的来说就是先用qt启动大模型然后在文本框发json结构体给指定的端口,或者是调用python启动vosk进行语音识别转化为txt再发送给ai,等待回复即可,代码已经启用流式回复,界面也还算凑合,树莓派4b跑起来有点吃力,不过也还凑合;如果你是通过ssh连接的树莓派并且想要在树莓派上启动你的界面,就先执行,来保证程序能正确运行;
export DISPLAY=:0如果要在qt程序里使用中文输入法,就先敲(替换为你的程序名称),不知道为什么用Qprocess执行这个命令没效果;
QT_IM_MODULE=fcitx ./ollama_qt 总的效果图如下:


 被折叠的 条评论
为什么被折叠?
被折叠的 条评论
为什么被折叠?
 到【灌水乐园】发言


