


项目中密码的存储
明文、密文
Jwt(JSON Web Token)简介
JWT是用于微服务之间传递用户信息的一段加密字符串,该字符串是一个JSON格式,各个微服务可以根据该JSON字符串识别用户的身份信息,这个JSON字符串可以封装用户的身份信息
JWT是目前最流行的跨域认证解决方案,适合前后端分离项目通过Restful API进行数据交互时进行身份认证
为什么使用JWT
首先在我的认知里 Jwt 用处最多的就是作为用户登陆的凭证,以往这个凭证是使用session和cookie进行存储的,session技术的存储在服务器端的一种技术,构造一个类似于哈希表存储用户id和用户的一些信息,将这个用户id放在cookie里返回给用户,用户每次登陆的时候带上这个cookie,在哈希表中如果可以查到信息,那么说明用户登陆并且得到对应用户的信息;
但是session存放在服务器端,当用户量很大时,占用了服务器过多的宝贵的内存资源。同时因为如果有多台服务器,那么当用户登陆时访问了服务器A,那么就只有服务器A上会存储这个用户的信息,当用户访问其他页面时,也许请求会发给服务器B,这时服务器B中是没有用户的信息的,会判定用户处于非登录的状态。也就是说session无法很好的在微服务的架构之中使用;
因为session是和cookie结合使用的,如果cookie被截获,那么就会存在安全危机。
JWT的优点
Json形式,而Json非常通用性可以让它在很多地方使用;
Jwt所占字节很小,便于传输信息;
需要服务器保存信息,易于扩展;
Jwt构成(.隔开)
eyJ0eXAiOiJKV1QiLCJhbGciOiJIUzI1NiJ9.
eyJleHAiOjE2MTkxNjQ4NjEsInVzZXJuYW1lIjoiYWRtaW4ifQ.
fo5a-H_C7XG3fSnNdCEMzM2QmrF5c7yypzoSxGzgJOo
Header(头部):
放有签名算法和令牌类型
- 头部用于描述JWT的基本信息,指定了令牌类型和加密算法
Payload(负载):
你在令牌上附带的信息:比如用户的姓名,这样以后验证了令牌之后就可以直接从这里获取信息而不用再查数据库了
负载是存放有效信息的地方
标准注册中的声明
iss: jwt签发者
sub: 当前令牌的描述说明
aud: 接收jwt的一方
exp: jwt的过期时间,过期时间必须大于签发时间
nbf: 定义在什么时间之前,该jwt都是不能使用的
iat: jwt的签发时间
jti: jwt的唯一身份标识
公共的声明
公共的声明可以添加任何信息,一般添加用户的相关信息或其他业务的必要信息,不建议添加敏感信息,因为该部分在客户端可解密
私有的声明
私有声明是提供者和消费者所共同定义的声明,不建议存放敏感的信息
Signature(签名):
对前两部分的签名,防止数据篡改
jwt的第三部分是一个签证信息,用于校验令牌是否被修改
签名信息由以下三个部分组成
-
- Header(Base64后的)
- Payload(Base64后的)
- Secret(秘钥)
- 签名的组成
-
-
- 头部信息Base64 + 载荷Base64 + Header中声明的加密方式进行加盐Secret组合加密,从而构成第三部分,也就是所谓的签名
-
交互流程
SpringBoot整合jwt操作
创建springboot项目
1,添加依赖
 <dependencies>
        <dependency>
            <groupId>org.springframework.boot</groupId>
            <artifactId>spring-boot-starter-security</artifactId>
        </dependency>
        <dependency>
            <groupId>org.springframework.boot</groupId>
            <artifactId>spring-boot-starter-web</artifactId>
        </dependency>
        <!-- jwt-->
        <dependency>
            <groupId>io.jsonwebtoken</groupId>
            <artifactId>jjwt</artifactId>
            <version>0.9.0</version>
        </dependency>
        <dependency>
            <groupId>org.projectlombok</groupId>
            <artifactId>lombok</artifactId>
            <optional>true</optional>
        </dependency>
        <dependency>
            <groupId>org.springframework.boot</groupId>
            <artifactId>spring-boot-starter-test</artifactId>
            <scope>test</scope>
        </dependency>
        <dependency>
            <groupId>org.springframework.security</groupId>
            <artifactId>spring-security-test</artifactId>
            <scope>test</scope>
        </dependency>
    </dependencies>
2,编写JWT工具类

3,测试类中编写代码测试

4,查看后台生成的token

使用vue+springboot完成jwt的登录验证
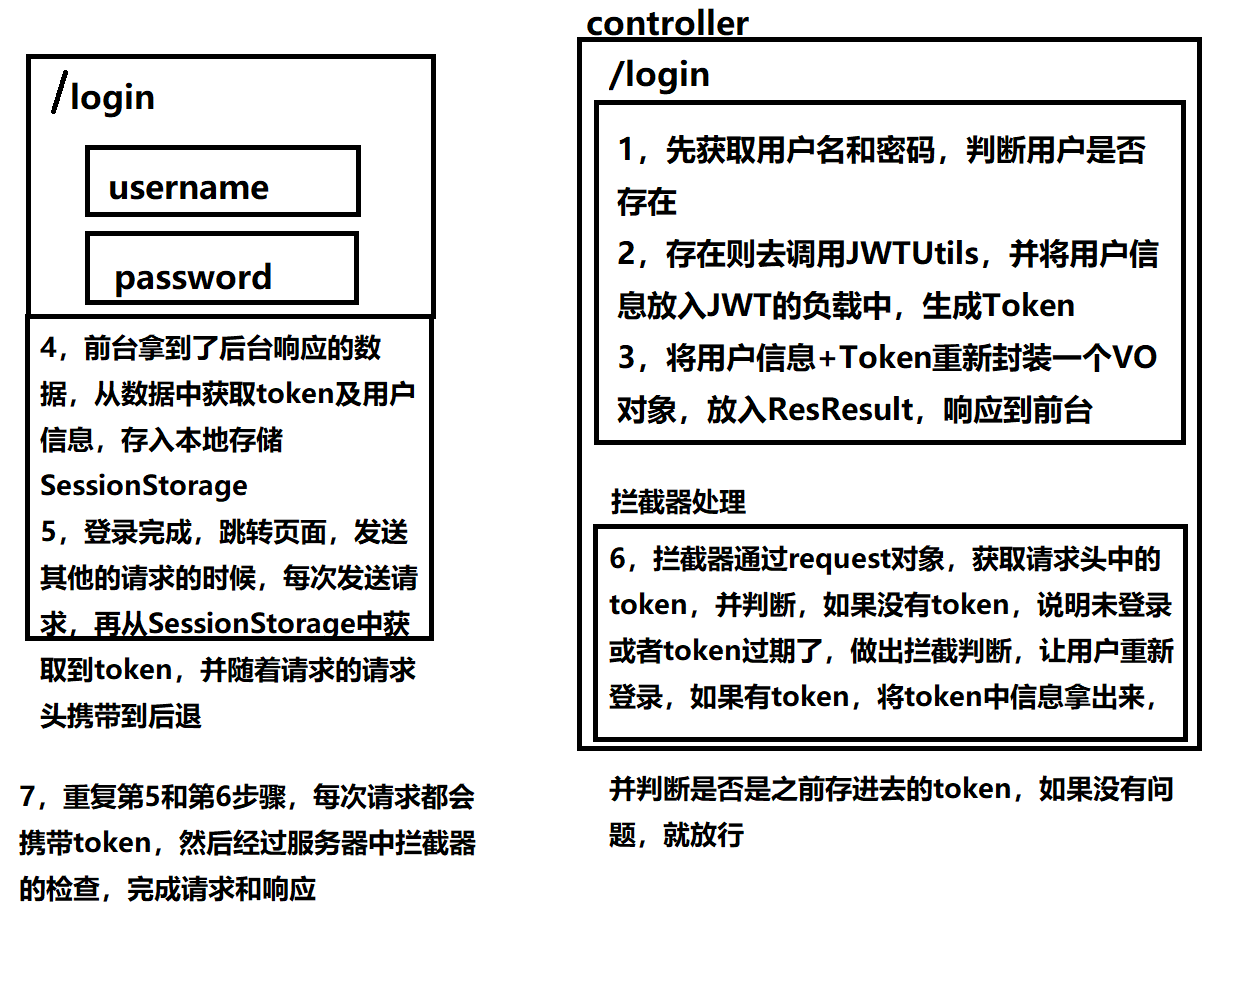
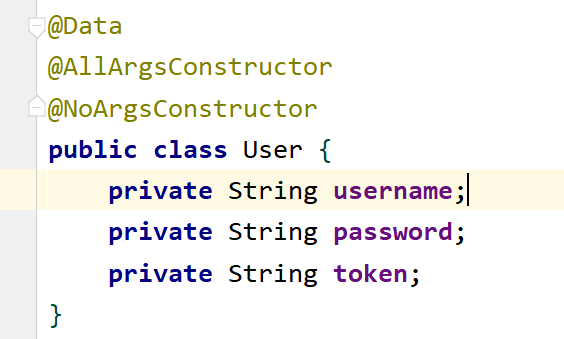
实体类
controller

跨域配置类
@Configuration
public class CorsConfig implements WebMvcConfigurer {
    @Override
    public void addCorsMappings(CorsRegistry registry) {
        // 设置允许跨域的路径
        registry.addMapping("/**")
                // 设置允许跨域请求的域名
                .allowedOriginPatterns("*")
                // 是否允许cookie
                .allowCredentials(true)
                // 设置允许的请求方式
                .allowedMethods("GET", "POST", "DELETE", "PUT")
                // 设置允许的header属性
                .allowedHeaders("*")
                // 跨域允许时间
                .maxAge(3600);

    }
}
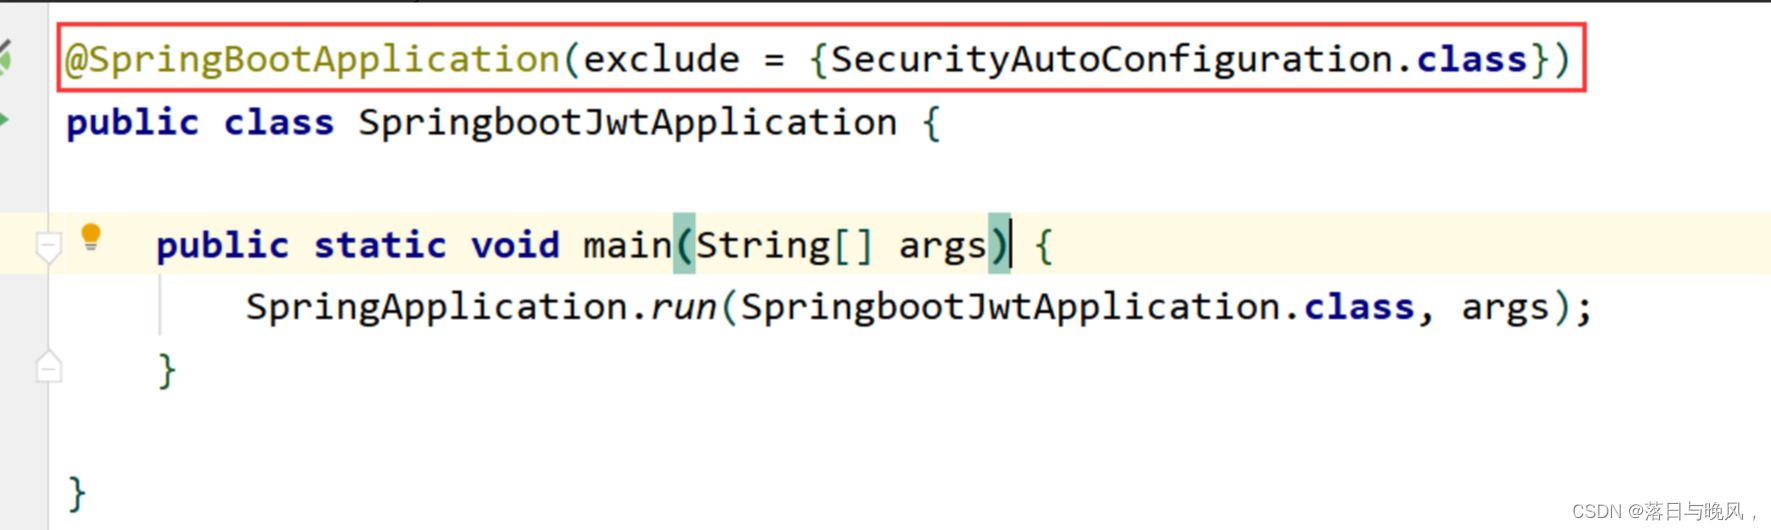
启动类排除security
vue部分
1,创建一个新的vue项目
2,添加elementUI和axios
vue add axios
cnpm install element-ui@2.6.3 -S
main.js
import ElementUI from 'element-ui';
import 'element-ui/lib/theme-chalk/index.css';


Vue.use(ElementUI);
3,编写登录界面 Login.vue
<template>
  <div>
    <el-form :model="ruleForm" status-icon :rules="rules" ref="ruleForm" label-width="100px" class="demo-ruleForm">
      <el-form-item label="用户名" prop="username">
        <el-input v-model="ruleForm.username"></el-input>
      </el-form-item>
      <el-form-item label="密码" prop="password">
        <el-input type="password" v-model="ruleForm.password" autocomplete="off"></el-input>
      </el-form-item>
      <el-form-item>
        <el-button type="primary" @click="submitForm('ruleForm')">提交</el-button>
      </el-form-item>
    </el-form>
  </div>
</template>

<script>


export default {
  data() {
    return {
      ruleForm: {
        username: '',
        password: '',
      },
      rules: {
        password: [
          { require:true,message:'请输入密码', trigger: 'blur' }
        ],
        username: [
          { require:true,message:'请输入用户名', trigger: 'blur'}
        ]
      }
    };
  },
  methods: {
    submitForm(formName) {
      this.$refs[formName].validate((valid) => {
        if (valid) {
          let _this=this
          axios.get('http://localhost:8181/login',{params:_this.ruleForm}).then(
              function (resp){
                console.log(resp.data)
              }
          )
        } else {
          console.log('error submit!!');
          return false;
        }
      });
    },
  }
}
</script>

<style scoped>

</style>
在index.js中注册

在地址栏输入/login去访问,看到后台返回的数据中,已经包含了token

token过期的测试
编写其他页面
HomeView.vue
<template>
  <div class="home">
    欢迎 {{admin.username}}
    <div id="nav">
      <router-link to="/about">下载</router-link>
    </div>
    <h1>这是首页</h1>
  </div>
</template>

<script>
// @ is an alias to /src


export default {
  data(){
      return {
        admin:''
      }
    },
  created() {
    this.admin=JSON.parse(window.localStorage.getItem('access-admin'))
  }
}
</script>
AboutView.vue
<template>
  <div class="about">
    欢迎 {{admin.username}}
    <div id="nav">
      <router-link to="/">首页</router-link>
    </div>
    <a href="">资源1</a> |
    <a href="">资源2</a> |
    <a href="">资源3</a> |
    <a href="">资源4</a> |
    <a href="">资源5</a> |
  </div>
</template>
<script>
export default {
  data(){
    return {
      admin:''
    }
  },
  created() {
    this.admin=JSON.parse(window.localStorage.getItem('access-admin'))
  }
}
</script>
Error.vue
<template>

</template>

<script>
export default {
  name: "Error",
  created() {
    let _this=this
    this.$alert('登录信息失效','提示',{
      confirmButtonText:'确定'
    }).then((response)=>{
      localStorage.removeItem('access-admin')
      _this.$router.replace({path:'/login'})
    })
  }
}
</script>

<style scoped>

</style>
修改Login.vue代码
  methods: {
    submitForm(formName) {
      this.$refs[formName].validate((valid) => {
        if (valid) {
          let _this=this
          axios.get('http://localhost:8181/login',{params:_this.ruleForm}).then(
              function (resp){
                console.log(resp)
                if(resp.data!=null){//成功获取
                  //将JSON转化成8-admin",JSON.stringify(resp.data))
                                 //跳转到登录页面
                   _this.$router.replace({path:'/'})
                  }
              }
          )
        } else {
          console.log('error submit!!');
          return false;
        }
      });
    },
  }
修改index.js注册路由
import Vue from 'vue'
import VueRouter from 'vue-router'
import HomeView from '../views/HomeView.vue'
import Login from '../views/Login.vue'
import Error from "@/views/Error";
Vue.use(VueRouter)

const routes = [
  {
    path: '/',
    name: 'Home',
    component: HomeView
  },
  {
    path: '/login',
    name: 'Login',
    component: Login
  },
  {
    path: '/error',
    name: 'Error',
    component: Error
  },
  {
    path: '/about',
    name: 'AboutView',
    // route level code-splitting
    // this generates a separate chunk (about.[hash].js) for this route
    // which is lazy-loaded when the route is visited.
    component: () => import(/* webpackChunkName: "about" */ '../views/AboutView.vue')
  }
]

const router = new VueRouter({
  mode: 'history',
  base: process.env.BASE_URL,
  routes
})
//路由设置
router.beforeEach((to,from,next)=>{
  if(to.path.startsWith('/login')){
    //如果访问的是登录页面 就删除旧的token
    window.localStorage.removeItem('access-admin')
    next()
  }
  else {
    //尝试获取token
    let admin=JSON.parse(window.localStorage.getItem('access-admin'))
    //如果没有token就直接跳转到登录页面
    if(!admin){
      next({path:'/login'})
    }
    else {
      //检查token是否正确
      axios({
        url:'http://localhost:8181/checkToken',
        method:'get',
        //将信息保存在header里
        headers:{
          token:admin.token
        }
      }).then((response)=>{
          if(!response.data){
            console.log('检验失败')
            next({path:'/error'})
          }
      })
      next()
    }
  }
})

export default router
修改后台token生效时间
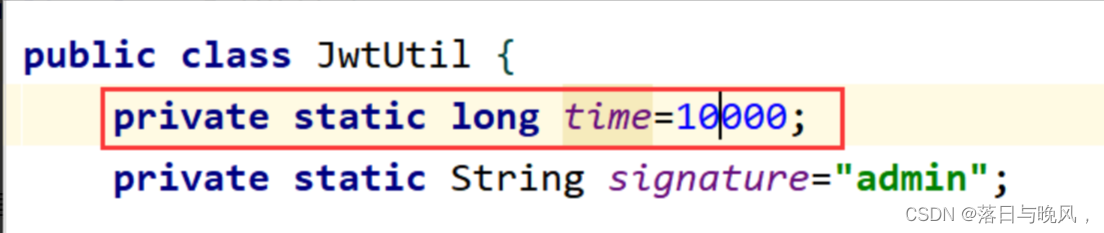
工具类增加检查token方法

过期之后,页面提示错误


 26万+
26万+


 被折叠的 条评论
为什么被折叠?
被折叠的 条评论
为什么被折叠?
 到【灌水乐园】发言


