


SpringCloudConfig配置中心的使用
本章节默认您已经学过配置中心操作不详细过于描述
1.远程配置在github或者gitee等各种git网站
配置服务—即configserver配置中心相关依赖
<parent>
 <-->父类继承</-->
</parent>
<!-- 项目依赖 -->
<dependencies>
  <!-- spring cloud config server 依赖 -->
  <dependency>
    <groupId>org.springframework.cloud</groupId>
    <artifactId>spring-cloud-config-server</artifactId>
  </dependency>
  <!-- netflix eureka client 依赖 -->
  <dependency>
    <groupId>org.springframework.cloud</groupId>
    <artifactId>spring-cloud-starter-netflix-eureka-client</artifactId>
  </dependency>
  <!-- spring boot test 依赖 -->
  <dependency>
    <groupId>org.springframework.boot</groupId>
    <artifactId>spring-boot-starter-test</artifactId>
    <scope>test</scope>
    <exclusions>
      <exclusion>
        <groupId>org.junit.vintage</groupId>
        <artifactId>junit-vintage-engine</artifactId>
      </exclusion>
    </exclusions>
  </dependency>
</dependencies>
2,相关的依赖(这里我用的是码云)
server:
 port: 8888 # 端口
spring:
 application:
  name: config-server # 应用名称
 cloud:
  config:
   server:
    git:
     uri: https://gitee.com/li-maodong/config-repoc # 配置文件所在仓库地址
       #username: # Github 等产品的登录账号
       #password: # Github 等产品的登录密码
       #default-label: master # 配置文件分支
       #search-paths: # 配置文件所在根目录
      # 配置 Eureka Server 注册中心
eureka:
  instance:
     prefer-ip-address: true # 是否使用 ip 地址注册
     instance-id: ${spring.cloud.client.ip-address}:${server.port} # ip:port
  client:
    service-url: # 设置服务注册中心地址
     defaultZone: http://localhost:8761/eureka/,http://localhost:8762/eureka/
这样就可以获取到其在git里面的所有配置文件
测试:http://localhost:8888/config-client/default
http://localhost:8888/config-client/dev/master
按照自己的写的来
访问规则为:
/{application}/{profile}[/{label}]

/{application}-{profile}.yml

/{label}/{application}-{profile}.yml

/{application}-{profile}.properties

/{label}/{application}-{profile}.properties
测试可以出数据后进行客户端的配置
客户端相关依赖 注意是高可用的配置中心 ,所以需要通过注册中心进行获取相关配置所以要用 spring cloud starter config 依赖而不是server 这个要注意
<?xml version="1.0" encoding="UTF-8"?>
<project xmlns="http://maven.apache.org/POM/4.0.0"
xmlns:xsi="http://www.w3.org/2001/XMLSchema-instance"
xsi:schemaLocation="http://maven.apache.org/POM/4.0.0
http://maven.apache.org/xsd/maven-4.0.0.xsd">
<modelVersion>4.0.0</modelVersion>
<groupId>com.yjxxt</groupId>
<artifactId>order-service</artifactId>
<version>1.0-SNAPSHOT</version>
<!-- 继承父依赖 -->
<parent>
<groupId>com.yjxxt</groupId>
<artifactId>config-demo</artifactId>
<version>1.0-SNAPSHOT</version>
</parent>
<!-- 项目依赖 -->
<dependencies>
<!-- spring boot web 依赖 -->
<dependency>
<groupId>org.springframework.boot</groupId>
<artifactId>spring-boot-starter-web</artifactId>
</dependency>
<!-- netflix eureka client 依赖 -->
<dependency>
<groupId>org.springframework.cloud</groupId>
<artifactId>spring-cloud-starter-netflix-eureka-client</artifactId>
</dependency>
<!-- spring cloud starter config 依赖 -->
<dependency>
<groupId>org.springframework.cloud</groupId>
<artifactId>spring-cloud-starter-config</artifactId>
</dependency>
<!-- spring boot test 依赖 -->
<dependency>
<groupId>org.springframework.boot</groupId>
<artifactId>spring-boot-starter-test</artifactId>
<scope>test</scope>
<exclusions>
<exclusion>
<groupId>org.junit.vintage</groupId>
<artifactId>junit-vintage-engine</artifactId>
</exclusion>
</exclusions>
</dependency>
</dependencies>
</project>
相关的yml依赖 这里注意所有的客户端必须都用bootstrap.yml
spring:
cloud:
config:
name: order-service # 配置文件名称,对应 git 仓库中配置文件前半部分
label: master # git 分支
profile: dev # 指定环境
discovery:
enabled: true # 开启
service-id: config-server # 指定配置中心服务端的 service-id
里面内容不过多赘述 自己理解 这个图很重要记住他的工作原理
ter # git 分支
profile: dev # 指定环境
discovery:
enabled: true # 开启
service-id: config-server # 指定配置中心服务端的 service-id
里面内容不过多赘述 自己理解 这个图很重要记住他的工作原理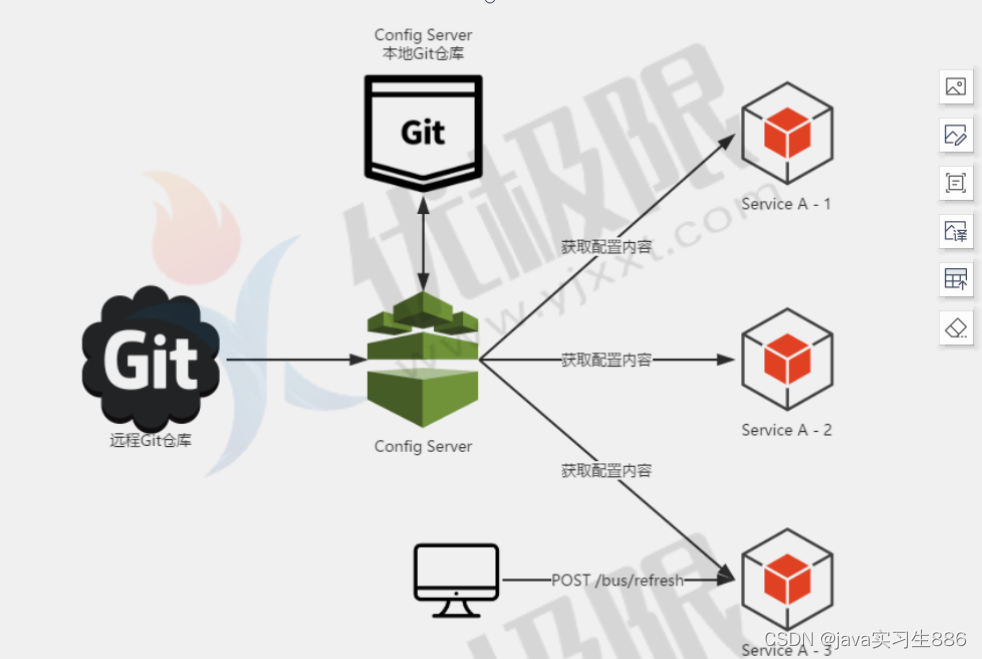


 935
935


 被折叠的 条评论
为什么被折叠?
被折叠的 条评论
为什么被折叠?
 到【灌水乐园】发言


