


目录
1. 语法
选择器{属性:值}
selector{property:value}
学习css即学习有哪些选择器,哪些属性以及可以使用什么样的值
也可以直接在元素上增加style属性以达到一样的结果
<p style="color:red">这是style为红色的</p>
<p>这是一个没有style的p</p>
2. 选择器
## 1)元素选择器
通过标签名选择元素
<style>
p{
  color:red;
}
</style>

<p>p元素</p>
<p>p元素</p>
<p>p元素</p>
实例中的所有元素都被设置成为了红色
2)id选择器
通过元素的id选择元素
id前要加#
<style>
p{
  color:red;
}
#p1{
  color:blue;
}
#p2{
  color:green;
}
</style>

<p>没有id的p</p>
<p id="p1">id=p1的p</p>
<p id="p2">id=p2的p</p>
3)类选择器
通过元素的class选择元素
类前要加#
<style>
.pre{
  color:blue;
}
.after{
  color:green;
}
</style>

<p class="pre">前3个</p>
<p class="pre">前3个</p>
<p class="pre">前3个</p>

<p class="after">后3个</p>
<p class="after">后3个</p>
<p class="after">后3个</p>
4)更精确的选择
同时根据元素名和class来选择
<style>

p.blue{
  color:blue;
}

</style>

<p class="blue">class=blue的p</p>

<span class="blue">class=blue的span</span>
3. 注释
注释以/✳开始,
以✳/结束
<style>
/*设置所有的p元素中的内容为红色*/
p{
  color:red;
}
</style>

<p>红色的p</p>
4. 尺寸大小
属性:height,width
值:可以是百分比或者像素值
<style>
p#percentage{
  width:50%;
  height:50%;
  background-color:pink;
}
p#pix{
  width:180px;
  height:50px;
  background-color:green;
}
</style>

<p id="percentage"> 按比例设置尺寸50%宽 50%高</p>

<p id="pix"> 按象素设置尺寸  180px宽 50 px高</p>
5. 背景
1)背景颜色
属性名:background-color
值:可以是预定义的颜色名,
rgb格式,
16进制格式
<style>
p.gray {background-color: gray;}
h1 {background-color: transparent}
h2 {background-color: rgb(250,0,255)}
h3 {background-color: #00ff00}

</style>

<p class="gray">灰色</p>
<h1>透明背景,默认即透明背景</h1>
<h2>紫色</h2>
<h3>绿色背景</h3>
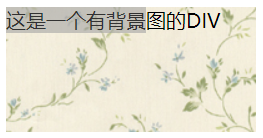
2)图片做背景
background-image:url(图片的绝对路径)
<style>
div#test
  {
    background-image:url(/study/background.jpg);
    width:200px;
    height:100px;
  }
</style>

<div id="test">
  这是一个有背景图的DIV
</div>
效果
3)本地测试
在本地测试的时候
不要写成 background-image:url(/study/background.jpg);
而是写成 background-image:url(background.jpg);
并且把图片和html文件放在同一个目录下
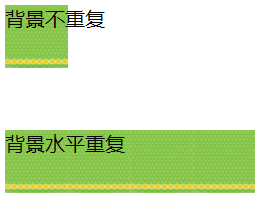
4)背景重复
属性:background-repeat
值:repeat 水平方向垂直方向都可以重复
repeat-x 水平方向重复
repeat-y 垂直方向重复
no-repeat 无重复
<style>
div#norepeat
  {
    background-image:url(/study/background_small.jpg);
    width:200px;
    height:100px;
    background-repeat: no-repeat;
  }

div#repeat-x
  {
    background-image:url(/study/background_small.jpg);
    width:200px;
    height:100px;
    background-repeat: repeat-x;
  }
</style>

<div id="norepeat">
  背景不重复
</div>

<div id="repeat-x">
  背景水平重复
</div>
效果:
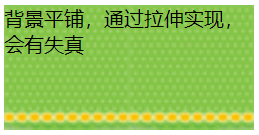
5)
属性 :background-size
值:contain
<style>
div#contain
  {
    background-image:url("background.jpg");
    width:200px;
    height:100px;
    background-size:contain;
  }
</style>
<div id="contain">
背景平铺会有失真,因为是拉伸
</div>
6. 文本
1)文本颜色
属性:color
与background-color类似
文本颜色的值可以采用3种方式
- 预定义的颜色名字
比如red,gray,white,black,pink - rgb格式
分别代表红绿蓝的比例 rgb(250,0,255) 即表示红色是满的,没有绿色,蓝色是满的,即红色和蓝色混合在一起:紫色 - 16进制的表示
#00ff00 等同于 rgb(0,255,0)
<style>
div#colorful
  {
    color:pink;
  }
</style>
<div id=colorful>
粉色
</div>
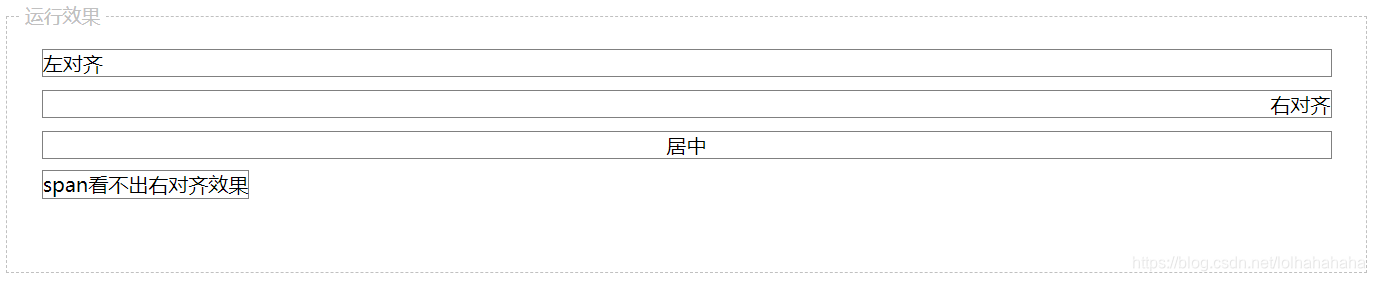
2)对齐
属性:text-align
值:left,right,center
div是块级元素,其默认宽度是100%,所以文本有对齐的空间前提。
但是,span却看不出右对齐效果,为什么呢?
因为span是内联元素其默认宽度就是其文本内容的宽度
<style>
div#left{
  text-align:left;
}
/*让div和span的边框显露出来,便于理解本知识点*/
div,span{
  border: 1px gray solid;
  margin:10px;
}

div#right{
  text-align:right;
}

div#center{
  text-align:center;
}

span#right{
  text-align:right;
}

</style>

<div id="left">
左对齐
</div>

<div id="right">
右对齐
</div>

<div id="center">
居中
</div>

<span id="right">
span看不出右对齐效果

</span>
3)文本修饰
属性:text-decoration
值:overline,line-through,underline,blink,none
<style type="text/css">
h1 {text-decoration: overline}
h2 {text-decoration: line-through}
h3 {text-decoration: underline}
h4 {text-decoration:blink}
.a {text-decoration: none}
</style>
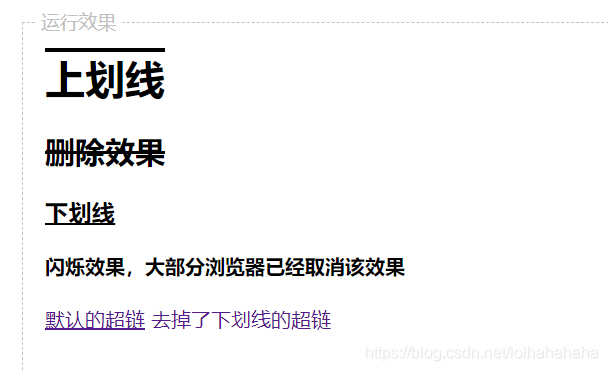
<h1>上划线</h1>
<h2>删除效果</h2>
<h3>下划线</h3>
<h4>闪烁效果,大部分浏览器已经取消该效果</h4>
<a href="https://how2j.cn/">默认的超链</a>
<a class="a" href="https://how2j.cn/">去掉了下划线的超链</a>
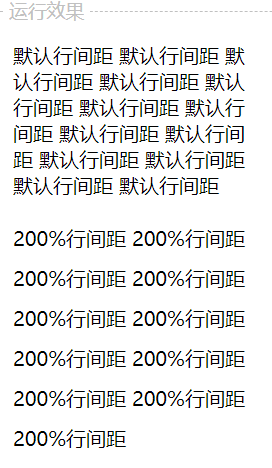
4)行间距
属性:line-height
值:数值或者百分比
<style>
p{
  width:200px;
}

.p{
  line-height:200%;
}
</style>

<p>
默认行间距
默认行间距
默认行间距
默认行间距
默认行间距
默认行间距
默认行间距
默认行间距
默认行间距
默认行间距
默认行间距
默认行间距
默认行间距
</p>

<p class="p">
200%行间距
200%行间距
200%行间距
200%行间距
200%行间距
200%行间距
200%行间距
200%行间距
200%行间距
200%行间距
200%行间距
</p>
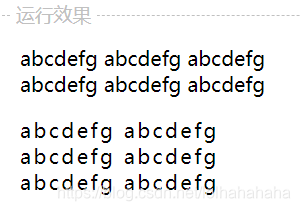
5)字符间距
属性:letter-spacing
值:数值
<style>
p{
  width:200px;
}

.p{
  letter-spacing:2;
}
</style>

<p>
abcdefg abcdefg abcdefg abcdefg abcdefg abcdefg
</p>

<p class="p">
abcdefg abcdefg abcdefg abcdefg abcdefg abcdefg
</p>
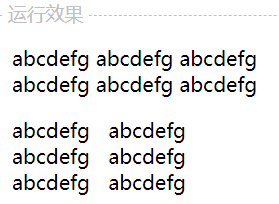
6)单词间距
属性:word-spacing
值:数值
<style>
p{
  width:200px;
}

.p{
  word-spacing:10;
}
</style>

<p>
abcdefg abcdefg abcdefg abcdefg abcdefg abcdefg
</p>

<p class="p">
abcdefg abcdefg abcdefg abcdefg abcdefg abcdefg
</p>
7)首行缩进
属性:text-indent
值:数值
<style>
p{
  width:200px;
}

.p{
  text-indent:50;
}
</style>

<p>
没有缩进效果的一段文字没有缩进效果的一段文字没有缩进效果的一段文字没有缩进效果的一段文字
</p>

<p class="p">
有缩进效果的一段文字有缩进效果的一段文字有缩进效果的一段文字有缩进效果的一段文字有缩进效果的一段

文字
</p>

8)大小写
属性:text-transform
值:uppercase 全部大写
capitalize 首字母大写
lowercase 全部小写
<style>
p.u {text-transform:uppercase}
p.c {text-transform:capitalize}
p.l {text-transform:lowercase}

</style>

<p class="u">
abcD
</p>

<p class="c">
abcD
</p>

<p class="l">
abcD
</p>

9)空白格
属性:white-space
值: normal 默认,多个空白格或者换行符会被合并成一个空白格
pre 有多少空白格,显示多少空白格,相当于pre标签,如果长度超出父容 器也不会换行。
pre-wrap 有多少空白格,显示多少空白格,相当于pre标签,如果长度超出父容器,会换行。
nowrap 一直不换行,直到使用br
7. 字体
1)尺寸
属性:font-size
值:数值或百分比
<style>
p.big{
  font-size:30px;
}
p.small{
  font-size:50%
}
p.small2{
  font-size:0.5em;
}
</style>
<p >正常大小</p>
<p class="big">30px大小的文字</p>
<p class="small">50%比例的文字</p>
<p class="small2">0.5em 等同于 50%比例的文字</p>
2)风格
属性:font-style
值:normal 普通
italic 斜体
<style>
p.n{
  font-style:normal;
}

p.i{
  font-style:italic;
}
</style>

<p >标准字体</p>
<p class="n">标准字体</p>
<p class="i">斜体</p>
3)粗细
属性:font-weight
值:normal 普通
bold 加粗
<style>
p.n{
  font-weight:normal;
}
p.b{
  font-weight:bold;
}
</style>

<p >标准字体</p>
<p class="n">标准字体</p>
<p class="b">粗一点</p>
4)字库
属性:font-family
值:
<style>
p.f1{
  font-family:"Times New Roman";
}

p.f2{
  font-family:Arial;
}
p.f3{
  font-family:宋体;
}
p.f4{
  font-family:黑体;
}
p.f5{
  font-family:楷体;
}
p.f6{
  font-family:微软雅黑;
}
</style>

<p >默认字库 font family:default </p>
<p class="f1">设置字库 font-family: Times New Roman</p>
<p class="f2">设置字库 font-family: Arial</p>
<p class="f3">设置字库 font-family: 宋体, 这种字体是IE默认字体</p>
<p class="f4">设置字库 font-family: 黑体</p>
<p class="f5">设置字库 font-family: 楷体</p>
<p class="f6">设置字库 font-family: 微软雅黑, 这个字体是火狐默认字体</p>
5)声明在一起
<style>
p.all{
   font:italic bold 30px "Times New Roman";
}

</style>

<p>默认字体</p>

<p class="all">斜体的 粗体的 大小是30px的 "Times New Roman" </p>
- 鼠标样式
属性:cursor
值:
9. 表格相关样式
1)表格布局
属性:table-layout
值:automatic 单元格的大小由内容宽度决定
fixed 单元格的大小只由td上设置的格式决定
<style>
table.t1{
  table-layout:automatic;
}

table.t2{
  table-layout:fixed;
}

</style>

<table class="t1" border="1" width="100%">
   <tr>
      <td width="10%">abcdefghijklmnopqrstuvwxyz</td>
      <td width="90%">abc</td>
   </tr>
</table>

<table class="t2" border="1" width="100%">
   <tr>
      <td width="50px">abcdefghijklmnopqrstuvwxyz</td>
      <td >abc</td>
   </tr>
</table>
效果:

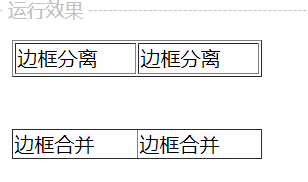
2)表格边框
属性:border-collapse
值: separate 边框分离
collapse 边框合并
<style>
table.t1{
  border-collapse:separate;
}

table.t2{
   border-collapse:collapse;
}

</style>

<table class="t1" border="1" width="200px">
   <tr>
      <td width="50%">边框分离</td>
      <td width="50%">边框分离</td>
   </tr>
</table>

<br/>
<br/>

<table class="t2" border="1" width="200px">
   <tr>
      <td width="50%">边框合并</td>
      <td width="50%">边框合并</td>
   </tr>
</table>
双击选中所有代码
效果:
10. 边框
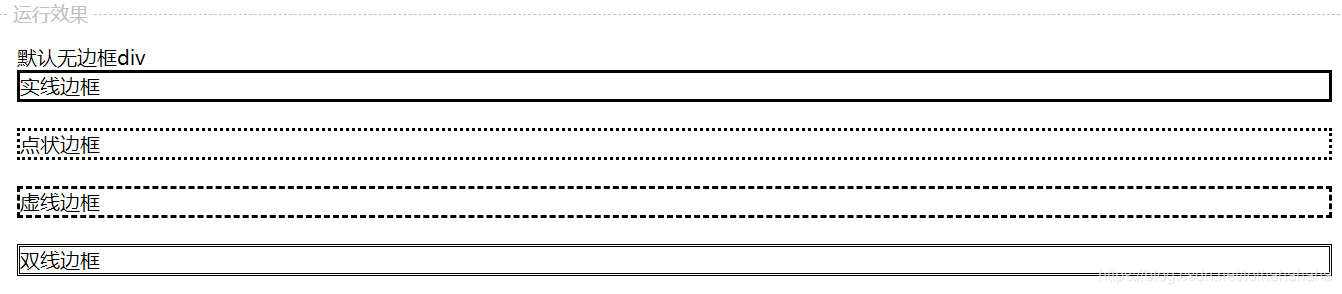
1)边框风格
属性:border-style
值:
solid: 实线
dotted:点状
dashed:虚线
double:双线
<style>
.solid{
   border-style:solid;
}
.dotted{
   border-style:dotted;
}
.dashed{
   border-style:dashed;
}
.double{
   border-style:double;
}

</style>

<div> 默认无边框div </div>

<div class="solid"> 实线边框  </div><br/>

<div class="dotted"> 点状边框  </div> <br/>
<div class="dashed"> 虚线边框  </div> <br/>
<div class="double"> 双线边框  </div> <br/>
效果
2)边框颜色
属性: border-color
值:颜色,rgb,十六进制表示
<style>
.red{
   border-style:solid;
   border-color:red;
}

</style>

<div> 默认无边框div </div>

<div class="red"> 实线红色边框  </div><br/>
效果

3)边框宽度
属性:border-width
值:数值
<style>
.red{
   border-style:solid;
   border-color:red;
   border-width:1px;
}

.default{
   border-style:solid;
   border-color:red;
}

</style>

<div> 默认无边框div </div>

<div class="red"> 实线红色细边框  </div><br/>

<div class="default"> 实线红色默认宽度边框  </div><br/>
效果

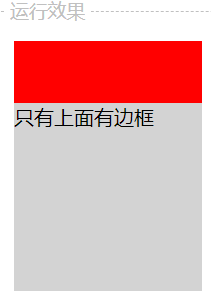
4)单方向边框
属性:border-top-width
borer-top-color
border-top-style
top,bottom,left,right 分别对应上下左右
<style>
 div{
   width:150px;
   height:150px;
   border-top-style:solid;
   border-top-color:red;
   border-top-width: 50px;
   background-color:lightgray;
  }
</style>

<div>
只有上面有边框
</div>
效果
5)块级元素和内联元素的边框区别
可以看到,块级元素div默认是占用100%的宽度
常见的块级元素有div h1 p 等
而内联元素span的宽度由其内容的宽度决定
常见的内联元素有 a b strong i input 等

<style>
.red{
   border:1px solid red;
}

</style>

<div> 默认无边框div </div>

<div class="red"> 实线红色细边框  </div><br/>
<span class="red"> 实线红色细边框  </span><br/>
11.内边距
1)左内边距
属性:padding-left
值:数值
<style>
.red{
   border:5px solid red;
   background-color:green;
}

.pad-left{
   border:5px solid red;
   background-color:green;
   padding-left:50px;
}

</style>

<span class="red"> 无内边距的span  </span><br/> <br/>

<span class="pad-left"> 左边距为50的span  </span><br/>
效果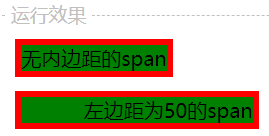
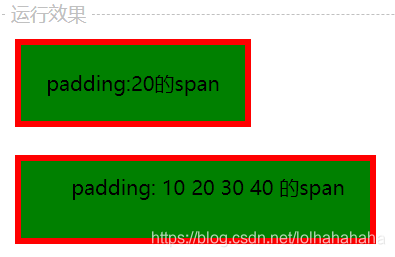
2)内边距规则
属性:padding
值:数值
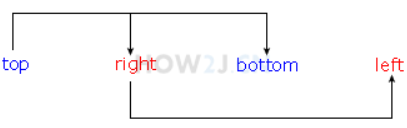
如果只写一个,即四个方向的值
如果写四个,即四个方向的值
上 右 下 左,依顺时针的方向依次赋值
如果缺少左内边距的值,则使用右内边距的值。
如果缺少下内边距的值,则使用上内边距的值。
如果缺少右内边距的值,则使用上内边距的值。
<style>
.pad-left-one{
   border:5px solid red;
   background-color:green;
   padding: 20;
}

.pad-left-four{
   border:5px solid red;
   background-color:green;
   padding: 10 20 30 40;
}

</style>
<br/>
<span class="pad-left-one"> padding:20的span  </span> <br/> <br/> <br/> <br/>

<span class="pad-left-four">
padding: 10 20 30 40 的span </span> <br/> <br/> <br/> <br/>
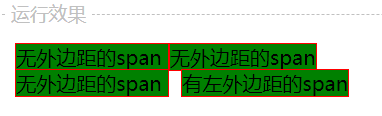
12.外边距
左外边距:
属性:margin-left
值:数值
指的是元素边框和元素边框之间的距离
注:像span这样的内联元素,默认情况下,只有左右外边距,没有上下外边距。 为了观察上下外边距的效果,可以采用块级元素,比如div.
<style>
.red{
   border:1px solid red;
   background-color:green;
}

.margin{
   border:1px solid red;
   background-color:green;
   margin-left:10px;
}

</style>

<span class="red"> 无外边距的span  </span>
<span class="red"> 无外边距的span  </span>

<br/>

<span class="red"> 无外边距的span  </span>
<span class="margin"> 有左外边距的span  </span>
13.边框模型
通过div块实现上下左右的外边距
<style>
.box{
    width:70px;
    padding:5px;
    margin: 10px;
}

div{
   border:1px solid gray;
   font-size:70%;
}
</style>

<div>
 其他元素
</div>

<div class="box">
   内容宽度70px <br><br>
   内边距:5px <br> <br>
   外边距:10px <br>
</div>

<div>
 其他元素
</div>
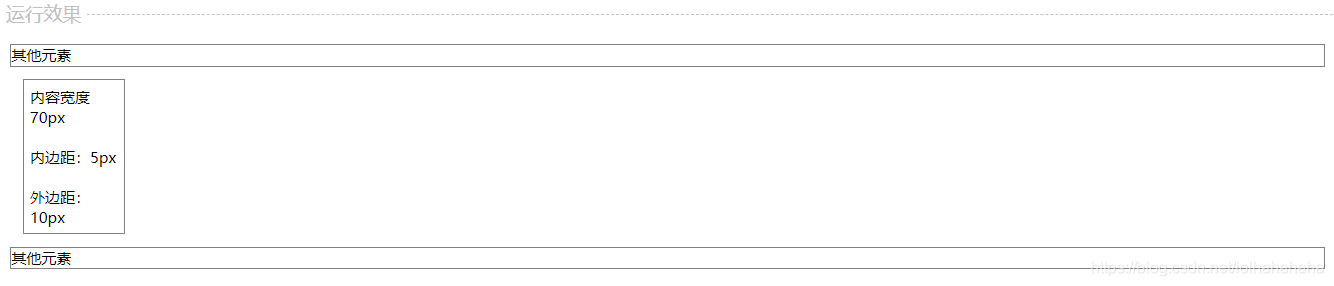
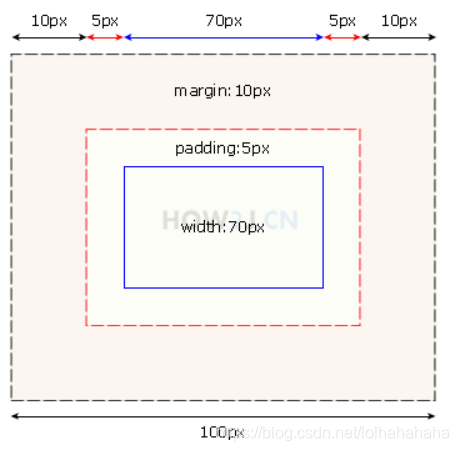
由图所示
蓝色框即为内容
width:70px 表示内容的大小
红色框即为边框
内容到边框之间的距离,即为内边距 5px
灰色框,是指边框与其他元素之间的距离,即为外边距:10px
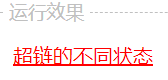
14.超链状态
1)超链状态
属性: a
值:
超链状态有4种
link - 初始状态,从未被访问过
visited - 已访问过
hover - 鼠标悬停于超链的上方
active - 鼠标左键点击下去,但是尚未弹起的时候
<style>
a: link{ color : #FF0000}
a:visited {color: #00FF00}
a:hover {color: #FF00FF}
a:active {color: #0000FF}
</style>
<a href="http://www.12306.com">超链的状态</a>
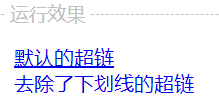
2)去除下划线的超链
属性:text-decoration
值:none
<style>
a.no_underline{text-decoration:none}
</style>
<a href="http://www.12306.com">默认的超链</a>
<br>
<a class="no_underline" href="http://www.12306.com">去除了下划线的超链</a>
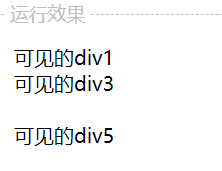
15.隐藏元素的两种方式
1)display:none 隐藏一个元素,这个元素将不再占有原空间 “坑” 让出来了
2) visibility:hidden 隐藏一个元素,这个元素继续占有原空间,只是“看不见”
<style>
div.d{
  display:none;
}

div.v{
  visibility:hidden;
}
</style>

<div>可见的div1</div>
<div class="d">隐藏的div2,使用display:none隐藏</div>
<div>可见的div3</div>
<div class="v">隐藏的div4,使用visibility:hidden隐藏</div>
<div>可见的div5</div>
16.将style单独写在css文件中
创建一个文件叫style.css
其内容为
.p1{
  color:red;
}
.span1{
  color:blue;
}
在html文件中包含这个css文件,就可以达到想要的效果
<link rel="stylesheet" type="text/css" href="https://how2j.cn/study/style.css" />

<p class="p1">红色</p>

<span class="span1">蓝色</span>
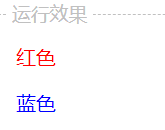
这样在后续的维护中更加方便
17.优先级
默认优先级是:style属性>style标签>style.css文件
但是如果在样式后加上了 ! important 则优先使用important样式


 258
258


 被折叠的 条评论
为什么被折叠?
被折叠的 条评论
为什么被折叠?
 到【灌水乐园】发言


