mvc
mvc是web程序开发一种通用的架构。mvc的核心思想:业务数据的抽取和业务数据呈现相分离。
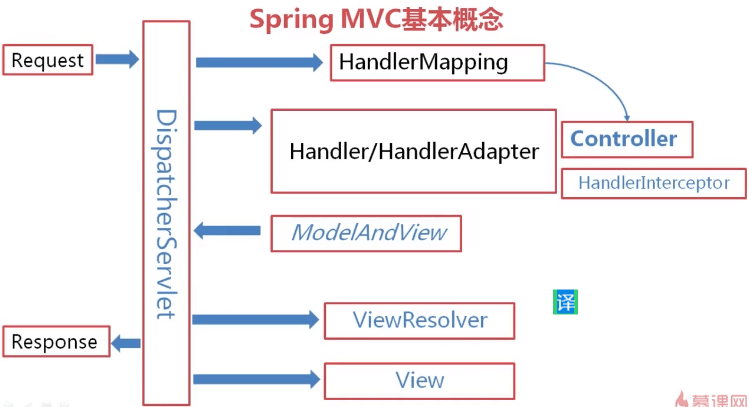
spring MVC基本概念

理解过程:浏览器的request过来,DispatcherServlet拦截request,DispatcherServlet通过HandlerMapping去寻找controller,将功能代理给HandlerMapping。 HandlerMapping找到了controller和HandlerInterceptor,形成一个执行链条,作为一个HandlerAdapyer。 写controller就是为了生成相应的model,返回给DispatcherServlet,然后通过视图解析器, 返回view对象,将模型数据传给view,就呈现我们的页面。
基于maven的spring MVC 例子
- 打开myeclipse,新建一个maven的工程,如何在myeclipse中建立一个maven工程,详细的请看maven中讲解。
- 配置整个工程需要的依赖坐标,具体的配置信息如下:
- <project xmlns="http://maven.apache.org/POM/4.0.0" xmlns:xsi="http://www.w3.org/2001/XMLSchema-instance"
- xsi:schemaLocation="http://maven.apache.org/POM/4.0.0 http://maven.apache.org/maven-v4_0_0.xsd">
- <modelVersion>4.0.0</modelVersion>
- <groupId>com.example.test.springmvc</groupId>
- <artifactId>springmvc</artifactId>
- <!-- <packaging>war</packaging> -->
- <version>0.0.1-SNAPSHOT</version>
- <name>springmvc Maven Webapp</name>
- <url>http://maven.apache.org</url>
- <properties>
- <spring.version>4.3.10.RELEASE</spring.version>
- </properties>
- <dependencies>
- <dependency>
- <groupId>org.springframework</groupId>
- <artifactId>spring-framework-bom</artifactId>
- <version>4.3.10.RELEASE</version>
- <type>pom</type>
- </dependency>
- <dependency>
- <groupId>org.springframework</groupId>
- <artifactId>spring-webmvc</artifactId>
- <version>4.3.10.RELEASE</version>
- </dependency>
- <dependency>
- <groupId>junit</groupId>
- <artifactId>junit</artifactId>
- <version>3.8.1</version>
- <scope>test</scope>
- </dependency>
- <dependency>
- <groupId>javax.servlet</groupId>
- <artifactId>javax.servlet-api</artifactId>
- <version>3.0.1</version>
- <scope>provided</scope>
- </dependency>
- <dependency>
- <groupId>commons-lang</groupId>
- <artifactId>commons-lang</artifactId>
- <version>2.6</version>
- </dependency>
- <dependency>
- <groupId>org.slf4j</groupId><!--基于日志管理的包 -->
- <artifactId>slf4j-log4j12</artifactId>
- <version>1.7.25</version>
- <scope>test</scope>
- </dependency>
- </dependencies>
- <build>
- <finalName>springmvc</finalName>
- <plugins>
- <plugin>
- <groupId>org.mortbay.jetty</groupId>
- <artifactId>maven-jetty-plugin</artifactId>
- <version>6.1.25</version>
- </plugin>
- </plugins>
- </build>
- </project>
- 在web.xml下配置DispatherServlet(前端控制器)
- <!DOCTYPE web-app PUBLIC
- "-//Sun Microsystems, Inc.//DTD Web Application 2.3//EN"
- "http://java.sun.com/dtd/web-app_2_3.dtd" >
- <web-app>
- <display-name>Archetype Created Web Application</display-name>
- <servlet>
- <servlet-name>springmvc-dispatcher</servlet-name><!-- DispatcherServlet对应的上下文配置,默认是/WEB-INF/$servlet-name$-servlet.xml -->
- <servlet-class>org.springframework.web.servlet.DispatcherServlet</servlet-class>
- <init-param>
- <param-name>contextconfiglocation</param-name>
- <param-value>WEB-INF/config/springmvc-dispatcher-servlet.xml</param-value><pre code_snippet_id="2502422" snippet_file_name="blog_20170727_2_818388" name="code" class="java"><!-- 这里改变默认的位置,所以要在对应的位置创建该文件--></pre> </init-param><load-on-startup>1</load-on-startup></servlet><servlet-mapping><servlet-name>springmvc-dispatcher</servlet-name><url-pattern>/</url-pattern><pre code_snippet_id="2502422" snippet_file_name="blog_20170727_3_5976602" name="code" class="java"><!--这里过滤所有的请求--></pre> </servlet-mapping></web-app>
- <pre></pre>
- <ul>
- <li>创建上述的文件,并进行配置。</li></ul>
- <div><pre code_snippet_id="2502422" snippet_file_name="blog_20170727_4_7231120" name="code" class="java"></pre><pre code_snippet_id="2502422" snippet_file_name="blog_20170727_4_7231120" name="code" class="java"><?xml version="1.0" encoding="UTF-8"?>
- <beans xmlns="http://www.springframework.org/schema/beans"
- xmlns:xsi="http://www.w3.org/2001/XMLSchema-instance"
- xmlns:context="http://www.springframework.org/schema/context"
- xmlns:mvc="http://www.springframework.org/schema/mvc"
- xsi:schemaLocation="http://www.springframework.org/schema/mvc http://www.springframework.org/schema/mvc/spring-mvc-4.3.xsd
- http://www.springframework.org/schema/beans http://www.springframework.org/schema/beans/spring-beans.xsd
- http://www.springframework.org/schema/context http://www.springframework.org/schema/context/spring-context-4.3.xsd">
- <context:annotation-config/>激活注解
- <!-- 配置包扫描,扫描controller -->
- <context:component-scan base-package="com.example.springmvc">
- <context:include-filter type="annotation" expression="org.springframework.stereotype.Controller"/><!-- 只用于管理@controller的bean,忽略@service等其他的bean。 -->
- </context:component-scan>
- <!-- HandlerMapping, 无需配置, Spring MVC可以默认启动。 DefaultAnnotationHandlerMapping
- annotation-driven HandlerMapping -->
- <!-- 注解驱动,配置映射器和适配器 --><!-- 扩充了注解驱动,可以将请求参数绑定到控制器参数 -->
- <mvc:annotation-driven></mvc:annotation-driven>
- <!-- 视图页面配置 -->
- <!-- 配置ViewResolver。 可以用多个ViewResolver。 使用order属性排序。 InternalResourceViewResolver放在最后。 -->
- <bean class="org.springframework.web.servlet.view.InternalResourceViewResolver">
- <property name="prefix" value="/WEB-INF/jsp/" />
- <property name="suffix" value=".jsp" />
- </bean>
- </beans></pre><br>
- <br>
- <ul>
- <li>创建controller类</li></ul>
- <div><pre code_snippet_id="2502422" snippet_file_name="blog_20170727_5_9673336" name="code" class="java">package com.example.springmvc;
- import org.springframework.stereotype.Controller;
- import org.springframework.web.bind.annotation.RequestMapping;
- @Controller
- @RequestMapping("/hello")
- public class HelloSpringMvc {
- @RequestMapping("/mvc")
- public String helloMvc(){
- return "home";//返回的是home.jsp
- }
- }
- </pre><br>
- </div>
- </div>
- <pre></pre>
- <pre></pre>
- <pre></pre>
由此可见访问地址:http://localhost:8080/项目名/hello/mvc
spring上下文配置
细心的小伙伴,在上述中,可以看到没有进行spring配置。
- <?xml version="1.0" encoding="UTF-8"?>
- <web-app version="2.4" xmlns="http://java.sun.com/xml/ns/j2ee"
- xmlns:xsi="http://www.w3.org/2001/XMLSchema-instance"
- xsi:schemaLocation="http://java.sun.com/xml/ns/j2ee
- http://java.sun.com/xml/ns/j2ee/web-app_2_4.xsd"></web-app>
- 在上述的web.xml中添加spring上下文
- <!-- 配置spring上下文 -->
- <context-param>
- <param-name>contextlocation</param-name>
- <param-value>/WEB-INF/applicationContext.xml</param-value><!-- 指明spring上下文位置 -->
- </context-param>
- <listener>
- <listener-class>org.springframework.web.context.ContextLoaderListener</listener-class>
- </listener>
- 创建applicationContext.xml文件
- <?xml version="1.0" encoding="UTF-8"?>
- <beans xmlns="http://www.springframework.org/schema/beans"
- xmlns:xsi="http://www.w3.org/2001/XMLSchema-instance" xmlns:context="http://www.springframework.org/schema/context"
- xmlns:mvc="http://www.springframework.org/schema/mvc"
- xsi:schemaLocation="
- http://www.springframework.org/schema/beans
- http://www.springframework.org/schema/beans/spring-beans.xsd
- http://www.springframework.org/schema/context
- http://www.springframework.org/schema/context/spring-context.xsd
- http://www.springframework.org/schema/mvc
- http://www.springframework.org/schema/mvc/spring-mvc.xsd">
- <context:annotation-config /><!-- //激活注解 -->
- <context:component-scan base-package="com.imooc.mvcdemo">
- <context:exclude-filter type="annotation"
- expression="org.springframework.stereotype.Controller" /><!-- 在这个spring容器中就不需要管理controller -->
- </context:component-scan>
- </beans>
spring MVC中controller的变量绑定
- package com.example.springmvc;
- import javax.servlet.http.HttpServletRequest;
- import org.springframework.stereotype.Controller;
- import org.springframework.web.bind.annotation.PathVariable;
- import org.springframework.web.bind.annotation.RequestMapping;
- import org.springframework.web.bind.annotation.RequestMethod;
- import org.springframework.web.bind.annotation.RequestParam;
- @Controller
- @RequestMapping("/hello")
- public class HelloSpringMvc {
- private String name;
- //处理请求类型:http://localhost:8080/项目名/hello/requestone/name=
- @RequestMapping(value="/requestone",method=RequestMethod.GET)
- public String requestMethod(@RequestParam("name")String name){
- return "home";
- }
- //处理请求类型:http://localhost:8080/项目名/hello/requestone/liu {name} {}是指变量name
- @RequestMapping(value="/requestone/{name}",method=RequestMethod.GET)
- public String requestMethodtwo(@PathVariable("name")String name){
- return "home";
- }
- //处理请求类型:http://localhost:8080/项目名/hello/requestthree/name=?
- @RequestMapping(value="/requestthree")
- public String requestMethodthree(HttpServletRequest request){
- String name = request.getParameter("name");
- System.out.println(name+"sdsadsada");
- return "home";
- }
- <pre code_snippet_id="2502422" snippet_file_name="blog_20170727_9_4941017" name="code" class="java"><span style="white-space:pre"> </span>//处理请求类型:http://localhost:8080/项目名/hello/requestthree/add</pre><span style="white-space:pre"> </span>@RequestMapping(value="/create",method = RequestMethod.GET,params="add")//只有参数变量,没有值<br>
- <span style="white-space:pre"></span>public String createCourse(){<br>
- <span style="white-space:pre"></span>return "course/create";<br>
- <span style="white-space:pre"></span>}}
- <pre></pre>
- <h3><a name="t5"></a>Binding数据绑定</h3>
- <div>将请求中的字段按照名字匹配的原则填入模型对象。下面一个简单例子:</div>
- <div></div>
- <div>controller类</div>
- <div></div>
- <div><pre code_snippet_id="2502422" snippet_file_name="blog_20170727_10_7067587" name="code" class="java"> @RequestMapping(value="/create",method = RequestMethod.GET,params="add")
- public String createCourse(){
- return "course/create";
- }
- @RequestMapping(value="/save",method = RequestMethod.GET)
- public String saveCourse(Course c){
- System.out.println(c.getName());
- return "course/show";</pre><br>
- 数据实体类对象</div>
- <div><br>
- </div>
- <div><pre code_snippet_id="2502422" snippet_file_name="blog_20170727_11_273954" name="code" class="java">package com.example.springmvc.model;
- public class Course {
- private String name;
- public String getName() {
- return name;
- }
- public void setName(String name) {
- this.name = name;
- }
- }
- </pre><br>
- <pre code_snippet_id="2502422" snippet_file_name="blog_20170727_12_2051861" name="code" class="java"> <form method="get" action="<%=request.getContextPath()%>/hello/save">
- <input type="text" name="name"/>
- <button type="submit">提交</button>
- </form></pre>
- <div><br>
- </div>
- 注意表单元素的name属性一定要和数据实体类一致,否则不能完成数据的绑定</div>
- <div><br>
- </div>
- <pre></pre>
Spring mvc文件上传
提供文件上传工作,作为公共服务。只需要进行相应的配置就可以使用。
首先先在spring mvc 核心配置文件中(springmvc-dispatcher-servlet.xml),进行如下的配置:
文件解析的bean
- <bean id="multipartResolver" class="org.springframework.web.multipart.commons.CommonsMultipartResolver">
- <property name="maxUploadSize" value="209715200" /><!-- 设置文件上传的最大字节 -->
- <property name="defaultEncoding" value="UTF-8" />
- <property name="resolveLazily" value="true" /> <!-- 设置文件是否延迟加载,来捕获大小异常 -->
- </bean>
提供一个文件上传的表单
- <form method="post" action="<%=request.getContextPath() %>/hello/end" enctype="multipart/form-data">
- <input type="file" name="file"/>
- <input type="submit">提交</input>
- </form>
controller
- @RequestMapping(value="/startupload",method = RequestMethod.GET)
- public String startupload(){
- return "file";
- }
- @RequestMapping(value="/end",method = RequestMethod.POST)
- public String endupload(@RequestParam("file")MultipartFile file){
- System.out.println(file.getOriginalFilename());
- return "course/show";
- }
在这里利用requuestparam绑定绑定表单元素,通过MultipartFile获取文件的信息,进行文件相应的操作。


 11万+
11万+

 被折叠的 条评论
为什么被折叠?


