


文章目录
智能体架构
https://langchain-ai.github.io/langgraph/concepts/agentic_concepts/
许多LLM应用在调用大语言模型前后会实现特定的控制流程步骤。例如,RAG会检索与用户问题相关的文档,并将这些文档传递给LLM,以使模型的响应基于提供的文档上下文。
与其硬编码固定的控制流程,我们有时希望LLM系统能够自主选择控制流程来解决更复杂的问题!这就是智能体的一种定义:智能体是利用LLM来决定应用程序控制流程的系统。LLM可以通过多种方式控制应用:
- LLM可以在两条潜在路径之间进行路由选择
- LLM可以决定调用众多工具中的哪一个
- LLM可以判断生成的答案是否足够或需要更多工作
因此,存在多种不同类型的智能体架构,它们赋予LLM不同级别的控制权。
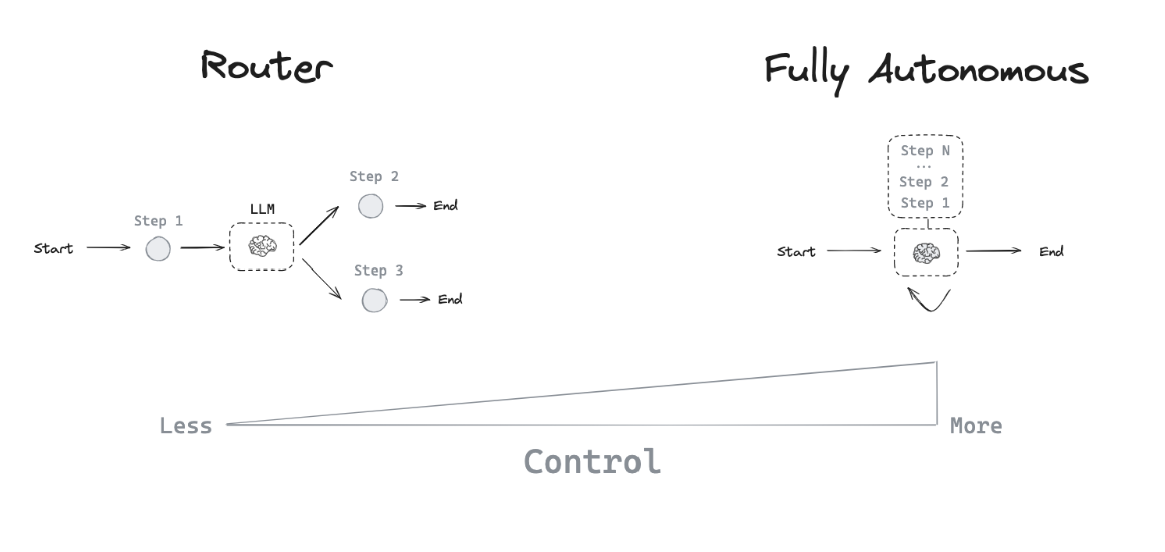
路由器
路由器允许大型语言模型(LLM)从一组指定选项中选择单个步骤。这是一种控制层级相对有限的智能体架构,因为LLM通常专注于做出单一决策,并从预先定义的有限选项集中生成特定输出。路由器通常采用几种不同的概念来实现这一功能。
结构化输出
通过为大型语言模型(LLM)提供特定的格式或模式规范,可以引导其生成遵循该结构的响应,这就是结构化输出的工作原理。这种方式与工具调用类似,但适用范围更广。工具调用通常涉及选择和使用预定义函数,而结构化输出可用于任何类型的格式化响应。实现结构化输出的常见方法包括:
1、提示工程:通过系统提示指示LLM以特定格式响应
2、输出解析器:使用后处理技术从LLM响应中提取结构化数据
3、工具调用:利用某些LLM内置的工具调用功能生成结构化输出
结构化输出对路由决策至关重要,它能确保系统可以可靠地解读LLM的决策并执行相应操作。了解更多关于结构化输出的实践指南。
工具调用代理
虽然路由机制允许大语言模型(LLM)做出单一决策,但更复杂的代理架构通过两种关键方式扩展了LLM的控制能力:
1、多步骤决策:LLM可以连续做出一系列决策,而不仅限于单次决策
2、工具访问:LLM能够选择并使用多种工具来完成任务
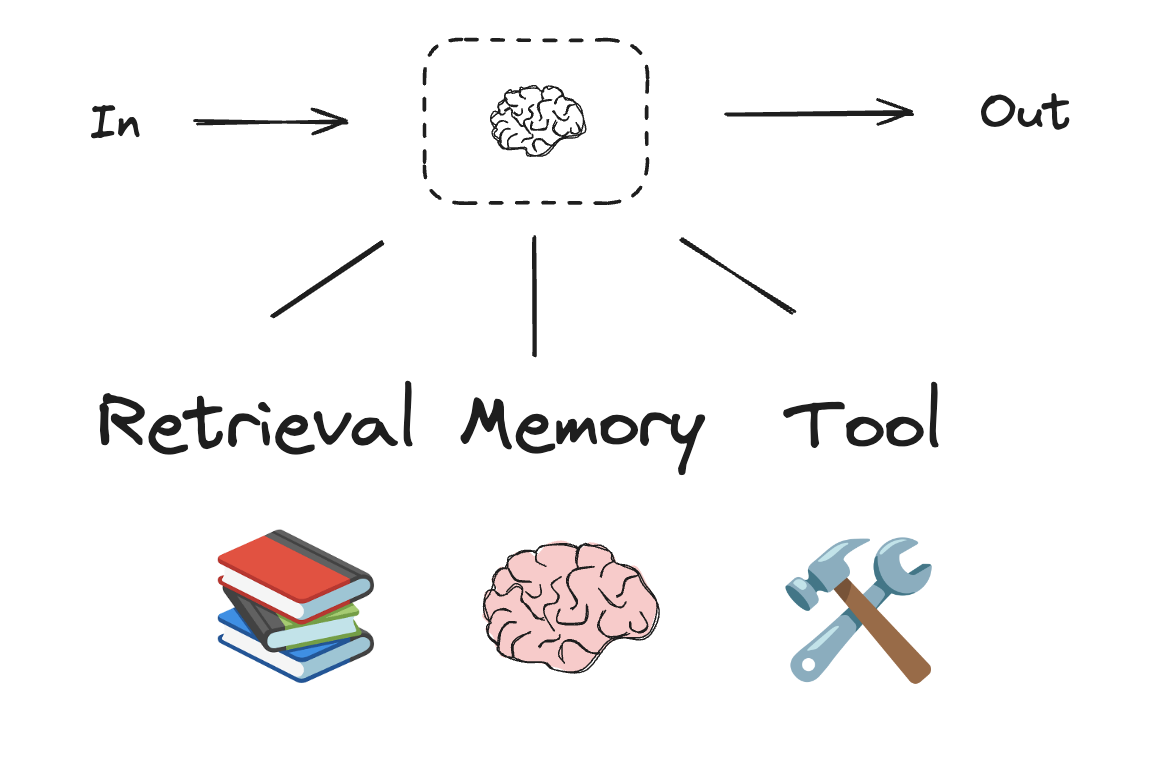
ReAct是一种流行的通用代理架构,它结合了这些扩展能力,整合了三个核心概念:
1、工具调用:允许LLM根据需要选择和使用各种工具
2、记忆:使代理能够保留并利用先前步骤的信息
3、规划:赋予LLM创建并执行多步骤计划以实现目标的能力
这种架构支持更复杂灵活的代理行为,超越了简单的路由机制,实现了多步骤动态问题解决。与原始论文](https://arxiv.org/abs/2210.03629)不同,现代代理依赖于LLM的[工具调用能力,并基于消息列表运行。
在LangGraph中,您可以使用预构建的代理来开始使用工具调用代理。
工具调用
当需要让智能体与外部系统交互时,工具就非常有用。外部系统(如API)通常需要特定的输入格式或数据载荷,而非自然语言。例如,当我们把某个API绑定为工具时,模型就能感知所需的输入格式。模型会根据用户的自然语言输入选择调用工具,并返回符合该工具要求格式的输出结果。
许多大语言模型提供商都支持工具调用,而LangChain中的工具调用接口非常简单:只需将任意Python函数传入ChatModel.bind_tools(function)即可。

内存
内存对智能体至关重要,使其能够在解决问题的多个步骤中保留和利用信息。内存系统在不同层级上运作:
1、短期记忆:允许智能体访问在序列中先前步骤获取的信息
2、长期记忆:使智能体能够回忆过往交互中的信息,例如对话中的历史消息
LangGraph 提供对内存实现的完全控制:
State:用户自定义模式,用于指定需要保留的内存结构Checkpointer:在会话中存储每一步状态的机制Store:跨会话存储用户特定数据或应用级数据的机制
这种灵活的方法允许您根据智能体架构需求定制内存系统。关于如何为图结构添加内存的实践指南,请参阅本教程。
有效的内存管理能增强智能体维持上下文、从历史经验中学习以及随时间推移做出更明智决策的能力。
规划
在支持工具调用的智能体中,大语言模型(LLM)会在一个while循环中被反复调用。每个步骤中,智能体会决定需要调用哪些工具,以及这些工具的输入参数应该是什么。随后执行这些工具,并将输出结果作为观察反馈给LLM。当智能体判定已获得足够信息来解决用户请求,且不值得继续调用更多工具时,while循环就会终止。
自定义智能体架构
虽然路由器和工具调用型智能体(如ReAct)很常见,但定制智能体架构通常能为特定任务带来更好的性能。LangGraph提供了多个强大功能来构建定制化的智能体系统:
人在回路
人工参与能显著提升智能体的可靠性,尤其对于敏感任务而言。具体方式包括:
- 审批特定操作
- 提供反馈以更新智能体状态
- 在复杂决策过程中给予指导
当完全自动化不可行或不理想时,人在回路模式至关重要。更多内容请参阅我们的人在回路指南。
并行处理
并行处理对高效的多智能体系统和复杂任务至关重要。LangGraph 通过其 Send API 支持并行化,能够实现:
- 多个状态的并发处理
- 类似 map-reduce 操作的实现
- 高效处理独立的子任务
具体实现方法,请参阅我们的 map-reduce 教程
子图
子图对于管理复杂的智能体架构至关重要,特别是在多智能体系统中。它们能够实现:
- 为单个智能体提供独立的状态管理
- 对智能体团队进行层级化组织
- 控制智能体与主系统之间的通信
子图通过状态模式中的重叠键与父图进行通信。这种机制支持灵活、模块化的智能体设计。具体实现细节,请参阅我们的子图操作指南。
反思机制
反思机制能显著提升智能体的可靠性,主要通过以下方式实现:
1、评估任务完成度与正确性
2、提供迭代改进的反馈
3、支持自我修正与学习
虽然通常基于大语言模型(LLM),但反思机制也可采用确定性方法。例如在编程任务中,编译错误就能作为反馈信号。这种方法在这个使用LangGraph实现自我修正代码生成的视频中有具体演示。
通过运用这些特性,LangGraph能够构建复杂的、面向特定任务的智能体架构,这些架构可以:
- 处理复杂工作流
- 实现高效协作
- 持续优化性能
工作流与智能体
https://langchain-ai.github.io/langgraph/tutorials/workflows/
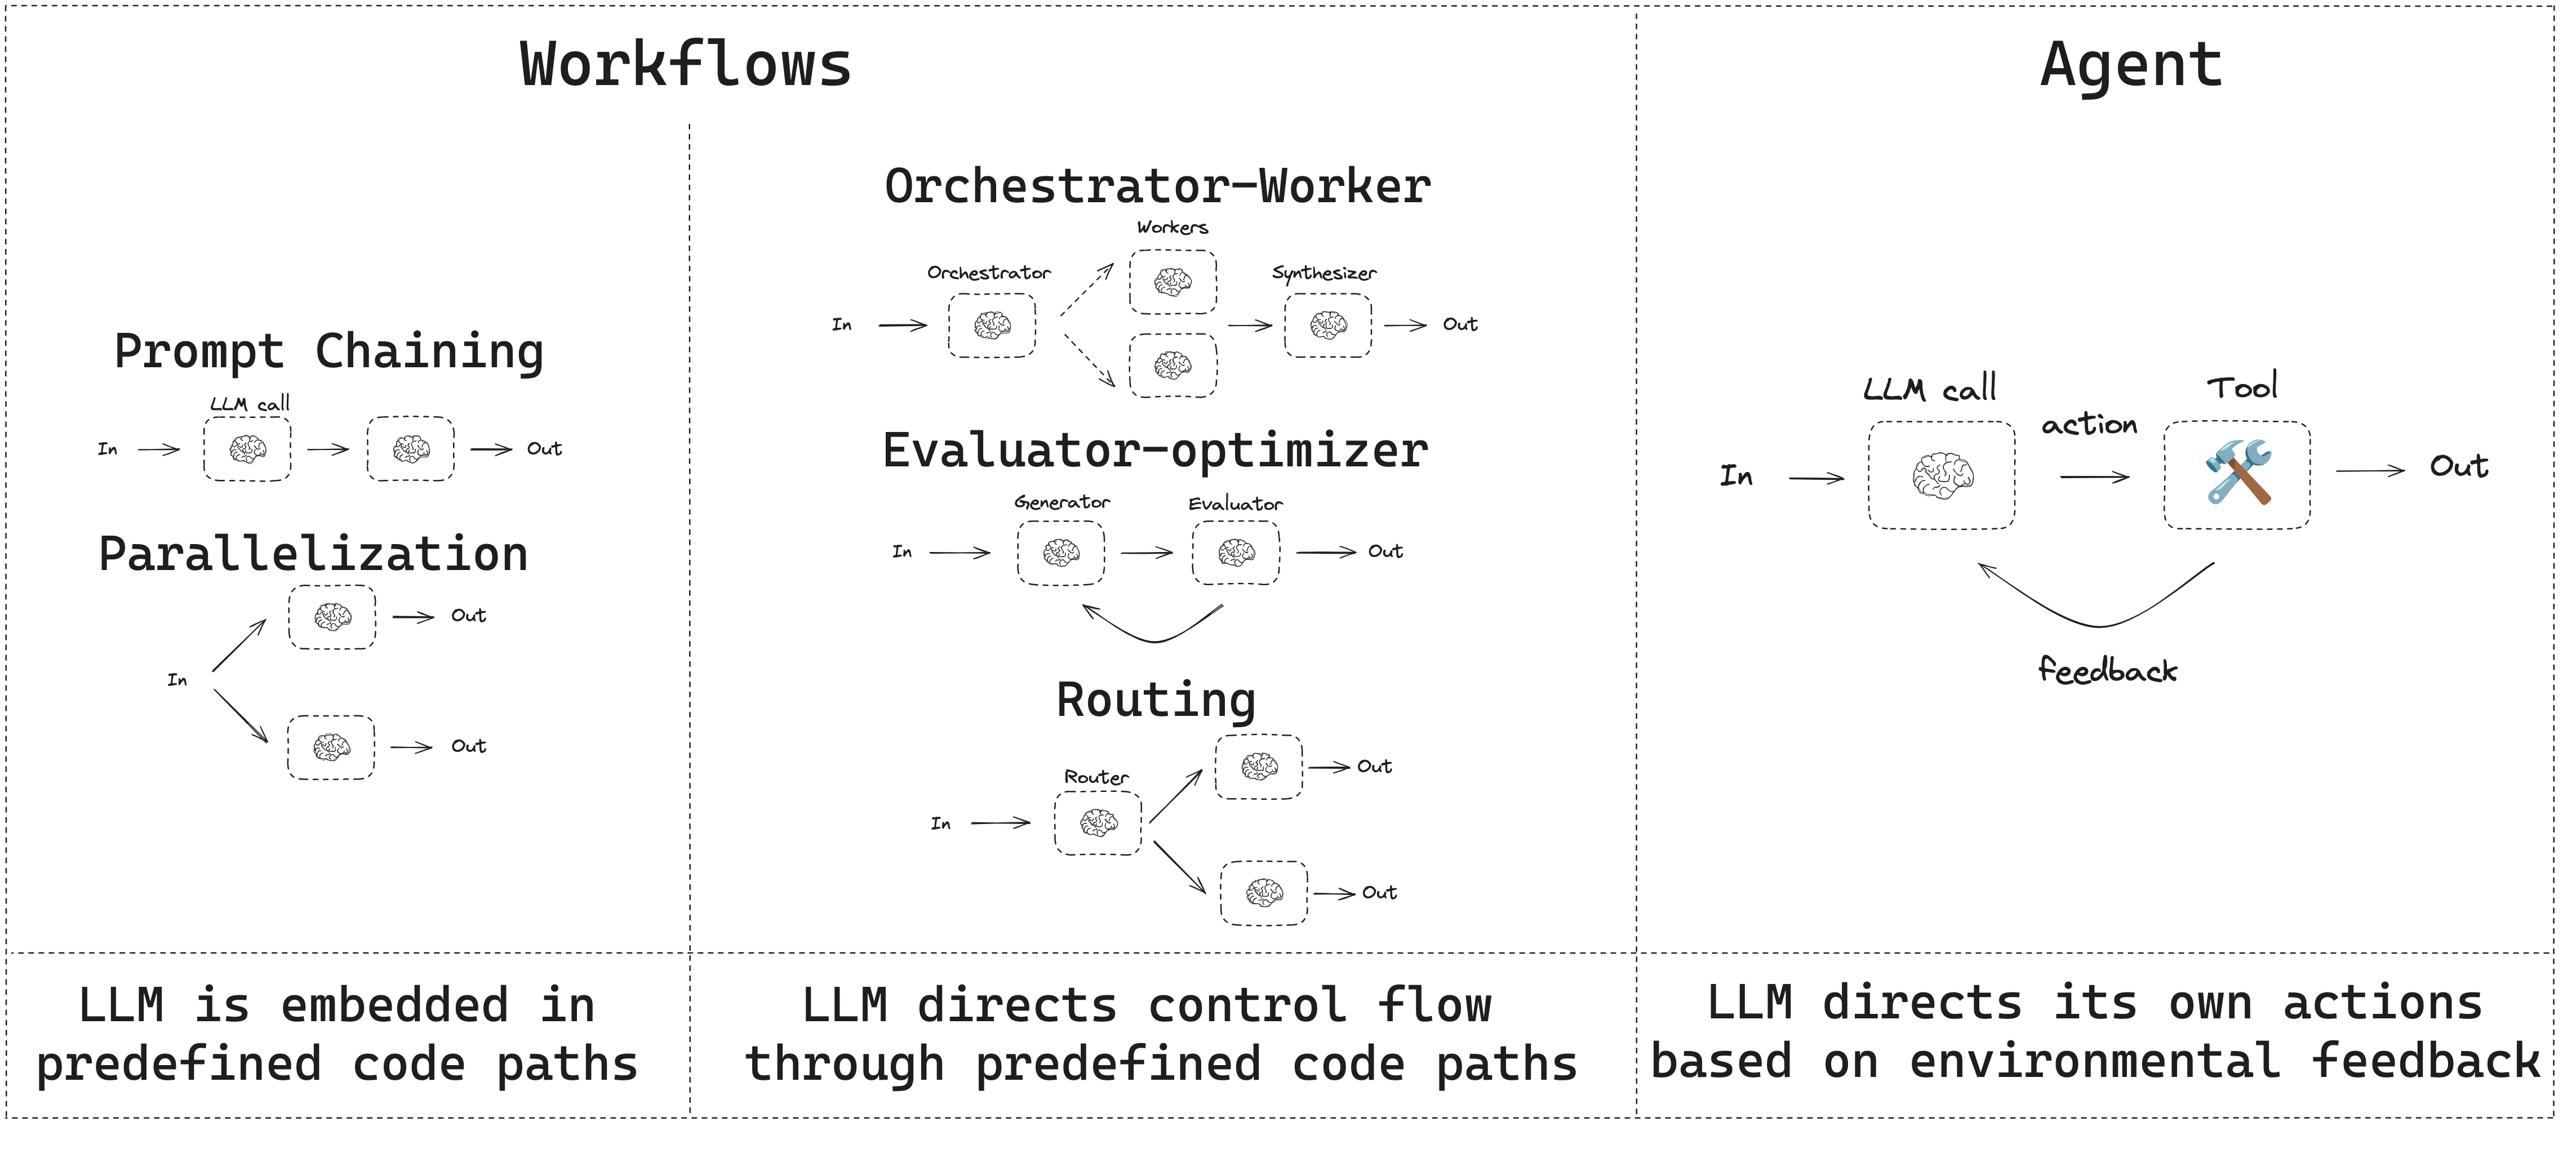
本指南回顾了智能体系统的常见模式。在描述这些系统时,区分"工作流"和"智能体"很有帮助。Anthropic在《构建高效智能体》博文中对此做了精妙阐释:
工作流是通过预定义代码路径编排大语言模型和工具的系统。
智能体则是大语言模型动态指导自身流程和工具使用,保持对任务完成方式控制权的系统。
以下是一个简单的可视化对比:
在构建智能体和工作流时,LangGraph提供了多项优势,包括持久化、流式处理、调试支持以及部署能力。
安装设置
您可以使用支持结构化输出和工具调用的任意聊天模型。以下我们将展示安装依赖包、设置API密钥以及测试Anthropic的结构化输出/工具调用功能的完整流程。
安装依赖项
pip install langchain_core langchain-anthropic langgraph
初始化一个LLM(大语言模型)
API参考文档:ChatAnthropic
import os
import getpass

from langchain_anthropic import ChatAnthropic

def _set_env(var: str):
    if not os.environ.get(var):
        os.environ[var] = getpass.getpass(f"{var}: ")

_set_env("ANTHROPIC_API_KEY")

llm = ChatAnthropic(model="claude-3-5-sonnet-latest")
核心组件:增强型大语言模型
大语言模型(LLM)具备支持构建工作流和智能体的增强功能。这些功能包括结构化输出和工具调用,如下图所示(源自Anthropic博客关于构建高效智能体的文章):
# Schema for structured output
from pydantic import BaseModel, Field

class SearchQuery(BaseModel):
    search_query: str = Field(None, description="Query that is optimized web search.")
    justification: str = Field(
        None, description="Why this query is relevant to the user's request."
    )

# Augment the LLM with schema for structured output
structured_llm = llm.with_structured_output(SearchQuery)

# Invoke the augmented LLM
output = structured_llm.invoke("How does Calcium CT score relate to high cholesterol?")

# Define a tool
def multiply(a: int, b: int) -> int:
    return a * b

# Augment the LLM with tools
llm_with_tools = llm.bind_tools([multiply])

# Invoke the LLM with input that triggers the tool call
msg = llm_with_tools.invoke("What is 2 times 3?")

# Get the tool call
msg.tool_calls
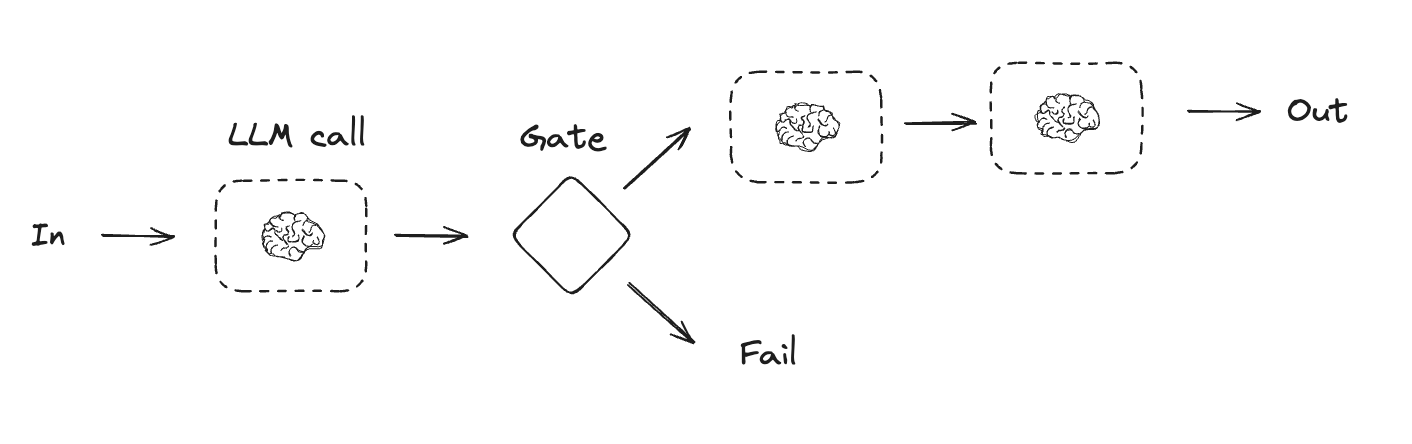
提示链
在提示链中,每个大语言模型(LLM)调用都会处理前一个调用的输出结果。
正如Anthropic博客《构建高效智能体》中所指出的:
提示链将任务分解为一系列步骤,其中每个LLM调用都会处理前一个步骤的输出。您可以在任何中间步骤添加程序化检查(参见下图中的"gate"),以确保流程仍在正轨上。
适用场景:当任务能够清晰且轻松地分解为固定子任务时,这种工作流程最为理想。其主要目标是通过让每个LLM调用处理更简单的任务,以牺牲延迟为代价换取更高的准确性。
Graph API 功能接口
from typing_extensions import TypedDict
from langgraph.graph import StateGraph, START, END
from IPython.display import Image, display

# Graph state
class State(TypedDict):
    topic: str
    joke: str
    improved_joke: str
    final_joke: str

# Nodes
def generate_joke(state: State):
    """First LLM call to generate initial joke"""
	msg = llm.invoke(f"Write a short joke about {state['topic']}")
    return {"joke": msg.content}

def check_punchline(state: State):
    """Gate function to check if the joke has a punchline"""
	# Simple check - does the joke contain "?" or "!"
    if "?" in state["joke"] or "!" in state["joke"]:
        return "Fail"
    return "Pass"

def improve_joke(state: State):
    """Second LLM call to improve the joke"""
	msg = llm.invoke(f"Make this joke funnier by adding wordplay: {state['joke']}")
    return {"improved_joke": msg.content}

def polish_joke(state: State):
    """Third LLM call for final polish"""
	msg = llm.invoke(f"Add a surprising twist to this joke: {state['improved_joke']}")
    return {"final_joke": msg.content}

# Build workflow
workflow = StateGraph(State)

# Add nodes
workflow.add_node("generate_joke", generate_joke)
workflow.add_node("improve_joke", improve_joke)
workflow.add_node("polish_joke", polish_joke)

# Add edges to connect nodes
workflow.add_edge(START, "generate_joke")
workflow.add_conditional_edges(
    "generate_joke", check_punchline, {"Fail": "improve_joke", "Pass": END}
)
workflow.add_edge("improve_joke", "polish_joke")
workflow.add_edge("polish_joke", END)

# Compile
chain = workflow.compile()

# Show workflow
display(Image(chain.get_graph().draw_mermaid_png()))

# Invoke
state = chain.invoke({"topic": "cats"})
print("Initial joke:")
print(state["joke"])
print("\n--- --- ---\n")
if "improved_joke" in state:
    print("Improved joke:")
    print(state["improved_joke"])
    print("\n--- --- ---\n")
	print("Final joke:")
    print(state["final_joke"])
else:
    print("Joke failed quality gate - no punchline detected!")
LangSmith 追踪记录 : https://smith.langchain.com/public/a0281fca-3a71-46de-beee-791468607b75/r
相关资源:
LangChain 学院
查看我们关于提示链(Prompt Chaining)的课程点击此处。
from langgraph.func import entrypoint, task

# Tasks
@task
def generate_joke(topic: str):
    """First LLM call to generate initial joke"""
    msg = llm.invoke(f"Write a short joke about {topic}")
    return msg.content

def check_punchline(joke: str):
    """Gate function to check if the joke has a punchline"""
    # Simple check - does the joke contain "?" or "!"
    if "?" in joke or "!" in joke:
        return "Fail"
	return "Pass"

@task
def improve_joke(joke: str):
    """Second LLM call to improve the joke"""
    msg = llm.invoke(f"Make this joke funnier by adding wordplay: {joke}")
    return msg.content

@task
def polish_joke(joke: str):
    """Third LLM call for final polish"""
    msg = llm.invoke(f"Add a surprising twist to this joke: {joke}")
    return msg.content

@entrypoint()
def prompt_chaining_workflow(topic: str):
    original_joke = generate_joke(topic).result()
    if check_punchline(original_joke) == "Pass":
        return original_joke
	improved_joke = improve_joke(original_joke).result()
    return polish_joke(improved_joke).result()

# Invoke
for step in prompt_chaining_workflow.stream("cats", stream_mode="updates"):
    print(step)
    print("\n")
LangSmith 追踪记录 : https://smith.langchain.com/public/332fa4fc-b6ca-416e-baa3-161625e69163/r
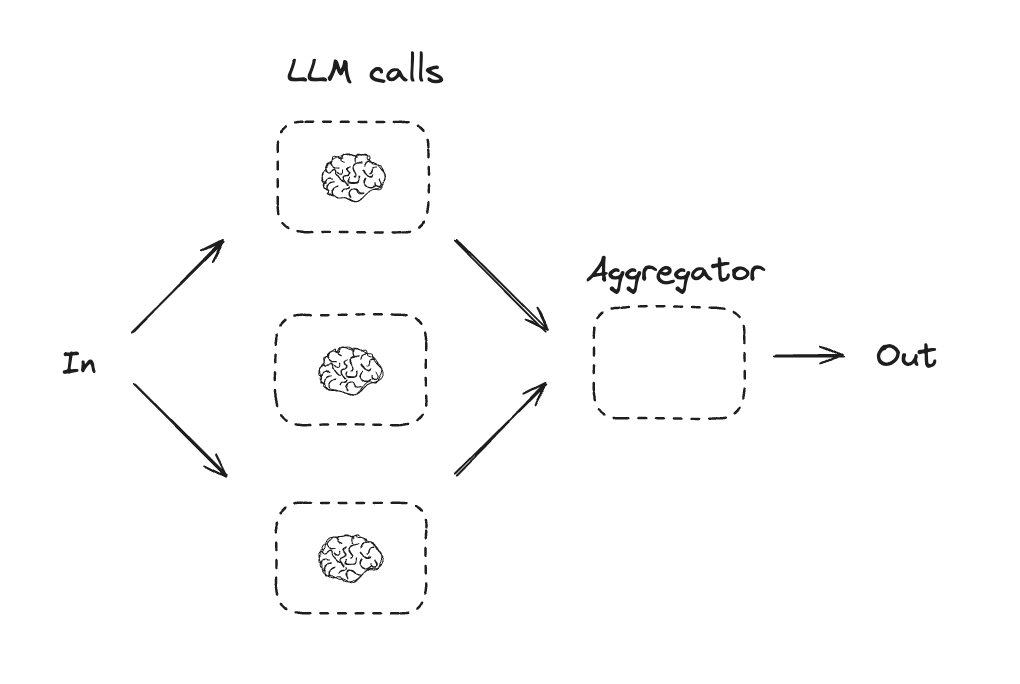
并行化
通过并行化,大语言模型(LLMs)可以同时处理任务:
LLMs有时能同时处理一个任务,并通过编程方式聚合它们的输出。这种工作流程——并行化,主要体现在两种关键形式中:
分段处理:将任务拆分为可并行运行的独立子任务。
投票机制:多次运行相同任务以获得多样化输出。
何时使用该工作流程:当子任务可并行化以提升速度时,或需要多视角/多次尝试来获得更高置信度结果时,并行化特别有效。对于涉及多重考量的复杂任务,通常让每个考量点由独立的LLM调用处理会更高效,这样能确保每个具体方面都获得专注处理。
Graph API
# Graph state
class State(TypedDict):
    topic: str
    joke: str
    story: str
    poem: str
    combined_output: str

# Nodes
def call_llm_1(state: State):
    """First LLM call to generate initial joke"""
	msg = llm.invoke(f"Write a joke about {state['topic']}")
    return {"joke": msg.content}

def call_llm_2(state: State):
    """Second LLM call to generate story"""
	msg = llm.invoke(f"Write a story about {state['topic']}")
    return {"story": msg.content}

def call_llm_3(state: State):
    """Third LLM call to generate poem"""
	msg = llm.invoke(f"Write a poem about {state['topic']}")
    return {"poem": msg.content}

def aggregator(state: State):
    """Combine the joke and story into a single output"""
	combined = f"Here's a story, joke, and poem about {state['topic']}!\n\n"
    combined += f"STORY:\n{state['story']}\n\n"
    combined += f"JOKE:\n{state['joke']}\n\n"
    combined += f"POEM:\n{state['poem']}"
    return {"combined_output": combined}

# Build workflow
parallel_builder = StateGraph(State)

# Add nodes
parallel_builder.add_node("call_llm_1", call_llm_1)
parallel_builder.add_node("call_llm_2", call_llm_2)
parallel_builder.add_node("call_llm_3", call_llm_3)
parallel_builder.add_node("aggregator", aggregator)

# Add edges to connect nodes
parallel_builder.add_edge(START, "call_llm_1")
parallel_builder.add_edge(START, "call_llm_2")
parallel_builder.add_edge(START, "call_llm_3")
parallel_builder.add_edge("call_llm_1", "aggregator")
parallel_builder.add_edge("call_llm_2", "aggregator")
parallel_builder.add_edge("call_llm_3", "aggregator")
parallel_builder.add_edge("aggregator", END)
parallel_workflow = parallel_builder.compile()

# Show workflow
display(Image(parallel_workflow.get_graph().draw_mermaid_png()))

# Invoke
state = parallel_workflow.invoke({"topic": "cats"})
print(state["combined_output"])
LangSmith 追踪记录 : https://smith.langchain.com/public/3be2e53c-ca94-40dd-934f-82ff87fac277/r
相关资源:
文档
查看我们关于并行化的文档请点击此处。
LangChain 学院
学习我们关于并行化的课程请访问此链接。
Functional API
@task
def call_llm_1(topic: str):
    """First LLM call to generate initial joke"""
    msg = llm.invoke(f"Write a joke about {topic}")
    return msg.content

@task
def call_llm_2(topic: str):
    """Second LLM call to generate story"""
    msg = llm.invoke(f"Write a story about {topic}")
    return msg.content

@task
def call_llm_3(topic):
    """Third LLM call to generate poem"""
    msg = llm.invoke(f"Write a poem about {topic}")
    return msg.content

@task
def aggregator(topic, joke, story, poem):
    """Combine the joke and story into a single output"""
	combined = f"Here's a story, joke, and poem about {topic}!\n\n"
    combined += f"STORY:\n{story}\n\n"
    combined += f"JOKE:\n{joke}\n\n"
    combined += f"POEM:\n{poem}"
    return combined

# Build workflow
@entrypoint()
def parallel_workflow(topic: str):
    joke_fut = call_llm_1(topic)
    story_fut = call_llm_2(topic)
    poem_fut = call_llm_3(topic)
    return aggregator(
        topic, joke_fut.result(), story_fut.result(), poem_fut.result()
    ).result()

# Invoke
for step in parallel_workflow.stream("cats", stream_mode="updates"):
    print(step)
    print("\n")
LangSmith 追踪记录 : https://smith.langchain.com/public/623d033f-e814-41e9-80b1-75e6abb67801/r
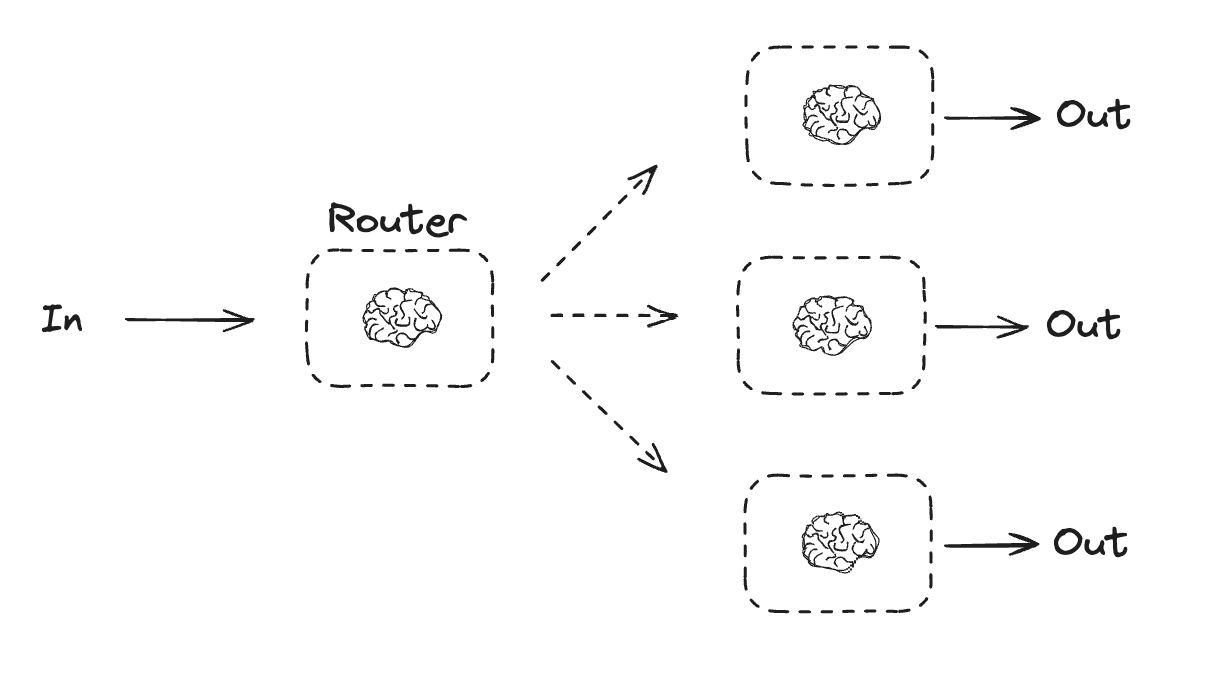
路由
路由功能对输入进行分类并将其引导至后续任务。正如Anthropic博客文章《构建高效智能体》中所指出的:
路由功能对输入进行分类并将其定向到专门的后续任务。这种工作流实现了关注点分离,可以构建更专业化的提示词。若不采用这种工作流,针对某类输入的优化可能会损害其他类型输入的处理效果。
适用场景:路由特别适合处理包含明显不同类别(这些类别更适合分开处理)的复杂任务,且分类过程可以通过LLM或更传统的分类模型/算法准确完成。
Graph API
from typing_extensions import Literal
from langchain_core.messages import HumanMessage, SystemMessage

# Schema for structured output to use as routing logic
class Route(BaseModel):
    step: Literal["poem", "story", "joke"] = Field(
        None, description="The next step in the routing process"
    )

# Augment the LLM with schema for structured output
router = llm.with_structured_output(Route)

# State
class State(TypedDict):
    input: str
    decision: str
    output: str

# Nodes
def llm_call_1(state: State):
    """Write a story"""
	result = llm.invoke(state["input"])
    return {"output": result.content}

def llm_call_2(state: State):
    """Write a joke"""
	result = llm.invoke(state["input"])
    return {"output": result.content}

def llm_call_3(state: State):
    """Write a poem"""
	result = llm.invoke(state["input"])
    return {"output": result.content}

def llm_call_router(state: State):
    """Route the input to the appropriate node"""
	# Run the augmented LLM with structured output to serve as routing logic
    decision = router.invoke(
        [
            SystemMessage(
                content="Route the input to story, joke, or poem based on the user's request."
            ),
            HumanMessage(content=state["input"]),
        ]
    )
	return {"decision": decision.step}

# Conditional edge function to route to the appropriate node
def route_decision(state: State):
    # Return the node name you want to visit next
    if state["decision"] == "story":
        return "llm_call_1"
    elif state["decision"] == "joke":
        return "llm_call_2"
    elif state["decision"] == "poem":
        return "llm_call_3"

# Build workflow
router_builder = StateGraph(State)

# Add nodes
router_builder.add_node("llm_call_1", llm_call_1)
router_builder.add_node("llm_call_2", llm_call_2)
router_builder.add_node("llm_call_3", llm_call_3)
router_builder.add_node("llm_call_router", llm_call_router)

# Add edges to connect nodes
router_builder.add_edge(START, "llm_call_router")
router_builder.add_conditional_edges(
    "llm_call_router",
    route_decision,
    {  # Name returned by route_decision : Name of next node to visit
        "llm_call_1": "llm_call_1",
        "llm_call_2": "llm_call_2",
        "llm_call_3": "llm_call_3",
    },
)
router_builder.add_edge("llm_call_1", END)
router_builder.add_edge("llm_call_2", END)
router_builder.add_edge("llm_call_3", END)

# Compile workflow
router_workflow = router_builder.compile()

# Show the workflow
display(Image(router_workflow.get_graph().draw_mermaid_png()))

# Invoke
state = router_workflow.invoke({"input": "Write me a joke about cats"})
print(state["output"])
LangSmith 追踪记录 : https://smith.langchain.com/public/c4580b74-fe91-47e4-96fe-7fac598d509c/r
资源:
LangChain 学院
查看我们关于路由的课程点击这里。
示例
这里展示了一个能路由问题的RAG工作流。观看我们的视频点击这里。
Functional API
from typing_extensions import Literal
from pydantic import BaseModel
from langchain_core.messages import HumanMessage, SystemMessage

# Schema for structured output to use as routing logic
class Route(BaseModel):
    step: Literal["poem", "story", "joke"] = Field(
        None, description="The next step in the routing process"
    )

# Augment the LLM with schema for structured output
router = llm.with_structured_output(Route)

@task
def llm_call_1(input_: str):
    """Write a story"""
    result = llm.invoke(input_)
    return result.content

@task
def llm_call_2(input_: str):
    """Write a joke"""
    result = llm.invoke(input_)
    return result.content

@task
def llm_call_3(input_: str):
    """Write a poem"""
    result = llm.invoke(input_)
    return result.content

def llm_call_router(input_: str):
    """Route the input to the appropriate node"""
    # Run the augmented LLM with structured output to serve as routing logic
    decision = router.invoke(
        [
            SystemMessage(
                content="Route the input to story, joke, or poem based on the user's request."
            ),
            HumanMessage(content=input_),
        ]
    )
    return decision.step

# Create workflow
@entrypoint()
def router_workflow(input_: str):
    next_step = llm_call_router(input_)
    if next_step == "story":
        llm_call = llm_call_1
    elif next_step == "joke":
        llm_call = llm_call_2
    elif next_step == "poem":
        llm_call = llm_call_3
	return llm_call(input_).result()

# Invoke
for step in router_workflow.stream("Write me a joke about cats", stream_mode="updates"):
    print(step)
    print("\n")
LangSmith 追踪记录 : https://smith.langchain.com/public/5e2eb979-82dd-402c-b1a0-a8cceaf2a28a/r
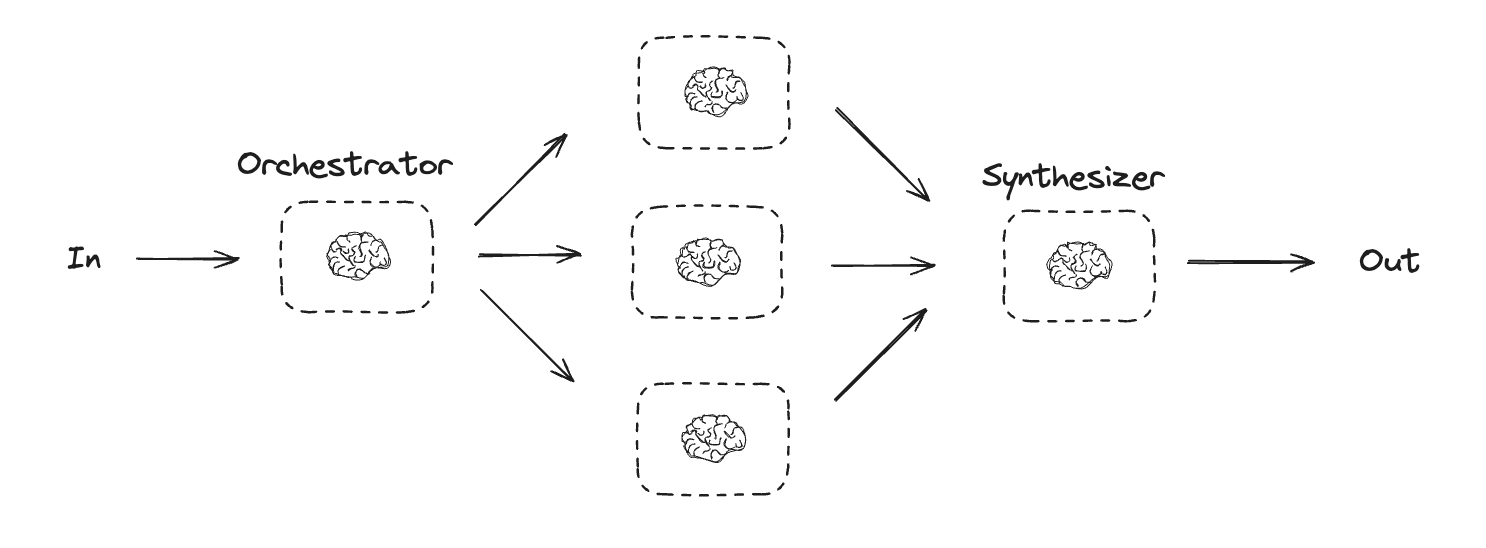
协调器-工作器模式
在协调器-工作器模式中,协调器负责分解任务并将子任务分配给各个工作器。正如Anthropic博客《构建高效智能体》中所指出的:
在协调器-工作器工作流中,一个核心LLM动态地分解任务,将它们分配给工作器LLM,并综合它们的结果。
适用场景:这种工作流特别适合那些无法预知需要哪些子任务的复杂场景(例如在编程中,需要修改的文件数量及每个文件的修改内容通常取决于具体任务)。虽然从结构上看它与并行处理相似,但关键区别在于其灵活性——子任务并非预先定义,而是由协调器根据具体输入动态决定。
Graph API
from typing import Annotated, List
import operator

# Schema for structured output to use in planning
class Section(BaseModel):
    name: str = Field(
        description="Name for this section of the report.",
    )
    description: str = Field(
        description="Brief overview of the main topics and concepts to be covered in this section.",
    )

class Sections(BaseModel):
    sections: List[Section] = Field(
        description="Sections of the report.",
    )

# Augment the LLM with schema for structured output
planner = llm.with_structured_output(Sections)
在LangGraph中创建工作节点
由于协调器-工作节点的流程模式很常见,LangGraph专门提供了Send API来支持这种场景。该API允许您动态创建工作节点,并为每个节点发送特定输入。每个工作节点拥有独立的状态,所有工作节点的输出会被写入一个共享状态键,协调器图可以访问这个键。这使得协调器能够获取所有工作节点的输出,并将它们合成为最终结果。
如下所示,我们可以遍历一个章节列表,并通过Send将每个章节分发给工作节点处理。更多文档请参考此处和此处。
Functional API
from langgraph.constants import Send

# Graph state
class State(TypedDict):
    topic: str  # Report topic
    sections: list[Section]  # List of report sections
    completed_sections: Annotated[
        list, operator.add
    ]  # All workers write to this key in parallel
    final_report: str  # Final report

# Worker state
class WorkerState(TypedDict):
    section: Section
    completed_sections: Annotated[list, operator.add]

# Nodes
def orchestrator(state: State):
    """Orchestrator that generates a plan for the report"""
	# Generate queries
    report_sections = planner.invoke(
        [
            SystemMessage(content="Generate a plan for the report."),
            HumanMessage(content=f"Here is the report topic: {state['topic']}"),
        ]
    )
	return {"sections": report_sections.sections}

def llm_call(state: WorkerState):
    """Worker writes a section of the report"""
	# Generate section
    section = llm.invoke(
        [
            SystemMessage(
                content="Write a report section following the provided name and description. Include no preamble for each section. Use markdown formatting."
            ),
            HumanMessage(
                content=f"Here is the section name: {state['section'].name} and description: {state['section'].description}"
            ),
        ]
    )
	# Write the updated section to completed sections
    return {"completed_sections": [section.content]}

def synthesizer(state: State):
    """Synthesize full report from sections"""
	# List of completed sections
    completed_sections = state["completed_sections"]
	# Format completed section to str to use as context for final sections
    completed_report_sections = "\n\n---\n\n".join(completed_sections)
	return {"final_report": completed_report_sections}

# Conditional edge function to create llm_call workers that each write a section of the report
def assign_workers(state: State):
    """Assign a worker to each section in the plan"""
	# Kick off section writing in parallel via Send() API
    return [Send("llm_call", {"section": s}) for s in state["sections"]]

# Build workflow
orchestrator_worker_builder = StateGraph(State)

# Add the nodes
orchestrator_worker_builder.add_node("orchestrator", orchestrator)
orchestrator_worker_builder.add_node("llm_call", llm_call)
orchestrator_worker_builder.add_node("synthesizer", synthesizer)

# Add edges to connect nodes
orchestrator_worker_builder.add_edge(START, "orchestrator")
orchestrator_worker_builder.add_conditional_edges(
    "orchestrator", assign_workers, ["llm_call"]
)
orchestrator_worker_builder.add_edge("llm_call", "synthesizer")
orchestrator_worker_builder.add_edge("synthesizer", END)

# Compile the workflow
orchestrator_worker = orchestrator_worker_builder.compile()

# Show the workflow
display(Image(orchestrator_worker.get_graph().draw_mermaid_png()))

# Invoke
state = orchestrator_worker.invoke({"topic": "Create a report on LLM scaling laws"})

from IPython.display import Markdown
Markdown(state["final_report"])
LangSmith 追踪记录 : https://smith.langchain.com/public/78cbcfc3-38bf-471d-b62a-b299b144237d/r
资源:
LangChain 学院
查看我们关于协调器-工作器模式的课程点击此处。
示例
此处是一个使用协调器-工作器模式进行报告规划和撰写的项目。观看我们的视频点击这里。
Functional API
from typing import List

# Schema for structured output to use in planning
class Section(BaseModel):
    name: str = Field(
        description="Name for this section of the report.",
    )
    description: str = Field(
        description="Brief overview of the main topics and concepts to be covered in this section.",
    )

class Sections(BaseModel):
    sections: List[Section] = Field(
        description="Sections of the report.",
    )

# Augment the LLM with schema for structured output
planner = llm.with_structured_output(Sections)

@task
def orchestrator(topic: str):
    """Orchestrator that generates a plan for the report"""
    # Generate queries
    report_sections = planner.invoke(
        [
            SystemMessage(content="Generate a plan for the report."),
            HumanMessage(content=f"Here is the report topic: {topic}"),
        ]
    )
	return report_sections.sections

@task
def llm_call(section: Section):
    """Worker writes a section of the report"""
	# Generate section
    result = llm.invoke(
        [
            SystemMessage(content="Write a report section."),
            HumanMessage(
                content=f"Here is the section name: {section.name} and description: {section.description}"
            ),
        ]
    )
	# Write the updated section to completed sections
    return result.content

@task
def synthesizer(completed_sections: list[str]):
    """Synthesize full report from sections"""
    final_report = "\n\n---\n\n".join(completed_sections)
    return final_report

@entrypoint()
def orchestrator_worker(topic: str):
    sections = orchestrator(topic).result()
    section_futures = [llm_call(section) for section in sections]
    final_report = synthesizer(
        [section_fut.result() for section_fut in section_futures]
    ).result()
    return final_report

# Invoke
report = orchestrator_worker.invoke("Create a report on LLM scaling laws")
from IPython.display import Markdown
Markdown(report)
LangSmith 追踪记录 : https://smith.langchain.com/public/75a636d0-6179-4a12-9836-e0aa571e87c5/r
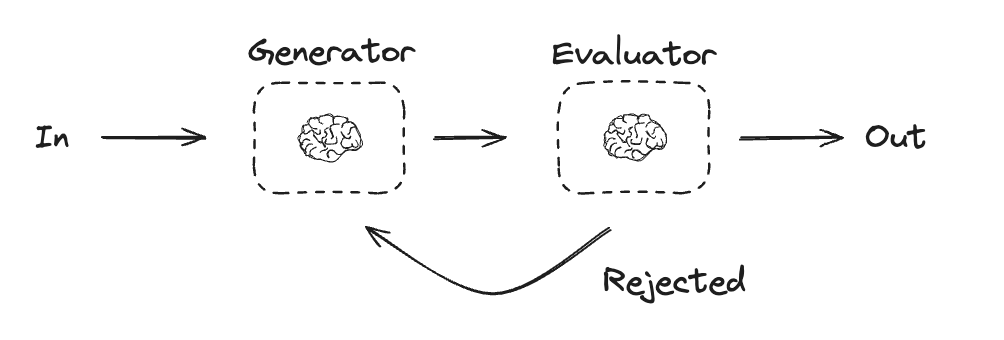
评估优化器工作流 Evaluator-optimizer
在评估优化器工作流中,一个LLM调用生成响应,而另一个LLM在循环中提供评估和反馈:
该工作流特别适用于以下场景:当我们有明确的评估标准,且迭代优化能带来可衡量的价值时。两个关键适用特征是:首先,当人类明确表达反馈意见时,LLM的响应能获得显著改进;其次,LLM自身能够提供此类反馈。这类似于人类作家在润色文档时经历的迭代写作过程。
Graph API
# Graph state
class State(TypedDict):
    joke: str
    topic: str
    feedback: str
    funny_or_not: str

# Schema for structured output to use in evaluation
class Feedback(BaseModel):
    grade: Literal["funny", "not funny"] = Field(
        description="Decide if the joke is funny or not.",
    )
    feedback: str = Field(
        description="If the joke is not funny, provide feedback on how to improve it.",
    )

# Augment the LLM with schema for structured output
evaluator = llm.with_structured_output(Feedback)

# Nodes
def llm_call_generator(state: State):
    """LLM generates a joke"""
	if state.get("feedback"):
        msg = llm.invoke(
            f"Write a joke about {state['topic']} but take into account the feedback: {state['feedback']}"
        )
    else:
        msg = llm.invoke(f"Write a joke about {state['topic']}")
    return {"joke": msg.content}

def llm_call_evaluator(state: State):
    """LLM evaluates the joke"""
	grade = evaluator.invoke(f"Grade the joke {state['joke']}")
    return {"funny_or_not": grade.grade, "feedback": grade.feedback}

# Conditional edge function to route back to joke generator or end based upon feedback from the evaluator
def route_joke(state: State):
    """Route back to joke generator or end based upon feedback from the evaluator"""
	if state["funny_or_not"] == "funny":
        return "Accepted"
    elif state["funny_or_not"] == "not funny":
        return "Rejected + Feedback"

# Build workflow
optimizer_builder = StateGraph(State)

# Add the nodes
optimizer_builder.add_node("llm_call_generator", llm_call_generator)
optimizer_builder.add_node("llm_call_evaluator", llm_call_evaluator)

# Add edges to connect nodes
optimizer_builder.add_edge(START, "llm_call_generator")
optimizer_builder.add_edge("llm_call_generator", "llm_call_evaluator")
optimizer_builder.add_conditional_edges(
    "llm_call_evaluator",
    route_joke,
    {  # Name returned by route_joke : Name of next node to visit
        "Accepted": END,
        "Rejected + Feedback": "llm_call_generator",
    },
)

# Compile the workflow
optimizer_workflow = optimizer_builder.compile()

# Show the workflow
display(Image(optimizer_workflow.get_graph().draw_mermaid_png()))

# Invoke
state = optimizer_workflow.invoke({"topic": "Cats"})
print(state["joke"])
LangSmith 追踪记录 : https://smith.langchain.com/public/86ab3e60-2000-4bff-b988-9b89a3269789/r
资源:
示例
此处展示了一个使用评估优化器改进报告的助手。观看演示视频请点击此处。
此处展示了一个能对答案进行幻觉或错误评分的RAG工作流。观看演示视频请点击此处。
Functional API
# Schema for structured output to use in evaluation
class Feedback(BaseModel):
    grade: Literal["funny", "not funny"] = Field(
        description="Decide if the joke is funny or not.",
    )
    feedback: str = Field(
        description="If the joke is not funny, provide feedback on how to improve it.",
    )

# Augment the LLM with schema for structured output
evaluator = llm.with_structured_output(Feedback)

# Nodes
@task
def llm_call_generator(topic: str, feedback: Feedback):
    """LLM generates a joke"""
    if feedback:
        msg = llm.invoke(
            f"Write a joke about {topic} but take into account the feedback: {feedback}"
        )
    else:
        msg = llm.invoke(f"Write a joke about {topic}")
    return msg.content

@task
def llm_call_evaluator(joke: str):
    """LLM evaluates the joke"""
    feedback = evaluator.invoke(f"Grade the joke {joke}")
    return feedback

@entrypoint()
def optimizer_workflow(topic: str):
    feedback = None
    while True:
        joke = llm_call_generator(topic, feedback).result()
        feedback = llm_call_evaluator(joke).result()
        if feedback.grade == "funny":
            break
	return joke

# Invoke
for step in optimizer_workflow.stream("Cats", stream_mode="updates"):
    print(step)
    print("\n")
LangSmith 追踪记录 : https://smith.langchain.com/public/f66830be-4339-4a6b-8a93-389ce5ae27b4/r
智能体
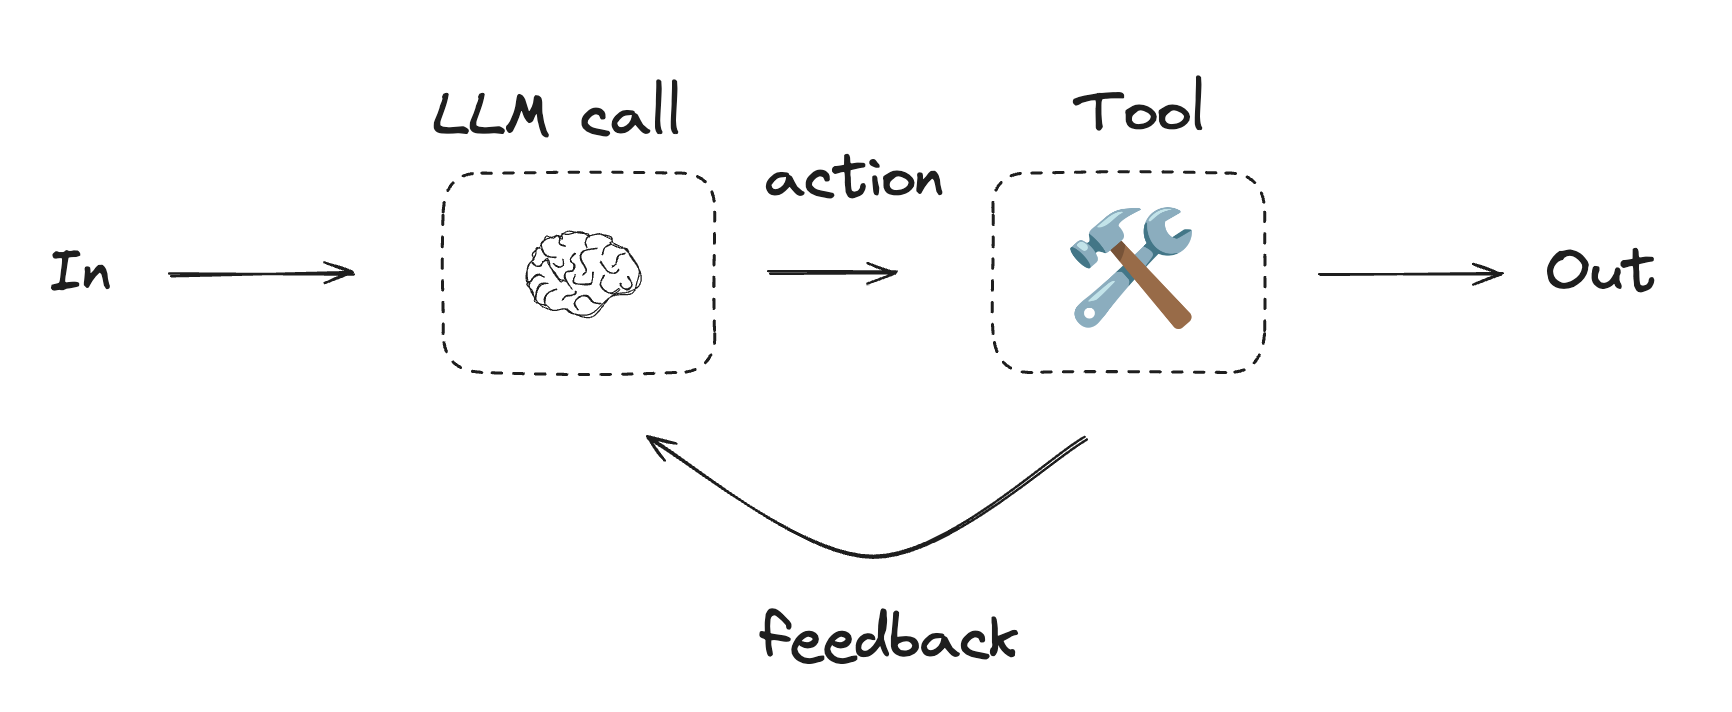
智能体通常以大型语言模型(LLM)为核心实现,通过循环执行工具调用来响应环境反馈。正如Anthropic博客《构建高效智能体》所述:
智能体能够处理复杂任务,但其实现往往简洁明了。它们本质上就是LLM在循环中根据环境反馈调用工具。因此,精心设计工具集及其文档至关重要。
适用场景:智能体适用于开放式问题,这类问题难以预测所需步骤数量,也无法固化执行路径。LLM可能进行多轮操作,这就要求对其决策能力有一定信任度。智能体的自主性使其成为可信环境中扩展任务的理想选择。
API参考文档:tool
from langchain_core.tools import tool

# Define tools
@tool
def multiply(a: int, b: int) -> int:
    """Multiply a and b.
	Args:
        a: first int
        b: second int
    """
    return a * b

@tool
def add(a: int, b: int) -> int:
    """Adds a and b.
	Args:
        a: first int
        b: second int
    """
    return a + b

@tool
def divide(a: int, b: int) -> float:
    """Divide a and b.
	Args:
        a: first int
        b: second int
    """
    return a / b

# Augment the LLM with tools
tools = [add, multiply, divide]
tools_by_name = {tool.name: tool for tool in tools}
llm_with_tools = llm.bind_tools(tools)
Graph API
from langgraph.graph import MessagesState
from langchain_core.messages import SystemMessage, HumanMessage, ToolMessage

# Nodes
def llm_call(state: MessagesState):
    """LLM decides whether to call a tool or not"""
	return {
        "messages": [
            llm_with_tools.invoke(
                [
                    SystemMessage(
                        content="You are a helpful assistant tasked with performing arithmetic on a set of inputs."
                    )
                ]
                + state["messages"]
            )
        ]
    }

def tool_node(state: dict):
    """Performs the tool call"""
	result = []
    for tool_call in state["messages"][-1].tool_calls:
        tool = tools_by_name[tool_call["name"]]
        observation = tool.invoke(tool_call["args"])
        result.append(ToolMessage(content=observation, tool_call_id=tool_call["id"]))
    return {"messages": result}

# Conditional edge function to route to the tool node or end based upon whether the LLM made a tool call
def should_continue(state: MessagesState) -> Literal["environment", END]:
    """Decide if we should continue the loop or stop based upon whether the LLM made a tool call"""
	messages = state["messages"]
    last_message = messages[-1]
    # If the LLM makes a tool call, then perform an action
    if last_message.tool_calls:
        return "Action"
    # Otherwise, we stop (reply to the user)
    return END

# Build workflow
agent_builder = StateGraph(MessagesState)

# Add nodes
agent_builder.add_node("llm_call", llm_call)
agent_builder.add_node("environment", tool_node)

# Add edges to connect nodes
agent_builder.add_edge(START, "llm_call")
agent_builder.add_conditional_edges(
    "llm_call",
    should_continue,
    {
        # Name returned by should_continue : Name of next node to visit
        "Action": "environment",
        END: END,
    },
)
agent_builder.add_edge("environment", "llm_call")

# Compile the agent
agent = agent_builder.compile()

# Show the agent
display(Image(agent.get_graph(xray=True).draw_mermaid_png()))

# Invoke
messages = [HumanMessage(content="Add 3 and 4.")]
messages = agent.invoke({"messages": messages})
for m in messages["messages"]:
    m.pretty_print()
LangSmith 追踪记录 : https://smith.langchain.com/public/051f0391-6761-4f8c-a53b-22231b016690/r
资源:
LangChain 学院
查看我们关于智能体的课程点击这里。
示例
这里是一个使用工具调用智能体来创建/存储长期记忆的项目。
Functional API
from langgraph.graph import add_messages
from langchain_core.messages import (
    SystemMessage,
    HumanMessage,
    BaseMessage,
    ToolCall,
)

@task
def call_llm(messages: list[BaseMessage]):
    """LLM decides whether to call a tool or not"""
    return llm_with_tools.invoke(
        [
            SystemMessage(
                content="You are a helpful assistant tasked with performing arithmetic on a set of inputs."
            )
        ]
        + messages
    )

@task
def call_tool(tool_call: ToolCall):
    """Performs the tool call"""
    tool = tools_by_name[tool_call["name"]]
    return tool.invoke(tool_call)

@entrypoint()
def agent(messages: list[BaseMessage]):
    llm_response = call_llm(messages).result()
	while True:
        if not llm_response.tool_calls:
            break
	    # Execute tools
        tool_result_futures = [
            call_tool(tool_call) for tool_call in llm_response.tool_calls
        ]
        tool_results = [fut.result() for fut in tool_result_futures]
        messages = add_messages(messages, [llm_response, *tool_results])
        llm_response = call_llm(messages).result()
	messages = add_messages(messages, llm_response)
    return messages

# Invoke
messages = [HumanMessage(content="Add 3 and 4.")]
for chunk in agent.stream(messages, stream_mode="updates"):
    print(chunk)
    print("\n")
LangSmith 追踪记录 : https://smith.langchain.com/public/42ae8bf9-3935-4504-a081-8ddbcbfc8b2e/r
预构建方案
LangGraph 还提供了一个预构建方法用于创建上述定义的智能体(通过 create_react_agent 函数实现):
https://langchain-ai.github.io/langgraph/how-tos/create-react-agent/
API参考文档:create_react_agent
from langgraph.prebuilt import create_react_agent

# Pass in:
# (1) the augmented LLM with tools
# (2) the tools list (which is used to create the tool node)
pre_built_agent = create_react_agent(llm, tools=tools)

# Show the agent
display(Image(pre_built_agent.get_graph().draw_mermaid_png()))

# Invoke
messages = [HumanMessage(content="Add 3 and 4.")]
messages = pre_built_agent.invoke({"messages": messages})
for m in messages["messages"]:
    m.pretty_print()
LangSmith 追踪记录 : https://smith.langchain.com/public/abab6a44-29f6-4b97-8164-af77413e494d/r
LangGraph 提供的功能
通过使用 LangGraph 构建上述每个组件,我们可以获得以下优势:
持久化:人工介入循环
LangGraph 持久化层支持对操作的中断和审批(例如人工介入循环)。详情请参阅 LangChain 学院的模块 3。
持久化:内存机制
LangGraph 的持久化层支持会话(短期)内存和长期记忆功能。具体可参考 LangChain 学院的模块 2 和 模块 5 相关内容:
流式处理
LangGraph 提供了多种方式来流式输出工作流/代理的结果或中间状态。具体可参考 LangChain 学院的模块 3。
部署
LangGraph 为部署、可观测性和评估提供了便捷的入门途径。详见 LangChain Academy 的模块 6。
Graph API 概念
https://langchain-ai.github.io/langgraph/concepts/low_level/
图结构
LangGraph 的核心思想是将智能体工作流建模为图结构。您可以通过以下三个关键组件来定义智能体的行为:
1、状态(State):表示应用程序当前快照的共享数据结构。它可以是任何 Python 类型,但通常是 TypedDict 或 Pydantic 的 BaseModel。
2、节点(Nodes):封装智能体逻辑的 Python 函数。它们接收当前 State 作为输入,执行计算或副作用操作,并返回更新后的 State。
3、边(Edges):根据当前 State 决定下一步执行哪个 Node 的 Python 函数。可以是条件分支或固定跳转。
通过组合 Nodes 和 Edges,您可以创建随时间演进 State 的复杂循环工作流。但真正的威力来自 LangGraph 管理 State 的方式——需要强调的是:Nodes 和 Edges 本质上只是 Python 函数,它们既可以包含 LLM 调用,也可以使用传统 Python 代码。
简言之:节点负责执行操作,边负责指引方向。
LangGraph 的底层图算法采用消息传递机制来定义通用程序。当节点完成操作时,它会沿一条或多条边向其他节点发送消息。接收节点执行其函数后,将结果消息传递给下一组节点,如此循环往复。受谷歌 Pregel 系统启发,程序以离散的"超步(super-step)"推进。
每个超步可视为对图节点的一次迭代。并行运行的节点属于同一超步,而顺序运行的节点属于不同超步。图执行开始时,所有节点都处于非活跃(inactive)状态。当节点在任何入边(或称"通道")上收到新消息(状态)时,会转为活跃(active)状态并执行函数。每个超步结束时,没有收到消息的节点会通过标记自身为非活跃来投票暂停(halt)。当所有节点都处于非活跃状态且无消息传递时,图执行终止。
StateGraph
StateGraph 类是主要使用的图类。它通过用户定义的 State 对象进行参数化。
编译你的图
要构建你的图,首先需要定义状态,然后添加节点和边,最后进行编译。那么编译图具体是什么?为什么需要这个步骤?
编译是一个相当简单的步骤。它会对图结构进行一些基本检查(比如确保没有孤立节点等)。这也是你指定运行时参数的地方,例如检查点和断点。你只需调用.compile方法即可完成图的编译:
graph = graph_builder.compile(...)
在使用图之前,您必须先编译它。
状态
定义图时首先要定义的是图的State(状态)。State由图的模式和reducer函数组成,这些函数规定了如何对状态进行更新操作。State的模式将作为图中所有Nodes(节点)和Edges(边)的输入模式,可以是TypedDict或Pydantic模型。所有Nodes都会向State发出更新,随后通过指定的reducer函数来应用这些更新。
模式定义
指定图模式的主要文档化方式是通过使用 TypedDict。不过,我们也支持采用 Pydantic 的 BaseModel 作为图状态,从而添加默认值和额外的数据验证功能。
默认情况下,图的输入和输出模式是相同的。如需修改这一行为,您可以直接显式指定独立的输入和输出模式。当图中存在大量键值,且部分专用于输入、另一些专用于输出时,这一特性尤为实用。具体使用方法请参阅此指南。
多模态架构
通常情况下,所有图节点都通过单一模式进行通信。这意味着它们会读写相同的状态通道。但在某些场景下,我们需要更精细的控制:
- 内部节点可以传递图形输入/输出不需要的信息
- 可能需要为图形使用不同的输入/输出模式。例如,输出可能仅包含单个相关输出键
我们可以让节点在图内部向私有状态通道写入数据,用于节点间内部通信。只需定义一个私有模式 PrivateState 即可。具体实现方法请参阅本指南。
同样可以为图形定义显式的输入和输出模式。这种情况下,我们需要定义一个包含所有图形操作相关键的"内部"模式,同时定义作为内部模式子集的 input 和 output 模式来约束图形的输入输出。详细说明请参考本指南。
下面通过示例来说明:
class InputState(TypedDict):
    user_input: str

class OutputState(TypedDict):
    graph_output: str

class OverallState(TypedDict):
    foo: str
    user_input: str
    graph_output: str

class PrivateState(TypedDict):
    bar: str

def node_1(state: InputState) -> OverallState:
    # Write to OverallState
    return {"foo": state["user_input"] + " name"}

def node_2(state: OverallState) -> PrivateState:
    # Read from OverallState, write to PrivateState
    return {"bar": state["foo"] + " is"}

def node_3(state: PrivateState) -> OutputState:
    # Read from PrivateState, write to OutputState
    return {"graph_output": state["bar"] + " Lance"}

builder = StateGraph(OverallState,input=InputState,output=OutputState)
builder.add_node("node_1", node_1)
builder.add_node("node_2", node_2)
builder.add_node("node_3", node_3)
builder.add_edge(START, "node_1")
builder.add_edge("node_1", "node_2")
builder.add_edge("node_2", "node_3")
builder.add_edge("node_3", END)

graph = builder.compile()
graph.invoke({"user_input":"My"})
{'graph_output': 'My name is Lance'}
这里有两个微妙而重要的要点需要注意:
1、我们将 state: InputState 作为输入模式传递给 node_1。但是,我们却写入 OverallState 中的通道 foo。为什么能写入一个未包含在输入模式中的状态通道?这是因为节点可以写入图状态中的任何状态通道。图状态是初始化时定义的所有状态通道的并集,包括 OverallState 以及过滤器 InputState 和 OutputState。
2、我们通过 StateGraph(OverallState,input=InputState,output=OutputState) 初始化图。那么,为什么能在 node_2 中写入 PrivateState?如果这个模式没有在 StateGraph 初始化时传入,图是如何获得访问权限的?这是因为只要状态模式定义存在,节点还可以声明额外的状态通道。在本例中,由于已定义 PrivateState 模式,因此我们可以在图中添加 bar 作为新的状态通道并写入数据。
Reducers(归约器)
Reducers 是理解节点更新如何应用到 State 的核心机制。State 中的每个键都拥有独立的归约函数。若未显式指定归约函数,则默认对该键的所有更新将直接覆盖原值。归约器主要分为以下几种类型,首先从默认类型开始:
默认Reducer
以下两个示例展示了如何使用默认reducer:
示例A:
from typing_extensions import TypedDict

class State(TypedDict):
    foo: int
    bar: list[str]
在这个示例中,没有为任何键指定 reducer 函数。假设图的输入是 {"foo": 1, "bar": ["hi"]}。接着假设第一个 Node 返回 {"foo": 2}。这会被视为对状态的更新。注意,Node 不需要返回整个 State 结构——只需返回更新部分。应用此更新后,State 将变为 {"foo": 2, "bar": ["hi"]}。如果第二个节点返回 {"bar": ["bye"]},那么 State 将更新为 {"foo": 2, "bar": ["bye"]}。
示例 B:
from typing import Annotated
from typing_extensions import TypedDict
from operator import add

class State(TypedDict):
    foo: int
    bar: Annotated[list[str], add]
在这个示例中,我们使用了 Annotated 类型来为第二个键(bar)指定归约函数(operator.add)。注意第一个键保持不变。假设图的输入是 {"foo": 1, "bar": ["hi"]},接着假设第一个 Node 返回 {"foo": 2}。这会被视为对状态的更新。请注意,Node 不需要返回完整的 State 结构——只需返回更新部分。应用此更新后,State 将变为 {"foo": 2, "bar": ["hi"]}。如果第二个节点返回 {"bar": ["bye"]},那么 State 将更新为 {"foo": 2, "bar": ["hi", "bye"]}。这里可以看到,bar 键的更新是通过将两个列表合并实现的。
图状态中的消息处理
为什么使用消息?
大多数现代LLM提供商都采用聊天模型接口,该接口接收消息列表作为输入。特别是LangChain的ChatModel,它接受Message对象列表作为输入。
这些消息有多种形式,例如HumanMessage(用户输入)或AIMessage(LLM响应)。要了解更多关于消息对象的信息,请参阅概念指南。
在图中使用消息
在许多场景下,将先前的对话历史作为消息列表存储在图的状体中非常有用。为此,我们可以向图状态添加一个键(通道),用于存储Message对象列表,并通过reducer函数进行标注(如下例中的messages键)。
reducer 函数至关重要,它告诉图如何在每次状态更新时(例如当节点发送更新时)更新状态中的Message对象列表。
如果不指定reducer,每次状态更新都会用最新提供的值覆盖消息列表。如果只想将消息追加到现有列表中,可以使用operator.add作为reducer。
不过,有时你可能需要手动更新图状态中的消息(例如人工介入)。
如果使用operator.add,手动发送到图的状态更新会被追加到现有消息列表,而不是更新现有消息。
为避免这种情况,你需要一个能跟踪消息ID并在更新时覆盖现有消息的reducer。
为此,可以使用预构建的add_messages函数。对于全新消息,它会直接追加到现有列表,同时也能正确处理现有消息的更新。
序列化
除了跟踪消息ID外,add_messages函数还会在messages通道上接收到状态更新时,尝试将消息反序列化为LangChain的Message对象。有关LangChain序列化/反序列化的更多信息,请参阅此处。这允许以以下格式发送图输入/状态更新:
# this is supported
{"messages": [HumanMessage(content="message")]}

# and this is also supported
{"messages": [{"type": "human", "content": "message"}]}
由于使用add_messages时状态更新总是会被反序列化为LangChain的Messages对象,因此应该通过点号表示法来访问消息属性,例如state["messages"][-1].content。下面是一个使用add_messages作为reducer函数的图表示例。
API参考:AnyMessage | add_messages
from langchain_core.messages import AnyMessage
from langgraph.graph.message import add_messages
from typing import Annotated
from typing_extensions import TypedDict

class GraphState(TypedDict):
    messages: Annotated[list[AnyMessage], add_messages]
MessagesState
由于在状态中维护消息列表是非常常见的需求,我们提供了一个预构建的状态类MessagesState,它能简化消息处理流程。
MessagesState通过单一的messages键来定义(该键是一个AnyMessage对象列表),并使用add_messages这个reducer。
通常,除了消息之外还需要跟踪更多状态,因此常见做法是通过子类化这个状态类并添加更多字段,例如:
from langgraph.graph import MessagesState

class State(MessagesState):
    documents: list[str]
节点
在LangGraph中,节点通常是Python函数(同步或异步),其中第一个位置参数是状态,而(可选的)第二个位置参数是"config",包含可选的可配置参数(例如thread_id)。
与NetworkX类似,您可以使用add_node方法将这些节点添加到图中:
API参考:RunnableConfig | StateGraph
from langchain_core.runnables import RunnableConfig
from langgraph.graph import StateGraph

builder = StateGraph(dict)

def my_node(state: dict, config: RunnableConfig):
    print("In node: ", config["configurable"]["user_id"])
    return {"results": f"Hello, {state['input']}!"}

# The second argument is optional
def my_other_node(state: dict):
    return state

builder.add_node("my_node", my_node)
builder.add_node("other_node", my_other_node)
...
在底层实现中,函数会被转换为RunnableLambda,这为您的函数添加了批处理和异步支持,同时具备原生追踪和调试功能。
如果在向图结构添加节点时未指定名称,系统会自动分配一个默认名称(默认采用函数名称)。
builder.add_node(my_node)
# You can then create edges to/from this node by referencing it as `"my_node"`
START 节点
START 节点是一个特殊节点,代表将用户输入发送至图结构的起始节点。引用该节点的主要目的是确定哪些节点应该被优先调用。
API参考文档:START
from langgraph.graph import START

graph.add_edge(START, "node_a")
END 节点
END 节点是一种特殊的终端节点。当需要表示某些边在完成操作后没有后续动作时,就会引用该节点。
from langgraph.graph import END

graph.add_edge("node_a", END)
边
边定义了逻辑如何流转以及图结构如何决定停止运行。这是决定智能体工作方式和不同节点间如何通信的重要组成部分。边主要有以下几种关键类型:
- 普通边:直接从一个节点指向下一个节点
- 条件边:通过调用函数来决定下一个要执行的节点
- 入口点:当用户输入到达时首先调用的节点
- 条件入口点:通过调用函数来决定用户输入到达时首先调用的节点
一个节点可以拥有多条出边。如果某节点存在多条出边,在下一个超步阶段,所有目标节点都将并行执行。
常规边
如果你总是需要从节点 A 连接到节点 B,可以直接使用 add_edge 方法。
graph.add_edge("node_a", "node_b")
条件边
如果你想可选地路由到1个或多个边(或选择性地终止),可以使用add_conditional_edges方法。该方法接受一个节点名称和一个"路由函数",在该节点执行后调用该函数:
graph.add_conditional_edges("node_a", routing_function)
与节点类似,routing_function 接收图的当前 state 并返回一个值。
默认情况下,routing_function 的返回值会被用作下一个接收状态的节点(或节点列表)的名称。所有这些节点将作为下一个超级步骤的一部分并行运行。
您还可以选择提供一个字典,将 routing_function 的输出映射到下一个节点的名称。
graph.add_conditional_edges("node_a", routing_function, {True: "node_b", False: "node_c"})
提示:
如果想在单个函数中合并状态更新和路由操作,请使用 Command 而非条件边。
入口节点
入口节点是图开始运行时首先执行的节点。你可以使用虚拟节点 START 的 add_edge 方法,将其连接到首个要执行的节点,从而指定图的入口位置。
API参考文档:START
from langgraph.graph import START

graph.add_edge(START, "node_a")
条件入口点
条件入口点允许您根据自定义逻辑从不同节点开始。您可以使用虚拟 START 方法来实现这一功能。
API参考文档:START
from langgraph.graph import START

graph.add_conditional_edges(START, routing_function)
您可以选择提供一个字典,将 routing_function 的输出映射到下一个节点的名称。
graph.add_conditional_edges(START, routing_function, {True: "node_b", False: "node_c"})
Send
默认情况下,Nodes和Edges会预先定义并在同一个共享状态上运行。但在某些情况下,可能无法提前确定具体的边,或者需要同时存在不同版本的State。一个典型的例子是map-reduce设计模式。在该模式中,第一个节点可能生成一个对象列表,而您可能希望将其他节点应用于所有这些对象。对象的数量可能事先未知(意味着边的数量也不确定),且下游Node的输入State应当各不相同(每个生成对象对应一个)。
为支持这种设计模式,LangGraph允许从条件边返回Send对象。Send接收两个参数:第一个是节点名称,第二个是传递给该节点的状态。
def continue_to_jokes(state: OverallState):
    return [Send("generate_joke", {"subject": s}) for s in state['subjects']]

graph.add_conditional_edges("node_a", continue_to_jokes)
Command
将控制流(边)和状态更新(节点)结合起来会非常有用。例如,您可能希望在同一个节点中既执行状态更新,又决定下一步要转向哪个节点。LangGraph 提供了一种实现方式:通过从节点函数返回 Command 对象来完成这一操作。
def my_node(state: State) -> Command[Literal["my_other_node"]]:
    return Command(
        # state update
        update={"foo": "bar"},
        # control flow
        goto="my_other_node"
    )
使用 Command 还可以实现动态控制流行为(与条件边功能相同):
def my_node(state: State) -> Command[Literal["my_other_node"]]:
    if state["foo"] == "bar":
        return Command(update={"foo": "baz"}, goto="my_other_node")
重要提示:
在节点函数中返回 Command 时,必须添加返回类型注解,明确列出该节点可能路由到的其他节点名称,例如 Command[Literal["my_other_node"]]。这一标注对于图谱渲染至关重要,它会告知 LangGraph 当前节点 my_node 可以跳转到 my_other_node。
具体使用方法可参考这篇操作指南,其中提供了端到端的 Command 使用示例。
何时应使用 Command 而非条件边?
当您需要同时更新图状态并路由到不同节点时,请使用 Command。例如,在实现多代理交接时,路由到不同代理并向该代理传递某些信息至关重要。
使用条件边可在不更新状态的情况下,根据条件在节点之间进行路由。
在父图中导航到节点
当使用子图时,可能需要从子图内的节点导航到另一个子图(即父图中的不同节点)。为此,可以在Command中指定graph=Command.PARENT来实现。
def my_node(state: State) -> Command[Literal["other_subgraph"]]:
    return Command(
        update={"foo": "bar"},
        goto="other_subgraph",  # where `other_subgraph` is a node in the parent graph
        graph=Command.PARENT
    )
注意:将 graph 设置为 Command.PARENT 会导航至最近的父级图。
使用 Command.PARENT 的状态更新
当从子图节点向父图节点发送状态更新,且更新的键同时存在于父图和子图的状态模式中时,必须在父图状态中为待更新的键定义归约器。具体示例可参考此文档。
这在实现多智能体交接时尤为实用。
详细说明请参阅本指南。
在工具内部使用
一个常见的使用场景是从工具内部更新图状态。例如,在客户支持应用中,你可能希望在对话开始时根据客户的账号或ID查找客户信息。
详情请参考本指南。
人机协同循环
Command 是人机协同工作流中的重要组成部分:当使用 interrupt() 收集用户输入时,可通过 Command(resume="用户输入") 来提供输入并恢复执行。更多信息请参阅这篇概念指南。
图迁移
LangGraph 能够轻松处理图定义(节点、边和状态)的迁移,即使在使用检查点追踪状态时也是如此。
- 对于图末端的线程(即未被中断的),您可以更改图的整个拓扑结构(即所有节点和边,包括删除、添加、重命名等操作)
- 对于当前被中断的线程,我们支持除重命名/删除节点之外的所有拓扑变更(因为该线程可能即将进入一个已不存在的节点)——如果这成为阻碍,请联系我们,我们将优先解决。
- 对于状态修改,我们在添加和删除键时具有完全的向后和向前兼容性
- 重命名的状态键在现有线程中会丢失其保存的状态
- 状态键的类型以不兼容方式更改时,可能会导致变更前状态的线程出现问题——如果这成为阻碍,请联系我们,我们将优先解决。
配置
在创建图时,你可以标记图的某些部分为可配置项。这一功能通常用于方便切换不同模型或系统提示,使你能够创建单一的"认知架构"(即图结构),同时拥有多个不同的实例。
在创建图时,你可以选择性地指定一个 config_schema。
class ConfigSchema(TypedDict):
    llm: str

graph = StateGraph(State, config_schema=ConfigSchema)
然后,你可以通过 configurable 配置字段将此配置传递给图表。
config = {"configurable": {"llm": "anthropic"}}

graph.invoke(inputs, config=config)
然后你可以在节点或条件边中访问和使用此配置:
def node_a(state, config):
    llm_type = config.get("configurable", {}).get("llm", "openai")
    llm = get_llm(llm_type)
    ...
完整配置说明请参阅本指南。
递归限制
递归限制用于设置图在单次执行过程中可运行的超级步骤的最大数量。一旦达到该限制,LangGraph 将抛出 GraphRecursionError 错误。默认情况下,该值设置为 25 步。
递归限制可以在运行时为任何图进行设置,并通过配置字典传递给 .invoke/.stream 方法。需要注意的是,recursion_limit 是一个独立的 config 键,不应像其他用户自定义配置那样放在 configurable 键内传递。具体示例如下:
graph.invoke(inputs, config={"recursion_limit": 5, "configurable":{"llm": "anthropic"}})
阅读本教程了解递归限制的工作原理。
可视化
能够可视化图形通常很有帮助,尤其是当它们变得更加复杂时。LangGraph 提供了多种内置的可视化图形方法。更多信息请参阅本操作指南。
LangGraph 运行时
https://langchain-ai.github.io/langgraph/concepts/pregel/
Pregel 实现了 LangGraph 的运行时机制,负责管理 LangGraph 应用程序的执行流程。
当您编译一个 StateGraph 实例,该实例可通过输入参数进行调用。
本指南将概要介绍运行时机制,并提供直接使用 Pregel 实现应用程序的操作说明。
注意: Pregel 运行时得名于 Google 的 Pregel 算法,该算法描述了一种利用图结构进行大规模并行计算的高效方法。
概述
在LangGraph中,Pregel将Actor模型和通道结合成一个统一的应用框架。Actor从通道读取数据,并向通道写入数据。Pregel按照Pregel算法/批量同步并行模型,将应用执行过程组织为多个步骤。
每个步骤包含三个阶段:
- 计划阶段:确定当前步骤需要执行的Actor。例如:第一步选择订阅特殊输入通道的Actor;后续步骤则选择订阅了上一步更新通道的Actor。
- 执行阶段:并行执行所有选中的Actor,直到全部完成、任一失败或达到超时。此阶段产生的通道更新对Actor不可见,需等到下一步骤才会生效。
- 更新阶段:根据本步骤中Actor写入的值更新通道状态。
该循环会持续执行,直到没有Actor被选中执行,或达到最大步骤数限制。
执行器
执行器是一个PregelNode。它订阅通道、从中读取数据并向其写入数据。可以将其视为Pregel算法中的执行器。PregelNodes实现了LangChain的Runnable接口。
通道
通道用于在参与者(PregelNodes)之间进行通信。每个通道都包含一个值类型、一个更新类型和一个更新函数——该函数接收一系列更新并修改存储的值。通道可用于将数据从一个链发送到另一个链,或在后续步骤中将数据从链发送到自身。LangGraph 提供了多种内置通道:
- LastValue:默认通道,存储发送到通道的最后一个值,适用于输入和输出值,或在步骤之间传递数据。
- Topic:可配置的发布-订阅主题,适用于在参与者之间发送多个值,或累积输出。可配置为去重或在多个步骤中累积值。
- BinaryOperatorAggregate:存储持久值,通过对当前值和发送到通道的每个更新应用二元运算符来更新,适用于在多步骤中计算聚合;例如,
total = BinaryOperatorAggregate(int, operator.add)
示例
虽然大多数用户会通过StateGraph API或entrypoint装饰器与Pregel交互,但也可以直接使用Pregel API。
以下是几个不同示例,帮助您了解Pregel API的使用方式:
单节点
from langgraph.channels import EphemeralValue
from langgraph.pregel import Pregel, Channel

node1 = (
    Channel.subscribe_to("a")
 | (lambda x: x + x)
 | Channel.write_to("b")
)

app = Pregel(
    nodes={"node1": node1},
    channels={
        "a": EphemeralValue(str),
        "b": EphemeralValue(str),
    },
    input_channels=["a"],
    output_channels=["b"],
)

app.invoke({"a": "foo"})
{'b': 'foofoo'}
多节点
from langgraph.channels import LastValue, EphemeralValue
from langgraph.pregel import Pregel, Channel

node1 = (
    Channel.subscribe_to("a")
 | (lambda x: x + x)
 | Channel.write_to("b")
)

node2 = (
    Channel.subscribe_to("b")
 | (lambda x: x + x)
 | Channel.write_to("c")
)

app = Pregel(
    nodes={"node1": node1, "node2": node2},
    channels={
        "a": EphemeralValue(str),
        "b": LastValue(str),
        "c": EphemeralValue(str),
    },
    input_channels=["a"],
    output_channels=["b", "c"],
)

app.invoke({"a": "foo"})
{'b': 'foofoo', 'c': 'foofoofoofoo'}
Topic
from langgraph.channels import EphemeralValue, Topic
from langgraph.pregel import Pregel, Channel

node1 = (
    Channel.subscribe_to("a")
 | (lambda x: x + x)
 | {
        "b": Channel.write_to("b"),
        "c": Channel.write_to("c")
    }
)

node2 = (
    Channel.subscribe_to("b")
 | (lambda x: x + x)
 | {
        "c": Channel.write_to("c"),
    }
)

app = Pregel(
    nodes={"node1": node1, "node2": node2},
    channels={
        "a": EphemeralValue(str),
        "b": EphemeralValue(str),
        "c": Topic(str, accumulate=True),
    },
    input_channels=["a"],
    output_channels=["c"],
)

app.invoke({"a": "foo"})
{'c': ['foofoo', 'foofoofoofoo']}
二元操作符
这个示例演示了如何使用 BinaryOperatorAggregate 通道实现一个 reducer。
from langgraph.channels import EphemeralValue, BinaryOperatorAggregate
from langgraph.pregel import Pregel, Channel

node1 = (
    Channel.subscribe_to("a")
 | (lambda x: x + x)
 | {
        "b": Channel.write_to("b"),
        "c": Channel.write_to("c")
    }
)

node2 = (
    Channel.subscribe_to("b")
 | (lambda x: x + x)
 | {
        "c": Channel.write_to("c"),
    }
)

def reducer(current, update):
    if current:
        return current + " | " + "update"
    else:
        return update

app = Pregel(
    nodes={"node1": node1, "node2": node2},
    channels={
        "a": EphemeralValue(str),
        "b": EphemeralValue(str),
        "c": BinaryOperatorAggregate(str, operator=reducer),
    },
    input_channels=["a"],
    output_channels=["c"],
)

app.invoke({"a": "foo"})
这个示例展示了如何通过在图中引入循环,让一个链式操作向其订阅的通道写入数据。执行将持续进行,直到向通道写入一个None值为止。
循环
from langgraph.channels import EphemeralValue
from langgraph.pregel import Pregel, Channel, ChannelWrite, ChannelWriteEntry

example_node = (
    Channel.subscribe_to("value")
 | (lambda x: x + x if len(x) < 10 else None)
 | ChannelWrite(writes=[ChannelWriteEntry(channel="value", skip_none=True)])
)

app = Pregel(
    nodes={"example_node": example_node},
    channels={
        "value": EphemeralValue(str),
    },
    input_channels=["value"],
    output_channels=["value"],
)

app.invoke({"value": "a"})
{'value': 'aaaaaaaaaaaaaaaa'}
高级 API
LangGraph 提供了两种创建 Pregel 应用的高级 API:StateGraph (Graph API) 和 Functional API。
StateGraph (Graph API)
StateGraph (Graph API) 是一个更高层次的抽象,它简化了 Pregel 应用的创建过程。该 API 允许您定义由节点和边组成的图结构。当您编译这个图时,StateGraph API 会自动为您生成对应的 Pregel 应用。
from typing import TypedDict, Optional

from langgraph.constants import START
from langgraph.graph import StateGraph

class Essay(TypedDict):
    topic: str
    content: Optional[str]
    score: Optional[float]

def write_essay(essay: Essay):
    return {
        "content": f"Essay about {essay['topic']}",
    }

def score_essay(essay: Essay):
    return {
        "score": 10
    }

builder = StateGraph(Essay)
builder.add_node(write_essay)
builder.add_node(score_essay)
builder.add_edge(START, "write_essay")

# Compile the graph.
# This will return a Pregel instance.
graph = builder.compile()
编译后的 Pregel 实例将与一组节点和通道相关联。您可以通过打印来查看这些节点和通道。
print(graph.nodes)
你会看到类似这样的内容:
{'__start__': <langgraph.pregel.read.PregelNode at 0x7d05e3ba1810>,
 'write_essay': <langgraph.pregel.read.PregelNode at 0x7d05e3ba14d0>,
 'score_essay': <langgraph.pregel.read.PregelNode at 0x7d05e3ba1710>}
print(graph.channels)
你会看到类似这样的内容:
{'topic': <langgraph.channels.last_value.LastValue at 0x7d05e3294d80>,
 'content': <langgraph.channels.last_value.LastValue at 0x7d05e3295040>,
 'score': <langgraph.channels.last_value.LastValue at 0x7d05e3295980>,
 '__start__': <langgraph.channels.ephemeral_value.EphemeralValue at 0x7d05e3297e00>,
 'write_essay': <langgraph.channels.ephemeral_value.EphemeralValue at 0x7d05e32960c0>,
 'score_essay': <langgraph.channels.ephemeral_value.EphemeralValue at 0x7d05e2d8ab80>,
 'branch:__start__:__self__:write_essay': <langgraph.channels.ephemeral_value.EphemeralValue at 0x7d05e32941c0>,
 'branch:__start__:__self__:score_essay': <langgraph.channels.ephemeral_value.EphemeralValue at 0x7d05e2d88800>,
 'branch:write_essay:__self__:write_essay': <langgraph.channels.ephemeral_value.EphemeralValue at 0x7d05e3295ec0>,
 'branch:write_essay:__self__:score_essay': <langgraph.channels.ephemeral_value.EphemeralValue at 0x7d05e2d8ac00>,
 'branch:score_essay:__self__:write_essay': <langgraph.channels.ephemeral_value.EphemeralValue at 0x7d05e2d89700>,
 'branch:score_essay:__self__:score_essay': <langgraph.channels.ephemeral_value.EphemeralValue at 0x7d05e2d8b400>,
 'start:write_essay': <langgraph.channels.ephemeral_value.EphemeralValue at 0x7d05e2d8b280>}
在Functional API中,您可以使用entrypoint来创建Pregel应用。entrypoint装饰器允许您定义一个接收输入并返回输出的函数。
Functional API
from typing import TypedDict, Optional

from langgraph.checkpoint.memory import InMemorySaver
from langgraph.func import entrypoint

class Essay(TypedDict):
    topic: str
    content: Optional[str]
    score: Optional[float]

checkpointer = InMemorySaver()

@entrypoint(checkpointer=checkpointer)
def write_essay(essay: Essay):
    return {
        "content": f"Essay about {essay['topic']}",
    }

print("Nodes: ")
print(write_essay.nodes)
print("Channels: ")
print(write_essay.channels)
Nodes:
{'write_essay': <langgraph.pregel.read.PregelNode object at 0x7d05e2f9aad0>}
Channels:
{'__start__': <langgraph.channels.ephemeral_value.EphemeralValue object at 0x7d05e2c906c0>, '__end__': <langgraph.channels.last_value.LastValue object at 0x7d05e2c90c40>, '__previous__': <langgraph.channels.last_value.LastValue object at 0x7d05e1007280>}
如何使用 Graph API
https://langchain-ai.github.io/langgraph/how-tos/graph-api/
本指南演示了LangGraph图API的基础用法。内容涵盖状态管理,以及构建常见图结构如顺序执行、分支和循环。同时介绍了LangGraph的控制特性,包括用于map-reduce工作流的Send API,以及结合状态更新与节点间"跳转"的Command API。
安装
安装 langgraph:
pip install -qU langgraph
配置LangSmith以获得更好的调试体验
注册LangSmith可以快速发现问题并提升LangGraph项目的性能。通过LangSmith,您能利用追踪数据来调试、测试和监控基于LangGraph构建的LLM应用——了解更多入门指南请查阅文档。
定义与更新状态
本节将展示如何在LangGraph中定义和更新状态,主要内容包括:
1、如何使用状态来定义图的模式结构
2、如何通过归约器控制状态更新的处理方式
定义状态
在LangGraph中,状态](https://langchain-ai.github.io/langgraph/concepts/low_level/#state)可以是TypedDict、Pydantic模型或数据类。下文我们将使用TypedDict作为示例。关于使用Pydantic的详细说明,请参阅[本节内容。
默认情况下,图的输入和输出模式相同,状态决定了该模式结构。如需定义不同的输入输出模式,请参考本节指南。
我们以消息为例进行简单说明。这种状态表示方式适用于大多数LLM应用的灵活场景。更多细节请查阅概念页。
API参考文档:AnyMessage
from langchain_core.messages import AnyMessage
from typing_extensions import TypedDict

class State(TypedDict):
    messages: list[AnyMessage]
    extra_field: int
该状态跟踪一个消息对象列表,以及一个额外的整数字段。
更新状态
让我们构建一个包含单个节点的示例图。我们的节点只是一个Python函数,它会读取图的状态并对其进行更新。该函数的第一个参数始终是状态:
API参考:AIMessage
from langchain_core.messages import AIMessage

def node(state: State):
    messages = state["messages"]
    new_message = AIMessage("Hello!")
	return {"messages": messages + [new_message], "extra_field": 10}
该节点仅将消息追加到我们的消息列表中,并填充一个额外字段。
重要提示:
节点应直接返回状态更新,而不是直接修改状态。
接下来我们定义一个包含此节点的简单图。我们使用StateGraph来定义基于此状态运行的图。然后通过add_node方法向图中添加节点。
API参考文档:StateGraph
from langgraph.graph import StateGraph

builder = StateGraph(State)
builder.add_node(node)
builder.set_entry_point("node")
graph = builder.compile()
LangGraph 提供了内置工具用于可视化您的图结构。现在我们来检查一下这个图。有关可视化的详细信息,请参阅此章节。
from IPython.display import Image, display

display(Image(graph.get_graph().draw_mermaid_png()))

from langchain_core.messages import HumanMessage

result = graph.invoke({"messages": [HumanMessage("Hi")]})
result
{'messages': [HumanMessage(content='Hi', additional_kwargs={}, response_metadata={}),
  AIMessage(content='Hello!', additional_kwargs={}, response_metadata={})],
 'extra_field': 10}
请注意:
- 我们通过更新状态的单个键来触发调用。
- 在调用结果中会接收到完整的状态。
为了方便起见,我们经常通过美化打印来检查消息对象的内容:
for message in result["messages"]:
    message.pretty_print()
================================ Human Message =================================

Hi
================================== Ai Message ==================================

Hello!
使用 reducers 处理状态更新
状态中的每个键都可以拥有自己独立的 reducer 函数,用于控制如何应用来自节点的更新。如果没有显式指定 reducer 函数,则默认对该键的所有更新都会直接覆盖原有值。
对于 TypedDict 状态模式,我们可以通过为状态的相应字段标注 reducer 函数来定义 reducers。
在前面的示例中,我们的节点通过追加消息的方式更新了状态中的 "messages" 键。下面我们为该键添加一个 reducer,使得更新能够自动追加:
from typing_extensions import Annotated

def add(left, right):
    """Can also import `add` from the `operator` built-in."""
    return left + right

class State(TypedDict):
    messages: Annotated[list[AnyMessage], add]
    extra_field: int
现在我们的节点可以简化为:
def node(state: State):
    new_message = AIMessage("Hello!")
    return {"messages": [new_message], "extra_field": 10}
[API 参考文档:START]
from langgraph.graph import START

graph = StateGraph(State).add_node(node).add_edge(START, "node").compile()

result = graph.invoke({"messages": [HumanMessage("Hi")]})

for message in result["messages"]:
    message.pretty_print()
================================ Human Message =================================

Hi
================================== Ai Message ==================================

Hello!
MessagesState
在实际应用中,更新消息列表时还需考虑以下因素:
LangGraph内置了add_messages归约器来处理这些需求:
API参考文档:add_messages
from langgraph.graph.message import add_messages

class State(TypedDict):
    messages: Annotated[list[AnyMessage], add_messages]
    extra_field: int

def node(state: State):
    new_message = AIMessage("Hello!")
    return {"messages": [new_message], "extra_field": 10}

graph = StateGraph(State).add_node(node).set_entry_point("node").compile()
input_message = {"role": "user", "content": "Hi"}

result = graph.invoke({"messages": [input_message]})

for message in result["messages"]:
    message.pretty_print()
================================ Human Message =================================

Hi
================================== Ai Message ==================================

Hello!
这是一个适用于涉及聊天模型应用的通用状态表示。为方便使用,LangGraph内置了预构建的MessagesState,这样我们可以实现:
from langgraph.graph import MessagesState

class State(MessagesState):
    extra_field: int
定义输入和输出模式
默认情况下,StateGraph 使用单一模式运行,所有节点都通过该模式进行通信。不过,也可以为图定义独立的输入和输出模式。
当指定了独立的模式时,节点之间的通信仍会使用内部模式。输入模式确保提供的输入符合预期结构,而输出模式则根据定义的输出模式过滤内部数据,仅返回相关信息。
下面我们将介绍如何定义独立的输入和输出模式。
API 参考:StateGraph | START | END
from langgraph.graph import StateGraph, START, END
from typing_extensions import TypedDict

# Define the schema for the input
class InputState(TypedDict):
    question: str

# Define the schema for the output
class OutputState(TypedDict):
    answer: str

# Define the overall schema, combining both input and output
class OverallState(InputState, OutputState):
    pass

# Define the node that processes the input and generates an answer
def answer_node(state: InputState):
    # Example answer and an extra key
    return {"answer": "bye", "question": state["question"]}

# Build the graph with input and output schemas specified
builder = StateGraph(OverallState, input=InputState, output=OutputState)
builder.add_node(answer_node)  # Add the answer node
builder.add_edge(START, "answer_node")  # Define the starting edge
builder.add_edge("answer_node", END)  # Define the ending edge
graph = builder.compile()  # Compile the graph

# Invoke the graph with an input and print the result
print(graph.invoke({"question": "hi"}))
{'answer': 'bye'}
请注意,invoke 的输出仅包含输出模式。
在节点间传递私有状态
在某些情况下,你可能需要让节点交换一些对中间逻辑至关重要、但不需要成为图主模式部分的信息。这些私有数据与图的整体输入/输出无关,只应在特定节点之间共享。
下面我们将创建一个由三个节点(node_1、node_2 和 node_3)组成的示例顺序图,其中私有数据在前两个步骤(node_1 和 node_2)之间传递,而第三个步骤(node_3)只能访问公共的整体状态。
API参考:StateGraph | START | END
from langgraph.graph import StateGraph, START, END
from typing_extensions import TypedDict

# The overall state of the graph (this is the public state shared across nodes)
class OverallState(TypedDict):
    a: str

# Output from node_1 contains private data that is not part of the overall state
class Node1Output(TypedDict):
    private_data: str

# The private data is only shared between node_1 and node_2
def node_1(state: OverallState) -> Node1Output:
    output = {"private_data": "set by node_1"}
    print(f"Entered node `node_1`:\n\tInput: {state}.\n\tReturned: {output}")
    return output

# Node 2 input only requests the private data available after node_1
class Node2Input(TypedDict):
    private_data: str

def node_2(state: Node2Input) -> OverallState:
    output = {"a": "set by node_2"}
    print(f"Entered node `node_2`:\n\tInput: {state}.\n\tReturned: {output}")
    return output

# Node 3 only has access to the overall state (no access to private data from node_1)
def node_3(state: OverallState) -> OverallState:
    output = {"a": "set by node_3"}
    print(f"Entered node `node_3`:\n\tInput: {state}.\n\tReturned: {output}")
    return output

# Connect nodes in a sequence
# node_2 accepts private data from node_1, whereas
# node_3 does not see the private data.
builder = StateGraph(OverallState).add_sequence([node_1, node_2, node_3])
builder.add_edge(START, "node_1")
graph = builder.compile()

# Invoke the graph with the initial state
response = graph.invoke(
    {
        "a": "set at start",
    }
)

print()
print(f"Output of graph invocation: {response}")
Entered node `node_1`:
    Input: {'a': 'set at start'}.
    Returned: {'private_data': 'set by node_1'}
Entered node `node_2`:
    Input: {'private_data': 'set by node_1'}.
    Returned: {'a': 'set by node_2'}
Entered node `node_3`:
    Input: {'a': 'set by node_2'}.
    Returned: {'a': 'set by node_3'}

Output of graph invocation: {'a': 'set by node_3'}
使用 Pydantic 模型定义图状态
StateGraph 在初始化时接受一个 state_schema 参数,用于指定图中节点可访问和更新的状态"结构"。
在我们的示例中,通常使用 Python 原生的 TypedDict 作为 state_schema,但实际上 state_schema 可以是任何类型。
本文将展示如何使用 Pydantic BaseModel 作为 state_schema,从而为输入添加运行时验证。
已知限制:
- 当前图的输出结果不会是 Pydantic 模型的实例
- 运行时验证仅针对节点的输入,不验证输出
- Pydantic 的验证错误追踪不会显示错误发生在哪个节点
API 参考:StateGraph | START | END
from langgraph.graph import StateGraph, START, END
from typing_extensions import TypedDict

from pydantic import BaseModel

# The overall state of the graph (this is the public state shared across nodes)
class OverallState(BaseModel):
    a: str

def node(state: OverallState):
    return {"a": "goodbye"}

# Build the state graph
builder = StateGraph(OverallState)
builder.add_node(node)  # node_1 is the first node
builder.add_edge(START, "node")  # Start the graph with node_1
builder.add_edge("node", END)  # End the graph after node_1
graph = builder.compile()

# Test the graph with a valid input
graph.invoke({"a": "hello"})
{'a': 'goodbye'}
使用无效输入调用图表
try:
    graph.invoke({"a": 123})  # Should be a string
except Exception as e:
    print("An exception was raised because `a` is an integer rather than a string.")
    print(e)
An exception was raised because `a` is an integer rather than a string.
1 validation error for OverallState
a
  Input should be a valid string [type=string_type, input_value=123, input_type=int]
    For further information visit https://errors.pydantic.dev/2.9/v/string_type
以下是Pydantic模型状态的额外特性说明:
序列化行为
当使用Pydantic模型作为状态模式时,理解序列化工作机制尤为重要,特别是在以下场景中:
- 将Pydantic对象作为输入传递时
- 从图中接收输出时
- 处理嵌套Pydantic模型时
让我们通过实例观察这些行为。
API参考文档:StateGraph | START | END
from langgraph.graph import StateGraph, START, END
from pydantic import BaseModel

class NestedModel(BaseModel):
    value: str

class ComplexState(BaseModel):
    text: str
    count: int
    nested: NestedModel

def process_node(state: ComplexState):
    # Node receives a validated Pydantic object
    print(f"Input state type: {type(state)}")
    print(f"Nested type: {type(state.nested)}")
	# Return a dictionary update
    return {"text": state.text + " processed", "count": state.count + 1}

# Build the graph
builder = StateGraph(ComplexState)
builder.add_node("process", process_node)
builder.add_edge(START, "process")
builder.add_edge("process", END)
graph = builder.compile()

# Create a Pydantic instance for input
input_state = ComplexState(text="hello", count=0, nested=NestedModel(value="test"))
print(f"Input object type: {type(input_state)}")

# Invoke graph with a Pydantic instance
result = graph.invoke(input_state)
print(f"Output type: {type(result)}")
print(f"Output content: {result}")

# Convert back to Pydantic model if needed
output_model = ComplexState(**result)
print(f"Converted back to Pydantic: {type(output_model)}")
运行时类型强制转换
Pydantic 会对某些数据类型执行运行时类型强制转换。这一特性虽然有用,但如果不了解它可能会导致意外行为。
API 参考: StateGraph | START | END
from langgraph.graph import StateGraph, START, END
from pydantic import BaseModel

class CoercionExample(BaseModel):
    # Pydantic will coerce string numbers to integers
    number: int
    # Pydantic will parse string booleans to bool
    flag: bool

def inspect_node(state: CoercionExample):
    print(f"number: {state.number} (type: {type(state.number)})")
    print(f"flag: {state.flag} (type: {type(state.flag)})")
    return {}

builder = StateGraph(CoercionExample)
builder.add_node("inspect", inspect_node)
builder.add_edge(START, "inspect")
builder.add_edge("inspect", END)
graph = builder.compile()

# Demonstrate coercion with string inputs that will be converted
result = graph.invoke({"number": "42", "flag": "true"})

# This would fail with a validation error
try:
    graph.invoke({"number": "not-a-number", "flag": "true"})
except Exception as e:
    print(f"\nExpected validation error: {e}")
处理消息模型
在状态模式中使用 LangChain 消息类型时,序列化需要特别注意。当通过网络传输消息对象时,应使用 AnyMessage(而非 BaseMessage)以确保正确的序列化/反序列化。
API 参考:StateGraph | START | END | HumanMessage | AIMessage | AnyMessage
from langgraph.graph import StateGraph, START, END
from pydantic import BaseModel
from langchain_core.messages import HumanMessage, AIMessage, AnyMessage
from typing import List

class ChatState(BaseModel):
    messages: List[AnyMessage]
    context: str

def add_message(state: ChatState):
    return {"messages": state.messages + [AIMessage(content="Hello there!")]}

builder = StateGraph(ChatState)
builder.add_node("add_message", add_message)
builder.add_edge(START, "add_message")
builder.add_edge("add_message", END)
graph = builder.compile()

# Create input with a message
initial_state = ChatState(
    messages=[HumanMessage(content="Hi")], context="Customer support chat"
)

result = graph.invoke(initial_state)
print(f"Output: {result}")

# Convert back to Pydantic model to see message types
output_model = ChatState(**result)
for i, msg in enumerate(output_model.messages):
    print(f"Message {i}: {type(msg).__name__} - {msg.content}")
添加运行时配置
有时您希望在调用图表时能够对其进行配置。例如,您可能希望在运行时指定使用哪个LLM或系统提示,同时避免这些参数污染图表状态。
添加运行时配置的步骤如下:
1、为配置定义模式
2、将配置添加到节点或条件边的函数签名中
3、将配置传入图表
下面是一个简单示例:
API参考:RunnableConfig | END | StateGraph | START
from langchain_core.runnables import RunnableConfig
from langgraph.graph import END, StateGraph, START
from typing_extensions import TypedDict

# 1、Specify config schema
class ConfigSchema(TypedDict):
    my_runtime_value: str

# 2、Define a graph that accesses the config in a node
class State(TypedDict):
    my_state_value: str

def node(state: State, config: RunnableConfig):
    if config["configurable"]["my_runtime_value"] == "a":
        return {"my_state_value": 1}
    elif config["configurable"]["my_runtime_value"] == "b":
        return {"my_state_value": 2}
    else:
        raise ValueError("Unknown values.")

builder = StateGraph(State, config_schema=ConfigSchema)
builder.add_node(node)
builder.add_edge(START, "node")
builder.add_edge("node", END)

graph = builder.compile()

# 3、Pass in configuration at runtime:
print(graph.invoke({}, {"configurable": {"my_runtime_value": "a"}}))
print(graph.invoke({}, {"configurable": {"my_runtime_value": "b"}}))
{'my_state_value': 1}
{'my_state_value': 2}
扩展示例:在运行时指定LLM
下面我们演示一个实际示例,展示如何在运行时配置要使用的LLM模型。我们将同时使用OpenAI和Anthropic的模型。
pip install -U langgraph "langchain[anthropic,openai]"
import getpass
import os

def _set_env(var: str):
    if not os.environ.get(var):
        os.environ[var] = getpass.getpass(f"{var}: ")

_set_env("ANTHROPIC_API_KEY")
_set_env("OPENAI_API_KEY")
构建流程图:
API参考文档:init_chat_model | RunnableConfig | END | StateGraph | START
from langchain.chat_models import init_chat_model
from langchain_core.runnables import RunnableConfig
from langgraph.graph import MessagesState
from langgraph.graph import END, StateGraph, START
from typing_extensions import TypedDict

class ConfigSchema(TypedDict):
    model: str

MODELS = {
    "anthropic": init_chat_model("anthropic:claude-3-5-haiku-latest"),
    "openai": init_chat_model("openai:gpt-4.1-mini"),
}

def call_model(state: MessagesState, config: RunnableConfig):
    model = config["configurable"].get("model", "anthropic")
    model = MODELS[model]
    response = model.invoke(state["messages"])
    return {"messages": [response]}

builder = StateGraph(MessagesState, config_schema=ConfigSchema)
builder.add_node("model", call_model)
builder.add_edge(START, "model")
builder.add_edge("model", END)

graph = builder.compile()

# Usage
input_message = {"role": "user", "content": "hi"}
# With no configuration, uses default (Anthropic)
response_1 = graph.invoke({"messages": [input_message]})["messages"][-1]
# Or, can set OpenAI
config = {"configurable": {"model": "openai"}}
response_2 = graph.invoke({"messages": [input_message]}, config=config)["messages"][-1]

print(response_1.response_metadata["model_name"])
print(response_2.response_metadata["model_name"])
claude-3-5-haiku-20241022
gpt-4.1-mini-2025-04-14
扩展示例:在运行时指定模型和系统消息
下面我们演示一个实际示例,其中配置了两个运行时参数:要使用的LLM和系统消息。
pip install -U langgraph "langchain[anthropic,openai]"
import getpass
import os

def _set_env(var: str):
    if not os.environ.get(var):
        os.environ[var] = getpass.getpass(f"{var}: ")

_set_env("ANTHROPIC_API_KEY")
_set_env("OPENAI_API_KEY")
API 参考文档: init_chat_model | SystemMessage | RunnableConfig | END | StateGraph | START
from typing import Optional

from langchain.chat_models import init_chat_model
from langchain_core.messages import SystemMessage
from langchain_core.runnables import RunnableConfig
from langgraph.graph import END, MessagesState, StateGraph, START
from typing_extensions import TypedDict

class ConfigSchema(TypedDict):
    model: Optional[str]
    system_message: Optional[str]

MODELS = {
    "anthropic": init_chat_model("anthropic:claude-3-5-haiku-latest"),
    "openai": init_chat_model("openai:gpt-4.1-mini"),
}

def call_model(state: MessagesState, config: RunnableConfig):
    model = config["configurable"].get("model", "anthropic")
    model = MODELS[model]
    messages = state["messages"]
    if system_message := config["configurable"].get("system_message"):
        messages = [SystemMessage(system_message)] + messages
    response = model.invoke(messages)
    return {"messages": [response]}

builder = StateGraph(MessagesState, config_schema=ConfigSchema)
builder.add_node("model", call_model)
builder.add_edge(START, "model")
builder.add_edge("model", END)

graph = builder.compile()

# Usage
input_message = {"role": "user", "content": "hi"}
config = {"configurable": {"model": "openai", "system_message": "Respond in Italian."}}
response = graph.invoke({"messages": [input_message]}, config)
for message in response["messages"]:
    message.pretty_print()
================================ Human Message =================================

hi
================================== Ai Message ==================================

Ciao! Come posso aiutarti oggi?
添加重试策略
在许多使用场景中,您可能希望节点具备自定义的重试策略,例如调用 API、查询数据库或调用大语言模型(LLM)等情况。LangGraph 允许您为节点添加重试策略。
要配置重试策略,请向 add_node 方法传递 retry 参数。该参数接收一个 RetryPolicy 命名元组对象。以下示例展示了如何使用默认参数实例化 RetryPolicy 对象并将其关联到节点:
from langgraph.pregel import RetryPolicy

builder.add_node(
    "node_name",
    node_function,
    retry=RetryPolicy(),
)
默认情况下,retry_on 参数使用 default_retry_on 函数,该函数会对所有异常进行重试,但以下情况除外:
ValueErrorTypeErrorArithmeticErrorImportErrorLookupErrorNameErrorSyntaxErrorRuntimeErrorReferenceErrorStopIterationStopAsyncIterationOSError
此外,对于来自流行 HTTP 请求库(如 requests 和 httpx)的异常,仅对 5xx 状态码进行重试。
扩展示例:自定义重试策略
考虑一个从 SQL 数据库读取数据的场景。下面我们向节点传递两种不同的重试策略:
API 参考:init_chat_model | END | StateGraph | START | SQLDatabase | AIMessage
import sqlite3
from typing_extensions import TypedDict

from langchain.chat_models import init_chat_model

from langgraph.graph import END, MessagesState, StateGraph, START
from langgraph.pregel import RetryPolicy
from langchain_community.utilities import SQLDatabase
from langchain_core.messages import AIMessage

db = SQLDatabase.from_uri("sqlite:///:memory:")

model = init_chat_model("anthropic:claude-3-5-haiku-latest")

def query_database(state: MessagesState):
    query_result = db.run("SELECT * FROM Artist LIMIT 10;")
    return {"messages": [AIMessage(content=query_result)]}

def call_model(state: MessagesState):
    response = model.invoke(state["messages"])
    return {"messages": [response]}

# Define a new graph
builder = StateGraph(MessagesState)
builder.add_node(
    "query_database",
    query_database,
    retry=RetryPolicy(retry_on=sqlite3.OperationalError),
)
builder.add_node("model", call_model, retry=RetryPolicy(max_attempts=5))
builder.add_edge(START, "model")
builder.add_edge("model", "query_database")
builder.add_edge("query_database", END)

graph = builder.compile()
创建步骤序列
前提条件
本指南假设您已熟悉上文关于状态的部分。
这里我们将演示如何构建一个简单的步骤序列。内容包括:
1、如何构建顺序图
2、用于构造相似图的内置快捷方式
要添加节点序列,我们使用图的.add_node和.add_edge方法:
API参考:START | StateGraph
from langgraph.graph import START, StateGraph

builder = StateGraph(State)

# Add nodes
builder.add_node(step_1)
builder.add_node(step_2)
builder.add_node(step_3)

# Add edges
builder.add_edge(START, "step_1")
builder.add_edge("step_1", "step_2")
builder.add_edge("step_2", "step_3")
我们也可以使用内置的快捷方法 .add_sequence:
builder = StateGraph(State).add_sequence([step_1, step_2, step_3])
builder.add_edge(START, "step_1")
为什么使用LangGraph将应用步骤拆分为序列?
LangGraph能轻松为应用添加底层持久化层。这使得状态可以在节点执行之间进行检查点保存,从而让LangGraph节点控制:
它们还决定了执行步骤如何流式传输,以及如何使用LangGraph Studio对应用进行可视化和调试。
让我们演示一个端到端示例。我们将创建包含三个步骤的序列:
1、在状态键中填充一个值
2、更新相同的值
3、填充不同的值
首先定义我们的状态](https://langchain-ai.github.io/langgraph/concepts/low_level/#state)。这决定了图的模式结构,也可以指定如何应用更新。详见[本节。
在本例中,我们将仅跟踪两个值:
from typing_extensions import TypedDict

class State(TypedDict):
    value_1: str
    value_2: int
我们的节点只是普通的Python函数,它们读取图的状态并对其进行更新。该函数的第一个参数始终是状态:
def step_1(state: State):
    return {"value_1": "a"}

def step_2(state: State):
    current_value_1 = state["value_1"]
    return {"value_1": f"{current_value_1} b"}

def step_3(state: State):
    return {"value_2": 10}
注意:在更新状态时,每个节点只需指定希望更新的键值。
默认情况下,这会覆盖对应键的值。你也可以使用reducers](https://langchain-ai.github.io/langgraph/concepts/low_level/#reducers)来控制更新处理方式——例如,你可以将连续更新追加到键值而非覆盖。详见[本节。
最后,我们定义图结构。使用StateGraph来构建一个基于该状态运行的图。
接着通过add_node和add_edge方法来填充图结构并定义其控制流。
API参考:START | StateGraph
from langgraph.graph import START, StateGraph

builder = StateGraph(State)

# Add nodes
builder.add_node(step_1)
builder.add_node(step_2)
builder.add_node(step_3)

# Add edges
builder.add_edge(START, "step_1")
builder.add_edge("step_1", "step_2")
builder.add_edge("step_2", "step_3")
指定自定义名称
您可以通过 .add_node 方法为节点指定自定义名称。
builder.add_node("my_node", step_1)
请注意以下事项:
.add_edge方法接收节点名称作为参数,对于函数节点默认使用node.__name__作为名称。- 必须指定图的入口点。为此,我们需要添加一条连接到 START节点 的边。
- 当没有更多可执行节点时,图将停止运行。
接下来我们需要编译这个图。编译过程会对图结构进行一些基础检查(例如识别孤立节点)。如果应用程序需要通过检查点机制实现持久化,检查点对象也应在此处传入。
graph = builder.compile()
LangGraph 提供了内置工具用于可视化您的图结构。让我们来检查这个序列。有关可视化的详细信息,请参阅本指南。
from IPython.display import Image, display

display(Image(graph.get_graph().draw_mermaid_png()))
graph.invoke({"value_1": "c"})
{'value_1': 'a b', 'value_2': 10}
请注意以下几点:
- 我们通过为单个状态键提供值来启动调用。必须始终至少为一个键提供值。
- 我们传入的值被第一个节点覆盖。
- 第二个节点更新了该值。
- 第三个节点填充了不同的值。
内置快捷方式
langgraph>=0.2.46 版本包含一个内置快捷方法 add_sequence,用于添加节点序列。你可以按以下方式编译相同的图:
builder = StateGraph(State).add_sequence([step_1, step_2, step_3])
builder.add_edge(START, "step_1")

graph = builder.compile()

graph.invoke({"value_1": "c"})
创建分支
节点的并行执行对于加速整个图操作至关重要。LangGraph 原生支持节点的并行执行,这可以显著提升基于图的工作流性能。这种并行化通过扇出(fan-out)和扇入(fan-in)机制实现,利用标准边和条件边。以下是一些示例,展示如何添加适用于你的分支数据流。
并行运行图节点
在这个示例中,我们从Node A扩展到B和C,然后再汇聚到D。通过状态设置,我们指定了reducer的加法操作](https://langchain-ai.github.io/langgraph/concepts/low_level/#reducers)。这种方式会合并或累加State中特定键的值,而不是简单地覆盖现有值。对于列表类型,这意味着将新列表与现有列表连接起来。关于使用reducers更新状态的更多细节,请参阅前文[状态reducers部分。
API参考: StateGraph | START | END
import operator
from typing import Annotated, Any

from typing_extensions import TypedDict

from langgraph.graph import StateGraph, START, END

class State(TypedDict):
    # The operator.add reducer fn makes this append-only
    aggregate: Annotated[list, operator.add]

def a(state: State):
    print(f'Adding "A" to {state["aggregate"]}')
    return {"aggregate": ["A"]}

def b(state: State):
    print(f'Adding "B" to {state["aggregate"]}')
    return {"aggregate": ["B"]}

def c(state: State):
    print(f'Adding "C" to {state["aggregate"]}')
    return {"aggregate": ["C"]}

def d(state: State):
    print(f'Adding "D" to {state["aggregate"]}')
    return {"aggregate": ["D"]}

builder = StateGraph(State)
builder.add_node(a)
builder.add_node(b)
builder.add_node(c)
builder.add_node(d)
builder.add_edge(START, "a")
builder.add_edge("a", "b")
builder.add_edge("a", "c")
builder.add_edge("b", "d")
builder.add_edge("c", "d")
builder.add_edge("d", END)
graph = builder.compile()
from IPython.display import Image, display

display(Image(graph.get_graph().draw_mermaid_png()))
graph.invoke({"aggregate": []}, {"configurable": {"thread_id": "foo"}})
***
Adding "A" to []
Adding "B" to ['A']
Adding "C" to ['A']
Adding "D" to ['A', 'B', 'C']
{'aggregate': ['A', 'B', 'C', 'D']}
注意:在上面的示例中,节点 "b" 和 "c" 在同一个超级步中并发执行。由于它们处于同一步骤,节点 "d" 会在 "b" 和 "c" 都完成后才执行。
关键点在于,并行超级步中的更新可能不会保持一致的顺序。如果需要确保并行超级步的更新具有一致且预定的顺序,应将输出写入状态中的一个单独字段,并附带一个用于排序的值。
异常处理?
LangGraph 在"超级步"中执行节点,这意味着虽然并行分支会并行执行,但整个超级步是事务性的。如果其中任何一个分支抛出异常,所有更新都不会应用到状态中(整个超级步会报错)。
特别需要注意的是,当使用检查点时,超级步中成功节点的结果会被保存,恢复时不会重复执行。
如果存在容易出错的情况(例如可能需要处理不稳定的 API 调用),LangGraph 提供了两种解决方法:
1、可以在节点内编写常规的 Python 代码来捕获和处理异常。
2、可以设置**重试策略**,指示图重试抛出特定类型异常的节点。只有失败的分支会被重试,因此无需担心执行冗余工作。
通过这些方法,可以实现并行执行并完全控制异常处理。
扩展示例:不等长分支
上面的示例展示了当每条路径只有一步时如何进行扇出和扇入。但如果其中一条路径有多步呢?让我们在 “b” 分支中添加一个节点 b_2:
API 参考:StateGraph | START | END
import operator
from typing import Annotated, Any

from typing_extensions import TypedDict

from langgraph.graph import StateGraph, START, END

class State(TypedDict):
    # The operator.add reducer fn makes this append-only
    aggregate: Annotated[list, operator.add]

def a(state: State):
    print(f'Adding "A" to {state["aggregate"]}')
    return {"aggregate": ["A"]}

def b(state: State):
    print(f'Adding "B" to {state["aggregate"]}')
    return {"aggregate": ["B"]}

def b_2(state: State):
    print(f'Adding "B_2" to {state["aggregate"]}')
    return {"aggregate": ["B_2"]}

def c(state: State):
    print(f'Adding "C" to {state["aggregate"]}')
    return {"aggregate": ["C"]}

def d(state: State):
    print(f'Adding "D" to {state["aggregate"]}')
    return {"aggregate": ["D"]}

builder = StateGraph(State)
builder.add_node(a)
builder.add_node(b)
builder.add_node(b_2)
builder.add_node(c)
builder.add_node(d)
builder.add_edge(START, "a")
builder.add_edge("a", "b")
builder.add_edge("a", "c")
builder.add_edge("b", "b_2")
builder.add_edge(["b_2", "c"], "d")
builder.add_edge("d", END)
graph = builder.compile()
from IPython.display import Image, display

display(Image(graph.get_graph().draw_mermaid_png()))
graph.invoke({"aggregate": []})
***
Adding "A" to []
Adding "B" to ['A']
Adding "C" to ['A']
Adding "B_2" to ['A', 'B', 'C']
Adding "D" to ['A', 'B', 'C', 'B_2']
{'aggregate': ['A', 'B', 'C', 'B_2', 'D']}
注意:在上面的示例中,节点 "b" 和 "c" 在同一个超级步中并发执行。那么下一步会发生什么?
这里我们使用 add_edge(["b_2", "c"], "d") 来强制节点 "d" 仅在节点 "b_2" 和 "c" 都完成执行后运行。如果我们添加两条独立的边,
节点 "d" 将会运行两次:一次在节点 b2 完成后,另一次在节点 c 完成后(无论这两个节点的完成顺序如何)。
条件分支
如果您的扇出逻辑需要根据运行时状态动态变化,可以使用 add_conditional_edges 方法,基于图状态选择一个或多个路径。如下示例所示,节点 a 生成的状态更新将决定后续执行节点。
API参考文档: StateGraph | START | END
import operator
from typing import Annotated, Literal, Sequence

from typing_extensions import TypedDict

from langgraph.graph import StateGraph, START, END

class State(TypedDict):
    aggregate: Annotated[list, operator.add]
    # Add a key to the state. We will set this key to determine
    # how we branch.
    which: str

def a(state: State):
    print(f'Adding "A" to {state["aggregate"]}')
    return {"aggregate": ["A"], "which": "c"}

def b(state: State):
    print(f'Adding "B" to {state["aggregate"]}')
    return {"aggregate": ["B"]}

def c(state: State):
    print(f'Adding "C" to {state["aggregate"]}')
    return {"aggregate": ["C"]}

builder = StateGraph(State)
builder.add_node(a)
builder.add_node(b)
builder.add_node(c)
builder.add_edge(START, "a")
builder.add_edge("b", END)
builder.add_edge("c", END)

def conditional_edge(state: State) -> Literal["b", "c"]:
    # Fill in arbitrary logic here that uses the state
    # to determine the next node
    return state["which"]

builder.add_conditional_edges("a", conditional_edge)

graph = builder.compile()
from IPython.display import Image, display

display(Image(graph.get_graph().draw_mermaid_png()))
result = graph.invoke({"aggregate": []})
print(result)
***
Adding "A" to []
Adding "C" to ['A']
{'aggregate': ['A', 'C'], 'which': 'c'}
提示:
条件分支可以路由到多个目标节点。例如:
def route_bc_or_cd(state: State) -> Sequence[str]:
    if state["which"] == "cd":
        return ["c", "d"]
    return ["b", "c"]
Map-reduce 与 Send API
默认情况下,Nodes 和 Edges 需要预先定义,并在相同的共享状态下运行。但在某些情况下,可能无法提前确定具体的边连接关系,或者需要同时存在不同版本的状态。一个典型的例子是 map-reduce 设计模式。在该模式中,第一个节点可能生成一个对象列表,而你可能希望将另一个节点应用于所有这些对象。对象的数量可能无法提前预知(这意味着边的数量也无法确定),且下游 Node 的输入状态应当各不相同(每个生成的对象对应一个独立状态)。
为支持这种设计模式,LangGraph 允许从条件边返回 Send 对象。Send 接收两个参数:第一个是目标节点名称,第二个是传递给该节点的状态。
def continue_to_jokes(state: OverallState):
    return [Send("generate_joke", {"subject": s}) for s in state['subjects']]

graph.add_conditional_edges("node_a", continue_to_jokes)
我们实现一个简单的示例,模拟使用大语言模型(LLM)完成以下任务:(1) 生成一个主题列表(列表长度事先未知),(2) 并行生成笑话,以及 (3) 选出一个“最佳”笑话。需要注意的是,分支节点(fan-out)的输入状态与整个图的全局状态是不同的。
import operator
from typing import Annotated
from typing_extensions import TypedDict

from langgraph.types import Send
from langgraph.graph import END, StateGraph, START

# This will be the overall state of the main graph.
# It will contain a topic (which we expect the user to provide)
# and then will generate a list of subjects, and then a joke for
# each subject
class OverallState(TypedDict):
    topic: str
    subjects: list
    # Notice here we use the operator.add
    # This is because we want combine all the jokes we generate
    # from individual nodes back into one list - this is essentially
    # the "reduce" part
    jokes: Annotated[list, operator.add]
    best_selected_joke: str

# This will be the state of the node that we will "map" all
# subjects to in order to generate a joke
class JokeState(TypedDict):
    subject: str

# This is the function we will use to generate the subjects of the jokes.
# In general the length of the list generated by this node could vary each run.
def generate_topics(state: OverallState):
    # Simulate a LLM.
    return {"subjects": ["lions", "elephants", "penguins"]}

# Here we generate a joke, given a subject
def generate_joke(state: JokeState):
    # Simulate a LLM.
    joke_map = {
        "lions": "Why don't lions like fast food? Because they can't catch it!",
        "elephants": "Why don't elephants use computers? They're afraid of the mouse!",
        "penguins": (
            "Why don’t penguins like talking to strangers at parties? "
            "Because they find it hard to break the ice."
        ),
    }
    return {"jokes": [joke_map[state["subject"]]]}

# Here we define the logic to map out over the generated subjects
# We will use this as an edge in the graph
def continue_to_jokes(state: OverallState):
    # We will return a list of `Send` objects
    # Each `Send` object consists of the name of a node in the graph
    # as well as the state to send to that node
    return [Send("generate_joke", {"subject": s}) for s in state["subjects"]]

# Here we will judge the best joke
def best_joke(state: OverallState):
    return {"best_selected_joke": "penguins"}

# Construct the graph: here we put everything together to construct our graph
builder = StateGraph(OverallState)
builder.add_node("generate_topics", generate_topics)
builder.add_node("generate_joke", generate_joke)
builder.add_node("best_joke", best_joke)
builder.add_edge(START, "generate_topics")
builder.add_conditional_edges("generate_topics", continue_to_jokes, ["generate_joke"])
builder.add_edge("generate_joke", "best_joke")
builder.add_edge("best_joke", END)
graph = builder.compile()
from IPython.display import Image, display

display(Image(graph.get_graph().draw_mermaid_png()))
# Call the graph: here we call it to generate a list of jokes
for step in graph.stream({"topic": "animals"}):
    print(step)
{'generate_topics': {'subjects': ['lions', 'elephants', 'penguins']}}
{'generate_joke': {'jokes': ["Why don't lions like fast food? Because they can't catch it!"]}}
{'generate_joke': {'jokes': ["Why don't elephants use computers? They're afraid of the mouse!"]}}
{'generate_joke': {'jokes': ['Why don’t penguins like talking to strangers at parties? Because they find it hard to break the ice.']}}
{'best_joke': {'best_selected_joke': 'penguins'}}
创建与控制循环
在构建带循环的图结构时,我们需要一种终止执行的机制。最常见的做法是添加条件边,当满足终止条件时,将流程导向END节点。
您还可以在调用或流式处理图时设置递归深度限制。该限制规定了图结构在报错前允许执行的超级步数。更多关于递归限制的概念可参阅此处。
下面通过一个带循环的简单图例来具体理解这些机制的工作原理。
提示:
若要返回状态的最终值而非触发递归限制错误,请参阅下一章节。
创建循环时,可包含指定终止条件的条件边:
builder = StateGraph(State)
builder.add_node(a)
builder.add_node(b)

def route(state: State) -> Literal["b", END]:
    if termination_condition(state):
        return END
    else:
        return "a"

builder.add_edge(START, "a")
builder.add_conditional_edges("a", route)
builder.add_edge("b", "a")
graph = builder.compile()
要控制递归深度限制,请在配置中指定 "recursion_limit"。这会触发 GraphRecursionError 异常,你可以捕获并处理该异常:
from langgraph.errors import GraphRecursionError

try:
    graph.invoke(inputs, {"recursion_limit": 3})
except GraphRecursionError:
    print("Recursion Error")
让我们定义一个带简单循环的图。注意,这里使用条件边来实现终止条件。
API参考:StateGraph | START | END
import operator
from typing import Annotated, Literal

from typing_extensions import TypedDict

from langgraph.graph import StateGraph, START, END

class State(TypedDict):
    # The operator.add reducer fn makes this append-only
    aggregate: Annotated[list, operator.add]

def a(state: State):
    print(f'Node A sees {state["aggregate"]}')
    return {"aggregate": ["A"]}

def b(state: State):
    print(f'Node B sees {state["aggregate"]}')
    return {"aggregate": ["B"]}

# Define nodes
builder = StateGraph(State)
builder.add_node(a)
builder.add_node(b)

# Define edges
def route(state: State) -> Literal["b", END]:
    if len(state["aggregate"]) < 7:
        return "b"
    else:
        return END

builder.add_edge(START, "a")
builder.add_conditional_edges("a", route)
builder.add_edge("b", "a")
graph = builder.compile()
from IPython.display import Image, display

display(Image(graph.get_graph().draw_mermaid_png()))
graph.invoke({"aggregate": []})
Node A sees []
Node B sees ['A']
Node A sees ['A', 'B']
Node B sees ['A', 'B', 'A']
Node A sees ['A', 'B', 'A', 'B']
Node B sees ['A', 'B', 'A', 'B', 'A']
Node A sees ['A', 'B', 'A', 'B', 'A', 'B']
{'aggregate': ['A', 'B', 'A', 'B', 'A', 'B', 'A']}
设置递归限制
在某些应用中,我们可能无法保证一定能达到指定的终止条件。这种情况下,可以为图计算设置递归限制。当超级步执行次数超过设定值时,系统会抛出GraphRecursionError异常。我们可以捕获并处理这个异常:
from langgraph.errors import GraphRecursionError

try:
    graph.invoke({"aggregate": []}, {"recursion_limit": 4})
except GraphRecursionError:
    print("Recursion Error")
Node A sees []
Node B sees ['A']
Node A sees ['A', 'B']
Node B sees ['A', 'B', 'A']
Recursion Error
请注意,这次我们在第四步后终止。默认递归限制为25步。扩展示例:达到递归限制时返回状态
不同于抛出GraphRecursionError,我们可以向状态中引入一个新键来跟踪距离达到递归限制的剩余步数。随后可以利用这个键来判断是否应该结束运行。
LangGraph实现了一个特殊的RemainingSteps注解。在底层,它会创建一个ManagedValue通道——这个状态通道仅在我们的图运行期间存在,之后便会消失。
API参考:StateGraph | START | END
import operator
from typing import Annotated, Literal

from typing_extensions import TypedDict

from langgraph.graph import StateGraph, START, END

from langgraph.managed.is_last_step import RemainingSteps

class State(TypedDict):
    # The operator.add reducer fn makes this append-only
    aggregate: Annotated[list, operator.add]
    remaining_steps: RemainingSteps

def a(state: State):
    print(f'Node A sees {state["aggregate"]}')
    return {"aggregate": ["A"]}

def b(state: State):
    print(f'Node B sees {state["aggregate"]}')
    return {"aggregate": ["B"]}

# Define nodes
builder = StateGraph(State)
builder.add_node(a)
builder.add_node(b)

# Define edges
def route(state: State) -> Literal["b", END]:
    if state["remaining_steps"] <= 2:
        return END
    else:
        return "b"

builder.add_edge(START, "a")
builder.add_conditional_edges("a", route)
builder.add_edge("b", "a")
graph = builder.compile()

# Test it out
result = graph.invoke({"aggregate": []}, {"recursion_limit": 4})
print(result)
Node A sees []
Node B sees ['A']
Node A sees ['A', 'B']
{'aggregate': ['A', 'B', 'A']}
扩展示例:带分支的循环
为了更好地理解递归限制的工作原理,我们来看一个更复杂的例子。下面我们实现一个循环,但其中一步会分支出两个节点:
API参考:StateGraph | START | END
import operator
from typing import Annotated, Literal

from typing_extensions import TypedDict

from langgraph.graph import StateGraph, START, END

class State(TypedDict):
    aggregate: Annotated[list, operator.add]

def a(state: State):
    print(f'Node A sees {state["aggregate"]}')
    return {"aggregate": ["A"]}

def b(state: State):
    print(f'Node B sees {state["aggregate"]}')
    return {"aggregate": ["B"]}

def c(state: State):
    print(f'Node C sees {state["aggregate"]}')
    return {"aggregate": ["C"]}

def d(state: State):
    print(f'Node D sees {state["aggregate"]}')
    return {"aggregate": ["D"]}

# Define nodes
builder = StateGraph(State)
builder.add_node(a)
builder.add_node(b)
builder.add_node(c)
builder.add_node(d)

# Define edges
def route(state: State) -> Literal["b", END]:
    if len(state["aggregate"]) < 7:
        return "b"
    else:
        return END

builder.add_edge(START, "a")
builder.add_conditional_edges("a", route)
builder.add_edge("b", "c")
builder.add_edge("b", "d")
builder.add_edge(["c", "d"], "a")
graph = builder.compile()
from IPython.display import Image, display

display(Image(graph.get_graph().draw_mermaid_png()))
result = graph.invoke({"aggregate": []})
Node A sees []
Node B sees ['A']
Node D sees ['A', 'B']
Node C sees ['A', 'B']
Node A sees ['A', 'B', 'C', 'D']
Node B sees ['A', 'B', 'C', 'D', 'A']
Node D sees ['A', 'B', 'C', 'D', 'A', 'B']
Node C sees ['A', 'B', 'C', 'D', 'A', 'B']
Node A sees ['A', 'B', 'C', 'D', 'A', 'B', 'C', 'D']
然而,如果我们将递归限制设为四,由于每圈需要四个超步,因此只能完成一圈。
from langgraph.errors import GraphRecursionError

try:
    result = graph.invoke({"aggregate": []}, {"recursion_limit": 4})
except GraphRecursionError:
    print("Recursion Error")
Node A sees []
Node B sees ['A']
Node C sees ['A', 'B']
Node D sees ['A', 'B']
Node A sees ['A', 'B', 'C', 'D']
Recursion Error
异步编程
采用异步编程范式可以显著提升I/O密集型代码的并发执行性能(例如:向聊天模型提供商发起并发API请求)。
要将图的同步实现转换为异步实现,您需要:
1、将节点函数声明从def改为async def
2、在函数内部适当使用await关键字
3、根据需要调用.ainvoke或.astream方法来执行图
由于许多LangChain对象实现了Runnable协议,该协议为所有同步方法都提供了异步版本,因此通常可以快速将同步图升级为异步图。
参考以下示例。为了展示底层LLM的异步调用,我们将包含一个聊天模型:
参考:https://blog.csdn.net/lovechris00/article/details/148014663?spm=1001.2014.3001.5501#3_381
来配置 OpenAI、Anthropic、Azure、Google Gemini、AWS Bedrock 模型
API参考文档:init_chat_model | StateGraph
from langchain.chat_models import init_chat_model
from langgraph.graph import MessagesState, StateGraph

async def node(state: MessagesState): # (1)!
    new_message = await llm.ainvoke(state["messages"]) # (2)!
    return {"messages": [new_message]}

builder = StateGraph(MessagesState).add_node(node).set_entry_point("node")
graph = builder.compile()

input_message = {"role": "user", "content": "Hello"}
result = await graph.ainvoke({"messages": [input_message]}) # (3)!
1、将节点声明为异步函数。
2、在节点内部可用时使用异步调用。
3、在图形对象本身上使用异步调用。
异步流式处理
有关异步流式处理的示例,请参阅流式处理指南。
使用Command结合控制流与状态更新
将控制流(边)和状态更新(节点)结合起来会非常实用。例如,您可能希望在同一个节点中既执行状态更新,又决定下一步要转向哪个节点。LangGraph 提供了一种实现方式:通过从节点函数返回 Command 对象来完成这一操作。
def my_node(state: State) -> Command[Literal["my_other_node"]]:
    return Command(
        # state update
        update={"foo": "bar"},
        # control flow
        goto="my_other_node"
    )
下面我们展示一个端到端的示例。首先创建一个包含3个节点(A、B和C)的简单图。我们将先执行节点A,然后根据节点A的输出决定下一步是转向节点B还是节点C。
API参考:StateGraph | START | Command
import random
from typing_extensions import TypedDict, Literal

from langgraph.graph import StateGraph, START
from langgraph.types import Command

# Define graph state
class State(TypedDict):
    foo: str

# Define the nodes

def node_a(state: State) -> Command[Literal["node_b", "node_c"]]:
    print("Called A")
    value = random.choice(["a", "b"])
    # this is a replacement for a conditional edge function
    if value == "a":
        goto = "node_b"
    else:
        goto = "node_c"
	# note how Command allows you to BOTH update the graph state AND route to the next node
    return Command(
        # this is the state update
        update={"foo": value},
        # this is a replacement for an edge
        goto=goto,
    )

def node_b(state: State):
    print("Called B")
    return {"foo": state["foo"] + "b"}

def node_c(state: State):
    print("Called C")
    return {"foo": state["foo"] + "c"}
现在我们可以用上述节点创建StateGraph。注意这个图没有用于路由的条件边!这是因为控制流是通过node_a内部的Command定义的。
builder = StateGraph(State)
builder.add_edge(START, "node_a")
builder.add_node(node_a)
builder.add_node(node_b)
builder.add_node(node_c)
# NOTE: there are no edges between nodes A, B and C!

graph = builder.compile()
重要提示:
你可能已经注意到,我们使用了 Command 作为返回类型注解,例如 Command[Literal["node_b", "node_c"]]。这对于图形渲染是必需的,它告诉 LangGraph node_a 可以导航到 node_b 和 node_c。
from IPython.display import display, Image

display(Image(graph.get_graph().draw_mermaid_png()))
graph.invoke({"foo": ""})
Called A
Called C
{'foo': 'bc'}
在父图中导航到节点
如果使用子图,可能需要从子图内的节点导航到另一个子图(即父图中的不同节点)。为此,可以在Command中指定graph=Command.PARENT参数。
def my_node(state: State) -> Command[Literal["my_other_node"]]:
    return Command(
        update={"foo": "bar"},
        goto="other_subgraph",  # where `other_subgraph` is a node in the parent graph
        graph=Command.PARENT
    )
让我们通过上述示例来演示这一点。我们将把示例中的 node_a 修改为一个单节点图,并将其作为子图添加到父图中。
使用 Command.PARENT 进行状态更新
当你从子图节点向父图节点发送状态更新,且该键同时存在于父图和子图的状态模式中时,必须在父图状态中为要更新的键定义一个归约器。请参考以下示例。
使用 Command.PARENT 进行状态更新
当你从子图节点向父图节点发送状态更新,且该键同时存在于父图和子图的状态模式中时,必须在父图状态中为要更新的键定义一个归约器。
import operator
from typing_extensions import Annotated

class State(TypedDict):
    # NOTE: we define a reducer here
    foo: Annotated[str, operator.add]

def node_a(state: State):
    print("Called A")
    value = random.choice(["a", "b"])
    # this is a replacement for a conditional edge function
    if value == "a":
        goto = "node_b"
    else:
        goto = "node_c"
	# note how Command allows you to BOTH update the graph state AND route to the next node
    return Command(
        update={"foo": value},
        goto=goto,
        # this tells LangGraph to navigate to node_b or node_c in the parent graph
        # NOTE: this will navigate to the closest parent graph relative to the subgraph
        graph=Command.PARENT,
    )

subgraph = StateGraph(State).add_node(node_a).add_edge(START, "node_a").compile()

def node_b(state: State):
    print("Called B")
    # NOTE: since we've defined a reducer, we don't need to manually append
    # new characters to existing 'foo' value. instead, reducer will append these
    # automatically (via operator.add)
    return {"foo": "b"}

def node_c(state: State):
    print("Called C")
    return {"foo": "c"}
builder = StateGraph(State)
builder.add_edge(START, "subgraph")
builder.add_node("subgraph", subgraph)
builder.add_node(node_b)
builder.add_node(node_c)

graph = builder.compile()
graph.invoke({"foo": ""})
Called A
Called C
{'foo': 'bc'}
在工具内部使用
一个常见的使用场景是从工具内部更新图状态。例如,在客户支持应用中,你可能需要在对话开始时根据客户账号或ID查找客户信息。要从工具中更新图状态,你可以从工具返回 Command(update={"my_custom_key": "foo", "messages": [...]}):
@tool
def lookup_user_info(tool_call_id: Annotated[str, InjectedToolCallId], config: RunnableConfig):
    """Use this to look up user information to better assist them with their questions."""
    user_info = get_user_info(config.get("configurable", {}).get("user_id"))
    return Command(
        update={
            # update the state keys
            "user_info": user_info,
            # update the message history
            "messages": [ToolMessage("Successfully looked up user information", tool_call_id=tool_call_id)]
        }
    )
重要提示:
从工具返回 Command 时,必须在 Command.update 中包含 messages(或用于消息历史的任何状态键),且 messages 列表必须包含一个 ToolMessage。这是确保最终消息历史有效的必要条件(LLM 提供商要求 AI 消息在工具调用后必须跟随工具结果消息)。
如果使用通过 Command 更新状态的工具,建议使用预构建的 ToolNode,它会自动处理工具返回的 Command 对象并将其传播到图状态。如果编写自定义节点调用工具,则需要手动传播工具返回的 Command 对象作为节点的更新。
可视化你的图结构
这里我们将展示如何可视化你创建的图。
你可以可视化任意类型的图,包括状态图。让我们通过绘制分形图来体验其中的乐趣 😃
API参考文档: 状态图 | 起始节点 | 结束节点 | 添加消息
import random
from typing import Annotated, Literal

from typing_extensions import TypedDict

from langgraph.graph import StateGraph, START, END
from langgraph.graph.message import add_messages

class State(TypedDict):
    messages: Annotated[list, add_messages]

class MyNode:
    def __init__(self, name: str):
        self.name = name
	def __call__(self, state: State):
        return {"messages": [("assistant", f"Called node {self.name}")]}

def route(state) -> Literal["entry_node", "__end__"]:
    if len(state["messages"]) > 10:
        return "__end__"
    return "entry_node"

def add_fractal_nodes(builder, current_node, level, max_level):
    if level > max_level:
        return
	# Number of nodes to create at this level
    num_nodes = random.randint(1, 3)  # Adjust randomness as needed
    for i in range(num_nodes):
        nm = ["A", "B", "C"][i]
        node_name = f"node_{current_node}_{nm}"
        builder.add_node(node_name, MyNode(node_name))
        builder.add_edge(current_node, node_name)
	    # Recursively add more nodes
        r = random.random()
        if r > 0.2 and level + 1 < max_level:
            add_fractal_nodes(builder, node_name, level + 1, max_level)
        elif r > 0.05:
            builder.add_conditional_edges(node_name, route, node_name)
        else:
            # End
            builder.add_edge(node_name, "__end__")

def build_fractal_graph(max_level: int):
    builder = StateGraph(State)
    entry_point = "entry_node"
    builder.add_node(entry_point, MyNode(entry_point))
    builder.add_edge(START, entry_point)
	add_fractal_nodes(builder, entry_point, 1, max_level)
	# Optional: set a finish point if required
    builder.add_edge(entry_point, END)  # or any specific node
	return builder.compile()

app = build_fractal_graph(3)
Mermaid
我们还可以将图形类转换为 Mermaid 语法。
print(app.get_graph().draw_mermaid())
%%{init: {'flowchart': {'curve': 'linear'}}}%%
graph TD;
    __start__([<p>__start__</p>]):::first
    entry_node(entry_node)
    node_entry_node_A(node_entry_node_A)
    node_entry_node_B(node_entry_node_B)
    node_node_entry_node_B_A(node_node_entry_node_B_A)
    node_node_entry_node_B_B(node_node_entry_node_B_B)
    node_node_entry_node_B_C(node_node_entry_node_B_C)
    __end__([<p>__end__</p>]):::last
    __start__ --> entry_node;
    entry_node --> __end__;
    entry_node --> node_entry_node_A;
    entry_node --> node_entry_node_B;
    node_entry_node_B --> node_node_entry_node_B_A;
    node_entry_node_B --> node_node_entry_node_B_B;
    node_entry_node_B --> node_node_entry_node_B_C;
    node_entry_node_A -.-> entry_node;
    node_entry_node_A -.-> __end__;
    node_node_entry_node_B_A -.-> entry_node;
    node_node_entry_node_B_A -.-> __end__;
    node_node_entry_node_B_B -.-> entry_node;
    node_node_entry_node_B_B -.-> __end__;
    node_node_entry_node_B_C -.-> entry_node;
    node_node_entry_node_B_C -.-> __end__;
    classDef default fill:#f2f0ff,line-height:1.2
    classDef first fill-opacity:0
    classDef last fill:#bfb6fc
PNG
如果更倾向于使用PNG格式,我们可以将图表渲染为.png文件。这里提供三种可选方案:
- 使用Mermaid.ink API(无需额外安装包)
- 使用Mermaid + Pyppeteer(需执行
pip install pyppeteer) - 使用graphviz(需执行
pip install graphviz)
使用Mermaid.Ink
默认情况下,draw_mermaid_png()函数会调用Mermaid.Ink的API来生成图表。
API参考文档:CurveStyle | MermaidDrawMethod | NodeStyles
from IPython.display import Image, display
from langchain_core.runnables.graph import CurveStyle, MermaidDrawMethod, NodeStyles

display(Image(app.get_graph().draw_mermaid_png()))
 # Required for Jupyter Notebook to run async functions
display(
Image(
app.get_graph().draw_mermaid_png(
curve_style=CurveStyle.LINEAR,
node_colors=NodeStyles(first="#ffdfba", last="#baffc9", default="#fad7de"),
wrap_label_n_words=9,
output_file_path=None,
draw_method=MermaidDrawMethod.PYPPETEER,
background_color="white",
padding=10,
)
)
)
pip install pygraphviz
try:
    display(Image(app.get_graph().draw_png()))
except ImportError:
    print(
        "You likely need to install dependencies for pygraphviz, see more here https://github.com/pygraphviz/pygraphviz/blob/main/INSTALL.txt"
    )
流式处理
https://langchain-ai.github.io/langgraph/concepts/streaming/
LangGraph 实现了一套流式系统来提供实时更新,从而实现响应迅速且透明的用户体验。
LangGraph 的流式系统允许你将图运行过程中的实时反馈传递到应用程序中。
主要有三类数据可以进行流式传输:
1、工作流进度 — 在每个图节点执行后获取状态更新。
2、LLM 生成内容 — 在语言模型生成时实时传输 token。
3、自定义更新 — 发送用户定义的信号(例如"已获取 10/100 条记录")。
LangGraph 流式处理功能概览
- 流式传输LLM令牌 —— 可从任意节点、子图或工具捕获令牌流
- 从工具发送进度通知 —— 直接从工具函数发送自定义更新或进度信号
- 子图流式输出 —— 同时包含父图和嵌套子图的输出结果
- 兼容所有LLM —— 通过
custom流式模式,可处理任意LLM的令牌流(包括非LangChain模型) - 多流式模式支持 —— 可选模式包括:
values(完整状态)、updates(状态增量)、messages(LLM令牌+元数据)、custom(自定义数据)或debug(详细追踪)
流输出
https://langchain-ai.github.io/langgraph/how-tos/streaming/
流式 API
LangGraph 图提供了 .stream()(同步)和 .astream()(异步)方法,用于以迭代器形式生成流式输出。
基础用法示例:
Sync
for chunk in graph.stream(inputs, stream_mode="updates"):
    print(chunk)
Async
async for chunk in graph.astream(inputs, stream_mode="updates"):
    print(chunk)
扩展示例:流式更新
from typing import TypedDict
from langgraph.graph import StateGraph, START, END

class State(TypedDict):
    topic: str
    joke: str

def refine_topic(state: State):
    return {"topic": state["topic"] + " and cats"}

def generate_joke(state: State):
    return {"joke": f"This is a joke about {state['topic']}"}

graph = (
    StateGraph(State)
    .add_node(refine_topic)
    .add_node(generate_joke)
    .add_edge(START, "refine_topic")
    .add_edge("refine_topic", "generate_joke")
    .add_edge("generate_joke", END)
    .compile()
)

for chunk in graph.stream( # (1)!
    {"topic": "ice cream"},
    stream_mode="updates", # (2)!
):
    print(chunk)
1、stream() 方法返回一个迭代器,用于生成流式输出。
2、设置 stream_mode="updates" 可以仅流式传输每个节点后图状态的更新。还支持其他流模式,详情请参阅支持的流模式。
{'refine_topic': {'topic': 'ice cream and cats'}}
{'generate_joke': {'joke': 'This is a joke about ice cream and cats'}}
支持的流模式
| 模式 | 描述 |
|---|---|
values | 在图的每一步执行后,流式传输状态的完整值。 |
updates | 在图的每一步执行后,流式传输状态的更新内容。如果同一步骤中有多次更新(例如运行多个节点),这些更新会分别流式传输。 |
custom | 从图节点内部流式传输自定义数据。 |
messages | 在调用LLM的图节点处,流式传输LLM生成的令牌及元数据。 |
debug | 在图执行过程中流式传输尽可能多的信息。 |
流式传输多种模式
你可以传递一个列表作为 stream_mode 参数,一次性流式传输多种模式。
流式输出的结果将是 (mode, chunk) 元组,其中 mode 表示流模式的名称,chunk 是该模式传输的数据块。
Sync
for mode, chunk in graph.stream(inputs, stream_mode=["updates", "custom"]):
    print(chunk)
Async
async for mode, chunk in graph.astream(inputs, stream_mode=["updates", "custom"]):
    print(chunk)
流式图状态
使用流模式 updates 和 values 可以在图执行时流式传输其状态。
updates流式传输图中每一步执行后状态的更新部分。values流式传输图中每一步执行后状态的完整值。
API参考:StateGraph | START | END
from typing import TypedDict
from langgraph.graph import StateGraph, START, END

class State(TypedDict):
  topic: str
  joke: str

def refine_topic(state: State):
    return {"topic": state["topic"] + " and cats"}

def generate_joke(state: State):
    return {"joke": f"This is a joke about {state['topic']}"}

graph = (
  StateGraph(State)
  .add_node(refine_topic)
  .add_node(generate_joke)
  .add_edge(START, "refine_topic")
  .add_edge("refine_topic", "generate_joke")
  .add_edge("generate_joke", END)
  .compile()
)
updates
使用此功能可以仅流式传输节点在每个步骤后返回的状态更新。流式输出内容包括节点名称及其更新内容。
for chunk in graph.stream(
    {"topic": "ice cream"},
    stream_mode="updates",
):
    print(chunk)
values
使用此功能可在每一步操作后流式传输图的完整状态。
for chunk in graph.stream(
    {"topic": "ice cream"},
    stream_mode="values",
):
    print(chunk)
子图
若要在流式输出中包含子图的输出结果,您可以在父图的.stream()方法中设置subgraphs=True参数。该设置将同时输出父图及所有子图的数据流。
for chunk in graph.stream(
    {"foo": "foo"},
    subgraphs=True, # (1)!
    stream_mode="updates",
):
    print(chunk)
1、设置 subgraphs=True 以从子图流式传输输出。
扩展示例:从子图流式传输
from langgraph.graph import START, StateGraph
from typing import TypedDict

# Define subgraph
class SubgraphState(TypedDict):
    foo: str  # note that this key is shared with the parent graph state
    bar: str

def subgraph_node_1(state: SubgraphState):
    return {"bar": "bar"}

def subgraph_node_2(state: SubgraphState):
    return {"foo": state["foo"] + state["bar"]}

subgraph_builder = StateGraph(SubgraphState)
subgraph_builder.add_node(subgraph_node_1)
subgraph_builder.add_node(subgraph_node_2)
subgraph_builder.add_edge(START, "subgraph_node_1")
subgraph_builder.add_edge("subgraph_node_1", "subgraph_node_2")
subgraph = subgraph_builder.compile()

# Define parent graph
class ParentState(TypedDict):
    foo: str

def node_1(state: ParentState):
    return {"foo": "hi! " + state["foo"]}

builder = StateGraph(ParentState)
builder.add_node("node_1", node_1)
builder.add_node("node_2", subgraph)
builder.add_edge(START, "node_1")
builder.add_edge("node_1", "node_2")
graph = builder.compile()

for chunk in graph.stream(
    {"foo": "foo"},
    stream_mode="updates",
    subgraphs=True, # (1)!
):
    print(chunk)
1、设置 subgraphs=True 以从子图流式传输输出。
注意:我们不仅会接收节点更新,还会获取命名空间信息,这些命名空间会告诉我们当前流式传输来自哪个图(或子图)。
调试
使用 debug 流模式可以在图执行过程中流式传输尽可能多的信息。流式输出内容包括节点名称以及完整状态。
for chunk in graph.stream(
    {"topic": "ice cream"},
    stream_mode="debug",
):
    print(chunk)
LLM 令牌
使用 messages 流式模式可以从图的任何部分(包括节点、工具、子图或任务)逐令牌流式传输大型语言模型(LLM)的输出。
messages 模式 流式输出的结果是一个元组 (message_chunk, metadata),其中:
message_chunk:来自 LLM 的令牌或消息片段。metadata:包含图节点和 LLM 调用详情的字典。
如果您的 LLM 尚未集成到 LangChain 中,可以使用 custom 模式流式传输其输出。详情请参阅 与任意 LLM 配合使用。
Python < 3.11 异步需手动配置
在 Python < 3.11 中使用异步代码时,必须显式将 RunnableConfig 传递给 ainvoke() 以启用正确的流式传输。详情请参阅 Python < 3.11 异步支持,或升级至 Python 3.11+。
API 参考:init_chat_model | StateGraph | START
from dataclasses import dataclass

from langchain.chat_models import init_chat_model
from langgraph.graph import StateGraph, START

@dataclass
class MyState:
    topic: str
    joke: str = ""

llm = init_chat_model(model="openai:gpt-4o-mini")

def call_model(state: MyState):
    """Call the LLM to generate a joke about a topic"""
    llm_response = llm.invoke( # (1)!
        [
            {"role": "user", "content": f"Generate a joke about {state.topic}"}
        ]
    )
    return {"joke": llm_response.content}

graph = (
    StateGraph(MyState)
    .add_node(call_model)
    .add_edge(START, "call_model")
    .compile()
)

for message_chunk, metadata in graph.stream( # (2)!
    {"topic": "ice cream"},
    stream_mode="messages",
):
    if message_chunk.content:
        print(message_chunk.content, end="|", flush=True)
1、请注意,即使使用.invoke而非.stream运行LLM时,消息事件仍会被触发。
2、"messages"流模式返回一个由元组(message_chunk, metadata)组成的迭代器,其中:
message_chunk是LLM流式输出的tokenmetadata是一个字典,包含调用LLM的图节点信息及其他元数据
按LLM调用筛选
您可以为LLM调用关联tags标签,从而按LLM调用来筛选流式传输的token。
API参考文档:init_chat_model
from langchain.chat_models import init_chat_model

llm_1 = init_chat_model(model="openai:gpt-4o-mini", tags=['joke']) # (1)!
llm_2 = init_chat_model(model="openai:gpt-4o-mini", tags=['poem']) # (2)!

graph = ... # define a graph that uses these LLMs

async for msg, metadata in graph.astream(  # (3)!
    {"topic": "cats"},
    stream_mode="messages",
):
    if metadata["tags"] == ["joke"]: # (4)!
        print(msg.content, end="|", flush=True)
1、llm_1 被打上了 “joke”(笑话)标签。
2、llm_2 被打上了 “poem”(诗歌)标签。
3、将 stream_mode 设置为 “messages” 以流式传输 LLM 的 token。metadata 包含有关 LLM 调用的信息,其中包括标签。
4、通过 metadata 中的 tags 字段过滤流式传输的 token,只包含带有 “joke” 标签的 LLM 调用所产生的 token。
扩展示例:按标签过滤
from typing import TypedDict

from langchain.chat_models import init_chat_model
from langgraph.graph import START, StateGraph

joke_model = init_chat_model(model="openai:gpt-4o-mini", tags=["joke"]) # (1)!
poem_model = init_chat_model(model="openai:gpt-4o-mini", tags=["poem"]) # (2)!

class State(TypedDict):
      topic: str
      joke: str
      poem: str

async def call_model(state, config):
      topic = state["topic"]
      print("Writing joke...")
      # Note: Passing the config through explicitly is required for python < 3.11
      # Since context var support wasn't added before then: https://docs.python.org/3/library/asyncio-task.html#creating-tasks
      joke_response = await joke_model.ainvoke(
            [{"role": "user", "content": f"Write a joke about {topic}"}],
            config, # (3)!
      )
      print("\n\nWriting poem...")
      poem_response = await poem_model.ainvoke(
            [{"role": "user", "content": f"Write a short poem about {topic}"}],
            config, # (3)!
      )
      return {"joke": joke_response.content, "poem": poem_response.content}

graph = (
      StateGraph(State)
      .add_node(call_model)
      .add_edge(START, "call_model")
      .compile()
)

async for msg, metadata in graph.astream(
      {"topic": "cats"},
      stream_mode="messages", # (4)!
):
    if metadata["tags"] == ["joke"]: # (4)!
        print(msg.content, end="|", flush=True)
1、joke_model 被打上了 “joke” 标签。
2、poem_model 被打上了 “poem” 标签。
3、显式传递 config 以确保上下文变量正确传播。在使用异步代码且 Python 版本低于 3.11 时,这是必需的。更多详情请参阅异步章节。
4、stream_mode 设置为 “messages” 以流式传输 LLM 令牌。metadata 包含有关 LLM 调用的信息,其中包括标签。
按节点筛选
若只需从特定节点获取令牌流,请使用 stream_mode="messages" 并通过流式元数据中的 langgraph_node 字段对输出进行筛选:
for msg, metadata in graph.stream( # (1)!
    inputs,
    stream_mode="messages",
):
    if msg.content and metadata["langgraph_node"] == "some_node_name": # (2)!
        ...
1、"messages"流模式返回一个元组(message_chunk, metadata),其中message_chunk是LLM流式输出的token,metadata是一个字典,包含调用LLM的图节点信息及其他元数据。
2、通过metadata中的langgraph_node字段过滤流式token,仅保留来自write_poem节点的token。
扩展示例:从特定节点流式获取LLM token
from typing import TypedDict
from langgraph.graph import START, StateGraph
from langchain_openai import ChatOpenAI

model = ChatOpenAI(model="gpt-4o-mini")

class State(TypedDict):
      topic: str
      joke: str
      poem: str

def write_joke(state: State):
      topic = state["topic"]
      joke_response = model.invoke(
            [{"role": "user", "content": f"Write a joke about {topic}"}]
      )
      return {"joke": joke_response.content}

def write_poem(state: State):
      topic = state["topic"]
      poem_response = model.invoke(
            [{"role": "user", "content": f"Write a short poem about {topic}"}]
      )
      return {"poem": poem_response.content}

graph = (
      StateGraph(State)
      .add_node(write_joke)
      .add_node(write_poem)
      # write both the joke and the poem concurrently
      .add_edge(START, "write_joke")
      .add_edge(START, "write_poem")
      .compile()
)

for msg, metadata in graph.stream( # (1)!
    {"topic": "cats"},
    stream_mode="messages",
):
    if msg.content and metadata["langgraph_node"] == "write_poem": # (2)!
        print(msg.content, end="|", flush=True)
1、"messages"流模式返回一个元组(message_chunk, metadata),其中message_chunk是LLM流式输出的token,metadata是一个字典,包含调用LLM的图节点信息及其他相关信息。
2、通过metadata中的langgraph_node字段过滤流式token,仅保留来自write_poem节点的token。
流式传输自定义数据
要在 LangGraph 节点或工具中发送用户自定义数据,请按照以下步骤操作:
1、使用 get_stream_writer() 获取流写入器并发送自定义数据。
2、在调用 .stream() 或 .astream() 时设置 stream_mode="custom" 以在流中获取自定义数据。您可以组合多种模式(例如 ["updates", "custom"]),但其中至少一个必须是 "custom"。
Python < 3.11 版本中异步代码无法使用 get_stream_writer()
在 Python < 3.11 版本的异步代码中,get_stream_writer() 将不可用。
替代方案是:为您的节点或工具添加一个 writer 参数并手动传入。
具体用法示例请参阅 Python < 3.11 异步处理。
node
from typing import TypedDict
from langgraph.config import get_stream_writer
from langgraph.graph import StateGraph, START

class State(TypedDict):
    query: str
    answer: str

def node(state: State):
    writer = get_stream_writer()  # (1)!
    writer({"custom_key": "Generating custom data inside node"}) # (2)!
    return {"answer": "some data"}

graph = (
    StateGraph(State)
    .add_node(node)
    .add_edge(START, "node")
    .compile()
)

inputs = {"query": "example"}

# Usage
for chunk in graph.stream(inputs, stream_mode="custom"):  # (3)!
    print(chunk)
1、获取流写入器以发送自定义数据
2、发送自定义键值对(例如进度更新)
3、设置 stream_mode="custom" 以便在流中接收自定义数据
tool
from langchain_core.tools import tool
from langgraph.config import get_stream_writer

@tool
def query_database(query: str) -> str:
    """Query the database."""
    writer = get_stream_writer() # (1)!
    writer({"data": "Retrieved 0/100 records", "type": "progress"}) # (2)!
    # perform query
    writer({"data": "Retrieved 100/100 records", "type": "progress"}) # (3)!
    return "some-answer"

graph = ... # define a graph that uses this tool

for chunk in graph.stream(inputs, stream_mode="custom"): # (4)!
    print(chunk)
1、访问流写入器以发送自定义数据。
2、发送自定义键值对(例如进度更新)。
3、发送另一个自定义键值对。
4、设置 stream_mode="custom" 以便在流中接收自定义数据。
兼容任意大语言模型
通过设置 stream_mode="custom",您可以从任何大语言模型API流式传输数据——即使该API未实现LangChain的聊天模型接口。
这使得您可以集成原生LLM客户端或提供自有流式接口的外部服务,让LangGraph能够高度灵活地适应各类定制化场景。
API参考文档:get_stream_writer
from langgraph.config import get_stream_writer

def call_arbitrary_model(state):
    """Example node that calls an arbitrary model and streams the output"""
    writer = get_stream_writer() # (1)!
    # Assume you have a streaming client that yields chunks
    for chunk in your_custom_streaming_client(state["topic"]): # (2)!
        writer({"custom_llm_chunk": chunk}) # (3)!
    return {"result": "completed"}

graph = (
    StateGraph(State)
    .add_node(call_arbitrary_model)
    # Add other nodes and edges as needed
    .compile()
)

for chunk in graph.stream(
    {"topic": "cats"},
    stream_mode="custom", # (4)!
):
    # The chunk will contain the custom data streamed from the llm
    print(chunk)
1、获取流写入器以发送自定义数据
2、使用自定义流式客户端生成LLM令牌
3、通过写入器将自定义数据发送至流
4、设置stream_mode="custom"以接收流中的自定义数据
扩展示例:流式传输任意聊天模型
import operator
import json

from typing import TypedDict
from typing_extensions import Annotated
from langgraph.graph import StateGraph, START

from openai import AsyncOpenAI

openai_client = AsyncOpenAI()
model_name = "gpt-4o-mini"

async def stream_tokens(model_name: str, messages: list[dict]):
    response = await openai_client.chat.completions.create(
        messages=messages, model=model_name, stream=True
    )
    role = None
    async for chunk in response:
        delta = chunk.choices[0].delta
	    if delta.role is not None:
            role = delta.role
	    if delta.content:
            yield {"role": role, "content": delta.content}

# this is our tool
async def get_items(place: str) -> str:
    """Use this tool to list items one might find in a place you're asked about."""
    writer = get_stream_writer()
    response = ""
    async for msg_chunk in stream_tokens(
        model_name,
        [
            {
                "role": "user",
                "content": (
                    "Can you tell me what kind of items "
                    f"i might find in the following place: '{place}'. "
                    "List at least 3 such items separating them by a comma. "
                    "And include a brief description of each item."
                ),
            }
        ],
    ):
        response += msg_chunk["content"]
        writer(msg_chunk)
	return response

class State(TypedDict):
    messages: Annotated[list[dict], operator.add]

# this is the tool-calling graph node
async def call_tool(state: State):
    ai_message = state["messages"][-1]
    tool_call = ai_message["tool_calls"][-1]
	function_name = tool_call["function"]["name"]
    if function_name != "get_items":
        raise ValueError(f"Tool {function_name} not supported")
	function_arguments = tool_call["function"]["arguments"]
    arguments = json.loads(function_arguments)
	function_response = await get_items(**arguments)
    tool_message = {
        "tool_call_id": tool_call["id"],
        "role": "tool",
        "name": function_name,
        "content": function_response,
    }
    return {"messages": [tool_message]}

graph = (
    StateGraph(State)
    .add_node(call_tool)
    .add_edge(START, "call_tool")
    .compile()
)
让我们用一个包含工具调用的AI消息来调用这个图:
inputs = {
    "messages": [
        {
            "content": None,
            "role": "assistant",
            "tool_calls": [
                {
                    "id": "1",
                    "function": {
                        "arguments": '{"place":"bedroom"}',
                        "name": "get_items",
                    },
                    "type": "function",
                }
            ],
        }
    ]
}

async for chunk in graph.astream(
    inputs,
    stream_mode="custom",
):
    print(chunk["content"], end="|", flush=True)
禁用特定聊天模型的流式传输
如果您的应用程序混合使用了支持流式传输和不支持流式传输的模型,您可能需要显式地为不支持流式传输的模型禁用此功能。
在初始化模型时设置 disable_streaming=True。
init_chat_modelchat model interface
from langchain.chat_models import init_chat_model

model = init_chat_model(
    "anthropic:claude-3-7-sonnet-latest",
    disable_streaming=True # (1)!
)
1、设置 disable_streaming=True 以禁用聊天模型的流式传输功能。
from langchain_openai import ChatOpenAI

llm = ChatOpenAI(model="o1-preview", disable_streaming=True) # (1)!
1、设置 disable_streaming=True 以禁用聊天模型的流式传输功能。
Python < 3.11 中的异步处理
在 Python 3.11 之前的版本中,asyncio tasks 不支持 context 参数。
这限制了 LangGraph 自动传播上下文的能力,并从以下两个方面影响了 LangGraph 的流式处理机制:
1、你必须显式地将 RunnableConfig 传入异步 LLM 调用(例如 ainvoke()),因为回调函数不会自动传播。
2、你不能在异步节点或工具中使用 get_stream_writer() —— 必须直接传递 writer 参数。
扩展示例:手动配置的异步 LLM 调用
from typing import TypedDict
from langgraph.graph import START, StateGraph
from langchain.chat_models import init_chat_model

llm = init_chat_model(model="openai:gpt-4o-mini")

class State(TypedDict):
    topic: str
    joke: str

async def call_model(state, config): # (1)!
    topic = state["topic"]
    print("Generating joke...")
    joke_response = await llm.ainvoke(
        [{"role": "user", "content": f"Write a joke about {topic}"}],
        config, # (2)!
    )
    return {"joke": joke_response.content}

graph = (
    StateGraph(State)
    .add_node(call_model)
    .add_edge(START, "call_model")
    .compile()
)

async for chunk, metadata in graph.astream(
    {"topic": "ice cream"},
    stream_mode="messages", # (3)!
):
    if chunk.content:
        print(chunk.content, end="|", flush=True)
1、在异步节点函数中接受 config 作为参数。
2、将 config 传递给 llm.ainvoke() 以确保正确的上下文传递。
3、设置 stream_mode="messages" 以实现 LLM token 流式传输。
扩展示例:使用流写入器实现异步自定义流式处理
from typing import TypedDict
from langgraph.types import StreamWriter

class State(TypedDict):
      topic: str
      joke: str

async def generate_joke(state: State, writer: StreamWriter): # (1)!
      writer({"custom_key": "Streaming custom data while generating a joke"})
      return {"joke": f"This is a joke about {state['topic']}"}

graph = (
      StateGraph(State)
      .add_node(generate_joke)
      .add_edge(START, "generate_joke")
      .compile()
)

async for chunk in graph.astream(
      {"topic": "ice cream"},
      stream_mode="custom", # (2)!
):
      print(chunk)
1、在异步节点或工具的函数签名中添加 writer 作为参数。LangGraph 会自动将流写入器传递给该函数。
2、设置 stream_mode="custom" 以接收流中的自定义数据。
持久化
https://langchain-ai.github.io/langgraph/concepts/persistence/
LangGraph内置了一个通过检查点器实现的持久化层。当您使用检查点器编译图时,检查点器会在每个超级步骤保存图状态的checkpoint。这些检查点会被保存到一个thread中,在图执行后仍可访问。由于threads允许在执行后访问图的状态,因此可以实现包括人在回路、记忆、时间旅行和容错在内的多种强大功能。具体操作示例请参阅本指南,了解如何为图添加和使用检查点器。下面我们将详细讨论这些概念。
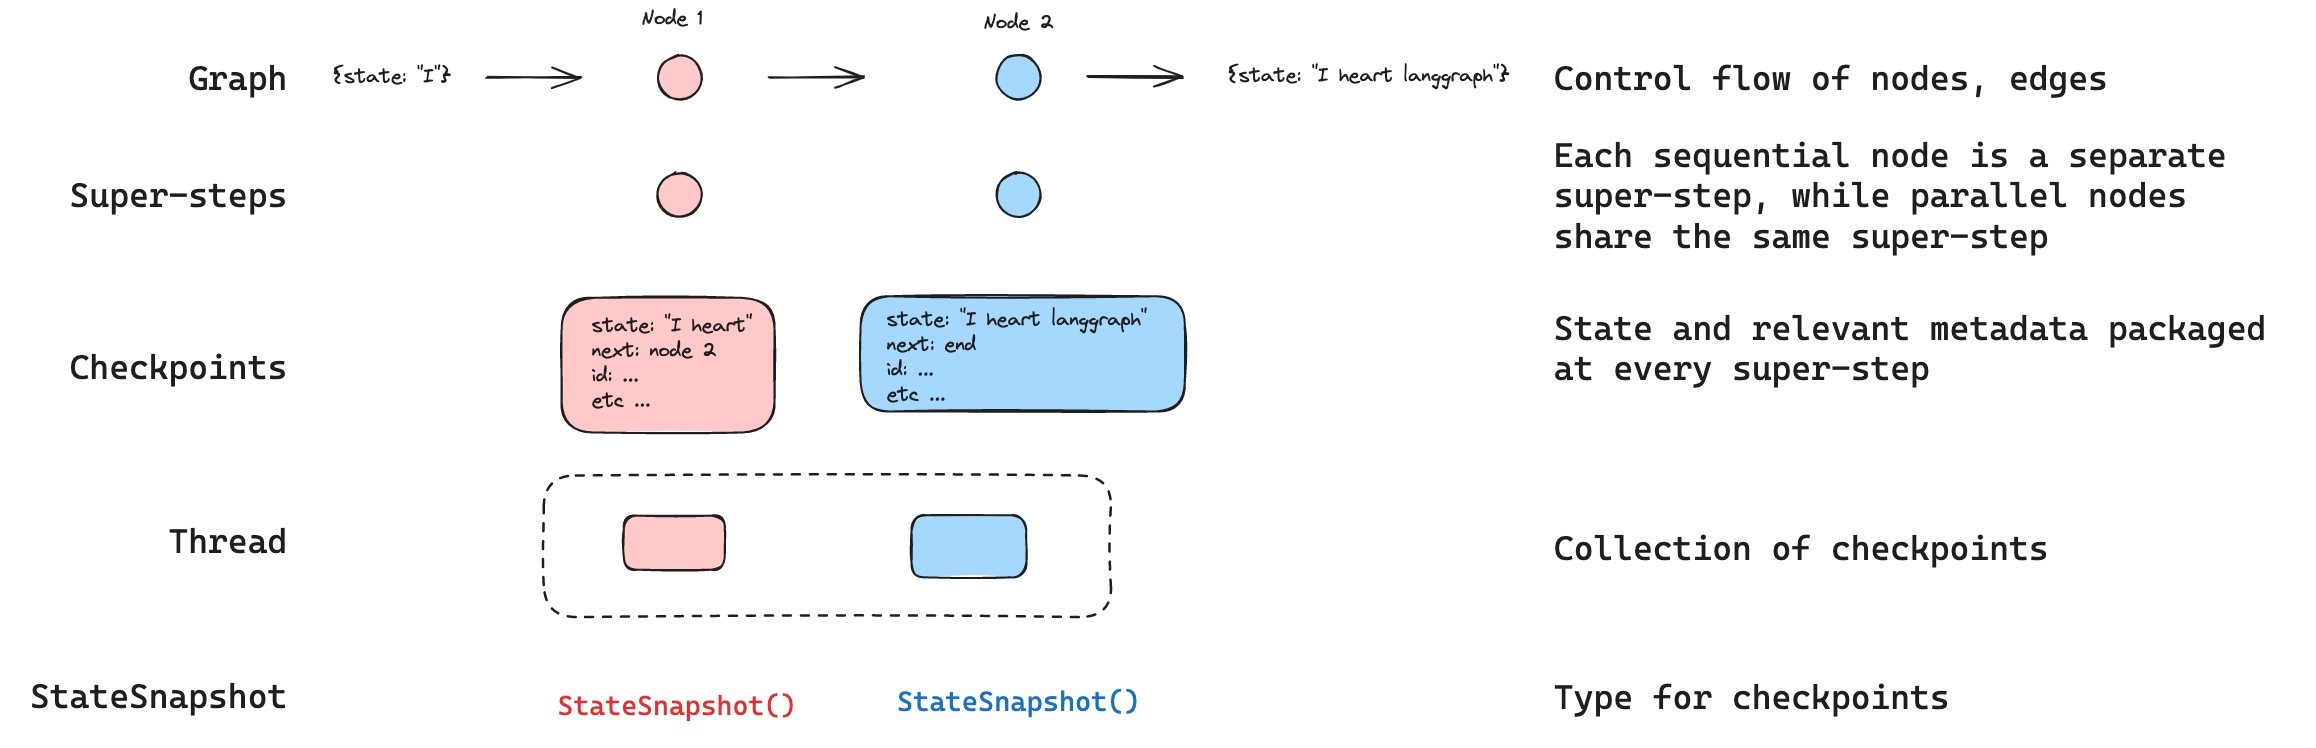
LangGraph API自动处理检查点
使用LangGraph API时,您无需手动实现或配置检查点器。API会在后台为您处理所有持久化基础设施。
线程
线程是由检查点保存器为每个检查点分配的唯一ID或线程标识符。当使用检查点器调用图时,必须在配置的configurable部分指定一个thread_id参数。
{"configurable": {"thread_id": "1"}}
检查点
检查点是每个超级步骤保存的图状态快照,由 StateSnapshot 对象表示,具有以下关键属性:
config:与此检查点关联的配置。metadata:与此检查点关联的元数据。values:此时刻状态通道的值。next:接下来要在图中执行的节点名称元组。tasks:包含待执行任务信息的PregelTask对象元组。如果该步骤之前尝试过,将包含错误信息。如果图是从节点内部动态中断的,任务将包含与中断相关的额外数据。
让我们看看调用简单图时会保存哪些检查点:
API 参考:StateGraph | START | END | InMemorySaver
from langgraph.graph import StateGraph, START, END
from langgraph.checkpoint.memory import InMemorySaver
from typing import Annotated
from typing_extensions import TypedDict
from operator import add

class State(TypedDict):
    foo: str
    bar: Annotated[list[str], add]

def node_a(state: State):
    return {"foo": "a", "bar": ["a"]}

def node_b(state: State):
    return {"foo": "b", "bar": ["b"]}

workflow = StateGraph(State)
workflow.add_node(node_a)
workflow.add_node(node_b)
workflow.add_edge(START, "node_a")
workflow.add_edge("node_a", "node_b")
workflow.add_edge("node_b", END)

checkpointer = InMemorySaver()
graph = workflow.compile(checkpointer=checkpointer)

config = {"configurable": {"thread_id": "1"}}
graph.invoke({"foo": ""}, config)
运行图后,我们预期会看到4个检查点:
- 空检查点,其中
START作为下一个待执行节点 - 包含用户输入
{'foo': '', 'bar': []}的检查点,且node_a作为下一个待执行节点 - 包含
node_a输出{'foo': 'a', 'bar': ['a']}的检查点,且node_b作为下一个待执行节点 - 包含
node_b输出{'foo': 'b', 'bar': ['a', 'b']}的检查点,且没有后续待执行节点
注意,由于我们为bar通道设置了归约器,因此bar通道的值包含来自两个节点的输出。
获取状态
与保存的图状态交互时,必须指定线程标识符。您可以通过调用graph.get_state(config)查看图的最新状态。该调用将返回一个StateSnapshot对象,该对象对应于配置中提供的线程ID关联的最新检查点;如果提供了检查点ID,则返回该线程ID关联的特定检查点。
# get the latest state snapshot
config = {"configurable": {"thread_id": "1"}}
graph.get_state(config)

# get a state snapshot for a specific checkpoint_id
config = {"configurable": {"thread_id": "1", "checkpoint_id": "1ef663ba-28fe-6528-8002-5a559208592c"}}
graph.get_state(config)
在我们的示例中,get_state 的输出将如下所示:
StateSnapshot(
    values={'foo': 'b', 'bar': ['a', 'b']},
    next=(),
    config={'configurable': {'thread_id': '1', 'checkpoint_ns': '', 'checkpoint_id': '1ef663ba-28fe-6528-8002-5a559208592c'}},
    metadata={'source': 'loop', 'writes': {'node_b': {'foo': 'b', 'bar': ['b']}}, 'step': 2},
    created_at='2024-08-29T19:19:38.821749+00:00',
    parent_config={'configurable': {'thread_id': '1', 'checkpoint_ns': '', 'checkpoint_id': '1ef663ba-28f9-6ec4-8001-31981c2c39f8'}}, tasks=()
)
获取状态历史记录
通过调用 graph.get_state_history(config),可以获取指定线程的图执行完整历史记录。该方法会返回与配置中提供的线程ID相关联的 StateSnapshot 对象列表。需要注意的是,检查点将按时间顺序排列,最新的检查点/StateSnapshot 会出现在列表首位。
config = {"configurable": {"thread_id": "1"}}
list(graph.get_state_history(config))
在我们的示例中,get_state_history 的输出将如下所示:
[
    StateSnapshot(
        values={'foo': 'b', 'bar': ['a', 'b']},
        next=(),
        config={'configurable': {'thread_id': '1', 'checkpoint_ns': '', 'checkpoint_id': '1ef663ba-28fe-6528-8002-5a559208592c'}},
        metadata={'source': 'loop', 'writes': {'node_b': {'foo': 'b', 'bar': ['b']}}, 'step': 2},
        created_at='2024-08-29T19:19:38.821749+00:00',
        parent_config={'configurable': {'thread_id': '1', 'checkpoint_ns': '', 'checkpoint_id': '1ef663ba-28f9-6ec4-8001-31981c2c39f8'}},
        tasks=(),
    ),
    StateSnapshot(
        values={'foo': 'a', 'bar': ['a']}, next=('node_b',),
        config={'configurable': {'thread_id': '1', 'checkpoint_ns': '', 'checkpoint_id': '1ef663ba-28f9-6ec4-8001-31981c2c39f8'}},
        metadata={'source': 'loop', 'writes': {'node_a': {'foo': 'a', 'bar': ['a']}}, 'step': 1},
        created_at='2024-08-29T19:19:38.819946+00:00',
        parent_config={'configurable': {'thread_id': '1', 'checkpoint_ns': '', 'checkpoint_id': '1ef663ba-28f4-6b4a-8000-ca575a13d36a'}},
        tasks=(PregelTask(id='6fb7314f-f114-5413-a1f3-d37dfe98ff44', name='node_b', error=None, interrupts=()),),
    ),
    StateSnapshot(
        values={'foo': '', 'bar': []},
        next=('node_a',),
        config={'configurable': {'thread_id': '1', 'checkpoint_ns': '', 'checkpoint_id': '1ef663ba-28f4-6b4a-8000-ca575a13d36a'}},
        metadata={'source': 'loop', 'writes': None, 'step': 0},
        created_at='2024-08-29T19:19:38.817813+00:00',
        parent_config={'configurable': {'thread_id': '1', 'checkpoint_ns': '', 'checkpoint_id': '1ef663ba-28f0-6c66-bfff-6723431e8481'}},
        tasks=(PregelTask(id='f1b14528-5ee5-579c-949b-23ef9bfbed58', name='node_a', error=None, interrupts=()),),
    ),
    StateSnapshot(
        values={'bar': []},
        next=('__start__',),
        config={'configurable': {'thread_id': '1', 'checkpoint_ns': '', 'checkpoint_id': '1ef663ba-28f0-6c66-bfff-6723431e8481'}},
        metadata={'source': 'input', 'writes': {'foo': ''}, 'step': -1},
        created_at='2024-08-29T19:19:38.816205+00:00',
        parent_config=None,
        tasks=(PregelTask(id='6d27aa2e-d72b-5504-a36f-8620e54a76dd', name='__start__', error=None, interrupts=()),),
    )
]
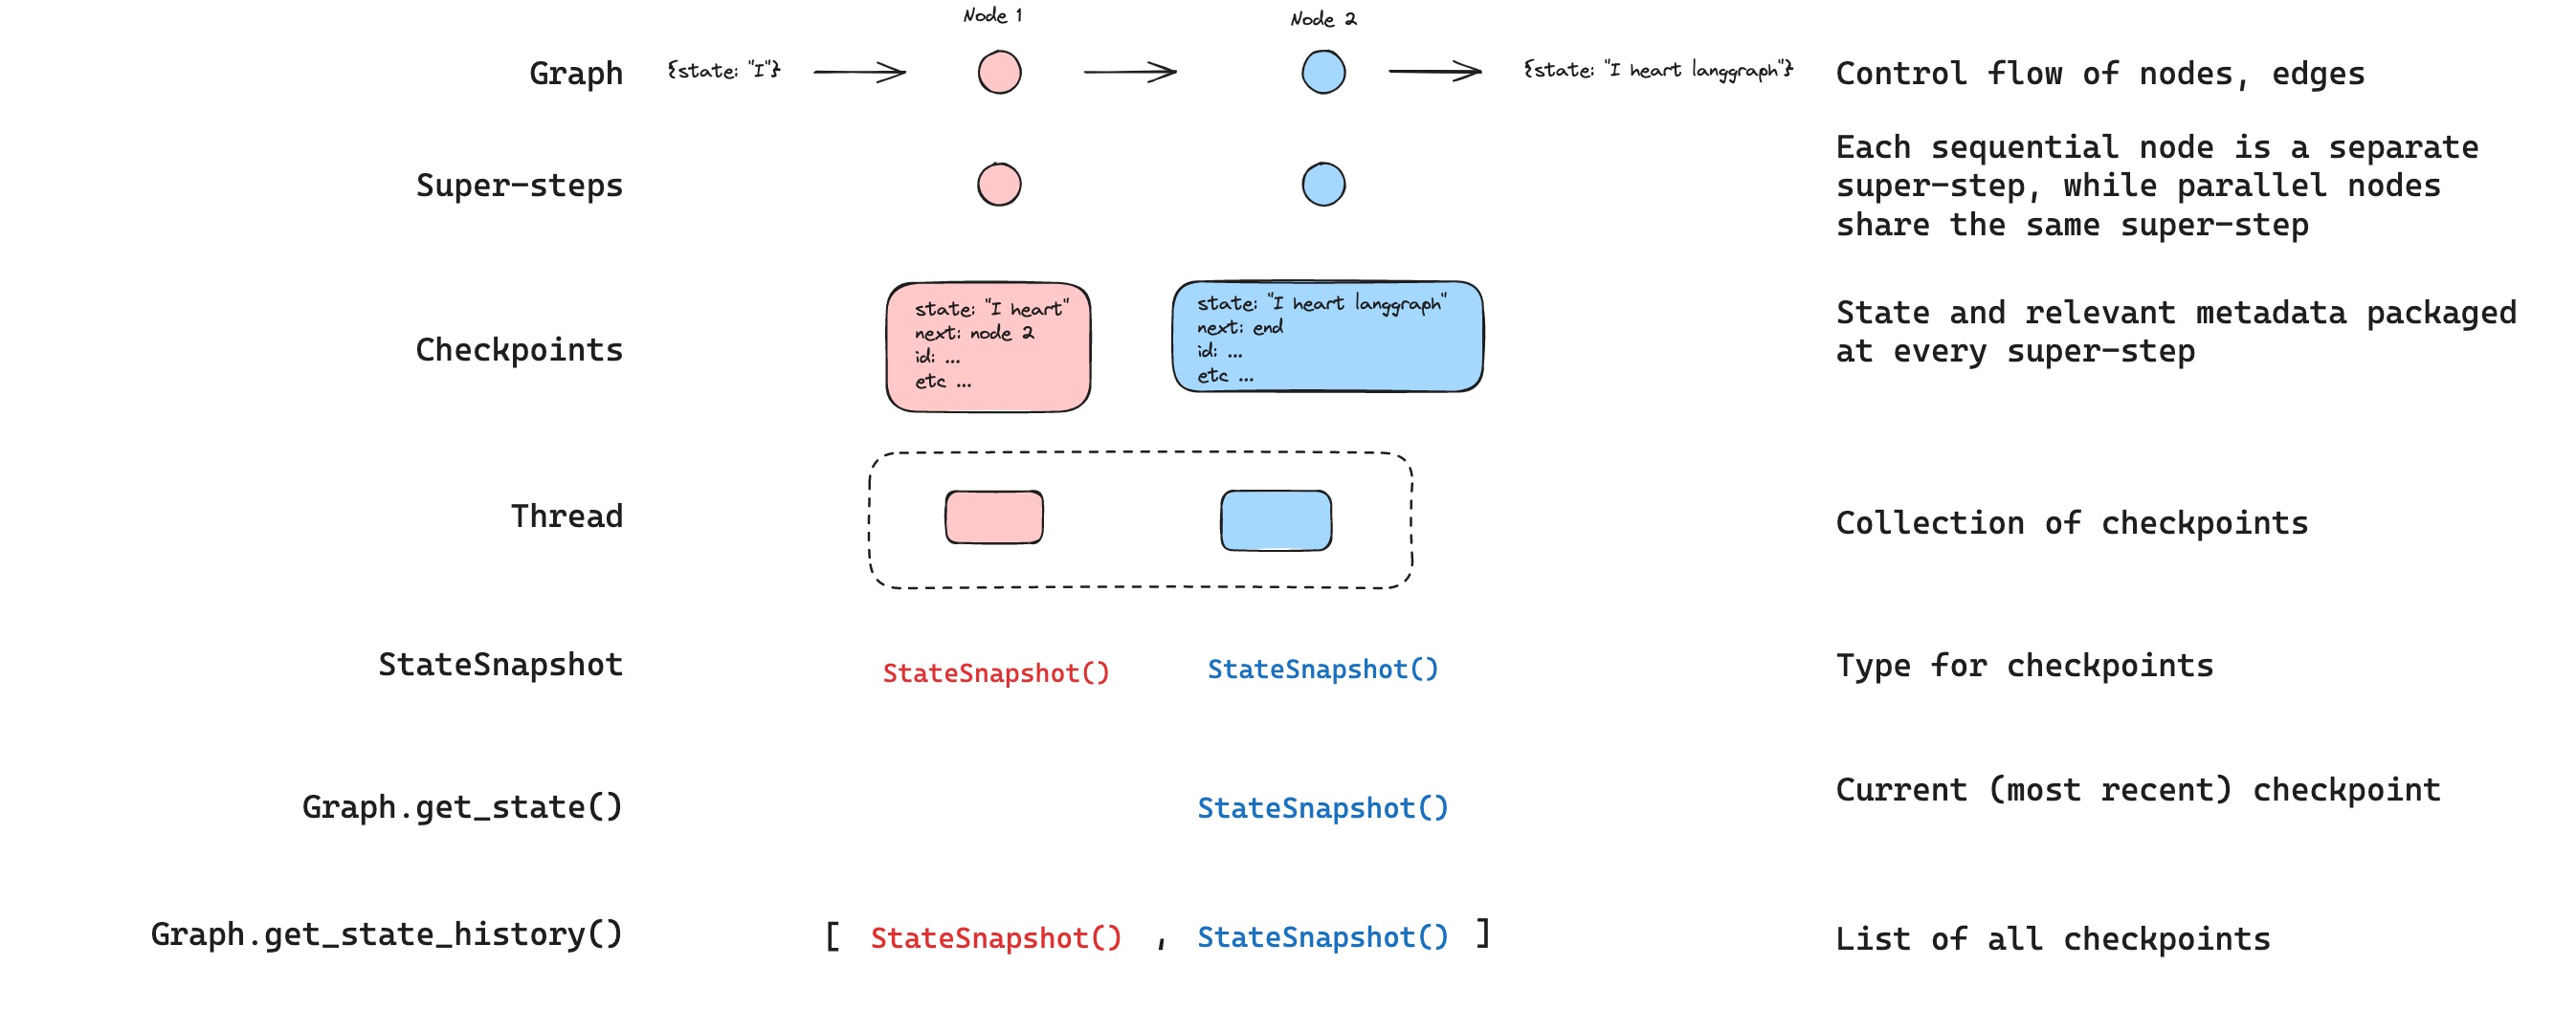
重放
我们还可以回放之前执行过的图。如果使用thread_id和checkpoint_id来invoke一个图,系统会重新执行对应checkpoint_id检查点之前的步骤,仅执行检查点之后的步骤。
thread_id表示线程的IDcheckpoint_id用于标识线程中的特定检查点
在调用图时,必须将这些参数作为配置中configurable部分进行传递。
config = {"configurable": {"thread_id": "1", "checkpoint_id": "0c62ca34-ac19-445d-bbb0-5b4984975b2a"}}
graph.invoke(None, config=config)
重要的是,LangGraph能够识别特定步骤是否已被执行过。如果已执行,LangGraph会简单地重放图中的该步骤,而不会重新执行它——但仅适用于checkpoint_id之前的步骤。所有位于checkpoint_id之后的步骤都将被执行(即形成新的分支),即使它们之前已被执行过。详见时间回溯操作指南了解重放机制的更多细节。

更新状态
除了从特定checkpoints重新执行计算图外,我们还可以编辑计算图的状态。这通过graph.update_state()方法实现,该方法接受三种不同的参数:
config
配置中应包含 thread_id 字段,用于指定要更新的线程。当仅传入 thread_id 时,系统会更新(或派生)当前状态。此外,如果包含 checkpoint_id 字段,则会基于选中的检查点进行派生操作。
values
这些值将用于更新状态。请注意,该更新与来自节点的任何更新处理方式完全相同。这意味着这些值将被传递到reducer函数(如果它们为图中的某些通道定义了reducer函数)。因此,update_state不会自动覆盖所有通道的值,而仅会覆盖那些未定义reducer的通道值。让我们通过一个示例来说明。
假设您已使用以下模式定义了图的状态(参见上文的完整示例):
from typing import Annotated
from typing_extensions import TypedDict
from operator import add

class State(TypedDict):
    foo: int
    bar: Annotated[list[str], add]
现在假设图的当前状态为
{"foo": 1, "bar": ["a"]}
如果你像下面这样更新状态:
graph.update_state(config, {"foo": 2, "bar": ["b"]})
然后图的新状态将是:
{"foo": 2, "bar": ["a", "b"]}
foo键(通道)被完全改变(因为未指定该通道的reducer,所以update_state直接覆盖了它)。但bar键指定了reducer,因此它会将"b"追加到bar的状态中。
as_node
在调用update_state时,你可以选择指定最后一个可选参数as_node。如果提供了该参数,更新操作会表现得像是来自节点as_node发起的。若未提供as_node,系统会默认将其设为最后一个更新该状态的节点(前提是节点来源明确)。这个参数之所以重要,是因为后续执行步骤取决于最近一次执行更新的节点,因此可通过该参数控制下一个执行节点。具体应用可参考时间旅行操作指南了解状态分叉的更多细节。
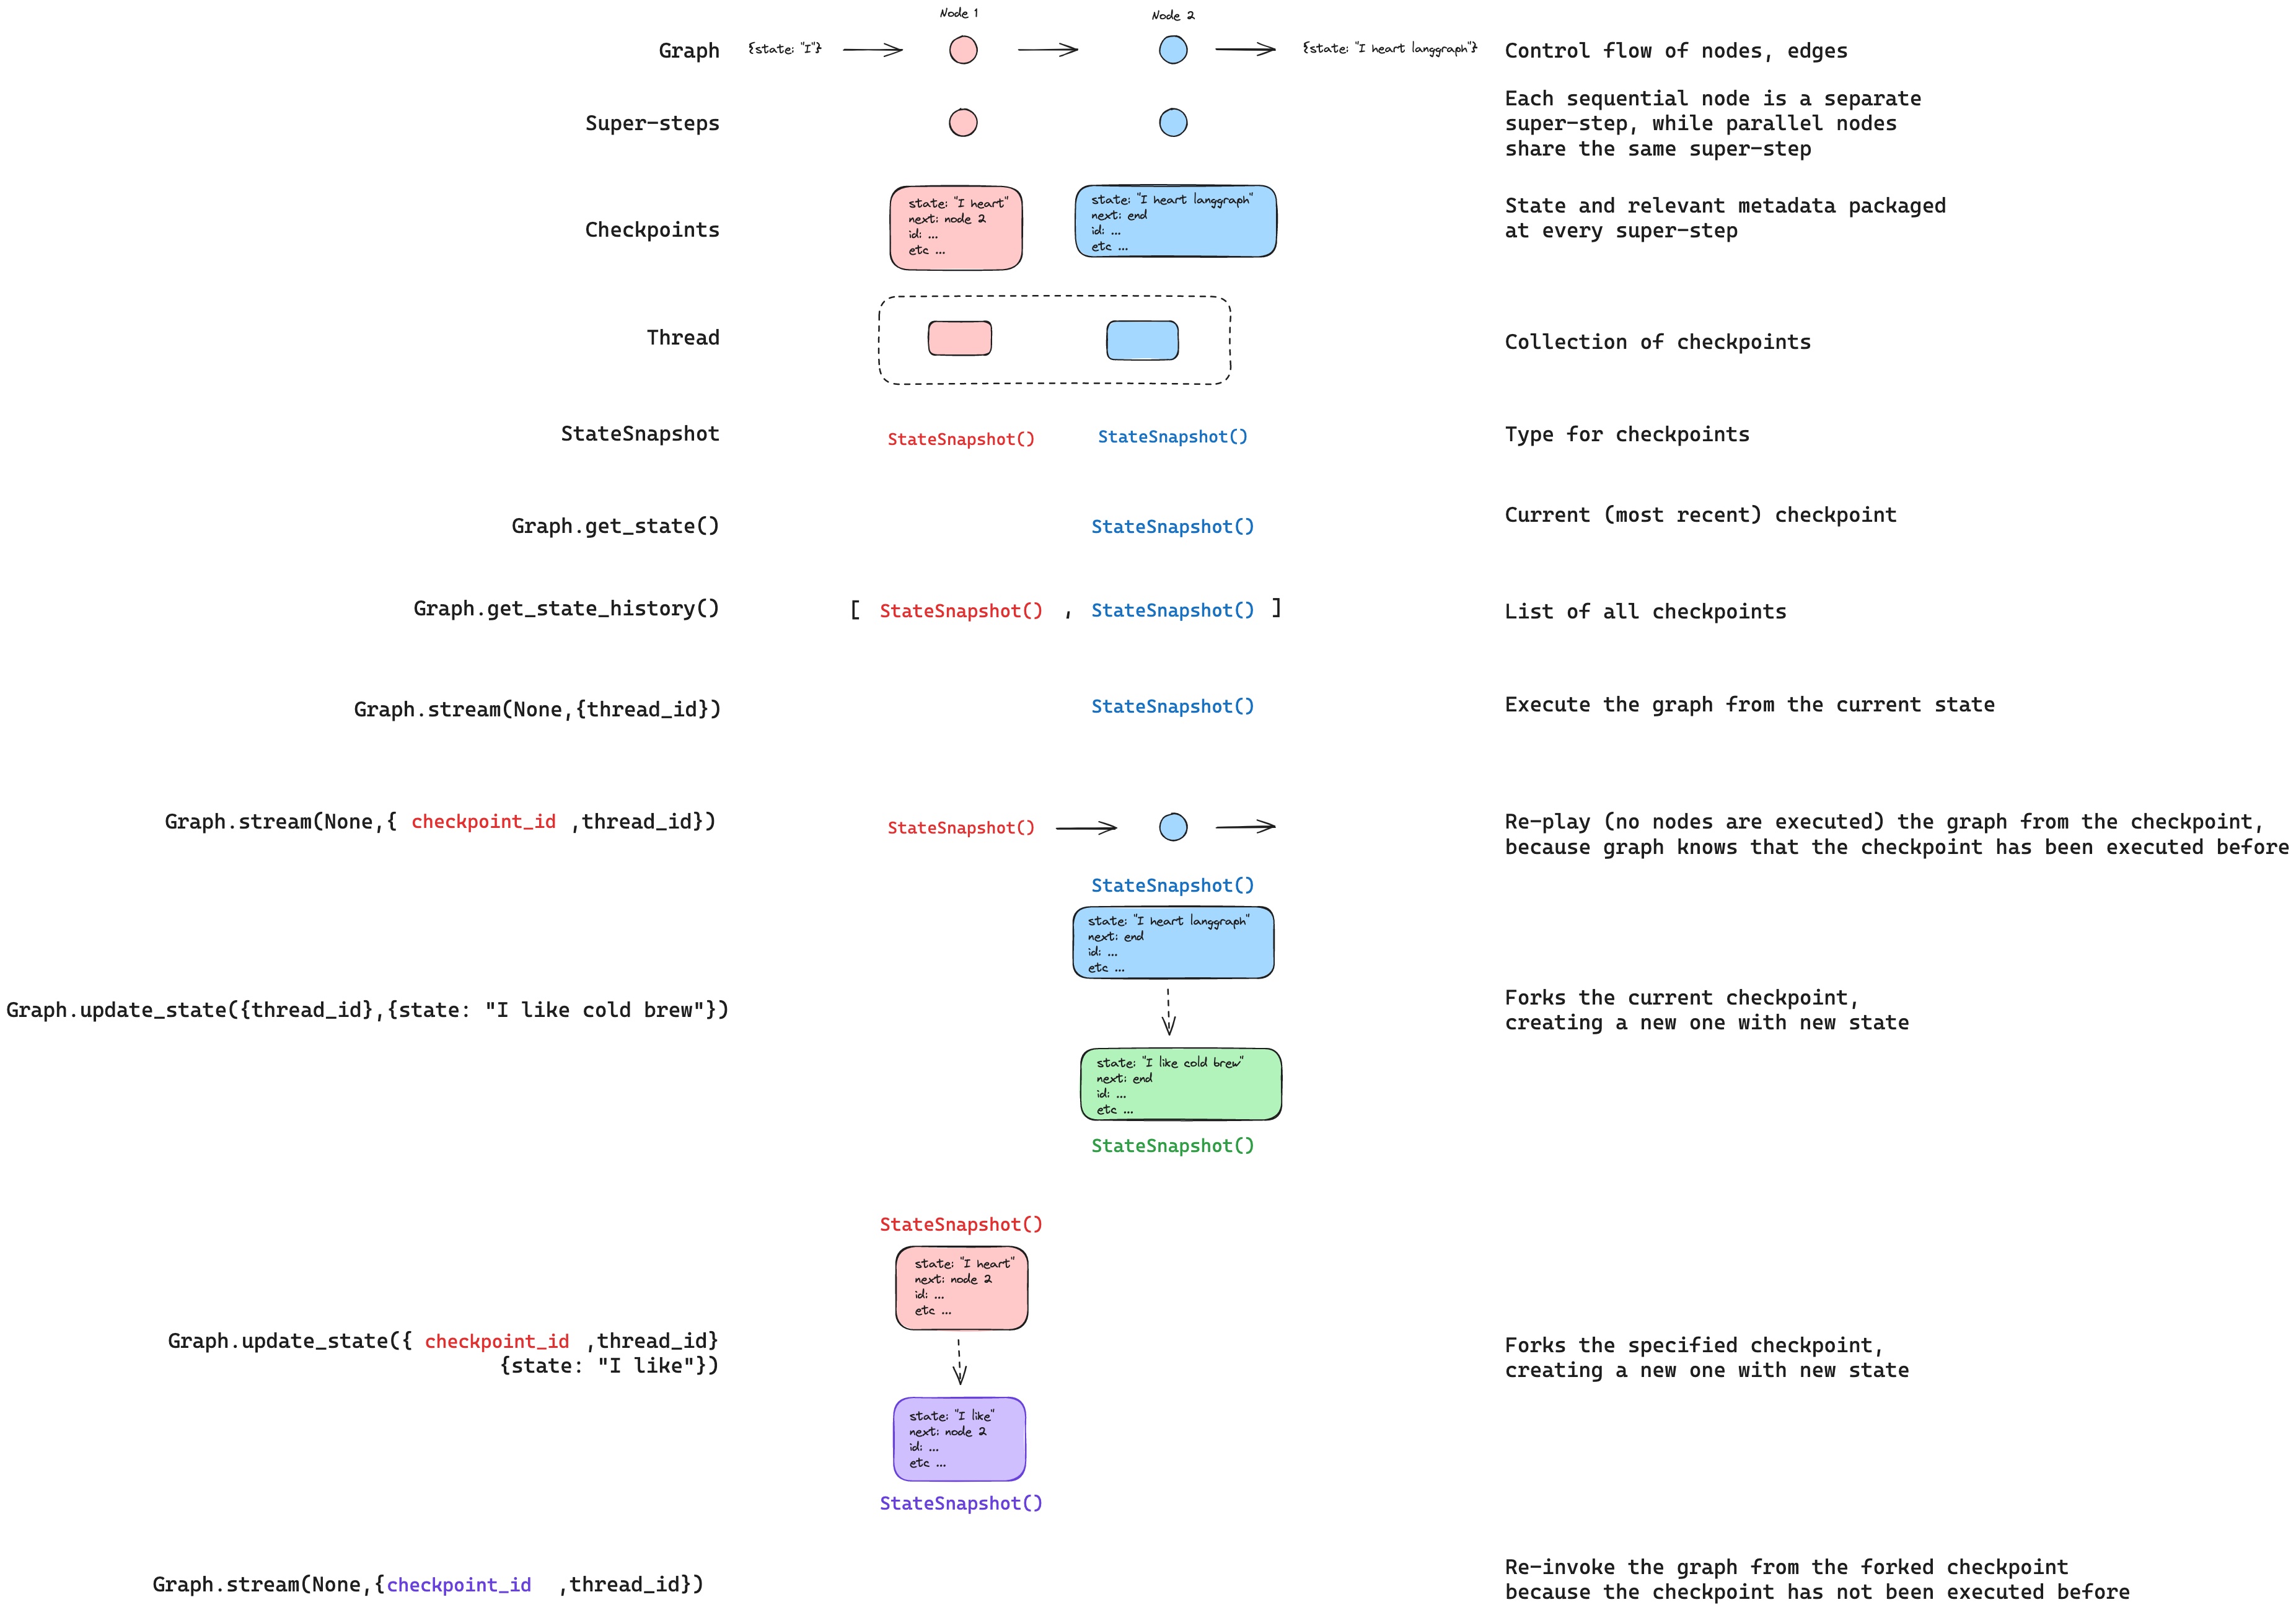
内存存储
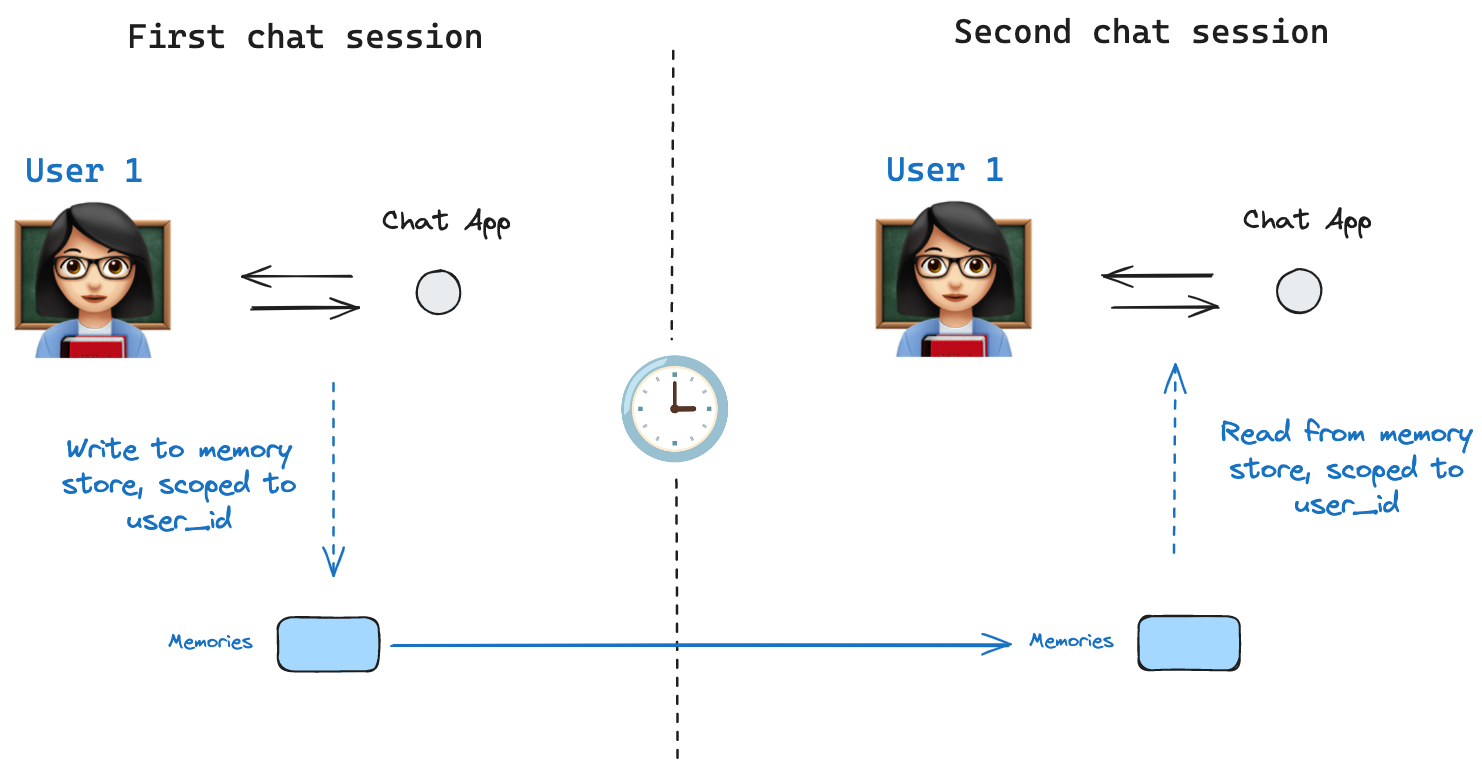
状态模式定义了一组键值,这些键值会在图执行过程中被填充。如前所述,检查点器(checkpointer)可以在每个图步骤将状态写入线程,从而实现状态持久化。
但如果我们需要在跨线程场景下保留某些信息呢?以聊天机器人为例,我们可能需要保留关于用户的特定信息,并让这些信息在用户的所有聊天对话(即不同线程)中持续可用!
仅靠检查点器无法实现跨线程信息共享。这正是Store接口存在的意义。例如,我们可以定义一个InMemoryStore来存储跨线程的用户信息。只需像往常一样用检查点器编译我们的图,并新增in_memory_store变量即可。
LangGraph API自动处理存储机制
使用LangGraph API时,您无需手动实现或配置存储。该API会在后台自动处理所有存储基础设施。
基础用法
首先,我们单独展示不使用LangGraph的情况。
from langgraph.store.memory import InMemoryStore
in_memory_store = InMemoryStore()
记忆空间通过一个tuple进行命名隔离,在本例中具体表现为(<user_id>, "memories")。命名空间可以是任意长度且表示任何内容,不必局限于用户维度。
user_id = "1"
namespace_for_memory = (user_id, "memories")
我们使用store.put方法将记忆保存到存储中的命名空间。操作时需指定上述定义的命名空间,并为记忆提供一个键值对:键是记忆的唯一标识符(memory_id),值(字典类型)则是记忆内容本身。
memory_id = str(uuid.uuid4())
memory = {"food_preference" : "I like pizza"}
in_memory_store.put(namespace_for_memory, memory_id, memory)
我们可以使用 store.search 方法读取命名空间中的记忆,该方法会以列表形式返回指定用户的所有记忆。列表中的最后一项是最新的记忆。
memories = in_memory_store.search(namespace_for_memory)
memories[-1].dict()
{'value': {'food_preference': 'I like pizza'},
 'key': '07e0caf4-1631-47b7-b15f-65515d4c1843',
 'namespace': ['1', 'memories'],
 'created_at': '2024-10-02T17:22:31.590602+00:00',
 'updated_at': '2024-10-02T17:22:31.590605+00:00'}
每种内存类型都是一个具有特定属性的 Python 类(Item)。我们可以通过上述的 .dict 转换将其作为字典访问。
它具有以下属性:
value:该内存的值(本身是一个字典)key:该内存在此命名空间中的唯一键namespace:字符串列表,表示该内存类型的命名空间created_at:该内存创建时的时间戳updated_at:该内存更新时间戳
语义搜索
除了简单的检索功能外,该存储系统还支持语义搜索,允许您根据含义而非精确匹配来查找记忆内容。要启用此功能,需通过嵌入模型对存储进行配置:
API参考文档:init_embeddings
from langchain.embeddings import init_embeddings

store = InMemoryStore(
    index={
        "embed": init_embeddings("openai:text-embedding-3-small"),  # Embedding provider
        "dims": 1536,                              # Embedding dimensions
        "fields": ["food_preference", "$"]              # Fields to embed
    }
)
现在搜索时,您可以使用自然语言查询来查找相关记忆:
# Find memories about food preferences
# (This can be done after putting memories into the store)
memories = store.search(
    namespace_for_memory,
    query="What does the user like to eat?",
    limit=3  # Return top 3 matches
)
您可以通过配置 fields 参数或在存储记忆时指定 index 参数,来控制记忆的哪些部分被嵌入。
# Store with specific fields to embed
store.put(
    namespace_for_memory,
    str(uuid.uuid4()),
    {
        "food_preference": "I love Italian cuisine",
        "context": "Discussing dinner plans"
    },
    index=["food_preference"]  # Only embed "food_preferences" field
)

# Store without embedding (still retrievable, but not searchable)
store.put(
    namespace_for_memory,
    str(uuid.uuid4()),
    {"system_info": "Last updated: 2024-01-01"},
    index=False
)
在LangGraph中的使用
完成上述配置后,我们将在LangGraph中使用in_memory_store。in_memory_store与检查点处理器协同工作:如之前所述,检查点处理器负责将状态保存到线程中,而in_memory_store则允许我们存储任意信息,以便跨线程访问。我们按以下方式同时集成检查点处理器和in_memory_store来编译图。
API参考文档:InMemorySaver
from langgraph.checkpoint.memory import InMemorySaver

# We need this because we want to enable threads (conversations)
checkpointer = InMemorySaver()

# ... Define the graph ...

# Compile the graph with the checkpointer and store
graph = graph.compile(checkpointer=checkpointer, store=in_memory_store)
我们像之前一样调用图表时传入一个 thread_id,同时还会传入 user_id,用于将记忆空间划分给特定用户,正如上文所示。
# Invoke the graph
user_id = "1"
config = {"configurable": {"thread_id": "1", "user_id": user_id}}

# First let's just say hi to the AI
for update in graph.stream(
    {"messages": [{"role": "user", "content": "hi"}]}, config, stream_mode="updates"
):
    print(update)
我们可以通过将 store: BaseStore 和 config: RunnableConfig 作为节点参数传递,在任意节点中访问 in_memory_store 和 user_id。以下示例展示了如何在节点中使用语义搜索来查找相关记忆:
def update_memory(state: MessagesState, config: RunnableConfig, *, store: BaseStore):
	# Get the user id from the config
    user_id = config["configurable"]["user_id"]
	# Namespace the memory
    namespace = (user_id, "memories")
	# ... Analyze conversation and create a new memory
	# Create a new memory ID
    memory_id = str(uuid.uuid4())
	# We create a new memory
    store.put(namespace, memory_id, {"memory": memory})
如上所述,我们可以在任何节点访问存储,并使用 store.search 方法获取记忆。请注意,返回的记忆是一个对象列表,可以转换为字典。
memories[-1].dict()
{'value': {'food_preference': 'I like pizza'},
 'key': '07e0caf4-1631-47b7-b15f-65515d4c1843',
 'namespace': ['1', 'memories'],
 'created_at': '2024-10-02T17:22:31.590602+00:00',
 'updated_at': '2024-10-02T17:22:31.590605+00:00'}
我们可以访问这些记忆并在模型调用中使用它们。
def call_model(state: MessagesState, config: RunnableConfig, *, store: BaseStore):
    # Get the user id from the config
    user_id = config["configurable"]["user_id"]
	# Namespace the memory
    namespace = (user_id, "memories")
	# Search based on the most recent message
    memories = store.search(
        namespace,
        query=state["messages"][-1].content,
        limit=3
    )
    info = "\n".join([d.value["memory"] for d in memories])
	# ... Use memories in the model call
如果我们创建一个新线程,只要user_id相同,仍然可以访问相同的内存。
# Invoke the graph
config = {"configurable": {"thread_id": "2", "user_id": "1"}}

# Let's say hi again
for update in graph.stream(
    {"messages": [{"role": "user", "content": "hi, tell me about my memories"}]}, config, stream_mode="updates"
):
    print(update)
当我们使用LangGraph平台时,无论是在本地(例如在LangGraph Studio中)还是通过LangGraph平台,默认情况下都可以使用基础存储,无需在图编译过程中特别指定。然而,若要启用语义搜索功能,您必须在langgraph.json文件中配置索引设置。例如:
{
    ...
    "store": {
        "index": {
            "embed": "openai:text-embeddings-3-small",
            "dims": 1536,
            "fields": ["$"]
        }
    }
}
详情及配置选项请参阅部署指南。
检查点库
底层实现上,检查点功能由符合 BaseCheckpointSaver 接口的检查点对象驱动。LangGraph 提供了多个检查点实现,均通过独立可安装的库来实现:
langgraph-checkpoint:检查点保存器的基础接口 (BaseCheckpointSaver) 和序列化/反序列化接口 (SerializerProtocol)。包含用于实验的内存检查点实现 (InMemorySaver)。LangGraph 已内置该库。langgraph-checkpoint-sqlite:基于 SQLite 数据库的检查点实现 (SqliteSaver / AsyncSqliteSaver),适合实验和本地工作流。需单独安装。langgraph-checkpoint-postgres:基于 Postgres 数据库的高级检查点实现 (PostgresSaver / AsyncPostgresSaver),用于 LangGraph 平台,适合生产环境。需单独安装。
检查点接口
每个检查点保存器都遵循BaseCheckpointSaver接口,并实现以下方法:
.put- 存储检查点及其配置和元数据.put_writes- 存储与检查点关联的中间写入(即待处理写入).get_tuple- 根据给定配置(thread_id和checkpoint_id)获取检查点元组。该方法用于在graph.get_state()中填充StateSnapshot.list- 列出符合给定配置和筛选条件的检查点。该方法用于在graph.get_state_history()中填充状态历史记录
当检查点保存器用于异步图执行时(即通过.ainvoke、.astream或.abatch执行图),将使用上述方法的异步版本(.aput、.aput_writes、.aget_tuple、.alist)。
注意:要实现图的异步执行,可以使用InMemorySaver,或者Sqlite/Postgres检查点保存器的异步版本——AsyncSqliteSaver/AsyncPostgresSaver检查点保存器。
序列化器
当检查点保存器需要保存图状态时,它们需要对状态中的通道值进行序列化操作。这一功能通过序列化器对象实现。
langgraph_checkpoint 定义了序列化器协议,并提供了默认实现(JsonPlusSerializer)。该默认实现能够处理多种数据类型,包括LangChain和LangGraph的原始类型、日期时间、枚举等。
功能特性
人在回路机制
首先,检查点机制通过允许人类检查、中断和批准图执行步骤,促进了人在回路工作流的实现。这类工作流必须依赖检查点机制,因为需要满足两个核心需求:1)人类必须能随时查看图的运行状态;2)在人工对状态进行更新后,图必须能恢复执行。具体案例可参阅操作指南中的实践示例。
内存机制
其次,检查点机制支持交互之间的"记忆"功能。在重复的人机交互场景中(例如对话),所有后续消息都可以发送至该线程,该线程将保留对之前交互的记忆。关于如何使用检查点机制添加和管理对话记忆的完整示例,请参阅操作指南。
时间旅行
第三,检查点机制支持"时间旅行"功能,用户可以通过回放之前的图计算过程来检查和调试特定计算步骤。此外,检查点还允许在任意检查点处分叉图状态,从而探索不同的计算路径。
容错性
最后,检查点机制还提供了容错和错误恢复能力:如果在某个超步(superstep)中一个或多个节点发生故障,您可以从最后一个成功的步骤重新启动图计算。此外,当图节点在某个超步执行过程中失败时,LangGraph会保存该超步中其他已成功完成节点的待写入检查点数据。这样,当我们从该超步恢复图计算时,就不需要重新运行那些已成功的节点。
待处理写入
此外,当图节点在某个超步(superstep)执行过程中失败时,LangGraph会存储该超步中其他已成功完成节点待写入的检查点数据。这样,无论何时从该超步恢复图执行,我们都不需要重新运行已成功的节点。
持久化执行
https://langchain-ai.github.io/langgraph/concepts/durable_execution/
持久化执行是一种技术,流程或工作流在关键节点保存进度,使其能够暂停并在之后从断点处准确恢复。这项技术特别适用于需要人工介入的场景——用户可在继续前检查、验证或修改流程,也适用于可能遭遇中断或错误的长时任务(例如调用LLM超时)。通过保留已完成的工作,持久化执行使得流程无需重新处理先前步骤即可恢复——即使经历较长时间延迟(例如一周后)也能实现。
LangGraph内置的持久化存储层为工作流提供持久化执行能力,确保每个执行步骤的状态都被保存至持久化存储中。该特性保证工作流无论因系统故障还是人工介入被中断,都能从最后记录的状态恢复执行。
提示:
若您使用带检查点的LangGraph,则已启用持久化执行功能。您可在任意节点暂停和恢复工作流,即使遭遇中断或故障后亦然。
为充分发挥持久化执行优势,请确保工作流设计符合确定性原则和幂等性要求,并将所有副作用或非确定性操作封装在任务中。您可在StateGraph(图API)和函数式API中均使用任务功能。
需求说明
要在LangGraph中实现持久化执行,您需要:
1、通过指定检查点器来启用工作流的持久化功能,该检查点器将保存工作流进度。
2、执行工作流时指定线程标识符,用于跟踪特定工作流实例的执行历史。
3、将所有非确定性操作(如随机数生成)或具有副作用操作(如文件写入、API调用)封装在任务](https://langchain-ai.github.io/langgraph/reference/func/#langgraph.func.task)中,确保当工作流恢复时,这些操作不会在特定运行中重复执行,而是从持久化层检索其结果。更多信息请参阅[确定性与一致性回放。
确定性执行与一致性重放
当您恢复工作流运行时,代码不会从执行停止的同一行代码处继续执行,而是会选择一个合适的起始点从中断处继续。这意味着工作流将从起始点开始重放所有步骤,直到达到之前停止的位置。
因此,在编写持久化执行的工作流时,您必须将所有非确定性操作(例如随机数生成)和具有副作用操作(例如文件写入、API调用)封装在任务或节点中。
为确保工作流具有确定性且能保持一致的重放行为,请遵循以下准则:
- 避免重复工作:如果某个节点包含多个具有副作用的操作(例如日志记录、文件写入或网络调用),请将每个操作封装在单独的任务中。这能确保工作流恢复时不会重复执行这些操作,而是从持久层获取其结果。
- 封装非确定性操作:将所有可能产生非确定性结果的代码(例如随机数生成)封装在任务或节点中。这能确保工作流恢复时严格遵循记录的步骤序列,并产生相同的结果。
- 使用幂等操作:尽可能确保副作用操作(例如API调用、文件写入)具有幂等性。这意味着如果工作流失败后重试某个操作,其效果与首次执行时相同。这对于数据写入操作尤为重要。当某个任务启动但未能成功完成时,工作流恢复将重新运行该任务,依赖记录的结果来保持一致性。使用幂等键或验证现有结果可避免意外重复,确保工作流执行平稳可预测。
有关需要避免的常见问题示例,请参阅功能API中的常见陷阱部分,其中展示了如何使用任务构建代码来规避这些问题。这些原则同样适用于StateGraph(图API)。
在节点中使用任务
如果一个节点包含多个操作,您可能会发现将每个操作转换为任务比将这些操作重构为单独的节点更为简便。
原始方式
from typing import NotRequired
from typing_extensions import TypedDict
import uuid

from langgraph.checkpoint.memory import MemorySaver
from langgraph.graph import StateGraph, START, END
import requests

# Define a TypedDict to represent the state
class State(TypedDict):
    url: str
    result: NotRequired[str]

def call_api(state: State):
    """Example node that makes an API request."""
    result = requests.get(state['url']).text[:100]  # Side-effect
    return {
        "result": result
    }

# Create a StateGraph builder and add a node for the call_api function
builder = StateGraph(State)
builder.add_node("call_api", call_api)

# Connect the start and end nodes to the call_api node
builder.add_edge(START, "call_api")
builder.add_edge("call_api", END)

# Specify a checkpointer
checkpointer = MemorySaver()

# Compile the graph with the checkpointer
graph = builder.compile(checkpointer=checkpointer)

# Define a config with a thread ID.
thread_id = uuid.uuid4()
config = {"configurable": {"thread_id": thread_id}}

# Invoke the graph
graph.invoke({"url": "https://www.example.com"}, config)
使用任务
from typing import NotRequired
from typing_extensions import TypedDict
import uuid

from langgraph.checkpoint.memory import MemorySaver
from langgraph.func import task
from langgraph.graph import StateGraph, START, END
import requests

# Define a TypedDict to represent the state
class State(TypedDict):
    urls: list[str]
    result: NotRequired[list[str]]

@task
def _make_request(url: str):
    """Make a request."""
    return requests.get(url).text[:100]

def call_api(state: State):
    """Example node that makes an API request."""
    requests = [_make_request(url) for url in state['urls']]
    results = [request.result() for request in requests]
    return {
        "results": results
    }

# Create a StateGraph builder and add a node for the call_api function
builder = StateGraph(State)
builder.add_node("call_api", call_api)

# Connect the start and end nodes to the call_api node
builder.add_edge(START, "call_api")
builder.add_edge("call_api", END)

# Specify a checkpointer
checkpointer = MemorySaver()

# Compile the graph with the checkpointer
graph = builder.compile(checkpointer=checkpointer)

# Define a config with a thread ID.
thread_id = uuid.uuid4()
config = {"configurable": {"thread_id": thread_id}}

# Invoke the graph
graph.invoke({"urls": ["https://www.example.com"]}, config)
恢复工作流
启用工作流的持久化执行后,您可以在以下场景中恢复执行:
- 暂停与恢复工作流:使用interrupt函数在特定节点暂停工作流,并通过Command原语携带更新后的状态恢复执行。详见人工介入循环文档。
- 从故障中恢复:当异常发生时(如LLM服务中断),系统会自动从最后一个成功检查点恢复工作流。只需通过提供
None作为输入值,使用相同线程标识符重新执行工作流即可(参见功能API的示例)。
工作流恢复的起始点
- 如果使用StateGraph (Graph API),起始点是执行停止的节点开头处。
- 如果在节点内调用子图时中断,起始点将是调用该子图的父节点。而在子图内部,起始点则是执行停止的具体节点。
- 如果使用Functional API,起始点是执行停止的入口点开头处。
添加持久化功能
https://langchain-ai.github.io/langgraph/how-tos/persistence/
许多AI应用需要记忆功能,以便在多次交互间共享上下文。LangGraph支持两种对构建对话代理至关重要的记忆类型:
- 短期记忆:通过维护会话内的消息历史记录来跟踪当前对话。
- 长期记忆:跨会话存储用户特定数据或应用级数据。
术语说明
在LangGraph中:
- 短期记忆 也被称为 线程级记忆。
- 长期记忆 也被称作 跨线程记忆。
线程表示由相同thread_id分组的一组相关运行序列。
添加短期记忆
短期记忆(线程级持久化)使智能体能够追踪多轮对话。添加短期记忆的方法如下:
API参考文档:init_chat_model | StateGraph | START | InMemorySaver
from langchain.chat_models import init_chat_model
from langgraph.graph import StateGraph, MessagesState, START

from langgraph.checkpoint.memory import InMemorySaver

model = init_chat_model(model="anthropic:claude-3-5-haiku-latest")

def call_model(state: MessagesState):
    response = model.invoke(state["messages"])
    return {"messages": response}

builder = StateGraph(MessagesState)
builder.add_node(call_model)
builder.add_edge(START, "call_model")

checkpointer = InMemorySaver()
graph = builder.compile(checkpointer=checkpointer)

config = {
    "configurable": {
        "thread_id": "1"
    }
}

for chunk in graph.stream(
    {"messages": [{"role": "user", "content": "hi! I'm bob"}]},
    config,
    stream_mode="values",
):
    chunk["messages"][-1].pretty_print()

for chunk in graph.stream(
    {"messages": [{"role": "user", "content": "what's my name?"}]},
    config,
    stream_mode="values",
):
    chunk["messages"][-1].pretty_print()
================================ Human Message =================================

hi! I'm bob
================================== Ai Message ==================================

Hi Bob! How are you doing today? Is there anything I can help you with?
================================ Human Message =================================

what's my name?
================================== Ai Message ==================================

Your name is Bob.
LangGraph API 用户无需操作
如果您正在使用 LangGraph API,无需在编译图时提供检查点(checkpointer)。该 API 会自动为您处理检查点功能。
生产环境使用
在生产环境中,建议使用数据库支持的检查点机制:
API参考文档:PostgresSaver
from langgraph.checkpoint.postgres import PostgresSaver

DB_URI = "postgresql://postgres:postgres@localhost:5442/postgres?sslmode=disable"
with PostgresSaver.from_conn_string(DB_URI) as checkpointer:
    builder = StateGraph(...)
    graph = builder.compile(checkpointer=checkpointer)
示例:使用 Postgres 检查点存储
pip install -U psycopg psycopg-pool langgraph langgraph-checkpoint-postgres
设置
首次使用 Postgres 检查点时,您需要调用 checkpointer.setup() 方法。
Sync Async
from langchain.chat_models import init_chat_model
from langgraph.graph import StateGraph, MessagesState, START
from langgraph.checkpoint.postgres import PostgresSaver

model = init_chat_model(model="anthropic:claude-3-5-haiku-latest")

DB_URI = "postgresql://postgres:postgres@localhost:5442/postgres?sslmode=disable"
with PostgresSaver.from_conn_string(DB_URI) as checkpointer:
    # checkpointer.setup()
	def call_model(state: MessagesState):
        response = model.invoke(state["messages"])
        return {"messages": response}
	builder = StateGraph(MessagesState)
    builder.add_node(call_model)
    builder.add_edge(START, "call_model")
	graph = builder.compile(checkpointer=checkpointer)
	config = {
        "configurable": {
            "thread_id": "1"
        }
    }
	for chunk in graph.stream(
        {"messages": [{"role": "user", "content": "hi! I'm bob"}]},
        config,
        stream_mode="values"
    ):
        chunk["messages"][-1].pretty_print()
	for chunk in graph.stream(
        {"messages": [{"role": "user", "content": "what's my name?"}]},
        config,
        stream_mode="values"
    ):
        chunk["messages"][-1].pretty_print()
from langchain.chat_models import init_chat_model
from langgraph.graph import StateGraph, MessagesState, START
from langgraph.checkpoint.postgres.aio import AsyncPostgresSaver

model = init_chat_model(model="anthropic:claude-3-5-haiku-latest")

DB_URI = "postgresql://postgres:postgres@localhost:5442/postgres?sslmode=disable"
async with AsyncPostgresSaver.from_conn_string(DB_URI) as checkpointer:
    # await checkpointer.setup()
	async def call_model(state: MessagesState):
        response = await model.ainvoke(state["messages"])
        return {"messages": response}
	builder = StateGraph(MessagesState)
    builder.add_node(call_model)
    builder.add_edge(START, "call_model")
	graph = builder.compile(checkpointer=checkpointer)
	config = {
        "configurable": {
            "thread_id": "1"
        }
    }
	async for chunk in graph.astream(
        {"messages": [{"role": "user", "content": "hi! I'm bob"}]},
        config,
        stream_mode="values"
    ):
        chunk["messages"][-1].pretty_print()
	async for chunk in graph.astream(
        {"messages": [{"role": "user", "content": "what's my name?"}]},
        config,
        stream_mode="values"
    ):
        chunk["messages"][-1].pretty_print()
示例:使用 MongoDB 检查点
pip install -U pymongo langgraph langgraph-checkpoint-mongodb
设置
要使用 MongoDB 检查点功能,您需要一个 MongoDB 集群。如果尚未拥有集群,请按照本指南创建一个。
Sync Async
from langchain.chat_models import init_chat_model
from langgraph.graph import StateGraph, MessagesState, START
from langgraph.checkpoint.mongodb import MongoDBSaver

model = init_chat_model(model="anthropic:claude-3-5-haiku-latest")

DB_URI = "localhost:27017"
with MongoDBSaver.from_conn_string(DB_URI) as checkpointer:
	def call_model(state: MessagesState):
        response = model.invoke(state["messages"])
        return {"messages": response}
	builder = StateGraph(MessagesState)
    builder.add_node(call_model)
    builder.add_edge(START, "call_model")
	graph = builder.compile(checkpointer=checkpointer)
	config = {
        "configurable": {
            "thread_id": "1"
        }
    }
	for chunk in graph.stream(
        {"messages": [{"role": "user", "content": "hi! I'm bob"}]},
        config,
        stream_mode="values"
    ):
        chunk["messages"][-1].pretty_print()
	for chunk in graph.stream(
        {"messages": [{"role": "user", "content": "what's my name?"}]},
        config,
        stream_mode="values"
    ):
        chunk["messages"][-1].pretty_print()
from langchain.chat_models import init_chat_model
from langgraph.graph import StateGraph, MessagesState, START
from langgraph.checkpoint.mongodb.aio import AsyncMongoDBSaver

model = init_chat_model(model="anthropic:claude-3-5-haiku-latest")

DB_URI = "localhost:27017"
async with AsyncMongoDBSaver.from_conn_string(DB_URI) as checkpointer:
	async def call_model(state: MessagesState):
        response = await model.ainvoke(state["messages"])
        return {"messages": response}
	builder = StateGraph(MessagesState)
    builder.add_node(call_model)
    builder.add_edge(START, "call_model")
	graph = builder.compile(checkpointer=checkpointer)
	config = {
        "configurable": {
            "thread_id": "1"
        }
    }
	async for chunk in graph.astream(
        {"messages": [{"role": "user", "content": "hi! I'm bob"}]},
        config,
        stream_mode="values"
    ):
        chunk["messages"][-1].pretty_print()
	async for chunk in graph.astream(
        {"messages": [{"role": "user", "content": "what's my name?"}]},
        config,
        stream_mode="values"
    ):
        chunk["messages"][-1].pretty_print()
示例:使用 Redis 检查点存储
pip install -U langgraph langgraph-checkpoint-redis
设置
首次使用 Redis 检查点时,需要调用 checkpointer.setup() 方法。
Sync
from langchain.chat_models import init_chat_model
from langgraph.graph import StateGraph, MessagesState, START
from langgraph.checkpoint.redis import RedisSaver

model = init_chat_model(model="anthropic:claude-3-5-haiku-latest")

DB_URI = "redis://localhost:6379"
with RedisSaver.from_conn_string(DB_URI) as checkpointer:
    # checkpointer.setup()
	def call_model(state: MessagesState):
        response = model.invoke(state["messages"])
        return {"messages": response}
	builder = StateGraph(MessagesState)
    builder.add_node(call_model)
    builder.add_edge(START, "call_model")
	graph = builder.compile(checkpointer=checkpointer)
	config = {
        "configurable": {
            "thread_id": "1"
        }
    }
	for chunk in graph.stream(
        {"messages": [{"role": "user", "content": "hi! I'm bob"}]},
        config,
        stream_mode="values"
    ):
        chunk["messages"][-1].pretty_print()
	for chunk in graph.stream(
        {"messages": [{"role": "user", "content": "what's my name?"}]},
        config,
        stream_mode="values"
    ):
        chunk["messages"][-1].pretty_print()
Async
from langchain.chat_models import init_chat_model
from langgraph.graph import StateGraph, MessagesState, START
from langgraph.checkpoint.redis.aio import AsyncRedisSaver

model = init_chat_model(model="anthropic:claude-3-5-haiku-latest")

DB_URI = "redis://localhost:6379"
async with AsyncRedisSaver.from_conn_string(DB_URI) as checkpointer:
    # await checkpointer.asetup()
	async def call_model(state: MessagesState):
        response = await model.ainvoke(state["messages"])
        return {"messages": response}
	builder = StateGraph(MessagesState)
    builder.add_node(call_model)
    builder.add_edge(START, "call_model")
	graph = builder.compile(checkpointer=checkpointer)
	config = {
        "configurable": {
            "thread_id": "1"
        }
    }
	async for chunk in graph.astream(
        {"messages": [{"role": "user", "content": "hi! I'm bob"}]},
        config,
        stream_mode="values"
    ):
        chunk["messages"][-1].pretty_print()
	async for chunk in graph.astream(
        {"messages": [{"role": "user", "content": "what's my name?"}]},
        config,
        stream_mode="values"
    ):
        chunk["messages"][-1].pretty_print()
与子图配合使用
如果你的图中包含子图,只需在编译父图时提供检查点处理器。LangGraph 会自动将检查点处理器传递给子图。
API参考:START | StateGraph | InMemorySaver
from langgraph.graph import START, StateGraph
from langgraph.checkpoint.memory import InMemorySaver
from typing import TypedDict

class State(TypedDict):
    foo: str

# Subgraph

def subgraph_node_1(state: State):
    return {"foo": state["foo"] + "bar"}

subgraph_builder = StateGraph(State)
subgraph_builder.add_node(subgraph_node_1)
subgraph_builder.add_edge(START, "subgraph_node_1")
subgraph = subgraph_builder.compile()

# Parent graph

def node_1(state: State):
    return {"foo": "hi! " + state["foo"]}

builder = StateGraph(State)
builder.add_node("node_1", subgraph)
builder.add_edge(START, "node_1")

checkpointer = InMemorySaver()
graph = builder.compile(checkpointer=checkpointer)
如果希望子图拥有独立的内存空间,可以在编译时设置with checkpointer=True。这在多智能体系统中尤为实用,能让各智能体持续追踪其内部消息历史记录。
subgraph_builder = StateGraph(...)
subgraph = subgraph_builder.compile(checkpointer=True)
与函数式API结合使用
要为函数式API的LangGraph工作流添加短期记忆功能:
1、将checkpointer实例传递给entrypoint()装饰器:
from langgraph.func import entrypoint

@entrypoint(checkpointer=checkpointer)
def workflow(inputs)
    ...
2、可选地在工作流函数签名中暴露 previous 参数:
@entrypoint(checkpointer=checkpointer)
def workflow(
    inputs,
    *,
    # you can optionally specify `previous` in the workflow function signature
    # to access the return value from the workflow as of the last execution
    previous
):
    previous = previous or []
    combined_inputs = previous + inputs
    result = do_something(combined_inputs)
    ...
3、可选选择哪些值将由工作流返回,哪些值将由检查点保存为 previous:
@entrypoint(checkpointer=checkpointer)
def workflow(inputs, *, previous):
    ...
    result = do_something(...)
    return entrypoint.final(value=result, save=combine(inputs, result))
示例:为Functional API工作流添加短期记忆功能
from langchain_core.messages import AnyMessage
from langgraph.graph import add_messages
from langgraph.func import entrypoint, task
from langgraph.checkpoint.memory import InMemorySaver

@task
def call_model(messages: list[AnyMessage]):
    response = model.invoke(messages)
    return response

checkpointer = InMemorySaver()

@entrypoint(checkpointer=checkpointer)
def workflow(inputs: list[AnyMessage], *, previous: list[AnyMessage]):
    if previous:
        inputs = add_messages(previous, inputs)
	response = call_model(inputs).result()
    return entrypoint.final(value=response, save=add_messages(inputs, response))

config = {
    "configurable": {
        "thread_id": "1"
    }
}

for chunk in workflow.invoke(
    [{"role": "user", "content": "hi! I'm bob"}],
    config,
    stream_mode="values",
):
    chunk.pretty_print()

for chunk in workflow.stream(
    [{"role": "user", "content": "what's my name?"}],
    config,
    stream_mode="values",
):
    chunk.pretty_print()
管理检查点
您可以查看和删除检查点存储的信息:
- 查看线程状态(检查点)
- Graph/Functional API
- Checkpointer API
config = {
    "configurable": {
        "thread_id": "1",
        # optionally provide an ID for a specific checkpoint,
        # otherwise the latest checkpoint is shown
        # "checkpoint_id": "1f029ca3-1f5b-6704-8004-820c16b69a5a"
	}
}
graph.get_state(config)
StateSnapshot(
values={'messages': [HumanMessage(content="hi! I'm bob"), AIMessage(content='Hi Bob! How are you doing today?), HumanMessage(content="what's my name?"), AIMessage(content='Your name is Bob.')]}, next=(),
config={'configurable': {'thread_id': '1', 'checkpoint_ns': '', 'checkpoint_id': '1f029ca3-1f5b-6704-8004-820c16b69a5a'}},
metadata={
'source': 'loop',
'writes': {'call_model': {'messages': AIMessage(content='Your name is Bob.')}},
'step': 4,
'parents': {},
'thread_id': '1'
},
created_at='2025-05-05T16:01:24.680462+00:00',
parent_config={'configurable': {'thread_id': '1', 'checkpoint_ns': '', 'checkpoint_id': '1f029ca3-1790-6b0a-8003-baf965b6a38f'}},
tasks=(),
interrupts=()
)
config = {
"configurable": {
"thread_id": "1",
# optionally provide an ID for a specific checkpoint,
# otherwise the latest checkpoint is shown
# "checkpoint_id": "1f029ca3-1f5b-6704-8004-820c16b69a5a"
}
}
checkpointer.get_tuple(config)
CheckpointTuple(
config={'configurable': {'thread_id': '1', 'checkpoint_ns': '', 'checkpoint_id': '1f029ca3-1f5b-6704-8004-820c16b69a5a'}},
checkpoint={
'v': 3,
'ts': '2025-05-05T16:01:24.680462+00:00',
'id': '1f029ca3-1f5b-6704-8004-820c16b69a5a',
'channel_versions': {'__start__': '00000000000000000000000000000005.0.5290678567601859', 'messages': '00000000000000000000000000000006.0.3205149138784782', 'branch:to:call_model': '00000000000000000000000000000006.0.14611156755133758'}, 'versions_seen': {'__input__': {}, '__start__': {'__start__': '00000000000000000000000000000004.0.5736472536395331'}, 'call_model': {'branch:to:call_model': '00000000000000000000000000000005.0.1410174088651449'}},
'channel_values': {'messages': [HumanMessage(content="hi! I'm bob"), AIMessage(content='Hi Bob! How are you doing today?), HumanMessage(content="what's my name?"), AIMessage(content='Your name is Bob.')]},
'pending_sends': []
},
metadata={
'source': 'loop',
'writes': {'call_model': {'messages': AIMessage(content='Your name is Bob.')}},
'step': 4,
'parents': {},
'thread_id': '1'
},
parent_config={'configurable': {'thread_id': '1', 'checkpoint_ns': '', 'checkpoint_id': '1f029ca3-1790-6b0a-8003-baf965b6a38f'}},
pending_writes=[]
)
查看线程历史记录(检查点)
Graph/Functional APICheckpointer API
config = {
"configurable": {
"thread_id": "1"
}
}
list(graph.get_state_history(config))
[
StateSnapshot(
values={'messages': [HumanMessage(content="hi! I'm bob"), AIMessage(content='Hi Bob! How are you doing today? Is there anything I can help you with?'), HumanMessage(content="what's my name?"), AIMessage(content='Your name is Bob.')]},
next=(),
config={'configurable': {'thread_id': '1', 'checkpoint_ns': '', 'checkpoint_id': '1f029ca3-1f5b-6704-8004-820c16b69a5a'}},
metadata={'source': 'loop', 'writes': {'call_model': {'messages': AIMessage(content='Your name is Bob.')}}, 'step': 4, 'parents': {}, 'thread_id': '1'},
created_at='2025-05-05T16:01:24.680462+00:00',
parent_config={'configurable': {'thread_id': '1', 'checkpoint_ns': '', 'checkpoint_id': '1f029ca3-1790-6b0a-8003-baf965b6a38f'}},
tasks=(),
interrupts=()
),
StateSnapshot(
values={'messages': [HumanMessage(content="hi! I'm bob"), AIMessage(content='Hi Bob! How are you doing today? Is there anything I can help you with?'), HumanMessage(content="what's my name?")]},
next=('call_model',),
config={'configurable': {'thread_id': '1', 'checkpoint_ns': '', 'checkpoint_id': '1f029ca3-1790-6b0a-8003-baf965b6a38f'}},
metadata={'source': 'loop', 'writes': None, 'step': 3, 'parents': {}, 'thread_id': '1'},
created_at='2025-05-05T16:01:23.863421+00:00',
parent_config={...}
tasks=(PregelTask(id='8ab4155e-6b15-b885-9ce5-bed69a2c305c', name='call_model', path=('__pregel_pull', 'call_model'), error=None, interrupts=(), state=None, result={'messages': AIMessage(content='Your name is Bob.')}),),
interrupts=()
),
StateSnapshot(
values={'messages': [HumanMessage(content="hi! I'm bob"), AIMessage(content='Hi Bob! How are you doing today? Is there anything I can help you with?')]},
next=('__start__',),
config={...},
metadata={'source': 'input', 'writes': {'__start__': {'messages': [{'role': 'user', 'content': "what's my name?"}]}}, 'step': 2, 'parents': {}, 'thread_id': '1'},
created_at='2025-05-05T16:01:23.863173+00:00',
parent_config={...}
tasks=(PregelTask(id='24ba39d6-6db1-4c9b-f4c5-682aeaf38dcd', name='__start__', path=('__pregel_pull', '__start__'), error=None, interrupts=(), state=None, result={'messages': [{'role': 'user', 'content': "what's my name?"}]}),),
interrupts=()
),
StateSnapshot(
values={'messages': [HumanMessage(content="hi! I'm bob"), AIMessage(content='Hi Bob! How are you doing today? Is there anything I can help you with?')]},
next=(),
config={...},
metadata={'source': 'loop', 'writes': {'call_model': {'messages': AIMessage(content='Hi Bob! How are you doing today? Is there anything I can help you with?')}}, 'step': 1, 'parents': {}, 'thread_id': '1'},
created_at='2025-05-05T16:01:23.862295+00:00',
parent_config={...}
tasks=(),
interrupts=()
),
StateSnapshot(
values={'messages': [HumanMessage(content="hi! I'm bob")]},
next=('call_model',),
config={...},
metadata={'source': 'loop', 'writes': None, 'step': 0, 'parents': {}, 'thread_id': '1'},
created_at='2025-05-05T16:01:22.278960+00:00',
parent_config={...}
tasks=(PregelTask(id='8cbd75e0-3720-b056-04f7-71ac805140a0', name='call_model', path=('__pregel_pull', 'call_model'), error=None, interrupts=(), state=None, result={'messages': AIMessage(content='Hi Bob! How are you doing today? Is there anything I can help you with?')}),),
interrupts=()
),
StateSnapshot(
values={'messages': []},
next=('__start__',),
config={'configurable': {'thread_id': '1', 'checkpoint_ns': '', 'checkpoint_id': '1f029ca3-0870-6ce2-bfff-1f3f14c3e565'}},
metadata={'source': 'input', 'writes': {'__start__': {'messages': [{'role': 'user', 'content': "hi! I'm bob"}]}}, 'step': -1, 'parents': {}, 'thread_id': '1'},
created_at='2025-05-05T16:01:22.277497+00:00',
parent_config=None,
tasks=(PregelTask(id='d458367b-8265-812c-18e2-33001d199ce6', name='__start__', path=('__pregel_pull', '__start__'), error=None, interrupts=(), state=None, result={'messages': [{'role': 'user', 'content': "hi! I'm bob"}]}),),
interrupts=()
)
]
config = {
"configurable": {
"thread_id": "1"
}
}
list(checkpointer.list(config))
[
CheckpointTuple(
config={'configurable': {'thread_id': '1', 'checkpoint_ns': '', 'checkpoint_id': '1f029ca3-1f5b-6704-8004-820c16b69a5a'}},
checkpoint={
'v': 3,
'ts': '2025-05-05T16:01:24.680462+00:00',
'id': '1f029ca3-1f5b-6704-8004-820c16b69a5a',
'channel_versions': {'__start__': '00000000000000000000000000000005.0.5290678567601859', 'messages': '00000000000000000000000000000006.0.3205149138784782', 'branch:to:call_model': '00000000000000000000000000000006.0.14611156755133758'},
'versions_seen': {'__input__': {}, '__start__': {'__start__': '00000000000000000000000000000004.0.5736472536395331'}, 'call_model': {'branch:to:call_model': '00000000000000000000000000000005.0.1410174088651449'}},
'channel_values': {'messages': [HumanMessage(content="hi! I'm bob"), AIMessage(content='Hi Bob! How are you doing today? Is there anything I can help you with?'), HumanMessage(content="what's my name?"), AIMessage(content='Your name is Bob.')]}, 'pending_sends': []
},
metadata={'source': 'loop', 'writes': {'call_model': {'messages': AIMessage(content='Your name is Bob.')}}, 'step': 4, 'parents': {}, 'thread_id': '1'},
parent_config={'configurable': {'thread_id': '1', 'checkpoint_ns': '', 'checkpoint_id': '1f029ca3-1790-6b0a-8003-baf965b6a38f'}},
pending_writes=[]
),
CheckpointTuple(
config={'configurable': {'thread_id': '1', 'checkpoint_ns': '', 'checkpoint_id': '1f029ca3-1790-6b0a-8003-baf965b6a38f'}},
checkpoint={
'v': 3,
'ts': '2025-05-05T16:01:23.863421+00:00',
'id': '1f029ca3-1790-6b0a-8003-baf965b6a38f',
'channel_versions': {'__start__': '00000000000000000000000000000005.0.5290678567601859', 'messages': '00000000000000000000000000000005.0.7935064215293443', 'branch:to:call_model': '00000000000000000000000000000005.0.1410174088651449'},
'versions_seen': {'__input__': {}, '__start__': {'__start__': '00000000000000000000000000000004.0.5736472536395331'}, 'call_model': {'branch:to:call_model': '00000000000000000000000000000002.0.9300422176788571'}},
'channel_values': {'messages': [HumanMessage(content="hi! I'm bob"), AIMessage(content='Hi Bob! How are you doing today? Is there anything I can help you with?'), HumanMessage(content="what's my name?")], 'branch:to:call_model': None},
'pending_sends': []
},
metadata={'source': 'loop', 'writes': None, 'step': 3, 'parents': {}, 'thread_id': '1'},
parent_config={...},
pending_writes=[('8ab4155e-6b15-b885-9ce5-bed69a2c305c', 'messages', AIMessage(content='Your name is Bob.'))]
),
CheckpointTuple(
config={...},
checkpoint={
'v': 3,
'ts': '2025-05-05T16:01:23.863173+00:00',
'id': '1f029ca3-1790-616e-8002-9e021694a0cd',
'channel_versions': {'__start__': '00000000000000000000000000000004.0.5736472536395331', 'messages': '00000000000000000000000000000003.0.7056767754077798', 'branch:to:call_model': '00000000000000000000000000000003.0.22059023329132854'},
'versions_seen': {'__input__': {}, '__start__': {'__start__': '00000000000000000000000000000001.0.7040775356287469'}, 'call_model': {'branch:to:call_model': '00000000000000000000000000000002.0.9300422176788571'}},
'channel_values': {'__start__': {'messages': [{'role': 'user', 'content': "what's my name?"}]}, 'messages': [HumanMessage(content="hi! I'm bob"), AIMessage(content='Hi Bob! How are you doing today? Is there anything I can help you with?')]},
'pending_sends': []
},
metadata={'source': 'input', 'writes': {'__start__': {'messages': [{'role': 'user', 'content': "what's my name?"}]}}, 'step': 2, 'parents': {}, 'thread_id': '1'},
parent_config={...},
pending_writes=[('24ba39d6-6db1-4c9b-f4c5-682aeaf38dcd', 'messages', [{'role': 'user', 'content': "what's my name?"}]), ('24ba39d6-6db1-4c9b-f4c5-682aeaf38dcd', 'branch:to:call_model', None)]
),
CheckpointTuple(
config={...},
checkpoint={
'v': 3,
'ts': '2025-05-05T16:01:23.862295+00:00',
'id': '1f029ca3-178d-6f54-8001-d7b180db0c89',
'channel_versions': {'__start__': '00000000000000000000000000000002.0.18673090920108737', 'messages': '00000000000000000000000000000003.0.7056767754077798', 'branch:to:call_model': '00000000000000000000000000000003.0.22059023329132854'},
'versions_seen': {'__input__': {}, '__start__': {'__start__': '00000000000000000000000000000001.0.7040775356287469'}, 'call_model': {'branch:to:call_model': '00000000000000000000000000000002.0.9300422176788571'}},
'channel_values': {'messages': [HumanMessage(content="hi! I'm bob"), AIMessage(content='Hi Bob! How are you doing today? Is there anything I can help you with?')]},
'pending_sends': []
},
metadata={'source': 'loop', 'writes': {'call_model': {'messages': AIMessage(content='Hi Bob! How are you doing today? Is there anything I can help you with?')}}, 'step': 1, 'parents': {}, 'thread_id': '1'},
parent_config={...},
pending_writes=[]
),
CheckpointTuple(
config={...},
checkpoint={
'v': 3,
'ts': '2025-05-05T16:01:22.278960+00:00',
'id': '1f029ca3-0874-6612-8000-339f2abc83b1',
'channel_versions': {'__start__': '00000000000000000000000000000002.0.18673090920108737', 'messages': '00000000000000000000000000000002.0.30296526818059655', 'branch:to:call_model': '00000000000000000000000000000002.0.9300422176788571'},
'versions_seen': {'__input__': {}, '__start__': {'__start__': '00000000000000000000000000000001.0.7040775356287469'}},
'channel_values': {'messages': [HumanMessage(content="hi! I'm bob")], 'branch:to:call_model': None},
'pending_sends': []
},
metadata={'source': 'loop', 'writes': None, 'step': 0, 'parents': {}, 'thread_id': '1'},
parent_config={...},
pending_writes=[('8cbd75e0-3720-b056-04f7-71ac805140a0', 'messages', AIMessage(content='Hi Bob! How are you doing today? Is there anything I can help you with?'))]
),
CheckpointTuple(
config={'configurable': {'thread_id': '1', 'checkpoint_ns': '', 'checkpoint_id': '1f029ca3-0870-6ce2-bfff-1f3f14c3e565'}},
checkpoint={
'v': 3,
'ts': '2025-05-05T16:01:22.277497+00:00',
'id': '1f029ca3-0870-6ce2-bfff-1f3f14c3e565',
'channel_versions': {'__start__': '00000000000000000000000000000001.0.7040775356287469'},
'versions_seen': {'__input__': {}},
'channel_values': {'__start__': {'messages': [{'role': 'user', 'content': "hi! I'm bob"}]}},
'pending_sends': []
},
metadata={'source': 'input', 'writes': {'__start__': {'messages': [{'role': 'user', 'content': "hi! I'm bob"}]}}, 'step': -1, 'parents': {}, 'thread_id': '1'},
parent_config=None,
pending_writes=[('d458367b-8265-812c-18e2-33001d199ce6', 'messages', [{'role': 'user', 'content': "hi! I'm bob"}]), ('d458367b-8265-812c-18e2-33001d199ce6', 'branch:to:call_model', None)]
)
]
删除线程的所有检查点
thread_id = "1"
checkpointer.delete_thread(thread_id)
添加长期记忆功能
使用长期记忆(跨线程持久化存储)来保存用户特定或应用特定的数据,实现跨对话的持久化。这对于聊天机器人等应用非常有用,可以记住用户偏好或其他信息。
要启用长期记忆功能,在创建图时需要提供一个存储:
API参考文档: RunnableConfig | StateGraph | START | InMemorySaver
import uuid
from typing_extensions import Annotated, TypedDict
from langchain_core.runnables import RunnableConfig
from langgraph.graph import StateGraph, MessagesState, START
from langgraph.checkpoint.memory import InMemorySaver
from langgraph.store.memory import InMemoryStore
from langgraph.store.base import BaseStore
model = init_chat_model(model="anthropic:claude-3-5-haiku-latest")
def call_model(
state: MessagesState,
config: RunnableConfig,
*,
store: BaseStore, # (1)!
):
user_id = config["configurable"]["user_id"]
namespace = ("memories", user_id)
memories = store.search(namespace, query=str(state["messages"][-1].content))
info = "\n".join([d.value["data"] for d in memories])
system_msg = f"You are a helpful assistant talking to the user. User info: {info}"
# Store new memories if the user asks the model to remember
last_message = state["messages"][-1]
if "remember" in last_message.content.lower():
memory = "User name is Bob"
store.put(namespace, str(uuid.uuid4()), {"data": memory})
response = model.invoke(
[{"role": "system", "content": system_msg}] + state["messages"]
)
return {"messages": response}
builder = StateGraph(MessagesState)
builder.add_node(call_model)
builder.add_edge(START, "call_model")
checkpointer = InMemorySaver()
store = InMemoryStore()
graph = builder.compile(
checkpointer=checkpointer,
store=store,
)
1、这是我们用来编译图的 store
config = {
"configurable": {
"thread_id": "1",
"user_id": "1",
}
}
for chunk in graph.stream(
{"messages": [{"role": "user", "content": "Hi! Remember: my name is Bob"}]},
config,
stream_mode="values",
):
chunk["messages"][-1].pretty_print()
config = {
"configurable": {
"thread_id": "2",
"user_id": "1",
}
}
for chunk in graph.stream(
{"messages": [{"role": "user", "content": "what is my name?"}]},
config,
stream_mode="values",
):
chunk["messages"][-1].pretty_print()
================================ Human Message =================================
Hi! Remember: my name is Bob
================================== Ai Message ==================================
Hi Bob! I'll remember that your name is Bob. How are you doing today?
================================ Human Message =================================
what is my name?
================================== Ai Message ==================================
Your name is Bob.
LangGraph API 用户无需此操作
如果您正在使用 LangGraph API,无需在编译图时提供存储。该 API 会自动为您处理存储基础设施。
生产环境使用
在生产环境中,建议使用基于数据库的检查点机制:
API参考文档:PostgresSaver
from langgraph.checkpoint.postgres import PostgresSaver
DB_URI = "postgresql://postgres:postgres@localhost:5442/postgres?sslmode=disable"
with PostgresStore.from_conn_string(DB_URI) as store:
builder = StateGraph(...)
graph = builder.compile(store=store)
示例:使用 Postgres 存储
pip install -U psycopg psycopg-pool langgraph langgraph-checkpoint-postgres
安装
首次使用 Postgres 存储时,需要调用 store.setup() 方法
同步
from langchain_core.runnables import RunnableConfig
from langchain.chat_models import init_chat_model
from langgraph.graph import StateGraph, MessagesState, START
from langgraph.checkpoint.postgres import PostgresSaver
from langgraph.store.postgres import PostgresStore
from langgraph.store.base import BaseStore
model = init_chat_model(model="anthropic:claude-3-5-haiku-latest")
DB_URI = "postgresql://postgres:postgres@localhost:5442/postgres?sslmode=disable"
with (
PostgresStore.from_conn_string(DB_URI) as store,
PostgresSaver.from_conn_string(DB_URI) as checkpointer,
):
# store.setup()
# checkpointer.setup()
def call_model(
state: MessagesState,
config: RunnableConfig,
*,
store: BaseStore,
):
user_id = config["configurable"]["user_id"]
namespace = ("memories", user_id)
memories = store.search(namespace, query=str(state["messages"][-1].content))
info = "\n".join([d.value["data"] for d in memories])
system_msg = f"You are a helpful assistant talking to the user. User info: {info}"
# Store new memories if the user asks the model to remember
last_message = state["messages"][-1]
if "remember" in last_message.content.lower():
memory = "User name is Bob"
store.put(namespace, str(uuid.uuid4()), {"data": memory})
response = model.invoke(
[{"role": "system", "content": system_msg}] + state["messages"]
)
return {"messages": response}
builder = StateGraph(MessagesState)
builder.add_node(call_model)
builder.add_edge(START, "call_model")
graph = builder.compile(
checkpointer=checkpointer,
store=store,
)
config = {
"configurable": {
"thread_id": "1",
"user_id": "1",
}
}
for chunk in graph.stream(
{"messages": [{"role": "user", "content": "Hi! Remember: my name is Bob"}]},
config,
stream_mode="values",
):
chunk["messages"][-1].pretty_print()
config = {
"configurable": {
"thread_id": "2",
"user_id": "1",
}
}
for chunk in graph.stream(
{"messages": [{"role": "user", "content": "what is my name?"}]},
config,
stream_mode="values",
):
chunk["messages"][-1].pretty_print()
异步
from langchain_core.runnables import RunnableConfig
from langchain.chat_models import init_chat_model
from langgraph.graph import StateGraph, MessagesState, START
from langgraph.checkpoint.postgres.aio import AsyncPostgresSaver
from langgraph.store.postgres.aio import AsyncPostgresStore
from langgraph.store.base import BaseStore
model = init_chat_model(model="anthropic:claude-3-5-haiku-latest")
DB_URI = "postgresql://postgres:postgres@localhost:5442/postgres?sslmode=disable"
async with (
AsyncPostgresStore.from_conn_string(DB_URI) as store,
AsyncPostgresSaver.from_conn_string(DB_URI) as checkpointer,
):
# await store.setup()
# await checkpointer.setup()
async def call_model(
state: MessagesState,
config: RunnableConfig,
*,
store: BaseStore,
):
user_id = config["configurable"]["user_id"]
namespace = ("memories", user_id)
memories = await store.asearch(namespace, query=str(state["messages"][-1].content))
info = "\n".join([d.value["data"] for d in memories])
system_msg = f"You are a helpful assistant talking to the user. User info: {info}"
# Store new memories if the user asks the model to remember
last_message = state["messages"][-1]
if "remember" in last_message.content.lower():
memory = "User name is Bob"
await store.aput(namespace, str(uuid.uuid4()), {"data": memory})
response = await model.ainvoke(
[{"role": "system", "content": system_msg}] + state["messages"]
)
return {"messages": response}
builder = StateGraph(MessagesState)
builder.add_node(call_model)
builder.add_edge(START, "call_model")
graph = builder.compile(
checkpointer=checkpointer,
store=store,
)
config = {
"configurable": {
"thread_id": "1",
"user_id": "1",
}
}
async for chunk in graph.astream(
{"messages": [{"role": "user", "content": "Hi! Remember: my name is Bob"}]},
config,
stream_mode="values",
):
chunk["messages"][-1].pretty_print()
config = {
"configurable": {
"thread_id": "2",
"user_id": "1",
}
}
async for chunk in graph.astream(
{"messages": [{"role": "user", "content": "what is my name?"}]},
config,
stream_mode="values",
):
chunk["messages"][-1].pretty_print()
示例:使用 Redis 存储
pip install -U langgraph langgraph-checkpoint-redis
安装指南
首次使用 Redis 存储时,需要调用 store.setup() 方法。
Sync
from langchain_core.runnables import RunnableConfig
from langchain.chat_models import init_chat_model
from langgraph.graph import StateGraph, MessagesState, START
from langgraph.checkpoint.redis import RedisSaver
from langgraph.store.redis import RedisStore
from langgraph.store.base import BaseStore
model = init_chat_model(model="anthropic:claude-3-5-haiku-latest")
DB_URI = "redis://localhost:6379"
with (
RedisStore.from_conn_string(DB_URI) as store,
RedisSaver.from_conn_string(DB_URI) as checkpointer,
):
store.setup()
checkpointer.setup()
def call_model(
state: MessagesState,
config: RunnableConfig,
*,
store: BaseStore,
):
user_id = config["configurable"]["user_id"]
namespace = ("memories", user_id)
memories = store.search(namespace, query=str(state["messages"][-1].content))
info = "\n".join([d.value["data"] for d in memories])
system_msg = f"You are a helpful assistant talking to the user. User info: {info}"
# Store new memories if the user asks the model to remember
last_message = state["messages"][-1]
if "remember" in last_message.content.lower():
memory = "User name is Bob"
store.put(namespace, str(uuid.uuid4()), {"data": memory})
response = model.invoke(
[{"role": "system", "content": system_msg}] + state["messages"]
)
return {"messages": response}
builder = StateGraph(MessagesState)
builder.add_node(call_model)
builder.add_edge(START, "call_model")
graph = builder.compile(
checkpointer=checkpointer,
store=store,
)
config = {
"configurable": {
"thread_id": "1",
"user_id": "1",
}
}
for chunk in graph.stream(
{"messages": [{"role": "user", "content": "Hi! Remember: my name is Bob"}]},
config,
stream_mode="values",
):
chunk["messages"][-1].pretty_print()
config = {
"configurable": {
"thread_id": "2",
"user_id": "1",
}
}
for chunk in graph.stream(
{"messages": [{"role": "user", "content": "what is my name?"}]},
config,
stream_mode="values",
):
chunk["messages"][-1].pretty_print()
Async
from langchain_core.runnables import RunnableConfig
from langchain.chat_models import init_chat_model
from langgraph.graph import StateGraph, MessagesState, START
from langgraph.checkpoint.redis.aio import AsyncRedisSaver
from langgraph.store.redis.aio import AsyncRedisStore
from langgraph.store.base import BaseStore
model = init_chat_model(model="anthropic:claude-3-5-haiku-latest")
DB_URI = "redis://localhost:6379"
async with (
AsyncRedisStore.from_conn_string(DB_URI) as store,
AsyncRedisSaver.from_conn_string(DB_URI) as checkpointer,
):
# await store.setup()
# await checkpointer.asetup()
async def call_model(
state: MessagesState,
config: RunnableConfig,
*,
store: BaseStore,
):
user_id = config["configurable"]["user_id"]
namespace = ("memories", user_id)
memories = await store.asearch(namespace, query=str(state["messages"][-1].content))
info = "\n".join([d.value["data"] for d in memories])
system_msg = f"You are a helpful assistant talking to the user. User info: {info}"
# Store new memories if the user asks the model to remember
last_message = state["messages"][-1]
if "remember" in last_message.content.lower():
memory = "User name is Bob"
await store.aput(namespace, str(uuid.uuid4()), {"data": memory})
response = await model.ainvoke(
[{"role": "system", "content": system_msg}] + state["messages"]
)
return {"messages": response}
builder = StateGraph(MessagesState)
builder.add_node(call_model)
builder.add_edge(START, "call_model")
graph = builder.compile(
checkpointer=checkpointer,
store=store,
)
config = {
"configurable": {
"thread_id": "1",
"user_id": "1",
}
}
async for chunk in graph.astream(
{"messages": [{"role": "user", "content": "Hi! Remember: my name is Bob"}]},
config,
stream_mode="values",
):
chunk["messages"][-1].pretty_print()
config = {
"configurable": {
"thread_id": "2",
"user_id": "1",
}
}
async for chunk in graph.astream(
{"messages": [{"role": "user", "content": "what is my name?"}]},
config,
stream_mode="values",
):
chunk["messages"][-1].pretty_print()
使用语义搜索
您可以在图的内存存储中启用语义搜索功能:这使得图代理能够通过语义相似性来搜索存储中的项目。
API参考文档:init_embeddings
from langchain.embeddings import init_embeddings
from langgraph.store.memory import InMemoryStore
# Create store with semantic search enabled
embeddings = init_embeddings("openai:text-embedding-3-small")
store = InMemoryStore(
index={
"embed": embeddings,
"dims": 1536,
}
)
store.put(("user_123", "memories"), "1", {"text": "I love pizza"})
store.put(("user_123", "memories"), "2", {"text": "I am a plumber"})
items = store.search(
("user_123", "memories"), query="I'm hungry", limit=1
)
基于语义搜索的长期记忆
from typing import Optional
from langchain.embeddings import init_embeddings
from langchain.chat_models import init_chat_model
from langgraph.store.base import BaseStore
from langgraph.store.memory import InMemoryStore
from langgraph.graph import START, MessagesState, StateGraph
llm = init_chat_model("openai:gpt-4o-mini")
# Create store with semantic search enabled
embeddings = init_embeddings("openai:text-embedding-3-small")
store = InMemoryStore(
index={
"embed": embeddings,
"dims": 1536,
}
)
store.put(("user_123", "memories"), "1", {"text": "I love pizza"})
store.put(("user_123", "memories"), "2", {"text": "I am a plumber"})
def chat(state, *, store: BaseStore):
# Search based on user's last message
items = store.search(
("user_123", "memories"), query=state["messages"][-1].content, limit=2
)
memories = "\n".join(item.value["text"] for item in items)
memories = f"## Memories of user\n{memories}" if memories else ""
response = llm.invoke(
[
{"role": "system", "content": f"You are a helpful assistant.\n{memories}"},
*state["messages"],
]
)
return {"messages": [response]}
builder = StateGraph(MessagesState)
builder.add_node(chat)
builder.add_edge(START, "chat")
graph = builder.compile(store=store)
for message, metadata in graph.stream(
input={"messages": [{"role": "user", "content": "I'm hungry"}]},
stream_mode="messages",
):
print(message.content, end="")
查看本指南了解如何将语义搜索与LangGraph内存存储结合使用的更多信息。
内存
https://langchain-ai.github.io/langgraph/concepts/memory/
什么是记忆?
记忆是一种认知功能,使人们能够存储、检索和利用信息来理解当下和未来。想象一下与一个总是忘记你所说内容的同事共事时的挫败感——这需要不断重复!随着AI代理承担更多涉及大量用户交互的复杂任务,为其配备记忆功能对效率和用户满意度变得同样关键。有了记忆,代理可以从反馈中学习并适应用户偏好。本指南介绍基于召回范围的两种记忆类型:
短期记忆,或称线程范围记忆,可以在与用户的单次对话线程内随时召回。LangGraph将短期记忆作为代理状态的一部分进行管理。状态通过检查点持久化到数据库,因此线程可以随时恢复。短期记忆在图调用或步骤完成时更新,并在每个步骤开始时读取状态。
长期记忆可跨对话线程共享。它能够在任何时间和任意线程中被召回。记忆作用域可自定义命名空间,不仅限于单个线程ID。LangGraph提供存储(参考文档)来实现长期记忆的保存和召回。
理解并实现这两种记忆对您的应用都至关重要。
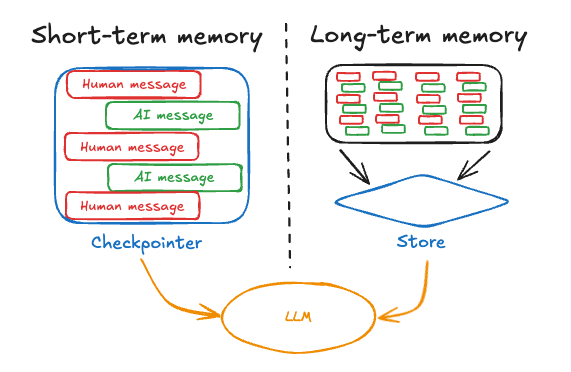
短期记忆
短期记忆功能让您的应用能够记住同一会话线程或对话中的历史交互。一个线程会组织会话中的多次交互,其作用类似于电子邮件将消息归类到同一对话链中。
LangGraph通过线程级检查点机制,将短期记忆作为智能体状态的一部分进行管理。该状态通常包含对话历史记录及其他有状态数据,例如上传的文件、检索到的文档或生成的处理结果。通过将这些数据存储在图的运行状态中,机器人可以获取完整对话上下文,同时保持不同线程间的隔离。
由于消息列表是最常见的短期记忆表现形式,下一节我们将重点讨论当消息列表变得过长时的对话历史管理技巧。如果您希望继续了解高层概念,请直接跳转至长期记忆章节。
管理长对话历史
长对话对当前的LLM构成了挑战。完整的对话历史可能无法放入LLM的上下文窗口,导致不可恢复的错误。即使您的LLM在技术上支持完整的上下文长度,大多数LLM在长上下文场景下表现仍然不佳。它们会被过时或无关内容"分散注意力",同时还会面临响应速度变慢和成本上升的问题。
管理短期记忆需要在精确率与召回率与应用程序其他性能要求(延迟和成本)之间取得平衡。一如既往,批判性地思考如何为LLM表示信息并分析数据非常重要。下面我们介绍几种管理消息列表的常见技术,希望能为您提供足够的背景信息,以便为应用程序选择最佳权衡方案:
- 编辑消息列表:介绍在将消息列表传递给语言模型前如何进行修剪和过滤的思路
- 总结过往对话:当您不仅想过滤消息列表时使用的常见技术
编辑消息列表
聊天模型通过消息接收上下文,这些消息包括开发者提供的指令(系统消息)和用户输入(人类消息)。在聊天应用中,消息会在用户输入和模型响应之间交替出现,从而形成一个随时间增长的消息列表。由于上下文窗口有限且包含大量token的消息列表成本较高,许多应用可以通过手动移除或遗忘过时信息的技术来优化性能。
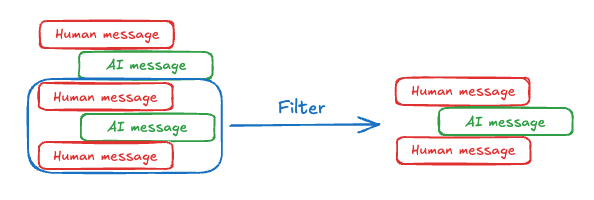
最直接的方法是从列表中移除旧消息(类似于最近最少使用缓存)。
在LangGraph中从列表中删除内容的典型技术是:让节点返回一个更新指令,告知系统删除列表的某部分。您可以自定义这个更新指令的格式,但常见做法是返回一个对象或字典,指定需要保留的值。
def manage_list(existing: list, updates: Union[list, dict]):
if isinstance(updates, list):
# Normal case, add to the history
return existing + updates
elif isinstance(updates, dict) and updates["type"] == "keep":
# You get to decide what this looks like.
# For example, you could simplify and just accept a string "DELETE"
# and clear the entire list.
return existing[updates["from"]:updates["to"]]
# etc. We define how to interpret updates
class State(TypedDict):
my_list: Annotated[list, manage_list]
def my_node(state: State):
return {
# We return an update for the field "my_list" saying to
# keep only values from index -5 to the end (deleting the rest)
"my_list": {"type": "keep", "from": -5, "to": None}
}
当更新内容以"my_list"为键返回时,LangGraph会调用manage_list这个"reducer"函数。在该函数中,我们定义了可接受的更新类型。通常情况下,消息会被追加到现有列表中(对话内容会增长);不过我们也添加了对字典格式的支持,允许你"保留"状态的特定部分。这让你可以通过编程方式丢弃旧消息上下文。
另一种常见做法是允许返回"remove"对象列表,其中指定了所有待删除消息的ID。如果你使用LangChain消息和LangGraph中的add_messages reducer(或使用相同底层功能的MessagesState),可以通过RemoveMessage实现这一功能。
API参考文档:RemoveMessage | AIMessage | add_messages
from langchain_core.messages import RemoveMessage, AIMessage
from langgraph.graph import add_messages
# ... other imports
class State(TypedDict):
# add_messages will default to upserting messages by ID to the existing list
# if a RemoveMessage is returned, it will delete the message in the list by ID
messages: Annotated[list, add_messages]
def my_node_1(state: State):
# Add an AI message to the `messages` list in the state
return {"messages": [AIMessage(content="Hi")]}
def my_node_2(state: State):
# Delete all but the last 2 messages from the `messages` list in the state
delete_messages = [RemoveMessage(id=m.id) for m in state['messages'][:-2]]
return {"messages": delete_messages}
在上面的示例中,add_messages reducer 允许我们像在 my_node_1 中展示的那样,将新消息追加到 messages 状态键中。当它遇到 RemoveMessage 时,会从列表中删除对应 ID 的消息(然后该 RemoveMessage 会被丢弃)。有关 LangChain 特定消息处理的更多信息,请查看这篇关于使用 RemoveMessage 的指南。
实际使用示例可参考本操作指南以及我们LangChain 学院课程的模块 2。
总结历史对话
如上所示,直接裁剪或删除消息的问题在于,我们可能会因清理消息队列而丢失重要信息。因此,某些应用场景更适合采用更智能的方法——通过聊天模型对消息历史进行总结处理。
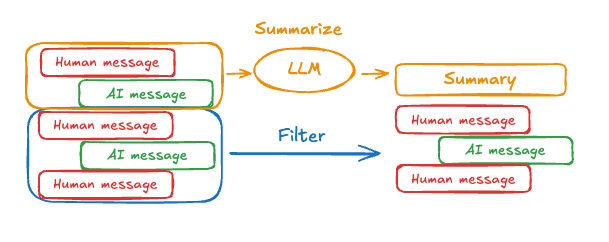
只需简单的提示词设计和编排逻辑即可实现这一功能。例如在LangGraph中,我们可以扩展MessagesState来包含一个summary键。
from langgraph.graph import MessagesState
class State(MessagesState):
summary: str
然后,我们可以生成聊天记录的摘要,利用现有摘要作为下一个摘要的上下文。当messages状态键中积累了一定数量的消息后,即可调用summarize_conversation节点。
def summarize_conversation(state: State):
# First, we get any existing summary
summary = state.get("summary", "")
# Create our summarization prompt
if summary:
# A summary already exists
summary_message = (
f"This is a summary of the conversation to date: {summary}\n\n"
"Extend the summary by taking into account the new messages above:"
)
else:
summary_message = "Create a summary of the conversation above:"
# Add prompt to our history
messages = state["messages"] + [HumanMessage(content=summary_message)]
response = model.invoke(messages)
# Delete all but the 2 most recent messages
delete_messages = [RemoveMessage(id=m.id) for m in state["messages"][:-2]]
return {"summary": response.content, "messages": delete_messages}
查看此操作指南此处以及我们LangChain学院课程的模块2以获取示例用法。
判断何时移除消息
大多数LLM都有最大支持的上下文窗口(以token数量计算)。决定何时截断消息的简单方法是统计消息历史中的token数量,当接近限制时进行截断。虽然自己实现简单的截断逻辑很直接,但存在一些"陷阱"。某些模型API还会限制消息类型的顺序(必须以人类消息开头、不能连续出现相同类型的消息等)。如果你使用LangChain,可以利用trim_messages工具,指定要保留的token数量以及处理边界的strategy(例如保留最后max_tokens)。
以下是一个示例。
API参考文档:trim_messages
from langchain_core.messages import trim_messages
trim_messages(
messages,
# Keep the last <= n_count tokens of the messages.
strategy="last",
# Remember to adjust based on your model
# or else pass a custom token_encoder
token_counter=ChatOpenAI(model="gpt-4"),
# Remember to adjust based on the desired conversation
# length
max_tokens=45,
# Most chat models expect that chat history starts with either:
# (1) a HumanMessage or
# (2) a SystemMessage followed by a HumanMessage
start_on="human",
# Most chat models expect that chat history ends with either:
# (1) a HumanMessage or
# (2) a ToolMessage
end_on=("human", "tool"),
# Usually, we want to keep the SystemMessage
# if it's present in the original history.
# The SystemMessage has special instructions for the model.
include_system=True,
)
长期记忆
LangGraph中的长期记忆功能使系统能够在不同对话或会话间保留信息。与线程作用域的短期记忆不同,长期记忆保存在自定义的"命名空间"中。
存储记忆
LangGraph 将长期记忆以 JSON 文档的形式存储在存储库中(参考文档)。每个记忆都通过自定义的 namespace(类似于文件夹)和唯一的 key(类似文件名)进行组织。命名空间通常包含用户或组织 ID 或其他便于信息分类的标签。这种结构支持记忆的分层组织,并通过内容过滤器实现跨命名空间的搜索。具体示例见下文。
from langgraph.store.memory import InMemoryStore
def embed(texts: list[str]) -> list[list[float]]:
# Replace with an actual embedding function or LangChain embeddings object
return [[1.0, 2.0] * len(texts)]
# InMemoryStore saves data to an in-memory dictionary. Use a DB-backed store in production use.
store = InMemoryStore(index={"embed": embed, "dims": 2})
user_id = "my-user"
application_context = "chitchat"
namespace = (user_id, application_context)
store.put(
namespace,
"a-memory",
{
"rules": [
"User likes short, direct language",
"User only speaks English & python",
],
"my-key": "my-value",
},
)
# get the "memory" by ID
item = store.get(namespace, "a-memory")
# search for "memories" within this namespace, filtering on content equivalence, sorted by vector similarity
items = store.search(
namespace, filter={"my-key": "my-value"}, query="language preferences"
)
长期记忆的思考框架
长期记忆是一个复杂的挑战,没有放之四海而皆准的解决方案。不过,以下问题提供了一个结构化框架,帮助您探索不同的技术方案:
记忆的类型是什么?
人类利用记忆来存储事实](https://en.wikipedia.org/wiki/Semantic_memory)、经历和规则。AI智能体同样可以运用这些记忆方式。例如,AI智能体可以通过记忆用户的特定信息来完成任务。我们将在[下方章节详细展开多种记忆类型。
何时更新记忆?
记忆可以作为智能体应用逻辑的一部分进行更新(例如"在关键路径上")。这种情况下,智能体通常在响应用户前决定记住某些信息。另一种方式是将记忆更新作为后台任务(在后台/异步运行的逻辑来生成记忆)。我们将在下方章节详细解释这两种方法的权衡取舍。
内存类型
不同的应用需要不同类型的内存。虽然这个类比并不完美,但参考人类记忆类型能带来启发。一些研究(例如CoALA论文)甚至将这些人类记忆类型映射到AI智能体所使用的内存类型上。
| 内存类型 | 存储内容 | 人类示例 | 智能体示例 |
|---|---|---|---|
| 语义记忆 | 事实 | 在学校学到的知识 | 关于用户的事实 |
| 情景记忆 | 经历 | 做过的事情 | 智能体过去的行动 |
| 程序记忆 | 指令 | 本能或运动技能 | 智能体系统提示 |
语义记忆
语义记忆在人类和AI智能体中,都涉及对特定事实和概念的保留。对人类而言,它可以包括在学校学到的信息以及对概念及其关系的理解。对AI智能体来说,语义记忆通常用于通过记住过去交互中的事实或概念来个性化应用程序。
注意:不要与"语义搜索"混淆,后者是一种利用"含义"(通常作为嵌入)查找相似内容的技术。语义记忆是心理学中的术语,指存储事实和知识,而语义搜索是一种基于含义而非精确匹配来检索信息的方法。
个人资料管理
语义记忆可以通过多种方式进行管理。例如,记忆可以是一个持续更新的"个人资料",包含关于用户、组织或其他实体(包括智能体自身)的特定信息。这类资料通常就是一个JSON文档,由您根据业务领域选择的各种键值对组成。
在维护个人资料时,务必确保每次都在更新资料内容。因此,您需要传入之前的资料文档,并让模型生成新的资料(或生成适用于旧资料的JSON补丁)。随着资料规模增大,这种操作容易出错,此时可以考虑将资料拆分为多个文档,或在生成文档时采用严格解码机制,以确保记忆模式始终保持有效。
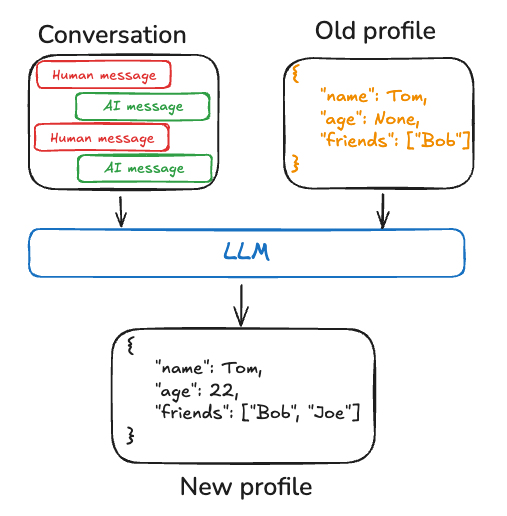
集合式记忆
另一种方式是,记忆可以作为一个持续更新和扩展的文档集合。每个独立的记忆可以更聚焦于特定范围,也更容易生成,这意味着随着时间的推移,你丢失信息的可能性更低。对于大语言模型(LLM)来说,为新信息生成新的对象比将新信息与现有档案进行协调要容易得多。因此,文档集合通常能带来更高的下游召回率。
然而,这种方式将部分复杂性转移到了记忆更新上。模型现在需要删除或更新列表中的现有条目,这可能比较棘手。此外,某些模型可能会默认过度插入,而另一些则可能默认过度更新。可以参考Trustcall包来管理这一问题,并通过评估(例如使用LangSmith等工具)来调整模型行为。
使用文档集合还会将复杂性转移到记忆搜索上。当前的Store支持语义搜索和按内容过滤。
最后,使用记忆集合可能会给模型提供全面的上下文带来挑战。虽然单个记忆可能遵循特定的模式,但这种结构可能无法完全捕捉记忆之间的上下文或关系。因此,当使用这些记忆生成响应时,模型可能会缺乏在统一档案方法中更容易获得的重要上下文信息。
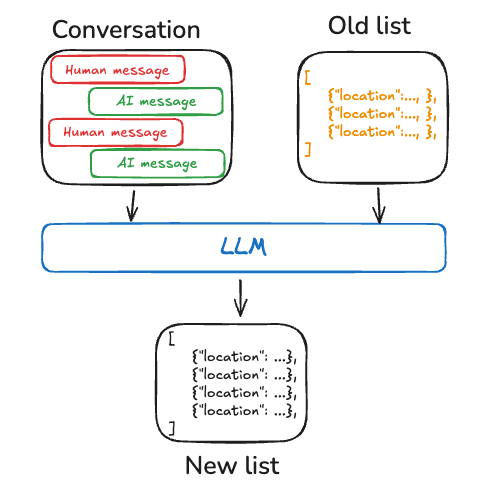
无论采用哪种记忆管理方法,核心在于智能体会利用语义记忆来锚定其响应,这通常会带来更个性化和相关的交互体验。
情景记忆
情景记忆在人类和AI智能体中,都涉及对过去事件或行为的回忆。CoALA论文对此进行了很好的阐述:事实可以写入语义记忆,而经验则可以写入情景记忆。对于AI智能体而言,情景记忆通常用于帮助其记住如何完成任务。
在实际应用中,情景记忆通常通过少量示例提示来实现,智能体通过学习过去的序列来正确执行任务。有时"展示"比"讲述"更有效,大型语言模型(LLM)能很好地从示例中学习。少量示例学习让你可以通过在提示中添加输入-输出示例来"编程"你的LLM,以展示预期行为。虽然可以采用各种最佳实践来生成少量示例,但挑战往往在于根据用户输入选择最相关的示例。
需要注意的是,内存存储只是将数据存储为少量示例的一种方式。如果你希望开发者更多参与,或者让少量示例与评估框架更紧密地结合,也可以使用LangSmith数据集来存储数据。然后可以直接使用动态少量示例选择器来实现相同目标。LangSmith会为数据集建立索引,并基于关键词相似度(使用类似BM25的算法)检索与用户输入最相关的少量示例。
观看这个视频教程了解如何在LangSmith中使用动态少量示例选择。另请参阅这篇博客文章展示如何使用少量示例提示提升工具调用性能,以及这篇博客文章介绍如何使用少量示例使LLM与人类偏好对齐。
程序性记忆
程序性记忆在人类和AI智能体中,都涉及记住执行任务所需的规则。对人类而言,程序性记忆类似于内化的技能知识,例如通过基本运动技能和平衡感骑自行车。而情景记忆则涉及回忆具体经历,比如第一次成功卸掉辅助轮骑车的经历,或是一次难忘的风景路线骑行。
对AI智能体来说,程序性记忆是模型权重、智能体代码和提示词(prompt)的组合,共同决定了智能体的功能。实践中,智能体很少会修改模型权重或重写自身代码,但修改自身提示词的情况更为常见。
优化智能体指令的一个有效方法是"反思"或元提示(meta-prompting)。该方法会让智能体基于当前指令(如系统提示词)、近期对话记录或明确的用户反馈,自主优化其指令。这种方法特别适用于难以预先明确指定指令的任务,因为它允许智能体从交互中学习和适应。
例如,我们构建了一个推文生成器,通过外部反馈和提示词重写来生成高质量的论文摘要推文。这个案例中,具体的摘要提示词很难预先确定,但用户可以轻松评判生成的推文,并提供改进摘要过程的反馈。
以下伪代码展示了如何通过LangGraph的记忆存储实现该功能:使用存储保存提示词,通过update_instructions节点获取当前提示词(以及从state["messages"]中捕获的用户对话反馈),更新提示词后将其存回存储。接着call_model从存储获取更新后的提示词并生成响应。
# Node that *uses* the instructions
def call_model(state: State, store: BaseStore):
namespace = ("agent_instructions", )
instructions = store.get(namespace, key="agent_a")[0]
# Application logic
prompt = prompt_template.format(instructions=instructions.value["instructions"])
...
# Node that updates instructions
def update_instructions(state: State, store: BaseStore):
namespace = ("instructions",)
current_instructions = store.search(namespace)[0]
# Memory logic
prompt = prompt_template.format(instructions=instructions.value["instructions"], conversation=state["messages"])
output = llm.invoke(prompt)
new_instructions = output['new_instructions']
store.put(("agent_instructions",), "agent_a", {"instructions": new_instructions})
...
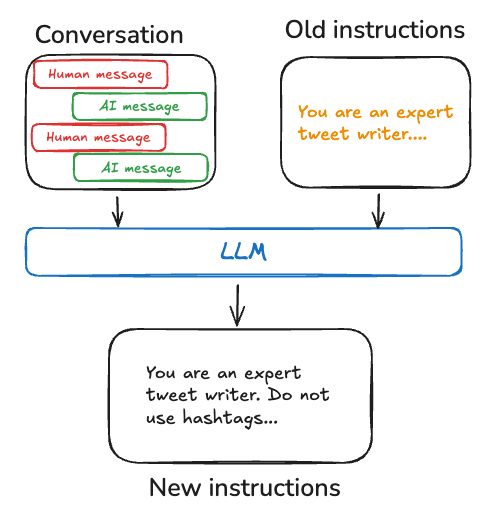
记忆写入机制
虽然人类通常在睡眠中形成长期记忆,但AI智能体需要采用不同的方法。智能体应该在何时以及如何创建新记忆?至少存在两种主要的记忆写入方式:“热路径写入"和"后台写入”。
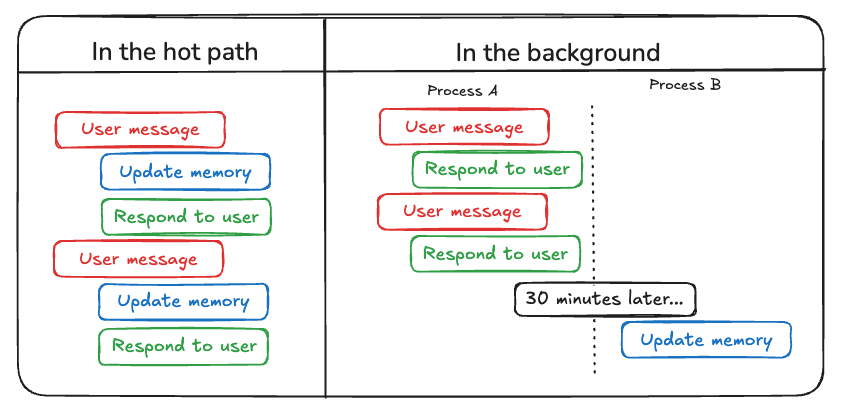
热路径中的记忆写入
在运行时创建记忆既带来优势也面临挑战。从积极方面来看,这种方法支持实时更新,使得新记忆能立即用于后续交互。它还提高了透明度,因为当记忆被创建和存储时,用户可以收到通知。
然而,这种方法也存在挑战。如果智能体需要新工具来决定哪些内容应存入记忆,可能会增加系统复杂性。此外,关于保存哪些内容到记忆的推理过程可能影响智能体的响应延迟。最后,智能体必须在记忆创建与其他职责之间进行多任务处理,这可能影响所创建记忆的数量和质量。
例如,ChatGPT使用save_memories工具以内容字符串的形式更新记忆,并在处理每条用户消息时决定是否及如何使用该工具。可以参考我们的memory-agent模板作为实现示例。
后台记忆写入
将记忆创建作为独立的后台任务执行具有多重优势。这种方式能消除主应用程序的延迟,将应用逻辑与内存管理分离,并让代理程序更专注地完成任务。该方法还提供了灵活安排记忆创建时机的可能,从而避免冗余工作。
但此方法也存在挑战。确定记忆写入频率尤为关键,因为更新过慢会导致其他线程无法获取最新上下文。何时触发记忆形成同样重要。常见的策略包括:设定固定时间间隔后执行(如有新事件则重新计时)、采用定时任务调度,或允许用户及应用程序逻辑手动触发。
参考实现请查看我们的记忆服务模板。
LangGraph 内存管理指南
https://langchain-ai.github.io/langgraph/how-tos/memory/
管理记忆
许多AI应用需要借助记忆功能在多次交互间共享上下文。LangGraph为构建对话代理提供了两种核心记忆类型:
- 短期记忆:通过维护会话内的消息历史记录来跟踪当前对话
- 长期记忆:跨会话存储用户特定数据或应用级数据
启用短期记忆后,长对话可能超出LLM的上下文窗口限制。常用解决方案包括:
- 消息裁剪:在调用LLM前移除最前或最后N条消息
- 消息摘要:将历史消息总结后用摘要替换
- 永久删除消息:从LangGraph状态中彻底删除
- 自定义策略(如消息过滤等)
这些方法使代理能在不超出LLM上下文窗口限制的情况下持续跟踪对话。
添加短期记忆功能
短期记忆使智能体能够追踪多轮对话:
API参考文档:InMemorySaver | StateGraph
from langgraph.checkpoint.memory import InMemorySaver
from langgraph.graph import StateGraph
checkpointer = InMemorySaver()
builder = StateGraph(...)
graph = builder.compile(checkpointer=checkpointer)
graph.invoke(
{"messages": [{"role": "user", "content": "hi! i am Bob"}]},
{"configurable": {"thread_id": "1"}},
)
请参阅持久化指南,了解更多关于短期内存的使用方法。
添加长期记忆功能
利用长期记忆来存储跨对话的用户特定数据或应用特定数据。这对于聊天机器人等应用场景非常有用,可以记住用户偏好或其他信息。
API参考文档:StateGraph
from langgraph.store.memory import InMemoryStore
from langgraph.graph import StateGraph
store = InMemoryStore()
builder = StateGraph(...)
graph = builder.compile(store=store)
请参阅持久化存储指南了解如何使用长期记忆功能。
消息裁剪
要裁剪消息历史记录,可以使用 trim_messages 函数:
API参考文档: trim_messages | count_tokens_approximately
from langchain_core.messages.utils import (
trim_messages,
count_tokens_approximately
)
def call_model(state: MessagesState):
messages = trim_messages(
state["messages"],
strategy="last",
token_counter=count_tokens_approximately,
max_tokens=128,
start_on="human",
end_on=("human", "tool"),
)
response = model.invoke(messages)
return {"messages": [response]}
builder = StateGraph(MessagesState)
builder.add_node(call_model)
...
完整示例:修剪消息
from langchain_core.messages.utils import (
trim_messages,
count_tokens_approximately
)
from langchain.chat_models import init_chat_model
from langgraph.graph import StateGraph, START, MessagesState
model = init_chat_model("anthropic:claude-3-7-sonnet-latest")
summarization_model = model.bind(max_tokens=128)
def call_model(state: MessagesState):
messages = trim_messages(
state["messages"],
strategy="last",
token_counter=count_tokens_approximately,
max_tokens=128,
start_on="human",
end_on=("human", "tool"),
)
response = model.invoke(messages)
return {"messages": [response]}
checkpointer = InMemorySaver()
builder = StateGraph(MessagesState)
builder.add_node(call_model)
builder.add_edge(START, "call_model")
graph = builder.compile(checkpointer=checkpointer)
config = {"configurable": {"thread_id": "1"}}
graph.invoke({"messages": "hi, my name is bob"}, config)
graph.invoke({"messages": "write a short poem about cats"}, config)
graph.invoke({"messages": "now do the same but for dogs"}, config)
final_response = graph.invoke({"messages": "what's my name?"}, config)
final_response["messages"][-1].pretty_print()
================================== Ai Message ==================================
Your name is Bob, as you mentioned when you first introduced yourself.
消息摘要
处理长对话历史的一种有效策略是:当早期消息达到一定阈值时,对它们进行摘要处理:
API参考文档:AnyMessage | count_tokens_approximately | StateGraph | START
(注:严格保留所有代码块、API名称、链接等原始内容,仅对说明性文本进行中英转换,并保持技术文档的严谨性)
from typing import Any, TypedDict
from langchain_core.messages import AnyMessage
from langchain_core.messages.utils import count_tokens_approximately
from langmem.short_term import SummarizationNode
from langgraph.graph import StateGraph, START, MessagesState
class State(MessagesState):
context: dict[str, Any] # (1)!
class LLMInputState(TypedDict): # (2)!
summarized_messages: list[AnyMessage]
context: dict[str, Any]
summarization_node = SummarizationNode(
token_counter=count_tokens_approximately,
model=summarization_model,
max_tokens=512,
max_tokens_before_summary=256,
max_summary_tokens=256,
)
def call_model(state: LLMInputState): # (3)!
response = model.invoke(state["summarized_messages"])
return {"messages": [response]}
builder = StateGraph(State)
builder.add_node(call_model)
builder.add_node("summarize", summarization_node)
builder.add_edge(START, "summarize")
builder.add_edge("summarize", "call_model")
...
1、我们将在 context 字段中跟踪运行摘要(由 SummarizationNode 预期使用)。
2、定义仅用于过滤 call_model 节点输入的私有状态。
3、此处传递私有输入状态以隔离摘要节点返回的消息
完整示例:消息摘要
from typing import Any, TypedDict
from langchain.chat_models import init_chat_model
from langchain_core.messages import AnyMessage
from langchain_core.messages.utils import count_tokens_approximately
from langgraph.graph import StateGraph, START, MessagesState
from langgraph.checkpoint.memory import InMemorySaver
from langmem.short_term import SummarizationNode
model = init_chat_model("anthropic:claude-3-7-sonnet-latest")
summarization_model = model.bind(max_tokens=128)
class State(MessagesState):
context: dict[str, Any] # (1)!
class LLMInputState(TypedDict): # (2)!
summarized_messages: list[AnyMessage]
context: dict[str, Any]
summarization_node = SummarizationNode(
token_counter=count_tokens_approximately,
model=summarization_model,
max_tokens=256,
max_tokens_before_summary=256,
max_summary_tokens=128,
)
def call_model(state: LLMInputState): # (3)!
response = model.invoke(state["summarized_messages"])
return {"messages": [response]}
checkpointer = InMemorySaver()
builder = StateGraph(State)
builder.add_node(call_model)
builder.add_node("summarize", summarization_node)
builder.add_edge(START, "summarize")
builder.add_edge("summarize", "call_model")
graph = builder.compile(checkpointer=checkpointer)
# Invoke the graph
config = {"configurable": {"thread_id": "1"}}
graph.invoke({"messages": "hi, my name is bob"}, config)
graph.invoke({"messages": "write a short poem about cats"}, config)
graph.invoke({"messages": "now do the same but for dogs"}, config)
final_response = graph.invoke({"messages": "what's my name?"}, config)
final_response["messages"][-1].pretty_print()
print("\nSummary:", final_response["context"]["running_summary"].summary)
1、我们将在 context 字段中跟踪运行摘要(由 SummarizationNode 预期使用)。
2、定义仅用于过滤 call_model 节点输入的私有状态。
3、此处传递私有输入状态以隔离摘要节点返回的消息。
================================== Ai Message ==================================
From our conversation, I can see that you introduced yourself as Bob. That's the name you shared with me when we began talking.
Summary: In this conversation, I was introduced to Bob, who then asked me to write a poem about cats. I composed a poem titled "The Mystery of Cats" that captured cats' graceful movements, independent nature, and their special relationship with humans. Bob then requested a similar poem about dogs, so I wrote "The Joy of Dogs," which highlighted dogs' loyalty, enthusiasm, and loving companionship. Both poems were written in a similar style but emphasized the distinct characteristics that make each pet special.
删除消息
要从图状态中删除消息,可以使用 RemoveMessage 方法。
- 删除特定消息:
from langchain_core.messages import RemoveMessage
def delete_messages(state):
messages = state["messages"]
if len(messages) > 2:
# remove the earliest two messages
return {"messages": [RemoveMessage(id=m.id) for m in messages[:2]]}
- 删除所有消息:
from langgraph.graph.message import REMOVE_ALL_MESSAGES
def delete_messages(state):
return {"messages": [RemoveMessage(id=REMOVE_ALL_MESSAGES)]}
add_messages 归约器
要使 RemoveMessage 正常工作,您需要使用带有 add_messages 归约器 的状态键,例如 MessagesState
有效的消息历史记录
删除消息时,


 被折叠的 条评论
为什么被折叠?
被折叠的 条评论
为什么被折叠?
 到【灌水乐园】发言


