


组件间传值的方式总结:
1.父组件向子组件传值 props
父组件使用v-bind绑定数据在子组件上,子组件通过props接收。缺点:组件嵌套层次太多时,传递数据比较麻烦。
父组件代码:
<template>
  <div>
    <h1>父组件</h1>
    <Child :msg="msg" />
  </div>
</template>
<script>
import Child from "./Child.vue"
export default {
  components: { Child },
  data () {
    return {
      msg: "data from Parent"
    }
  }
}
</script>
<style scoped>
</style>
子组件代码:
<template>
  <div>
    <h2>{{msg}}</h2>
  </div>
</template>
<script>
export default {
  name: "Child",
  props: {
    msg: String
  },
  data () {
    return {}
  }
}
</script>
<style scoped>
</style>
2.子组件向父组件传值 $emit(事件形式)
子组件使用 $emit派发事件,父组件使用 v-on监听事件
子组件代码:
<template>
  <div>
    <button @click="sendMsgToParent">send Msg To Parent</button>
  </div>
</template>
<script>
export default {
  name: "Child",
  data () {
    return {
      msg: "data from Child"
    }
  },
  methods: {
    sendMsgToParent () {
      this.$emit("sendMsg", this.msg)
    }
  }
}
</script>
<style scoped>
</style>
父组件代码:
<template>
  <div>
    <Child @sendMsg="getMsgFromChild" />
  </div>
</template>
<script>
import Child from "./Child.vue"
export default {
  name: "Parent",
  components: { Child },
  data () {
    return {
    }
  },
  methods: {
    getMsgFromChild (msg) {
      console.log(msg);
    }
  }
}
</script>
<style scoped>
</style>
3.使用全局事件总线(Event bus) $emit / $on
使用Vue的事件机制, 通过在Vue实例上使用 $on来监听事件,然后在其他组件 $emit触发相应的事件来传递数据。这种方式可以实现在任意两个组件间传递数据。缺点:不支持响应式。
在 main.js 中定义一个空的 Vue 实例作为事件总线:
import Vue from 'vue'
export const bus = new Vue()
子组件A的代码:
<template>
  <div>
    <button @click="sendMsgToChildB">send Msg To Parent</button>
  </div>
</template>
<script>
import { bus } from "../main"
export default {
  name: "ChildA",
  data () {
    return {
    }
  },
  methods: {
    sendMsgToChildB () {
      bus.$emit("sendMsgToChildB", "data from ChildA")
    }
  }
}
</script>
<style scoped>
</style>
子组件B的代码:
<template>
  <div>
    <h2>{{msgFromChildA}}</h2>
  </div>
</template>
<script>
import { bus } from "../main"
export default {
  name: "ChildB",
  data () {
    return {
      msgFromChildA: ""
    }
  },
  mounted () {
    bus.$on("sendMsgToChildB", (msg) => {
      this.msgFromChildA = msg
    })
  }
}
</script>
<style scoped>
</style>
4.provider / inject
祖先组件中通过 provider 来提供变量,然后在子孙组件中通过 inject 来注入变量。provide / inject 主要解决了跨级组件间的通信问题,不过它的使用场景,主要是子组件获取上级组件的状态,跨级组件间建立了一种主动提供与依赖注入的关系。
祖先组件的代码:
<template>
  <div>
    <ChildA />
  </div>
</template>
<script>
import ChildA from "./ChildA.vue"
export default {
  components: { ChildA },
  provide () {
    return {
      msgToChildB: "data from parent"
    }
  }
}
</script>
<style scoped>
</style>
子组件A的代码:
<template>
  <div>
    <ChildB />
  </div>
</template>
<script>
import ChildB from "./ChildB.vue"
export default {
  name: "ChildA",
  components: { ChildB }
}
</script>
<style scoped>
</style>
子组件B的代码:
<template>
  <div>
    <h2>{{msgToChildB}}</h2>
  </div>
</template>
<script>
export default {
  name: "ChildB",
  inject: ["msgToChildB"]
}
</script>
<style scoped>
</style>
5.使用 Vuex
当应用的数据状态比较复杂或者需要在多个组件之间共享时,可以使用 Vuex。可以在任何组件中访问和修改 Vuex 存储的数据,通过 mutations 来修改状态,通过 actions 来触发 mutations。这种方式可以方便地在不同的组件中进行状态管理和数据共享。
新建store文件:
import Vue from 'vue'
import Vuex from 'vuex'
Vue.use(Vuex)

const store = new Vuex.Store({
  state: {
    msg: "data from Vuex"
  },
  mutations: {
    updateMsg (state, payload) {
      state.msg = payload
    }
  }
})

export default store
子组件A的代码:
<template>
  <div>
    <button @click="sendDataToChild">send data to childB</button>
  </div>
</template>
<script>
import { mapActions, mapMutations } from 'vuex'
export default {
  name: "ChildA",
  methods: {
    ...mapMutations(["updateMsg"]),
    sendDataToChild () {
      this.updateMsg("data from childA")
    }
  }
}
</script>
<style scoped>
</style>
子组件B的代码:
<template>
  <div>
    <h2>{{msg}}</h2>
  </div>
</template>
<script>
import { mapState } from 'vuex'
export default {
  name: "ChildB",
  computed: {
    ...mapState(["msg"])
  }
}
</script>
<style scoped>
</style>
6.$attrs / $listeners
多级组件嵌套需要传递数据时,通常使用的方法是通过 vuex。但如果仅仅是传递数据,而不做中间处理,使用 vuex 处理,未免有点大材小用。为此 Vue2.4 版本提供了另一种方法---- $attrs/ $listeners。
$attrs:包含了父作用域中不被 prop 所识别 (且获取) 的特性绑定 (class 和 style 除外)。当一个组件没有声明任何 prop 时,这里会包含所有父作用域的绑定 (class 和 style 除外),并且可以通过 v-bind=" $attrs" 传入内部组件。通常配合 interitAttrs (Vue组件的interitAttrs)选项一起使用。
$listeners:包含了父作用域中的 (不含 .native 修饰器的) v-on 事件监听器。它可以通过 v-on=" $listeners" 传入内部组件。
祖父元素代码:
<template>
  <div>
    <Father :name="name"
            :like="like"
            :age="24"
            work="程序员"
            @methods1="onMethods1"
            @methods2="onMethods2" />
  </div>
</template>
<script>
import Father from "./Father.vue"
export default {
  components: { Father },
  data () {
    return {
      name: "张三",
      like: "篮球",
      age: "24"
    }
  },
  methods: {
    onMethods1 (msg1) {
      console.log(`${msg1} running`);
    },
    onMethods2 (msg2) {
      console.log(`${msg2} running`);
    }
  }
}
</script>
<style scoped>
</style>
父元素代码:
<template class="childA">
  <div>
    <h2>Father name:{{ name }}</h2>
    <h2>Parent的$attrs:{{ $attrs }}</h2>
    <Child v-bind='$attrs'
           v-on="$listeners" />
  </div>
</template>
<script>
import Child from './Child.vue'
export default {
  name: "Father",
  components: { Child },
  inheritAttrs: false,//关闭自动挂在到根元素上的没有在 props 声明的属性
  props: {
    name: String
  },
  data () {
    return {
      father: "Father"
    }
  },
  created () {
    console.log(this.$attrs);//like: '篮球', age: 24, work: '程序员'}
  },
  mounted () {
    this.$emit("methods1", this.father);
  },
}
</script>
<style scoped>
.childA {
  width: 100%;
  border: 1px solid black;
}
</style>
子组件代码:
<template>
  <div>
    <h2>Child: {{ $attrs }}</h2>
  </div>
</template>
<script>
export default {
  name: "Child",
  inheritAttrs: false,
  props: {
    like: String
  },
  data () {
    return {
      child: "child"
    }
  },
  created () {
    console.log(this.$attrs);//{age: 24, work: '程序员'}
  },
  mounted () {
    this.$emit("methods1", this.child)
  }
}
</script>
<style scoped>
</style>
实现效果:
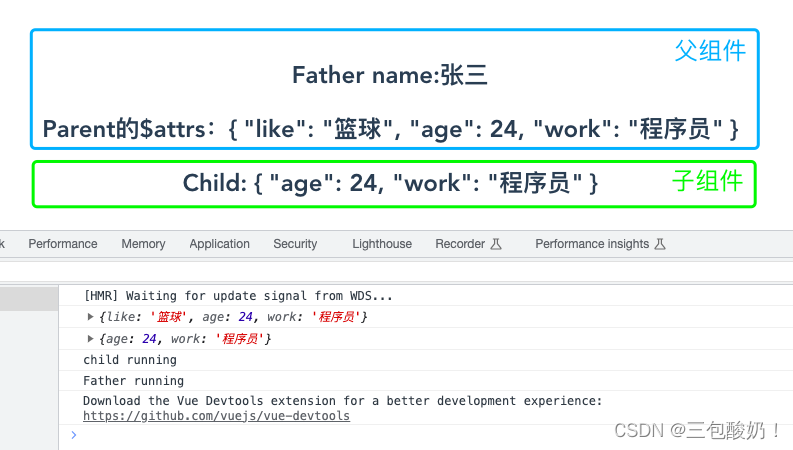
在父组件和子组件 中,需要设置 inheritAttrs: false,来禁止自动将父组件传递的属性绑定到子组件的根元素上。这样,我们就可以使用 v-bind=“$attrs” 把所有属性绑定到子元素上。使用 $emit(‘click’) 来触发祖父组件传递过来的点击事件。
7. $parent/ $children 与 ref
$parent / $children:访问父 / 子实例
ref:如果在普通的 DOM 元素上使用,引用指向的就是 DOM 元素;如果用在子组件上,引用就指向组件实例
注意:这两种都是直接得到组件实例,使用后可以直接调用组件的方法或访问数据。
弊端:这两种方法都无法在跨级或兄弟间通信。 $children 并不保证顺序,也不是响应式的。
父组件代码:
<template>
  <div>
    <h2>parentComponent:{{getMsgFromChild}}</h2>
    <ChildComponent ref="childA" />
    <h2>ref拿到的子组件的title:{{childTitle}}</h2>
  </div>
</template>
<script>
import ChildComponent from './ChildComponent.vue'
export default {
  components: { ChildComponent },
  data () {
    return {
      msgFromParent: "msg from parent",
      getMsgFromChild: "",
      childTitle: ""
    }
  },
  mounted () {
    this.getMsgFromChild = this.$children[0]._data.msgFromChild
    //ref 拿到子组件的title
    this.childTitle = this.$refs.childA.title
    //ref 执行子组件的alert事件
    this.$refs.childA.alertChildMsg()
  },
}
</script>
<style scoped>
</style>
子组件代码:
<template>
  <div>
    <h2>childComponent: {{getmsgFromParent}}</h2>
  </div>
</template>
<script>
export default {
  name: "ChildComponent",
  data () {
    return {
      msgFromChild: "msg from child",
      getmsgFromParent: "",
      title: "这是子组件定义的数据"
    }
  },
  mounted () {
    this.getmsgFromParent = this.$parent._data.msgFromParent
  },
  methods: {
    alertChildMsg () {
      alert("子组件的alert事件")
    }
  }
}
</script>
<style scoped>
</style>
总结
常见的使用场景可以分为三类:
1. 父子间通信:
父向子传递数据通过 props,子向父传递数据通过 $emit (event) ;
$parent / $children:访问父 / 子实例;
ref 访问组件实例;
provide / inject API;
$attrs / $listeners
2. 兄弟通信:
全局事件总线(Event bus) $emit / $on;
Vuex
3. 跨级通信:
全局事件总线(Event bus) $emit / $on;
provide / inject API;
$attrs / $listeners;
Vuex


 8911
8911


 被折叠的 条评论
为什么被折叠?
被折叠的 条评论
为什么被折叠?
 到【灌水乐园】发言


