


介绍
Aware(感知)接口是一个标记,里面没有任何方法,实际方法定义都是子接口确定(相当于定义了一套规则,并建议子接口中应该只有一个无返回值的方法)。
我们知道spring已经定义好了很多对象,如ApplicationContext、BeanFactory、Environment等,但是这些对象是spring框架自身的,我们去获取这些是及其困难的,所以spring定义了一套规则能让我们很容易得获取框架中的对象,这就是Aware的意义,现在对Aware有一定了解了吧,Aware是感知spring容器中的对象。
spring定义了很多子接口并已实现可直接可用,下图均为spring中的子接口。
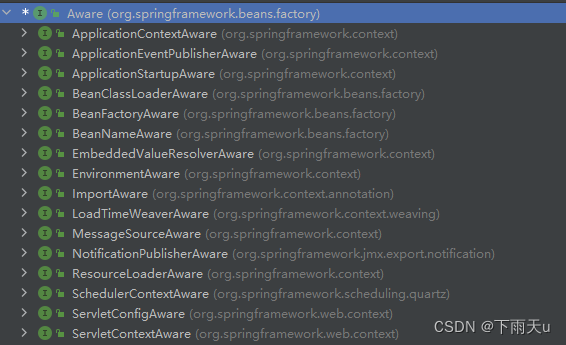
如图第一个ApplicationContextAware,类名很清晰的告诉我们是感知ApplicationContext,ApplicationContext都知道是spring容器,所以这里表示感知容器,就是我们想获取ApplicationContext只需要实现这个接口就行。
注意
这里的接口名都是有规则的,如ApplicationContextAware就是获取ApplicationContext的,BeanFactoryAware就是获取BeanFactory的,见名知意。
源码
public interface ApplicationContextAware extends Aware {

	/**
	 * 只有一个方法,实现这方法spring在启动过程中会默认将
	 * 调用此方法并将ApplicationContext参数传递过来,这样
	 * 我们就能很容易的获取到ApplicationContext了
	 */
	void setApplicationContext(ApplicationContext applicationContext) throws BeansException;

}
例子
Teacher类并实现ApplicationContextAware 接口
package com.lp.entity;


import org.springframework.beans.BeansException;
import org.springframework.context.ApplicationContext;
import org.springframework.context.ApplicationContextAware;

public class Teacher implements ApplicationContextAware {
	private String name;

	private ApplicationContext applicationContext;

	public ApplicationContext getApplicationContext() {
		return applicationContext;
	}

	public String getName() {
		return name;
	}

	public void setName(String name) {
		this.name = name;
	}

	@Override
	public String toString() {
		return "Teacher{" +
				"name='" + name + '\'' +
				'}';
	}

	@Override
	public void setApplicationContext(ApplicationContext applicationContext) throws BeansException {
		this.applicationContext =applicationContext;
	}
}
配置文件
<?xml version="1.0" encoding="UTF-8"?>
<beans xmlns="http://www.springframework.org/schema/beans"
	   xmlns:xsi="http://www.w3.org/2001/XMLSchema-instance"
	   xmlns:context="http://www.springframework.org/schema/context"
	   xsi:schemaLocation="http://www.springframework.org/schema/beans http://www.springframework.org/schema/beans/spring-beans.xsd http://www.springframework.org/schema/context https://www.springframework.org/schema/context/spring-context.xsd">
	<context:component-scan base-package="com.lp"/>

	<bean id="teacher" class="com.lp.entity.Teacher">
		<property name="name" value="zhangsan"/>
	</bean>
</beans>
测试,看一看Teacher类中能不能获取到ApplicationContext对象
package example.lp;

import com.lp.entity.Teacher;
import org.springframework.context.support.ClassPathXmlApplicationContext;

public class test {
	public static void main(String[] args) {
		ClassPathXmlApplicationContext context = new ClassPathXmlApplicationContext("application.xml");
		Teacher teacher = (Teacher)context.getBean("teacher");
		System.out.println("------------ApplicationContext="+teacher.getApplicationContext());
	}
}

从结果中可以清晰的看到已经获取到了ApplicationContext对象,当我们需要其他对象也可以看看其他Aware子接口,直接实现即可。
自定义Aware接口(简单看一下)
spring中有一个ApplicationContextAwareProcessor类,里面就是实现这些子接口功能的,invokeAwareInterfaces方法就是具体逻辑。
class ApplicationContextAwareProcessor implements BeanPostProcessor {

	private final ConfigurableApplicationContext applicationContext;

	private final StringValueResolver embeddedValueResolver;


	/**
	 * Create a new ApplicationContextAwareProcessor for the given context.
	 */
	public ApplicationContextAwareProcessor(ConfigurableApplicationContext applicationContext) {
		this.applicationContext = applicationContext;
		this.embeddedValueResolver = new EmbeddedValueResolver(applicationContext.getBeanFactory());
	}


	@Override
	@Nullable
	public Object postProcessBeforeInitialization(Object bean, String beanName) throws BeansException {
		if (bean instanceof Aware) {
			invokeAwareInterfaces(bean);
		}
		return bean;
	}

	private void invokeAwareInterfaces(Object bean) {
		if (bean instanceof EnvironmentAware environmentAware) {
			environmentAware.setEnvironment(this.applicationContext.getEnvironment());
		}
		if (bean instanceof EmbeddedValueResolverAware embeddedValueResolverAware) {
			embeddedValueResolverAware.setEmbeddedValueResolver(this.embeddedValueResolver);
		}
		if (bean instanceof ResourceLoaderAware resourceLoaderAware) {
			resourceLoaderAware.setResourceLoader(this.applicationContext);
		}
		if (bean instanceof ApplicationEventPublisherAware applicationEventPublisherAware) {
			applicationEventPublisherAware.setApplicationEventPublisher(this.applicationContext);
		}
		if (bean instanceof MessageSourceAware messageSourceAware) {
			messageSourceAware.setMessageSource(this.applicationContext);
		}
		if (bean instanceof ApplicationStartupAware applicationStartupAware) {
			applicationStartupAware.setApplicationStartup(this.applicationContext.getApplicationStartup());
		}
		if (bean instanceof ApplicationContextAware applicationContextAware) {
			applicationContextAware.setApplicationContext(this.applicationContext);
		}
	}

}
自己实现Aware接口
这个需要了解一下spring启动过程,跟BeanPostProcessor这个接口有关,也需要了解BeanPostProcessor的执行时机,这里我就不介绍了,我自己写了一个示例,这里只是展示怎么实现Aware的。
package com.lp.entity;


import org.springframework.beans.BeansException;
import org.springframework.context.ApplicationContext;
import org.springframework.context.ApplicationContextAware;

public class Teacher implements ApplicationContextAware {
	private String name;

	private ApplicationContext applicationContext;

	public ApplicationContext getApplicationContext() {
		return applicationContext;
	}

	public String getName() {
		return name;
	}

	public void setName(String name) {
		this.name = name;
	}

	@Override
	public String toString() {
		return "Teacher{" +
				"name='" + name + '\'' +
				'}';
	}

	@Override
	public void setApplicationContext(ApplicationContext applicationContext) throws BeansException {
		this.applicationContext =applicationContext;
	}
}
package com.lp.entity;

import com.lp.TeacherAware;

public class Student implements TeacherAware {
	private String name;

	private Teacher teacher;

	public Teacher getTeacher() {
		return teacher;
	}

	public String getName() {
		return name;
	}

	public void setName(String name) {
		this.name = name;
	}

	@Override
	public void setTeacher(Teacher teacher) {
		this.teacher =teacher;
	}
}
package com.lp;

import com.lp.entity.Teacher;
import org.springframework.beans.factory.Aware;

public interface TeacherAware extends Aware {
	void setTeacher(Teacher teacher);
}
package com.lp;

import com.lp.entity.Teacher;
import org.springframework.beans.BeansException;
import org.springframework.beans.factory.annotation.Autowired;
import org.springframework.beans.factory.config.BeanPostProcessor;
import org.springframework.context.ConfigurableApplicationContext;
import org.springframework.stereotype.Component;

@Component
public class TeacherAwareBeanPostProcessor implements BeanPostProcessor {
	private final ConfigurableApplicationContext applicationContext;

	@Autowired
	public TeacherAwareBeanPostProcessor(ConfigurableApplicationContext applicationContext) {
		this.applicationContext = applicationContext;
	}

	@Override
	public Object postProcessBeforeInitialization(Object bean, String beanName) throws BeansException {
		if (bean instanceof TeacherAware teacherAware){
			teacherAware.setTeacher(applicationContext.getBean(Teacher.class));
		}
		return bean;
	}
}
<?xml version="1.0" encoding="UTF-8"?>
<beans xmlns="http://www.springframework.org/schema/beans"
	   xmlns:xsi="http://www.w3.org/2001/XMLSchema-instance"
	   xmlns:context="http://www.springframework.org/schema/context"
	   xsi:schemaLocation="http://www.springframework.org/schema/beans http://www.springframework.org/schema/beans/spring-beans.xsd http://www.springframework.org/schema/context https://www.springframework.org/schema/context/spring-context.xsd">
	<context:component-scan base-package="com.lp"/>

	<bean id="teacher" class="com.lp.entity.Teacher">
		<property name="name" value="zhangsan"/>
	</bean>
	<bean id="student" class="com.lp.entity.Student">
		<property name="name" value="lisi"/>
	</bean>

</beans>
package example.lp;

import com.lp.entity.Student;
import com.lp.entity.Teacher;
import org.springframework.context.support.ClassPathXmlApplicationContext;

public class test {
	public static void main(String[] args) {
		ClassPathXmlApplicationContext context = new ClassPathXmlApplicationContext("application.xml");
		//Teacher teacher = (Teacher)context.getBean("teacher");
		//System.out.println("------------ApplicationContext="+teacher.getApplicationContext());

		Student student = (Student)context.getBean("student");
		System.out.println("------------Teacher="+student.getTeacher());
	}
}
从上述代码和结果中可以看到,我创建了两个bean,一个Student和一个Teacher,我用Aware方式实现了将Student中的Teacher属性注入,当然这个场景可能不是很合适,但这里主要是演示怎么自己实现Aware接口,需要自己写一个接口实现Aware接口并之定义一个方法(接口名最好是遵循spring规则,且只有一个void方法),创建一个实现BeanPostProcessor的对象并写出具体实现逻辑,这儿需要你了解spring启动流程并且知道BeanPostProcessor接口的作用。
希望对你有帮助,别忘了点赞!!


 1119
1119

 被折叠的 条评论
为什么被折叠?
被折叠的 条评论
为什么被折叠?
 到【灌水乐园】发言


