


SpringBoot简介
Spring Boot是由Pivotal团队提供的全新框架,其设计目的是用来简化新Spring应用的初始搭建以及开发过程。该框架使用了特定的方式来进行配置,从而使开发人员不再需要定义样板化的配置。通过这种方式,Spring Boot致力于在蓬勃发展的快速应用开发领域(rapid application development)成为领导者。
详情请参阅spirngboot官网:http://projects.spring.io/spring-boot/
SpringBoot特点
遵循“习惯优于配置”的原则,使用Spring Boot只需要很少的配置,大部分的时候我们直接使用默认的配置即可;
- 项目快速搭建,可以无需配置的自动整合第三方的框架;
- 可以完全不使用XML配置文件,只需要自动配置和Java Config;
- 内嵌Servlet容器,降低了对环境的要求,可以使用命令直接执行项目,应用可用jar包执行:java -jar;
- 提供了starter POM, 能够非常方便的进行包管理, 很大程度上减少了jar hell或者dependency hell;
- 运行中应用状态的监控;
- 与云计算的天然继承;
SpringBoot优点
SpringBoot是伴随着Spring4.0诞生的,一经推出,引起了巨大的反响。
- 从字面理解,Boot是引导的意思,因此SpringBoot帮助开发者快速搭建Spring框架; - SpringBoot帮助开发者快速启动一个Web容器;
- SpringBoot继承了原有Spring框架的优秀基因;
- SpringBoot简化了使用Spring的过程;
- Spring Boot为我们带来了脚本语言开发的效率,但是Spring Boot并没有让我们意外的新技术,都是Java EE开发者常见的额技术。
SpringBoot解决的问题
Spring Boot使编码变简单
- Spring Boot使配置变简单
- Spring Boot使部署变简单
- Spring Boot使监控变简单
SpringBoot的核心功能
(一)独立运行的Spring项目 Spring Boot可以以jar包的形式进行独立的运行,使用:java -jar xx.jar 就可以成功的运行项目,或者在应用项目的主程序中运行main函数即可;使得项目的部署,调试都变得简单。
(二)内嵌的Servlet容器 内嵌容器,使得我们可以执行运行项目的主程序main函数,使项目的快速运行; 主程序代码:SpringbootDemoApplication.java
import org.springframework.boot.SpringApplication;
import org.springframework.boot.autoconfigure.SpringBootApplication;
@SpringBootApplication
public class SpringbootDemoApplication {
public static void main(String[] args) { SpringApplication.run(SpringbootDemoApplication.class, args);
}
}
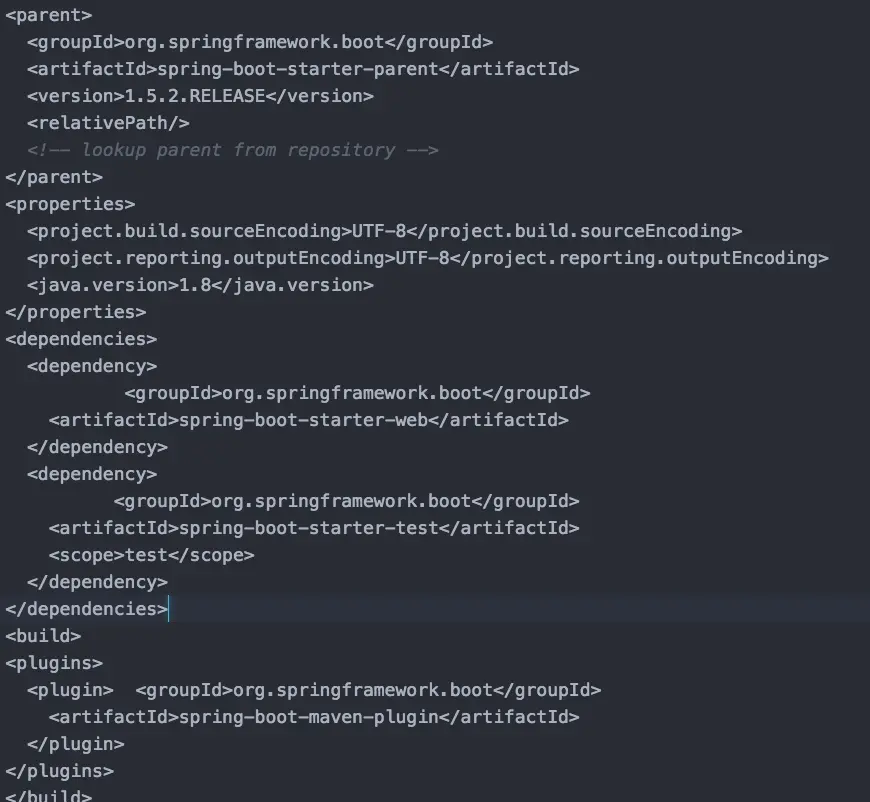
(三)提供starter简化Manen配置 Spring Boot提供了一系列的starter pom用来简化我们的Maven依赖,下边是创建一个简单web demo的依赖pom代码org.springframework.bootspring-boot-starter-parent1.5.2.RELEASE
Spring Boot官网还提供了很多的starter pom,请参考:
http://docs.spring.io/spring-boot/docs/1.5.2.RELEASE/reference/htmlsingle/#boot-documentation 或者访问https://github.com/spring-projects/spring-boot/tree/master/spring-boot-starters
通过粗略阅读,我们知道springboot几乎为市面上主流常见的框架接入做了starter pom整合,我们在使用的时候只要引入相关的starter,然后就可以直接使用(或者很少的配置)就可以使用该框架的功能为我们服务。
(四)自动配置SpringSpring Boot会根据我们项目中类路径的jar包/类,为jar包的类进行自动配置Bean,这样一来就大大的简化了我们的配置。当然,这只是Spring考虑到的大多数的使用场景,在一些特殊情况,我们还需要自定义自动配置;
(五)无代码生成和XML配置Spring Boot神奇的地方不是借助于代码生成来实现的,而是通过条件注解的方式来实现的,这也是Spring 4.x的新特性。
Spring Boot的快速搭建案例
我们可以通过访问http://start.spring.io/来快速构建一个springboot应用,选好我们需要的模块后,回车或者点击Generate Project就会生成一个压缩包,把压缩包解压后导入我们的ide就可以运行一个demo项目。我们也可以通过idea的SPRING INITIALIZR来快速生成一个SpringBoot项目。
SpringBoot启动流程初探
阅读我们的demo代码,我们发现在main方法里我们执行了一串这样的代码
SpringApplication.run(DemoApplication.class, args);
查看run方法,发现这个run方法的方法说明为:
/** * Static helper that can be used to run a {@link SpringApplication} from the
* specified source using default settings.
* @param source the source to load
* @param args the application arguments (usually passed from a Java main method)
* @return the running {@link ApplicationContext}
*/
public static ConfigurableApplicationContext run(Object source, String... args) {
return run(new Object[] { source }, args);
}
从这段说明和代码我们可以看到,该静态方法是用来启动我们的应用,特殊的配置使用默认设置,接收两个参数分别是我们的main方法所在的类,和main方法的方法参数,然后调用了当前类下的重载run方法。重载run方法如下:
public static ConfigurableApplicationContext run(Object[] sources, String[] args) {
return new SpringApplication(sources).run(args);
}
从这段方法我们看到,该方法实例化了一个SpringApplication,传入的参数依然为应用所在入口类,并且调用了SpringApplication下的run(String...args)方法。首先我们查看实例话的方法,也就是SpringApplication的构造函数:
public SpringApplication(Object... sources) {
initialize(sources);
}
查看initialize方法:
@SuppressWarnings({ "unchecked", "rawtypes" })
private void initialize(Object[] sources) {
if (sources != null && sources.length > 0) {
this.sources.addAll(Arrays.asList(sources));
}
this.webEnvironment = deduceWebEnvironment();
setInitializers((Collection) getSpringFactoriesInstances( ApplicationContextInitializer.class) );
setListeners((Collection) getSpringFactoriesInstances(ApplicationListener.class));
this.mainApplicationClass = deduceMainApplicationClass();
}
从面的代码可以看到初始化过程做了以下几件事情
this.webEnvironment = deduceWebEnvironment();
这一个方法决定创建的是一个WEB应用还是一个SPRING的标准Standalone应用。进方法可以看到其是怎么判断的:
private boolean deduceWebEnvironment() {
for (String className : WEB_ENVIRONMENT_CLASSES) {
if (!ClassUtils.isPresent(className, null)){
return false;
}
}
return true;
}
可以看到是根据org.springframework.util.ClassUtils的静态方法去判断classpath里面是否有WEB_ENVIRONMENT_CLASSES包含的类,如果有都包含则返回true则表示启动一个WEB应用,否则返回false启动一个标准Spring的应用。然后通过代码:
private static final String[] WEB_ENVIRONMENT_CLASSES = { "javax.servlet.Servlet", "org.springframework.web.context.ConfigurableWebApplicationContext" };
可以看到是否启动一个WEB应用就是取决于classpath下是否有javax.servlet.Servlet和 org.springframework.web.context.ConfigurableWebApplicationContext。然后进入下一个阶段:
setInitializers((Collection) getSpringFactoriesInstances(ApplicationContextInitializer.class));
这个方法是初始化classpath下的所有的可用的
ApplicationContextInitializersetListeners((Collection) getSpringFactoriesInstances(ApplicationListener.class));
这个方法是初使化classpath下的所有的可用的ApplicationListener。最后的执行deduceMainApplicationClass方法,找出main方法的全类名并返回其实例并设置到SpringApplication的this.mainApplicationClass完成初始化。
private Class<?> deduceMainApplicationClass() {
try {
StackTraceElement[] stackTrace = new RuntimeException().getStackTrace();
for (StackTraceElement stackTraceElement : stackTrace) {
if ("main".equals(stackTraceElement.getMethodName())) {
return Class.forName(stackTraceElement.getClassName());
}
}
}catch (ClassNotFoundException ex) {
// Swallow and continue
}
return null;
}
然后调用SpringApplication实例的run方法来启动应用,代码如下:
/** * Run the Spring application, creating and refreshing a new
* {@link ApplicationContext}.
* @param args the application arguments (usually passed from a Java main method)
* @return a running {@link ApplicationContext}
*/
public ConfigurableApplicationContext run(String... args) {
StopWatch stopWatch = new StopWatch();
stopWatch.start();
ConfigurableApplicationContext context = null;
FailureAnalyzers analyzers = null;
configureHeadlessProperty();
SpringApplicationRunListeners listeners = getRunListeners(args);
listeners.starting();
try {
ApplicationArguments applicationArguments = new DefaultApplicationArguments(args);
ConfigurableEnvironment environment = prepareEnvironment(listeners,applicationArguments);
Banner printedBanner = printBanner(environment);
context = createApplicationContext();
analyzers = new FailureAnalyzers(context);
prepareContext(context, environment, listeners, applicationArguments,printedBanner);
refreshContext(context);afterRefresh(context, applicationArguments);
listeners.finished(context, null);
stopWatch.stop();
if (this.logStartupInfo) {
new StartupInfoLogger(this.mainApplicationClass)
.logStarted(getApplicationLog(), stopWatch);
}
return context;
}catch (Throwable ex) {
handleRunFailure(context, listeners, analyzers, ex);
throw new IllegalStateException(ex);
}
}
我们可以看到,这段代码作为整个应用启动的具体实现,还是比较复杂的,目前已知这里会加载SpringApplicationRunListener对整个容器的初始化过程进行监听:
SpringApplicationRunListeners listeners = getRunListeners(args);
listeners.starting();
然后我们查看下面几行代码:
ApplicationArguments applicationArguments = new DefaultApplicationArguments(args);
ConfigurableEnvironment environment = prepareEnvironment(listeners, applicationArguments);
Banner printedBanner = printBanner(environment);
context = createApplicationContext();
prepareContext(context, environment, listeners, applicationArguments, printedBanner);
refreshContext(context);
afterRefresh(context, applicationArguments);
首先是获取启动时传入参数args并初始化为ApplicationArguments对象 SpringApplication.run(Application.class, args);取这里传入值。 然后配置SpringBoot应用的环境:
ConfigurableEnvironment environment = prepareEnvironment(listeners, applicationArguments);
然后下面代码就是比较核心的:
context = createApplicationContext();
prepareContext(context, environment, listeners, applicationArguments, printedBanner);
refreshContext(context);
afterRefresh(context, applicationArguments);
首先是createApplicationContext()方法:
protected ConfigurableApplicationContext createApplicationContext() {
Class<?> contextClass = this.applicationContextClass;
if (contextClass == null) {
try {
contextClass = Class.forName(this.webEnvironment ? DEFAULT_WEB_CONTEXT_CLASS : DEFAULT_CONTEXT_CLASS);
}catch (ClassNotFoundException ex) {
throw new IllegalStateException( "Unable create a default ApplicationContext, " + "please specify an ApplicationContextClass", ex);
}
}
return (ConfigurableApplicationContext) BeanUtils.instantiate(contextClass);
}
可以看出根据这前初始化过程初始化的this.webEnvironment来决定初始化一个什么容器。如果classpath下是否有javax.servlet.Servlet和 org.springframework.web.context. ConfigurableWebApplicationContext类, 则使用DEFAULT_WEB_CONTEXT_CLASS初始化容器,如果不存在则用DEFAULT_CONTEXT_CLASS初始化容器。完成容器的创建工作。然后执行以下的几个步骤完成整个容器的创建与启动以及bean的注入功能。
prepareContext(context, environment, listeners, applicationArguments, printedBanner);
以下这一句代码是实现spring-boot-starter-*的自动化配置的关键。
refreshContext(context);
afterRefresh(context, applicationArguments);
其中refreshContext会更新ApplicationContext基础组件,包括prepareBeanFactory工厂,postProcessBeanFactory工厂,监听器注册,消息流初始化等等操作。详情可以查看AbstractApplicationContext类下的refresh()方法。afterRefresh方法实质上使用的是callRunners(context, args);方法,代码如下:
private void callRunners(ApplicationContext context, ApplicationArguments args) {
List<Object> runners = new ArrayList();
runners.addAll(context.getBeansOfType(ApplicationRunner.class).values());
runners.addAll(context.getBeansOfType(CommandLineRunner.class).values());
AnnotationAwareOrderComparator.sort(runners);
for (Object runner : new LinkedHashSet(runners)) {
if (runner instanceof ApplicationRunner) {
callRunner((ApplicationRunner) runner, args);
}
if (runner instanceof CommandLineRunner) {
callRunner((CommandLineRunner) runner, args);
}
}
}
可以看到,这里会把所有的bean放入一个List然后循环注册,其中值得注意的callRunner方法调用了ApplicationRunner接口的run方法,用以执行bean。 到现在为止,整个容器的启动流程基本完成,其中的各种Listener,创建Environment及Environment的初始化的内容都没有做过多深入的解析,有时间和有兴趣可以继续查看源代码## SpringBoot自动配置解析
我们先看@SpringBootApplication注解:
@Target(ElementType.TYPE)
@Retention(RetentionPolicy.RUNTIME)
@Documented
@Inherited
@SpringBootConfiguration
@EnableAutoConfiguration
@ComponentScan(excludeFilters = {@Filter(type = FilterType.CUSTOM, classes = TypeExcludeFilter.class),@Filter(type = FilterType.CUSTOM, classes = AutoConfigurationExcludeFilter.class) })
其中其中@Target,@Retention,@Documented,@Inherited这四个注解为元注解跳过。@ComponentScan这个是Spring很常用的注解,也跳过。
我们先看@SpringBootConfiguration:
@Target(ElementType.TYPE)
@Retention(RetentionPolicy.RUNTIME)
@Documented
@Configuration
public @interface SpringBootConfiguration {}
这个注解里面的@Configuration标注当前类为:JavaConfig类 。然后我们来看@EnableAutoConfiguration注解
@SuppressWarnings("deprecation")
@Target(ElementType.TYPE)
@Retention(RetentionPolicy.RUNTIME)
@Documented
@Inherited
@AutoConfigurationPackage
@Import(EnableAutoConfigurationImportSelector.class)
这个注解上@Import(EnableAutoConfigurationImportSelector.class)代表引入其它的Spring的JavaConfig接着进入EnableAutoConfigurationImportSelector.class 我们发现该类继承了AutoConfigurationImportSelector,然后我们查看下下面的方法:
@Override
public String[] selectImports(AnnotationMetadata annotationMetadata) {
if (!isEnabled(annotationMetadata)) {
return NO_IMPORTS;
}
try {
AutoConfigurationMetadata autoConfigurationMetadata = AutoConfigurationMetadataLoader.loadMetadata(this.beanClassLoader);
AnnotationAttributes attributes = getAttributes(annotationMetadata);
Listconfigurations = getCandidateConfigurations(annotationMetadata,attributes);
configurations = removeDuplicates(configurations);
configurations = sort(configurations, autoConfigurationMetadata);
Setexclusions = getExclusions(annotationMetadata, attributes);
checkExcludedClasses(configurations, exclusions);
configurations.removeAll(exclusions);
configurations = filter(configurations, autoConfigurationMetadata);
fireAutoConfigurationImportEvents(configurations, exclusions);
return configurations.toArray(new String[configurations.size()]);
}catch (IOException ex) {
throw new IllegalStateException(ex);
}
}
进入:List configurations = getCandidateConfigurations(metadata,attributes);
protected List<String> getCandidateConfigurations(AnnotationMetadata metadata,AnnotationAttributes attributes) {
Listconfigurations = SpringFactoriesLoader.loadFactoryNames(
getSpringFactoriesLoaderFactoryClass(), getBeanClassLoader());
Assert.notEmpty(configurations,
"No auto configuration classes found in META-INF/spring.factories. If you are using a custom packaging, make sure that file is correct.");
return configurations;
}
在进入:List configurations = SpringFactoriesLoader.loadFactoryNames( getSpringFactoriesLoaderFactoryClass(), getBeanClassLoader()); 代码如下:
public static List<String> loadFactoryNames(Class<?> factoryClass, ClassLoader classLoader) {
String factoryClassName = factoryClass.getName();
try {
Enumerationurls = (classLoader != null ? classLoader.getResources(FACTORIES_RESOURCE_LOCATION) :ClassLoader.getSystemResources(FACTORIES_RESOURCE_LOCATION));
Listresult = new ArrayList();
while (urls.hasMoreElements()) {
URL url = urls.nextElement();
Properties properties = PropertiesLoaderUtils.loadProperties(new UrlResource(url));
String factoryClassNames = properties.getProperty(factoryClassName);
result.addAll(Arrays.asList(StringUtils.commaDelimitedListToStringArray(
factoryClassNames)));
}
return result;
}catch (IOException ex) {
throw new IllegalArgumentException("Unable to load [" + factoryClass.getName() +"] factories from location [" + FACTORIES_RESOURCE_LOCATION + "]", ex);
}
}
在上面的代码可以看到自动配置器会跟根据传入的factoryClass.getName()到spring.factories的文件中找到相应的key,从而加载里面的类,最后的refreshContext(context);实现。我们可以通过查看spring-boot-autoconfigure-1.5.2.RELEASE.jar下的META-INF里的spring.factories查看SpringBoot中支持的自动配置的类/第三方框架。这里以org.springframework.boot.autoconfigure.data.Redis.RedisAutoConfiguration为例查看代码如下:
@Configuration
@ConditionalOnClass({ JedisConnection.class, RedisOperations.class, Jedis.class })
@EnableConfigurationProperties(RedisProperties.class)
public class RedisAutoConfiguration {
@Configuration
@ConditionalOnClass(GenericObjectPool.class)
protected static class RedisConnectionConfiguration {
@Bean
@ConditionalOnMissingBean(RedisConnectionFactory.class)
public JedisConnectionFactory redisConnectionFactory()
throws UnknownHostException {
return applyProperties(createJedisConnectionFactory());
}
}
@Configuration
protected static class RedisConfiguration {
@Bean
@ConditionalOnMissingBean(name = "redisTemplate")
public RedisTemplateredisTemplate( RedisConnectionFactory redisConnectionFactory) throws UnknownHostException {
RedisTemplatetemplate = new RedisTemplate();
template.setConnectionFactory(redisConnectionFactory);
return template;
}
@Bean
@ConditionalOnMissingBean(StringRedisTemplate.class)
public StringRedisTemplate stringRedisTemplate(RedisConnectionFactory
redisConnectionFactory)throws UnknownHostException {
StringRedisTemplate template = new StringRedisTemplate();
template.setConnectionFactory(redisConnectionFactory);
return template;
}
}
}
把类简化一下基本上就可以看出这就是一个Spring的注解版的配置
@ConditionalOnClass({ JedisConnection.class, RedisOperations.class, Jedis.class })
这个注解的意思是:当存在JedisConnection.class, RedisOperations.class, Jedis.class三个类时才解析RedisAutoConfiguration配置类,否则不解析这一个配置类
@ConditionalOnMissingBean(name = “redisTemplate”)
这个注解的意思是如果容器中不存在name指定的bean则创建bean注入,否则不执行 内部代码可以看出里面又定义了两个带@Configuration注解的配置类,这两个配置类会向SpringIOC容器注入可能3个bean:
首先当类路径下存在(GenericObjectPool.class)时则注入JedisConnectionFactory 的实例如果Spring容器中不存在name = “redisTemplate”的实体,则创建RedisTemplate和StringRedisTemplate实例注入容器,这样在Spring的项目中,就可以用在任意的Spring管理的bean中注册用RedisTemplate和StringRedisTemplate的实例来对redis进入操作了。
通过以上分析的过程我们可以发现只要一个基于SpringBoot项目的类路径下存在JedisConnection.class, RedisOperations.class, Jedis.class就可以触发自动化配置,意思说我们只要在maven的项目中依赖了spring-data-redis-1.7.2.RELEASE.jar和jedis-2.8.2.jar就可以触发自动配置,但这样不是每集成一个功能都要去分析里其自动化配置类,那就代不到开箱即用的效果了。所以Spring-boot为我提供了统一的starter可以直接配置好相关触发自动配置的所有的类的依赖集如redis的start如下:
spring-boot-starter-data-redis
然后我们点击artifactId可以发现,spring-boot-starter-data-redis的源码中pom.xml文件中所有依赖:
spring-boot-starter
spring-data-redis
redis.clientsjedis
因为maven依赖的传递性,我们只要依赖starter就可以看在类路径下配置好所有的触发自动配置的所有类,实现开箱即用的功能。通过这个对springboot自动配置原理的理解,我们甚至可以自己制作自己专有的starter也不是很困难的,只需要扩展一个spring.factories,然后在配置一个自己拥有的config类包含我们需要触发的规则就可以了。


 1815
1815

 被折叠的 条评论
为什么被折叠?
被折叠的 条评论
为什么被折叠?
 到【灌水乐园】发言


