


 该文章介绍了一个在前后端分离项目中使用Redis和Jedis来生成及验证随机验证码的实现。通过Java编写工具类生成随机图片并存储到Redis中,然后在控制器中处理HTTP请求,提供验证码图片并校验输入的验证码。同时,文章提到了使用uni-app进行前端UI展示并与后端接口交互。
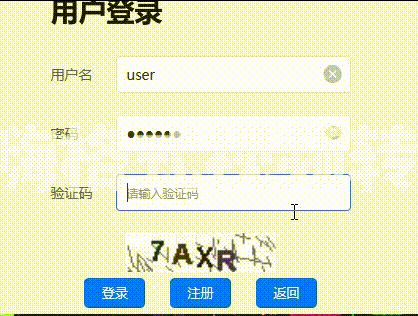
效果图
因为session更多用于前后端一体项目(主要要考虑同步异步的事),我这使用的前后端分离项目,所以本次就使用到了redis,
老规矩用人家的 就要导人家的依赖(我权当默认SpringBoot依赖什么的你们导入过了)
pom.xml导入依赖
<dependency>
            <groupId>redis.clients</groupId>
            <artifactId>jedis</artifactId>
            <version>2.9.0</version>
</dependency>
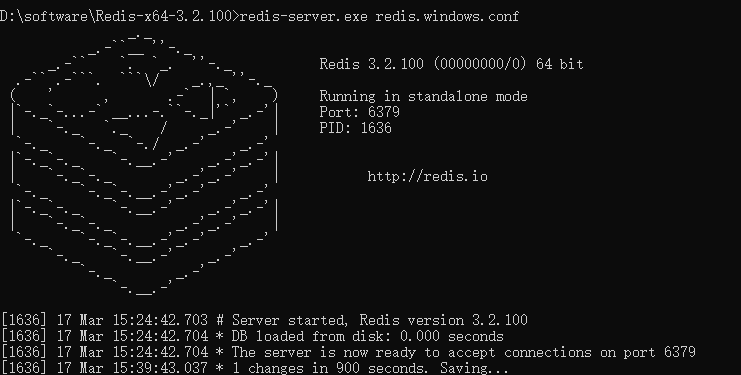
启动redis
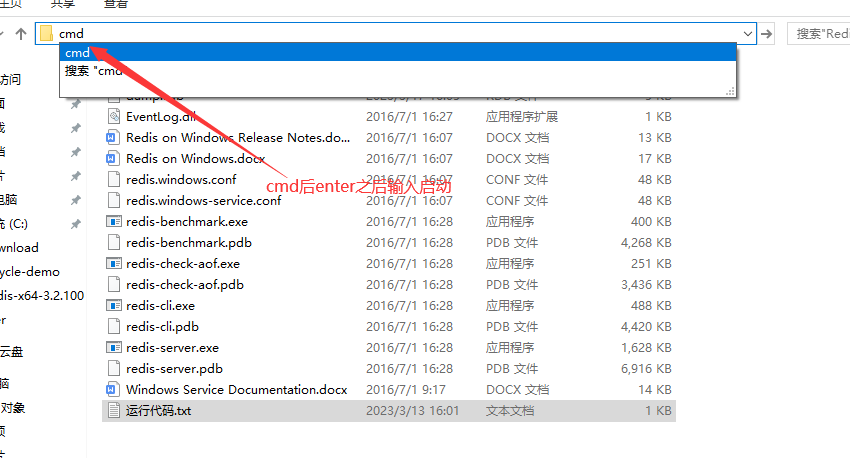
redis-server.exe redis.windows.conf
写入工具类
RandomValidateCodeUtil.java
package com.lps.utils;

/**
 * @author 阿水
 * @create 2023-03-17 10:41
 */


import org.slf4j.Logger;
import org.slf4j.LoggerFactory;
import redis.clients.jedis.Jedis;

import javax.imageio.ImageIO;
import javax.servlet.http.HttpServletRequest;
import javax.servlet.http.HttpServletResponse;
import javax.servlet.http.HttpSession;
import java.awt.*;
import java.awt.image.BufferedImage;
import java.util.Random;

public class RandomValidateCodeUtil {


    public static final String RANDOMCODEKEY = "RANDOMVALIDATECODEKEY";//放到session中的key
    private static final Logger logger = LoggerFactory.getLogger(RandomValidateCodeUtil.class);

    // private String randString = "0123456789";//随机产生只有数字的字符串 private String
    //private String randString = "ABCDEFGHIJKLMNOPQRSTUVWXYZ";//随机产生只有字母的字符串
    private String randString = "0123456789ABCDEFGHIJKLMNOPQRSTUVWXYZ";//随机产生数字与字母组合的字符串

    private int width = 95;// 图片宽
    private int height = 25;// 图片高
    private int lineSize = 40;// 干扰线数量
    private int stringNum = 4;// 随机产生字符数量
    private Random random = new Random();

    /**
     * 获得字体
     */
    private Font getFont() {
        return new Font("Fixedsys", Font.CENTER_BASELINE, 18);
    }

    /**
     * 获得颜色
     */
    private Color getRandColor(int fc, int bc) {
        if (fc > 255)
            fc = 255;
        if (bc > 255)
            bc = 255;
        int r = fc + random.nextInt(bc - fc - 16);
        int g = fc + random.nextInt(bc - fc - 14);
        int b = fc + random.nextInt(bc - fc - 18);
        return new Color(r, g, b);
    }

    /**
     * 生成随机图片
     */
    public void getRandomCode(HttpServletRequest request, HttpServletResponse response) {
        System.out.println("开始随机生成图片。。。。。。。。");

        HttpSession session = request.getSession();

        // BufferedImage类是具有缓冲区的Image类,Image类是用于描述图像信息的类
        BufferedImage image = new BufferedImage(width, height, BufferedImage.TYPE_INT_BGR);

        // 产生Image对象的Graphics对象,改对象可以在图像上进行各种绘制操作
        Graphics g = image.getGraphics();

        g.fillRect(0, 0, width, height);//图片大小

        g.setFont(new Font("Times New Roman", Font.ROMAN_BASELINE, 18));//字体大小

        g.setColor(getRandColor(110, 133));//字体颜色

        // 绘制干扰线
        for (int i = 0; i <= lineSize; i++) {
            drawLine(g);
        }

        // 绘制随机字符
        String randomString = "";

        for (int i = 1; i <= stringNum; i++) {
            randomString = drawString(g, randomString, i);
        }

        // logger.info(randomString);

        Jedis jedis = new Jedis("127.0.0.1", 6379); //ip和端口号
        jedis.set("RANDOMCODEKEY", randomString); //存入数据key=name;value=HelloWorld
        String value = jedis.get("RANDOMCODEKEY"); //获取key=name的值
        System.out.println("生成的数据value: " + value);


        //将生成的随机字符串保存到session中
        //session.removeAttribute(RANDOMCODEKEY);
        //session.setAttribute(RANDOMCODEKEY, randomString);
        g.dispose();

        try {
            // 将内存中的图片通过流动形式输出到客户端
            ImageIO.write(image, "JPEG", response.getOutputStream());
        } catch (Exception e) {
            logger.error("将内存中的图片通过流动形式输出到客户端失败>>>>   ", e);
        }
        System.out.println("随机生成图片完成!!");

    }

    /**
     * 绘制字符串
     */
    private String drawString(Graphics g, String randomString, int i) {
        g.setFont(getFont());
        g.setColor(new Color(random.nextInt(101), random.nextInt(111), random
                .nextInt(121)));
        String rand = String.valueOf(getRandomString(random.nextInt(randString
                .length())));
        randomString += rand;
        g.translate(random.nextInt(3), random.nextInt(3));
        g.drawString(rand, 13 * i, 16);
        return randomString;
    }

    /**
     * 绘制干扰线
     */
    private void drawLine(Graphics g) {

        int x = random.nextInt(width);
        int y = random.nextInt(height);

        int xl = random.nextInt(13);
        int yl = random.nextInt(15);

        g.drawLine(x, y, x + xl, y + yl);

    }

    /**
     * 获取随机的字符
     */
    public String getRandomString(int num) {
        return String.valueOf(randString.charAt(num));
    }
}
控制层
PicVerifyAction.java
package com.lps.controller;

/**
 * @author 阿水
 * @create 2023-03-17 10:40
 */


import com.lps.utils.RandomValidateCodeUtil;
import org.slf4j.Logger;
import org.slf4j.LoggerFactory;
import org.springframework.web.bind.annotation.*;
import redis.clients.jedis.Jedis;

import javax.servlet.http.HttpServletRequest;
import javax.servlet.http.HttpServletResponse;
import javax.servlet.http.HttpSession;

@RestController
@RequestMapping("/login")
@CrossOrigin(origins = "*")
public class PicVerifyAction {
    private final static Logger logger = LoggerFactory.getLogger(PicVerifyAction.class);

    /**
     * 生成验证码
     */
    @RequestMapping(value = "/getVerify")
    public void getVerify(HttpServletRequest request, HttpServletResponse response) {

        try {

            //设置相应类型,告诉浏览器输出的内容为图片
            response.setContentType("image/jpeg");

            //设置响应头信息,告诉浏览器不要缓存此内容
            response.setHeader("Pragma", "No-cache");
            response.setHeader("Cache-Control", "no-cache");
            response.setDateHeader("Expire", 0);

            RandomValidateCodeUtil randomValidateCode = new RandomValidateCodeUtil();

            randomValidateCode.getRandomCode(request, response);//输出验证码图片方法

        } catch (Exception e) {

            logger.error("获取验证码失败>>>>   ", e);

        }

    }

    /**
     * 校验验证码
     */
    @RequestMapping(value = "/checkVerify", method = RequestMethod.GET, headers = "Accept=application/json")
    public boolean checkVerify(String vaibleStr, HttpSession session) {
        try {
            //@RequestParam

            //从session中获取随机数
            //String inputStr = verifyInput;
            String inputStr = vaibleStr;


            //String randomNum = (String) session.getAttribute("RANDOMVALIDATECODEKEY");
            Jedis jedis = new Jedis("127.0.0.1", 6379); //ip和端口号

            String randomNum = jedis.get("RANDOMCODEKEY"); //获取key=name的值
            jedis.close(); //关闭Jedis

            if (randomNum == null || "".equals(randomNum) || !randomNum.equalsIgnoreCase(inputStr)) {
                System.out.println("接受的随机数"+inputStr);
                System.out.println("生成的随机数"+randomNum);
                System.out.println("得得得得");
                return false;
            } else {
                System.out.println("验证码正确!!!!!!!!!!!!!!!!!!!!!!!");
                return true;
            }

        } catch (Exception e) {
            logger.error("验证码校验失败", e);
            System.out.println("哈哈哈哈哈哈哈哈");
            return false;
        }
    }

}
后台搞定完成 我们用postman测试一下(我自己修改了我tomcat启动端口为8070)
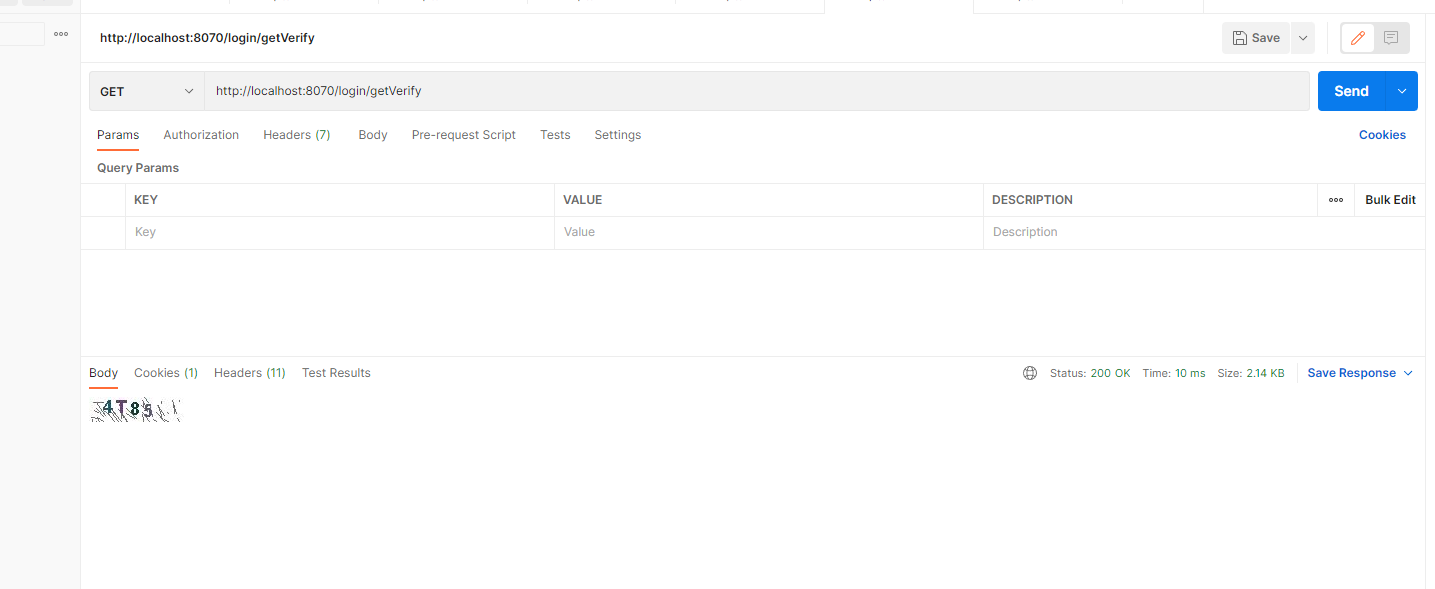
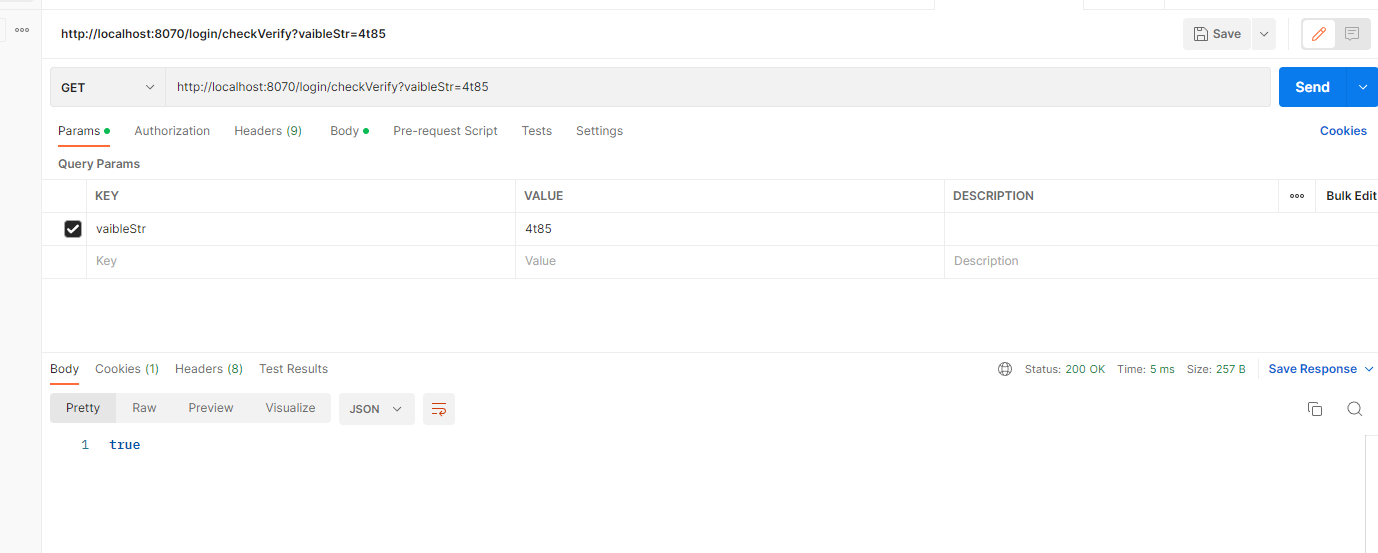
很好测试通过!
接下来是uni-app对接上就好啦
<template>
    <view>

        <image class="bg-img" src="../../static/bannerlist2.jpg"></image>
        <view class="content"></view>

        <uni-forms ref="form" :model="formData" :rules="rules"
            style="width: 600rpx; margin-top: 500rpx; margin-left: auto;margin-right: auto; ">

            <uni-forms-item >
                <h1>用户登录</h1>
            </uni-forms-item>
            <uni-forms-item label="用户名" name="userName">
                <uni-easyinput v-model="formData.userName" placeholder="请输入账号" style="background: transparent;"></uni-easyinput>
            </uni-forms-item>
            <uni-forms-item label="密码" name="passwd">
                <uni-easyinput v-model="formData.passwd" type="password" placeholder="请输入密码"></uni-easyinput>
            </uni-forms-item>

            <uni-forms-item label="验证码" name="Verification" >
                <uni-easyinput v-model="formData.Verification" type="text" placeholder="请输入验证码"></uni-easyinput>

            </uni-forms-item>
            <view style="text-align: center;">

                <image :src="picture+'?id='+this.varId" style="width: 300rpx;" mode="widthFix" @click="doFlush" ></image>
            </view>


            <uni-forms-item style="text-align: center;">
                <button type="primary" size="mini" @click="doLogin">登录</button>
                <button type="primary" size="mini" @click="doRegister" style="margin-left: 50rpx;">注册</button>
                <button type="primary" size="mini" @click="goBack" style="margin-left: 50rpx;">返回</button>
            </uni-forms-item>


        </uni-forms>


        <!-- 提示框 -->
        <uni-popup ref="popup" type="dialog">
            <uni-popup-dialog mode="base" title="通知" :content="msg" :duration="2000" :before-close="true" @close="close"
                @confirm="confirm">
            </uni-popup-dialog>
        </uni-popup>


    </view>
</template>

<script>
    export default {
        data() {
            return {
                varId:1,
                picture: "http://localhost:8070/login/getVerify",
                msg: null,
                show:true,
                formData: {
                    userName: null,
                    passwd: null,
                    Verification:null,
                },

                rules: {
                    userName: {
                        rules: [{
                            required: true,
                            errorMessage: '请输入用户名',
                        }, ]
                    },
                    passwd: {
                        rules: [{
                            required: true,
                            errorMessage: '请输入密码',
                        }, ]
                    },
                    Verification: {
                        rules: [{
                            required: true,
                            errorMessage: '请输入验证码',
                        }, ]
                    },
                }

            }
        },
        methods: {

            doFlush(){
                this.varId=this.varId+1
                console.log(this.varId)

            },
            doRegister(){
                uni.redirectTo({
                    url: '/pages/login/add_user'
                })
            },
            goBack() {
                uni.redirectTo({
                    url: '/pages/login/TotalLogin'
                })
            },
            doLogin() {


                //进行表单校验
                this.$refs.form.validate().then(res => {
                    uni.request({
                        url:'http://localhost:8070/login/checkVerify?vaibleStr='+this.formData.Verification,
                        method: 'GET',
                        success: (res) => {
                            console.log("res.data为"+res.data)
                            console.log(res.data);
                            if(res.data==true){
                                uni.request({
                                    url: "http://localhost:8070/user/login",
                                    method: 'POST',
                                    data: {
                                        username: this.formData.userName,
                                        passwd: this.formData.passwd
                                    },
                                    success: (res) => {
                                        console.log(res.data);
                                        if (res.data.code == 200) {
                                            uni.setStorageSync('user_info', res.data.data); //将用户信息保存到本地
                                            //跳转到主页
                                            uni.redirectTo({
                                                url: "/pages/user/homepage",

                                            })
                                        } else {
                                            this.msg = res.data.msg
                                            this.open()
                                        }

                                    }
                                })
                            }else{
                                alert("验证码有错")
                            }

                        }
                    })


                }).catch(err => {
                    console.log('表单错误信息:', err);
                })

            },


            open() {
                this.$refs.popup.open()
            },
            /**
             * 点击取消按钮触发
             */
            close() {
                this.$refs.popup.close()
            },
            /**
             * 点击确认按钮触发
             */
            confirm(value) {
                this.$refs.popup.close()
            },

        }
    }
</script>

<style>
    .bg-img {
        position: fixed;
        width: 100%;
        height: 100%;
        top: 0;
        left: 0;
        z-index: -1;
    }
</style>


 1230
1230

 被折叠的 条评论
为什么被折叠?
被折叠的 条评论
为什么被折叠?
 到【灌水乐园】发言


