


课程链接:黑马程序员Netty全套教程, netty深入浅出Java网络编程教程_哔哩哔哩_bilibili
一、NIO基础
1. 三大组件
1.1 Channel & Buffer
(1)Channel
channel有一点类似于stream,是读写数据的双向通道,可以从channel将数据读入buffer,也可以将buffer的数据写入channel,而之前的stream要么是输入,要么是输出,channel比stream更为底层。

常见的Channel:
- FileChannel:文件的数据传输通道
- DatagramChannel:UDP网络编程时的数据传输通道
- SocketChannel:TCP数据传输通道,客户端和服务器端都能用
- ServerSocketChannel:TCP数据传输通道,专用于服务器
(2)Buffer
buffer则用来缓冲读写数据,常见的buffer有:
- ByteBuffer
- MappedByteBuffer
- DirectByteBuffer
- HeapByteBuffer
- ShortBuffer
- IntBuffer
- LongBuffer
- FloatBuffer
- DoubleBuffer
- CharBuffer
1.2 Selector
selector单从字面意思不好理解,需要结合服务器的设计演化来理解它的用途。
(1)多线程版设计

多线程版缺点:
- 内存占用高(每个线程需要占用一定的内存)
- 线程上下文切换成本高
- 只适合连接数少的场景
(2)线程池版设计
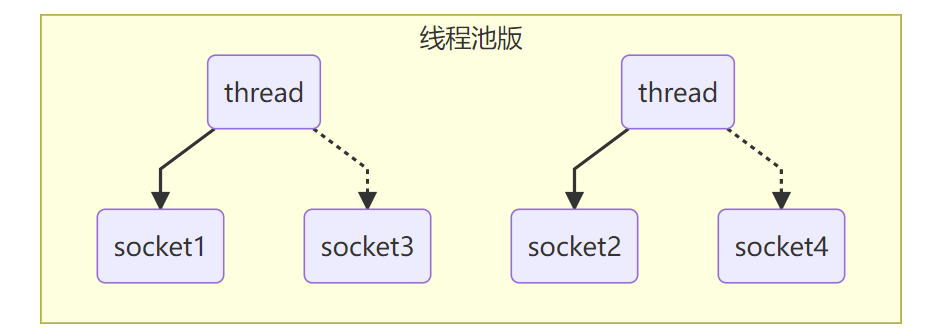
线程池版缺点:
- 阻塞模式下,线程仅能处理一个socket连接
- 仅适合短连接场景
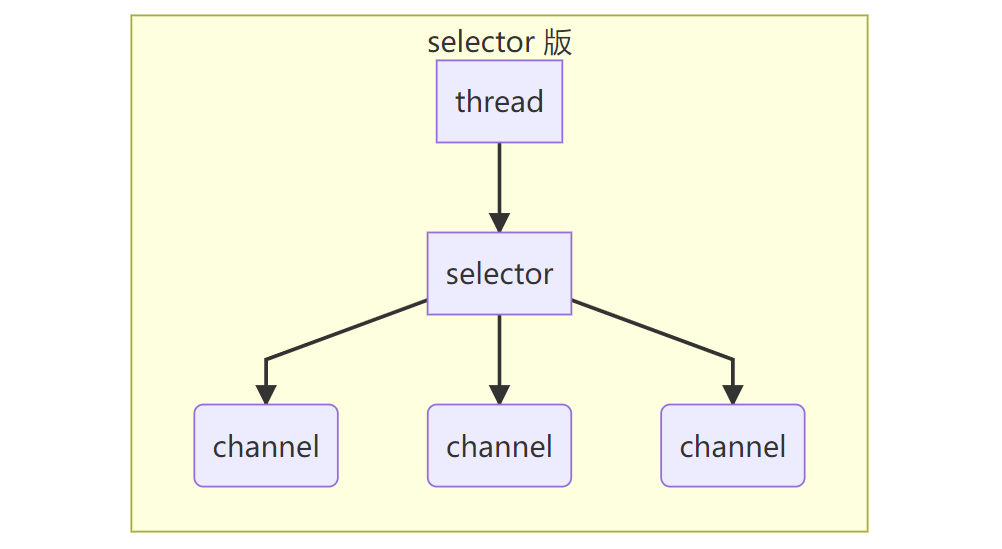
(3)selector版设计
selector的作用就是配合一个线程来管理多个channel,获取这些channel上发生的事件,这些channel工作在非阻塞模式下,不会让线程吊死在一个channel上。适合连接数特别多,但流量低的场景(low traffic)。
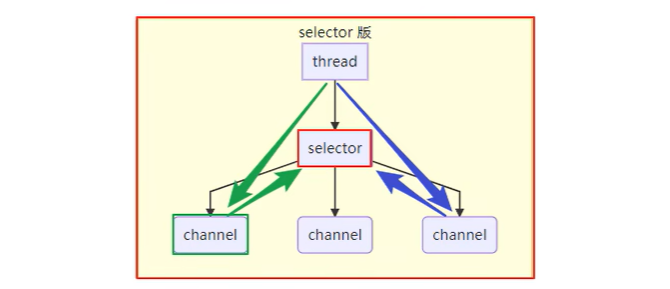
调用selector的select()会阻塞直到channel发生了读写就绪事件,这些事件发生,select方法就会返回这些事件交给thread来处理。
2. ByteBuffer
2.1 ByteBuffer正确使用姿势
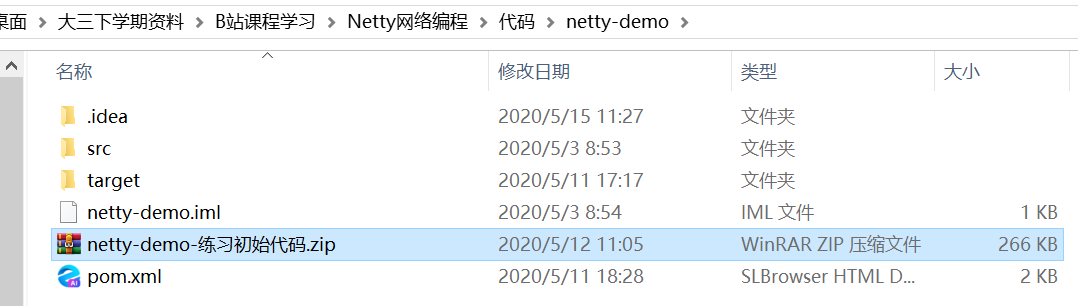
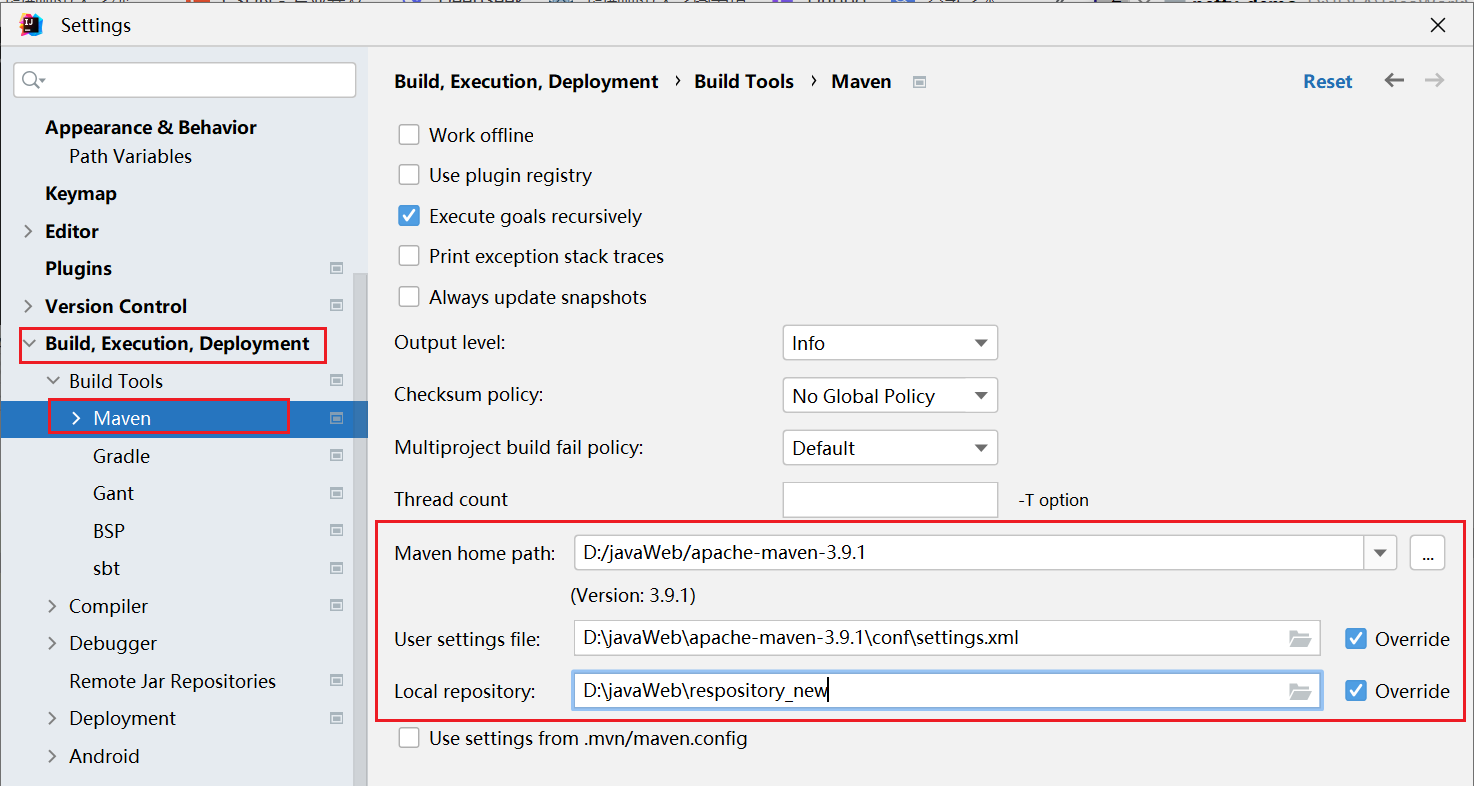
①打开资料中提供的netty-demo初始代码,修改maven配置
②新建一个文本文件data.txt,内容如下
1234567890abc③在test包下新增TestByteBuffer类
package cn.itcast.netty.c1;

import lombok.extern.slf4j.Slf4j;

import java.io.FileInputStream;
import java.io.IOException;
import java.nio.ByteBuffer;
import java.nio.channels.FileChannel;

@Slf4j
public class TestByteBuffer {

    public static void main(String[] args) {
        // FileChannel
        // 1. 输入输出流
        // 2. RandomAccessFile
        try (FileChannel channel = new FileInputStream("data.txt").getChannel()) {
            // 准备缓冲区
            ByteBuffer buffer = ByteBuffer.allocate(10);  // 10个字节
            while (true) {
                // 从channel读取数据,向buffer写入
                int len = channel.read(buffer);  // 读到的实际字节数
                log.debug("读取到的字节数: {}", len);
                if (len == -1) {  // 如果为-1表示已经读到文件末尾
                    break;
                }
                // 打印buffer的内容
                buffer.flip();  // 切换到buffer的读模式
                while (buffer.hasRemaining()) {  // 是否还有剩余未读数据
                    byte b = buffer.get();  // 一次读一个字节
                    log.debug("实际字节: {}", (char) b);
                }

                // buffer切换为写模式
                buffer.clear();
//                buffer.compact();
            }
        } catch (IOException e) {
            throw new RuntimeException(e);
        }
    }
}
④ctrl + shift + f10运行,输出如下
21:10:16 [DEBUG] [main] c.i.n.c.TestByteBuffer - 读取到的字节数: 10
21:10:16 [DEBUG] [main] c.i.n.c.TestByteBuffer - 实际字节: 1
21:10:16 [DEBUG] [main] c.i.n.c.TestByteBuffer - 实际字节: 2
21:10:16 [DEBUG] [main] c.i.n.c.TestByteBuffer - 实际字节: 3
21:10:16 [DEBUG] [main] c.i.n.c.TestByteBuffer - 实际字节: 4
21:10:16 [DEBUG] [main] c.i.n.c.TestByteBuffer - 实际字节: 5
21:10:16 [DEBUG] [main] c.i.n.c.TestByteBuffer - 实际字节: 6
21:10:16 [DEBUG] [main] c.i.n.c.TestByteBuffer - 实际字节: 7
21:10:16 [DEBUG] [main] c.i.n.c.TestByteBuffer - 实际字节: 8
21:10:16 [DEBUG] [main] c.i.n.c.TestByteBuffer - 实际字节: 9
21:10:16 [DEBUG] [main] c.i.n.c.TestByteBuffer - 实际字节: 0
21:10:16 [DEBUG] [main] c.i.n.c.TestByteBuffer - 读取到的字节数: 3
21:10:16 [DEBUG] [main] c.i.n.c.TestByteBuffer - 实际字节: a
21:10:16 [DEBUG] [main] c.i.n.c.TestByteBuffer - 实际字节: b
21:10:16 [DEBUG] [main] c.i.n.c.TestByteBuffer - 实际字节: c
21:10:16 [DEBUG] [main] c.i.n.c.TestByteBuffer - 读取到的字节数: -1Process finished with exit code 0
步骤:
- 向buffer写入数据,例如调用channel.read(buffer);
- 调用flip()切换至读模式;
- 从buffer读取数据,例如调用buffer.get();
- 调用clear()或compact()切换至写模式;
- 重复1~4步骤
2.2 ByteBuffer结构
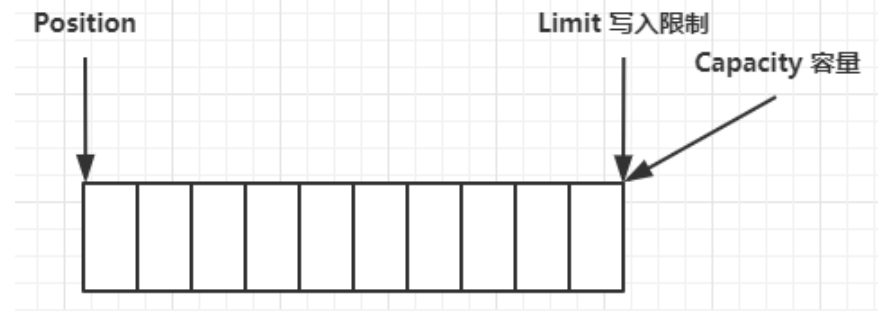
ByteBuffer有以下重要属性:
- capacity
- position
- limit
一开始时:
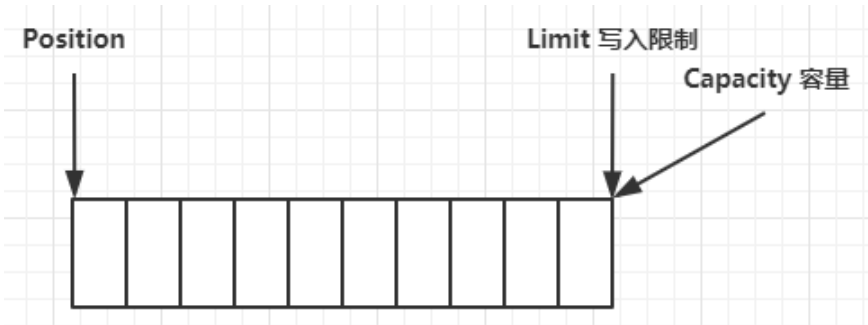
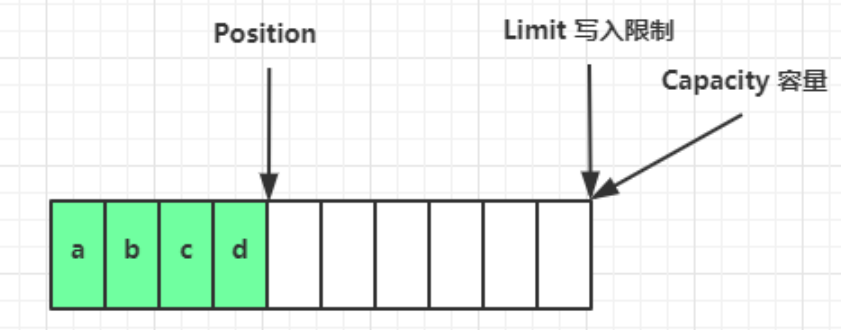
写模式下,position是写入位置,limit等于capacity,下图表示写入了4个字节后的状态:
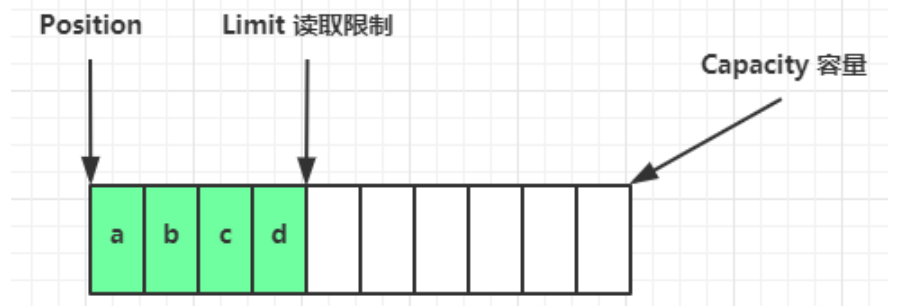
flip动作发生后,position切换为读取位置,limit切换为读取限制:
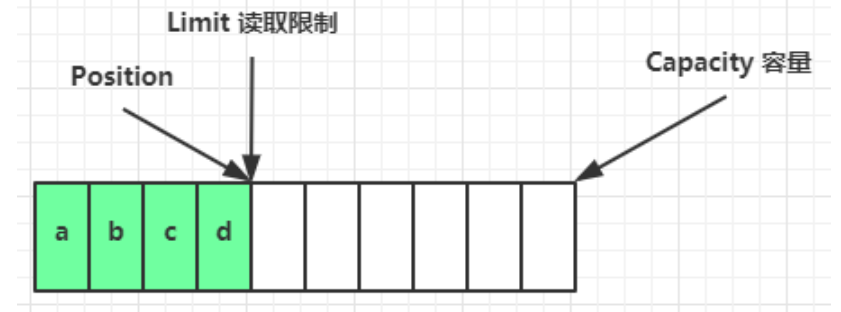
读取4个字节后,状态如下图:
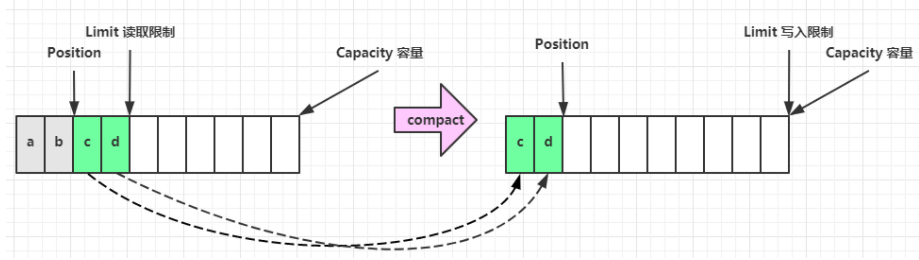
clear动作发生后,状态如下图:
其中compact方法,是把未读完的部分向前压缩,然后切换至写模式:
步骤①:新增调试工具类ByteBufferUtil,代码如下:
package cn.itcast.netty.c1;

import io.netty.util.internal.StringUtil;

import java.nio.ByteBuffer;

import static io.netty.util.internal.MathUtil.isOutOfBounds;
import static io.netty.util.internal.StringUtil.NEWLINE;

public class ByteBufferUtil {
    private static final char[] BYTE2CHAR = new char[256];
    private static final char[] HEXDUMP_TABLE = new char[256 * 4];
    private static final String[] HEXPADDING = new String[16];
    private static final String[] HEXDUMP_ROWPREFIXES = new String[65536 >>> 4];
    private static final String[] BYTE2HEX = new String[256];
    private static final String[] BYTEPADDING = new String[16];

    static {
        final char[] DIGITS = "0123456789abcdef".toCharArray();
        for (int i = 0; i < 256; i++) {
            HEXDUMP_TABLE[i << 1] = DIGITS[i >>> 4 & 0x0F];
            HEXDUMP_TABLE[(i << 1) + 1] = DIGITS[i & 0x0F];
        }

        int i;

        // Generate the lookup table for hex dump paddings
        for (i = 0; i < HEXPADDING.length; i++) {
            int padding = HEXPADDING.length - i;
            StringBuilder buf = new StringBuilder(padding * 3);
            for (int j = 0; j < padding; j++) {
                buf.append("   ");
            }
            HEXPADDING[i] = buf.toString();
        }

        // Generate the lookup table for the start-offset header in each row (up to 64KiB).
        for (i = 0; i < HEXDUMP_ROWPREFIXES.length; i++) {
            StringBuilder buf = new StringBuilder(12);
            buf.append(NEWLINE);
            buf.append(Long.toHexString(i << 4 & 0xFFFFFFFFL | 0x100000000L));
            buf.setCharAt(buf.length() - 9, '|');
            buf.append('|');
            HEXDUMP_ROWPREFIXES[i] = buf.toString();
        }

        // Generate the lookup table for byte-to-hex-dump conversion
        for (i = 0; i < BYTE2HEX.length; i++) {
            BYTE2HEX[i] = ' ' + StringUtil.byteToHexStringPadded(i);
        }

        // Generate the lookup table for byte dump paddings
        for (i = 0; i < BYTEPADDING.length; i++) {
            int padding = BYTEPADDING.length - i;
            StringBuilder buf = new StringBuilder(padding);
            for (int j = 0; j < padding; j++) {
                buf.append(' ');
            }
            BYTEPADDING[i] = buf.toString();
        }

        // Generate the lookup table for byte-to-char conversion
        for (i = 0; i < BYTE2CHAR.length; i++) {
            if (i <= 0x1f || i >= 0x7f) {
                BYTE2CHAR[i] = '.';
            } else {
                BYTE2CHAR[i] = (char) i;
            }
        }
    }

    /**
     * 打印所有内容
     * @param buffer
     */
    public static void debugAll(ByteBuffer buffer) {
        int oldlimit = buffer.limit();
        buffer.limit(buffer.capacity());
        StringBuilder origin = new StringBuilder(256);
        appendPrettyHexDump(origin, buffer, 0, buffer.capacity());
        System.out.println("+--------+-------------------- all ------------------------+----------------+");
        System.out.printf("position: [%d], limit: [%d]\n", buffer.position(), oldlimit);
        System.out.println(origin);
        buffer.limit(oldlimit);
    }

    /**
     * 打印可读取内容
     * @param buffer
     */
    public static void debugRead(ByteBuffer buffer) {
        StringBuilder builder = new StringBuilder(256);
        appendPrettyHexDump(builder, buffer, buffer.position(), buffer.limit() - buffer.position());
        System.out.println("+--------+-------------------- read -----------------------+----------------+");
        System.out.printf("position: [%d], limit: [%d]\n", buffer.position(), buffer.limit());
        System.out.println(builder);
    }

    private static void appendPrettyHexDump(StringBuilder dump, ByteBuffer buf, int offset, int length) {
        if (isOutOfBounds(offset, length, buf.capacity())) {
            throw new IndexOutOfBoundsException(
                    "expected: " + "0 <= offset(" + offset + ") <= offset + length(" + length
                            + ") <= " + "buf.capacity(" + buf.capacity() + ')');
        }
        if (length == 0) {
            return;
        }
        dump.append(
                "         +-------------------------------------------------+" +
                        NEWLINE + "         |  0  1  2  3  4  5  6  7  8  9  a  b  c  d  e  f |" +
                        NEWLINE + "+--------+-------------------------------------------------+----------------+");

        final int startIndex = offset;
        final int fullRows = length >>> 4;
        final int remainder = length & 0xF;

        // Dump the rows which have 16 bytes.
        for (int row = 0; row < fullRows; row++) {
            int rowStartIndex = (row << 4) + startIndex;

            // Per-row prefix.
            appendHexDumpRowPrefix(dump, row, rowStartIndex);

            // Hex dump
            int rowEndIndex = rowStartIndex + 16;
            for (int j = rowStartIndex; j < rowEndIndex; j++) {
                dump.append(BYTE2HEX[getUnsignedByte(buf, j)]);
            }
            dump.append(" |");

            // ASCII dump
            for (int j = rowStartIndex; j < rowEndIndex; j++) {
                dump.append(BYTE2CHAR[getUnsignedByte(buf, j)]);
            }
            dump.append('|');
        }

        // Dump the last row which has less than 16 bytes.
        if (remainder != 0) {
            int rowStartIndex = (fullRows << 4) + startIndex;
            appendHexDumpRowPrefix(dump, fullRows, rowStartIndex);

            // Hex dump
            int rowEndIndex = rowStartIndex + remainder;
            for (int j = rowStartIndex; j < rowEndIndex; j++) {
                dump.append(BYTE2HEX[getUnsignedByte(buf, j)]);
            }
            dump.append(HEXPADDING[remainder]);
            dump.append(" |");

            // Ascii dump
            for (int j = rowStartIndex; j < rowEndIndex; j++) {
                dump.append(BYTE2CHAR[getUnsignedByte(buf, j)]);
            }
            dump.append(BYTEPADDING[remainder]);
            dump.append('|');
        }

        dump.append(NEWLINE +
                "+--------+-------------------------------------------------+----------------+");
    }

    private static void appendHexDumpRowPrefix(StringBuilder dump, int row, int rowStartIndex) {
        if (row < HEXDUMP_ROWPREFIXES.length) {
            dump.append(HEXDUMP_ROWPREFIXES[row]);
        } else {
            dump.append(NEWLINE);
            dump.append(Long.toHexString(rowStartIndex & 0xFFFFFFFFL | 0x100000000L));
            dump.setCharAt(dump.length() - 9, '|');
            dump.append('|');
        }
    }

    public static short getUnsignedByte(ByteBuffer buffer, int index) {
        return (short) (buffer.get(index) & 0xFF);
    }
}
②新增TestByteBufferReadWrite类
package cn.itcast.netty.c1;

import java.nio.ByteBuffer;

import static cn.itcast.netty.c1.ByteBufferUtil.debugAll;

public class TestByteBufferReadWrite {

    public static void main(String[] args) {
        ByteBuffer buffer = ByteBuffer.allocate(10);

        // 写入
        buffer.put((byte) 0x61); // 'a'
        debugAll(buffer);
        buffer.put(new byte[]{0x62, 0x63, 0x64});  // b c d
        debugAll(buffer);

        // 读取
        buffer.flip();  // 切换到读模式
        System.out.println(buffer.get());
        debugAll(buffer);

        buffer.compact();  // 切换到写模式
        debugAll(buffer);

        buffer.put(new byte[]{0x65, 0x66, 0x67});  // e f g
        debugAll(buffer);
    }
}
③输出
+--------+-------------------- all ------------------------+----------------+
position: [1], limit: [10]
+-------------------------------------------------+
| 0 1 2 3 4 5 6 7 8 9 a b c d e f |
+--------+-------------------------------------------------+----------------+
|00000000| 61 00 00 00 00 00 00 00 00 00 |a......... |
+--------+-------------------------------------------------+----------------+
+--------+-------------------- all ------------------------+----------------+
position: [4], limit: [10]
+-------------------------------------------------+
| 0 1 2 3 4 5 6 7 8 9 a b c d e f |
+--------+-------------------------------------------------+----------------+
|00000000| 61 62 63 64 00 00 00 00 00 00 |abcd...... |
+--------+-------------------------------------------------+----------------+
97
+--------+-------------------- all ------------------------+----------------+
position: [1], limit: [4]
+-------------------------------------------------+
| 0 1 2 3 4 5 6 7 8 9 a b c d e f |
+--------+-------------------------------------------------+----------------+
|00000000| 61 62 63 64 00 00 00 00 00 00 |abcd...... |
+--------+-------------------------------------------------+----------------+
+--------+-------------------- all ------------------------+----------------+
position: [3], limit: [10]
+-------------------------------------------------+
| 0 1 2 3 4 5 6 7 8 9 a b c d e f |
+--------+-------------------------------------------------+----------------+
|00000000| 62 63 64 64 00 00 00 00 00 00 |bcdd...... |
+--------+-------------------------------------------------+----------------+
+--------+-------------------- all ------------------------+----------------+
position: [6], limit: [10]
+-------------------------------------------------+
| 0 1 2 3 4 5 6 7 8 9 a b c d e f |
+--------+-------------------------------------------------+----------------+
|00000000| 62 63 64 65 66 67 00 00 00 00 |bcdefg.... |
+--------+-------------------------------------------------+----------------+
2.3 ByteBuffer常见方法
(1)分配空间
可以使用allocate方法为ByteBuffer分配空间,其它buffer类也有该方法
package cn.itcast.netty.c1;

import java.nio.ByteBuffer;

public class TestByteBufferAllocate {
    public static void main(String[] args) {
        System.out.println(ByteBuffer.allocate(16).getClass());
        System.out.println(ByteBuffer.allocateDirect(16).getClass());

        /*
        class java.nio.HeapByteBuffer - java堆内存,读写效率较低,受到垃圾回收GC的影响
        class java.nio.DirectByteBuffer - 直接内存,读写效率高(少一次数据拷贝),不会受到GC影响,但分配的效率低
         */
    }
}
(2)向buffer写入数据
有两种方法:
- 调用channel的read方法
int readBytes = channel.read(buf);- 调用buffer自己的put方法
buf.put((byte)127);(3)从buffer读取数据
有两种方法:
- 调用channel的write方法
int writeBytes = channel.write(buf);- 调用buffer自己的get方法
byte b = buf.get();get方法会让position读指针向后走,如果想重复读取数据:
- 可以调用rewind方法将position重置为0;
- 或者调用get(int i)方法获取索引i的内容,它不会移动读指针。
(4)mark 和 reset
mark是在读取时,做一个标记,即使position改变,只要调用reset就能回到mark的位置。
注意:rewind和flip都会清除mark的位置。
示例代码:
package cn.itcast.netty.c1;

import java.nio.ByteBuffer;

import static cn.itcast.netty.c1.ByteBufferUtil.debugAll;

public class TestByteBufferRead {
    public static void main(String[] args) {
        ByteBuffer buffer = ByteBuffer.allocate(10);
        buffer.put(new byte[]{'a', 'b', 'c', 'd'});
        buffer.flip();

        // 从头开始读
        /*
        buffer.get(new byte[4]);  // a b c d
        debugAll(buffer);
        buffer.rewind();
        System.out.println((char) buffer.get());  // a
        */

        // mark & reset
        // mark做一个标记,记录position位置;reset是将position重置到mark的位置
        /*
        System.out.println((char) buffer.get());  // a
        System.out.println((char) buffer.get());  // b
        buffer.mark();  // 加标记,索引2的位置
        System.out.println((char) buffer.get());  // c
        System.out.println((char) buffer.get());  // d

        buffer.reset();  // 将position重置到索引2
        System.out.println((char) buffer.get()); // c
        System.out.println((char) buffer.get());  // d
        */

        // get(i) 不会改变读索引的位置
        System.out.println((char) buffer.get(3));  // d
        debugAll(buffer);
    }
}
(5)字符串与ByteBuffer互转
package cn.itcast.netty.c1;

import java.nio.ByteBuffer;
import java.nio.charset.Charset;
import java.nio.charset.StandardCharsets;

import static cn.itcast.netty.c1.ByteBufferUtil.debugAll;

public class TestByteBufferString {
    public static void main(String[] args) {
        // 1. 字符串转为ByteBuffer
        ByteBuffer buffer = ByteBuffer.allocate(16);  // 写模式
        buffer.put("hello".getBytes());
        debugAll(buffer);

        // 2. CharSet
        ByteBuffer buffer2 = StandardCharsets.UTF_8.encode("hello");  // 自动切换到读模式
        debugAll(buffer2);

        // 3. wrap
        ByteBuffer buffer3 = ByteBuffer.wrap("hello".getBytes());  // 自动切换到读模式
        debugAll(buffer3);

        // decode 转为字符串
        String str1 = StandardCharsets.UTF_8.decode(buffer2).toString();
        System.out.println(str1);

        buffer.flip();  // 切换到读模式
        String str2 = StandardCharsets.UTF_8.decode(buffer).toString();
        System.out.println(str2);
    }
}
输出
+--------+-------------------- all ------------------------+----------------+
position: [5], limit: [16]
+-------------------------------------------------+
| 0 1 2 3 4 5 6 7 8 9 a b c d e f |
+--------+-------------------------------------------------+----------------+
|00000000| 68 65 6c 6c 6f 00 00 00 00 00 00 00 00 00 00 00 |hello...........|
+--------+-------------------------------------------------+----------------+
+--------+-------------------- all ------------------------+----------------+
position: [0], limit: [5]
+-------------------------------------------------+
| 0 1 2 3 4 5 6 7 8 9 a b c d e f |
+--------+-------------------------------------------------+----------------+
|00000000| 68 65 6c 6c 6f |hello |
+--------+-------------------------------------------------+----------------+
hello
hello
注意:Buffer是非线程安全的。
2.4 Scattering Reads
步骤①:准备一个文本文件words.txt,内容如下
onetwothree②使用如下方式读取,可以将数据填充至多个buffer
package cn.itcast.netty.c1;

import java.io.IOException;
import java.io.RandomAccessFile;
import java.nio.ByteBuffer;
import java.nio.channels.FileChannel;

import static cn.itcast.netty.c1.ByteBufferUtil.debugAll;

public class TestScatteringReads {
    public static void main(String[] args) {
        try (FileChannel channel = new RandomAccessFile("words.txt", "r").getChannel()) {
            // 准备3个ByteBuffer
            ByteBuffer b1 = ByteBuffer.allocate(3);
            ByteBuffer b2 = ByteBuffer.allocate(3);
            ByteBuffer b3 = ByteBuffer.allocate(5);

            // 写入数据到ByteBuffer
            channel.read(new ByteBuffer[]{b1, b2, b3});

            // 切换为读模式
            b1.flip();
            b2.flip();
            b3.flip();
            debugAll(b1);
            debugAll(b2);
            debugAll(b3);
        } catch (IOException e) {
            e.printStackTrace();
        }
    }
}
输出
+--------+-------------------- all ------------------------+----------------+
position: [0], limit: [3]
+-------------------------------------------------+
| 0 1 2 3 4 5 6 7 8 9 a b c d e f |
+--------+-------------------------------------------------+----------------+
|00000000| 6f 6e 65 |one |
+--------+-------------------------------------------------+----------------+
+--------+-------------------- all ------------------------+----------------+
position: [0], limit: [3]
+-------------------------------------------------+
| 0 1 2 3 4 5 6 7 8 9 a b c d e f |
+--------+-------------------------------------------------+----------------+
|00000000| 74 77 6f |two |
+--------+-------------------------------------------------+----------------+
+--------+-------------------- all ------------------------+----------------+
position: [0], limit: [5]
+-------------------------------------------------+
| 0 1 2 3 4 5 6 7 8 9 a b c d e f |
+--------+-------------------------------------------------+----------------+
|00000000| 74 68 72 65 65 |three |
+--------+-------------------------------------------------+----------------+
2.5 Gathering Writes
使用如下方式写入,可以将多个buffer的数据填充至channel
package cn.itcast.netty.c1;

import java.io.IOException;
import java.io.RandomAccessFile;
import java.nio.ByteBuffer;
import java.nio.channels.FileChannel;
import java.nio.charset.StandardCharsets;

public class TestGatheringWrite {

    public static void main(String[] args) {
        // 准备三个ByteBuffer数组
        ByteBuffer b1 = StandardCharsets.UTF_8.encode("hello");
        ByteBuffer b2 = StandardCharsets.UTF_8.encode("world");
        ByteBuffer b3 = StandardCharsets.UTF_8.encode("你好");

        try (FileChannel channel = new RandomAccessFile("words2.txt", "rw").getChannel()) {
            // 集中写入(减少数据在ByteBuffer之间的拷贝,减少数据复制的次数)
            channel.write(new ByteBuffer[]{b1, b2, b3});
        } catch (IOException e) {
            e.printStackTrace();
        }
    }
}
文件内容
helloworld你好
2.6 黏包/半包
黏包和半包是网络编程中常见的数据传输问题,主要发生在基于流的传输协议(如TCP)中。
黏包(Sticky Packet)
定义:发送方发送的多个数据包被接收方当作一个数据包接收,多个包“粘”在一起。
产生原因:
- Nagle算法:TCP协议默认启用Nagle算法,会将多个小数据包合并发送以提高网络效率
- 缓冲区机制:发送方或接收方的缓冲区可能将多个小数据包合并
- 网络传输:底层网络协议可能将多个数据包合并传输
示例:
发送方发送: "Hello\n" + "World\n"
接收方收到: "Hello\nWorld\n" (两个包粘在一起)
半包(Partial Packet)
定义:一个完整的数据包被拆分成多个部分接收,接收方一次只收到部分数据。
产生原因:
- MTU限制:网络最大传输单元限制导致大包被拆分
- 缓冲区大小:接收缓冲区小于数据包大小
- 流量控制:TCP滑动窗口机制可能导致数据分段到达
示例:
发送方发送: "HelloWorld\n"
接收方收到: "Hello" + "World\n" (一个包被拆成两部分)
常见解决方案
1. 固定长度法:每条消息固定长度,不足补位
- 优点:简单
- 缺点:浪费带宽
2. 分隔符法:使用特殊字符(如\n)作为消息结束标志
- 优点:灵活
- 缺点:内容不能包含分隔符
3. 长度前缀法:在消息前添加长度字段
- 如:[长度][实际数据]
- 优点:最可靠
- 缺点:实现稍复杂
需求:网络上有多条数据发送给服务端,数据之间使用 \n 进行分隔 但由于某种原因这些数据在接收时,被进行了重新组合,例如原始数据有3条为
-
Hello,world\n
-
I'm zhangsan\n
-
How are you?\n
变成了下面的两个 byteBuffer (黏包,半包)
-
Hello,world\nI'm zhangsan\nHo -> 消息合并到一起叫黏包
-
w are you?\n -> 消息被切割叫半包
现在要求你编写程序,将错乱的数据恢复成原始的按 \n 分隔的数据
package cn.itcast.netty.c1;

import java.nio.ByteBuffer;

import static cn.itcast.netty.c1.ByteBufferUtil.debugAll;

public class TestByteBufferExam {

    public static void main(String[] args) {
        /*
        网络上有多条数据发送给服务端,数据之间使用 \n 进行分隔
        但由于某种原因这些数据在接收时,被进行了重新组合,例如原始数据有3条为
                Hello,world\n
                I'm zhangsan\n
                How are you?\n
        变成了下面的两个 byteBuffer (黏包,半包)
            Hello,world\nI'm zhangsan\nHo
            w are you?\n

        现在要求你编写程序,将错乱的数据恢复成原始的按 \n 分隔的数据
        */

        ByteBuffer source = ByteBuffer.allocate(32);
        source.put("Hello,world\nI'm zhangsan\nHo".getBytes());
        split(source);
        source.put("w are you?\n".getBytes());
        split(source);
    }

    private static void split(ByteBuffer source) {
        // 切换到读模式
        source.flip();
        for (int i = 0; i < source.limit(); i++) {
            // 找到一条完整消息
            if (source.get(i) == '\n') {
                // 把这条完整消息存入新的ByteBuffer
                int length = i + 1 - source.position();
                ByteBuffer target = ByteBuffer.allocate(length);
                // 从source读,向target写
                for (int j = 0; j < length; j++) {
                    target.put(source.get());
                }
                debugAll(target);
            }
        }

        // 切换到写模式
        source.compact();
    }
}
输出
+--------+-------------------- all ------------------------+----------------+
position: [12], limit: [12]
+-------------------------------------------------+
| 0 1 2 3 4 5 6 7 8 9 a b c d e f |
+--------+-------------------------------------------------+----------------+
|00000000| 48 65 6c 6c 6f 2c 77 6f 72 6c 64 0a |Hello,world. |
+--------+-------------------------------------------------+----------------+
+--------+-------------------- all ------------------------+----------------+
position: [13], limit: [13]
+-------------------------------------------------+
| 0 1 2 3 4 5 6 7 8 9 a b c d e f |
+--------+-------------------------------------------------+----------------+
|00000000| 49 27 6d 20 7a 68 61 6e 67 73 61 6e 0a |I'm zhangsan. |
+--------+-------------------------------------------------+----------------+
+--------+-------------------- all ------------------------+----------------+
position: [13], limit: [13]
+-------------------------------------------------+
| 0 1 2 3 4 5 6 7 8 9 a b c d e f |
+--------+-------------------------------------------------+----------------+
|00000000| 48 6f 77 20 61 72 65 20 79 6f 75 3f 0a |How are you?. |
+--------+-------------------------------------------------+----------------+
3. 文件编程
3.1 FileChannel
注意:FileChannel只能工作在阻塞模式下
获取
不能直接打开FileChannel,必须通过FileInputStream、FileOutputStream或者RandomAccessFile来获取FileChannel,它们都有getChannel方法
- 通过FileInputStream获取的channel只能读
- 通过FileOutputStream获取的channel只能写
- 通过RandomAccessFile是否能读写根据构造RandomAccessFile时的读写模式决定
读取
会从channel读取数据填充ByteBuffer,返回值表示读到了多少字节,-1表示到达了文件的末尾
int readBytes = channel.read(buffer);写入
写入的正确姿势如下,SocketChannel
ByteBuffer buffer = ...;
buffer.put(...); // 存入数据
buffer.flip();   // 切换读模式

while(buffer.hasRemaining()) {
    channel.write(buffer);
}在while中调用channel.write是因为write方法并不能保证一次将buffer中的内容全部写入channel。
关闭
channel必须关闭,不过调用了FileInputStream、FileOutputStream或者RandomAccessFile的close方法会间接地调用channel的close方法。
位置
- 获取当前位置
long pos = channel.position();- 设置当前位置
long newPos = ...;
channel.position(newPos);设置当前位置时,如果设置为文件的末尾
- 这时读取会返回-1
- 这时写入,会追加内容,但要注意如果position超过了文件末尾,再写入时在新内容和原末尾之间会有空洞(00)
- 空洞:文件中逻辑上存在但实际上不占用物理磁盘空间的区域。具体表现为:
- 逻辑大小:文件看起来比实际占用的磁盘空间大
- 物理存储:空洞部分不会真正分配磁盘块
- 内容表现:读取空洞部分会返回零(00 字节)
大小
使用size方法获取文件的大小
强制写入
操作系统出于性能的考虑,会将数据缓存,不是立刻写入磁盘。可以调用 force(true) 方法将文件内容和元数据(文件的权限等信息)立刻写入磁盘。
3.2 两个Channel传输数据
package cn.itcast.netty.c1;

import java.io.FileInputStream;
import java.io.FileOutputStream;
import java.io.IOException;
import java.nio.channels.FileChannel;

public class TestFileChannelTransferTo {

    public static void main(String[] args) {
        try (
                FileChannel from = new FileInputStream("data.txt").getChannel();
                FileChannel to = new FileOutputStream("to.txt").getChannel();
        ) {
            // 效率高,底层会利用操作系统的零拷贝进行优化,一次最多传2g数据 -> 分多次传输
            long size = from.size();
            for(long left = size; left > 0; ) {  // left变量代表还剩余多少字节
                System.out.println("position: " + (size - left) + ", left: " + left);
                left -= from.transferTo((size - left), left, to);  // 起始位置 数据大小 目的地址
            }
        } catch (IOException e) {
            e.printStackTrace();
        }
    }
}
3.3 Path
JDK7 引入了Path和Paths类
- Path用来表示文件路径
- Paths是工具类,用来获取Path实例
Path source = Paths.get("1.txt"); // 相对路径 使用 user.dir 环境变量来定位 1.txt

Path source = Paths.get("d:\\1.txt"); // 绝对路径 代表了  d:\1.txt

Path source = Paths.get("d:/1.txt"); // 绝对路径 同样代表了  d:\1.txt

Path projects = Paths.get("d:\\data", "projects"); // 代表了 d:\data\projects- . 代表当前路径
- .. 代表上一级路径
例如,目录结构如下
d:
|- data
|- projects
|- a
|- b
代码
Path path = Paths.get("d:\\data\\projects\\a\\..\\b");
System.out.println(path);
System.out.println(path.normalize()); // 正常化路径
会输出
d:\data\projects\a\..\b
d:\data\projects\b
3.4 Files
检查文件是否存在
Path path = Paths.get("helloword/data.txt");
System.out.println(Files.exists(path));
创建一级目录
Path path = Paths.get("helloword/d1");
Files.createDirectory(path);- 如果目录已经存在,会抛出异常FileAlreadyExistsException
- 不能一次创建多级目录,否则会抛出异常NoSuchFileException
创建多级目录
Path path = Paths.get("helloword/d1/d2");
Files.createDirectories(path);
拷贝文件
Path source = Paths.get("helloword/data.txt");
Path target = Paths.get("helloword/target.txt");

Files.copy(source, target);- 如果文件已经存在,会抛异常FileAlreadyExistsException
如果希望用source覆盖掉target,需要用StandardCopyOption来控制
Files.copy(source, target, StandardCopyOption.REPLACE_EXISTING);移动文件
Path source = Paths.get("helloword/data.txt");
Path target = Paths.get("helloword/data.txt");

Files.move(source, target, StandardCopyOption.ATOMIC_MOVE);- StandardCopyOption.ATOMIC_MOVE保证文件移动的原子性
删除文件
Path target = Paths.get("helloword/target.txt");
Files.delete(target);- 如果文件不存在,会抛异常NoSuchFileException
删除目录
Path target = Paths.get("helloword/d1");
Files.delete(target);- 如果目录还有内容,会抛异常DirectoryNotEmptyException
遍历目录文件
package cn.itcast.netty.c1;

import java.io.IOException;
import java.nio.file.*;
import java.nio.file.attribute.BasicFileAttributes;
import java.util.concurrent.atomic.AtomicInteger;

public class TestFilesWalkFileTree {
    public static void main(String[] args) throws IOException {
        // 删除多级目录:先删除文件夹下的文件,再删除文件夹
        Files.walkFileTree(Paths.get("C:\\Program Files\\Java\\jdk1.8.0_192"), new SimpleFileVisitor<Path>() {
            /*@Override
            public FileVisitResult preVisitDirectory(Path dir, BasicFileAttributes attrs) throws IOException {
                System.out.println("===>进入" + dir);
                return super.preVisitDirectory(dir, attrs);
            }*/

            @Override
            public FileVisitResult visitFile(Path file, BasicFileAttributes attrs) throws IOException {
                // 进入文件夹时删除文件
                // System.out.println(file);
                Files.delete(file);
                return super.visitFile(file, attrs);
            }

            @Override
            public FileVisitResult postVisitDirectory(Path dir, IOException exc) throws IOException {
                // System.out.println("<===退出" + dir);
                // 退出文件夹时删除文件夹
                Files.delete(dir);
                return super.postVisitDirectory(dir, exc);
            }
        });
    }

    /**
     * 统计jar包的数目
     * @throws IOException
     */
    private static void m2() throws IOException {
        AtomicInteger jarCount = new AtomicInteger();

        Files.walkFileTree(Paths.get("C:\\Program Files\\Java\\jdk1.8.0_192"), new SimpleFileVisitor<Path>() {
            @Override
            public FileVisitResult visitFile(Path file, BasicFileAttributes attrs) throws IOException {
                if (file.toString().endsWith(".jar")) {
                    System.out.println(file);
                    jarCount.incrementAndGet();
                }
                return super.visitFile(file, attrs);
            }
        });

        System.out.println("jar count: " + jarCount);
    }

    // 抽取方法:ctrl + alt + m

    /**
     * 统计文件夹和文件的个数
     * @throws IOException
     */
    private static void m1() throws IOException {
        AtomicInteger dirCount = new AtomicInteger();
        AtomicInteger fileCount = new AtomicInteger();

        Files.walkFileTree(Paths.get("C:\\Program Files\\Java\\jdk1.8.0_192"), new SimpleFileVisitor<Path>() {
            @Override
            public FileVisitResult preVisitDirectory(Path dir, BasicFileAttributes attrs) throws IOException {
                // 统计文件夹个数
                System.out.println("====>" + dir);
                dirCount.incrementAndGet();

                return super.preVisitDirectory(dir, attrs);
            }

            @Override
            public FileVisitResult visitFile(Path file, BasicFileAttributes attrs) throws IOException {
                // 统计文件个数
                System.out.println(file);
                fileCount.incrementAndGet();

                return super.visitFile(file, attrs);
            }
        });

        System.out.println("dir count: " + dirCount);
        System.out.println("file count: " + fileCount);
    }
}
拷贝多级目录
package cn.itcast.netty.c1;

import java.io.IOException;
import java.nio.file.Files;
import java.nio.file.Paths;

public class TestFilesCopy {

    public static void main(String[] args) throws IOException {
        String source = "D:\\IDEA\\IdeaWorkSpace";
        String target = "D:\\IDEA\\IdeaWorkSpaceaaa";

        Files.walk(Paths.get(source)).forEach(path -> {
            try {
                String targetName = path.toString().replace(source, target);
                if (Files.isDirectory(path)) {
                    // 目录
                    Files.createDirectory(Paths.get(targetName));
                } else if(Files.isRegularFile(path)) {
                    // 普通文件
                    Files.copy(path, Paths.get(targetName));
                }
            } catch (IOException e) {
                e.printStackTrace();
            }
        });
    }
}
4. 网络编程
4.1 非阻塞 vs 阻塞
阻塞
- 阻塞模式下,相关方法都会导致线程暂停
- ServerSocketChannel.accept会在没有连接建立时让线程暂停
- SocketChannel.read会在没有数据可读时让线程暂停
- 阻塞的表现就是线程暂停了,暂停期间不会占用CPU,但线程相当于闲置。
- 单线程下,阻塞方法之间相互影响,几乎不能正常工作,需要多线程支持
- 但多线程下,有新的问题,体现在以下方面
- 32位jvm一个线程320k,64位jvm一个线程1024k,如果连接数过多,必然导致OOM,并且线程太多,反而会因为频繁上下文切换导致性能降低;
- 可以采用线程池技术来减少线程数和线程上下文切换,但治标不治本,如果有很多连接建立,但长时间inactive,会阻塞线程池中所有线程,因此不适合长连接,只适合短连接。
阻塞模式示例代码:
- 服务器Server:
package cn.itcast.netty.c1_1;

import lombok.extern.slf4j.Slf4j;

import java.io.IOException;
import java.net.InetSocketAddress;
import java.nio.ByteBuffer;
import java.nio.channels.ServerSocketChannel;
import java.nio.channels.SocketChannel;
import java.util.ArrayList;
import java.util.List;

import static cn.itcast.netty.c1.ByteBufferUtil.debugRead;

@Slf4j
public class Server {
    public static void main(String[] args) throws IOException {
        // 使用nio来理解阻塞模式,单线程

        ByteBuffer buffer = ByteBuffer.allocate(16);

        // 1. 创建了服务器
        ServerSocketChannel ssc = ServerSocketChannel.open();

        // 2. 绑定监听端口
        ssc.bind(new InetSocketAddress(8080));

        List<SocketChannel> channels = new ArrayList<>();
        while (true) {
            // 3. accept建立与客户端连接,SocketChannel用来与客户端之间通信
            log.debug("connecting...");
            SocketChannel sc = ssc.accept();  // 阻塞方法,线程停止运行(等待连接建立)
            log.debug("connected... {}", sc);
            channels.add(sc);

            for (SocketChannel channel : channels) {
                // 4. 接收客户端发送的数据
                log.debug("before read...{}", channel);
                channel.read(buffer);  // 阻塞方法,线程停止运行(直到客户端发来数据)

                // 切换到读模式
                buffer.flip();
                debugRead(buffer);
                // 切换到写模式
                buffer.clear();
                log.debug("after read...{}", channel);
            }
        }
    }
}
- 客户端Client:
package cn.itcast.netty.c1_1;

import java.io.IOException;
import java.net.InetSocketAddress;
import java.nio.channels.SocketChannel;

public class Client {
    public static void main(String[] args) throws IOException {
        SocketChannel sc = SocketChannel.open();
        sc.connect(new InetSocketAddress("localhost", 8080));

        System.out.println("waiting...");
    }
}
非阻塞
- 非阻塞模式下,相关方法都 不会 让线程暂停
- 在ServerSocketChannel.accept在没有连接建立时,会返回null,继续运行
- SocketChannel.read在没有数据可读时,会返回0,单线程不必阻塞,可以去执行其它SocketChannel的read或是去执行SeverSocketChannel.accept
- 写数据时,线程只是等待数据写入Channel即可,无需等Channel通过网络把数据发送出去
- 但非阻塞模式下,即使没有连接建立 和 可读数据,线程仍然在不断运行,白白浪费了CPU
- 数据复制过程中,线程实际还是阻塞的(AIO改进的地方)
服务器端代码(客户端代码不变):
package cn.itcast.netty.c1_1;

import lombok.extern.slf4j.Slf4j;

import java.io.IOException;
import java.net.InetSocketAddress;
import java.nio.ByteBuffer;
import java.nio.channels.ServerSocketChannel;
import java.nio.channels.SocketChannel;
import java.util.ArrayList;
import java.util.List;

import static cn.itcast.netty.c1.ByteBufferUtil.debugRead;

@Slf4j
public class Server {
    public static void main(String[] args) throws IOException {
        // 使用nio来理解阻塞模式,单线程

        ByteBuffer buffer = ByteBuffer.allocate(16);

        // 1. 创建了服务器
        ServerSocketChannel ssc = ServerSocketChannel.open();
        ssc.configureBlocking(false);  // 非阻塞模式

        // 2. 绑定监听端口
        ssc.bind(new InetSocketAddress(8080));

        List<SocketChannel> channels = new ArrayList<>();
        while (true) {
            // 3. accept建立与客户端连接,SocketChannel用来与客户端之间通信
            // log.debug("connecting...");
            SocketChannel sc = ssc.accept();  // 非阻塞,线程还会继续运行;如果没有连接建立,但sc是null
            if (sc != null) {
                log.debug("connected... {}", sc);
                sc.configureBlocking(false);  // 非阻塞模式
                channels.add(sc);
            }

            for (SocketChannel channel : channels) {
                // 4. 接收客户端发送的数据
                // log.debug("before read...{}", channel);
                int read = channel.read(buffer);// 非阻塞,线程仍然会继续运行,如果没有读取到数据,read返回0
                if (read > 0) {
                    // 切换到读模式
                    buffer.flip();
                    debugRead(buffer);
                    // 切换到写模式
                    buffer.clear();
                    log.debug("after read...{}", channel);
                }
            }
        }
    }
}
多路复用
单线程可以配合Selector完成对多个Channel可读写事件的监控,这称之为多路复用
- 多路复用仅针对网络IO,普通文件IO没法利用多路复用
- 如果不用Selector的非阻塞模式,线程大部分时间都在做无用功,而Selector能够保证:
- 有可连接事件时才去连接
- 有可读事件才去读取
- 有可写事件才去写入
- 限于网络传输能力,Channel未必时时可写,一旦Channel可写,会触发Selector的可写事件
4.2 Selector
好处
- 一个线程配合selector就可以监控多个channel的事件,事件发生线程才去处理。避免非阻塞模式下所做无用功
- 让这个线程能够被充分利用
- 节约了线程的数量
- 减少了线程上下文切换
使用步骤①:创建
Selector selector = Selector.open();②绑定Channel事件
也称为注册事件,绑定的事件selector才会关心
channel.configureBlocking(false);
SelectionKey key = channel.register(selector, 绑定事件);- channel必须工作在非阻塞模式
- FileChannel没有非阻塞模式,因此不能配合selector一起使用
- 绑定的事件类型可以有:
- connect - 客户端连接成功时触发
- accept - 服务器端成功接受连接时触发
- read - 数据可读入时触发,有因为接受能力弱,数据暂不能读入的情况
- write - 数据可写出时触发,有因为发送能力弱,数据暂不能写出的情况。
③监听Channel事件
可以通过下面三种方法来监听是否有事件发生,方法的返回值代表有多少channel发生了事件
方法1:阻塞直到绑定事件发生
int count = selector.select();方法2:阻塞直到绑定事件发生,或是超时(时间单位为ms)
int count = selector.select(long timeout);方法3:不会阻塞,也就是不管有没有事件,立刻返回,自己根据返回值检查是否有事件
int count = selector.selectNow();💡 select 何时不阻塞
- 事件发生时
- 客户户端发起连接请求,会触发accept事件
- 客户端发送数据过来,客户端正常、异常关闭时,都会触发read事件,另外如果发送的数据大于buffer缓冲区,会触发多次读取事件
- channel可写,会触发write事件
- 在linux下nio bug发生时
- 调用selector.wakeup()
- 调用selector.close()
- selector所在线程interrupt
4.3 处理accept事件
③处理accept事件
客户端代码为:
public class Client {
    public static void main(String[] args) {
        try (Socket socket = new Socket("localhost", 8080)) {
            System.out.println(socket);
            socket.getOutputStream().write("world".getBytes());
            System.in.read();
        } catch (IOException e) {
            e.printStackTrace();
        }
    }
}
服务器端代码为:
@Slf4j
public class ChannelDemo6 {
    public static void main(String[] args) {
        try (ServerSocketChannel channel = ServerSocketChannel.open()) {
            channel.bind(new InetSocketAddress(8080));
            System.out.println(channel);
            Selector selector = Selector.open();
            channel.configureBlocking(false);
            channel.register(selector, SelectionKey.OP_ACCEPT);

            while (true) {
                int count = selector.select();
//                int count = selector.selectNow();
                log.debug("select count: {}", count);
//                if(count <= 0) {
//                    continue;
//                }

                // 获取所有事件
                Set<SelectionKey> keys = selector.selectedKeys();

                // 遍历所有事件,逐一处理
                Iterator<SelectionKey> iter = keys.iterator();
                while (iter.hasNext()) {
                    SelectionKey key = iter.next();
                    // 判断事件类型
                    if (key.isAcceptable()) {
                        ServerSocketChannel c = (ServerSocketChannel) key.channel();
                        // 必须处理
                        SocketChannel sc = c.accept();
                        log.debug("{}", sc);
                    }
                    // 处理完毕,必须将事件移除
                    iter.remove();
                }
            }
        } catch (IOException e) {
            e.printStackTrace();
        }
    }
}
💡 事件发生后能否不处理
事件发生后,要么处理,要么取消(cancel),不能什么都不做,否则下次该事件仍会触发,这是因为nio底层使用的是水平触发。
4.4 处理read事件
④处理read事件
@Slf4j
public class ChannelDemo6 {
    public static void main(String[] args) {
        try (ServerSocketChannel channel = ServerSocketChannel.open()) {
            channel.bind(new InetSocketAddress(8080));
            System.out.println(channel);
            Selector selector = Selector.open();
            channel.configureBlocking(false);
            channel.register(selector, SelectionKey.OP_ACCEPT);

            while (true) {
                int count = selector.select();
//                int count = selector.selectNow();
                log.debug("select count: {}", count);
//                if(count <= 0) {
//                    continue;
//                }

                // 获取所有事件
                Set<SelectionKey> keys = selector.selectedKeys();

                // 遍历所有事件,逐一处理
                Iterator<SelectionKey> iter = keys.iterator();
                while (iter.hasNext()) {
                    SelectionKey key = iter.next();
                    // 判断事件类型
                    if (key.isAcceptable()) {
                        ServerSocketChannel c = (ServerSocketChannel) key.channel();
                        // 必须处理
                        SocketChannel sc = c.accept();
                        sc.configureBlocking(false);
                        sc.register(selector, SelectionKey.OP_READ);
                        log.debug("连接已建立: {}", sc);
                    } else if (key.isReadable()) {
                        SocketChannel sc = (SocketChannel) key.channel();
                        ByteBuffer buffer = ByteBuffer.allocate(128);
                        int read = sc.read(buffer);
                        if(read == -1) {
                            key.cancel();
                            sc.close();
                        } else {
                            buffer.flip();
                            debug(buffer);
                        }
                    }
                    // 处理完毕,必须将事件移除
                    iter.remove();
                }
            }
        } catch (IOException e) {
            e.printStackTrace();
        }
    }
}
💡为何要iter.remove()
- 因为select在事件发生后,就会将相关的key放入selectedKeys集合,但不会在处理完后从selectedKeys集合中移除,需要我们自己编码删除。例如:
- 第一次触发了sscKey上的accept事件,没有移除sscKey
- 第二次触发了scKey上的read事件,但这时selectedKeys中还有上次的sscKey,在处理时因为没有真正的serverSocket连上了,就会导致空指针异常。
💡cancel的作用
- cancel会取消注册在selector上的channel,并从keys集合中删除key,后续不会再监听事件。
package cn.itcast.netty.c1_1;

import lombok.extern.slf4j.Slf4j;

import java.io.IOException;
import java.net.InetSocketAddress;
import java.nio.ByteBuffer;
import java.nio.channels.*;
import java.nio.charset.Charset;
import java.util.Iterator;

import static cn.itcast.netty.c1.ByteBufferUtil.debugAll;
import static cn.itcast.netty.c1.ByteBufferUtil.debugRead;

@Slf4j
public class Server {
    public static void main(String[] args) throws IOException {
        // 1. 创建Selector, 可管理多个channel
        Selector selector = Selector.open();
        ServerSocketChannel ssc = ServerSocketChannel.open();
        ssc.configureBlocking(false);

        /*
            事件类型
                accept - 会在有连接请求时触发
                connect -是客户端连接建立后触发
                read - 可读事件
                write - 可写事件
         */

        // 2. 建立selector和channel的联系(注册)
        // SelectionKet就是将来事件发生后,通过它可以知道事件和哪个channel的事件
        SelectionKey sscKey = ssc.register(selector, 0, null);
        sscKey.interestOps(SelectionKey.OP_ACCEPT);  // key 只关注 accept事件
        log.debug("register key: {}", sscKey);

        ssc.bind(new InetSocketAddress(8080));
        while (true) {
            // 3. select 方法,没有事件发生则线程阻塞;有事件,线程才会恢复运行
            // select在事件未处理时,不会阻塞,事件发生后要么处理,要么取消,不能置之不理
            selector.select();

            // 4. 处理事件 selectedKeys 内部包含了所有发生的事件
            Iterator<SelectionKey> iterator = selector.selectedKeys().iterator();
            while (iterator.hasNext()) {
                SelectionKey key = iterator.next();
                // 处理key时要从selectedKeys集合中删除,否则下次处理就会NullPointException                iterator.remove();
                iterator.remove();
                log.debug("key: {}", key);

                // 5. 区分事件类型
                if (key.isAcceptable()) {  // 如果是accept
                    ServerSocketChannel channel = (ServerSocketChannel) key.channel();
                    SocketChannel sc = channel.accept();
                    sc.configureBlocking(false);
                    log.debug("{}", sc);

                    SelectionKey scKey = sc.register(selector, 0, null);
                    scKey.interestOps(SelectionKey.OP_READ);
                    log.debug("register key : {}", scKey);
                } else if (key.isReadable()) {  // 如果是read
                    try {
                        SocketChannel channel = (SocketChannel) key.channel();  // 拿到触发事件的channel
                        ByteBuffer buffer = ByteBuffer.allocate(4);  // 如果接收的是汉字,无法正确处理消息的边界
                        int read = channel.read(buffer);// 接收客户端数据。如果是正常断开,read的返回值是-1
                        if (read == -1) {
                            key.cancel();  // 删除key
                        } else {
                            buffer.flip();  // 切换到读模式
//                            debugAll(buffer);
                            System.out.println(Charset.defaultCharset().decode(buffer));
                        }
                    } catch (IOException e) {
                        e.printStackTrace();
                        key.cancel();  // 客户端断开连接,因此需要将key取消(从selector的keys集合中真正删除key)
                    }
                }

                // 取消事件,不进行处理
                // key.cancel();
            }
        }
    }
}
⚠️处理消息的边界
1. 一种思路是固定消息长度,数据包大小一样,服务器按预定长度读取,缺点是浪费带宽;
2. 另一种思路是按分隔符拆分,缺点是效率低
3. TLV格式,即Type类型、Length长度、Value数据,在类型和长度已知的情况下,可以方便地获取消息大小,分配合适的buffer,缺点是buffer需要提前分配,如果内容过大,则影响server吞吐量。
- Http 1.1是TLV格式
- Http 2.0是LTV格式
服务器端
package cn.itcast.netty.c1_1;

import lombok.extern.slf4j.Slf4j;

import java.io.IOException;
import java.net.InetSocketAddress;
import java.nio.ByteBuffer;
import java.nio.channels.*;
import java.nio.charset.Charset;
import java.util.Iterator;

import static cn.itcast.netty.c1.ByteBufferUtil.debugAll;
import static cn.itcast.netty.c1.ByteBufferUtil.debugRead;

@Slf4j
public class Server {
    public static void main(String[] args) throws IOException {
        // 1. 创建Selector, 可管理多个channel
        Selector selector = Selector.open();
        ServerSocketChannel ssc = ServerSocketChannel.open();
        ssc.configureBlocking(false);

        /*
            事件类型
                accept - 会在有连接请求时触发
                connect -是客户端连接建立后触发
                read - 可读事件
                write - 可写事件
         */

        // 2. 建立selector和channel的联系(注册)
        // SelectionKet就是将来事件发生后,通过它可以知道事件和哪个channel的事件
        SelectionKey sscKey = ssc.register(selector, 0, null);
        sscKey.interestOps(SelectionKey.OP_ACCEPT);  // key 只关注 accept事件
        log.debug("register key: {}", sscKey);

        ssc.bind(new InetSocketAddress(8080));
        while (true) {
            // 3. select 方法,没有事件发生则线程阻塞;有事件,线程才会恢复运行
            // select在事件未处理时,不会阻塞,事件发生后要么处理,要么取消,不能置之不理
            selector.select();

            // 4. 处理事件 selectedKeys 内部包含了所有发生的事件
            Iterator<SelectionKey> iterator = selector.selectedKeys().iterator();
            while (iterator.hasNext()) {
                SelectionKey key = iterator.next();
                // 处理key时要从selectedKeys集合中删除,否则下次处理就会NullPointException                iterator.remove();
                iterator.remove();
                log.debug("key: {}", key);

                // 5. 区分事件类型
                if (key.isAcceptable()) {  // 如果是accept
                    ServerSocketChannel channel = (ServerSocketChannel) key.channel();
                    SocketChannel sc = channel.accept();
                    sc.configureBlocking(false);
                    log.debug("{}", sc);

                    ByteBuffer buffer = ByteBuffer.allocate(16);  // attachment
                    // 将一个byteBuffer作为附件关联到selectionKey上
                    SelectionKey scKey = sc.register(selector, 0, buffer);
                    scKey.interestOps(SelectionKey.OP_READ);
                    log.debug("register key : {}", scKey);
                } else if (key.isReadable()) {  // 如果是read
                    try {
                        SocketChannel channel = (SocketChannel) key.channel();  // 拿到触发事件的channel
                        // 获取selectionKey上关联的附件
                        ByteBuffer buffer = (ByteBuffer) key.attachment();
                        int read = channel.read(buffer);// 接收客户端数据。如果是正常断开,read的返回值是-1
                        if (read == -1) {
                            key.cancel();  // 删除key
                        } else {
                            split(buffer);
                            if(buffer.position() == buffer.limit()) {
                                // buffer满了,扩容2倍
                                ByteBuffer newBuffer = ByteBuffer.allocate(buffer.capacity() * 2);
                                buffer.flip();  // 切换到读模式
                                newBuffer.put(buffer);
                                key.attach(newBuffer);  // 替换attachment
                            }
                        }
                    } catch (IOException e) {
                        e.printStackTrace();
                        key.cancel();  // 客户端断开连接,因此需要将key取消(从selector的keys集合中真正删除key)
                    }
                }

                // 取消事件,不进行处理
                // key.cancel();
            }
        }
    }

    private static void split(ByteBuffer source) {
        // 切换到读模式
        source.flip();
        for (int i = 0; i < source.limit(); i++) {
            // 找到一条完整消息
            if (source.get(i) == '\n') {
                // 把这条完整消息存入新的ByteBuffer
                int length = i + 1 - source.position();
                ByteBuffer target = ByteBuffer.allocate(length);
                // 从source读,向target写
                for (int j = 0; j < length; j++) {
                    target.put(source.get());
                }
                debugAll(target);
            }
        }

        // 切换到写模式
        source.compact();
    }
}
客户端
package cn.itcast.netty.c1_1;

import java.io.IOException;
import java.net.InetSocketAddress;
import java.net.SocketAddress;
import java.nio.channels.SocketChannel;
import java.nio.charset.Charset;

public class Client {
    public static void main(String[] args) throws IOException {
        SocketChannel sc = SocketChannel.open();
        sc.connect(new InetSocketAddress("localhost", 8080));

        SocketAddress address = sc.getLocalAddress();
        sc.write(Charset.defaultCharset().encode("hello\nworld\n"));
        sc.write(Charset.defaultCharset().encode("0123456789abcdef3333\\n"));
        System.in.read();

    }
}
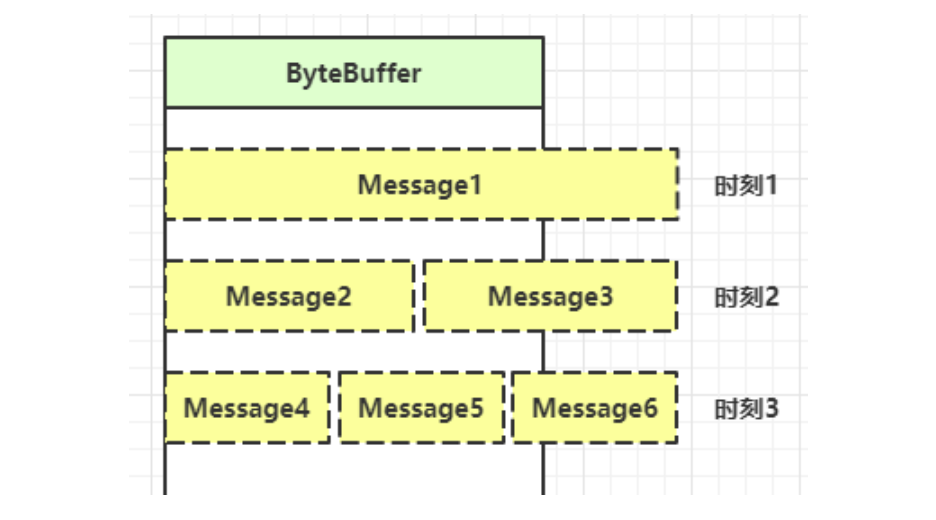
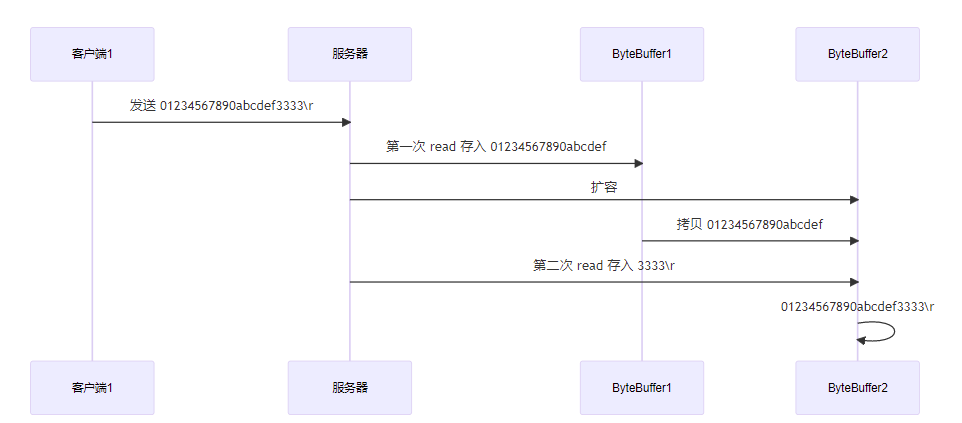
ByteBuffer大小分配
- 每个channel都需要记录可能被切分的消息,因为ByteBuffer不能被多个channel共同使用,因此需要为每个channel维护一个独立的ByteBuffer
- ByteBuffer不能太大,比如一个ByteBuffer 1MB的话,要支持百万连接就要1Tb内存,因此需要设计大小可变的ByteBuffer
- 一种思路是首先分配一个较小的buffer,例如4k,如果发现数据不够,再分配8k的buffer,将4k buffer内容拷贝至8k buffer,优点是消息连续容易处理,缺点是数据拷贝耗费性能
- 另一种思路是用多个数组组成buffer,一个数组不够,把多出来的内容写入新的数组,与前面的区别是消息存储不连续,解析复杂,优点是避免了拷贝引起的性能损耗。
4.5 处理write事件
一次无法写完数据的例子
- 非阻塞模式下,无法保证把buffer中所有数据都写入channel,因为需要追踪write方法的返回值(代表实际写入字节数)
- 用selector监听所有channel的可写事件,每个channel都需要一个key来追踪buffer,但这样又会导致占用内存过多,就有两阶段策略
- 当消息处理器第一次写入消息时,才将channel注册到selector上
- selector检查channel上的可写事件,如果所有的数据写完了,就取消channel的注册
- 如果不取消,会每次可写均触发write事件
服务器端
package cn.itcast.netty.c1_1;

import java.io.IOException;
import java.net.InetSocketAddress;
import java.nio.ByteBuffer;
import java.nio.channels.*;
import java.nio.charset.Charset;
import java.util.Iterator;

public class WriteServer {
    public static void main(String[] args) throws IOException {
        ServerSocketChannel ssc = ServerSocketChannel.open();
        ssc.configureBlocking(false);

        Selector selector = Selector.open();
        ssc.register(selector, SelectionKey.OP_ACCEPT);

        ssc.bind(new InetSocketAddress(8080));

        while (true) {
            selector.select();
            Iterator<SelectionKey> iterator = selector.selectedKeys().iterator();
            while (iterator.hasNext()) {
                SelectionKey key = iterator.next();
                iterator.remove();
                if (key.isAcceptable()) {
                    SocketChannel sc = ssc.accept();
                    sc.configureBlocking(false);
                    SelectionKey scKey = sc.register(selector, 0, null);
                    scKey.interestOps(SelectionKey.OP_READ);

                    // 1. 向客户端发生大量数据
                    StringBuilder sb = new StringBuilder();
                    for (int i = 0; i < 30000000; i++) {
                        sb.append("a");
                    }
                    ByteBuffer buffer = Charset.defaultCharset().encode(sb.toString());

                    // 2. 返回实际写入的字节数
                    int write = sc.write(buffer);
                    System.out.println(write);

                    // 3. 判断是否还有剩余内容
                    if (buffer.hasRemaining()) {
                        // 4. 关注可写事件
                        scKey.interestOps(scKey.interestOps() + SelectionKey.OP_WRITE);
//                        scKey.interestOps(scKey.interestOps() | SelectionKey.OP_WRITE);

                        // 5. 把未写完的数据挂到scKey上
                        scKey.attach(buffer);
                    }
                } else if (key.isWritable()) {
                    ByteBuffer buffer = (ByteBuffer) key.attachment();
                    SocketChannel sc = (SocketChannel) key.channel();

                    int write = sc.write(buffer);
                    System.out.println(write);

                    // 6. 清理操作
                    if (!buffer.hasRemaining()) {
                        key.attach(null);  // 需要清除buffer
                        key.interestOps(key.interestOps() - SelectionKey.OP_WRITE);  // 不再需要关注可写事件
                    }
                }
            }
        }
    }
}
客户端
public class WriteClient {
    public static void main(String[] args) throws IOException {
        Selector selector = Selector.open();
        SocketChannel sc = SocketChannel.open();
        sc.configureBlocking(false);

        sc.register(selector, SelectionKey.OP_CONNECT | SelectionKey.OP_READ);
        sc.connect(new InetSocketAddress("localhost", 8080));

        int count = 0;
        while (true) {
            selector.select();
            Iterator<SelectionKey> iter = selector.selectedKeys().iterator();

            while (iter.hasNext()) {
                SelectionKey key = iter.next();
                iter.remove();

                if (key.isConnectable()) {
                    System.out.println(sc.finishConnect());
                } else if (key.isReadable()) {
                    ByteBuffer buffer = ByteBuffer.allocate(1024 * 1024);
                    count += sc.read(buffer);
                    buffer.clear();
                    System.out.println(count);
                }
            }
        }
    }
}
4.6 利用多线程优化
前面的代码只有一个选择器,没有充分利用多核CPU,如何改进呢?
分两组选择器:
- 单线程配一个选择器,专门处理accept事件
- 创建cpu核心数的线程,每个线程配一个选择器,轮流处理read、write事件
服务器端代码:
package cn.itcast.netty.c1_1;

import lombok.extern.slf4j.Slf4j;

import java.io.IOException;
import java.net.InetSocketAddress;
import java.nio.ByteBuffer;
import java.nio.channels.*;
import java.util.Iterator;
import java.util.concurrent.ConcurrentLinkedQueue;
import java.util.concurrent.atomic.AtomicInteger;

import static cn.itcast.netty.c1.ByteBufferUtil.debugAll;

@Slf4j
public class MultiThreadServer {
    public static void main(String[] args) throws IOException {
        Thread.currentThread().setName("boss");
        ServerSocketChannel ssc = ServerSocketChannel.open();
        ssc.configureBlocking(false);
        Selector boss = Selector.open();
        SelectionKey bossKey = ssc.register(boss, 0, null);
        bossKey.interestOps(SelectionKey.OP_ACCEPT);
        ssc.bind(new InetSocketAddress("localhost", 8080));

        // 1. 创建固定数量的worker 并初始化
        Worker[] workers = new Worker[Runtime.getRuntime().availableProcessors()];
        for (int i = 0; i < workers.length; i++) {
            workers[i] = new Worker("worker-" + i);
        }

        AtomicInteger index = new AtomicInteger();
        while (true) {
            boss.select();
            Iterator<SelectionKey> iterator = boss.selectedKeys().iterator();
            while (iterator.hasNext()) {
                SelectionKey key = iterator.next();
                iterator.remove();
                if (key.isAcceptable()) {
                    SocketChannel sc = ssc.accept();
                    sc.configureBlocking(false);
                    log.debug("connected...{}", sc.getRemoteAddress());

                    // 2. 关联selector
                    log.debug("before register...{}", sc.getRemoteAddress());
                    // 负载均衡 - 轮询
                    workers[index.getAndIncrement() % workers.length].register(sc);  // boss线程调用 -> 初始化selector,启动worker-0
                    log.debug("after register...{}", sc.getRemoteAddress());
                }
            }
        }
    }

    static class Worker implements Runnable {
        private Thread thread;
        private Selector selector;
        private String name;
        private volatile boolean start = false;
// 利用队列解决两个线程间数据传输的问题
//        private ConcurrentLinkedQueue<Runnable> queue = new ConcurrentLinkedQueue<>();

        public Worker(String name) {
            this.name = name;
        }

        // 初始化线程和selector
        public void register(SocketChannel sc) throws IOException {
            if (!start) {
                selector = Selector.open();
                thread = new Thread(this, name);
                thread.start();
                start = true;
            }

            // 向队列添加了任务,但这个任务并没有立刻执行 boss
            /*queue.add(() -> {
                try {
                    sc.register(selector, SelectionKey.OP_READ, null);
                } catch (ClosedChannelException e) {
                    throw new RuntimeException(e);
                }
            });*/

            selector.wakeup();  // 唤醒select方法
            sc.register(selector, SelectionKey.OP_READ, null);  // boss
        }

        @Override
        public void run() {
            while (true) {
                try {
                    selector.select();  // worker-0 阻塞, wakeup

                    /*Runnable task = queue.poll();
                    if(task != null) {
                        task.run();  // 执行了 sc.register(selector, SelectionKey.OP_READ, null);
                    }*/

                    Iterator<SelectionKey> iterator = selector.selectedKeys().iterator();
                    while (iterator.hasNext()) {
                        SelectionKey key = iterator.next();
                        iterator.remove();
                        if (key.isReadable()) {
                            ByteBuffer buffer = ByteBuffer.allocate(16);
                            SocketChannel channel = (SocketChannel) key.channel();
                            log.debug("read...{}", channel.getRemoteAddress());
                            channel.read(buffer);
                            buffer.flip();
                            debugAll(buffer);
                        }
                    }
                } catch (IOException e) {
                    throw new RuntimeException(e);
                }
            }
        }
    }
}
客户端代码:
package cn.itcast.netty.c1_1;

import java.io.IOException;
import java.net.InetSocketAddress;
import java.nio.channels.SocketChannel;
import java.nio.charset.Charset;

public class TestClient {
    public static void main(String[] args) throws IOException {
        SocketChannel sc = SocketChannel.open();
        sc.connect(new InetSocketAddress("localhost", 8080));
        sc.write(Charset.defaultCharset().encode("1234567890abcdef"));

        System.in.read();
    }
}
💡 如何拿到CPU个数
- Runtime.getRuntime.availableProcessors():如果工作在docker容器下,因为容器不是物理隔离的,会拿到物理cpu个数,而不是容器申请时的个数
- 这个问题直到JDK 10才修复,使用jvm参数 UseContainerSupport 配置,默认开启。
4.7 UDP
- UDP是无连接的,client发送数据不会管server是否开启
- server这边的receive方法会将接收到的数据存入byte buffer,但如果数据报文超过buffer大小,多出来的数据会被默默抛弃
服务器端代码:
public class UdpServer {
    public static void main(String[] args) {
        try (DatagramChannel channel = DatagramChannel.open()) {
            channel.socket().bind(new InetSocketAddress(9999));
            System.out.println("waiting...");
            ByteBuffer buffer = ByteBuffer.allocate(32);
            channel.receive(buffer);
            buffer.flip();
            debug(buffer);
        } catch (IOException e) {
            e.printStackTrace();
        }
    }
}
客户端代码:
public class UdpClient {
    public static void main(String[] args) {
        try (DatagramChannel channel = DatagramChannel.open()) {
            ByteBuffer buffer = StandardCharsets.UTF_8.encode("hello");
            InetSocketAddress address = new InetSocketAddress("localhost", 9999);
            channel.send(buffer, address);
        } catch (Exception e) {
            e.printStackTrace();
        }
    }
}
5. NIO vs BIO
5.1 stream vs channel
- stream不会自动缓冲数据,channel会利用系统提供的发送缓冲区、接收缓冲区(更为底层);
- stream仅支持阻塞API,channel同时支持阻塞、非阻塞API,网络channel可配合selector实现多路复用
- 二者均为全双工,即读写可以同时进行
5.2 IO模型
同步阻塞、同步非阻塞、同步多路复用、异步阻塞、异步非阻塞
- 同步:线程自己去获取结果(一个线程)
- 异步:线程自己不去获取结果,而是由其它线程送结果(至少两个线程)
当调用一次channel.read或stream.read后,会切换至操作系统内核态来完成真正数据读取,而读取又分为两个阶段,分别为:
- 等待数据阶段
- 复制数据阶段
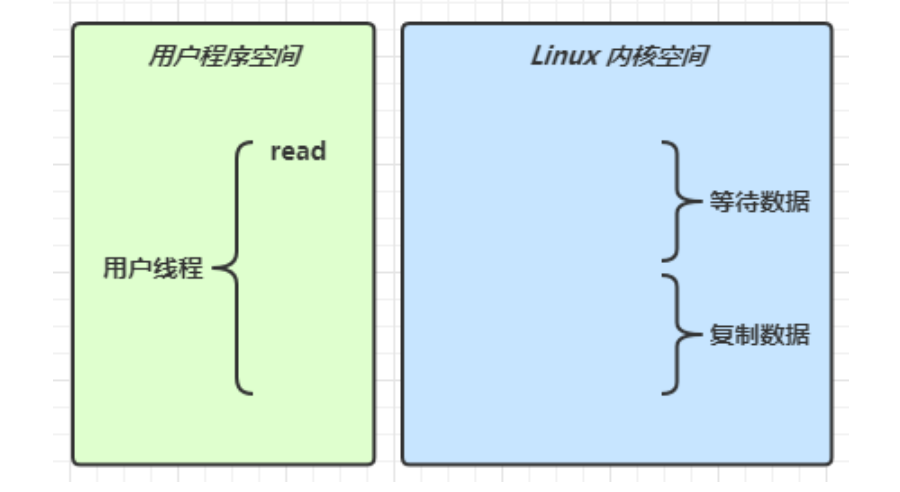
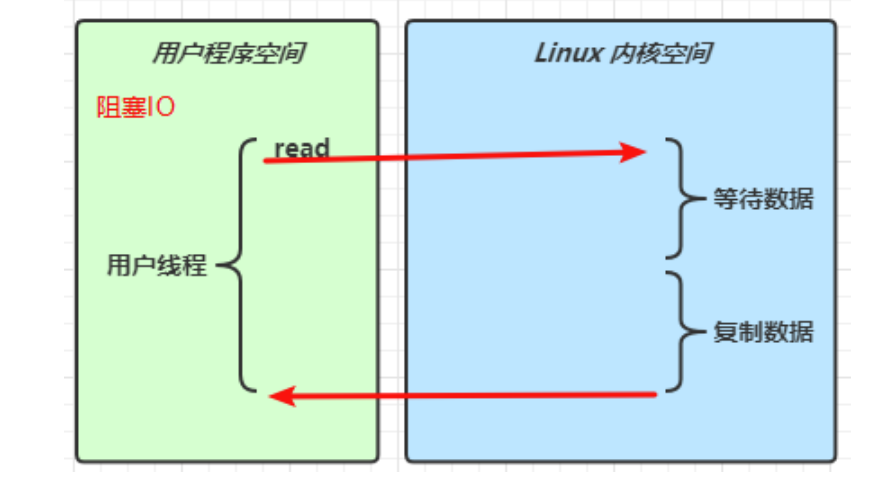
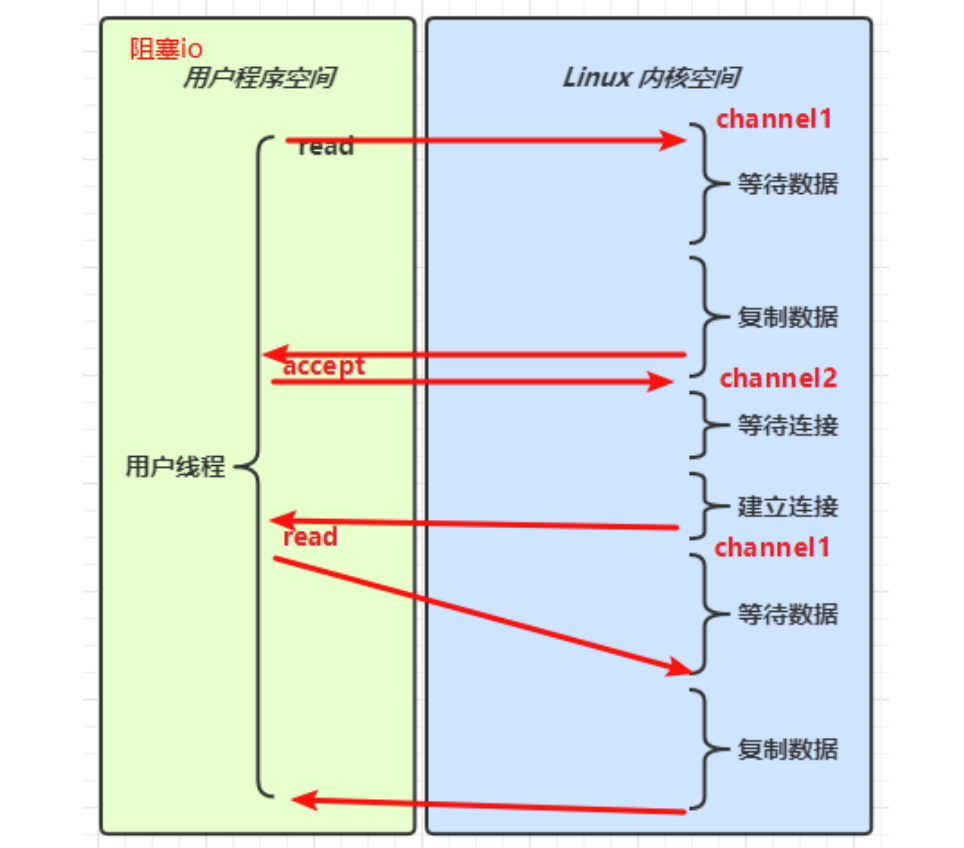
(1)阻塞IO
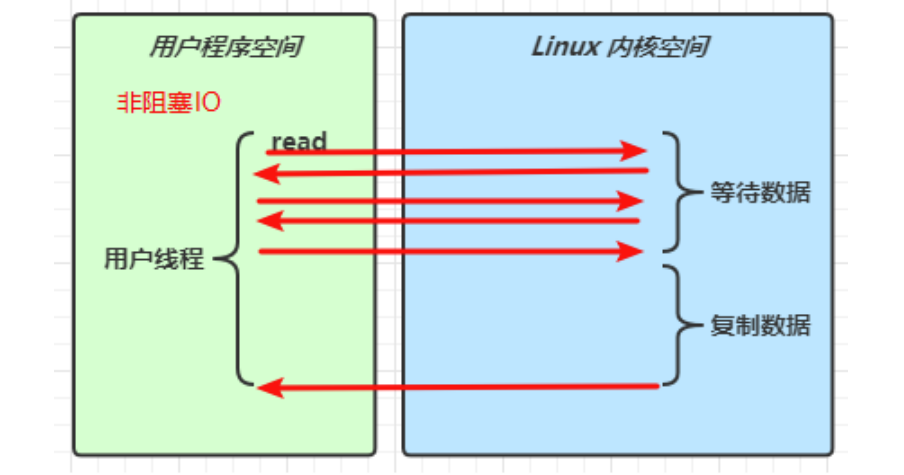
(2)非阻塞IO
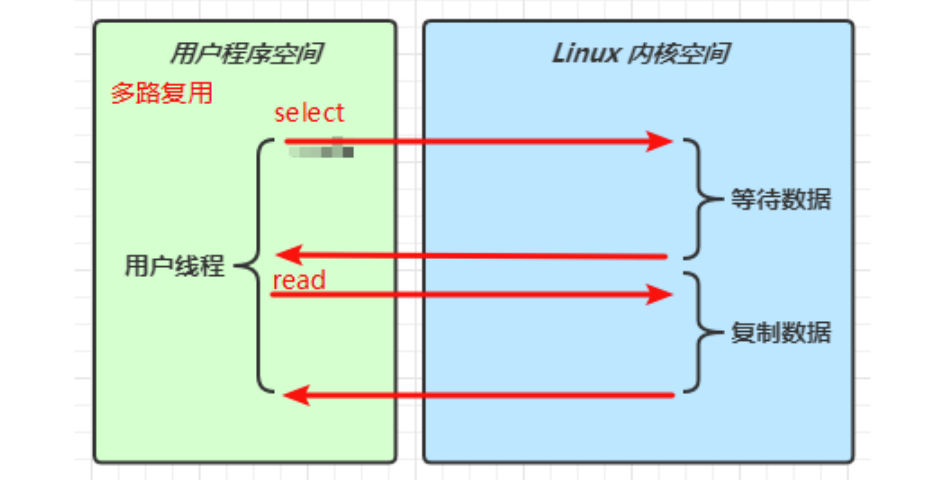
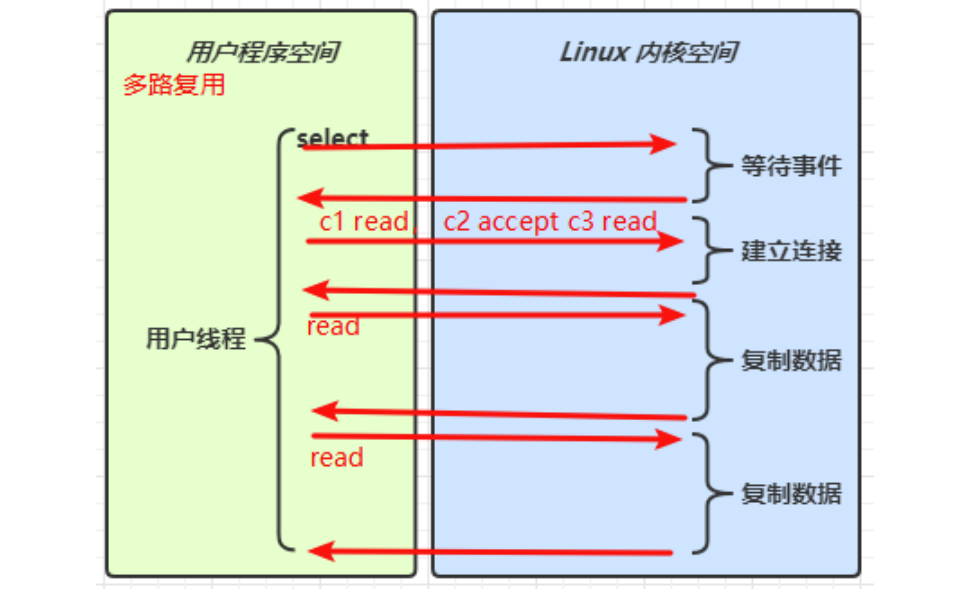
(3)多路复用
(4)信号驱动
(5)异步IO
阻塞IO vs 多路复用
5.3 零拷贝
传统IO问题
- 传统的IO将一个文件通过socket写出
File f = new File("helloword/data.txt");
RandomAccessFile file = new RandomAccessFile(file, "r");

byte[] buf = new byte[(int)f.length()];
file.read(buf);

Socket socket = ...;
socket.getOutputStream().write(buf);
内部的工作流程是这样的:
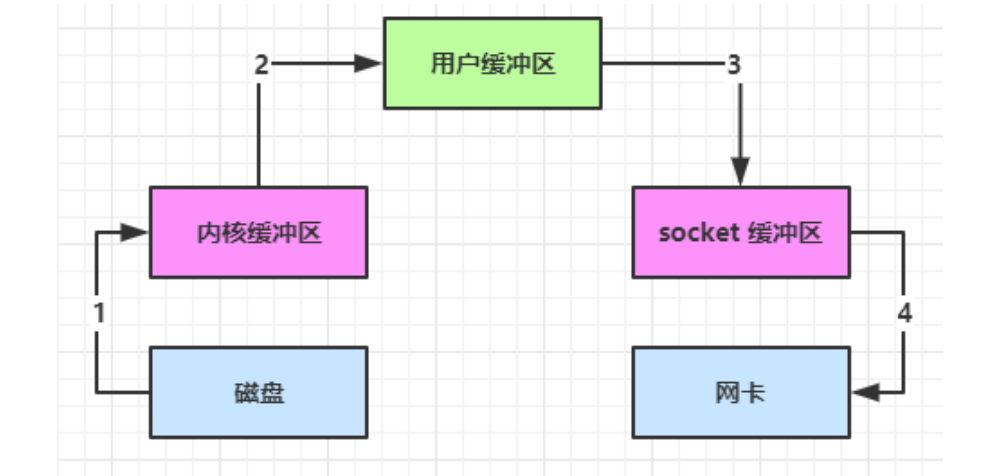
1. Java本身并不具备IO读写能力,因此read方法调用后,要从Java程序的用户态切换至内核态,去调用操作系统(Kernel)的读写能力,将数据读入内核缓冲区。这期间用户线程阻塞,操作系统使用DMA(Direct Memory Access)来实现文件读,期间也不会使用cpu。
- DMA也可以理解为硬件单元,用来解放cpu,完成文件IO
2. 从内核态切换回用户态,将数据从内核缓冲区读入用户缓冲区(即byte[] buf),这期间cpu会参与拷贝,无法利用DMA。
3. 调用write方法,这时将数据从用户缓冲区(byte[] buf)写入socket缓冲区,cpu会参与拷贝
4. 接下来要向网卡写数据,这项能力Java又不具备,因此又得从用户态切换至内核态,调用操作系统的写能力,使用DMA将socket缓冲区的数据写入网卡,不会使用cpu
可以看到中间环节较多,java的IO实际不是物理设备级别的读写,而是缓存的复制,底层的真正读写是操作系统来完成的:
- 用户态与内核态的切换发生了3次,这个操作比较重量级;
- 数据拷贝了共4次。
NIO优化
通过DirectByteBuffer:
- ByteBuffer.allocate(10):HeapByteBuffer使用的还是Java内存;
- ByteBuffer.allocateDirect(10):DirectByteBuffer使用的是操作系统内存
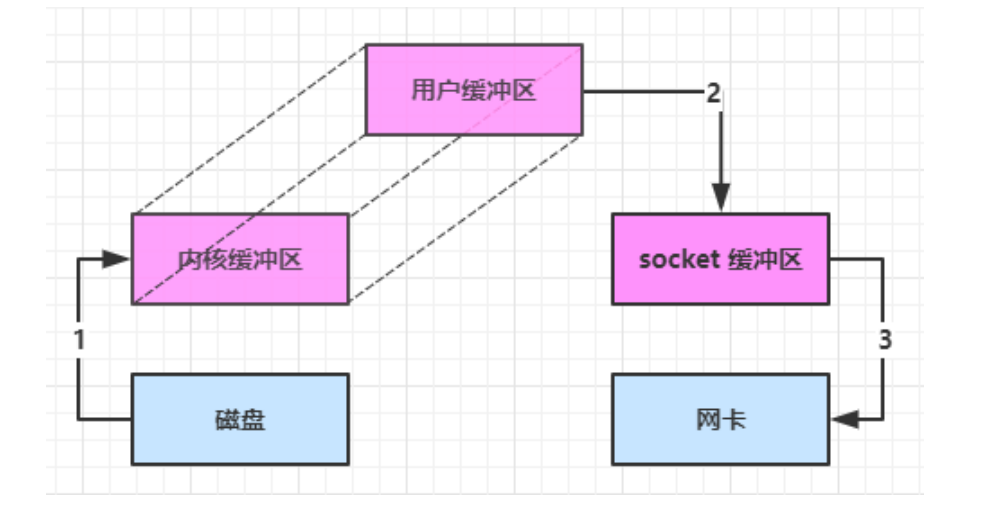
Java可以使用DirectByteBuf将堆外内存映射到jvm内存中来直接访问使用
- 这块内存不受jvm垃圾回收的影响,因此内存地址固定,有助于IO读写
- java中的DirectByteBuf对象仅维护了此内存的虚引用,内存回收分成两步:
- DirectByteBuf对象被垃圾回收,将虚引用加入引用队列
- 通过专门线程访问引用队列,根据虚引用释放堆外内存
- 减少了一次数据拷贝,用户态与内核态的切换次数没有减少
进一步优化:底层采用了Linux 2.1后提供的sendFile方法,java中对应着两个channel调用transferTo / transferFrom方法拷贝数据
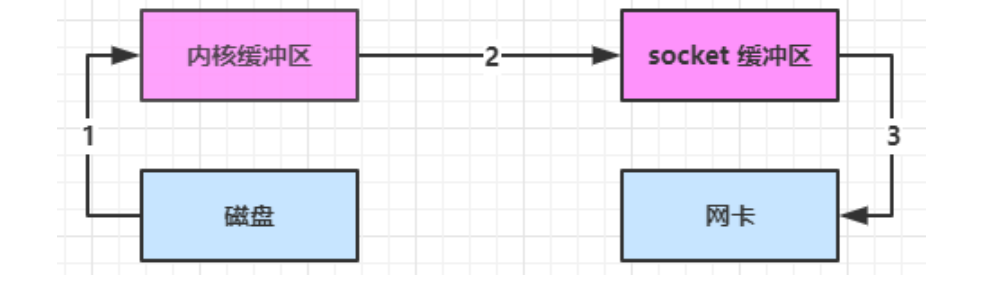
1. java调用transferTo方法后,要从java程序的用户态切换至内核态,使用DMA将数据读入内核缓冲区,不会使用cpu;
2. 数据从内核缓冲区传输到socket缓冲区,cpu会参与拷贝
3. 最后使用DMA将socket缓冲区的数据写入网卡,不会使用cpu
可以看到,只发生了一次用户态与内核态的切换,数据拷贝了3次。
进一步优化:Linux 2.4
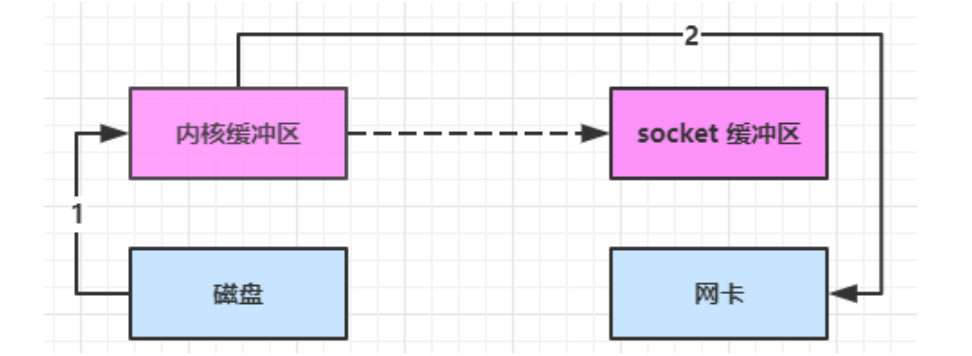
1. java调用transferTo方法后,要从java程序的用户态切换至内核态,使用DMA将数据读入内核缓冲区,不会使用cpu
2. 只会将一些offset和length信息拷入socket缓冲区,几乎无消耗
3. 使用DMA将内核缓冲区的数据写入网卡,不会使用cpu
整个过程仅只发生了一次用户态与内核态的切换,数据拷贝了2次。所谓的【零拷贝】,并不是真正无拷贝,而是在不会拷贝重复数据到jvm内存中,零拷贝的优点有:
- 更少的用户态与内核态的切换
- 不利于cpu计算,减少cpu缓存伪共享
- 零拷贝适合小文件传输
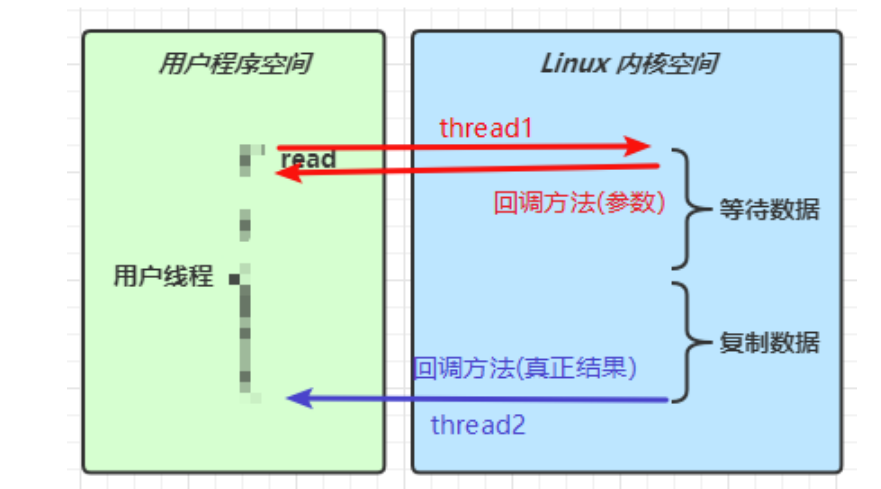
5.4 AIO
AIO用来解决数据复制阶段的阻塞问题
- 同步意味着,在进行读写操作时,线程需要等待结果,还是相当于闲置
- 异步意味着,在进行读写操作时,线程不必等待结果,而是将来由操作系统来通过回调方式由另外的线程来获得结果
异步模型需要底层操作系统(Kernel)提供支持
- Winddows系统通过IOCP实现了真正的异步IO
- Linux系统异步IO在2.6版本引入,但其底层实现还是用多路复用模拟了异步IO,性能没有优势
文件AIO
package cn.itcast.netty.c1_1;

import lombok.extern.slf4j.Slf4j;

import java.io.IOException;
import java.nio.ByteBuffer;
import java.nio.channels.AsynchronousFileChannel;
import java.nio.channels.CompletionHandler;
import java.nio.file.Paths;
import java.nio.file.StandardOpenOption;

import static cn.itcast.netty.c1.ByteBufferUtil.debugAll;

@Slf4j
public class AioFileChannel {

    public static void main(String[] args) throws IOException {
        try (AsynchronousFileChannel channel = AsynchronousFileChannel.open(Paths.get("data.txt"), StandardOpenOption.READ)) {
            // 参数1 ByteBuffer
            // 参数2 读取的起始位置
            // 参数3 附件
            // 参数4 回调对象
            ByteBuffer buffer = ByteBuffer.allocate(16);

            log.debug("read begin...");
            channel.read(buffer, 0, buffer, new CompletionHandler<Integer, ByteBuffer>() {
                // 守护线程

                @Override
                public void completed(Integer result, ByteBuffer attachment) {
                    // read成功
                    log.debug("read completed...");
                    attachment.flip();
                    debugAll(attachment);
                }

                @Override
                public void failed(Throwable exc, ByteBuffer attachment) {
                    // read失败
                    exc.printStackTrace();
                }
            });

            log.debug("read end...");
        } catch (IOException e) {
            e.printStackTrace();
        };

        System.in.read();
    }
}
输出
14:26:29 [DEBUG] [main] c.i.n.c.AioFileChannel - read begin...
14:26:29 [DEBUG] [main] c.i.n.c.AioFileChannel - read end...
14:26:29 [DEBUG] [Thread-16] c.i.n.c.AioFileChannel - read completed...
+--------+-------------------- all ------------------------+----------------+
position: [0], limit: [13]
+-------------------------------------------------+
| 0 1 2 3 4 5 6 7 8 9 a b c d e f |
+--------+-------------------------------------------------+----------------+
|00000000| 31 32 33 34 35 36 37 38 39 30 61 62 63 00 00 00 |1234567890abc...|
+--------+-------------------------------------------------+----------------+
可以看到
- 响应文件读取成功的是另一个线程Thread-16
- 主线程并没有IO操作阻塞
💡守护线程
默认文件AIO使用的线程都是守护线程,所以最后要执行System.in.read()以避免守护线程意外结束
网络AIO
服务器端代码
package cn.itcast.netty.c1_1;

import java.io.IOException;
import java.net.InetSocketAddress;
import java.nio.ByteBuffer;
import java.nio.channels.AsynchronousServerSocketChannel;
import java.nio.channels.AsynchronousSocketChannel;
import java.nio.channels.CompletionHandler;
import java.nio.charset.Charset;

public class AioServer {
    public static void main(String[] args) throws IOException {
        AsynchronousServerSocketChannel ssc = AsynchronousServerSocketChannel.open();
        ssc.bind(new InetSocketAddress(8080));
        ssc.accept(null, new AcceptHandler(ssc));
        System.in.read();
    }

    private static void closeChannel(AsynchronousSocketChannel sc) {
        try {
            System.out.printf("[%s] %s close\n", Thread.currentThread().getName(), sc.getRemoteAddress());
            sc.close();
        } catch (IOException e) {
            e.printStackTrace();
        }
    }

    private static class ReadHandler implements CompletionHandler<Integer, ByteBuffer> {
        private final AsynchronousSocketChannel sc;

        public ReadHandler(AsynchronousSocketChannel sc) {
            this.sc = sc;
        }

        @Override
        public void completed(Integer result, ByteBuffer attachment) {
            try {
                if (result == -1) {
                    closeChannel(sc);
                    return;
                }

                System.out.printf("[%s] %s read\n", Thread.currentThread().getName(), sc.getRemoteAddress());
                attachment.flip();

                System.out.println(Charset.defaultCharset().decode(attachment));
                attachment.clear();

                // 处理完第一个read时,需要再次调用read方法来处理下一个read事件
                sc.read(attachment, attachment, this);
            } catch (IOException e) {
                e.printStackTrace();
            }
        }

        @Override
        public void failed(Throwable exc, ByteBuffer attachment) {
            closeChannel(sc);
            exc.printStackTrace();
        }
    }

    private static class WriteHandler implements CompletionHandler<Integer, ByteBuffer> {
        private final  AsynchronousSocketChannel sc;

        public WriteHandler(AsynchronousSocketChannel sc) {
            this.sc = sc;
        }

        @Override
        public void completed(Integer result, ByteBuffer attachment) {
            // 如果作为附件的buffer还有内容,需要再次write 写出剩余内容
            if (attachment.hasRemaining()) {
                sc.write(attachment);
            }
        }

        @Override
        public void failed(Throwable exc, ByteBuffer attachment) {
            exc.printStackTrace();
            closeChannel(sc);
        }
    }

    private static class AcceptHandler implements CompletionHandler<AsynchronousSocketChannel, Object> {
        private final AsynchronousServerSocketChannel ssc;
        public AcceptHandler(AsynchronousServerSocketChannel ssc) {
            this.ssc = ssc;
        }


        @Override
        public void completed(AsynchronousSocketChannel sc, Object attachment) {
            try {
                System.out.printf("[%s] %s connected\n", Thread.currentThread().getName(), sc.getRemoteAddress());
            } catch (IOException e) {
                e.printStackTrace();
            }

            ByteBuffer buffer = ByteBuffer.allocate(16);
            // 读事件由ReadHandler处理
            sc.read(buffer, buffer, new ReadHandler(sc));
            // 写事件由writeHandler处理
            sc.write(Charset.defaultCharset().encode("server hello!"), ByteBuffer.allocate(16), new WriteHandler(sc));

            // 处理完第一个accept时,需要再次调用accept方法来处理下一个accept事件
            ssc.accept(null, this);
        }

        @Override
        public void failed(Throwable exc, Object attachment) {
            exc.printStackTrace();
        }
    }
}


 3309
3309

 被折叠的 条评论
为什么被折叠?
被折叠的 条评论
为什么被折叠?
 到【灌水乐园】发言


