


前言
欢迎大家我分享和推荐好用的代码段~~
声明
欢迎转载,但请保留文章原始出处:
CSDN:http://www.csdn.net
雨季o莫忧离:http://blog.csdn.net/luckkof
正文
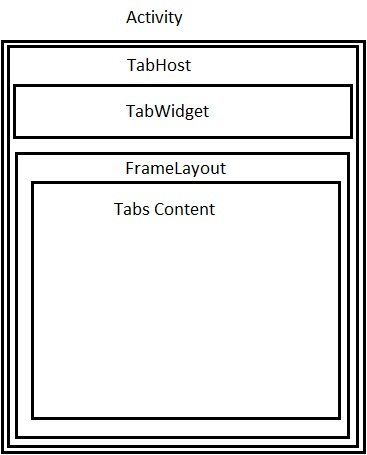
Tab应用的结构
TabHost的Activity的结构如下:
<?xml version="1.0" encoding="utf-8"?>
 <!-- 定义TabHost组件 -->
 <LinearLayout xmlns:android="http://schemas.android.com/apk/res/android" android:layout_width="fill_parent" android:layout_height="fill_parent">
  <!-- TabHost必须包含一个 TabWidget和一个FrameLayout-->
  <TabHost android:id="@+id/tabhost" android:layout_width="fill_parent" android:layout_height="wrap_content">
            <!-- TabWidget的id属性必须为 @android:id/tabs-->
            <TabWidget android:id="@android:id/tabs" android:orientation="horizontal" android:layout_width="fill_parent"
              android:layout_height="wrap_content" />
            <!-- FrameLayout的id属性必须为 @android:id/tabcontent-->
             <FrameLayout android:id="@android:id/tabcontent" android:layout_width="fill_parent" android:layout_height="fill_parent">
                <LinearLayout android:id="@+id/linear01" android:layout_width="match_parent" android:layout_height="match_parent" android:layout_marginTop="50dp">
					<TextView android:id="@+id/view1" android:layout_width="fill_parent" android:layout_height="fill_parent" android:text="The one"/>
                </LinearLayout>
                <LinearLayout android:id="@+id/linear02" android:layout_width="match_parent" android:layout_height="match_parent" android:layout_marginTop="50dp">
                	<TextView android:id="@+id/view2" android:layout_width="fill_parent" android:layout_height="fill_parent" android:text="The two"/>
                </LinearLayout>
                <LinearLayout android:id="@+id/linear03" android:layout_width="match_parent" android:layout_height="match_parent" android:layout_marginTop="50dp">
                	<TextView android:id="@+id/view3" android:layout_width="fill_parent" android:layout_height="fill_parent" android:text="The three"/>
                </LinearLayout>
             </FrameLayout>
    </TabHost>
</LinearLayout>
package com.example.tabhostdemo;

import android.app.Activity;
import android.os.Bundle;
import android.widget.TabHost;

public class MainActivity extends Activity {

	@Override
	protected void onCreate(Bundle savedInstanceState) {
		super.onCreate(savedInstanceState);
		setContentView(R.layout.activity_main);

		TabHost tabHost = (TabHost) findViewById(R.id.tabhost);
		// 如果没有继承TabActivity时,通过该种方法加载启动tabHost
		tabHost.setup();

		// 添加第一个标签页
		tabHost.addTab(tabHost.newTabSpec("tab01").setIndicator("已开始")
				.setContent(R.id.linear01));

		// 添加第二个标签页,并在其标签上添加一个图片
		tabHost.addTab(tabHost
				.newTabSpec("tab02")
				.setIndicator("待开始",
						getResources().getDrawable(R.drawable.ic_launcher))
				.setContent(R.id.linear02));

		// 添加第三个标签页
		tabHost.addTab(tabHost.newTabSpec("tab03").setIndicator("已完成")
				.setContent(R.id.linear03));


	}
}


 810
810

 被折叠的 条评论
为什么被折叠?
被折叠的 条评论
为什么被折叠?
 到【灌水乐园】发言


