


一、什么是 Spring MVC?
官方对于
Spring MVC
的描述是这样的:
Spring Web MVC is the original web framework built on the Servlet API and has beenincluded in the Spring Framework from the very beginning. The formal name, “Spring WebMVC,” comes from the name of its source module ( spring-webmvc ), but it is more commonly known as “Spring MVC”.引用来自: https://docs.spring.io/springframework/docs/current/reference/html/web.html#spring-web
翻译为中文:
Spring Web MVC 是基于 Servlet API 构建的原始 Web 框架,从一开始就包含在 Spring 框架中。它的正式名称“Spring Web MVC” 来自其源模块的名称 (Spring-webmvc) ,但它通常被称为 “Spring MVC”。
从上述定义我们可以得出两个关键信息:
1. Spring MVC
是一个
Web
框架。
2. Spring MVC
是基于
Servlet API
构建的。
然而要真正的理解什么是
Spring MVC
?我们首先要搞清楚什么是
MVC
?
1.1 MVC 定义
MVC
是
Model View Controller
的缩写,它是软件工程中的一种软件架构模式,它把软件系统分为模型、视图和控制器三个基本部分。
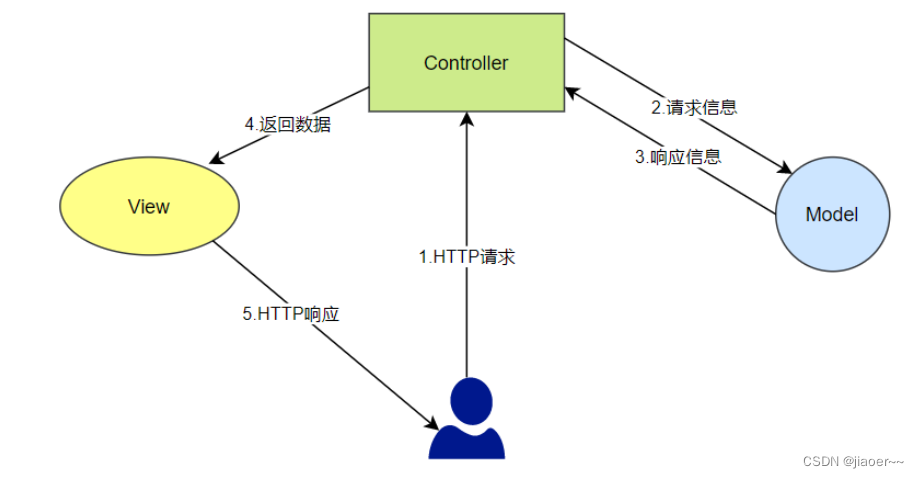
- Model(模型)是应用程序中用于处理应用程序数据逻辑的部分。通常模型对象负责在数据库中存取数据。
- View(视图)是应用程序中处理数据显示的部分。通常视图是依据模型数据创建的。
- Controller(控制器)是应用程序中处理用户交互的部分。通常控制器负责从视图读取数据,控制用户输入,并向模型发送数据。
1.2 MVC 和 Spring MVC 的关系
MVC
是一种思想,而
Spring MVC
是对
MVC
思想的具体实现。
总结来说,
Spring MVC
是一个实现了
MVC
模式,并继承了
Servlet API
的
Web
框架。既然是
Web
框架,那么当用户在浏览器中输入了 url
之后,我们的
Spring MVC
项目就可以感知到用户的请求。
二、为什么要学 Spring MVC?
现在
绝大部分的
Java
项目都是基于
Spring
(或
Spring Boot
)的,而
Spring
的核心就是
Spring
MVC
。也就是说
Spring MVC
是
Spring
框架的核心模块,而
Spring Boot
是
Spring
的脚手架,因此我们可以推断出,现在市面上绝大部分的 Java
项目约等于
Spring MVC
项目,这是我们要学
Spring MVC 的原因。
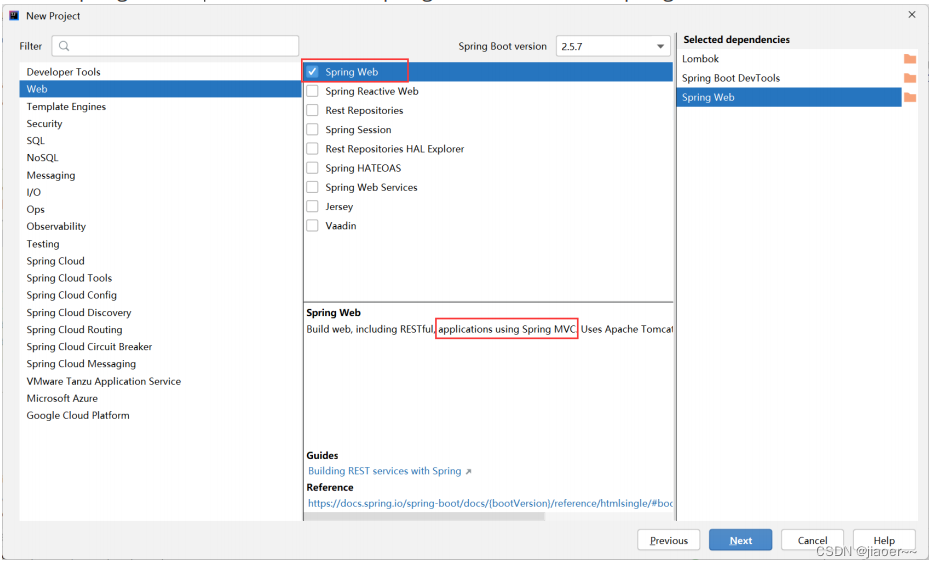
在创建
Spring Boot
项目时,我们勾选的
Spring Web
框架其实就是
Spring MVC
框架,如下图所示:
简单来说,我们之所以要学习
Spring MVC
是因为它是一切项目的基础,我们以后创建的所有
Spring
、Spring Boot 项目基本都是基于
Spring MVC
的。
三、怎么学 Spring MVC?
学习
Spring MVC
我们只需要掌握以下
3
个功能:
1. 连接的功能 :将用户(浏览器)和 Java 程序连接起来,也就是访问一个地址能够调用到我们的 Spring 程序。2. 获取参数的功能 :用户访问的时候会带一些参数,在程序中要想办法获取到参数。3. 输出数据的功能 :执行了业务逻辑之后,要把程序执行的结果返回给用户。对于 Spring MVC 来说,掌握了以上 3 个功能就相当于掌握了 Spring MVC 。
3.1 Spring MVC 创建和连接
Spring MVC
项目创建和
Spring Boot
创建项目相同(
Spring MVC
使用
Spring Boot
的方式创建),在创建的时候选择 Spring Web
就相当于创建了
Spring MVC
的项目。
在
Spring MVC
中使用
@RequestMapping
来实现
URL
路由映射
,也就是浏览器连接程序的作用。接下来要实现的功能是访问地址:
http://localhost:8080/user/hi
,能打印
“hello
,
spring mvc”
信息。
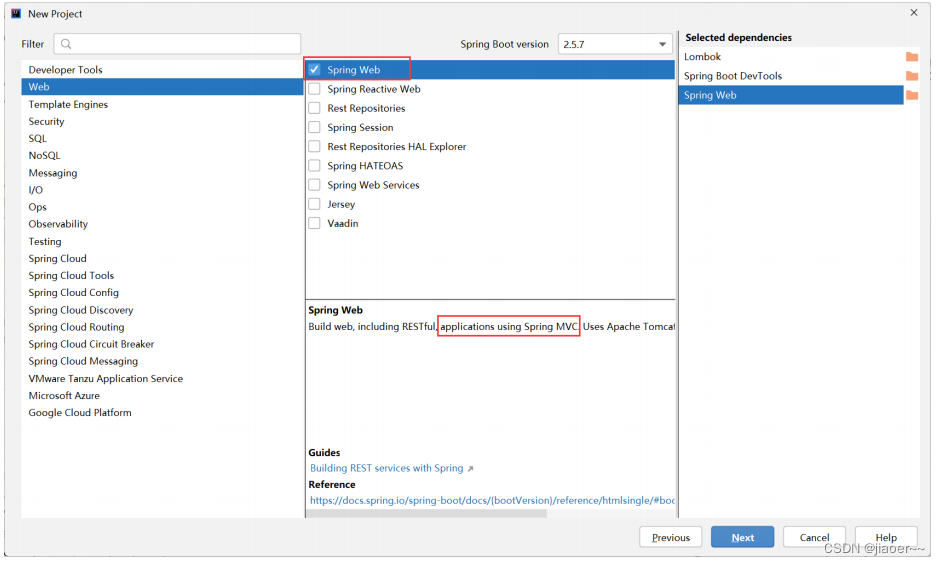
3.1.1 创建 Spring MVC 项目
Spring MVC
可以基于
Spring Boot
创建,也就是创建一个
Spring Boot
项目,勾选上
Spring Web
模块即可,如下图所示:
接下来,创建一个 UserController 类,实现用户到 Spring 程序的互联互通,具体实现代码如下:
import org.springframework.stereotype.Controller;
import org.springframework.web.bind.annotation.RequestMapping;
import org.springframework.web.bind.annotation.ResponseBody;
@Controller // 让 spring 框架启动时,加载
@ResponseBody // 返回一个 text/html 信息
@RequestMapping("/user") // 路由器规则注册
public class UserController {
// 路由器规则注册
@RequestMapping("/hi")
public String sayHi(){
return "<h1>Hi,Spring MVC.</h1>";
    }
}
这样实现之后,当访问地址:
http://localhost:8080/user/hi
时就能打印
“hello
,
spring mvc”
的信息
了。
3.1.2 @RequestMapping 注解介绍
@RequestMapping
是
Spring Web
应用程序中最常被用到的注解之一,它是用来注册接口的路由映射的。
路由映射:所谓的路由映射指的是,当用户访问一个
url
时,将用户的请求对应到程序中某个类的
某个方法的过程就叫路由映射。
@RequestMapping
基础使用:
import com.example.demo.model.Person;
import org.springframework.stereotype.Controller;
import org.springframework.web.bind.annotation.RequestMapping;
@Controller
@RequestMapping("/p")
public class PersonController {
@RequestMapping("/index")
public Object index(Person person){
// 获取参数
System.out.println(person.getName() +":"+
person.getPassword());
// 执行业务...
return "/index.html";
    }
}
@RequestMapping
即可修饰类,也可以修饰方法
,当修饰类和方法时,访问的地址是类
+
方法。
@RequestMapping
也可以直接修饰方法,代码实现如下:
import org.springframework.stereotype.Controller;
import org.springframework.web.bind.annotation.RequestMapping;
import org.springframework.web.bind.annotation.ResponseBody;
@Controller
@ResponseBody // 定义返回的数据格式为非视图(text/html)
public class UserController {
@RequestMapping("/hi")
public String sayHi(){
return "<h1>Hi,Spring MVC.</h1>";
    }
}
方法地址:
http://localhost:8080/
hi
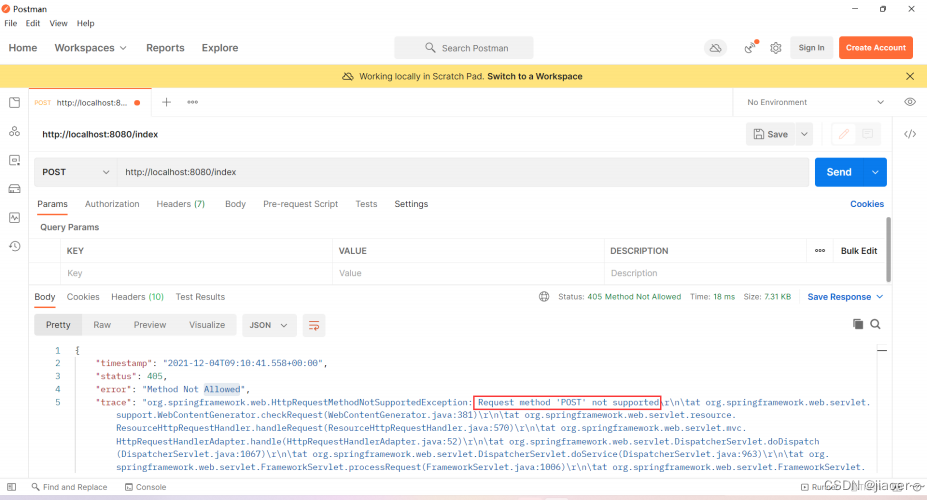
3.1.3 @RequestMapping 是 post 还是 get 请求?
@RequestMapping
默认是
get
方式的请求,可以使用
postman
进行测试。
postman
的使用详见:
《
Postman
下载与使用》
上面的示例,当我们尝试使用
post
访问时,效果如下:
如何接收 post 请求?
我们可以显示的指定
@RequestMapping
来接收
POST
的情况,如下所示:
import org.springframework.stereotype.Controller;
import org.springframework.web.bind.annotation.RequestMapping;
import org.springframework.web.bind.annotation.RequestMethod;
import org.springframework.web.bind.annotation.ResponseBody;
@Controller
@ResponseBody // 定义返回的数据格式为非视图(text/html)
public class UserController {
@RequestMapping(value = "/hi",method= RequestMethod.POST)
public String sayHi(){
return "<h1>Hi,Spring MVC.</h1>";
    }
}
3.1.4 @GetMapping 和 PostMapping
get
请求的
3
种写法:
// 写法1
@RequestMapping("/index")
// 写法2
@RequestMapping(value = "/index",method = RequestMethod.GET)
// 写法3
@GetMapping("/index")
post
请求的
2
种写法:
// 写法1
@RequestMapping(value = "/index",method = RequestMethod.POST)
// 写法2
@PostMapping("/index")
3.2 获取参数
3.2.1 传递单个参数
在
Spring MVC
中可以直接用方法中的参数来实现传参,比如以下代码:
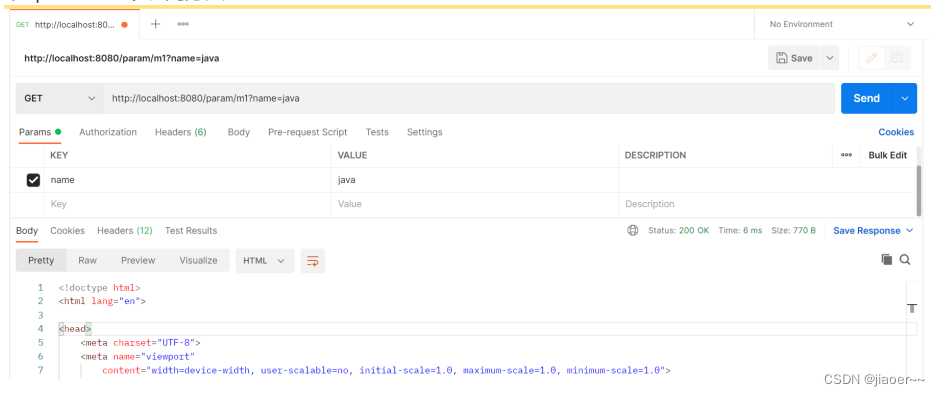
@RequestMapping("/m1")
public Object method_1(String name){
System.out.println("参数 name:"+name);
return "/index.html";
}
在
postman
中访问方法:
程序的执行结果:

3.2.2 传递对象
并且
Spring MVC
可以自动实现参数对象的赋值,比如
Person
对象:
import lombok.Data;
@Data
public class Person {
private int id;
private String name;
private String password;
}
传递对象代码实现:
@RequestMapping("/m2")
public Object method_2(Person p){
System.out.println("对象中的 name:"+p.getName());
System.out.println("对象中的 password:"+p.getPassword());
return "/index.html";
}
前端访问:

最终执行结果:

3.2.3 表单参数传递/传递多个参数(非对象)
@RequestMapping("/m3")
public Object method_3(String name, String pwd) {
System.out.println("name 参数:" + name);
System.out.println("pwd 参数:" + pwd);
return "/index.html";
}
前台访问地址:

重要说明:当有多个参数时,前后端进行参数匹配时,是以参数的名称进行匹配的,因此参数的位
置是不影响后端获取参数的结果。
3.2.4 后端参数重命名(后端参数映射)
某些特殊的情况下,前端传递的参数
key
和我们后端接收的
key
可以不一致,比如前端传递了一个
time 给后端,而后端又是有 createtime
字段来接收的,这样就会出现参数接收不到的情况,如果出现这种情况,我们就可以使用 @RequestParam
来重命名前后端的参数值。
具体示例如下,后端实现代码:
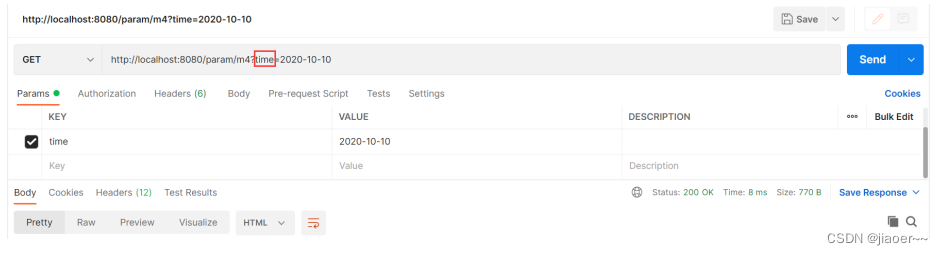

@RequestMapping("/m4")
public Object method_4(@RequestParam("time") String createtime) {
System.out.println("时间:" + createtime);
return "/index.html";
}
前端访问地址:
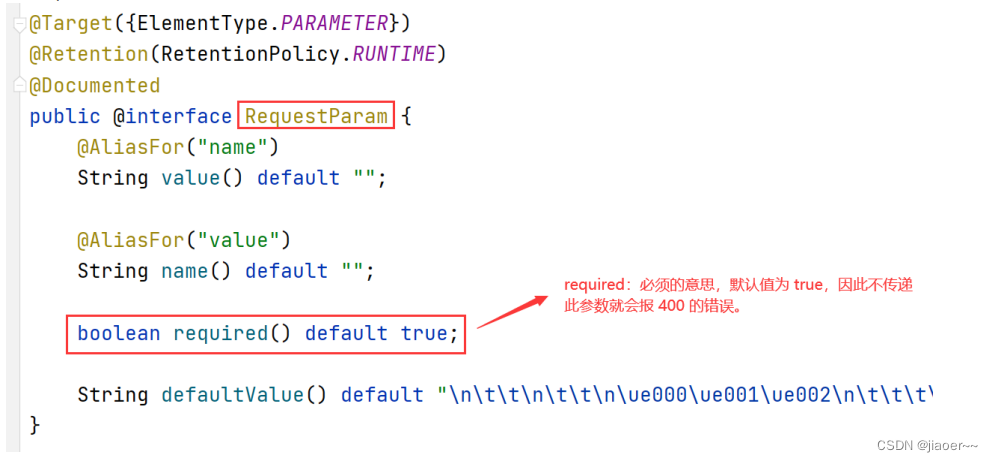
3.2.5 设置参数必传@RequestParam
上面的列子,如果我们是前端传递一个非
time
的参数,就会出现程序报错的情况,如下图所示:
这是因为后端已经声明了前端必须传递一个
time
的参数,但是前端没有给后端传递,我们查看
@RequestParam
注解的实现细节就可以发现端倪,注解实现如下:
非必传参数设置
如果我们的实际业务前端的参数是一个非必传的参数,我们可以通过设置
@RequestParam
中的
required=false
来避免不传递时报错,具体实现如下:
@RequestMapping("/m4")
public Object method_4(@RequestParam(value = "time", required = false) String
createtime) {
System.out.println("时间:" + createtime);
return "/index.html";
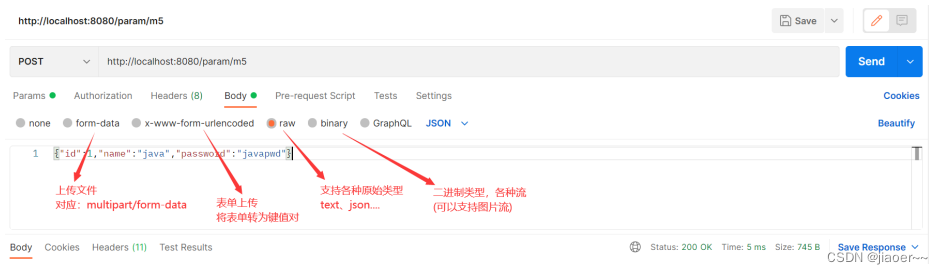
}3.2.6 @RequestBody 接收JSON对象
后端接收代码:
@RequestMapping(value = "/m5", method = RequestMethod.POST)
public Object method_5(@RequestBody Person person) {
System.out.println("Person:" + person);
return "redirect:/index.html";
}
尝试去除掉 @RequestBody 试试。
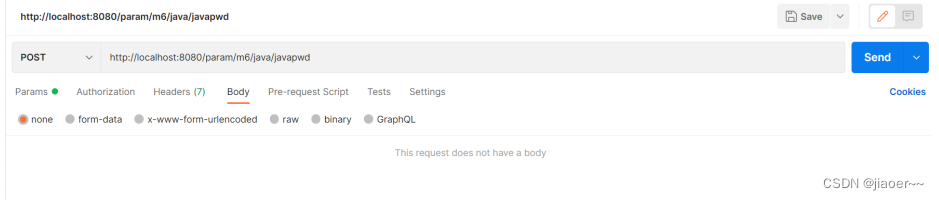
3.2.7 获取URL中参数@PathVariable
后端实现代码:
@PostMapping("/m6/{name}/{password}")
public Object method_6(@PathVariable String name, @PathVariable String password)
{
System.out.println("name:" + name);
System.out.println("password:" + password);
return "redirect:/index.html";
}
前端方法地址:
注意事项:
@PostMapping("/m6/{name}/{password}")
中的
{password}
参数不能省略。
3.2.8 上传文件@RequestPart
@RequestMapping("/param9")
public String param9(String name, @RequestPart("myfile") MultipartFile file)
throws IOException {
// 获取文件后缀名
String fileName =
file.getOriginalFilename().substring(file.getOriginalFilename().lastIndexOf(".")
);
// 文件保存地址
String filePath =
ClassUtils.getDefaultClassLoader().getResource("static").getPath() +
"/" + UUID.randomUUID() + fileName;
// 保存文件
file.transferTo(new File(filePath));
return filePath + " 上传成功.";
}
获取项目目录的几种方式:
ResourceUtils.getFile(ResourceUtils.CLASSPATH_URL_PREFIX).getPath();
new ClassPathResource("").getFile().getAbsolutePath();
ClassUtils.getDefaultClassLoader().getResource("").getPath();
ResourceUtils.getFile("classpath:static/").getPath();
3.2.9 获取Cookie/Session/header
获取 Request 和 Response 对象
@RequestMapping("/param10")
public String param10(HttpServletResponse response, HttpServletRequest request)
{
String name = request.getParameter("name");
// 获取所有 cookie 信息
Cookie[] cookies = request.getCookies();
return name + " 你好.";
}
传统获取 header/cookie
@RequestMapping("/param10")
@ResponseBody
public String param10(HttpServletResponse response, HttpServletRequest request)
{
String name = request.getParameter("name");
// 获取所有 cookie 信息
Cookie[] cookies = request.getCookies();
String userAgent = request.getHeader("User-Agent");
return name + ":"+userAgent;
}
简洁的获取 Cookie—@CookieValue
@RequestMapping("/cookie")
@ResponseBody
public String cookie(@CookieValue("bite") String bite) {
return "cookie:" + bite;
}
简洁获取 Header—@RequestHeader
@RequestMapping("/header")
@ResponseBody
public String header(@RequestHeader("User-Agent") String userAgent) {
return "userAgent:"+userAgent;
}
Session 存储和获取
Session
存储和
Servlet
类似,是使用
HttpServletRequest
中获取的,如下代码所示:
@RequestMapping("/setsess")
@ResponseBody
public String setsess(HttpServletRequest request) {
// 获取 HttpSession 对象,参数设置为 true 表示如果没有 session 对象就创建一个
session
HttpSession session = request.getSession(true);
if(session!=null){
session.setAttribute("username","java");
}
return "session 存储成功";
}
读取 Session 可以使用 HttpServletRequest,如下代码所示:
@RequestMapping("/sess")
@ResponseBody
public String sess(HttpServletRequest request) {
// 如果 session 不存在,不会自动创建
HttpSession session = request.getSession(false);
String username = "暂无";
if(session!=null && session.getAttribute("username")!=null){
username = (String) session.getAttribute("username");
}
return "username:"+username;
}
获取 Session 更简洁的方式:
@RequestMapping("/sess2")
@ResponseBody
public String sess2(@SessionAttribute(value = "username",required = false)
String username) {
return "username:"+username;
}
3.3 返回数据
通过上面的学习我们知道,默认请求下无论是
Spring MVC
或者是
Spring Boot
返回的是视图
(
xxx.html
),而现在都是前后端分离的,后端只需要返给给前端数据即可,这个时候我们就需要使用 @ResponseBody 注解了。
3.3.1 返回静态页面
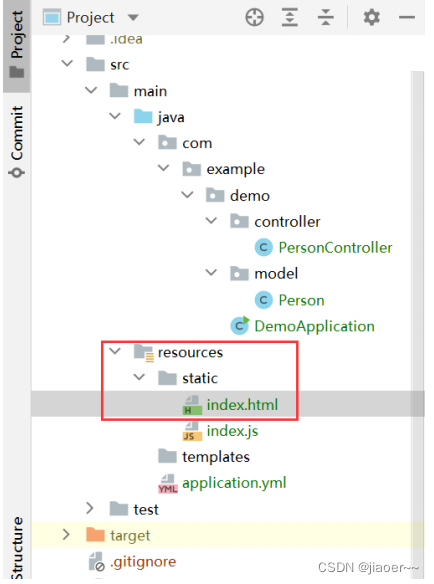
创建前端页面
index.html
<!doctype html>
<html lang="en">
<head>
<meta charset="UTF-8">
<meta name="viewport"
content="width=device-width, user-scalable=no, initial-scale=1.0,
maximum-scale=1.0, minimum-scale=1.0">
<meta http-equiv="X-UA-Compatible" content="ie=edge">
<title>hello,spring mvc</title>
<script src="index.js"></script>
</head>
<body>
<h1>Hello,Spring MVC.</h1>
</body>
</html>
创建控制器 controller:
import com.example.demo.model.Person;
import org.springframework.stereotype.Controller;
import org.springframework.web.bind.annotation.RequestMapping;
@Controller
@RequestMapping("/p")
public class PersonController {
@RequestMapping("/index")
public Object index(){
// 执行业务...
// 返回view -> index.html
return "/index.html";
    }
}
3.3.2 返回 text/html
@RequestMapping("/m7")
@ResponseBody
public String method_7() {
return "<h1>Hello,HTML~</h1>";
}

练习:实现计算器功能。
可使用
postman
传递参数,或使用
form
表单的方式提交参数。
前端页面:
<!doctype html>
<html lang="en">
<head>
<meta charset="UTF-8">
<meta name="viewport"
content="width=device-width, user-scalable=no, initial-scale=1.0,
maximum-scale=1.0, minimum-scale=1.0">
<meta http-equiv="X-UA-Compatible" content="ie=edge">
<title>计算器示例</title>
</head>
<body>
<form action="http://localhost:8080/calc/sum">
<h1>计算器</h1>
数字1:<input name="num1" type="text"><br>
数字2:<input name="num2" type="text"><br>
<input type="submit" value=" 点击相加 ">
</form>
</body>
</html>
controller
代码:
import org.springframework.stereotype.Controller;
import org.springframework.web.bind.annotation.RequestMapping;
import org.springframework.web.bind.annotation.ResponseBody;
@ResponseBody
@Controller
@RequestMapping("/calc")
public class CalcController {
@RequestMapping("/sum")
public String sum(Integer num1,Integer num2){
return String.format("<h1>计算的结果是:%d</h1><a
href='javascript:history.go(-1);'>返回</a>",num1+num2);
    }
}
3.3.3 返回 JSON 对象
@RequestMapping("/m8")
@ResponseBody
public HashMap<String, String> method_8() {
HashMap<String, String> map = new HashMap<>();
map.put("Java", "Java Value");
map.put("MySQL", "MySQL Value");
map.put("Redis", "Redis Value");
return map;
}

练习:实现登录功能,前端使用
ajax
,后端返回
json
给前端。
后端代码:
@RequestMapping(value = "/login")
@ResponseBody
public HashMap<String,Object> login(String username, String password){
HashMap<String,Object> res = new HashMap<>();
int succ = 200;
if(username!=null && password!=null &&
username.equals("admin") && password.equals("admin")){
res.put("msg","登录成功");
}else{
res.put("msg","登录失败");
}
res.put("succ",succ);
return res;
}
前端代码:
<!doctype html>
<html lang="en">
<head>
<meta charset="UTF-8">
<meta name="viewport"
content="width=device-width, user-scalable=no, initial-scale=1.0,
maximum-scale=1.0, minimum-scale=1.0">
<meta http-equiv="X-UA-Compatible" content="ie=edge">
<script src="js/jquery-1.9.1.min.js"></script>
<title>Document</title>
<script>
function mysub() {
var username = jQuery("#username").val();
var password = jQuery("#password").val();
jQuery.getJSON("/user/login",
{
"username":username,
"password":password
},
function (result) {
if(result.succ==200){
alert("返回结果:"+result.msg);
}else{
alert("操作失败,请重试。");
}
});
}
</script>
</head>
<body>
<div style="text-align: center;">
<h1>登录</h1>
用户:<input id="username">
<br>
密码:<input id="password" type="password">
<br>
<input type="button" value=" 提交 " onclick="mysub()" style="margin-top:
20px;margin-left: 50px;">
</div>
</body>
</html>
3.3.4 请求转发或请求重定向
forward VS redirect
return
不但可以返回一个视图,还可以实现跳转,跳转的方式有两种:
- forward 是请求转发;
- redirect:请求重定向。
请求转发和重定向的使用对比:
// 请求重定向
@RequestMapping("/index")
public String index(){
return "redirect:/index.html";
}
// 请求转发
@RequestMapping("/index2")
public String index2(){
return "forward:/index.html";
}
举例说明 forward 和 redirect
forward
(请求转发)和
redirect
(请求重定向)的区别,举例来说,例如,你告诉你妈妈,你想吃辣条,如果你妈妈,说好,我帮你去买,这就是 forward
请求转发;如果你妈妈让你自己去买,那么就是请求 redirect
重定向。
“
转发
”
和
“
重定向
”
理解:在中国官方发布的内容越少事也越大,
“
转发
”
和
“
重定向
”
也是一样:
字越
少,责任越大
。转发是服务器帮转的,而重定向是让浏览器重新请求另一个地址。
forward 和 redirect 具体区别如下:
1.
请求重定向(
redirect
)将请求重新定位到资源;请求转发(
forward
)服务器端转发。
2.
请求重定向地址发生变化,请求转发地址不发生变化。
3.
请求重定向与直接访问新地址效果一直,不存在原来的外部资源不能访问;请求转发服务器端转发有可能造成原外部资源不能访问。
请求转发 forward 导致问题演示
请求转发如果资源和转发的页面不在一个目录下,会导致外部资源不可访问,演示示例如下。
controller
示例代码:
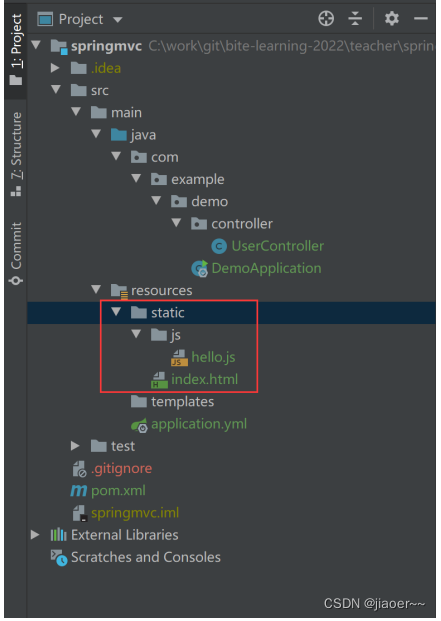
@Controller
@RequestMapping("/user")
public class UserController {
@RequestMapping(value = "/index")
public String sayHi(){
return "forward:/index.html";
    }
}
程序的目录如下:
程序的执行结果如下:


尝试将转发 foward 换成重定向 redirect,如下代码所示:
import org.springframework.stereotype.Controller;
import org.springframework.web.bind.annotation.RequestMapping;
import org.springframework.web.bind.annotation.RequestMethod;
import org.springframework.web.bind.annotation.ResponseBody;
@Controller
@RequestMapping("/user")
public class UserController {
@RequestMapping(value = "/index")
public String sayHi(){
return "redirect:/index.html";
    }
}
页面就可以正常获取到外部资源 js 了。
3.3.5 @ResponseBody 说明
- @ResponseBody 返回的值如果是字符会转换成 text/html,如果返回的是对象会转换成 application/json 返回给前端。
- @ResponseBody 可以用来修饰方法或者是修饰类,修饰类表示类中的所有方法都会返回 html 或者json,而不是视图。
3.3.6 组合注解:@RestController
@RestController = @Controller + @ResponseBody
3.3.7 查看更多注解
官方 API : https://docs.spring.io/spring-framework/docs/current/reference/html/web.html#mvcann-requestmapping


 8万+
8万+

 被折叠的 条评论
为什么被折叠?
被折叠的 条评论
为什么被折叠?
 到【灌水乐园】发言


