一 功能图和知识点
1 功能图部分:(由于网速的原因,网页部分没有加载出来,但是功能完好)

2 该部分能学到的知识点概括:
>1 UITableView的使用(简单)
>2 UICollectionView的使用
>3 请求数据
>4 模型
>5 自定义cell
>6 清除缓存
>7 细节处理
二 确定搭建方式
2 结论: 直接用storyboard来加载,在storyboard中设置分组样式,静态表格.用代码和storyboard结合的方式达到整体的效果.
三 storyboard
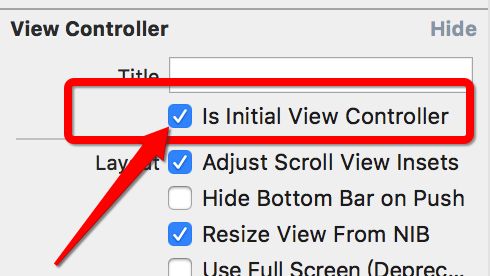
1 创建一个storyboard,注意storyboard中的设置.注意勾选选项,否则会出不了结果.
图一:
2 在Main文件中的创建控制器的方法,采用storyboard加载
代码:
UIStoryboard *storyBoard = [UIStoryboard storyboardWithName:@"XFJMeViewController" bundle:nil];
    //加载箭头指向的控制器
    XFJMeViewController *meVC = [storyBoard instantiateInitialViewController];
    XFJNavigationController *nav4 = [[XFJNavigationController alloc] initWithRootViewController:meVC];
    [self addChildViewController:nav4];
3 可能会出现的现象: 如果发现加载不出storyboard.那么原因是因为创建类的时候,系统默认的让组和行数为0,所以加载不出来.
四 设置tableView的尾部视图—->是一个UICollectionViewCell
1 注意点: collectionView必须有的步骤
—-> 1> 必须设置流水布局
—-> 2> 必须注册
—-> 3> 必须自定义cell
2 想法: 由于创建collectionView和设置有关数据代码比较多,那么我们采取抽出一个方法,用来设置collectionView.
五 collectionView代码部分
#pragma mark - 添加尾部视图
- (void)setUpFooterView
{
UICollectionViewFlowLayout *flowLayout = ({
UICollectionViewFlowLayout *flowLayout = [[UICollectionViewFlowLayout alloc] init];
flowLayout.itemSize = CGSizeMake(XFJ_itemsWH ,XFJ_itemsWH);
flowLayout.minimumInteritemSpacing = margin;
flowLayout.minimumLineSpacing = margin;
flowLayout;
});
UICollectionView *collectionView = ({
UICollectionView *collectionView = [[UICollectionView alloc] initWithFrame:CGRectMake(0, 0, 0, 0) collectionViewLayout:flowLayout];
collectionView.backgroundColor = XFJ_globeColor;
self.tableView.tableFooterView = collectionView;
collectionView.dataSource = self;
collectionView.delegate = self;
self.collectionView = collectionView;
collectionView.scrollEnabled = NO;
collectionView;
});
[collectionView registerNib:[UINib nibWithNibName:@"XFJMeCollectionViewCell" bundle:nil] forCellWithReuseIdentifier:ID];
}
- 1
- 2
- 3
- 4
- 5
- 6
- 7
- 8
- 9
- 10
- 11
- 12
- 13
- 14
- 15
- 16
- 17
- 18
- 19
- 20
- 21
- 22
- 23
- 24
- 25
- 26
- 27
- 28
- 29
- 30
- 31
- 32
- 33
- 34
六 模型
1 经过查看接口文档,模型中只需要以下的数据
@property (nonatomic, strong) NSString *icon;
@property (nonatomic, strong) NSString *name;
@property (nonatomic, strong) NSString *url;
2 模型的处理方式,采用MJ框架字典转模型
七 加载数据
框架部分采用: MJ;AFN框架
1 三大步:
—-> 1> 创建会话管理者;
—-> 2> 设置请求参数(包括:包装请求参数)
—-> 3> 发送请求(包括:字典转模型;计算cell的相关数据)
2 需要书写的代码量比较大,我们单独抽出一个方法来写该部分的功能
#pragma mark - 加载数据
- (void)setUpData
{
AFHTTPSessionManager *manager = [AFHTTPSessionManager manager];
NSMutableDictionary *dict = [NSMutableDictionary dictionary];
dict[@"a"] = @"square";
dict[@"c"] = @"topic";
[manager GET:@"http://api.budejie.com/api/api_open.php" parameters:dict progress:nil success:^(NSURLSessionDataTask * _Nonnull task, id _Nullable responseObject) {
NSArray *array = responseObject[@"square_list"];
self.meItems = [XFJMeItem mj_objectArrayWithKeyValuesArray:array];
[responseObject writeToFile:@"/Users/xiaofeng/Desktop/BuDeJie/Me.plist" atomically:YES];
[self sloveData];
[self.collectionView reloadData];
NSInteger count = self.meItems.count;
NSInteger rows = (count - margin) / cols + margin;
CGFloat cellH = XFJ_itemsWH * rows + (rows - margin) * margin;
self.collectionView.XFJ_Height = cellH;
self.tableView.tableFooterView = self.collectionView;
} failure:^(NSURLSessionDataTask * _Nullable task, NSError * _Nonnull error) {
NSLog(@"error");
}];
}
- 1
- 2
- 3
- 4
- 5
- 6
- 7
- 8
- 9
- 10
- 11
- 12
- 13
- 14
- 15
- 16
- 17
- 18
- 19
- 20
- 21
- 22
- 23
- 24
- 25
- 26
- 27
- 28
- 29
- 30
- 31
- 32
- 33
- 34
- 35
- 36
- 37
- 38
- 39
- 40
八 collectionView的数据源方法
1 组数(不写默认为1)
2 行数(由模型的数量决定)
3 cell的内容(由对应的模型决定)
数据源代码:
#pragma mark - collectionView数据源方法(组数)--->可以不写,默认为1
- (NSInteger)numberOfSectionsInCollectionView:(UICollectionView *)collectionView
{
    return 1;
}

#pragma mark - 行数
- (NSInteger)collectionView:(UICollectionView *)collectionView numberOfItemsInSection:(NSInteger)section
{
    return self.meItems.count;
}

#pragma mark - cell的内容
- (UICollectionViewCell *)collectionView:(UICollectionView *)collectionView cellForItemAtIndexPath:(NSIndexPath *)indexPath
{
    XFJMeCollectionViewCell *cell = [collectionView dequeueReusableCellWithReuseIdentifier:ID forIndexPath:indexPath];

    cell.meItem = self.meItems[indexPath.row];

    return cell;
}
- 1
- 2
- 3
- 4
- 5
- 6
- 7
- 8
- 9
- 10
- 11
- 12
- 13
- 14
- 15
- 16
- 17
- 18
- 19
- 20
- 21
九 自定义cell
1 自定义cell采用xib的方式进行cell数据的展示
—-> 采用xib的原因: 通过观察app此模块的样式,cell的样式都是一样的,固定不变的,所以可以采用xib的形式来描述
2 通过拖线的方式,我们可以通过拿到xib中设置的属性来给xib中属性赋值
3 在自定义cell中定义模型属性,重写模型的set方法
—-> 重写原因: 用来作为设置cell内容的调用,直接通过set方法来设置
4 代码部分
#pragma mark - 提供模型的set方法
- (void)setMeItem:(XFJMeItem *)meItem
{
_meItem = meItem
[self.iconImageView sd_setImageWithURL:[NSURL URLWithString:meItem.icon]]
self.nameLabel.text = meItem.name
}
十 需要用到的部分参数
1 注意const的书写原因: 不让外界修改变量
static NSString * const ID = @"cell";
static NSInteger const cols = 4;
static CGFloat const margin = 1;
#define XFJ_itemsWH (XFJ_screenW - (cols - 1) * margin) / cols
十一 点击cell的业务逻辑
1 如何判断点击的cell跳转的是网页还是控制器?
—-> 思路: 1> 根据点击的反应(网页反应时间过长) 2> 根据服务器的数据
2 点击cell跳转到safari(第一种)
—-> 优点:1> 使用方便,实现简单,代码量少
—-> 缺点:2> 该方法是从ios9开始使用的,无法满足ios9之前的版本
—-> 3> 有进度条,但是进度条并不真实,是一种假象,是做给用户看的一种假象.
—–> 2.1 设置collectionView的代理为控制器
collectionView.delegate = self;
—–> 2.2 点击某行cell就会调用下面代理方法
#pragma mark - 代理方法(点击某个cell调用)
- (void)collectionView:(UICollectionView *)collectionView didSelectItemAtIndexPath:(NSIndexPath *)indexPath
{
NSLog(@"点击了cell");
XFJMeItem *meItem = self.meItems[indexPath.row];
if (![meItem.url containsString:@"http"]) {
return;
}
NSURL *url = [NSURL URLWithString:meItem.url];
SFSafariViewController *safari = [[SFSafariViewController alloc] initWithURL:url];
[self.navigationController pushViewController:safari animated:YES];
self.navigationController.navigationBarHidden = YES;
safari.delegate = self;
}
- 1
- 2
- 3
- 4
- 5
- 6
- 7
- 8
- 9
- 10
- 11
- 12
- 13
- 14
- 15
- 16
- 17
- 18
- 19
- 20
- 21
2.3 通过设置safari的代理为控制器,那么也会执行下面的方法
#pragma mark - safari的代理方法
- (void)safariViewControllerDidFinish:(SFSafariViewController *)controller
{
[self.navigationController popViewControllerAnimated:YES];
self.navigationController.navigationBarHidden = NO;
}
3 点击cell跳转到WKWebViewcontroller(第二种)
—-> 3.1 优点和缺点
缺点:
—-> 1> 需要导入WebKit框架
—-> 2> 需要自己实现进度条读取的功能
优点:
—-> 1> 该方法是苹果从ios8开始推出使用的,这种方法能满足所有ios版本的开发.总体功能和safari一样,但是进度条的读取更加真实.
—-> 3.2 使用步骤
—-> 1> 自定控制器,创建xib文件
—-> 2> 对进度条自动布局
—-> 3> 在点击某行collectionView的cell中,实现对自定义WebViewController的跳转
—-> 4> 在自定义的控制器中实现对进度条的监听和对观察者的移除
—-> 3.3 代码块部分:
代码块一:创建控制器并且push出控制器
XFJWebViewController *webViewController = [[XFJWebViewController alloc] init];
webViewController.url = url;
[self.navigationController pushViewController:webViewController animated:YES];
代码块二:创建WebView加入到自定义的控制器的view中(该部分是主旨部分,是WebView起到的加载网页的作用)
- (void)viewDidLoad {
[super viewDidLoad];
WKWebView *webView = [[WKWebView alloc] init];
self.webView = webView;
webView.frame = self.view.bounds;
[self.view insertSubview:webView atIndex:0];
NSURLRequest *request = [NSURLRequest requestWithURL:self.url];
[webView loadRequest:request];
[webView addObserver:self forKeyPath:@"estimatedProgress" options:NSKeyValueObservingOptionNew context:nil];
}
- 1
- 2
- 3
- 4
- 5
- 6
- 7
- 8
- 9
- 10
- 11
- 12
- 13
- 14
- 15
- 16
- 17
- 18
- 19
代码块三:(由于代码块二实现了监听,那么只要有值的变化,就会调用下面的方法)
- (void)observeValueForKeyPath:(NSString *)keyPath ofObject:(id)object change:(NSDictionary<NSString *,id> *)change context:(void *)context
{
self.progressView.progress = self.webView.estimatedProgress;
self.progressView.hidden = self.progressView.progress >= 1;
}
代码块四:移除观察者(一定要移除,否则会出现莫名其妙的错误)
#pragma mark - 移除监听
- (void)dealloc
{
    [self.webView removeObserver:self forKeyPath:@"estimatedProgress"];
}
十二 清除缓存业务类
1 创建一个业务类,用来清除该部分功能的缓存,这里我就不细说了,直接抽取一个业务类,然后附上文件给大家参考
2 业务类的思路:1> 先获取文件尺寸(caches) 2> 删除文件夹中所有文件
十三 细节处理
十三 细节处理
1 处理cell之间的距离—>示例程序是一样的(设置顶部的额外滚动区域)
//分组样式默认头部和尾部都有一定的滚动区域
self.tableView.sectionFooterHeight = 10
self.tableView.sectionHeaderHeight = 0
//设置顶部额外滚动区域
self.tableView.contentInset = UIEdgeInsetsMake(-25, 0, 0, 0)
2 处理collectionView最后面几个空格
思路:往空格处添加空的模型,有多少空格就添加多少个空模型(该方法调用:是在请求数据,字典转模型之后,因为只有知道有多少模型,collectionView才能计算总共cell的位置,才能知道后面有多少个空格,针对的往里面添加空的模型)
#pragma mark - 处理数据(往最后的空格中添加空的模型)
- (void)sloveData
{
NSInteger count = self.meItems.count;
NSInteger exte = count % cols;
if (exte) {
exte = cols - exte;
for (int i = 0; i < exte; i++) {
XFJMeItem *meItem = [[XFJMeItem alloc] init];
[self.meItems addObject:meItem];
}
}
}
- 1
- 2
- 3
- 4
- 5
- 6
- 7
- 8
- 9
- 10
- 11
- 12
- 13
- 14
- 15
- 16
- 17
- 18
十四 计算collectionView行数的万能公式(不外传的)
1 count:总的模型个数
2 cols:cell的列数
3 rows:行数
—> 行数: rows = (count - 1) / cols + 1;
十五 总结
1 当如果点击cell的时候,选择push出控制器来加载内容,那么要特别的注意push的时候要隐藏顶部的导航条,但是pop的时候,顶部的导航条一定要开启,否则会将内容隐藏.
2 处理文件内容缓存问题要特别注意将空的文件排除掉,否则会多出内容.但是大家没必要将代码写一遍,我接下来给大家附上处理该模块的业务类,你们可以自己封装一下,到时候直接拷贝用就行,没必要写了.
3 最后,大家有什么问题尽管给我提出来,我一定尽力解答.后续我还会奉上百思不得姐进一步的完善代码,如果大家觉得写得还可,麻烦关注我的官方博客,谢谢!!!!
——————–>业务类
.h文件中附有用法
.h文件
/**
* 专门用于处理文件业务
*
* 用法:1 先获取文件夹尺寸
*
* 2 删除文件夹所有的文件
*/
#import <Foundation/Foundation.h>
@interface XFJFileManager : NSObject
/**
* 获取文件夹尺寸
*
* @param directoryPath 文件夹全路径
*
* @return 文件夹尺寸
*/
+ (NSInteger)getDirectorySize:(NSString *)directoryPath;
/**
* 删除文件夹下所有文件
*
* @param directoryPath 文件夹全路径
*/
+ (void)removeDirectoryPath:(NSString *)directoryPath;
@end
- 1
- 2
- 3
- 4
- 5
- 6
- 7
- 8
- 9
- 10
- 11
- 12
- 13
- 14
- 15
- 16
- 17
- 18
- 19
- 20
- 21
- 22
- 23
- 24
- 25
- 26
- 27
- 28
- 29
- 30
- 31
- 32
- 33
- 34
- 35
- 36
- 37
- 38
.m文件
#import "XFJFileManager.h"
@implementation XFJFileManager
+ (void)removeDirectoryPath:(NSString *)directoryPath
{
NSFileManager *mgr = [NSFileManager defaultManager];
BOOL isDirectory;
BOOL isExist = [mgr fileExistsAtPath:directoryPath isDirectory:&isDirectory];
if (!isExist || !isDirectory) {
NSException *excp = [NSException exceptionWithName:@"filePathError" reason:@"传错,必须传文件夹路径" userInfo:nil];
[excp raise];
}
NSArray *subpaths = [[NSFileManager defaultManager] contentsOfDirectoryAtPath:directoryPath error:nil];
for (NSString *subPath in subpaths) {
NSString *filePath = [directoryPath stringByAppendingPathComponent:subPath];
[[NSFileManager defaultManager] removeItemAtPath:filePath error:nil];
}
}
+ (NSInteger)getDirectorySize:(NSString *)directoryPath
{
NSFileManager *mgr = [NSFileManager defaultManager];
BOOL isDirectory;
BOOL isExist = [mgr fileExistsAtPath:directoryPath isDirectory:&isDirectory];
if (!isExist || !isDirectory) {
NSException *excp = [NSException exceptionWithName:@"filePathError" reason:@"传入文件路径错误.." userInfo:nil];
[excp raise];
}
NSArray *subpaths = [mgr subpathsAtPath:directoryPath];
NSInteger totalSize = 0;
for (NSString *subpath in subpaths) {
NSString *filePath = [directoryPath stringByAppendingPathComponent:subpath];
BOOL isDirectory;
BOOL isExist = [mgr fileExistsAtPath:filePath isDirectory:&isDirectory];
if (!isExist || isDirectory) continue;
if ([filePath containsString:@".DS"]) continue;
NSDictionary *attr = [mgr attributesOfItemAtPath:filePath error:nil];
NSInteger size = [attr fileSize];
totalSize += size;
}
return totalSize;
}
@end


 1705
1705

 被折叠的 条评论
为什么被折叠?
被折叠的 条评论
为什么被折叠?
 到【灌水乐园】发言


