


React 可以改变你对可见设计和应用构建的思考。当你使用 React 构建用户界面时,你首先会把它分解成一个个 组件,然后,你需要把这些组件连接在一起,使数据流经它们。在本教程中,我们将引导你使用 React 构建一个可搜索的产品数据表。不要以为这只是前端UI编程,即便是在最底层的基础支撑软硬件系统的研发当中仍然离不开此类的思维逻辑,认知物化视图有利于更加客观地形成分析心智模型的能力。
从原型开始
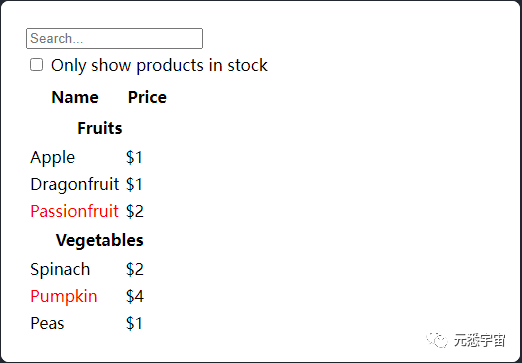
想象一下,你早已从设计者那儿得到了一个 JSON API 和原型。
JSON API 返回如下的数据:
[
{ category: "Fruits", price: "$1", stocked: true, name: "Apple" },
{ category: "Fruits", price: "$1", stocked: true, name: "Dragonfruit" },
{ category: "Fruits", price: "$2", stocked: false, name: "Passionfruit" },
{ category: "Vegetables", price: "$2", stocked: true, name: "Spinach" },
{ category: "Vegetables", price: "$4", stocked: false, name: "Pumpkin" },
{ category: "Vegetables", price: "$1", stocked: true, name: "Peas" }
]
原型看起来像是这样:
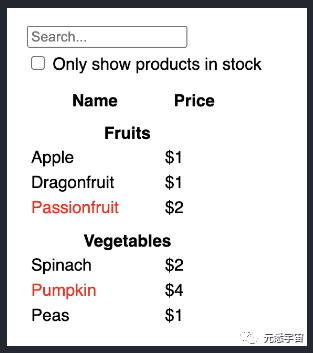
仅需跟随下面的五步,即可使用 React 中实现 UI。
步骤一:将 UI 拆解为组件层级结构
一开始,在绘制原型中的每个组件和子组件周围绘制盒子并命名它们。如果你与设计师一起工作,他们可能早已在其设计工具中对这些组件进行了命名。检查一下它们!
取决于你的使用背景,可以考虑通过不同的方式将设计分割为组件:
程序设计——使用同样的技术决定你是否应该创建一个新的函数或者对象。这一技术即 单一功能原理,也就是说,一个理想组件仅做一件事情。但随着功能的持续增长,它应该被分解为更小的子组件。
CSS——思考你将把类选择器用于何处。(然而,组件并没有那么细的粒度。)
设计——思考你将如何组织布局的层级。
如果你的 JSON 结构非常棒,经常会发现其映射到 UI 中的组件结构是一件自然而然的事情。那是因为 UI 和原型常拥有相同的信息结构——即相同的形状。将你的 UI 分割到组件,每个组件匹配到原型中的每个部分。
以下展示了五个组件:
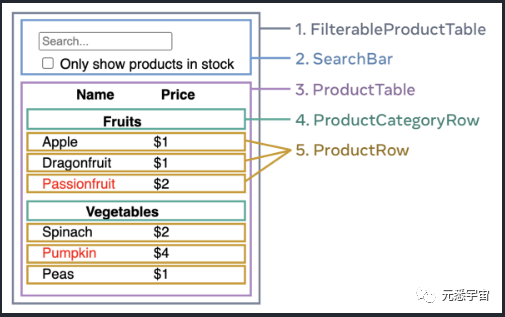
1. FilterableProductTable(灰色)包含完整的应用。
2. SearchBar(蓝色)获取用户输入。
3. ProductTable(淡紫色)根据用户输入,展示和过滤清单。
4. ProductCategoryRow(绿色)展示每个类别的表头。
5. ProductRow(黄色)展示每个产品的行。
看向 ProductTable(淡紫色),可以看到表头(包含 “Name” 和 “Price” 标签)并不是独立的组件。这是个人喜好的问题,你可以采取任何一种方式继续。在这个例子中,它是作为 ProductTable 的一部分,因为它展现在 ProductTable 列表之中。然而,如果这个表头变得复杂(举个例子,如果添加排序),创建独立的 ProductTableHeader 组件就变得有意义了。
现在你已经在原型中辨别了组件,并将它们转化为了层级结构。在原型中,组件可以展示在其它组件之中,在层级结构中如同其孩子一般:
FilterableProductTable
SearchBar
ProductTable
ProductCategoryRow
ProductRow
步骤二:使用 React 构建一个静态版本
现在你已经拥有了你自己的组件层级结构,是时候实现你的应用程序了。最直接的办法是根据你的数据模型,构建一个不带任何交互的 UI 渲染代码版本…经常是先构建一个静态版本比较简单,然后再一个个添加交互。构建一个静态版本需要写大量的代码,并不需要什么思考; 但添加交互需要大量的思考,却不需要大量的代码。
构建应用程序的静态版本来渲染你的数据模型,将构建 组件 并复用其它的组件,然后使用 props 进行传递数据。Props 是从父组件向子组件传递数据的一种方式。如果你对 state 章节很熟悉,不要在静态版本中使用 state 进行构建。state 只是为交互提供的保留功能,即数据会随着时间变化。因为这是一个静态应用程序,所以并不需要。
你既可以通过从层次结构更高层组件(如 FilterableProductTable)开始“自上而下”构建,也可以通过从更低层级组件(如 ProductRow)“自下而上”进行构建。在简单的例子中,自上而下构建通常更简单;而在大型项目中,自下而上构建更简单。
function ProductCategoryRow({ category }) {
return (
<tr>
<th colSpan="2">
{category}
</th>
</tr>
);
}
function ProductRow({ product }) {
const name = product.stocked ? product.name :
<span style={{ color: 'red' }}>
{product.name}
</span>;
return (
<tr>
<td>{name}</td>
<td>{product.price}</td>
</tr>
);
}
function ProductTable({ products }) {
const rows = [];
let lastCategory = null;
products.forEach((product) => {
if (product.category !== lastCategory) {
rows.push(
<ProductCategoryRow
category={product.category}
key={product.category} />
);
}
rows.push(
<ProductRow
product={product}
key={product.name} />
);
lastCategory = product.category;
});
return (
<table>
<thead>
<tr>
<th>Name</th>
<th>Price</th>
</tr>
</thead>
<tbody>{rows}</tbody>
</table>
);
}
function SearchBar() {
return (
<form>
<input type="text" placeholder="Search..." />
<label>
<input type="checkbox" />
{' '}
Only show products in stock
</label>
</form>
);
}
function FilterableProductTable({ products }) {
return (
<div>
<SearchBar />
<ProductTable products={products} />
</div>
);
}
const PRODUCTS = [
{category: "Fruits", price: "$1", stocked: true, name: "Apple"},
{category: "Fruits", price: "$1", stocked: true, name: "Dragonfruit"},
{category: "Fruits", price: "$2", stocked: false, name: "Passionfruit"},
{category: "Vegetables", price: "$2", stocked: true, name: "Spinach"},
{category: "Vegetables", price: "$4", stocked: false, name: "Pumpkin"},
{category: "Vegetables", price: "$1", stocked: true, name: "Peas"}
];
export default function App() {
return <FilterableProductTable products={PRODUCTS} />;
}
在构建你的组件之后,即拥有一个渲染数据模型的可复用组件库。因为这是一个静态应用程序,组件仅返回 JSX。最顶层组件(FilterableProductTable)将接收你的数据模型作为其 prop。这被称之为 单向数据流,因为数据从树的顶层组件传递到下面的组件。
陷阱
在这部分中,你不需要使用任何 state,这是下一步的内容!
步骤三:找出 UI 精简且完整的 state 表示
为了使 UI 可交互,你需要用户更改潜在的数据结构。你将可以使用 state 进行实现。
考虑将 state 作为应用程序需要记住改变数据的最小集合。组织 state 最重要的一条原则是保持它 DRY(不要自我重复)。计算出你应用程序需要的绝对精简 state 表示,按需计算其它一切。举个例子,如果你正在构建一个购物列表,你可将他们在 state 中存储为数组。如果你同时想展示列表中物品数量,不需要将其另存为一个新的 state。取而代之,可以通过读取你数组的长度来实现。
现在考虑示例应用程序中的每一条数据:
产品原始列表
搜索用户键入的文本
复选框的值
过滤后的产品列表
其中哪些是 state 呢?标记出那些不是的:
随着时间推移 保持不变?如此,便不是 state。
通过 props 从父组件传递?如此,便不是 state。
是否可以基于已存在于组件中的 state 或者 props 进行计算?如此,它肯定不是state!
剩下的可能是 state。
让我们再次一条条验证它们:
原始列表中的产品 被作为 props 传递,所以不是 state。
搜索文本似乎应该是 state,因为它会随着时间的推移而变化,并且无法从任何东西中计算出来。
复选框的值似乎是 state,因为它会随着时间的推移而变化,并且无法从任何东西中计算出来。
过滤后列表中的产品 不是 state,因为可以通过被原始列表中的产品,根据搜索框文本和复选框的值进行计算。
这就意味着只有搜索文本和复选框的值是 state!非常好!
props vs state
在 React 中有两种“模型”数据:props 和 state。下面是它们的不同之处:
props 像是你给函数传递的参数。它们使父组件可以传递数据给子组件,定制它们的展示。举个例子,Form 可以传递 color prop 至 Button。
state 像是组件的内存。它使组件可以对一些信息保持追踪,并根据交互来改变。举个例子,Button 可以保持对 isHovered state 的追踪。
props 和 state 是不同的,但它们可以共同工作。父组件将经常在 state 中放置一些信息(以便它可以改变),并且作为子组件的属性 向下 传递至它的子组件。如果第一次了解这其中的差别感到迷惑,也没关系。通过大量练习即可牢牢记住!
步骤四:验证 state 应该被放置在哪里
在验证你应用程序中的最小 state 数据之后,你需要验证哪个组件是通过改变 state 实现可响应的,或者 拥有 这个 state。记住:React 使用单向数据流,通过组件层级结构从父组件传递数据至子组件。要搞清楚哪个组件拥有哪个 state。如果你是第一次阅读此章节,可能会很有挑战,但可以通过下面的步骤搞定它!
为你应用程序中的每一个 state:
验证每一个基于特定 state 渲染的组件。
寻找它们最近并且共同的父组件——在层级结构中,一个凌驾于它们所有组件之上的组件。
决定 state 应该被放置于哪里:
通常情况下,你可以直接放置 state 于它们共同的父组件。
你也可以将 state 放置于它们父组件上层的组件。
如果你找不到一个有意义拥有这个 state 的地方,单独创建一个新的组件去管理这个 state,并将它添加到它们父组件上层的某个地方。
在之前的步骤中,你已在应用程序中创建了两个 state:输入框文本和复选框的值。在这个例子中,它们总在一起展示,将其视为一个 state 非常简单。
现在为这个 state 贯彻我们的策略:
验证使用 state 的组件:
ProductTable 需要基于 state (搜索文本和复选框值) 过滤产品列表。
SearchBar 需要展示 state (搜索文本和复选框值)。
寻找它们的父组件:它们的第一个共同父组件为 FilterableProductTable。
决定 state 放置的地方:我们将放置过滤文本和勾选 state 的值于 FilterableProductTable。
所以 state 将被放置在 FilterableProductTable。
用 useState() Hook 为组件添加 state。Hook 可以“钩住”组件的 渲染周期。在 FilterableProductTable 的顶部添加两个 state 变量,用于指定你应用程序的初始 state:
function FilterableProductTable({ products }) {
const [filterText, setFilterText] = useState('');
const [inStockOnly, setInStockOnly] = useState(false);
然后,filterText 和 inStockOnly 作为 props 传递至 ProductTable 和 SearchBar:
<div>
<SearchBar
filterText={filterText}
inStockOnly={inStockOnly} />
<ProductTable
products={products}
filterText={filterText}
inStockOnly={inStockOnly} />
</div>
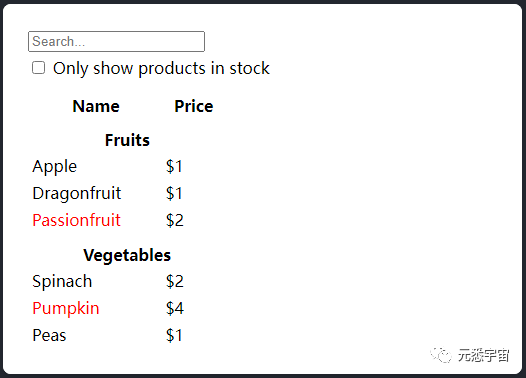
你可以查看你应用程序的表现。在下面的沙盒代码中,通过修改 useState('') 为 useState('fruit') 以编辑 filterText 的初始值,你将会发现搜索输入框和表格发生更新:
import { useState } from 'react';
function FilterableProductTable({ products }) {
const [filterText, setFilterText] = useState('');
const [inStockOnly, setInStockOnly] = useState(false);
return (
<div>
<SearchBar
filterText={filterText}
inStockOnly={inStockOnly} />
<ProductTable
products={products}
filterText={filterText}
inStockOnly={inStockOnly} />
</div>
);
}
function ProductCategoryRow({ category }) {
return (
<tr>
<th colSpan="2">
{category}
</th>
</tr>
);
}
function ProductRow({ product }) {
const name = product.stocked ? product.name :
<span style={{ color: 'red' }}>
{product.name}
</span>;
return (
<tr>
<td>{name}</td>
<td>{product.price}</td>
</tr>
);
}
function ProductTable({ products, filterText, inStockOnly }) {
const rows = [];
let lastCategory = null;
products.forEach((product) => {
if (
product.name.toLowerCase().indexOf(
filterText.toLowerCase()
) === -1
) {
return;
}
if (inStockOnly && !product.stocked) {
return;
}
if (product.category !== lastCategory) {
rows.push(
<ProductCategoryRow
category={product.category}
key={product.category} />
);
}
rows.push(
<ProductRow
product={product}
key={product.name} />
);
lastCategory = product.category;
});
return (
<table>
<thead>
<tr>
<th>Name</th>
<th>Price</th>
</tr>
</thead>
<tbody>{rows}</tbody>
</table>
);
}
function SearchBar({ filterText, inStockOnly }) {
return (
<form>
<input
type="text"
value={filterText}
placeholder="Search..."/>
<label>
<input
type="checkbox"
checked={inStockOnly} />
{' '}
Only show products in stock
</label>
</form>
);
}
const PRODUCTS = [
{category: "Fruits", price: "$1", stocked: true, name: "Apple"},
{category: "Fruits", price: "$1", stocked: true, name: "Dragonfruit"},
{category: "Fruits", price: "$2", stocked: false, name: "Passionfruit"},
{category: "Vegetables", price: "$2", stocked: true, name: "Spinach"},
{category: "Vegetables", price: "$4", stocked: false, name: "Pumpkin"},
{category: "Vegetables", price: "$1", stocked: true, name: "Peas"}
];
export default function App() {
return <FilterableProductTable products={PRODUCTS} />;
}
注意,编辑表单还不能正常工作,在上面的 sandbox 中,有一个控制台的报错,解释了原因:
Console
You provided a `value` prop to a form field without an `onChange` handler. This will render a read-only field.
在上面的沙盒中,ProductTable 和 SearchBar 读取 filterText 和 inStockOnly props 以渲染表格、输入,以及复选框。举个例子,这里展示了 SearchBar 如何填充输入的值:
function SearchBar({ filterText, inStockOnly }) {
return (
<form>
<input
type="text"
value={filterText}
placeholder="Search..."/>
然而,你还没有添加任何代码来响应用户的动作,如输入文案,这将是你应做的最后一步。
步骤五:添加反向数据流
目前你的应用程序可以带着 props 和 state 随着层级结构进行正确渲染。但是根据用户的输入改变 state,需要通过其它的方式支持数据流:深层结构的表单组件需要在 FilterableProductTable 中更新 state。
React 使数据流显式展示,是与双向数据绑定相比,需要更多的输入。如果你尝试在上述的例子中输入或者勾选复选框,发现 React 忽视了你的输入。这点是有意为之的。通过 <input value={filterText} />,已经设置了 input 的 value 属性,使之恒等于从 FilterableProductTable 传递的 filterText state。只要 filterText state 不设置,(输入框的)输入就不会改变。
当用户更改表单输入时,state 将更新以反映这些更改。state 由 FilterableProductTable 所拥有,所以只有它可以调用 setFilterText 和 setInStockOnly。使 SearchBar 更新 FilterableProductTable 的 state,需要将这些函数传递到 SearchBar:
function FilterableProductTable({ products }) {
const [filterText, setFilterText] = useState('');
const [inStockOnly, setInStockOnly] = useState(false);
return (
<div>
<SearchBar
filterText={filterText}
inStockOnly={inStockOnly}
onFilterTextChange={setFilterText}
onInStockOnlyChange={setInStockOnly} />
在 SearchBar 中,添加一个 onChange 事件处理器,使用其设置父组件的 state:
<input
type="text"
value={filterText}
placeholder="Search..."
onChange={(e) => onFilterTextChange(e.target.value)} />
现在应用程序可以完整工作了!
import { useState } from 'react';
function FilterableProductTable({ products }) {
const [filterText, setFilterText] = useState('');
const [inStockOnly, setInStockOnly] = useState(false);
return (
<div>
<SearchBar
filterText={filterText}
inStockOnly={inStockOnly}
onFilterTextChange={setFilterText}
onInStockOnlyChange={setInStockOnly} />
<ProductTable
products={products}
filterText={filterText}
inStockOnly={inStockOnly} />
</div>
);
}
function ProductCategoryRow({ category }) {
return (
<tr>
<th colSpan="2">
{category}
</th>
</tr>
);
}
function ProductRow({ product }) {
const name = product.stocked ? product.name :
<span style={{ color: 'red' }}>
{product.name}
</span>;
return (
<tr>
<td>{name}</td>
<td>{product.price}</td>
</tr>
);
}
function ProductTable({ products, filterText, inStockOnly }) {
const rows = [];
let lastCategory = null;
products.forEach((product) => {
if (
product.name.toLowerCase().indexOf(
filterText.toLowerCase()
) === -1
) {
return;
}
if (inStockOnly && !product.stocked) {
return;
}
if (product.category !== lastCategory) {
rows.push(
<ProductCategoryRow
category={product.category}
key={product.category} />
);
}
rows.push(
<ProductRow
product={product}
key={product.name} />
);
lastCategory = product.category;
});
return (
<table>
<thead>
<tr>
<th>Name</th>
<th>Price</th>
</tr>
</thead>
<tbody>{rows}</tbody>
</table>
);
}
function SearchBar({
filterText,
inStockOnly,
onFilterTextChange,
onInStockOnlyChange
}) {
return (
<form>
<input
type="text"
value={filterText} placeholder="Search..."
onChange={(e) => onFilterTextChange(e.target.value)} />
<label>
<input
type="checkbox"
checked={inStockOnly}
onChange={(e) => onInStockOnlyChange(e.target.checked)} />
{' '}
Only show products in stock
</label>
</form>
);
}
const PRODUCTS = [
{category: "Fruits", price: "$1", stocked: true, name: "Apple"},
{category: "Fruits", price: "$1", stocked: true, name: "Dragonfruit"},
{category: "Fruits", price: "$2", stocked: false, name: "Passionfruit"},
{category: "Vegetables", price: "$2", stocked: true, name: "Spinach"},
{category: "Vegetables", price: "$4", stocked: false, name: "Pumpkin"},
{category: "Vegetables", price: "$1", stocked: true, name: "Peas"}
];
export default function App() {
return <FilterableProductTable products={PRODUCTS} />;
}
当你熟悉了React编程的思维方式,再去接触其他前端框架会觉得很容易,因为所有编程工具都是相通的,都是为了实现某种需求。


 723
723


 被折叠的 条评论
为什么被折叠?
被折叠的 条评论
为什么被折叠?
 到【灌水乐园】发言


