


Button或者ImageButton的背景设为透明或者半透明
半透明<Button Android:background="#e0000000" ... />
透明<Button android:background="#00000000" ... />
颜色和不透明度 (alpha) 值以十六进制表示法表示。任何一种颜色的值范围都是 0 到 255(00 到 ff)。对于 alpha,00 表示完全透明,ff 表示完全不透明。表达式顺序是“aabbggrr”,其中“aa=alpha”(00 到 ff);“bb=blue”(00 到 ff);“gg=green”(00 到 ff);“rr=red”(00 到 ff)。例如,如果您希望对某叠加层应用不透明度为 50% 的蓝色,则应指定以下值:7fff0000
RGB
设置背景图片透明度:
View v = findViewById(R.id.content);//找到你要设透明背景的layout 的id
v.getBackground().setAlpha(100);//0~255透明度值
设置背景颜色透明度:
ImageView.setBackgroundColor(Color.TRANSPARENT);
android设置背景色为透明
方法一: 只要在配置文件内activity属性配置内加上 android:theme=@android:style/Theme.Translucent 就好了。 这样就调用了android的透明样式!
方法二:
先在res/values下建colors.xml文件,写入:
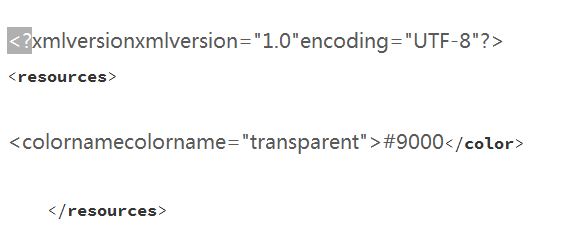
这个值设定了整个界面的透明度,为了看得见效果,现在设为透明度为56%(9/16)左右。
再在res/values/下建styles.xml,设置程序的风格
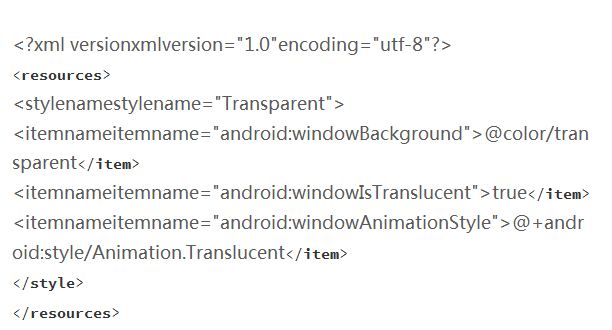
最后一步,把这个styles.xml用在相应的Activity上。即在AndroidManifest.xml中的任意标签中添加
android:theme=”@style/transparent”
如果想设置所有的activity都使用这个风格,可以把这句标签语句添加在中。
Android设置布局背景为白色的三种方法
一、在xml文件里可以直接设置:
android:background=”#ffffff”
其他颜色可以看这里;http://blog.csdn.net/yanzi1225627/article/details/8581270
二、在java文件里设置:
LinearLayout myLayout = () findViewById(R.id.linearLayout1);
myLayout.setBackgroundColor(Color.WHITE);三、在AndroidManifest.xml里利用android:theme来设置
这个命令还是很强大的,如下所示:
theme的设置 可以设置为系统自带的格式,也可以自定义格式。A: 系统自带格式
@android:style/Theme.Black //背景黑色-有标题-非全屏
@android:style/Theme.Black.NoTitleBar //背景黑色-无标题-非全屏
@android:style/Theme.Black.NoTitleBar.Fullscreen //背景黑色-无标题-全屏显示
@android:style/Theme.Dialog //对话框显示
@android:style/Theme.InputMethod@android:style/Theme.Light //背景白色-有标题-非全屏
@android:style/Theme.Light.NoTitleBar //背景白色-无标题-非全屏
@android:style/Theme.Light.NoTitleBar.Fullscreen //背景白色-无标题-全屏显示@android:style/Theme.Light.Panel
@android:style/Theme.Light.WallpaperSettings //背景透明
@android:style/Theme.NoDisplay@android:style/Theme.Translucent.NoTitleBar.Fullscreen //半透明、无标题栏、全屏
@android:style/Theme.Wallpaper.NoTitleBar.Fullscreen
可以在单个Activity里设置,也可以在applicaiton里全局设置。比如:
B:也可以自定义
在activity里加入 android:theme=”@style/MyTitleBar” 再在 style.xml里加入
这里的parent是继承于android:Theme,所以在下面的样式里,只能是window开头的样式才起作用,所有样式请参考\sdk\docs\reference\android\R.attr.html,
也可以设置windowTitleBackgroundStyle 为@style/MyTitleBackground,这样就可以在MyTitleBackground里,设置背景图。

贴段代码
        ed1.setOnTouchListener(new View.OnTouchListener() {
            @Override
            public boolean onTouch(View v, MotionEvent event) {
                ed1.setBackgroundResource(R.drawable.common_google_signin_btn_text_dark);
                return false;
            }
        });

        get_sql.setOnClickListener(new OnClickListener() {
            @Override
            public void onClick(View v) {
                Intent intent_get =new Intent(MainActivity.this,getsql.class);
                layout_sent.setBackgroundResource(0);//去掉背景图片
                txt1.setText("");
                ed1.setText("");
                ed1.setBackgroundResource(0);
                startActivity(intent_get);

            }
        });
        cotent.setOnClickListener(new OnClickListener() {
            @Override
            public void onClick(View v) {
                Intent  intent_content = new Intent(MainActivity.this,View_tree.class);
                layout_sent.setBackgroundResource(0);//去掉背景图片
                txt1.setText("");
                ed1.setText("");
                ed1.setBackgroundResource(0);
                startActivity(intent_content);
            }
        });
        reset.setOnClickListener(new OnClickListener() {
            @Override
            public void onClick(View v) {
                txt1.setText("");
                ed1.setText("");
                layout_sent.setBackgroundResource(0);//去掉背景图片
                ed1.setBackgroundResource(0);

            }
        });
        send.setOnClickListener(new OnClickListener() {

            @Override
            public void onClick(View v) {
                layout_sent.setBackgroundResource(R.drawable.common_google_signin_btn_text_dark_focused);
                //设置背景图片
                geted1 = ed1.getText().toString();
                int count = 0;
                count++;
                if(count>=5){
                    txt1.setText("");
                }
                if(geted1.equals("")){

                    txt1.append("ERRROR!!请输入数据!\n");

                }else {
                    //启动线程 向服务器发送和接收信息
                    new MyThread(geted1).start();
                    txt1.append("client:"+geted1+"\n");
                }
            }
        });

    }


 1万+
1万+


 被折叠的 条评论
为什么被折叠?
被折叠的 条评论
为什么被折叠?
 到【灌水乐园】发言


