


原理性东西 请自行搜索 实际操作还是会有很多出入,在此,记录一下主要的操作步骤及核心代码。
参考资料:
学成在线笔记+踩坑(11)——认证授权介绍、网关认证,SpringSecurity+JWT+OAuth2_学成在线微信登录-CSDN博客
一、主要操作步骤
第一步 登录用户  浏览器
http://localhost:59099/auth/login
账号  lisi 456

第二步 执行下列 获取code 浏览器-点击授权 (请自行修改子模块的回调路径地址 下面出现的地方,也是一样处理 http://localhost:51802/ap-article/all )
http://localhost:59099/auth/oauth/authorize?client_id=XcWebApp&response_type=code&scope=all&redirect_uri=http://localhost:51802/ap-article/all


第三步  POST获取令牌环 将上述返回的code值 代入 POST请求的code中
POST http://localhost:59099/auth/oauth/token?client_id=XcWebApp&client_secret=XcWebApp&grant_type=authorization_code&code=UUzGsM&redirect_uri=http://localhost:51802/ap-article/all

第四步  校验令牌环
POST http://localhost:59099/auth/oauth/check_token?token=eyJhbGciOiJIUzI1NiIsInR5cCI6IkpXVCJ9.eyJhdWQiOlsieHVlY2hlbmctcGx1cyJdLCJ1c2VyX25hbWUiOiJsaXNpIiwic2NvcGUiOlsiYWxsIl0sImV4cCI6MTcxNjY0MzUwNCwiYXV0aG9yaXRpZXMiOlsicDIiXSwianRpIjoiMzJkZjQwMjEtZTJkMi00ZTQ0LThkZjItMmM1YTEyZTkyNGQ0IiwiY2xpZW50X2lkIjoiWGNXZWJBcHAifQ.IAa45OCiBAsCOHPHbs-n0s-Ur2opb8IWErlAxmwM0ek

#http://localhost:51802/ap-article/all
 第五步  获取其他资源信息  将第三步拿到的token放入到GET请求中 即:Authorization: Bearer 加上token
### 文章获取
GET http://localhost:51802/ap-article/all
##Authorization: Bearer 加上token
Authorization: Bearer eyJhbGciOiJIUzI1NiIsInR5cCI6IkpXVCJ9.eyJhdWQiOlsibGVhZG5ld3MtYXJ0aWNsZSJdLCJ1c2VyX25hbWUiOiJsaXNpIiwic2NvcGUiOlsiYWxsIl0sImV4cCI6MTcxNjY0NjA0OSwiYXV0aG9yaXRpZXMiOlsicDIiXSwianRpIjoiMjg5MzcxNTAtZTQ3Yi00YzRkLThkY2UtOWUwMGJkZjBmN2Q0IiwiY2xpZW50X2lkIjoiWGNXZWJBcHAifQ.TNoGRsyXR21eVFDJVQ7D2iaBrYDHEOXJcrft7T9z5G4

二、环境准备(微服务环境下 )
1、SpringSecurity OAuth2 服务端集成

各文件主要代码:
pom.xml
<properties>
    <maven.compiler.target>1.8</maven.compiler.target>
    <maven.compiler.source>1.8</maven.compiler.source>
    <project.build.sourceEncoding>UTF-8</project.build.sourceEncoding>
</properties>
<dependencies>
    <dependency>
        <groupId>org.springframework.cloud</groupId>
        <artifactId>spring-cloud-starter-security</artifactId>
    </dependency>
    <dependency>
        <groupId>org.springframework.cloud</groupId>
        <artifactId>spring-cloud-starter-oauth2</artifactId>
    </dependency>
    <!--导入数据库-->
    <dependency>
        <groupId>mysql</groupId>
        <artifactId>mysql-connector-java</artifactId>
    </dependency>
    <!--导入数据源-->
    <dependency>
        <groupId>com.alibaba</groupId>
        <artifactId>druid</artifactId>
    </dependency>
</dependencies>
AuthorizationServer.java
package com.jxgy.leadauthoauth2login.config;

import org.springframework.beans.factory.annotation.Autowired;
import org.springframework.context.annotation.Configuration;
import org.springframework.http.HttpMethod;
import org.springframework.security.authentication.AuthenticationManager;
import org.springframework.security.crypto.bcrypt.BCryptPasswordEncoder;
import org.springframework.security.oauth2.config.annotation.configurers.ClientDetailsServiceConfigurer;
import org.springframework.security.oauth2.config.annotation.web.configuration.AuthorizationServerConfigurerAdapter;
import org.springframework.security.oauth2.config.annotation.web.configuration.EnableAuthorizationServer;
import org.springframework.security.oauth2.config.annotation.web.configurers.AuthorizationServerEndpointsConfigurer;
import org.springframework.security.oauth2.config.annotation.web.configurers.AuthorizationServerSecurityConfigurer;
import org.springframework.security.oauth2.provider.token.AuthorizationServerTokenServices;

import javax.annotation.Resource;

/**

 * @description 授权服务器配置

 */
@Configuration
@EnableAuthorizationServer
public class AuthorizationServer extends AuthorizationServerConfigurerAdapter {

    @Resource(name = "authorizationServerTokenServicesCustom")
    private AuthorizationServerTokenServices authorizationServerTokenServices;

    @Autowired
    private AuthenticationManager authenticationManager;

    //客户端详情服务
    @Override
    public void configure(ClientDetailsServiceConfigurer clients)
            throws Exception {
        clients.inMemory()// 使用in-memory存储
                .withClient("XcWebApp")// client_id
                .secret("XcWebApp")//客户端密钥
                //.secret(new BCryptPasswordEncoder().encode("XcWebApp"))//客户端密钥
                .resourceIds("leadnews-article")//资源列表
                .authorizedGrantTypes("authorization_code", "password", "client_credentials", "implicit", "refresh_token")// 该client允许的授权类型authorization_code,password,refresh_token,implicit,client_credentials
                .scopes("all")// 允许的授权范围
                .autoApprove(false)//false跳转到授权页面
                //客户端接收授权码的重定向地址
                .redirectUris("http://localhost:51802/ap-article/all")
               // .redirectUris("https://www.baidu.com")
        ;
    }


    //令牌端点的访问配置
    @Override
    public void configure(AuthorizationServerEndpointsConfigurer endpoints) {
        endpoints
                .authenticationManager(authenticationManager)//认证管理器
                .tokenServices(authorizationServerTokenServices)//令牌管理服务
                .allowedTokenEndpointRequestMethods(HttpMethod.POST);
    }

    //令牌端点的安全配置
    @Override
    public void configure(AuthorizationServerSecurityConfigurer security) {
        security
                .tokenKeyAccess("permitAll()")                    //oauth/token_key是公开
                .checkTokenAccess("permitAll()")                  //oauth/check_token公开
                .allowFormAuthenticationForClients()                //表单认证(申请令牌)
        ;
    }
}
TokenConfig.java
package com.jxgy.leadauthoauth2login.config;

import org.springframework.beans.factory.annotation.Autowired;
import org.springframework.context.annotation.Bean;
import org.springframework.context.annotation.Configuration;
import org.springframework.security.oauth2.provider.token.AuthorizationServerTokenServices;
import org.springframework.security.oauth2.provider.token.DefaultTokenServices;
import org.springframework.security.oauth2.provider.token.TokenEnhancerChain;
import org.springframework.security.oauth2.provider.token.TokenStore;
import org.springframework.security.oauth2.provider.token.store.JwtAccessTokenConverter;
import org.springframework.security.oauth2.provider.token.store.JwtTokenStore;

import java.util.Arrays;

/**
 * @author Administrator
 * @version 1.0
 **/
@Configuration
public class TokenConfig {

    @Autowired
    TokenStore tokenStore;

//    @Bean
//    public TokenStore tokenStore() {
//        //使用内存存储令牌(普通令牌)
//        return new InMemoryTokenStore();
//    }

    private String SIGNING_KEY = "mq123";

    @Autowired
    private JwtAccessTokenConverter accessTokenConverter;
    @Bean
    public TokenStore tokenStore() {
        return new JwtTokenStore(accessTokenConverter());
    }

    @Bean
    public JwtAccessTokenConverter accessTokenConverter() {
        JwtAccessTokenConverter converter = new JwtAccessTokenConverter();
        converter.setSigningKey(SIGNING_KEY);
        return converter;
    }


    //令牌管理服务
    @Bean(name="authorizationServerTokenServicesCustom")
    public AuthorizationServerTokenServices tokenService() {
        DefaultTokenServices service=new DefaultTokenServices();
        service.setSupportRefreshToken(true);//支持刷新令牌
        service.setTokenStore(tokenStore);//令牌存储策略

        TokenEnhancerChain tokenEnhancerChain = new TokenEnhancerChain();
        tokenEnhancerChain.setTokenEnhancers(Arrays.asList(accessTokenConverter));
        service.setTokenEnhancer(tokenEnhancerChain);

        service.setAccessTokenValiditySeconds(7200); // 令牌默认有效期2小时
        service.setRefreshTokenValiditySeconds(259200); // 刷新令牌默认有效期3天
        return service;
    }


}
WebSecurityConfig.java
package com.jxgy.leadauthoauth2login.config;

import org.springframework.context.annotation.Bean;
import org.springframework.security.authentication.AuthenticationManager;
import org.springframework.security.config.annotation.method.configuration.EnableGlobalMethodSecurity;
import org.springframework.security.config.annotation.web.builders.HttpSecurity;
import org.springframework.security.config.annotation.web.configuration.EnableWebSecurity;
import org.springframework.security.config.annotation.web.configuration.WebSecurityConfigurerAdapter;
import org.springframework.security.core.userdetails.User;
import org.springframework.security.core.userdetails.UserDetailsService;
import org.springframework.security.crypto.password.NoOpPasswordEncoder;
import org.springframework.security.crypto.password.PasswordEncoder;
import org.springframework.security.provisioning.InMemoryUserDetailsManager;

/**

 * @description 安全管理配置

 */
@EnableWebSecurity
@EnableGlobalMethodSecurity(securedEnabled = true,prePostEnabled = true)
public class WebSecurityConfig extends WebSecurityConfigurerAdapter {
    //配置用户信息服务
    @Bean
    public UserDetailsService userDetailsService() {
        //这里配置用户信息,这里暂时使用这种方式将用户存储在内存中
        InMemoryUserDetailsManager manager = new InMemoryUserDetailsManager();
        manager.createUser(User.withUsername("zhangsan").password("123").authorities("p1").build());
        manager.createUser(User.withUsername("lisi").password("456").authorities("p2").build());
        return manager;
    }

    @Bean
    public PasswordEncoder passwordEncoder() {
        //密码为明文方式
        return NoOpPasswordEncoder.getInstance();
    }

    //配置安全拦截机制
    @Override
    protected void configure(HttpSecurity http) throws Exception {
        http
                .authorizeRequests()
                .antMatchers("/**").authenticated()//访问/r开始的请求需要认证通过
                .anyRequest().permitAll()//其它请求全部放行
                .and()
                .formLogin().successForwardUrl("/login-success");//登录成功跳转到/login-success
        http.logout().logoutUrl("/logout");//退出地址
    }

    @Bean
    public AuthenticationManager authenticationManagerBean() throws Exception {
        return super.authenticationManagerBean();
    }
}

2、子服务访问资源模块 主要模块及代码 其他微服务子模块也需要认证的话,也同样把下面的配置和代码加入到相关模块中即可实现spring security的认证管理
注意对下面://.antMatchers("/r/**","/course/**").authenticated()//所有/r/**的请求必须认证通过 的设置
pom.xml
<properties>
    <java.version>1.8</java.version>
    <maven.compiler.target>1.8</maven.compiler.target>
    <maven.compiler.source>1.8</maven.compiler.source>
    <project.build.sourceEncoding>UTF-8</project.build.sourceEncoding>
    <docker.image>docker_storage</docker.image>
</properties>
<dependencies>
    <dependency>
        <groupId>org.springframework.boot</groupId>
        <artifactId>spring-boot-starter-freemarker</artifactId>
    </dependency>
    <!--对本模块使用starter-security 管控 实现统一登录的认证 -start-->
    <dependency>
        <groupId>org.springframework.cloud</groupId>
        <artifactId>spring-cloud-starter-security</artifactId>
    </dependency>
    <dependency>
        <groupId>org.springframework.cloud</groupId>
        <artifactId>spring-cloud-starter-oauth2</artifactId>
    </dependency>
    <!--对本模块使用starter-security 管控 实现统一登录的认证 -end-->
</dependencies>
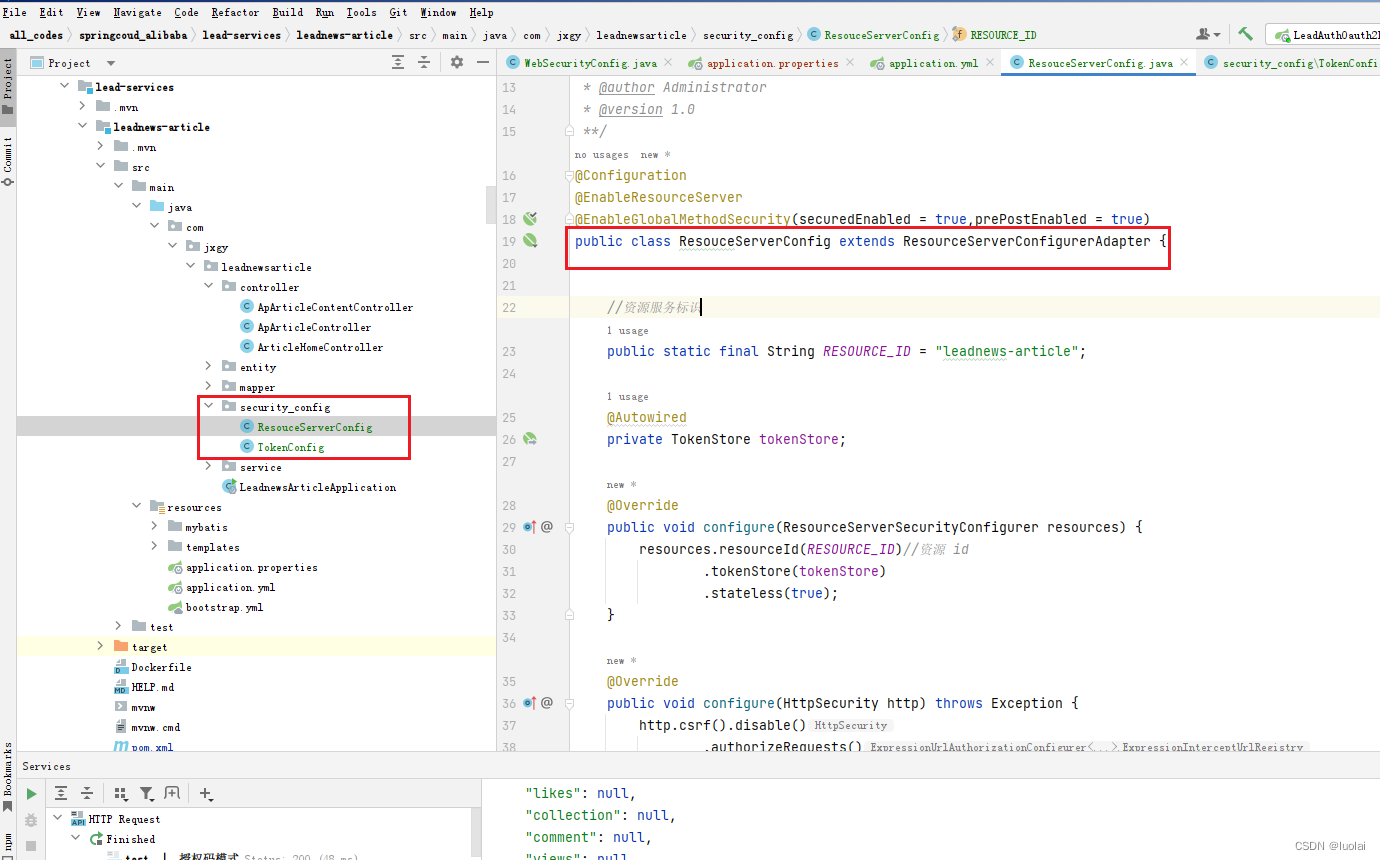
ResouceServerConfig.java
package com.jxgy.leadnewsarticle.security_config;

import org.springframework.beans.factory.annotation.Autowired;
import org.springframework.context.annotation.Configuration;
import org.springframework.security.config.annotation.method.configuration.EnableGlobalMethodSecurity;
import org.springframework.security.config.annotation.web.builders.HttpSecurity;
import org.springframework.security.oauth2.config.annotation.web.configuration.EnableResourceServer;
import org.springframework.security.oauth2.config.annotation.web.configuration.ResourceServerConfigurerAdapter;
import org.springframework.security.oauth2.config.annotation.web.configurers.ResourceServerSecurityConfigurer;
import org.springframework.security.oauth2.provider.token.TokenStore;

/**
 * @author Administrator
 * @version 1.0
 **/
@Configuration
@EnableResourceServer
@EnableGlobalMethodSecurity(securedEnabled = true,prePostEnabled = true)
public class ResouceServerConfig extends ResourceServerConfigurerAdapter {


    //资源服务标识
    public static final String RESOURCE_ID = "leadnews-article";

    @Autowired
    private TokenStore tokenStore;

    @Override
    public void configure(ResourceServerSecurityConfigurer resources) {
        resources.resourceId(RESOURCE_ID)//资源 id
                .tokenStore(tokenStore)
                .stateless(true);
    }

    @Override
    public void configure(HttpSecurity http) throws Exception {
        http.csrf().disable()
                .authorizeRequests()
                .antMatchers("/**","/ap**/**").authenticated()//所有/r/**的请求必须认证通过
                .anyRequest().permitAll()
        ;
    }

}
TokenConfig.java
package com.jxgy.leadnewsarticle.security_config;

import org.springframework.context.annotation.Bean;
import org.springframework.context.annotation.Configuration;
import org.springframework.security.oauth2.provider.token.TokenStore;
import org.springframework.security.oauth2.provider.token.store.JwtAccessTokenConverter;
import org.springframework.security.oauth2.provider.token.store.JwtTokenStore;

/**
 * @author Administrator
 * @version 1.0
 **/
@Configuration
public class TokenConfig {

    //jwt签名密钥,与认证服务保持一致
    private String SIGNING_KEY = "mq123";

    @Bean
    public TokenStore tokenStore() {
        //JWT令牌存储方案
        return new JwtTokenStore(accessTokenConverter());
    }

    @Bean
    public JwtAccessTokenConverter accessTokenConverter() {
        JwtAccessTokenConverter converter = new JwtAccessTokenConverter();
        converter.setSigningKey(SIGNING_KEY);
        return converter;
    }

   /* @Bean
    public TokenStore tokenStore() {
        //使用内存存储令牌(普通令牌)
        return new InMemoryTokenStore();
    }*/
}


 2656
2656

 被折叠的 条评论
为什么被折叠?
被折叠的 条评论
为什么被折叠?
 到【灌水乐园】发言


