


 本文深入探讨了SpringBoot应用中Tomcat容器的启动流程。解析了SpringApplication.run()方法的执行顺序,揭示了Tomcat并非在扫描包之前启动,而是在refreshContext()方法中创建并启动。
疑惑
SpringBoot中内置了Tomcat容器,那么Tomcat是在什么时间点启动的?是先扫描包加载类再启动Tomcat?,还是先启动Tomcat再扫描包加载类?
我们做一下假设:
- 先启动Tomcat,再扫描包加载类
- 先扫描包加载类,再启动Tomcat
接下来我们做一下验证。
验证
首先创建一个空的SpringBoot工程,然后启动它,查看一下控制台的输出日志:
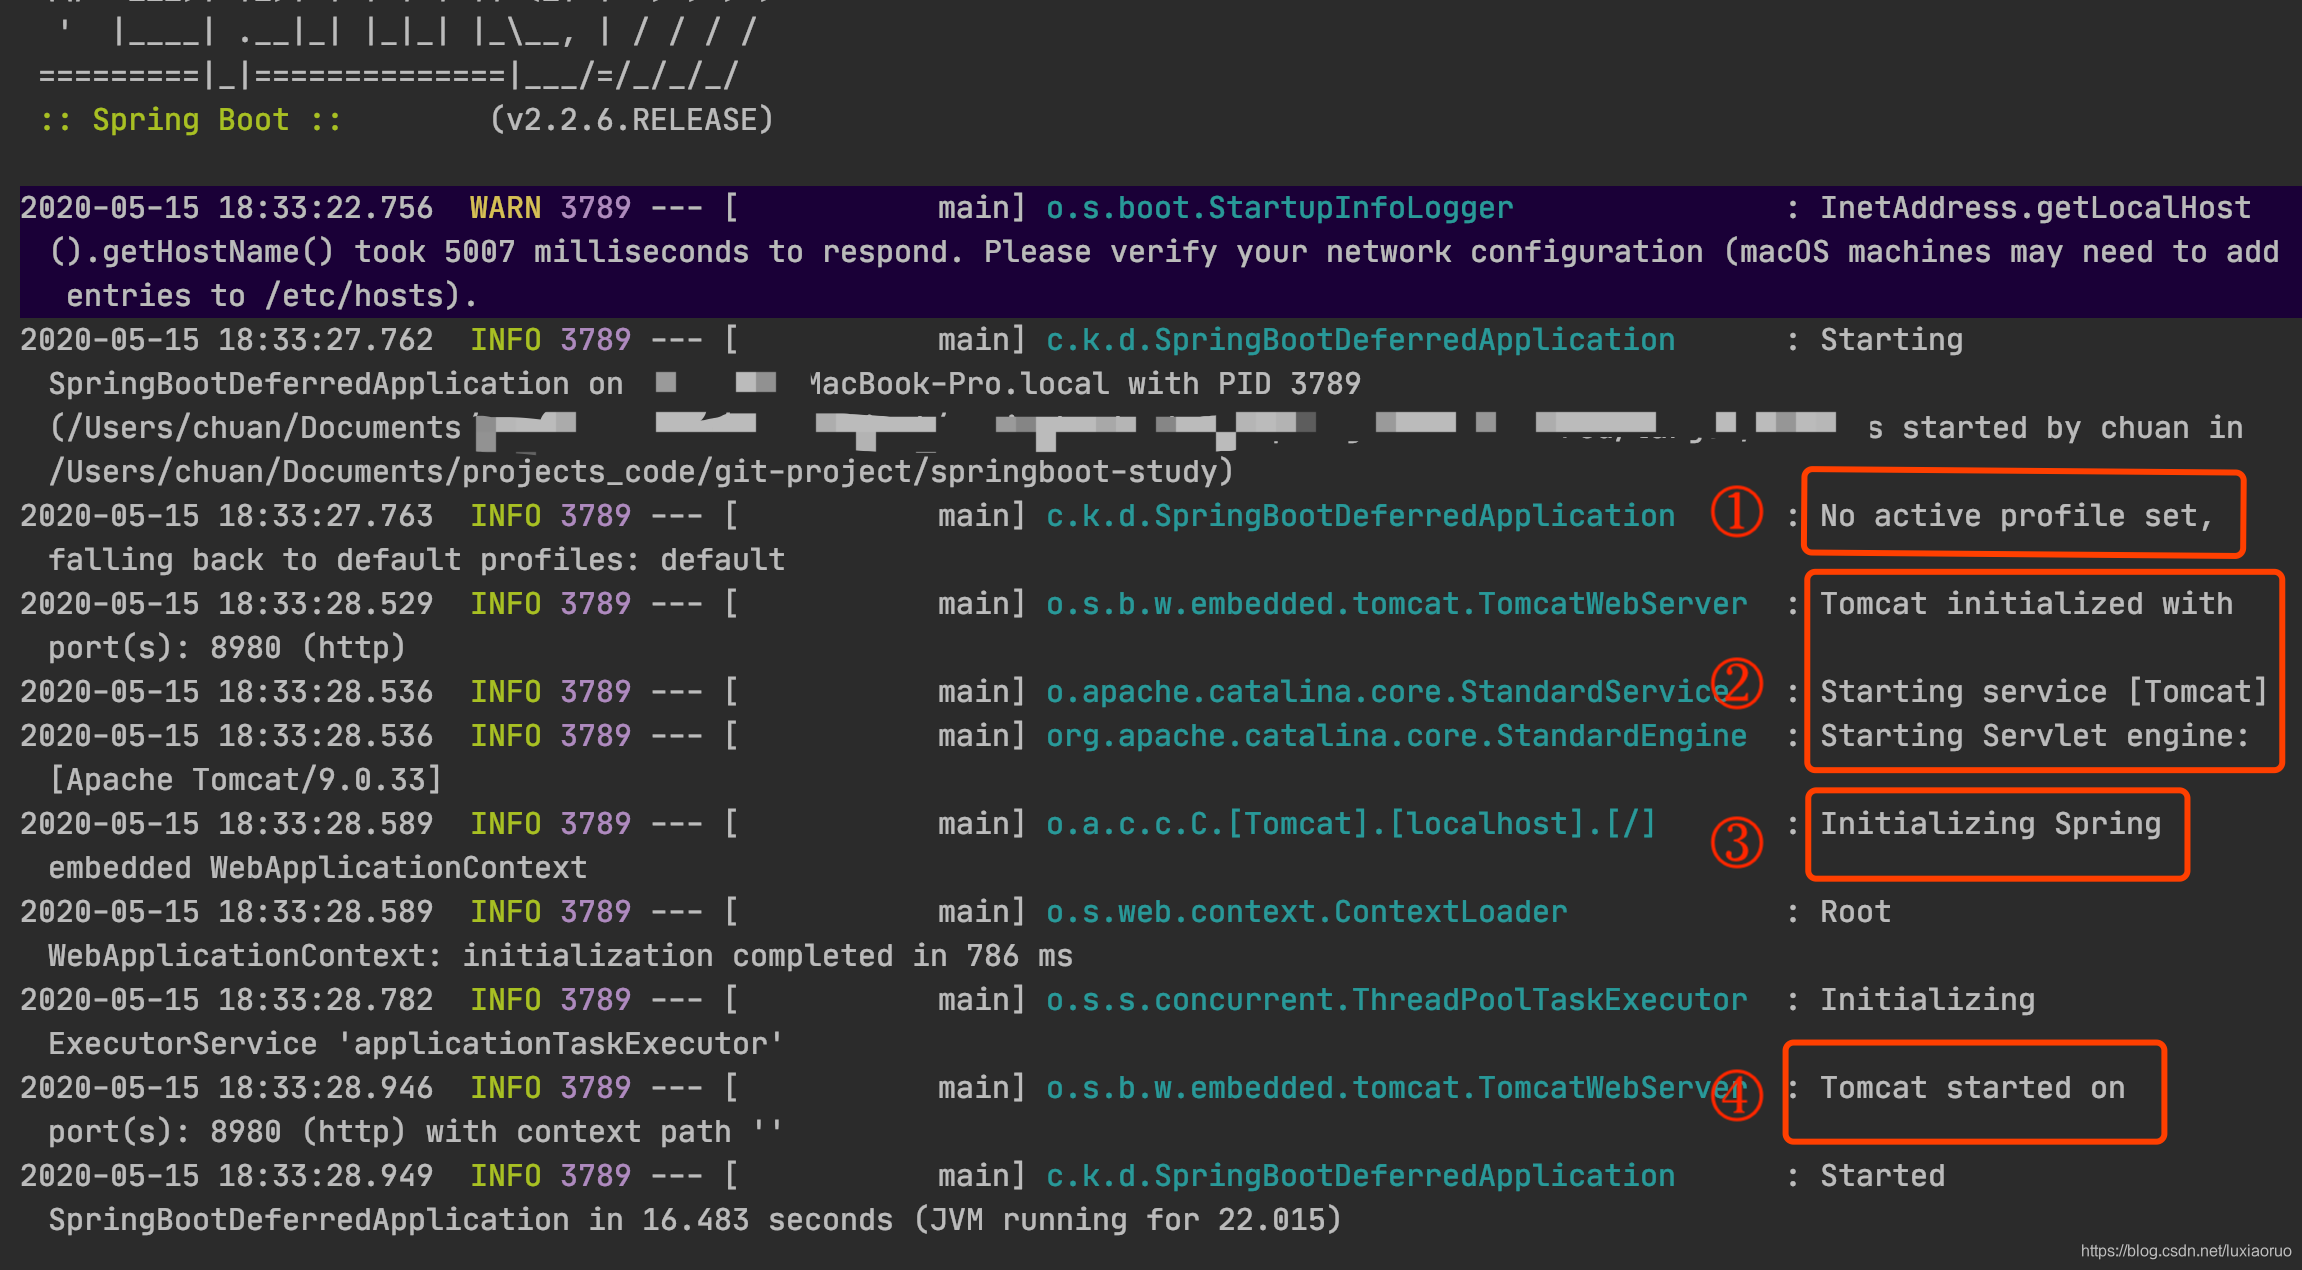
从输出的日志中可以看到②中显示Tomcat进行初始化,并且正在启动中,然后③中进行初始化WebApplicationContext,紧接着就是初始化WebApplicationContext完成,然后是在④中报告我们Tomcat启动完成。
从日志上看,好像是先启动Tomcat再去扫描包的,具体是怎么回事,我们看一下源码,暂时先不揭晓。
-
从启动类中进入到
SpringApplication.run()方法中public ConfigurableApplicationContext run(String... args) { // 创建启动监控类,监控启动过程用了多久,但是ms StopWatch stopWatch = new StopWatch(); // 开始计时,设置开始时间 stopWatch.start(); // 上下文实例 ConfigurableApplicationContext context = null; // 启动异常错误报告 Collection<SpringBootExceptionReporter> exceptionReporters = new ArrayList<>(); // 启用headless模式(headless模式是在系统缺少部分硬件支持的时候让服务自力更生) configureHeadlessProperty(); // 获取spring.factories文件中配置的org.springframework.boot.SpringApplicationRunListener列表,原理是Spring的事件机制,所有的类都实现自ApplicationEvent,可以监听启动过程中的任意阶段 SpringApplicationRunListeners listeners = getRunListeners(args); // 进入监听启动阶段 listeners.starting(); try { // 获取JVM运行参数,也就是在使用java -jar xxx.jar命令启动时指定的其他参数 ApplicationArguments applicationArguments = new DefaultApplicationArguments(args); // 准备运行环境,传入监听器和运行参数,获取环境变量,绑定到环境中 ConfigurableEnvironment environment = prepareEnvironment(listeners, applicationArguments); // 配置spring.beaninfo.ignore属性,SpringBoot中默认为true configureIgnoreBeanInfo(environment); // 输出Banner信息,banner的输出方式有三种:none/console/log,默认为console,通过配置参数spring.main.banner-mode指定 Banner printedBanner = printBanner(environment); // ☆创建一个上下文实例,比较重点的地方☆ context = createApplicationContext(); // 获取spring.factories文件中声明的SpringBootExceptionReporter exceptionReporters = getSpringFactoriesInstances(SpringBootExceptionReporter.class, new Class[] { ConfigurableApplicationContext.class }, context); // 创建上下文,设置环境变量和资源加载器,创建bean,加载到所有的listener中 prepareContext(context, environment, listeners, applicationArguments, printedBanner); // 调用spring的refresh方法,并注册一个ShutdownHook(应用关闭时的动作,可以通过继承AbstractApplicationContext实现自定义) refreshContext(context); // 空方法 afterRefresh(context, applicationArguments); // 启动完成,停止计时 stopWatch.stop(); if (this.logStartupInfo) { // 输出启动信息,包括计时 new StartupInfoLogger(this.mainApplicationClass).logStarted(getApplicationLog(), stopWatch); } // 进入监听器的启动完成事件 listeners.started(context); callRunners(context, applicationArguments); } catch (Throwable ex) { handleRunFailure(context, ex, exceptionReporters, listeners); throw new IllegalStateException(ex); } try { // 进入监听器的运行中事件 listeners.running(context); } catch (Throwable ex) { handleRunFailure(context, ex, exceptionReporters, null); throw new IllegalStateException(ex); } return context; }从源码中并未看到是在哪里启动了Tomcat容器,那么我们就看一下创建Spring上下文的方法中是否有关键字
-
createApplicationContext()方法
protected ConfigurableApplicationContext createApplicationContext() {
  Class<?> contextClass = this.applicationContextClass;
  if (contextClass == null) {
    try {
      switch (this.webApplicationType) {
        case SERVLET:
          // org.springframework.boot.web.servlet.context.AnnotationConfigServletWebServerApplicationContext
          contextClass = Class.forName(DEFAULT_SERVLET_WEB_CONTEXT_CLASS);
          break;
        case REACTIVE:
          // org.springframework.boot.web.reactive.context.AnnotationConfigReactiveWebServerApplicationContext
          contextClass = Class.forName(DEFAULT_REACTIVE_WEB_CONTEXT_CLASS);
          break;
        default:
          // org.springframework.context.annotation.AnnotationConfigApplicationContext
          contextClass = Class.forName(DEFAULT_CONTEXT_CLASS);
      }
    }
    catch (ClassNotFoundException ex) {
      throw new IllegalStateException(
        "Unable create a default ApplicationContext, please specify an ApplicationContextClass", ex);
    }
  }
  return (ConfigurableApplicationContext) BeanUtils.instantiateClass(contextClass);
}
这是一个创建
ApplicationContext实例的方法,我们只看Tomcat的AnnotationConfigServletWebServerApplicationContext,他的继承关系如下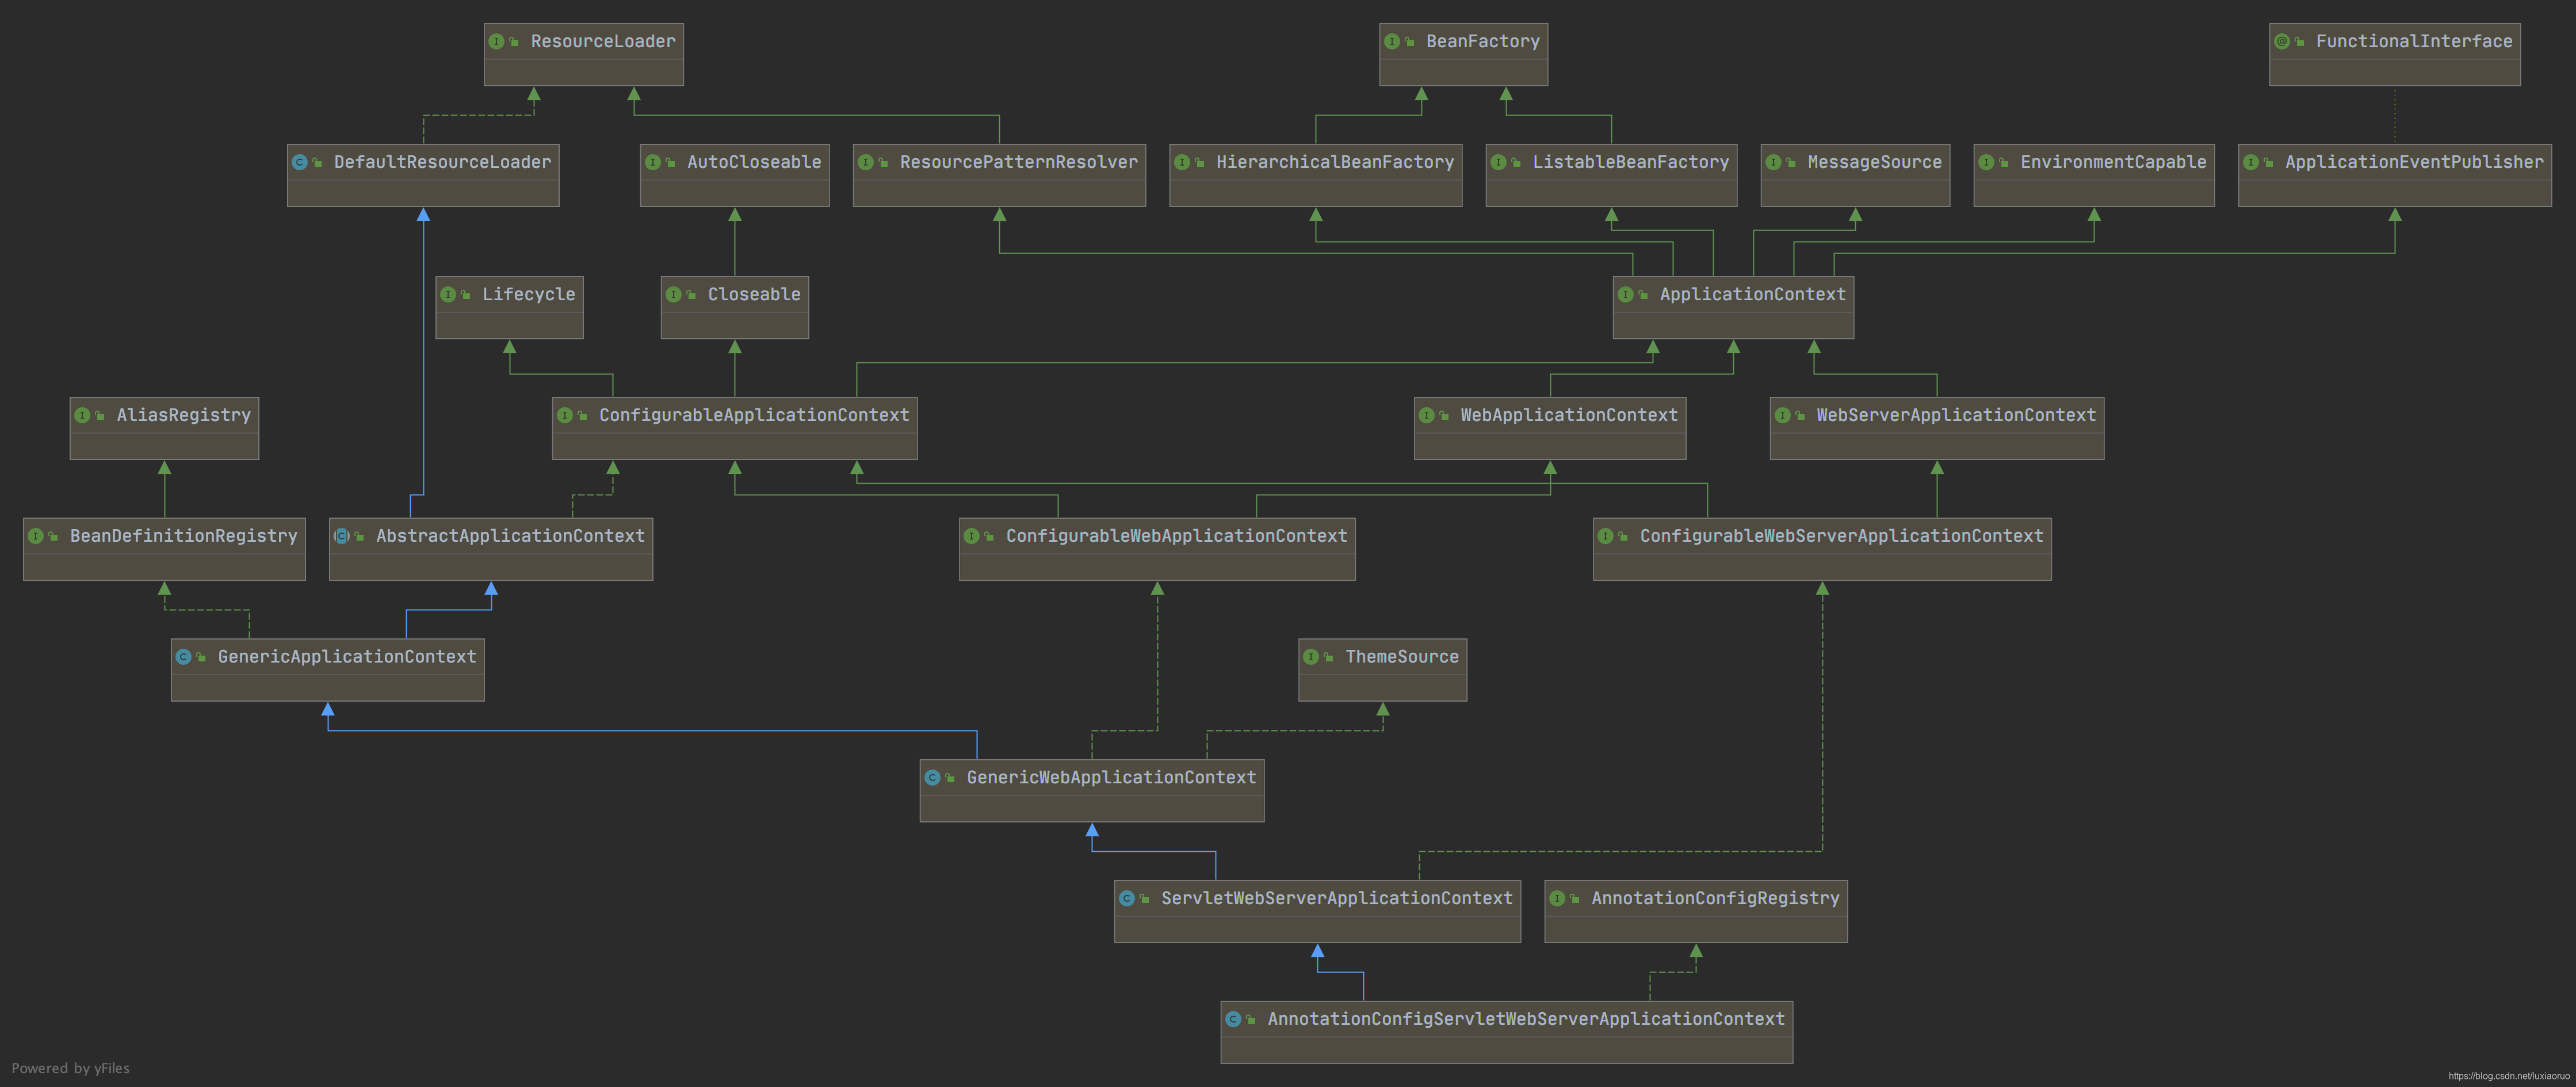
以上类中并没有在静态代码块中启动Tomcat,则说明不是在这里启动的,这里只是创建一个
ApplicationContext上下文实例 -
prepareContext()方法
private void prepareContext(ConfigurableApplicationContext context, ConfigurableEnvironment environment,
                            SpringApplicationRunListeners listeners, ApplicationArguments applicationArguments, Banner printedBanner) {
  // 设置环境变量
  context.setEnvironment(environment);
  // 处理上下文
  postProcessApplicationContext(context);
  // 做refresh前的初始化准备
  applyInitializers(context);
  // 进入到监听器的上下文准备阶段
  listeners.contextPrepared(context);
  if (this.logStartupInfo) {
    logStartupInfo(context.getParent() == null);
    logStartupProfileInfo(context);
  }
  // 创建特殊的引导类实例,单例的
  ConfigurableListableBeanFactory beanFactory = context.getBeanFactory();
  beanFactory.registerSingleton("springApplicationArguments", applicationArguments);
  if (printedBanner != null) {
    // 创建Banner类实例,单例的
    beanFactory.registerSingleton("springBootBanner", printedBanner);
  }
  if (beanFactory instanceof DefaultListableBeanFactory) {
    ((DefaultListableBeanFactory) beanFactory)
    .setAllowBeanDefinitionOverriding(this.allowBeanDefinitionOverriding);
  }
  if (this.lazyInitialization) {
    context.addBeanFactoryPostProcessor(new LazyInitializationBeanFactoryPostProcessor());
  }
  // Load the sources
  Set<Object> sources = getAllSources();
  Assert.notEmpty(sources, "Sources must not be empty");
  load(context, sources.toArray(new Object[0]));
  listeners.contextLoaded(context);
}
方法里整个过程都在创建各种类的实例,并未出现对Tomcat的启动操作,看来也不在这个方法中,那么就继续往下看
-
refreshContext()方法
这个方法最终是调用到
AbstractApplicationContext#refresh()中,这就到了Spring基础框架中。我们在分析createApplicationContext()方法的时候,知道Tomcat使用的是org.springframework.boot.web.servlet.context.AnnotationConfigServletWebServerApplicationContext类,这个类继承自org.springframework.boot.web.servlet.context.ServletWebServerApplicationContext,在这个类中,重写了父类AbstractApplicationContext中的refresh()、onRefresh()和finishRefresh()方法,而在AbstractApplicationContext#refresh()方法中,调用了onRefresh()和finishRefresh()这两个方法public void refresh() throws BeansException, IllegalStateException { synchronized (this.startupShutdownMonitor) { // Prepare this context for refreshing. // Tell the subclass to refresh the internal bean factory. // Prepare the bean factory for use in this context. try { // Allows post-processing of the bean factory in context subclasses. // Invoke factory processors registered as beans in the context. // Register bean processors that intercept bean creation. // Initialize message source for this context. // Initialize event multicaster for this context. // Initialize other special beans in specific context subclasses. onRefresh(); // Check for listener beans and register them. // Instantiate all remaining (non-lazy-init) singletons. // Last step: publish corresponding event. finishRefresh(); } catch (BeansException ex) { throw ex; } finally { } } }此时调用的onRefresh()和finishRefresh()实际上是调用了
ServletWebServerApplicationContext中的方法,那么我们就来看下这个类中的这两个方法分别做了什么- onRefresh()方法
protected void onRefresh() {
  // 调用父类的onRefresh()方法
  super.onRefresh();
  try {
    // 创建WebServer
    createWebServer();
  }
  catch (Throwable ex) {
    throw new ApplicationContextException("Unable to start web server", ex);
  }
}

private void createWebServer() {
  WebServer webServer = this.webServer;
  ServletContext servletContext = getServletContext();
  if (webServer == null && servletContext == null) {
    // 获取ServletWebServerFactory的实例,使用Tomcat的话会获取到tomcatServletWebServerFactory
    ServletWebServerFactory factory = getWebServerFactory();
    // 获取WebServer实例,方法内创建Tomcat并准备Tomcat启动所需环境变量
    this.webServer = factory.getWebServer(getSelfInitializer());
  } else if (servletContext != null) {
    try {
      getSelfInitializer().onStartup(servletContext);
    } catch (ServletException ex) {
    }
  }
  // 初始化自定义的环境变量,涉及到servletContextInitParams和servletConfigInitParams
  initPropertySources();
}

protected ServletWebServerFactory getWebServerFactory() {
  // 使用bean名称,这样我们就不会考虑层次结构
  String[] beanNames = getBeanFactory().getBeanNamesForType(ServletWebServerFactory.class);
  if (beanNames.length == 0) {
    throw new ApplicationContextException("");
  }
  if (beanNames.length > 1) {
    throw new ApplicationContextException("");
  }
  // 获取Bean实例,这里获取到的就是TomcatServletWebServerFactory类的实例
  return getBeanFactory().getBean(beanNames[0], ServletWebServerFactory.class);
}
通过代码我们知道在onRefresh()方法中主要是创建Tomcat实例,准备Tomcat启动所需参数和配置信息,并未启动Tomcat
- finishRefresh()方法
protected void finishRefresh() {
  super.finishRefresh();
  // 启动WebServer,难道是这里启动的Tomcat?
  WebServer webServer = startWebServer();
  if (webServer != null) {
    publishEvent(new ServletWebServerInitializedEvent(webServer, this));
  }
}

private WebServer startWebServer() {
  WebServer webServer = this.webServer;
  if (webServer != null) {
    // 启动WebServer,这里调用的是TomcatWebServer#start()方法
    webServer.start();
  }
  return webServer;
}

// TomcatWebServer#start()方法
public void start() throws WebServerException {
  // 加锁防并发
  synchronized (this.monitor) {
    if (this.started) {
      return;
    }
    try {
      addPreviouslyRemovedConnectors();
      // 获取Tomcat的Connector
      Connector connector = this.tomcat.getConnector();
      if (connector != null && this.autoStart) {
        // 如果connector不为null,并且自动启动,则启动时执行延迟加载
        // 当端口大于0的时候,autoStart就为true
        performDeferredLoadOnStartup();
      }
      // 检查Connector是否已启动,若有未启动的Connector则抛异常
      checkThatConnectorsHaveStarted();
      // 修改运行标识属性
      this.started = true;
      // 输出Tomcat启动成功日志
      logger.info("Tomcat started on port(s): " + getPortsDescription(true) + " with context path '"
                  + getContextPath() + "'");
    } catch (ConnectorStartFailedException ex) {
    } catch (Exception ex) {
    } finally {
    }
  }
}
这里好像也仅仅就是检测Tomcat服务是否启动成功了,并没有执行启动这个操作,看来也不在这里。
这就奇怪了,我们几乎翻遍了整个启动类的代码,都没有Tomcat启动的代码,那么Tomcat是怎么启动的呢?是不是我们遗漏了什么?我们来回顾一下上面的分析,TomcatWebServer实例的获取的地方
ServletWebServerFactory#getWebServer()方法内我们好像没有看,是不是在创建TomcatWebServer实例的时候直接就启动了,然后在TomcatWebServer#start()方法中只是去检测启动的状态?我们来看下ServletWebServerFactory#getWebServer()的源码public WebServer getWebServer(ServletContextInitializer... initializers) { if (this.disableMBeanRegistry) { Registry.disableRegistry(); } // 简单略过 Tomcat tomcat = new Tomcat(); File baseDir = (this.baseDirectory != null) ? this.baseDirectory : createTempDir("tomcat"); tomcat.setBaseDir(baseDir.getAbsolutePath()); Connector connector = new Connector(this.protocol); connector.setThrowOnFailure(true); tomcat.getService().addConnector(connector); customizeConnector(connector); tomcat.setConnector(connector); tomcat.getHost().setAutoDeploy(false); configureEngine(tomcat.getEngine()); for (Connector additionalConnector : this.additionalTomcatConnectors) { tomcat.getService().addConnector(additionalConnector); } prepareContext(tomcat.getHost(), initializers); // 获取TomcatWebServer实例 return getTomcatWebServer(tomcat); } // 不重要 protected TomcatWebServer getTomcatWebServer(Tomcat tomcat) { // autoStart = getPort() >= 0 return new TomcatWebServer(tomcat, getPort() >= 0); } public TomcatWebServer(Tomcat tomcat, boolean autoStart) { Assert.notNull(tomcat, "Tomcat Server must not be null"); this.tomcat = tomcat; this.autoStart = autoStart; // 最重要的方法 initialize(); }initialize()方法源码
private void initialize() throws WebServerException {
  synchronized (this.monitor) {
    try {

      // 启动服务器以触发初始化侦听器
      this.tomcat.start();

      // 所有Tomcat线程都是守护进程线程。我们创建一个阻塞非守护进程来停止立即关闭
      startDaemonAwaitThread();
    }
    catch (Exception ex) {
      stopSilently();
      destroySilently();
      throw new WebServerException("Unable to start embedded Tomcat", ex);
    }
  }
}
终于找到了,语句
this.tomcat.start()就是启动Tomcat容器的关监语句。
总结
通过对SpringApplication.run()方法执行顺序的分析来看,先构建Spring上下文加载Bean,也就是扫描包,然后再在refreshContext()方法中创建Tomcat容器并启动容器。
由此我们可以验证出假设2是正确的


 269
269

 被折叠的 条评论
为什么被折叠?
被折叠的 条评论
为什么被折叠?
 到【灌水乐园】发言


