


Future
Future可以为主线程开一个分支任务,专门为主线程处理耗时费力的复杂业务。
-
优点:Future + 线程池 异步多线程任务配合,能显著提高程序执行效率。
-
缺点1:get()阻塞(也就是在主线程main的主干任务之前去获取分支任务的结果,由于程序是一行一行执行,那么就会等待得到分支任务的结果后再执行主干任务,容器造成阻塞)
解决方法:1、放在主干任务之后获取 2、设置超时时间 futureTask.get(3L,TimeUnit.SECONDS) -
缺点2:isDone()轮询,耗费cpu资源
        while (true){
            if (futureTask.isDone()){
                // todo
                System.out.println(futureTask.get());
                break;
            }else {
                //控制轮询次数,尽量避免cpu耗费资源
                TimeUnit.MILLISECONDS.sleep(500);
            }
        }
上面的解决方案对于简单的业务场景使用Future完全OK
CompletableFuture
通过runAsync、supplyAsync创建completableFuture对象,没有指定线程池(Executor)就用默认的 ForkJoinPool。
他是Future的增强版,减少了阻塞和轮询,可以传入回调对象,当异步任务完成或者发生异常时,自动调用对象的回调方法。
以下是四种创建方式
        //线程池
        ExecutorService threadPool =  Executors.newFixedThreadPool(3);

        //runnable接口、默认线程池(ForkJoinPool)
        CompletableFuture<Void> voidCompletableFuture = CompletableFuture.runAsync(() -> {
            System.out.println(Thread.currentThread().getName());
        });

        //runnable接口、指定线程池
        CompletableFuture<Void> voidCompletableFuture1 = CompletableFuture.runAsync(() -> {
            System.out.println(Thread.currentThread().getName());
        }, threadPool);

        //有返回值
        CompletableFuture<String> completableFuture = CompletableFuture.supplyAsync(() -> {
            System.out.println(Thread.currentThread().getName());
            return "ss";
        });

        //指定线程池
        CompletableFuture<String> completableFuture1 = CompletableFuture.supplyAsync(() -> {
            System.out.println(Thread.currentThread().getName());
            return "ss";
        },threadPool);

        //关闭线程池
        threadPool.shutdown();
以下是回调函数的使用
        ExecutorService threadPool = Executors.newFixedThreadPool(3);

        CompletableFuture.supplyAsync(() -> {
            System.out.println(Thread.currentThread().getName()+" com in");
            int result = new Random().nextInt();
            try { TimeUnit.SECONDS.sleep(1); } catch (InterruptedException e) { e.printStackTrace(); }
            System.out.println(result);
//            int i = 10 / 0 ;
            return result;
        },threadPool).whenComplete((value,e) ->{  //回调函数whenComplete
            if(e == null){
                System.out.println("得到结果:"+value);
            }
        }).exceptionally((e) -> {
            e.printStackTrace();
            System.out.println("异常情况: "+e.getCause()+"\t"+e.getMessage());
            return null;
        });

        threadPool.shutdown();
        System.out.println( Thread.currentThread().getName()+" over");
| 函数式接口名称 | 方法名称 | 参数 | 返回值 |
|---|---|---|---|
| Runnable | run | 无 | 无 |
| Function | apply | 1 | 有 |
| Consumer | accept | 1 | 无 |
| BiConsumer | accept | 2 | 无 |
| Supplier | get | 无 | 有 |
常用方法
获得结果和触发计算
- get():等待获取结果,容易造成诸塞,需抛出异常
- get(Long timeout, TimeUtil unit):设置等待时长,过期获取不到抛TimeOutException
- jion():和get差不多,不过不会抛异常
- getNow( T valueIfAbsent):立即获取结果(不阻塞),没有计算完成就返回设定的valueIfAbsent值
- complete(T value):判断是否能立即返回计算结果,返回值是boolean类型
对计算结果进行处理
- thenApply:只有一个参数(function计算结果),计算结果存在依赖关系,下一步需要上一步的计算结果,如果中途出异常,那么之后的计算无法进行。
        ExecutorService threadPool = Executors.newFixedThreadPool(3);
        CompletableFuture.supplyAsync(()->{
            try {
                System.out.println(111);
                TimeUnit.SECONDS.sleep(1);
            } catch (InterruptedException e) {
                e.printStackTrace();
            }
            return 1;
        },threadPool).thenApply(f ->{
            System.out.println(222);
            return f + 2;
        }).thenApply(f ->{
//            int i = 10 / 0;
            System.out.println(333);
            return f + 3;
        }).whenComplete((v,e)->{
            if (e == null) {
                System.out.println("最终结果:" + v);
            }
        }).exceptionally(e ->{
            e.printStackTrace();
            System.out.println(e.getCause()+e.getMessage());
            return null;
        });

        threadPool.shutdown();
- handle:两个参数(计算结果、异常),计算结果也存在依赖关系,但是出异常后可以带着异常结果继续执行下一步
        .handle((v,e) ->{
            int i = 10 / 0;
            System.out.println(222);
            return v + 2;
        }).handle((v,e) ->{
            System.out.println(333);
            return v + 3;
        })
对计算结果进行消费
- thenAccept:参数为consumer(结算结果),接受任务的处理结果,并处理消费,无返回结果
        CompletableFuture.supplyAsync(() ->{
            return 1;
        }).thenApply(f ->{
            return f + 2;
        }).handle((e,v)->{
            return e + 3;
        }).thenAccept(v ->{
            //todo
            System.out.println(v);
        });
- thenRun:任务A执行结束后执行任务B(thenRun),任务B不需要任务A的计算结果,thenRun没有返回值,理解为新起一个线程执行其他任务。
        System.out.println( //null
                CompletableFuture.supplyAsync(() -> {
                    return "result";
                }).thenRun(() -> {
                    //todo
                }).join()
        );
- 没有传入自定义线程池,使用默认forkJoinPool
- 传入自定义线程池:如果传入第一个任务自定义线程池,后面没有使用异步(Async)那么都用这个自定义线程池,如果使用异步(Async)但是没有传入自定义线程池,那么后面的使用ForkJoinPool。还有一种可能是处理太快,都是用main线程。
对计算速度进行选用
applyToEither(),谁快选用谁执行函数
        CompletableFuture<String> playA = CompletableFuture.supplyAsync(() -> {
            System.out.println("A start up");
            try {
                TimeUnit.SECONDS.sleep(3);
            } catch (InterruptedException e) {
                e.printStackTrace();
            }
            return "playA";
        });
        CompletableFuture<String> playB = CompletableFuture.supplyAsync(() -> {
            System.out.println("B start up");
            try {
                TimeUnit.SECONDS.sleep(2);
            } catch (InterruptedException e) {
                e.printStackTrace();
            }
            return "playB";
        });
        CompletableFuture<String> completableFuture = playA.applyToEither(playB, f -> {
            return f + " is winner";
        });
对计算结果进行合并
等待两线程执行结束,然后合并执行新任务。thenCombine()

       playA.thenCombine(playB, (x, y) -> {
            return x + y;
       });
锁
乐观锁与悲观锁,悲观锁认为其它线程会修改公共资源所以强制加锁,当自己使用完才释放锁。乐观锁则相反,但是它会使用版本、CAS算法进行校验判断公共资源是否被修改,适用于读操作多的场景,没有锁性能高。
synchronized锁底层是获取监视器(monitor),使用monitorenter获取、monitorexit释放。释放有两次,因为在有异常时也会释放锁,在finally语块里。
线程中断
一个线程不应该由其他线程来中断或停止,而是自己“掌握命运”,所以Thread.stop,Thread.suspend,Thread.resume都已经被废弃了。
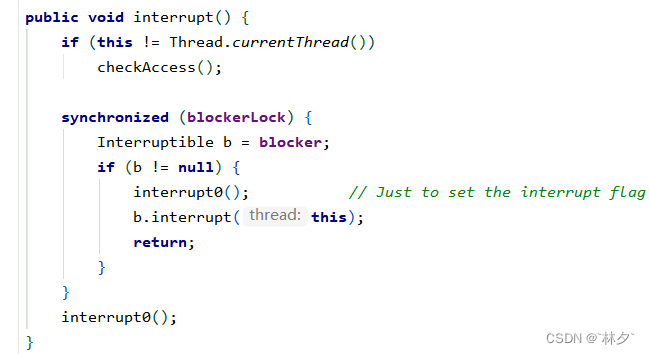
interrupt
- 如果线程处于正常活动状态,那么仅仅将中断标志设为为true,被设置中断标识的线程仍然继续运行,不受影响。
- 如果线程处于阻塞状态(wait、join、sleep等),在别的线程中调用当前线程的interrupt方法,那么线程会立即退出阻塞状态,并抛出interruptedException异常,中断标识会被清除(变为false)。
解决第二个问题的方案:捕获异常后线程会继续运行,可以在catch语句块中再次调用 interrupt方法。
interrupted
返回线程是否被中断并清除中断状态(设为false)。
interupted与isInterrupted区别:
- interrupted是静态方法,参数是true。
- isInterrupted是实例方法,参数是false。
他们都调用的是 private native boolean isInterrupted(boolean ClearInterrupted); 参数作用为是否清除当前中断标识

isInterrupted
判断当前线程是否被中断(通过检查中断标志)
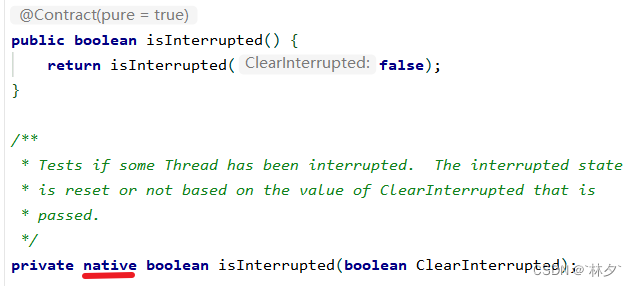
最终调用的是底层c++或操作系统。
注意:
- interrupt()仅仅设置标志位,不会中断线程,需要手动通过中断标识处理。
- 当线程停止后再次获取中断标识(isInterrupted)为false。静态方法调用native方法时重设标志位(clearInterrupted参数)。
- 中断不活动的线程不会产生影响
       Thread t1 = new Thread(()->{
            while (true){ //判断当前线程是否被中断
                if(Thread.currentThread().isInterrupted()){
                    System.out.println("t1 线程中断");
                    break;
                }
                System.out.println("t1运行中");
            }
        });
       t1.start();

       try {
           Thread.sleep(20);
       } catch (InterruptedException e) {
       }
        new  Thread(()->{
           t1.interrupt();//设置中断表示为true
       }).start();
LockSupport
等待唤醒
- Object中 wait、notify
- juc condition中 await、 single
- LockSupport 中 park、unpark
注意:以上2种情况 等待、唤醒 方法必须在持有锁的状态才能使用,在同步代码块或同步方法中使用。先等待后唤醒,否则后续无唤醒线程阻塞
  public static void Condtion() throws InterruptedException {
        Object o = new Object();
        Lock lock = new ReentrantLock();
        Condition condition = lock.newCondition();

        new Thread(() -> {
            lock.lock();

            try {
                System.out.println("come in");
                condition.await();
                Thread.sleep(200);
            } catch (InterruptedException e) {
                e.printStackTrace();
            } finally {
                System.out.println("come out");
                lock.unlock();
            }
        }).start();

        Thread.sleep(1000);

        new Thread(() -> {
            lock.lock();
            try {
                System.out.println("signal");
                condition.signal();
            } finally {
                lock.unlock();
            }
        }).start();
    }
但是LockSupport不需要持有锁(不在同步代码中也能使用),且可以先唤醒后等待。它发出的是许可证,有许可证即能通过。
先发许可证后阻塞(LockSupport.park()),会使park方法失效,形同虚设。执行这个方法的时间为0ms。
**注意**:先唤醒后等待,在使用 LockSupport.unpark(t1) 时,t1 线程应当是启动的,否则不能正确发放许可证,这里我估计是拿不到操作系统中进程的pid。最终导致程序阻塞。
LockSupport中只能发放一个许可证,无论使用几次 LockSupport.unPark()。但是使用LockSupport.park()会消耗一次许可证,所以连续两次使用LockSupport.park()会造成阻塞。
    public static void LockSupportTest() throws InterruptedException {
        //调的是 unsafe类的park方法

        Thread t1 = new Thread(() -> {
            try { Thread.sleep(1000); } catch (InterruptedException e) { e.printStackTrace(); }
            System.out.println(Thread.currentThread().getName() + " come in");
            LockSupport.park();
//            LockSupport.park();
            System.out.println(Thread.currentThread().getName() + " 被唤醒");
        }, "t1");

//        Thread.sleep(20);
        t1.start();

        new Thread(() -> {
            LockSupport.unpark(t1);
            LockSupport.unpark(t1);
            System.out.println("发出许可证");
        }).start();

    }
JMM(java memory model)
简介
处理器的读写速度远远大于内存,中间一般设有高速缓存区,现阶段一般windows电脑就有三级缓存。
作用:屏蔽各种硬件和操作系统的内存访问差异。
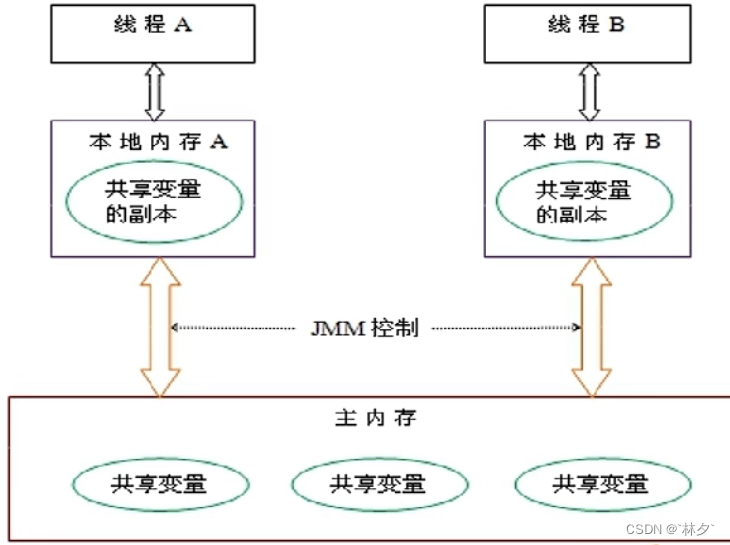
JMM:java内存模型,本身是一种抽象的概念,并不正是存在,它仅仅是描述的一组预定与规范。通过这组规范定义程序中各个变量的读写访问方式并对共享变量的写入何时/如何编程对另一个线程可见。关键技术点都是围绕多线程的原子性、可见性、有序性展开。
能干嘛?
- 通过JMM 来实现线程和主内存之间的抽象关系。
- 屏蔽各个硬件平台和操作系统的内存访问差异以实现让java程序在各个平台都能达到一致的内存访问效果。
可见性
指当一个线程修改了某个共享变量的值,其他线程是否能够立即知道该变更。JMM规定所有共享变量都存储在主内存。
共享变量的修改、写入时机是不确定的,多线程下很容易出现“脏读”。所以设定每个线程都有自己的工作内存,将需要的变量拷贝进自己的工作内存使用。不同的线程无法访问他人的工作内存,线程间的变量值传递需要通过主内存来完成。
原子性
指一个操作是不可以被打断,即使在多线程状态下,操作也不能被其他线程影响。
有序性
指令重排序。只要程序的最终结果不改变,那么它的执行顺序可以和代码顺序不一致。
1234 : 只要保证2在134这组组数字中的4之前就行。
    public void Mysort(){
        int x = 10;
        int y = 20;
        x = x + 4;
        y = x * x;
    }
先行发生原则
happens-before。包含可见性和有序性的约束。
x = 5;
y = x;
存在happens-before原则,y 一定等于5。若不存在,发生指令重排序,y就不一定为5了,可能是x赋值前的值。
happendsbefore 8条原则
次序规则:一个线程内,按照代码顺序,写在前面的操作先行发生于写在后面的操作。
锁定规则:一个unlock操作先行发生于(时间上)后面对同一个锁的lock操作
volatile变量规则:对volatile变量的写操作先行发生于后面对这个变量的读操作,前面的写对后面的读是可见的。
传递规则:A先于B,B先于C,那么A肯定先于C发生。
线程启动规则:线程的 start() 方法先行发生于该线程的每一个操作。
线程中断规则:对线程 interrupt() 方法的调用先行发生于被中断线程中检测中断事件的代码的逻辑
线程终止规则:线程中所有操作都会先行发生于对此线程终止检测操作。
对象终结规则:一个对象的初始化(构造函数执行结束)先行发生于这个对象的finalize()操作(垃圾回收)。
public class HappendsBeforeDemo1 {
    public static void main(String[] args) {
        Resource resource = new Resource();

        new Thread(()->{
                resource.setValue();
        }).start();

        new Thread(()->{
            System.out.println(resource.getValue());
        }).start();
    }
}

/**
 * 不满足先行发生原则前四条:次序原则(同一线程),volatile变量原则,锁定原则,传递原则
 * 所以这里并不能保证取到的value就一定为 1,会出现线程安全问题
 * 解决方法:一、在get、set方法都加synchronized关键字
 *         二、使用volatile保证读操作的可见性,使用synchronized保证复合操作的原子性。
 *
 */


class Resource {
//    private int value = 0;
    private volatile int value = 0;

    public  int getValue() {
        return value;
    }
//    public void setValue() {
//        ++value;
//    }
    public synchronized void setValue() {
        ++value;
    }
}
volatile
被volatile修饰的变量有两大特点:可见性、有序性(禁止指令重排序)
volatile禁止指令重排优化,从而避免在多线程环境下程序出现乱排序执行的现象
内存屏障:
内存屏障之前所有的写操作都要写回到主内存。
内存屏障之后所有的读操作都能获得内粗屏障之前所有写操作的最新结果。广义两种屏障:
- 读屏障:在读指令之前插入读屏障,使工作内存或cpu高速缓存的缓存数据失效,重新回到主内存中获取最新数据。
- 写屏障:在写指令之后插入写屏障,强行把写缓存区数据刷新回主内存。
细说有四种屏障:读读(load load)、读写(load store)、写读(store load)、写写(store store)。都是在前一步操作执行结束才能执行后一步操作。
对一个volatile的写先行发生于任意一个对volatile的读。
 第一个操作时 volatile 读,无论后续操作是什么都不能指令重排序。
第二个操作时 volatile 写,无论前面操作是什么都不能指令重排序。
第一个操作时volatile 写,第二个操作时volatile 读,不能指令重排序。
- 在volatile写操作:
-
- 前加 storestore:将前面普通写刷新回内存
-
- 后加storeLoad:将防止volatile写操作与之后的volatile读/写操作重排序
- 在volatile读操作:
-
- 后加 LoadLoad:禁止下面所有的普通读操作与该volatile读操作重排序
-
- 后加LoadStore:禁止下面所有的普通写操作与该volatile读操作重排序


- 后加LoadStore:禁止下面所有的普通写操作与该volatile读操作重排序
总结
含有 可见性、有序性(禁重排),没有原子性
volatile 写之前的操作,禁止重排序到volatile之后
volatile 读之后的操作,禁止重排序到volatile之前
volatile写 => volatile读 禁止重排序
禁止指令重排序
以下三种情况发生指令重排序会导致执行结果改变
- 写后读:a = 1; b = a;
- 写后写:a = 1; a = 2;
- 读后写:a = b; b = 1;
可见性测试
public class VolatileDemo1 {
//    static boolean flag = true;
    static volatile boolean flag = true;

    public static void main(String[] args) throws InterruptedException {

        new Thread(() -> {
            System.out.println(Thread.currentThread().getName() + "\t come in");
            while (flag) {

            }
            System.out.println(Thread.currentThread().getName() + "\t flag 被修改为false");
        }, "t1").start();

        Thread.sleep(2000);

        flag = false;
        System.out.println(Thread.currentThread().getName() + "\t 将flag修改为 false");

    }
}
volatile正确使用
从jvm字节码看 i++ 分为三步,它不是一个原子操作
- volatile常用于boolean变量,而不是经常更改的变量
- 状态标志,判断业务是否结束
- 开销比较低的读
double checked locking
public class DoubleCheckLocking {
    //未使用volatile声明
//    private static DoubleCheckLocking doubleCheckLocking;

    private volatile static DoubleCheckLocking doubleCheckLocking;

    /**
     * 1、分配内存空间
     * 2、初始化对象
     * 3、将指针指向刚分配的内存空间
     */
    private DoubleCheckLocking(){
    }


    public static DoubleCheckLocking getInstance(){
        if(doubleCheckLocking == null){
            //多线程创建对象时,会通过加锁保证只有一个线程创建对象
            synchronized (DoubleCheckLocking.class){
                if(doubleCheckLocking == null){
                    //隐患:多线程环境下,由于重排序(132),该对象可能还未完全初始化就会被其它线程读取使用
                    doubleCheckLocking = new DoubleCheckLocking();
                }
            }
        }
        //对象创建完毕,执行getInstance()将不需要获取锁,直接返回创建对象
        return doubleCheckLocking;
    }
}
CAS
简介
compare and swap :比较并交换。有点像乐观锁
包含三个数:内存位置、预期原值、更新值
执行CAS操作时,将内存位置的值与预期原值进行比较
- 匹配,那么处理器会自动将该位置的值更新为新值
- 不匹配,处理器不做任何操作,多个线程同时执行CAS只有一个会成功
    public static void main(String[] args) {
        AtomicInteger atomicInteger = new AtomicInteger(10);

        new Thread(()->{
            atomicInteger.compareAndSet(10,2022);
        }).start();

        new Thread(()->{
            atomicInteger.compareAndSet(10,2023);
        }).start();

        System.out.println(atomicInteger.get());
    }
源码:
this是当前对象,valueOffset是当前对象的属性在内存的偏移地址(通过偏移地址获取数据),expect期待值,update更新值

    public final boolean compareAndSet(int expect, int update) {
        return unsafe.compareAndSwapInt(this, valueOffset, expect, update);
    }

再往里走调的是native方法
    public final native boolean compareAndSwapObject(Object var1, long var2, Object var4, Object var5);

    public final native boolean compareAndSwapInt(Object var1, long var2, int var4, int var5);

    public final native boolean compareAndSwapLong(Object var1, long var2, long var4, long var6);
自旋(源码):
    atomicInteger.getAndIncrement();

    public final int getAndIncrement() {
        return unsafe.getAndAddInt(this, valueOffset, 1);
    }
    public final int getAndAddInt(Object var1, long var2, int var4) {
        int var5;
        do {
            var5 = this.getIntVolatile(var1, var2);//获取最新值(期待值)
        } while(!this.compareAndSwapInt(var1, var2, var5, var5 + var4)); //比较在内存中的属性值与期待值,然后确定是否更新。否的话会一直循环

        return var5;
    }
Unsafe类
CAS是一条cpu的原子指令(cmpxchg),通过硬件保证了比较-更新的原子性,不会造成数据不一致问题,更可靠。
UnSafel类提供了CAS方法(CompareAndSwapXXX)底层实现即为cpu的 cpmxchg 。
执行cpmxchg指令时,会判断当前操作系统是不是多核,如果是则会给总线加锁,只有一个线程会对总线加锁成功,加锁后执行CAS操作,也就是说CAS的原子性实际上是CPU独占的,比起synchronized重量锁它的时间短很多,性能好。
-
注意:
UnSafe类中所有方法否是native修饰,都直接调用底层操作系统资源或第三方c语言函数库执行相应任务。 -
变量valueOffset 表示该变量在内存中的
偏移地址,因为UnSafe是根据内存的偏移地址获取数据的 -
变量value用volatile修饰,保证了多个线程之间数据的可见性
原子类型
class User{
    private String name;
    private int age;

    public User(String name, int age) {
        this.name = name;
        this.age = age;
    }

    @Override
    public String toString() {
        return "User{" +
                "name='" + name + '\'' +
                ", age=" + age +
                '}';
    }
}

public class AtomicDemo {
    public static void main(String[] args) {
        AtomicReference<User> atomicReference = new AtomicReference<>();

        User z3 = new User("z3", 13);
        User l4 = new User("l4", 19);

        atomicReference.set(z3);

        System.out.println(atomicReference.compareAndSet(z3,l4)+"\t"+atomicReference.get());
        System.out.println(atomicReference.compareAndSet(z3,l4)+"\t"+atomicReference.get());
    }
}
自旋锁
采用循环的方式去尝试获取锁。CAS是实现自旋锁的基础,底层代码是do-while循环。
    public final int getAndAddInt(Object var1, long var2, int var4) {
        int var5;
        do {
            var5 = this.getIntVolatile(var1, var2);
        } while(!this.compareAndSwapInt(var1, var2, var5, var5 + var4));

        return var5;
    }
好处是减少了线程上下文切换的消耗,坏处是循环会消耗cpu性能。
手写自旋锁:
public class SpinLockDemo {
    AtomicReference<Thread> atomicReference = new AtomicReference<>();

    public void lock(){
        Thread thread = Thread.currentThread();
        System.out.println(thread.getName()+"\t come in");
        while (!atomicReference.compareAndSet(null,thread));
    }

    public void unlock(){
        Thread thread = Thread.currentThread();
        atomicReference.compareAndSet(thread,null);
        System.out.println(thread.getName()+"\t come out");
    }

    public static void main(String[] args) throws InterruptedException {
        SpinLockDemo spinLockDemo = new SpinLockDemo();
        new Thread(()->{
            spinLockDemo.lock();
            try { Thread.sleep(5000); } catch (InterruptedException e) { e.printStackTrace(); }
            spinLockDemo.unlock();
        },"A").start();

        Thread.sleep(500);

        new Thread(()->{
            spinLockDemo.lock();
            spinLockDemo.unlock();
        },"B").start();

    }
}
CAS缺点
- 循环时间长导致cpu开销很大
- 引出来ABA问题:线程1从内存中取的值为A,线程2也取的A。线程1开始操作,将A改成B,然后又将B改成A,线程2发现预期原值未改变,将A改成C。
虽然线程2操作成功,但过程可能是错误的。
解决ABA问题:(使用版本号,规定版本号不能减少)使用时间锉加版本号、使用戳记流水加版本号。
戳记流水可以是任何类型,使用原子类 AtomicStampedReference
public class ABADemo {

    static AtomicStampedReference<Integer> atomicStampedReference = new AtomicStampedReference<>(100,1);
    public static void main(String[] args) {
        new Thread(()->{
            int stamp = atomicStampedReference.getStamp();
            System.out.println(Thread.currentThread().getName()+"\t戳记流水:"+atomicStampedReference.getReference()+"\t版本号:"+stamp);
            try { Thread.sleep(100); } catch (InterruptedException e) { e.printStackTrace(); }

            //将A改成B
            boolean b = atomicStampedReference.compareAndSet(100, 101, stamp, stamp + 1);
            System.out.println("first "+b+"\t"+Thread.currentThread().getName()+"\t戳记流水:"+atomicStampedReference.getReference()+"\t版本号:"+atomicStampedReference.getStamp());

            //将B改回A
            boolean c = atomicStampedReference.compareAndSet(101, 100, atomicStampedReference.getStamp(), atomicStampedReference.getStamp()+1);
            System.out.println("second "+c+"\t"+Thread.currentThread().getName()+"\t戳记流水:"+atomicStampedReference.getReference()+"\t版本号:"+atomicStampedReference.getStamp());

        },"A").start();


        new Thread(()->{
            int stamp = atomicStampedReference.getStamp();
            System.out.println(Thread.currentThread().getName()+"\t戳记流水:"+atomicStampedReference.getReference()+"\t版本号:"+stamp);
            try { Thread.sleep(1000); } catch (InterruptedException e) { e.printStackTrace(); }

            //将A改成B
            boolean b = atomicStampedReference.compareAndSet(100, 2022, stamp, stamp + 1);
            System.out.println("last "+b+"\t"+Thread.currentThread().getName()+"\t戳记流水:"+atomicStampedReference.getReference()+"\t版本号:"+atomicStampedReference.getStamp());

        },"B").start();
    }
}
原子类
volatile 解决多线程可见性问题,对于一写多读可以解决变量同步问题;对于多写则无法解决,或出现线程安全问题。
原子整型类对于 count++操作:
count.addAndGet(1);
如果是java8,推荐使用LongAdder对象比使用 AtomicLong对象性能更好(减少乐观锁的重试次数)
基本类型原子类
    AtomicInteger atomicInteger = new AtomicInteger();//初始值0
    AtomicLong atomicLong = new AtomicLong();//初始值0
    AtomicBoolean atomicBoolean = new AtomicBoolean();//初始值false
数组类型原子类
    //三种初始方法,一二初始值为0
    AtomicIntegerArray atomicIntegerArray = new AtomicIntegerArray(5);
    AtomicIntegerArray atomicIntegerArray1 = new AtomicIntegerArray(new int[5]);
    AtomicIntegerArray atomicIntegerArray2 = new AtomicIntegerArray(new int[]{1,2,3,4,5});
    //Long同理
引用类型原子类
AtomicReference
泛型是V, AtomicReference
public class SpinLockDemo {
    AtomicReference<Thread> atomicReference = new AtomicReference<>();

    public void lock(){
        Thread thread = Thread.currentThread();
        System.out.println(thread.getName()+"\t come in");
        while (!atomicReference.compareAndSet(null,thread));
    }

    public void unlock(){
        Thread thread = Thread.currentThread();
        atomicReference.compareAndSet(thread,null);
        System.out.println(thread.getName()+"\t come out");
    }

    public static void main(String[] args) throws InterruptedException {
        SpinLockDemo spinLockDemo = new SpinLockDemo();
        new Thread(()->{
            spinLockDemo.lock();
            try { Thread.sleep(5000); } catch (InterruptedException e) { e.printStackTrace(); }
            spinLockDemo.unlock();
        },"A").start();

        Thread.sleep(500);

        new Thread(()->{
            spinLockDemo.lock();
            spinLockDemo.unlock();
        },"B").start();

    }
}
AtomicStempedReference
戳记流水 + 版本号,可以知道修改了多少次,解决ABA问题
代码在目录CAS缺点里
AtomicMarkableReference
将状态戳记简化为 true | false ,解决了是否修改过
    static AtomicMarkableReference<Integer> atomicMarkableReference = new AtomicMarkableReference<>(100, false);

    public static void main(String[] args) {
        new Thread(()->{
            boolean mark = atomicMarkableReference.isMarked();
            try { Thread.sleep(1000); } catch (InterruptedException e) { e.printStackTrace(); }

            atomicMarkableReference.compareAndSet(100,1000,mark,!mark);
        }).start();
        new Thread(()->{
            boolean mark = atomicMarkableReference.isMarked();
            try { Thread.sleep(2000); } catch (InterruptedException e) { e.printStackTrace(); }

            boolean b = atomicMarkableReference.compareAndSet(1000, 2000, mark, !mark);
            System.out.println(Thread.currentThread().getName()+"\t"+b);
            System.out.println(atomicMarkableReference.getReference()+"\t"+atomicMarkableReference.isMarked());
        },"t2").start();
    }
对象的属性修改原子类
目的: 以一种线程安全的方式操作非线程安全对象内的某些字段
- 更新的对象属性必须使用 public volatile 修饰符
- 因为对象的属性修改类型原子类是抽象类,所以每次使用都必须使用静态方法newUpdater()创建一个更新器,并且需要设置想要更新的类型与属性。
AtomicIntegerFieldUpdater
基于反射的实用程序,可对指定类的指定 volatile int 字段进行原子更新
class BankAccount{
//    int money = 0;
    public volatile int money = 0;

//    public synchronized void add(){
//        money++;
//    }

    //通过静态方法 newUpdater 构造对象,参数是反射对象与参数
    AtomicIntegerFieldUpdater<BankAccount> atomicIntegerFieldUpdater =
            AtomicIntegerFieldUpdater.newUpdater(BankAccount.class,"money");

    public void transMoney(BankAccount bankAccount){
        atomicIntegerFieldUpdater.getAndIncrement(bankAccount);
    }

}

/**
 * 以一种线程安全的方式操作线程不安全的类的属性
 */
public class AtomicIntegerFieldUpdaterDemo {
    public static void main(String[] args) throws InterruptedException {
        BankAccount bankAccount = new BankAccount();
        CountDownLatch countDownLatch = new CountDownLatch(10);

        for (int i = 0; i < 10; i++) {
            new Thread(()->{
                try {
                    for (int j = 0; j < 1000; j++) {
//                        bankAccount.add();
                        bankAccount.transMoney(bankAccount);
                    }
                } finally {
                    countDownLatch.countDown();
                }
            }).start();
        }

        countDownLatch.await();
        System.out.println(bankAccount.money);
    }
}
AtomicLongFieldUpdater
基于反射的实用程序,可对指定类的指定 volatile long 字段进行原子更新
AtomicReferenceFieldUpdater
基于反射的实用程序,可对指定类的指定 volatile 引用字段进行原子更新
class Var{
    public volatile Boolean isInit = Boolean.FALSE;

    AtomicReferenceFieldUpdater<Var,Boolean> atomicReferenceFieldUpdater =
            AtomicReferenceFieldUpdater.newUpdater(Var.class,Boolean.class,"isInit");
    public void init(Var var){
        if(atomicReferenceFieldUpdater.compareAndSet(var,Boolean.FALSE,Boolean.TRUE)){
            System.out.println(Thread.currentThread().getName()+"\t need two seconds to word");
            //TODO 模拟需要完成的工作所耗费的时间
            try { Thread.sleep(2000); } catch (InterruptedException e) { e.printStackTrace(); }
            System.out.println(Thread.currentThread().getName()+"\t work over");
        }else {
            System.out.println(Thread.currentThread().getName()+"\t 已有线程在完成任务");
        }
    }
}

public class AtomicDemo3 {
    public static void main(String[] args) {
        Var var = new Var();

        for (int i = 0; i < 5; i++) {
            new Thread(()->{
                var.init(var);
            },String.valueOf(i)).start();
        }
    }
}
原子操作增强类原理深度解析(jdk1.8)
DoubleAccumulator
DOubleAdder
LongAccumulator
public class LongAdderDemo1 {
    public static void main(String[] args) {
        LongAdder longAdder = new LongAdder();
        for (int i = 0; i < 10; i++) {
            longAdder.increment();
        }
        System.out.println(longAdder.sum());


        //第二个参数为初始值是left(x),调用accumulate方法中的参数是right(y)
        LongAccumulator longAccumulator = new LongAccumulator((x,y)->x+y,0);
        for (int i = 0; i <= 100; i++) {
            longAccumulator.accumulate(i);
        }
        System.out.println(longAccumulator.get());
    }
}
LongAdder 简介
LongAdder 只能用来计算加法,且从零开始计算
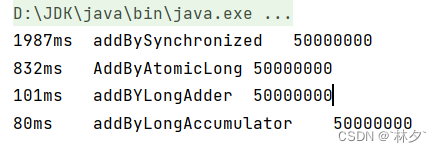
上文提到 LongAdder 对象性能比 AtomicLong好,使用下面代码进行测试
class Account {
    public int number = 0;

    public synchronized void addBySynchronized() {
        number++;
    }

    AtomicLong atomicLong = new AtomicLong();

    public void AddByAtomicLong() {
        atomicLong.getAndIncrement();
    }

    LongAdder longAdder = new LongAdder();

    public void addBYLongAdder() {
        longAdder.increment();
    }

    LongAccumulator longAccumulator = new LongAccumulator((x, y) -> x + y, 0);

    public void addByLongAccumulator() {
        longAccumulator.accumulate(1);
    }

}

public class LongAdderDemo2 {
    static final int _1W = 10000;
    static final int ThreadNumber = 50;

    public static void main(String[] args) throws InterruptedException {
        Account account = new Account();
        CountDownLatch countDownLatch1 = new CountDownLatch(ThreadNumber);
        CountDownLatch countDownLatch2 = new CountDownLatch(ThreadNumber);
        CountDownLatch countDownLatch3 = new CountDownLatch(ThreadNumber);
        CountDownLatch countDownLatch4 = new CountDownLatch(ThreadNumber);

        long startTime, endTime;

        startTime = System.currentTimeMillis();
        for (int i = 0; i < ThreadNumber; i++) {
            new Thread(() -> {
                try {
                    for (int j = 0; j < 100 * _1W; j++) {
                        account.addBySynchronized();
                    }
                } finally {
                    countDownLatch1.countDown();
                }
            }).start();
        }
        countDownLatch1.await();
        endTime = System.currentTimeMillis();
        System.out.println(endTime - startTime + "\t" + "addBySynchronized\t" + account.number);

        startTime = System.currentTimeMillis();
        for (int i = 0; i < ThreadNumber; i++) {
            new Thread(() -> {
                try {
                    for (int j = 0; j < 100 * _1W; j++) {
                        account.AddByAtomicLong();
                    }
                } finally {
                    countDownLatch2.countDown();
                }
            }).start();
        }
        countDownLatch2.await();
        endTime = System.currentTimeMillis();
        System.out.println(endTime - startTime + "\t" + "AddByAtomicLong\t" + account.atomicLong.get());

        startTime = System.currentTimeMillis();
        for (int i = 0; i < ThreadNumber; i++) {
            new Thread(() -> {
                try {
                    for (int j = 0; j < 100 * _1W; j++) {
                        account.addBYLongAdder();
                    }
                } finally {
                    countDownLatch3.countDown();
                }
            }).start();
        }
        countDownLatch3.await();
        endTime = System.currentTimeMillis();
        System.out.println(endTime - startTime + "\t" + "addBYLongAdder\t" + account.longAdder.sum());

        startTime = System.currentTimeMillis();
        for (int i = 0; i < ThreadNumber; i++) {
            new Thread(() -> {
                try {
                    for (int j = 0; j < 100 * _1W; j++) {
                        account.addByLongAccumulator();
                    }
                } finally {
                    countDownLatch4.countDown();
                }
            }).start();
        }
        countDownLatch4.await();
        endTime = System.currentTimeMillis();
        System.out.println(endTime - startTime + "\t" + "addByLongAccumulator\t" + account.longAccumulator.get());
    }
}
总结:
AtomicLong:线程安全。可允许一些性能损耗,要求高精确度使用。多个线程对单个热点value进行原子累加操作
LongAdder:在高并发有更好的性能表现,且对精确度要求不高时使用。拥有多个槽,线程在不同操进行原子累加操作,求和时没有阻止继续累加,可能前面加过的槽更新了数据造成精确缺失。
LongAdder 源码分析
LongAdder在高并发性能优于AtomicLong的原因:
- AtomicLong底层采用的是CAS算法、自旋锁。如果上万的线程来抢一把锁,那么就会有大量的空转线程,消耗大量cpu资源
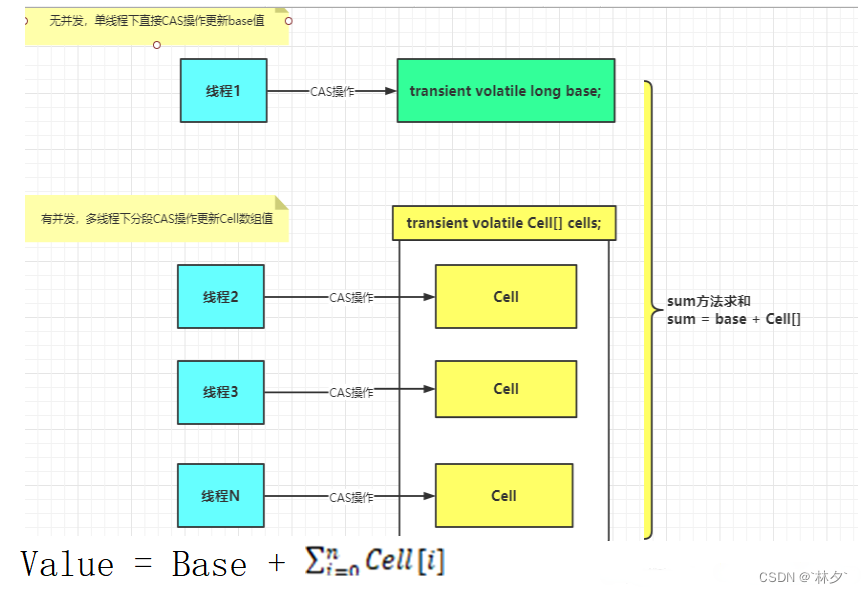
- LongAdder 基本思路:分散热点,将value值分散到一个cell数组中,求和 value = base + Cell[]。
-
- base变量:底并发,直接累加到该变量上
-
- Cell[]数组:高并发,累加到各个线程自己的槽Cell[i]中
sum求和:并不完全精确,因为在执行求和时并没有限制各个cell的累加
实现了序列化接口,继承了Stripe64,Striped64继承了Number。

Striped64的属性
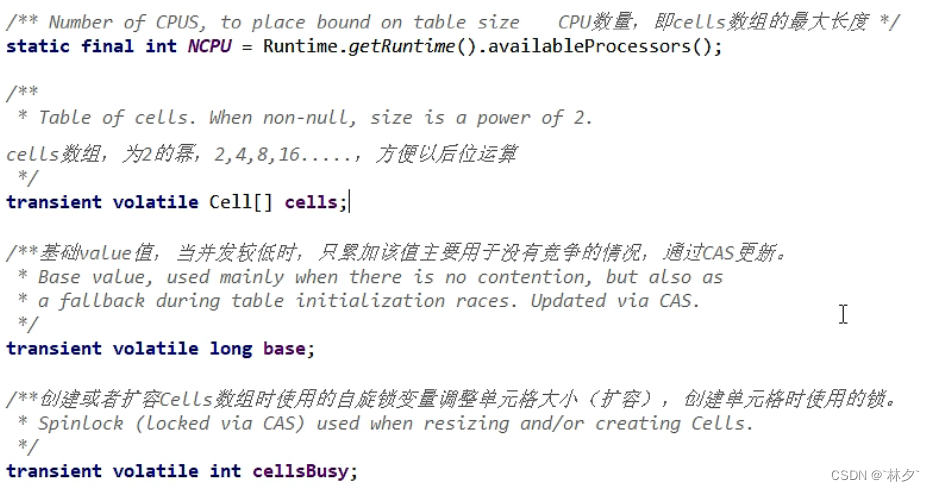
as   表示cells引用
b    表示获取的base值
v    表示期望值
m   表示cells数组的长度
a  表示当前线程命中的cell单元格
add方法执行流程:
-
无竞争只更新base:代码执行首次增加的操作,进入判断,因为是首次所以原 cells为null(也可以从上面的Striped64声明看出来),而base为初始值,调用casBase方法(cmp期望值,val替换值)比较并交换能成功执行,返回true,不会进入if代码块,整个add方法执行结束。 -
更新base失败创建cells数组代码继续执行遇见高并发,目前cells还是null,都进入casBase方法,因为其中一个线程成功替换了base值,会使其它线程的期待值与之不匹配返回false,进入if代码块。里面的所有判断条件都是或的关系,满足一个即可,因cells还是null则会调用longAccumulate方法,
第一个cellBusy 0 判断是否已有线程再进行初始化,第二个cellsas==null,第三个解决并发问题比较并交换cellBusy值(修改成1),277号执行cells初始化(下图),278行赋值其中一个元素,284结束初始化标志,287行结束循环。

-
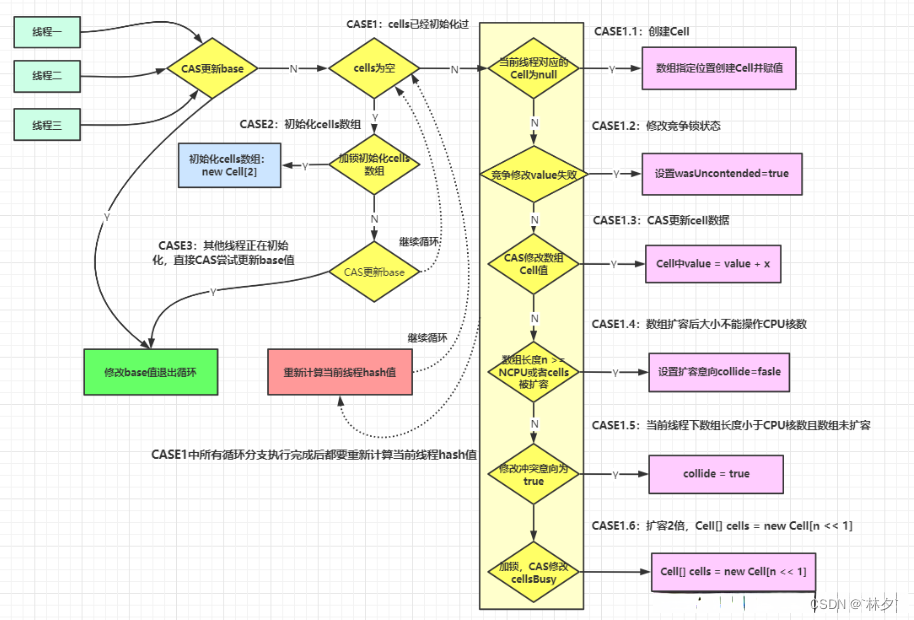
目前cell数组里的元素为空,会调用longAccumulate方法进行更新。因已经初始化cells,则会进入第一个if句块,分以下几点
第一点:根据获得hash值对应的cells的元素为null,确定cells未被操作,新new一个cell元素(值为要操作的x),
双端检锁获得锁,设置创建标识为false,再次判断当前cells不为null且长度大于0且当前cells单元格为null,
将新new的cell元素赋值给当前单元格,更改创建标识,结束循环。
第二点:竞争标识为false(竞争失败),更改标识并重设hash值(272行),循环(再次)尝试累加操作
第三点:因fn一直为null,直接执行cas比较并交换,成功则退出,失败则往下走
第四点:cells的元素个数大于cpu核心数或者cells不是同一个,禁止扩容,修改扩容意向为false。
重设线程hash值(272号)并再次尝试。
第五点:如果扩容意向为false,修改成true,重设线程hash值并再次尝试
第六点:进行扩容。判断并获取锁,当前cells与程序cells是一个,new一个新的cells,通过位运算实现新cells长
度为之前的两倍,然后将原有的cells元素赋值给新cells,释放锁、修改扩容意向为false,结束本次循环再次尝试。

当多个线程竞争一个Cell比较激烈,出现比较并交换失败,则扩容:代码继续执行遇见高并发,a 赋值的cells单元格不为null,则会调用cas方法,与下面第二段代码含义一致(比较并交换),高并发遇见与上述情况一致返回false,则会调用longAccumulate方法
    public void add(long x) {
        Cell[] as; long b, v; int m; Cell a;
        if ((as = cells) != null || !casBase(b = base, b + x)) {
            boolean uncontended = true;
            if (as == null || (m = as.length - 1) < 0 ||
                (a = as[getProbe() & m]) == null ||
                !(uncontended = a.cas(v = a.value, v + x)))
                longAccumulate(x, null, uncontended);
        }
    }
    final boolean casBase(long cmp, long val) {
        return UNSAFE.compareAndSwapLong(this, BASE, cmp, val);
    }
add调用longAccumulate方法第三个参数 uncontended 表示是否出现了竞争,也就是比较并更新失败。出现竞争false,未出现true。
case1:进入case1条件:cells已经初始化。
case2:已在add方法执行流程第2步写出
case3:下面图片标注的第三条if语句,是兜底语句,多个尝试CAS修改失败的线程则会走这个分支,因为fn一直为null,所以走v+x

    final void longAccumulate(long x, LongBinaryOperator fn,
                              boolean wasUncontended) {
        int h;
        if ((h = getProbe()) == 0) { //如果线程的hash值为0,强制初始化hash值,因为之前没有hash值,所以不知道取那个Cell格更新,因此导致比较并更新失败不算竞争导致的,所以重新调用cas方法。
            ThreadLocalRandom.current(); // force initialization
            h = getProbe();
            wasUncontended = true;
        }
        boolean collide = false;                // True if last slot nonempty
        for (;;) {
            Cell[] as; Cell a; int n; long v;
            if ((as = cells) != null && (n = as.length) > 0) {
                if ((a = as[(n - 1) & h]) == null) {
                    if (cellsBusy == 0) {       // Try to attach new Cell
                        Cell r = new Cell(x);   // Optimistically create
                        if (cellsBusy == 0 && casCellsBusy()) {
                            boolean created = false;
                            try {               // Recheck under lock
                                Cell[] rs; int m, j;
                                if ((rs = cells) != null &&
                                    (m = rs.length) > 0 &&
                                    rs[j = (m - 1) & h] == null) {
                                    rs[j] = r;
                                    created = true;
                                }
                            } finally {
                                cellsBusy = 0;
                            }
                            if (created)
                                break;
                            continue;           // Slot is now non-empty
                        }
                    }
                    collide = false;
                }
                else if (!wasUncontended)       // CAS already known to fail
                    wasUncontended = true;      // Continue after rehash
                else if (a.cas(v = a.value, ((fn == null) ? v + x :
                                             fn.applyAsLong(v, x))))
                    break;
                else if (n >= NCPU || cells != as)
                    collide = false;            // At max size or stale
                else if (!collide)
                    collide = true;
                else if (cellsBusy == 0 && casCellsBusy()) {
                    try {
                        if (cells == as) {      // Expand table unless stale
                            Cell[] rs = new Cell[n << 1];
                            for (int i = 0; i < n; ++i)
                                rs[i] = as[i];
                            cells = rs;
                        }
                    } finally {
                        cellsBusy = 0;
                    }
                    collide = false;
                    continue;                   // Retry with expanded table
                }
                h = advanceProbe(h);
            }
            else if (cellsBusy == 0 && cells == as && casCellsBusy()) {
                boolean init = false;
                try {                           // Initialize table
                    if (cells == as) {
                        Cell[] rs = new Cell[2];
                        rs[h & 1] = new Cell(x);
                        cells = rs;
                        init = true;
                    }
                } finally {
                    cellsBusy = 0;
                }
                if (init)
                    break;
            }
            else if (casBase(v = base, ((fn == null) ? v + x :
                                        fn.applyAsLong(v, x))))
                break;                          // Fall back on using base
        }
    }
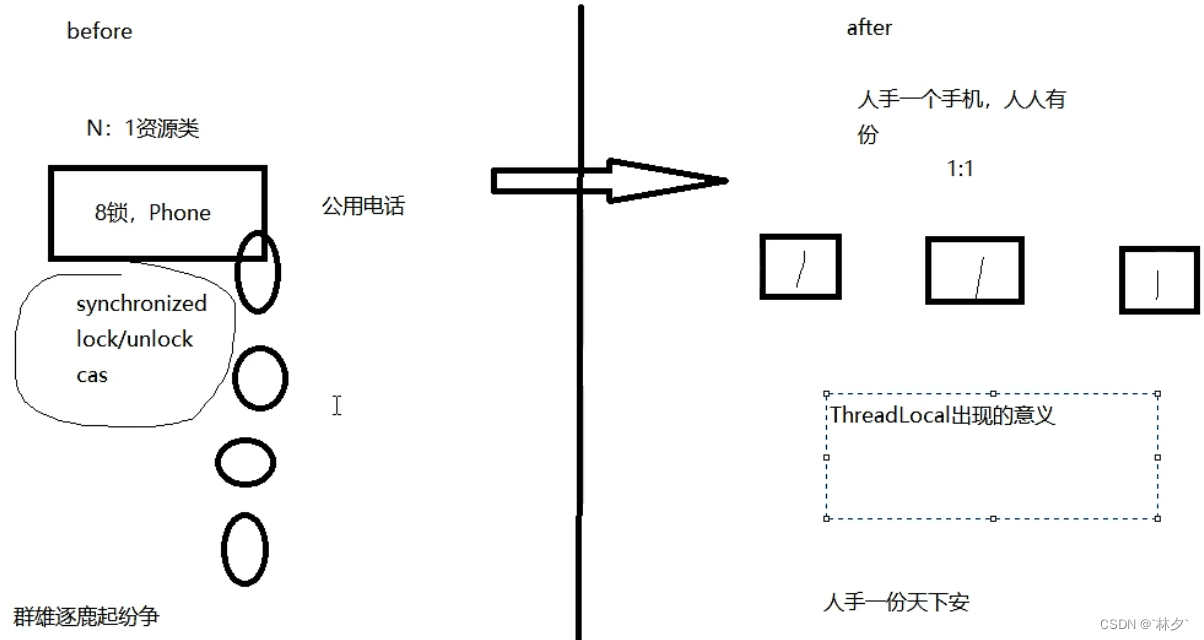
ThreadLocal
简介与使用
线程局部变量 不共享就不会起纷争
实现每一个变量都有自己专属的本地变量副本,从而避免线程安全问题
get():获取当前线程局部变量副本的值
set():设置当前线程局部变量副本的值
remove():清除当前线程局部变量副本的值
initialvalue():设置并返回当前线程局部变量副本的初始值
withInitial():和initialvalue功能一样,不过它是静态方法
    ThreadLocal<Integer> threadLocal = new ThreadLocal<Integer>(){
        //初始化局部变量,每个调用者开始调用时都是0。
        @Override
        protected Integer initialValue() {
            return 0;
        }
    };
    //工作中使用这类方式
    ThreadLocal<Integer> threadLocal2 =  ThreadLocal.withInitial(()->0);

    public void saleVolume(){
        threadLocal2.set(threadLocal2.get() + 1);
    }
由于后续业务逻辑造成内存泄漏问题,在用完后使用try-final进行回收。
class Resource{
    ThreadLocal<Integer> threadLocal = ThreadLocal.withInitial(() -> 0);
    public  void add(){
        threadLocal.set(threadLocal.get() + 1);
    }
}

public class RemoveThreadLocal {
    public static void main(String[] args) {
        Resource resource = new Resource();
        ThreadPoolExecutor threadPool = new ThreadPoolExecutor(
                3,
                5,
                300L,
                TimeUnit.MILLISECONDS,
                new ArrayBlockingQueue<>(3),
                Executors.defaultThreadFactory(),
                new ThreadPoolExecutor.AbortPolicy()
        );

        try {
            for (int i = 0; i < 8; i++) { //当线程数量超过设置最大线程数 + 阻塞队列数时,会抛异常
                threadPool.submit(()->{

                    try {
                        int begin = resource.threadLocal.get();
                        resource.add();
                        int after = resource.threadLocal.get();
                        System.out.println(Thread.currentThread().getName()+" 初始状态:"+begin+" 最终状态:"+after);
                    } finally {
                        //最终回收ThreadLocal的局部变量副本的值
                        resource.threadLocal.remove();
                    }
                });
            }
        } catch (Exception e) {
            e.printStackTrace();
        } finally {
            threadPool.shutdown();
        }
    }
}
源码分析
Thread、ThreadLocal、ThreadLocalMap三者关系:
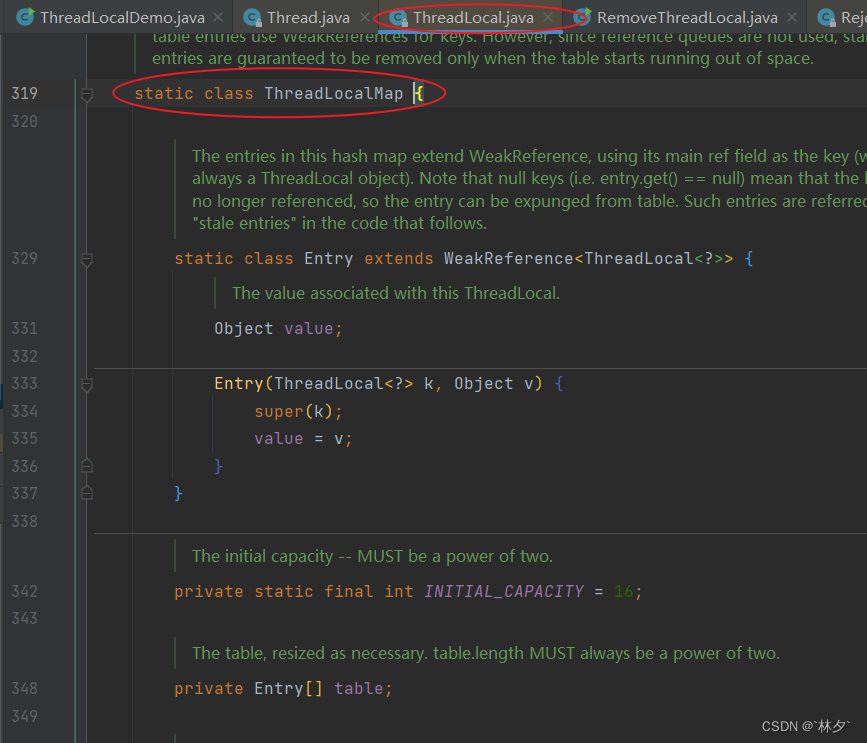
Thread类中引用了ThreadLocal类,而ThreadLocalMap是ThreadLocal的静态内部类。

thread其实只和threadlocal内部类threadlocalmap有关系 threadlocal提供访问当前线程threadlocalmap途径
ThreadLocal使用结束要用 remove()清除ThreadLocal变量,尤其在线程池环境下,线程会复用,不清楚会造成后续业务逻辑数据错误或内存泄漏。
- 强引用:根可达,Students s1 = new Students();内存不足报OOM也不会回收。
- 软引用:内存充足时不回收,内存不足时回收。softReference
- 弱引用:不管内存是否充足,只要执行gc,内存空间都会被回收.WeakReference
- 虚引用:配合ReferenceQueue使用,对象使用虚引用相当于没有引用,在任何时候都能被回收。虚引用的get方法返回都是null,无法访问对应的引用对象
ThreadLocalMap中的Entry的Key是一个弱引用。
Thread ref => Thread => ThreadLocalMap => Entry => key、value
- ThreadLocal的方法执行结束后要被回收:栈帧引用弹出,ThreadLocalMap中的key也指向ThreadLocal,如果他是强引用则不能对ThreadLocal进行回收。所以使用弱引用。
- 当使用线程池,存在线程复用时,对ThreadLocal进行回收,那么储存在ThreadLcoalMap的key值也是null,而使用gcRoots无法到达null对该键值对进行回收,造成内存泄漏。解决方法:在ThreadLocal使用结束后调用remove方法清空。
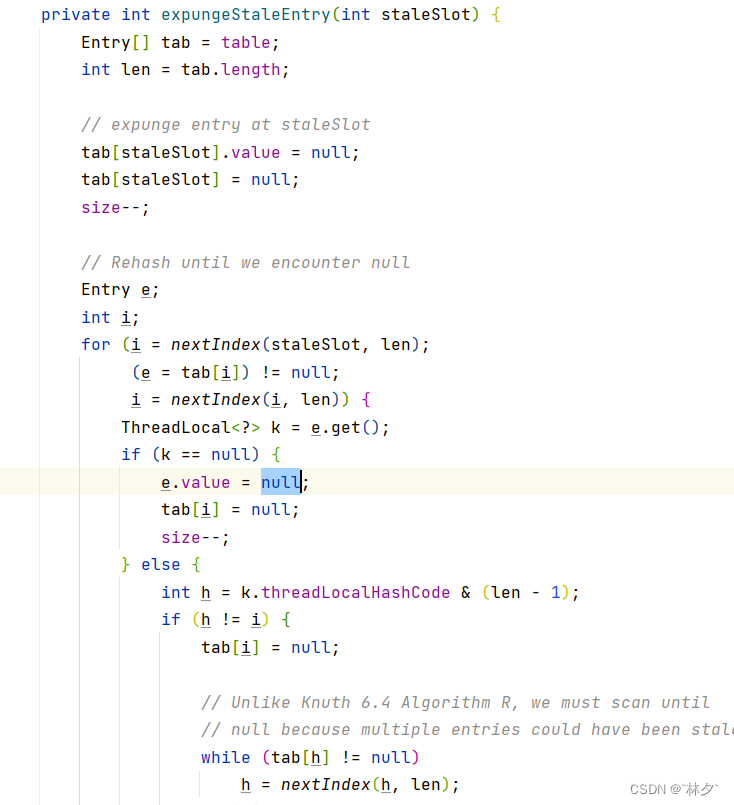
调用get、set、remove方法时,就会尝试删除key为null的entry(调用expungeStaleEntry方法)
expungeStaleEntry
当key为null时,会将value也置为null
总结
实践使用规则:
- 使用ThreadLocal.whitInitial(()->初始化值)
- ThreadLocal修饰为static
- 使用完手动remove
- ThreadLocal并不解决线程间数据共享的问题
- ThreadLocal适用于变量在线程间隔离在方法间共享的场景
- ThreadLocal通过隐式在不同线程间创建局部变量副本避免了线程安全问题。
- 每个线程都有一个专属的ThreadLocalMap,维护了ThreadLocal对象与具体实例映射,这个map只能被持有它的线程访问,固不存在线程安全与锁的问题
- ThreadLcoalMap的key对ThreadLocal是弱引用,避免了ThreadLocal不能回收的问题
- get、set、remove都会调用expungeStaleEntry,cleanSmoeSlots,replaceStableEntry这三个方法回收键为null的Entry对象的值,防止内存泄漏,属于安全加固方法。
- 群雄涿鹿起纷争,人各一份天下安


 995
995


 被折叠的 条评论
为什么被折叠?
被折叠的 条评论
为什么被折叠?
 到【灌水乐园】发言


