


第三章:程序控制语句
1.从小打到排序数值
import java.util.Scanner;

public class NewTest {

    // 1.从小打到排序数值
    public static void main(String[] args) {
        Scanner s = new Scanner(System.in);
        System.out.println("请输入3个整数:");
        int a = s.nextInt();
        int b = s.nextInt();
        int c = s.nextInt();

        if (a < b) {
            int t = a;
            a = b;
            b = t;
        }
        if (a < c) {
            int t = a;
            a = c;
            c = t;
        }
        if (b < c) {
            int t = b;
            b = c;
            c = t;
        }

        System.out.println("从大到小的顺序输出:");
        System.out.println(a + "," + b + "," + c);
        s.close();
    }

}

2.运算符
import java.util.Scanner;

public class NewTest {


    public static void main(String[] args) {
        int x = 23;
        int y = 2;
        float z = 16.28f;
        System.out.println("x+y: " + (x + y));
        System.out.println("x-y: " + (x - y));
        System.out.println("x*y: " + x * y);
        System.out.println("x/y: " + x / y);
        System.out.println("x%y: " + x % y);

        System.out.println("x=" + x + "," + "y=" + y);
        System.out.println('a' == 98);
        System.out.println('a' > 'b');
        System.out.println("x>y:" + (x > y));
    }
}

3.scaner
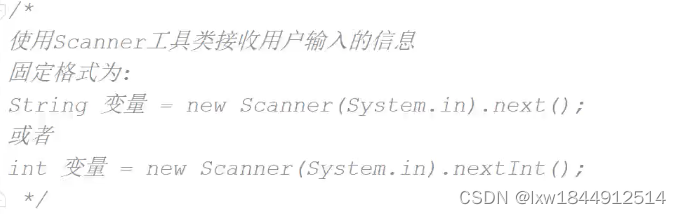
 public static void score() {
        System.out.print("请输入当前分数:");
        int score = new Scanner(System.in).nextInt();
        System.out.println("加分前:" + score);

        int count = 0;
        while (score < 60) {
            score++;
            count++;
        }
        System.out.println("加分后:" + score);
        System.out.println("加分次数:" + count);
    }
4.测试
public static void task() {
        //创建String数组,并为每一个元素赋值。赋值内容为第几周+学习内容
        String[] contentList = new String[35];
        contentList[0] = "【第1周】环境搭建与语法入门";
        contentList[1] = "【第2周】Java语法之循环、数组与方法";
        contentList[2] = "【第3周】面向对象之封装与继承";
        contentList[3] = "【第4周】面向对象之单例模式与多态";
        contentList[4] = "【第5周】常用工具类(上)";
        contentList[5] = "【第6周】常用工具类(下)";
        contentList[6] = "【第7周】常用工具类(下)";
        contentList[7] = "【第8周】前端基础之HTML与CSS";
        contentList[8] = "【第9周】前端基础之JavaScript与综合案例";
        contentList[9] = "【第10周】Java Web基础";
        contentList[10] = "【第11周】Java Web基础";
        contentList[11] = "【第12周】常用功能与过滤器";
        contentList[12] = "【第13周】监听器与项目实战";
        contentList[13] = "【第14周】监听器与项目实战";
        contentList[14] = "【第15周】MySQL基础";
        contentList[15] = "【第16周】MySQL基础";
        contentList[16] = "【第17周】Java数据库开发基础";
        contentList[17] = "【第18周】框架前置知识";
        contentList[18] = "【第19周】MyBatis基础";
        contentList[19] = "【第20周】MyBatis实现OA系统项目实战";
        contentList[20] = "【第21周】MyBatis实现OA系统项目实战";
        contentList[21] = "【第22周】Linux环境搭建与Redis应用";
        contentList[22] = "【第23周】Spring基础";
        contentList[23] = "【第24周】Spring基础";
        contentList[24] = "【第25周】Spring基础";
        contentList[25] = "【第26周】SSM开发社交网站";
        contentList[26] = "【第27周】Spring Boot电商项目实战";
        contentList[27] = "【第28周】Spring Boot电商项目实战";
        contentList[28] = "【第29周】面试";
        contentList[29] = "【第30周】多线程与分布式";
        contentList[30] = "【第31周】多线程与分布式";
        contentList[31] = "【第32周】Spring Cloud基础";
        contentList[32] = "【第33周】Spring Cloud电商实战";
        contentList[33] = "【第34周】Spring Cloud电商实战";
        contentList[34] = "【第35周】Zookeeper+Dubbo应用与面试";

        //提示信息
        System.out.print("您要开始第几周学习啦,直接输入数字吧:");
        //设置变量存储接收到的数据
        int week = new Scanner(System.in).nextInt();

        //计算今天是几月(1-月第一周、4-月第4周)

        //方法二:
        int nowWeek, month;

        if (week > 4 && week % 4 != 0) {
            month = week / 4;
            nowWeek = week % 4;
        } else if (week % 4 == 0) {
            month = week / 4;
            nowWeek = 4;
        } else {
            month = 1;
            nowWeek = week;
        }

        //计算输入的周是这个月的第几周
        //提示信息
        System.out.println("以下是您本月的学习计划, √ 代表当周学习任务");
        System.out.println("=======================================");

        //利用for循环,找到数组中对应这个月的内容输出
        //根据当前月第几周,在输出此行时,前面添加“√”
        for (int i = 0; i < contentList.length; i++) {
            if (i == week - 1) {
                System.out.print("现在是第" + month + "月第" + nowWeek + "周" + "√" + contentList[i]);
            }
        }
    }
public static void task() {
//创建String数组,并为每一个元素赋值。赋值内容为第几周+学习内容
String[] contentList = new String[35];
contentList[0] = "【第1周】环境搭建与语法入门";
contentList[1] = "【第2周】Java语法之循环、数组与方法";
contentList[2] = "【第3周】面向对象之封装与继承";
contentList[3] = "【第4周】面向对象之单例模式与多态";
contentList[4] = "【第5周】常用工具类(上)";
contentList[5] = "【第6周】常用工具类(下)";
contentList[6] = "【第7周】常用工具类(下)";
contentList[7] = "【第8周】前端基础之HTML与CSS";
contentList[8] = "【第9周】前端基础之JavaScript与综合案例";
contentList[9] = "【第10周】Java Web基础";
contentList[10] = "【第11周】Java Web基础";
contentList[11] = "【第12周】常用功能与过滤器";
contentList[12] = "【第13周】监听器与项目实战";
contentList[13] = "【第14周】监听器与项目实战";
contentList[14] = "【第15周】MySQL基础";
contentList[15] = "【第16周】MySQL基础";
contentList[16] = "【第17周】Java数据库开发基础";
contentList[17] = "【第18周】框架前置知识";
contentList[18] = "【第19周】MyBatis基础";
contentList[19] = "【第20周】MyBatis实现OA系统项目实战";
contentList[20] = "【第21周】MyBatis实现OA系统项目实战";
contentList[21] = "【第22周】Linux环境搭建与Redis应用";
contentList[22] = "【第23周】Spring基础";
contentList[23] = "【第24周】Spring基础";
contentList[24] = "【第25周】Spring基础";
contentList[25] = "【第26周】SSM开发社交网站";
contentList[26] = "【第27周】Spring Boot电商项目实战";
contentList[27] = "【第28周】Spring Boot电商项目实战";
contentList[28] = "【第29周】面试";
contentList[29] = "【第30周】多线程与分布式";
contentList[30] = "【第31周】多线程与分布式";
contentList[31] = "【第32周】Spring Cloud基础";
contentList[32] = "【第33周】Spring Cloud电商实战";
contentList[33] = "【第34周】Spring Cloud电商实战";
contentList[34] = "【第35周】Zookeeper+Dubbo应用与面试";
//提示信息
System.out.print("您要开始第几周学习啦,直接输入数字吧:");
//设置变量存储接收到的数据
int num = new Scanner(System.in).nextInt();
//计算今天是几月(1-月第一周、4-月第4周)
//方法一:简单
int week, month;
month = (num - 1) / 4 + 1;
week = num - (month - 1) * 4;
//计算输入的周是这个月的第几周
//提示信息
System.out.println("以下是您本月的学习计划, √ 代表当周学习任务");
System.out.println("=======================================");
//利用for循环,找到数组中对应这个月的内容输出
//根据当前月第几周,在输出此行时,前面添加“√”
for (int i = 0; i < contentList.length; i++) {
if (i == week - 1) {
System.out.print("现在是第" + month + "月第" + week + "周" + "√" + contentList[i]);
}
}
}
增强版:
 public static void task() {
        //创建String数组,并为每一个元素赋值。赋值内容为第几周+学习内容
        String[] contentList = new String[35];
        contentList[0] = "【第1周】环境搭建与语法入门";
        contentList[1] = "【第2周】Java语法之循环、数组与方法";
        contentList[2] = "【第3周】面向对象之封装与继承";
        contentList[3] = "【第4周】面向对象之单例模式与多态";
        contentList[4] = "【第5周】常用工具类(上)";
        contentList[5] = "【第6周】常用工具类(下)";
        contentList[6] = "【第7周】常用工具类(下)";
        contentList[7] = "【第8周】前端基础之HTML与CSS";
        contentList[8] = "【第9周】前端基础之JavaScript与综合案例";
        contentList[9] = "【第10周】Java Web基础";
        contentList[10] = "【第11周】Java Web基础";
        contentList[11] = "【第12周】常用功能与过滤器";
        contentList[12] = "【第13周】监听器与项目实战";
        contentList[13] = "【第14周】监听器与项目实战";
        contentList[14] = "【第15周】MySQL基础";
        contentList[15] = "【第16周】MySQL基础";
        contentList[16] = "【第17周】Java数据库开发基础";
        contentList[17] = "【第18周】框架前置知识";
        contentList[18] = "【第19周】MyBatis基础";
        contentList[19] = "【第20周】MyBatis实现OA系统项目实战";
        contentList[20] = "【第21周】MyBatis实现OA系统项目实战";
        contentList[21] = "【第22周】Linux环境搭建与Redis应用";
        contentList[22] = "【第23周】Spring基础";
        contentList[23] = "【第24周】Spring基础";
        contentList[24] = "【第25周】Spring基础";
        contentList[25] = "【第26周】SSM开发社交网站";
        contentList[26] = "【第27周】Spring Boot电商项目实战";
        contentList[27] = "【第28周】Spring Boot电商项目实战";
        contentList[28] = "【第29周】面试";
        contentList[29] = "【第30周】多线程与分布式";
        contentList[30] = "【第31周】多线程与分布式";
        contentList[31] = "【第32周】Spring Cloud基础";
        contentList[32] = "【第33周】Spring Cloud电商实战";
        contentList[33] = "【第34周】Spring Cloud电商实战";
        contentList[34] = "【第35周】Zookeeper+Dubbo应用与面试";

        //提示信息
        System.out.print("您要开始第几周学习啦,直接输入数字吧:");
        //设置变量存储接收到的数据
        int w = new Scanner(System.in).nextInt();  //周数
        int month;
        //5= 5/4=>1  ,8->8/4=2
        if (w % 4 == 0) {
            month = w / 4;
        } else {
            month = w / 4 + 1;
        }

        System.out.println("月:" + month);
        //计算输入的周是这个月的第几周
        //提示信息
        System.out.println("以下是您本月的学习计划, √ 代表当周学习任务");
        System.out.println("=======================================");

        //利用for循环,找到数组中对应这个月的内容输出
        //根据当前月第几周,在输出此行时,前面添加“√”
        // 第1月:0-3;第2月:4-7
        System.out.println("当月的学习计划:");
        for (int i = (month - 1) * 4; i < month * 4; i++) {
            try {
                if (i == (w - 1)) {
                    System.out.println("√" + contentList[i]);
                } else {
                    System.out.println(contentList[i]);
                }
            } catch (ArrayIndexOutOfBoundsException e) {
                System.out.println("未发现第" + (i + 1) + "周学习计划");
            }
        }
} 
第二季:面相对象编程
1.面相对象编程


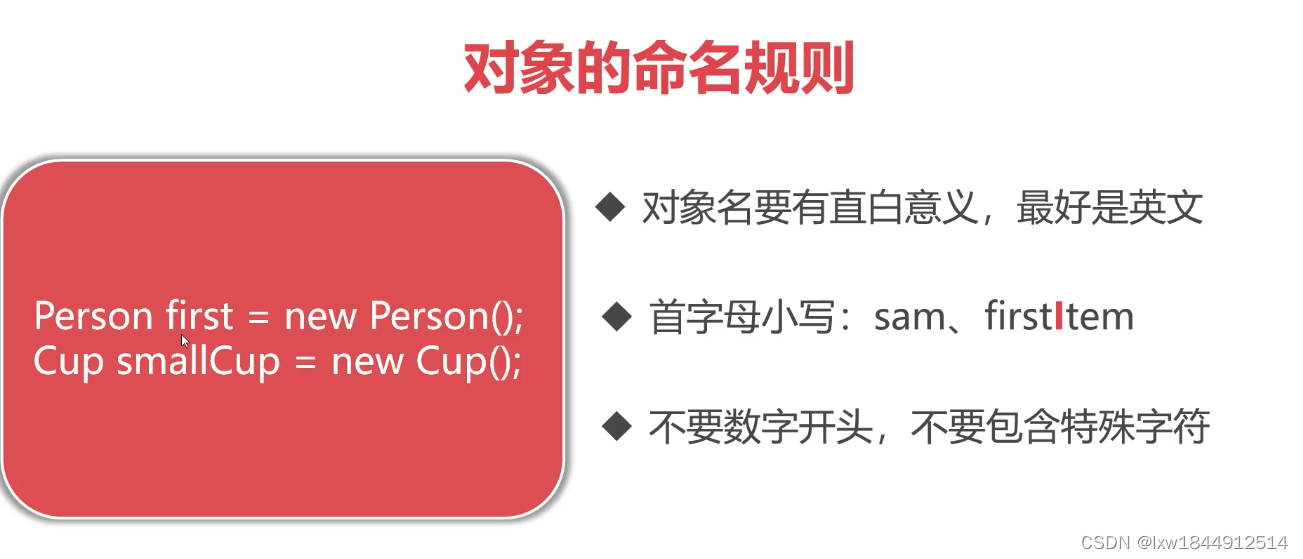
2.成员变量
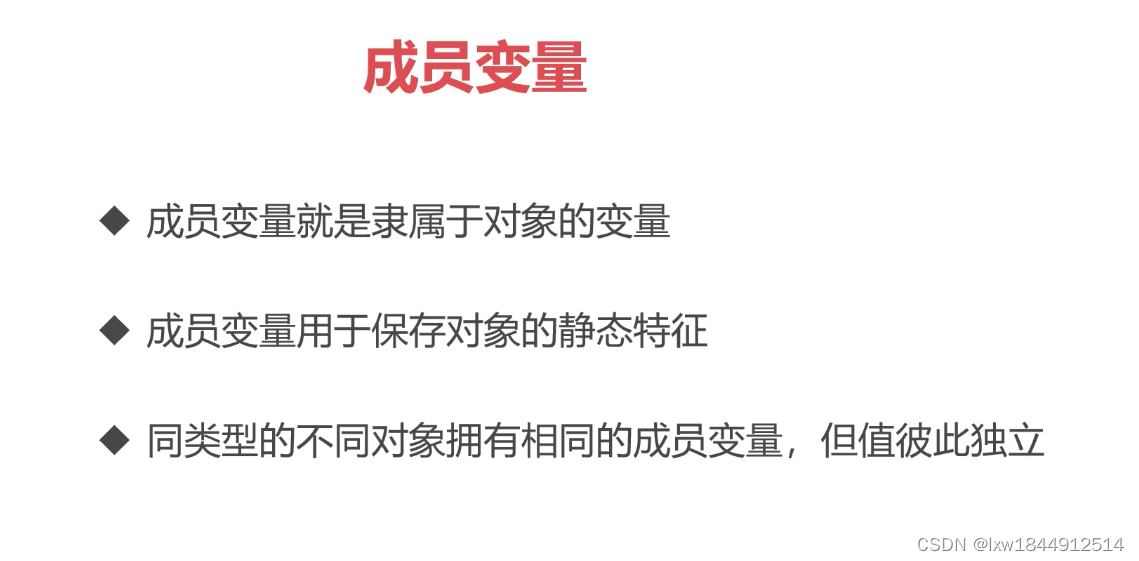

public class Dog {
    //    成员变量==PHP中的成员属性
    String name;  // ToDo::String首字母大写
    int age;
    double weight;
    float height;

    public static void main(String[] args) {
        Dog duoDuo = new Dog();
        duoDuo.name = "多多";
        duoDuo.age = 12;
        duoDuo.weight = 13.5; //double 可带f,也可以不带f
        duoDuo.height = 12.2f;//todo:: 必须带f,保证赋值的数据与成员变量的类型一直;否则报错【java: 不兼容的类型: 从double转换到float可能会有损失】

        Dog lucky = new Dog();
        lucky.name = "Lucky"; //todo::必须双引号,否则报错:【java: 未结束的字符文字】
        lucky.age = 10;
        lucky.weight = 12.5;

        System.out.println(duoDuo.name + "今年" + duoDuo.age + "岁了,体重:" + duoDuo.weight + "kg,身高:" + duoDuo.height + "cm");
        System.out.println(lucky.name + "今年" + lucky.weight + "kg了");


    }
}
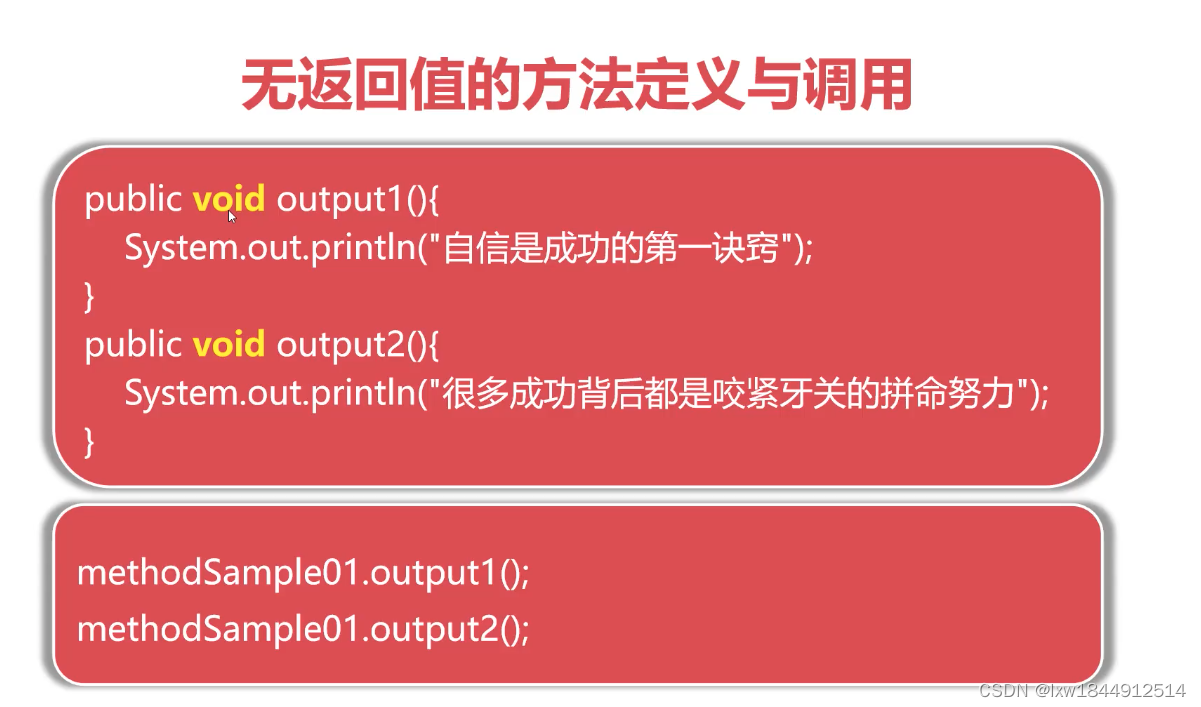
3.方法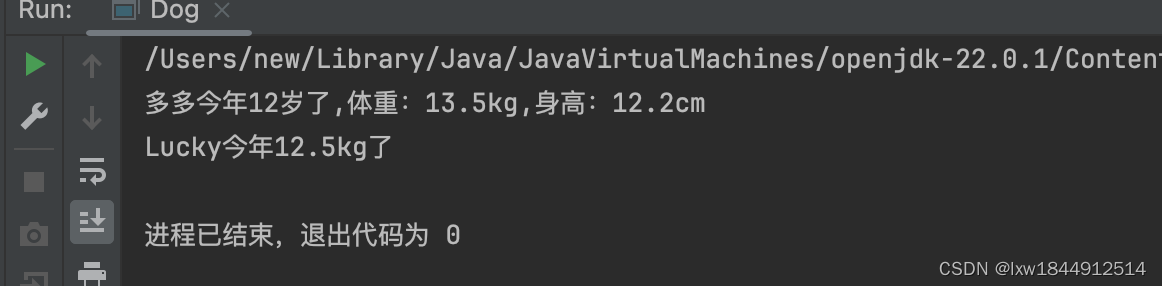

public class MethodSample {
    public static void main(String[] args) {
        int a = 10;
        int b = 5;
        MethodSample methodSample = new MethodSample();
        String r1 = methodSample.isOddNum(a);
        System.out.println(a + "是:" + r1);

        String r2 = methodSample.isOddNum(b);
        System.out.println(b + "是:" + r2);
    }

    public String isOddNum(int num) {
        System.out.println("原始数字:" + num);
        if (num % 2 == 0) {
            return "偶数";
        } else {
        }
        return "奇数";
    }
}

4.包-package


5.访问修饰符


PackageSample01:
package com.imooc.sample1;

public class PackageSample01 {
    //public 代表其他任何类都能访问的成员变量
    public String name;

    //private 代表只能在当前类中使用
    private void sayHello() {
        System.out.println("Hello world");
    }

    // 不写访问修饰符代表是默认修饰符,表示只能被包中其他类访问,【 能被sample03调用,不能被sample02调用】
    void sayGoodBye() {
        System.out.println("Good bye!");
    }

    public static void main(String[] args) {
        PackageSample01 packageSample01 = new PackageSample01();
        packageSample01.name = "lxw";
        packageSample01.sayHello();
        packageSample01.sayGoodBye();
        System.out.println("在包01中的名字:"+packageSample01.name);
    }
}
PackageSample02:
package com.imooc.sample2;

import com.imooc.sample1.PackageSample01;

public class PackgeSample02 {
    public static void main(String[] args) {
        // 要使用其他包下的类必须事先import 导入
        PackageSample01 packageSample01 = new PackageSample01();
        packageSample01.name = "lilY";

        System.out.println("在package02名字: " + packageSample01.name);
    }
}
 PackageSample03:
package com.imooc.sample1;

import com.imooc.sample2.PackgeSample02;

public class PackageSample03 {

    public static void main(String[] args) {
        // 同一个包下的类无需import导入
        PackageSample01 packageSample01 = new PackageSample01();
        //idea 在书写时会自动产生import 语句
        PackgeSample02 packgeSample02 = new PackgeSample02();

//        packageSample01.sayHello(); //
        packageSample01.sayGoodBye(); //Good bye!
    }
}

6.面相对象三大特征


idea 生成getter 和setter


快捷键:cmd+N

6.1封装
对成员变量进行读写封装:
MobileNumber.java 代码如下
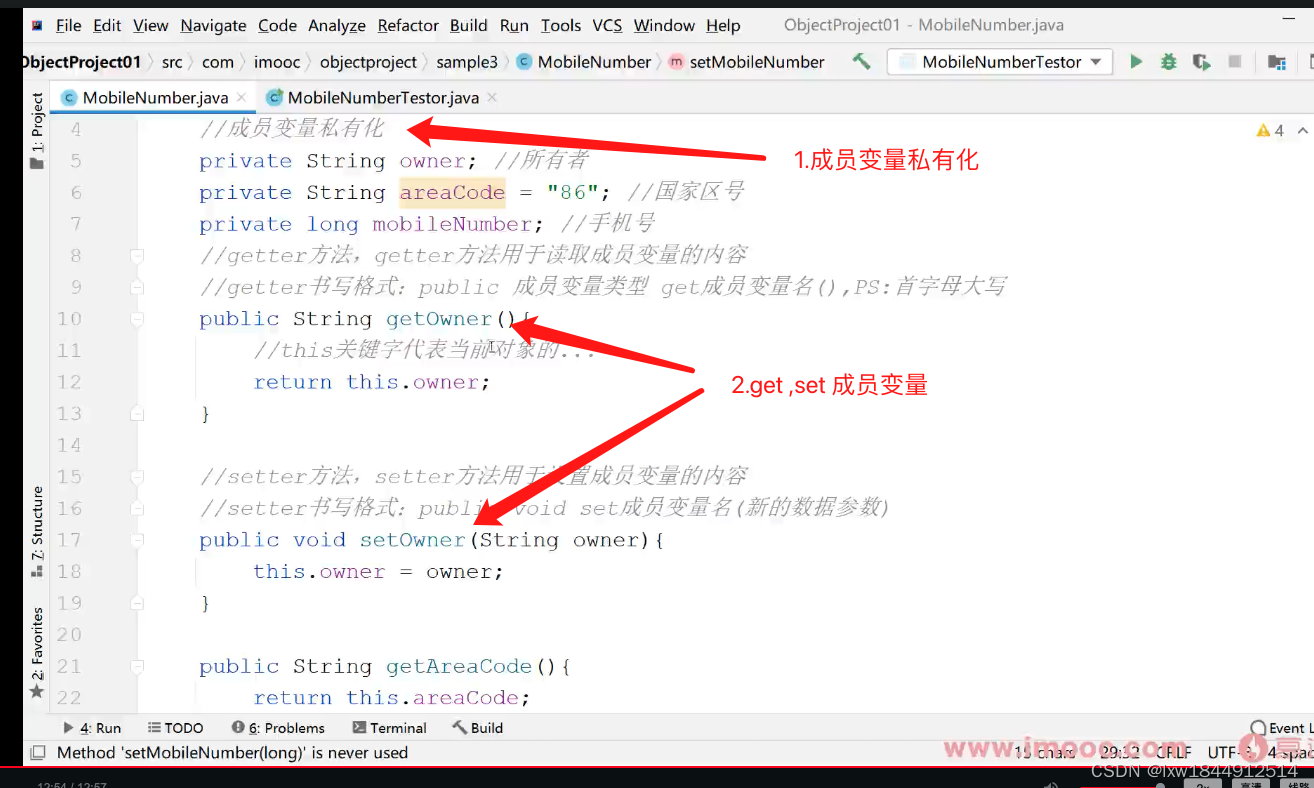
package com.imooc.sample3;

public class MobileNumber {
    private String name;
    private String areaCode = "86";
    private long mobileNumber;

    // getter 方法用于读取成员变量的的内容
    //getter 书写格式: public 成员变量类型 get成员变量名(),ps: 成员变量首字母大写
    public String getName() {
        //        return name;  // 推荐这个,简单
        return this.name;
    }

    // setter 用于设置成员变量的内容
    //    setter 书写格式, public void set成员变量名(新的数据参数)ps: 成员变量首字母大写
    public void setName(String name) {
        // this 关键字代表当前对像
        this.name = name;
    }

    public long getMobileNumber() {
        return mobileNumber;
    }

    public void setMobileNumber(long mobileNumber) {
        this.mobileNumber = mobileNumber;
    }

    public String getAreaCode() {
        return areaCode;
    }
}
MobileNumberTestor.java 代码如下
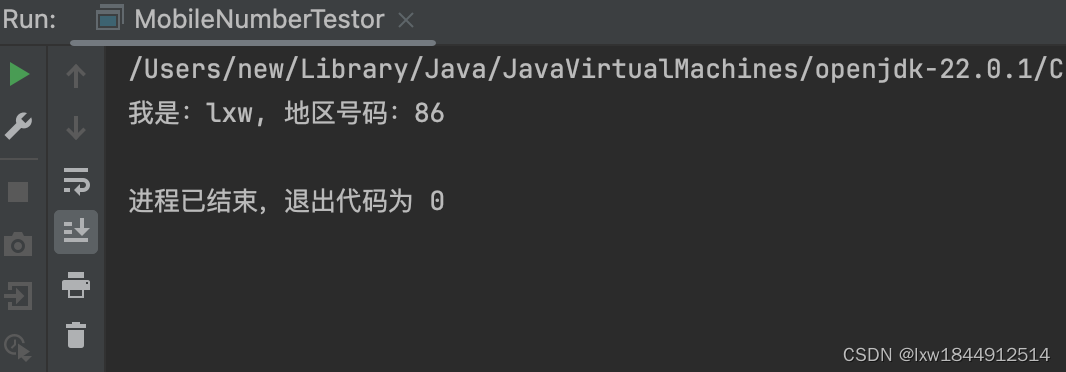
package com.imooc.sample3;

public class MobileNumberTestor {
    public static void main(String[] args) {
        MobileNumber mobileNumber=new MobileNumber();
        mobileNumber.setName("lxw");
        String name=mobileNumber.getName();
        String areaCode=mobileNumber.getAreaCode();

        System.out.println("我是:"+name+", 地区号码:"+areaCode);
    }

}
6.2. 继承


Mark1父类代码如下:
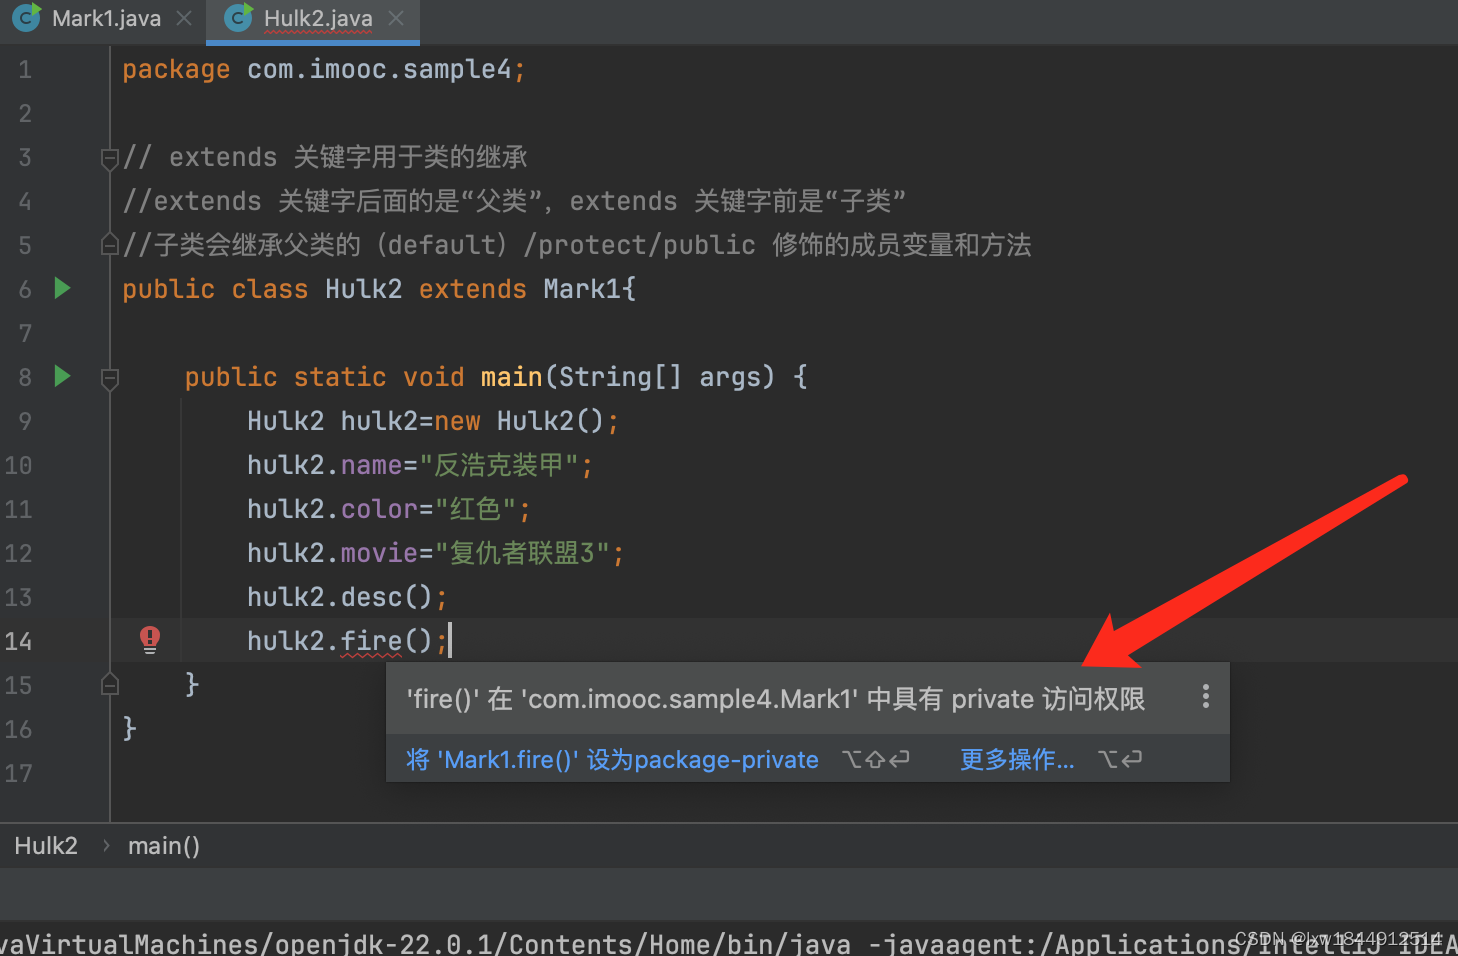
package com.imooc.sample4;

public class Mark1 {
    protected String name;
    protected String color;
    protected String movie;

    public void desc() {
        System.out.println("型号:" + name);
        System.out.println("颜色:" + color);
        System.out.println("首次出现电影:" + movie);
    }

    private void fire() {
        System.out.println("特殊技能:射出火焰");
    }

    public static void main(String[] args) {
        Mark1 mark1 = new Mark1();
        mark1.name = "马克1型";
        mark1.movie = "钢铁侠1";
        mark1.color = "银灰色";
        mark1.desc();
        mark1.fire();
        ;
    }
}
Hulk2子类代码如下:
package com.imooc.sample4;

// extends 关键字用于类的继承
//extends 关键字后面的是“父类”,extends 关键字前是“子类”
//子类会继承父类的(default)/protect/public 修饰的成员变量和方法
public class Hulk2 extends Mark1{

    private void repaire(){
        System.out.println("技能:替换战损组件");
    }

    public static void main(String[] args) {
        Hulk2 hulk2=new Hulk2();
        hulk2.name="反浩克装甲";
        hulk2.color="红色";
        hulk2.movie="复仇者联盟3";
        hulk2.desc();
//        hulk2.fire();
        hulk2.repaire();
    }
}
6.3多态


Language.java:
package com.imooc.sample5.system;

public interface Language {
    public void voice();
}
Chinese.java
package com.imooc.sample5.system;

public class Chinese implements Language{

    @Override
    public void voice() {
        System.out.println("您好,有什么可以帮到您的?");
    }
}
Englist.java
package com.imooc.sample5.system;

public class English implements Language{
    @Override
    public void voice() {
        System.out.println("can I help you?");
    }
}
CustomerService.java
package com.imooc.sample5.system;
//客户服务中心
public class CustomerService {
    //返回值类型是接口
    public Language contact(int areaCode) {
        if (areaCode == 86) {
            return new Chinese();
        } else {
            return new English();
        }
    }

    public static void main(String[] args) {
        Language language = new English();
        language.voice();

        Language language2 = new Chinese(); // 格式: 接口  类名字 = new 具体的实现类();
        language2.voice();

        CustomerService cs=new CustomerService();
        Language language3=cs.contact(86);
        language3.voice();
    }
}
Customer.java
package com.imooc.sample5;

import com.imooc.sample5.system.CustomerService;
import com.imooc.sample5.system.Language;

public class Customer {
    public static void main(String[] args) {
        CustomerService customerService=new CustomerService();
        Language language=customerService.contact(86);
        language.voice();
    }
}

6.4 arraylist 使用


package com.imooc.sample6;

import java.util.ArrayList;
import java.util.List;

public class ArrayListSample {
    public static void main(String[] args) {
        //泛型< 类名>,用于规范列表中数据类型
        //<string> 约束聚合中的数据类型为 string
        List<String> bookList = new ArrayList<String>(); // 创建Arraylist 对象
        bookList.add("西游记");
        bookList.add("水浒传");
        bookList.add("红楼梦");
        bookList.add("三国志");// 向列表末尾追加数据
        bookList.add(String.valueOf(2));

        bookList.add(0, "天道"); //向列表首添加元素
        System.out.println(bookList);
        String bookName = bookList.get(2);// 得到指定索引位置的数据(从0开始)
        System.out.println("第3本书名字:" + bookName);
        int length = bookList.size(); //得到列表数据的总数
        System.out.println("列表长度:" + length);
        bookList.remove(2);// 移除下标为2的数据
        System.out.println("移除下标为2后的数据:" + bookList);
        bookList.remove(bookList.size() - 1); //移除最后一条数据
        System.out.println("移除最后一条数据:" + bookList);

        for (String book : bookList) {
            System.out.println("《" + book + "》");
        }


    }
}

6.5 天气预报

要使用 Maven,你需要安装 Maven 并确保它可以在命令行中运行。之后,你可以使用 Maven 命令来管理你的项目,例如:
-
mvn clean清理项目 -
mvn compile编译项目 -
mvn test运行测试 -
mvn package打包项目 -
mvn install安装项目到本地仓库
确保你的 IDE(如 IntelliJ IDEA 或 Eclipse)支持 Maven,并且能够识别 pom.xml 文件来管理项目依赖和构建。
maven更详细的内容可以参考文章:https://www.cnblogs.com/wendyw/p/12200225.html#_label0
java的maven;python的pip, php中composer。
maven如何管理依赖
1、maven是什么
maven是java的一款构建工具,对项目依赖进行管理。Maven是一个项目管理和综合工具,可以帮助开发人员进行依赖管理、项目构建、项目知识管理等工作,极大的提升开发效率。
2、maven的使用方式
maven使用XML格式的文件进行依赖配置描述的方式,叫做POM(Project Object Model)
pom.xml对应的结构:
- 1.groupId、artifactId、version: 依赖的基本坐标
- 2.type:依赖的类型,默认为jar
- 3.scope:依赖的范围
- 4.optional:标记依赖是否可选
-
- exclusions:用来排除传递性依赖
pom.xml文件是Maven进行工作的主要配置文件。在这个文件中我们可以配置Maven项目的groupId、artifactId和version等Maven项目必须的元素;可以配置Maven项目需要使用的远程仓库;可以定义Maven项目打包的形式;可以定义Maven项目的资源依赖关系等等。
pom.xml中引入的依赖:
   <dependencies>
        <!-- 引入 SpringMVC 相关依赖,并实现对其的自动配置 -->
        <dependency>
            <groupId>org.springframework.boot</groupId>
            <artifactId>spring-boot-starter-web</artifactId>
        </dependency>
        <!-- 实现对 Spring Data Redis 的自动化配置 -->
        <dependency>
            <groupId>org.springframework.boot</groupId>
            <artifactId>spring-boot-starter-data-redis</artifactId>
            <exclusions>
                <!-- 去掉对 Lettuce 的依赖,因为 Spring Boot 优先使用 Lettuce 作为 Redis 客户端 -->
                <exclusion>
                    <groupId>io.lettuce</groupId>
                    <artifactId>lettuce-core</artifactId>
                </exclusion>
            </exclusions>
        </dependency>
        <!-- 引入 Jedis 的依赖 -->
        <dependency>
            <groupId>redis.clients</groupId>
            <artifactId>jedis</artifactId>
        </dependency>
        <!-- 引入 Zipkin 相关依赖-->
        <dependency>
            <groupId>org.springframework.cloud</groupId>
            <artifactId>spring-cloud-starter-zipkin</artifactId>
        </dependency>
        <!--引入 Sleuth 相关依赖 -->
        <dependency>
            <groupId>org.springframework.cloud</groupId>
            <artifactId>spring-cloud-starter-sleuth</artifactId>
        </dependency>
        <!--  Brave 对 Opentracing 的实现 -->
        <dependency>
            <groupId>io.opentracing.brave</groupId>
            <artifactId>brave-opentracing</artifactId>
            <version>0.35.0</version>
        </dependency>
        <!-- Opentracing 对 Redis 的支持 -->
        <dependency>
            <groupId>io.opentracing.contrib</groupId>
            <artifactId>opentracing-redis-jedis3</artifactId>
            <version>0.1.16</version>
        </dependency>
        <dependency>
            <groupId>io.opentracing.contrib</groupId>
            <artifactId>opentracing-redis-spring-data</artifactId>
            <version>0.1.16</version>
        </dependency>
    </dependencies>


 15万+
15万+


 被折叠的 条评论
为什么被折叠?
被折叠的 条评论
为什么被折叠?
 到【灌水乐园】发言


