


Apache的管理及优化web
实验环境:
- 首先需要配置好软件仓库
- hostname set-hostname (设定主机名称)
- cd /etc/sysconfig/network-scripts
- vim ifcfg-ens160(设定ip)
- nmcli connection reload
- nmcli connection show
- cd /etc/yum.repos.d
- vim westos.repo(设定软件仓库)
- dnf list httpd 查看软件仓库是否已经配置好了

-
http:超文本传输协议,是由软件提供协议
-
curl -I www.qq.com 查看qq用的什么协议Server

-
apache是其他众多提供超文本传输协议之一,还有nginx,stgw,jfe,Tengine等
apache如何安装与使用
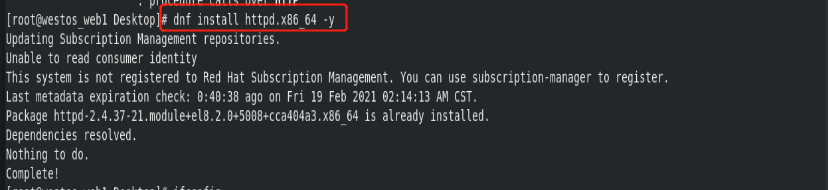
【1】安装Apache服务
-
dnf search http
httpd.x86_64 : Apache HTTP server就是搜索到软件

-
dnf install httpd.x86_64 -y 安装apache
【2】Apache的开启与使用
-
开启apache :
systemctl enable --now httpd -
永久设定火墙策略 :
firewall-cmd --permanent --add-service=http -
firewall-cmd --reload 刷新火墙,让策略生效
*查看火墙信息 firewall-cmd --list-all 看到http在火墙策略中对外开放就代表成功

-
测试:
-
确定ip能够被访问 浏览器中输入ip能够访问text page(Apache的默认安装页面)代表成功

Apache的基本信息
-
Apache的服务名称为httpd,查看服务开启状态的命令:

-
查看http的配置文件:rpm -qc httpd

-
主配置文件:/etc/httpd/conf/httpd.conf
-
子配置目录:/etc/httpd/conf.d/
-
查看Apache使用的默认端口
netstat -antlupe | grep

-
Apache的默认共享目录

-
默认发布文件为:index.html

Apache的基本配置
【1】更改端口
vim /etc/httpd/conf/httpd.conf
搜索/Listen 改端口80为8080
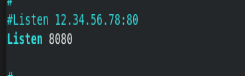
-
getenforce #必须是disabled状态
如果不是:需要更改:
vim /etc/sysconfig/selinux
修改为SELINUX=disabled


-
systemctl restart httpd 重启服务
-
netstat -antlupe | grep http 查看端口更改为8080

-
firewall-cmd --add-port=8080/tcp #在火墙中修改端口配置
-
firwall-cmd --list-all #查看ports是否修改成功

【2】默认发布文件
cd /var/www/html
vim westos
vim index.html (默认发布文件):在默认发布文件中写需要发布的内容,登录网站即可看到所需要发布的内容


【3】更改默认发布文件名字:
cd /etc/httpd/conf/
vim httpd.conf
查找/index
DirectoryIndex 名字.html#可以有多个默认发布文件
例子:
westos index.html 表示有两个默认发布文件,前面的文件优先级高

-
当westos存在访问westos,当westos不存在访问index默认发布文件
-
westos存在时,发布文件的内容就是westos文件中的内容

-
如果删除westos发布文件,刷新浏览器就显示的是index.html发布文件中的内容

【4】更改默认发布目录
默认发布目录:/var/www/html
- 更改默认发布目录
- 建立默认发布文件和目录
mkdir /var/www/westos 创建一个新的默认发布目录
cd /var/www/westos
vim index.html 在新的默认发布目录中编写默认发布文件

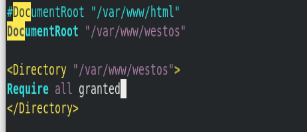
cd /etc/httpd/conf/
vim httpd.conf
查找/Doc
修改DocumentRoot “/var/www/westos”
还要进行授权,退出保存,才能生效

- 重启apache服务
systemctl restart httpd
在浏览器中访问172.25.254.101所显示的内容就是修改后在/var/www/westos/index.html中的内容

Apache的访问控制
【1】基于ip
mkdir /var/www/html/westos #创建一个子目录
cd /var/www/html/westos
vim index.html 写:hhhhhhh

访问:此时是允许所有人对新建的子目录进行访问

cd /etc/httpd/conf/httpd.conf
查找/DocumentRoot
写
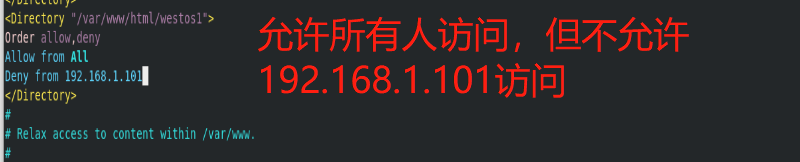
<Directory “/var/www/html/westos”>
Order Allow,Deny
Allow from all
Deny from 192.168.1.101
- 表示allow的优先级高于deny,表示系统首先读取allow允许所有用户进行访问/var/www/html/westos中的index.html
之后读取deny不允许172.25.254.101访问后,deny把之前的allow覆盖掉
- 重新启动apache服务:systemctl restart httpd
- 测试:
在浏览器中输入192.168.1.101/westos1/
192.168.1.101这台主机就无法访问/192.168.1.101/westos1

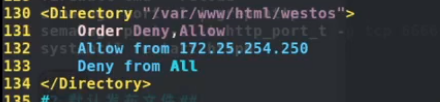
<Directory “/var/www/html/westos”>
Order Deny,Allow
Allow from 172.25.254.101
Deny from All
重启apache服务
systemctl restart httpd
*表示首先禁止所有ip访问,之后允许172.25.254.101对子目录下的默认访问文件进行访问
- 测试:
在浏览器中输入172.25.254.101/westos/
172.25.254.101这台主机被允许访问
【2】基于用户
(1)建立一个认证文件
htpasswd -cm /etc/httpd/.htpasswd admin #当认证文件不存在时需要加-c参数
htpasswd -m /etc/httpd/.htpasswd westos #当认证文件存在时加-c会删除原有的内容
-
cat /etc/httpd/.htpasswd 查看文件中的内容

-
ls -l /etc/httpd/.htpasswd #查看文件建立是否成功

-
编写Apache配置文件
cd /etc/httpd/conf/
vim httpd.conf
内容:
<Directory “var/www/html/westos”>
AuthUserFile /etc/http/.htpasswd
AuthName “Please input username and passwd”
AuthType basic
Require user admin #只允许admin用户
#Require valid-user #允许所有用户
-
重启apache服务 systemctl restart httpd

-
测试:
在浏览器中输入:192.168.1.101/westos1,要求输入用户名和密码:

输入正确后可访问:

-
如果想要清空访问记录:按< Ctrl > + < Shift > + < Delete >

-
点击Clear Now即可清空历史访问,重新访问时则需要继续输入用户名与密码
Apache的虚拟主机
- Apache有多个页面要发布的方法
1 构架Apache所需要的虚拟主机目录
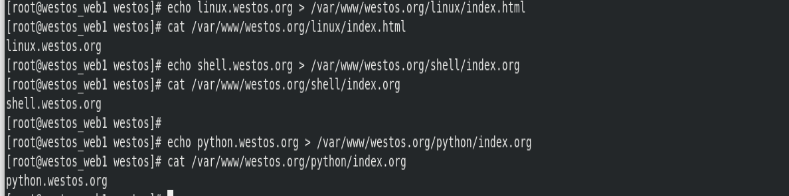
mkdir -p /var/www/westos.org/{linux,shell,python}
创建多个子目录

echo linux.westos.org > /var/www/westos.org/linux/index.html
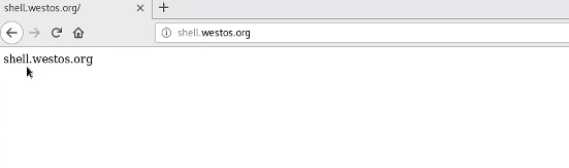
echo shell.westos.org > /var/www/westos.org/shell/index.html
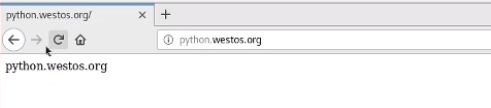
echo python.westos.org > /var/www/westos.org/python/index.html
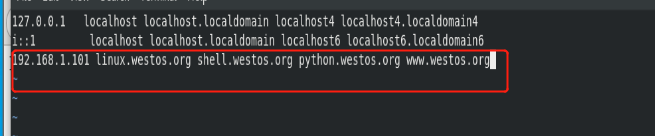
2 浏览器所在主机书写本地解析,在哪台主机中测试,就需要在哪台主机下写解析
vim /etc/hosts
写
192.168.1.101 linux.westos.org shell.westos.org python.westos.org www.westos.org
3 切换到Apache的子配置目录
cd /etc/httpd/conf.d/

4 指定子目录配置文件
vim vhost.conf
写:
#代表Apache默认主机
DocumentRoot /var/www/html
CustomLog logs/default.log combined
<VirtualHost *:80> #代表Apache虚拟机主机
ServerName linux.westos.org #代表虚拟主机域名
DocumentRoot /var/www/westos.org/linux #虚拟主机默认发布目录
CustomLog logs/linux.log combined #虚拟主机日志 combine表示混合型日志
<VirtualHost *:80>
ServerName shell.westos.org
DocumentRoot /var/www/westos.org/shell
CustomLog logs/shell.log combined
<VirtualHost *:80>
ServerName python.westos.org
DocumentRoot /var/www/westos.org/python
CustomLog logs/python.log combined
保存后退出

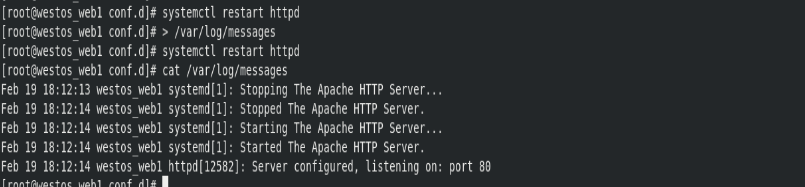
5清空日志,重启Apache服务
systemctl restart httpd
测试:在浏览器中分别输入
www.westos.org 显示的是 hello westos 123 lxy

linux.westos.org 显示的是 linux.westos.org

shell.westos.org 显示的是 shell.westos.org
python.westos.org 显示的是 python.westos.org
表示配置成功
Apache的语言支持
【1】php的发布
只需要安装软件
- vim /var/www/html/index.php
其中需要写的内容:
-
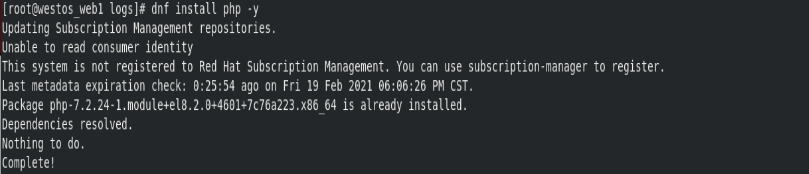
dnf install php -y
-
systemctl restart httpd
firefox http://172.25.254.101/index.php

-
Apache只能共享静态页面
dnf install httpd-manual -y #Apache的帮助文档

systemctl restart httpd
【2】cgi
- mkdir /var/www/html/cgi
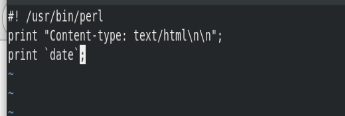
- vim /var/www/html/cgi/index/cgi 编写cgi脚本文件
脚本内容:
#! /usr/bin/perl
print “Content-type: text/html\n\n”;
printdate;
调用:

在浏览器中访问cgi: - chmod +x index.cgi 首先需要给执行权限
- vim /etc/httpd/conf.d/vhost.conf
添加内容:
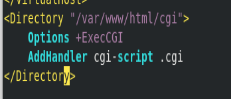
<Dirctory “/var/www/html/cgi”>
Options +ExecCGI
AddHandler cgi-script .cgi
firefox http://192.168.1.101/cgi/index.cgi

【3】python下的
(1) 创建一个wsgi的文件
mkdir /var/www/html/wsgi
vim index.wsgi
编写内容:
def application(env, westos):
westos(‘200 ok’,[(‘Content-Type’, ‘text/html’)])
return [b’hello westos!’]
*书写格式必须是这样,不然就会报错,一个空格都不能少
保存后退出最终显示的结果是hello westos,其余的都是对该项目进行描述
(2)chmod +x index.wsgi #修改执行权限
(3)用apache发布python脚本
vim /etc/httpd/conf.d/vhost.conf
编写内容如下:
<VirtualHost *:80>
ServerName wsgi.westos.org
WSGIScriptAlias / /var/www/html/wsgi/index.wsgi
保存后退出
默认wsgi插件是没有安装的,需要自己安装
(4)dnf search wsgi
dnf install python3-mod_wsgi.x86_64 -y
systemctl restart httpd #重新启动apache
(5)本地解析要做好,浏览器所在的主机
vim /etc/hosts
添加内容:wsgi.westos.org
- 测试:在浏览器中输入wsgi.westos.org

apache的加密访问(https://)
两台主机再进行数据传输时,如果是明文的,如果仅仅是浏览网页影响不大,但是如果涉及到登录,其他人就有可能截取到你的用户名和密码,所以这是非常不安全的
因此,需要对数据进行加密
1 安装加密时用到的mod_ssl插件
dnf install mod_ssl -y
cd /etc/httpd/conf.d
ls 可以看到加密文件的生成

2 systemctl restart httpd
3 需要火墙支持
firewall-cmd --permanent --add-service=https
4 firewall-cmd --reload
5 firewall-cmd --list-all
可以看到https ssh服务已经添加成功进入火墙策略

6 在浏览器中访问
https://www.westos.org
显示没有锁

点击Advanced 之后点击Accept the Risk and Continue
即可访问

7 点击小锁子,点击第一个箭头,之后点击More Information,选择View Certificate,但是可以看出,这个锁不是我们自己的

8 删除已经下载好的不是自己的这把锁
浏览器右上角选择Preference–>Privacy&Security–>View Certificate–>Server,选中自己点击delete,刷新浏览界面,又回到警告界面


9 生成key文件
mkdir -p /etc/httpd/webkey
openssl genrsa --out /etc/httpd/webkey/www.westos.org.key 2048

10 对key文件进行签证
openssl req -new -key /etc/httpd/webkey/www.westos.org.key -out
/etc/httpd/webkey/www.westos.org.csr
需要填写内容如下:
CN–>shannxi–>xi’an–>westos–>linux–>www.westos.org–>lee@westos.org–>回车–>回车

11 模仿CA机构进行授权(真实情况是需要收钱的,但是由于仅仅是实验用途,所以模仿着来做)
openssl x509 -req -days 365 -in /etc/httpd/webkey/www.westos.org.csr -signkey /etc/httpd/webkey/www.westos.org.key -out /etc/httpd/webkey/www.westos.org.crt

- 加密是很影响负载的,所以只有重要网站需要加密,普通网站不需要加密
12 指定到主机中
mkdir /var/www/westos.org/login -p
echo login.westos.org >/var/www/westos.org/login/index.html
#只有访问登陆界面需要加密
vim /etc/httpd/conf.d/vhost.conf
写一个虚拟主机
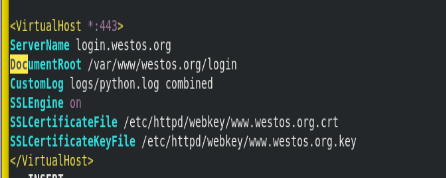
<VirtualHost *:443>
ServerName login.westos.org
DocumentRoot /var/www/westos.org/login
CustomLog logs/python.log combined
SSLEngine on
SSLCertificateFile /etc/httpd/webkey/www.westos.org.crt
SSLCertificateKeyFile /etc/httpd/webkey/www.westos.org.key
-
在vim的命令模式输入:sp /etc/httpd/conf.d/ssl.conf
54行粘贴过去
加密证书也需要
加密公钥也需要粘贴过去
SSLEngine on
SSLCertificateFile /etc/pki/tls/certs/localhost.crt
SSLCertificateKeyFile /etc/pki/tls/private/localhost.key
*但需要修改路径和文件名称
之后保存退出
13 systemctl restart httpd
14 本地解析
vim /etc/hosts
login.westos.org

-
测试:浏览器上访问https://login.westos.org

设定apache网页重写
vim /etc/httpd/conf.d/vhost.conf
书写内容如下:
<VirtualHost :80>
ServerName login.westos.org
RewriteEngine On
RewriteRule ^(/.)$ https://%{HTTP_HOST}$1
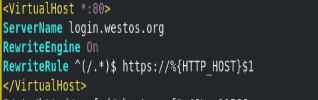
测试:在访问login.westos.org时自动的跳转到加密通道https://login.westos.org


 3518
3518


 被折叠的 条评论
为什么被折叠?
被折叠的 条评论
为什么被折叠?
 到【灌水乐园】发言


