Android自定义Dialog实现弹出二维码效果

转自:http://blog.csdn.net/javaandroid730/article/details/53357599

Android应用中,最缺少不了的就是自定义Dialog,对于系统默认提供的Dialog样式,一般都不复合我们应用的样式。 
自定义Dialog需要3步骤即可: 
1、主要的重写Dialog的Java类 
2、自定义布局文件、并设置Dialog Theme,在style.xml文件中加一个即可 
3、使用方法

一、创建CustomPopDialog2.java类

import android.app.Dialog;
import android.content.Context;
import android.graphics.Bitmap;
import android.view.LayoutInflater;
import android.view.View;
import android.view.WindowManager.LayoutParams;
import android.widget.ImageView;

/**
 * 该自定义Dialog应用在:弹出框居中显示图片,点击其他区域自动关闭Dialog
 *
 */
public class CustomPopDialog2 extends Dialog {

    public CustomPopDialog2(Context context) {
        super(context);
    }

    public CustomPopDialog2(Context context, int theme) {
        super(context, theme);
    }

    public static class Builder {
        private Context context;
        private Bitmap image;

        public Builder(Context context) {
            this.context = context;
        }

        public Bitmap getImage() {
            return image;
        }

        public void setImage(Bitmap image) {
            this.image = image;
        }

        public CustomPopDialog2 create() {
            LayoutInflater inflater = (LayoutInflater) context
                    .getSystemService(Context.LAYOUT_INFLATER_SERVICE);
            final CustomPopDialog2 dialog = new CustomPopDialog2(context,R.style.Dialog);
            View layout = inflater.inflate(R.layout.dialog_share_qrcode, null);
            dialog.addContentView(layout, new LayoutParams(
                    android.view.ViewGroup.LayoutParams.WRAP_CONTENT
                    , android.view.ViewGroup.LayoutParams.WRAP_CONTENT));
            dialog.setContentView(layout);
            ImageView img = (ImageView)layout.findViewById(R.id.img_qrcode);
            img.setImageBitmap(getImage());
            return dialog;
        }
    }
}


  • 1
  • 2
  • 3
  • 4
  • 5
  • 6
  • 7
  • 8
  • 9
  • 10
  • 11
  • 12
  • 13
  • 14
  • 15
  • 16
  • 17
  • 18
  • 19
  • 20
  • 21
  • 22
  • 23
  • 24
  • 25
  • 26
  • 27
  • 28
  • 29
  • 30
  • 31
  • 32
  • 33
  • 34
  • 35
  • 36
  • 37
  • 38
  • 39
  • 40
  • 41
  • 42
  • 43
  • 44
  • 45
  • 46
  • 47
  • 48
  • 49
  • 50
  • 51
  • 52
  • 53
  • 54
  • 55
  • 56

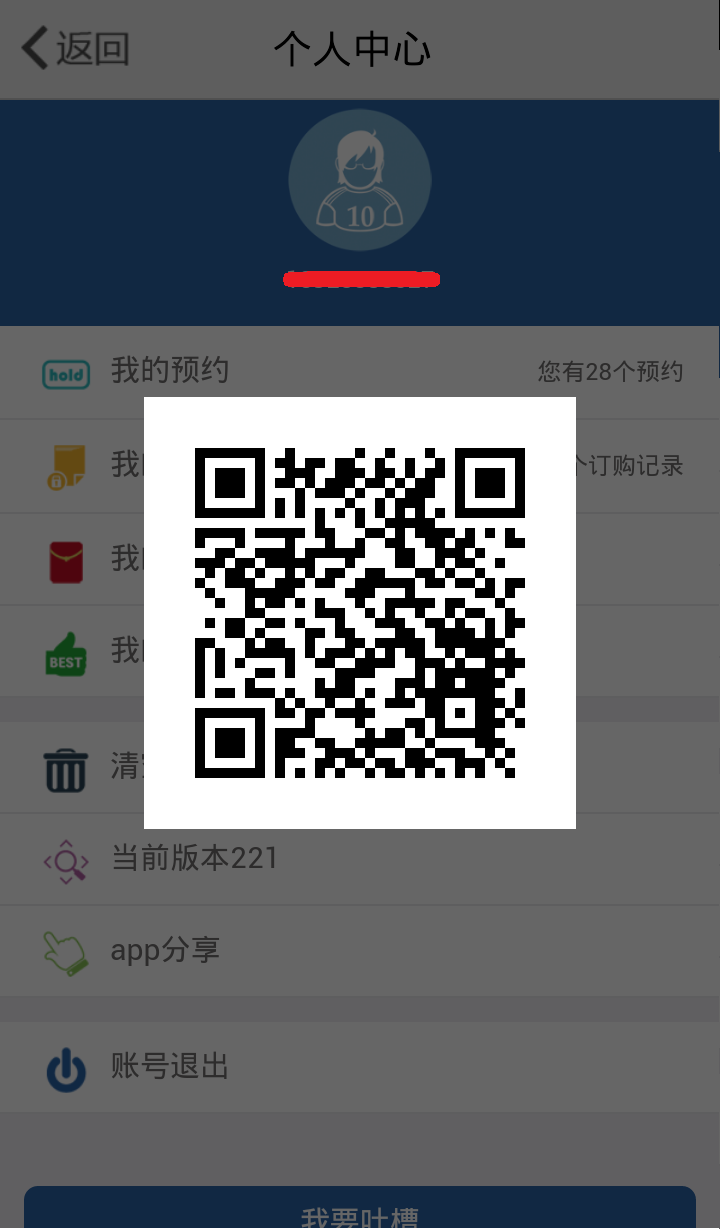
这里简单说明下,我们自定义Dialog需要准备一个自己的View布局文件,主要关注create()方法即可,本例中就是直接显示一个图片。

二、自定义View的布局文件、并在style.xml中添加theme

<?xml version="1.0" encoding="utf-8"?>
<LinearLayout xmlns:android="http://schemas.android.com/apk/res/android"
    android:layout_width="match_parent"
    android:layout_height="match_parent"
    android:orientation="vertical" android:gravity="center"
    android:id="@+id/rootLayout">

    <ImageView
        android:id="@+id/img_qrcode"
        android:layout_width="wrap_content"
        android:layout_height="wrap_content"
        android:contentDescription="二维码" />

</LinearLayout>
 
 
  • 1
  • 2
  • 3
  • 4
  • 5
  • 6
  • 7
  • 8
  • 9
  • 10
  • 11
  • 12
  • 13
  • 14
  • 1
  • 2
  • 3
  • 4
  • 5
  • 6
  • 7
  • 8
  • 9
  • 10
  • 11
  • 12
  • 13
  • 14
    <style name="Dialog" parent="android:style/Theme.Dialog">
        <item name="android:background">#00000000</item>
        <item name="android:windowBackground">@android:color/transparent</item>
        <item name="android:windowNoTitle">true</item>
        <item name="android:windowIsFloating">true</item>
    </style>
 
 
  • 1
  • 2
  • 3
  • 4
  • 5
  • 6
  • 1
  • 2
  • 3
  • 4
  • 5
  • 6

三、使用自定义的Dialog

        Bitmap bitmap = xxxxx;// 这里是获取图片Bitmap,也可以传入其他参数到Dialog中
        CustomPopDialog2.Builder dialogBuild = new CustomPopDialog2.Builder(context);
        dialogBuild.setImage(bitmap);
        CustomPopDialog2 dialog = dialogBuild.create();
        dialog.setCanceledOnTouchOutside(true);// 点击外部区域关闭
        dialog.show();
 
 
  • 1
  • 2
  • 3
  • 4
  • 5
  • 6
  • 1
  • 2
  • 3
  • 4
  • 5
  • 6

最终效果图:

效果图


  • 3
    点赞
  • 9
    收藏
    觉得还不错? 一键收藏
  • 2
    评论
评论 2
添加红包

请填写红包祝福语或标题

红包个数最小为10个

红包金额最低5元

当前余额3.43前往充值 >
需支付:10.00
成就一亿技术人!
领取后你会自动成为博主和红包主的粉丝 规则
hope_wisdom
发出的红包
实付
使用余额支付
点击重新获取
扫码支付
钱包余额 0

抵扣说明:

1.余额是钱包充值的虚拟货币,按照1:1的比例进行支付金额的抵扣。
2.余额无法直接购买下载,可以购买VIP、付费专栏及课程。

余额充值