


目录
1.SpringMVC
1.1基本介绍
功能:连接前端服务器与java,使得网页提交的数据可以被java获取
核心:三层模型:model ,view,control
工作原理:前端控制器DispatcherServlet 将网页发送请求分发给不同处理器处理,以此得出数据后返回视图解析器进行渲染

1.2具体实例:展示汽车数据
1.2.1需求
访问链接: http://localhost:8080/car/get
得到JSON数据: {"id":718,"name":"保时捷","type":"Cayman T","color":"红色","price":641000.0}
1.2.2 具体代码
pom.xml
 <dependency>
        <groupId>org.springframework.boot</groupId>
        <artifactId>spring-boot-starter-web</artifactId>
    </dependency>
    <dependency>
        <groupId>org.projectlombok</groupId>
        <artifactId>lombok</artifactId>
    </dependency>
主启动类RunApp
@SpringBootApplication
@Controller
public class RunApp {
    public static void main(String[] args) {
        SpringApplication.run(RunApp.class, args);
    }
}
pojo类 car.java
说明:lombok工具类封装了各种方法,可用注解方式编程
package com.jt.pojo;

import lombok.AllArgsConstructor;
import lombok.Data;
import lombok.NoArgsConstructor;
import lombok.experimental.Accessors;

@Data  //get ,set ,tostring
@NoArgsConstructor  //无参构造
@AllArgsConstructor  //全参构造
@Accessors (chain = true)
public class Car {
    private String name;
    private String brand;
    private Double price;
    private String color;

}
controller层: CarController.java
@RestController
@RequestMapping("/car")
public class CarController {
    @RequestMapping("/get")
    public Car get(){
        Car car=new Car();
        car.setId(12).setName("保时捷t280").setBrand("保时捷")
                .setPrice(230000.00).setColor("red");
        return car;
    }
1.2.3测试
- 1访问http ://localHost:8080/car/get
执行结果:
{"id":12,"name":"保时捷t718","brand":"保时捷","color":"red","price":23000.0}
1.3其他知识点
请求参数的形式有8种,重点三种
GET方式
POST方式
RESTFul方式(推荐)
1.4 总结:
SpringMVC常用的注解
@Controller 标识是一个Controller,Spring包扫描创建实例
@RequestMapping 请求后的映射路径
@PathVariable 标识接收单个参数
@ResponseBody 返回对象利用jackson工具类转换为json字符串
@RequestParam 参数名和请求参数名称不同时使用,可以设置默认值
2.Spring
2.1spring介绍
Spring是一个开源框架,是为了解决企业应用程序开发复杂性而创建的。Spring框架的不光是技术牛,而是它的核心思想更牛,它不重复发明轮子,而是"拿来主义",把业界做的最好的技术黏合起来形成一个强大的企业级的应用框架。
功能:管理前后端交互的对象,通过bean工厂,储存和管理前后端交互的对象
核心:依赖注入DI 和控制反转 Ioc
控制反转:Ioc,即将创建对象的权利交给第三方,交给spring中的bean工厂进行管理
依赖注入DI;DI实现对象关系管理
2.2具体实例结构:
2.2 .1.loc的XML案例
1.创建hello.java
public class Hello {
    public void hi(){
        System.out.println("hello world!!");
    }
}
2.创建applicationContext.xml

3.创建TestIoC.java
package spring;

import org.junit.Test;
import org.springframework.context.ApplicationContext;
import org.springframework.context.support.ClassPathXmlApplicationContext;

public class TestIoC {
	@Test
	public void bean() {
		ApplicationContext ac = new ClassPathXmlApplicationContext("applicationContext.xml");
		Hello h1 = new Hello();
		System.out.println(h1);
		h1.hi();
		//根据id获取bean
        //Spring就是一个大工厂(容器)专门生成bean,bean就是对象
		Hello hello = (Hello)ac.getBean("Hello");
		System.out.println(hello);
		hello.hi();
	}
}
4.测试代码
2.2.2 DI依赖注入
1.导入依赖
<project xmlns="http://maven.apache.org/POM/4.0.0" xmlns:xsi="http://www.w3.org/2001/XMLSchema-instance"
	xsi:schemaLocation="http://maven.apache.org/POM/4.0.0 http://maven.apache.org/xsd/maven-4.0.0.xsd">
	<modelVersion>4.0.0</modelVersion>
	<groupId>cn.tedu</groupId>
	<artifactId>spring</artifactId>
	<version>0.0.1-SNAPSHOT</version>

	<!-- 集中定义依赖版本号 -->
	<properties>
		<junit.version>4.10</junit.version>
		<spring.version>4.1.3.RELEASE</spring.version>
	</properties>

	<dependencies>
		<!-- 单元测试 -->
		<dependency>
			<groupId>junit</groupId>
			<artifactId>junit</artifactId>
			<version>${junit.version}</version>
			<scope>test</scope>
		</dependency>

		<!-- Spring -->
		<dependency>
			<groupId>org.springframework</groupId>
			<artifactId>spring-webmvc</artifactId>
			<version>${spring.version}</version>
		</dependency>

	</dependencies>
</project>
2.编辑dept.java
@Component
public class Dept {
	 String name = "java开发部";

    @Override
    public String toString() {
        return "Dept{" +
                "name='" + name + '\'' +
                '}';
    }
3.编辑user.java
@Component
public class User {
	String name = "jack";
    @Autowired  //相当于框架完成了:new User().setDept(new Dept());
    Dept dept;

    @Override
    public String toString() {
        return "User{" +
                "name='" + name + '\'' +
                ", dept=" + dept +
                '}';
    }
}
4.编辑TestDI.java
package test;

import org.springframework.context.ApplicationContext;
import org.springframework.context.support.ClassPathXmlApplicationContext;

import spring.pojo.Dept;
import spring.pojo.User;

public class TestDI {
	public static void main(String[] args) {
		ApplicationContext ac = new ClassPathXmlApplicationContext("applicationContext.xml");

		Dept d = (Dept)ac.getBean("dept");
		User u = (User)ac.getBean("user");

		System.out.println(d);
		System.out.println(u);

		System.out.println(u.dept.name);
	}
}
自动装配
利用注解方式,我们只需要写@Autowired注解,底层就会去容器中找对应的对象,如果有获取到,反射调用其对应的set方法,设置。而这个调用过程都是自动,我们没有手工去写set方法。所以这个过程也称为自动装配。
3.mybatis
3.1mybatis介绍
java连接数据库,操作数据库的框架。
功能:连接数据库,对里边的数据进行增删改减操作
核心:sql 语句
3.2 具体实例结构--汽车数据的入库
项目结构:

启动类:
@SpringBootApplication
public class RunApp {
    public static void main(String[] args) {
        SpringApplication.run(RunApp.class);
    }
}
pojo类
@Data
@Accessors(chain=true)
public class User implements Serializable {
    //序列化:保证数据传输完成
    private Integer id;
    private String name;
    private Integer age;
    private String sex;
}
yml文件
server:
  port: 8090
#  \ No newline at end of file
#port: 8090

spring:
  datasource:
    driver-class-name: com.mysql.cj.jdbc.Driver
    url: jdbc:mysql://127.0.0.1:3306/jt?serverTimezone=GMT%2B8&useUnicode=true&characterEncoding=utf8&autoReconnect=true&allowMultiQueries=true
    username: root
    password: lydon
    #如果数据库密码以数字0开头 则必须使用""号包裹
    #password: "01234"

#SpringBoot整合Mybatis配置
mybatis:
  #定义别名包:实现对象映射
  type-aliases-package: com.jt.pojo #别名包
  #加载映射文件:一个接口对应一个映射文件
  mapper-locations: classpath:/mybatis/*.xml
  #开启驼峰映射
  configuration:
    map-underscore-to-camel-case: true

#不打印日志
debug: false
xml配置文件
<?xml version="1.0" encoding="UTF-8" ?>
<!DOCTYPE mapper
        PUBLIC "-//mybatis.org//DTD Mapper 3.0//EN"
        "http://mybatis.org/dtd/mybatis-3-mapper.dtd">
<!--规则:namespace必须于接口一一对应-->
<mapper namespace="com.jt.mapper.UserMapper">

    <!--CRUD-->
    <!--定义别名包:添加别名包后-->
    <!--单表封装,resultType 多表封装resultMap-->
    <select id="getAll" resultType="com.jt.pojo.User">
        select * from demo_user
    </select>
<!--驼峰命名规则
    表字段:  user_id,user_name
    对象的属性:userId,userName
    resultType:保证属性与字段名必须一致.
    Mybaits提供了驼峰命名规则:
    -->
</mapper>
接口文件
public interface UserMapper {
    //查询所有demo_user表的数据
    List<User> getAll();

}
说明:接口文件会对xml文件进行一个映射,以或取xml文件中的sql语句
测试类
/**测试类的要求
 * 需求:1.测试包路径必须在主启动类的同包以及子包中
 * 2.从Spring容器可以获取对象进行调用*/
@SpringBootTest
@MapperScan("com.jt,mapper")
//spring容器内部为接口创建代理对象
//jdk的动态对象
public class TestSpringBoot {
    /**调用mapper  service  controller !!!单元测试~~*/
    @Autowired//注入错误!!!!????
    private UserMapper userMapper;
    /**
     * 需要:需要动态注入UserMapper接口<之后实现getAll的测试!!!
     * */
    @Test
    public void testGetAll(){
        System.out.println(userMapper.getClass());
        List<User> userlist =userMapper.getAll();
        System.out.println(userlist);
    }

}
4.springMvc三大框架整合
4.1 整合结构

整合结构说明:ssm框架整合的实质是springBoot整合SpringMvc,spring,mybtis的功能
将数据从前端传递到数据库,再从数据库传回前端的一个过程,其具体的流程图如下:
4.2整合案例--表单数据的传入的更新
4.2.1 前端数据界面
<!DOCTYPE html>
<html>
	<head>
		<meta charset="utf-8">
		<title>SSM整合</title>
	</head>
	<body>
		<a href="http://localhost:8080/car/get">点我获取数据</a>
		<form method="post" action="http://localhost:8080/car/add">
			<table align="center">
				<th>汽车数据提交表</th>
				<tr><td>
						请输入你要输入的汽车品牌:
						<input type="text" value="" name="name"/>
					</td></tr>
				<tr><td>
						请输入你要输入的汽车颜色
						<input type="text" value="" name="color"/>
					</td></tr>
				<tr><td>
						请输入你要输入的汽车价格
						<input type="text" value="" name="price"/>
						</td></tr>
				<tr align="center">	<td>
				<input type="submit" value="搜索"/>
				<input type="reset" value="重置"/>
				</td></tr>
			</table>
		</form>
		<a href="http://localhost:8080/car/get01">点我获取数据</a>
	</body>
</html>
说明:前端页面的第一个按钮获取数据。可将后端查询的数据传递到网址上:具体如下图
当提交数据s时,页面的数据会传递到后端,存入数据库之中。
4.2.2 后端代码及调用
1.pojo类
@Data
@Accessors(chain = true)
@TableName("demo_user")
public class User implements Serializable {
    @TableId(type=IdType.AUTO)//id 代表主键
    //拓展:uuid
    //主键自增
    private Integer id;
    //@TableField("name")
    //如果属性与字段同名(包括驼峰规则) 注解可以省略
    private String name;
    private Integer age;
    private String sex;
}
2 . controller 层(控制层)
@RestController
@CrossOrigin//跨域
public class UserController {
    @Autowired
    private UserService userService;

    /**需求:查询全部用户信息
     * URL:/getAll
     * 返回值:List<User>*/
    @RequestMapping("/getAll")
    public List<User> getAll(){

        return userService.getAll();
    }
说明:控制层接受网页传来的请求和数据,通过调用传递给server层
3.service层(服务层)
@Service//服务层
public class UserServiceImp  implements UserService{
    @Autowired
    private UserMapper userMapper;

   @Override
   public List<User> getAll(){
       return userMapper.selectList(null);
   }
}
说明:service层实现类实现了接口方法的处理,对其中的数据进行了一定的处理
4.mapper层
@Component
//注意事项:继承接口时,必须添加泛型对象,否则映射表报错
public interface UserMapper extends BaseMapper<User>{
    //Mp规则: 对象的方式操作数据库 curd操作
    List<User> getAll();
}
说明:mapper层做了xml文件的一个映射,通过获取文件中的sql语句,对于文件数据进行操作
<mapper namespace="com.jt.mapper.UserMapper">
    <!--驼峰命名规则
       表字段:  user_id,user_name
       对象的属性: userId,userName
       resultType: 保证属性与字段名称必须一致.
       Mybatis提供了驼峰命名规则:
       规则:  字段user_id~~~去除_线~~~之后映射对象的属性userId-->

    <select id="getAll" resultType="User">
        select * from demo_user
    </select>
5.核心配置文件yml
server:
  port: 2375
spring:
  datasource:
    driver-class-name: com.mysql.cj.jdbc.Driver
    url: jdbc:mysql://127.0.0.1:3306/jt?serverTimezone=GMT%2B8&useUnicode=true&characterEncoding=utf8&autoReconnect=true&allowMultiQueries=true
    username: root
    password: lydon
#SpringBoot整合mp配置
mybatis-plus:
  type-aliases-package: com.jt.pojo
  mapper-locations: classpath:/mybatis/*.xml
  #开启驼峰映射
  configuration:
    map-underscore-to-camel-case: true
#不打印日志
##debug: false

#Mapper接口执行 打印Sql日志
logging:
  level:
    com.jt.mapper: debug
说明:核心配置文件完成了数据库的连接,定义了日志的一些打印规则
6.框架调用说明

说明:ssm框架在传输数据时,一直沿用的是层层调用的原理,通过一层一层的调用,将数据从数据库取出或者传入数据库。
5.springMvc 三大框架整合升级版
5.1 mybatis-plus 替代mybayis
MyBatis-Plus (opens new window)(简称 MP)是一个 MyBatis (opens new window)的增强工具,在 MyBatis 的基础上只做增强不做改变,为简化开发、提高效率而生。
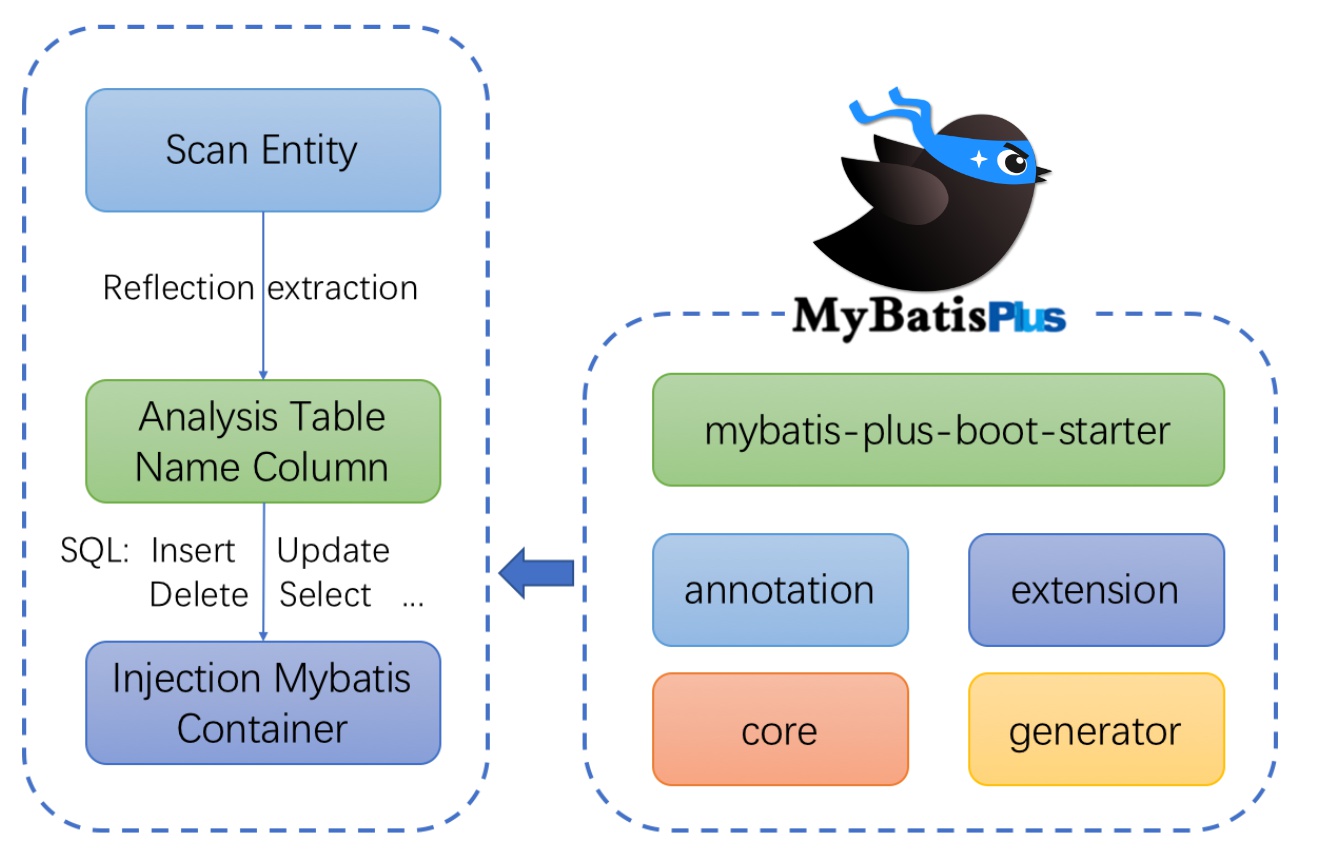
其有以下特性:
- 无侵入:只做增强不做改变,引入它不会对现有工程产生影响,如丝般顺滑
- 损耗小:启动即会自动注入基本 CURD,性能基本无损耗,直接面向对象操作
- 强大的 CRUD 操作:内置通用 Mapper、通用 Service,仅仅通过少量配置即可实现单表大部分 CRUD 操作,更有强大的条件构造器,满足各类使用需求
- 支持 Lambda 形式调用:通过 Lambda 表达式,方便的编写各类查询条件,无需再担心字段写错
- 支持主键自动生成:支持多达 4 种主键策略(内含分布式唯一 ID 生成器 - Sequence),可自由配置,完美解决主键问题
MP的强大性在于将繁琐的数据库查询语言进行了类似ApI的封装,通过对于数据库常用的增删改查操作的封装,极大的便利了操作者的使用。
5.2 MP 整合升级后的案例
5.2.1 项目结构:

说明:配置文件中的代码和sql语句大幅度减少,只做一些特殊的sql语句查询
5.2.2 变化的代码--mapper层
@Component
public interface UserMapper extends BaseMapper<User> {
    List<User> getAll();
}
说明:mapper层继承了MP中的一些api,封装了大量基础的sql语句,我们只需要动态的输入参数即可。
<?xml version="1.0" encoding="UTF-8"?>
<!DOCTYPE mapper
        PUBLIC "-//mybatis.org//DTD mapper 3.0//EN"
        "http://mybatis.org/dtd/mybatis-3-mapper.dtd">
<!--规则: namespace必须与接口一一对应  -->
<mapper namespace="com.jt.mapper.UserMapper">
    <sql id="cols">
        id,name,age,sex
    </sql>
    <!--CRUD
        定义别名包: 添加了别名包之后可以简化resultType编辑.
    -->
    <select id="getAll" resultType="User">
        select * from demo_user
    </select>
</mapper>
其中。xml文件可保留,用于写一些特殊的sql语句
5.2.3 变化的代码--service层
@Service
public class UserserviceImp implements UserService{
    @Autowired
    private UserMapper userMapper;
    @Override
    public List<User> getAll() {
        return userMapper.selectList(null);
    }
}
5.3 MP整合案例实例
5.3.1 根据ID查询数据
5.3.2 条件构造器-对象封装
5.3.3 条件构造器-特殊字符查询
5.3.4 条件构造器-like关键字
5.3.5条件构造器-orderBy
5.3.6 条件构造器-in关键字
5.3.7 条件构造器-动态Sql
5.3.8 MP的更新操作
5.4 MP用法总结
MP整合的案例在很大程度上增强了程序的可用性,也为大批量业务代码的书写带来了很多便利,MP整合后的三大框架,在代码编写上能更轻松,也能为业务节省了很多思考的时间,使得程序员更好的优化业务逻辑,完成项目的优化。


 2749
2749


 被折叠的 条评论
为什么被折叠?
被折叠的 条评论
为什么被折叠?
 到【灌水乐园】发言


