


一、软件安装
只需要安装Anaconda3和PyCharm即可。Anaconda3中已经包含Qt Designer和PyQt5软件包。
二、配置过程
需要配置三样东西,其中QtDesigner用于界面设计,PyUIC用于把ui文件转化成py文件,Pyqcc用于把资源文件qrc转换成py文件。
1、Qt Designer
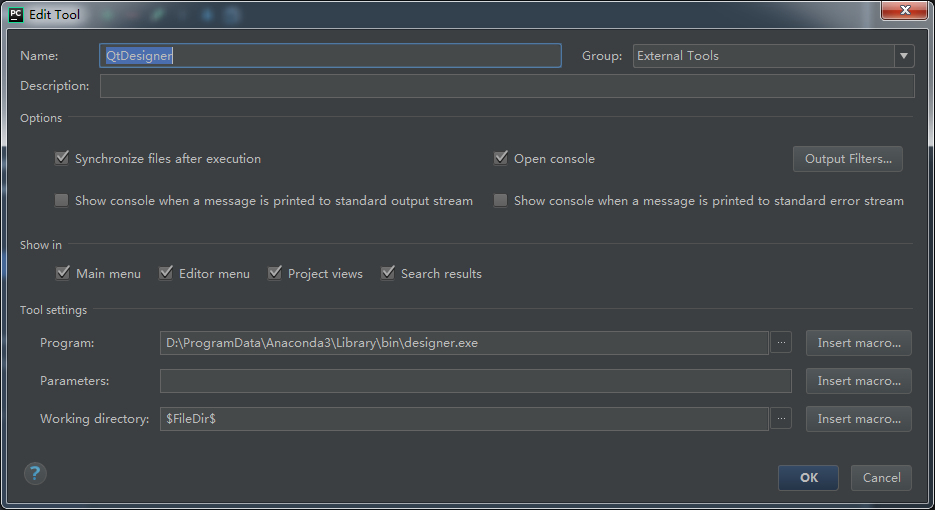
先打开pycharm软件,找到settings下的External Tools,点 + 号添加工具。按照下图进行填写。
(1). Name可以取任意名称,笔者取的是“
QtDesigner
”。
(2). Program填写的是Qt Designer中designer.exe的安装路径,笔者的安装路径为“D:\ProgramData\Anaconda3\Library\bin\designer.exe”。
(3). Working directory填写
</span><spanstyle="color:rgb(63,63,63);font−family:′microsoftyahei′;font−size:16px;">FileDir
<
/
s
p
a
n
><
s
p
a
n
s
t
y
l
e
="
c
o
l
o
r
:
r
g
b
(
63
,
63
,
63
)
;
f
o
n
t
−
f
a
m
i
l
y
:
′
m
i
c
r
o
s
o
f
t
y
a
h
e
i
′
;
f
o
n
t
−
s
i
z
e
:
16
p
x
;
">
F
i
l
e
D
i
r
<script type="math/tex" id="MathJax-Element-1">
FileDir</script>。
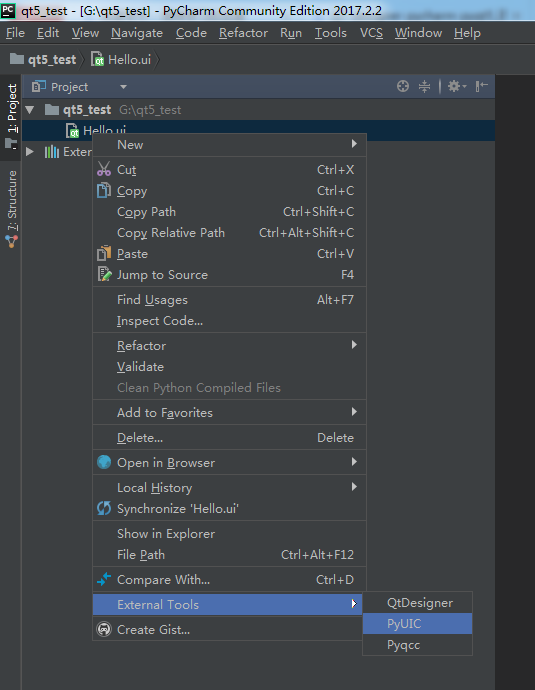
2、PyUIC
再点 + 号添加工具。按照下图进行填写。
(1). Name可以取任意名称,笔者取的是“PyUIC”。
(2).
Program填写的是python的安装路径,笔者的安装路径为“D:\ProgramData\Anaconda3\python.exe”。
(3).
Parameters填写”-m PyQt5.uic.pyuic
</span><spanstyle="color:rgb(63,63,63);font−family:′microsoftyahei′;font−size:16px;">FileName</span><spanstyle="color:rgb(63,63,63);font−family:′microsoftyahei′;font−size:16px;">
<
/
s
p
a
n
><
s
p
a
n
s
t
y
l
e
="
c
o
l
o
r
:
r
g
b
(
63
,
63
,
63
)
;
f
o
n
t
−
f
a
m
i
l
y
:
′
m
i
c
r
o
s
o
f
t
y
a
h
e
i
′
;
f
o
n
t
−
s
i
z
e
:
16
p
x
;
">
F
i
l
e
N
a
m
e
<
/
s
p
a
n
><
s
p
a
n
s
t
y
l
e
="
c
o
l
o
r
:
r
g
b
(
63
,
63
,
63
)
;
f
o
n
t
−
f
a
m
i
l
y
:
′
m
i
c
r
o
s
o
f
t
y
a
h
e
i
′
;
f
o
n
t
−
s
i
z
e
:
16
p
x
;
">
<script type="math/tex" id="MathJax-Element-2">
FileName
</script>
-o
</span><spanstyle="color:rgb(63,63,63);font−family:′microsoftyahei′;font−size:16px;">FileNameWithoutExtension</span><spanstyle="color:rgb(63,63,63);font−family:′microsoftyahei′;font−size:16px;">
<
/
s
p
a
n
><
s
p
a
n
s
t
y
l
e
="
c
o
l
o
r
:
r
g
b
(
63
,
63
,
63
)
;
f
o
n
t
−
f
a
m
i
l
y
:
′
m
i
c
r
o
s
o
f
t
y
a
h
e
i
′
;
f
o
n
t
−
s
i
z
e
:
16
p
x
;
">
F
i
l
e
N
a
m
e
W
i
t
h
o
u
t
E
x
t
e
n
s
i
o
n
<
/
s
p
a
n
><
s
p
a
n
s
t
y
l
e
="
c
o
l
o
r
:
r
g
b
(
63
,
63
,
63
)
;
f
o
n
t
−
f
a
m
i
l
y
:
′
m
i
c
r
o
s
o
f
t
y
a
h
e
i
′
;
f
o
n
t
−
s
i
z
e
:
16
p
x
;
">
<script type="math/tex" id="MathJax-Element-3">
FileNameWithoutExtension
</script>
.py”。
(4).
Working directory填写”
</span><spanstyle="color:rgb(63,63,63);font−family:′microsoftyahei′;font−size:16px;">FileDir
<
/
s
p
a
n
><
s
p
a
n
s
t
y
l
e
="
c
o
l
o
r
:
r
g
b
(
63
,
63
,
63
)
;
f
o
n
t
−
f
a
m
i
l
y
:
′
m
i
c
r
o
s
o
f
t
y
a
h
e
i
′
;
f
o
n
t
−
s
i
z
e
:
16
p
x
;
">
F
i
l
e
D
i
r
<script type="math/tex" id="MathJax-Element-4">
FileDir</script>”。

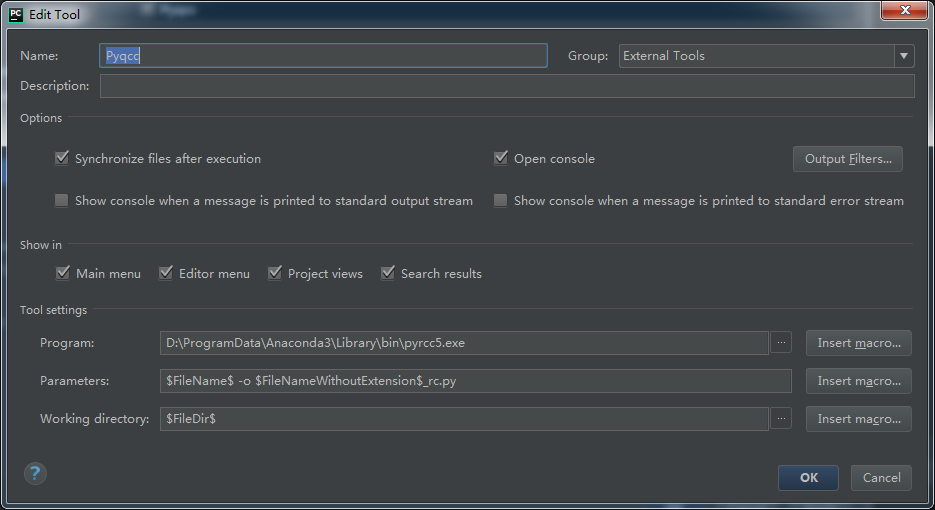
3、Pyqcc
再点 + 号添加工具。按照下图进行填写。
(1). Name可以取任意名称,笔者取的是“Pyqcc”。
(2). Program填写的是pyrcc5.exe的安装路径,笔者的安装路径为“D:\ProgramData\Anaconda3\Library\bin\pyrcc5.exe”。
(3). Parameters填写” </span><spanstyle="color:rgb(63,63,63);font−family:′microsoftyahei′;font−size:16px;">FileName</span><spanstyle="color:rgb(63,63,63);font−family:′microsoftyahei′;font−size:16px;"> < / s p a n >< s p a n s t y l e =" c o l o r : r g b ( 63 , 63 , 63 ) ; f o n t − f a m i l y : ′ m i c r o s o f t y a h e i ′ ; f o n t − s i z e : 16 p x ; "> F i l e N a m e < / s p a n >< s p a n s t y l e =" c o l o r : r g b ( 63 , 63 , 63 ) ; f o n t − f a m i l y : ′ m i c r o s o f t y a h e i ′ ; f o n t − s i z e : 16 p x ; "> <script type="math/tex" id="MathJax-Element-5">FileName</script> -o </span><spanstyle="color:rgb(63,63,63);font−family:′microsoftyahei′;font−size:16px;">FileNameWithoutExtension</span><spanstyle="color:rgb(63,63,63);font−family:′microsoftyahei′;font−size:16px;"> < / s p a n >< s p a n s t y l e =" c o l o r : r g b ( 63 , 63 , 63 ) ; f o n t − f a m i l y : ′ m i c r o s o f t y a h e i ′ ; f o n t − s i z e : 16 p x ; "> F i l e N a m e W i t h o u t E x t e n s i o n < / s p a n >< s p a n s t y l e =" c o l o r : r g b ( 63 , 63 , 63 ) ; f o n t − f a m i l y : ′ m i c r o s o f t y a h e i ′ ; f o n t − s i z e : 16 p x ; "> <script type="math/tex" id="MathJax-Element-6">FileNameWithoutExtension</script>_rc.py”。
(3). Parameters填写” </span><spanstyle="color:rgb(63,63,63);font−family:′microsoftyahei′;font−size:16px;">FileName</span><spanstyle="color:rgb(63,63,63);font−family:′microsoftyahei′;font−size:16px;"> < / s p a n >< s p a n s t y l e =" c o l o r : r g b ( 63 , 63 , 63 ) ; f o n t − f a m i l y : ′ m i c r o s o f t y a h e i ′ ; f o n t − s i z e : 16 p x ; "> F i l e N a m e < / s p a n >< s p a n s t y l e =" c o l o r : r g b ( 63 , 63 , 63 ) ; f o n t − f a m i l y : ′ m i c r o s o f t y a h e i ′ ; f o n t − s i z e : 16 p x ; "> <script type="math/tex" id="MathJax-Element-5">FileName</script> -o </span><spanstyle="color:rgb(63,63,63);font−family:′microsoftyahei′;font−size:16px;">FileNameWithoutExtension</span><spanstyle="color:rgb(63,63,63);font−family:′microsoftyahei′;font−size:16px;"> < / s p a n >< s p a n s t y l e =" c o l o r : r g b ( 63 , 63 , 63 ) ; f o n t − f a m i l y : ′ m i c r o s o f t y a h e i ′ ; f o n t − s i z e : 16 p x ; "> F i l e N a m e W i t h o u t E x t e n s i o n < / s p a n >< s p a n s t y l e =" c o l o r : r g b ( 63 , 63 , 63 ) ; f o n t − f a m i l y : ′ m i c r o s o f t y a h e i ′ ; f o n t − s i z e : 16 p x ; "> <script type="math/tex" id="MathJax-Element-6">FileNameWithoutExtension</script>_rc.py”。
(4). Working directory填写”
</span><spanstyle="color:rgb(63,63,63);font−family:′microsoftyahei′;font−size:16px;">FileDir
<
/
s
p
a
n
><
s
p
a
n
s
t
y
l
e
="
c
o
l
o
r
:
r
g
b
(
63
,
63
,
63
)
;
f
o
n
t
−
f
a
m
i
l
y
:
′
m
i
c
r
o
s
o
f
t
y
a
h
e
i
′
;
f
o
n
t
−
s
i
z
e
:
16
p
x
;
">
F
i
l
e
D
i
r
<script type="math/tex" id="MathJax-Element-7">FileDir</script>”。
三、简单使用
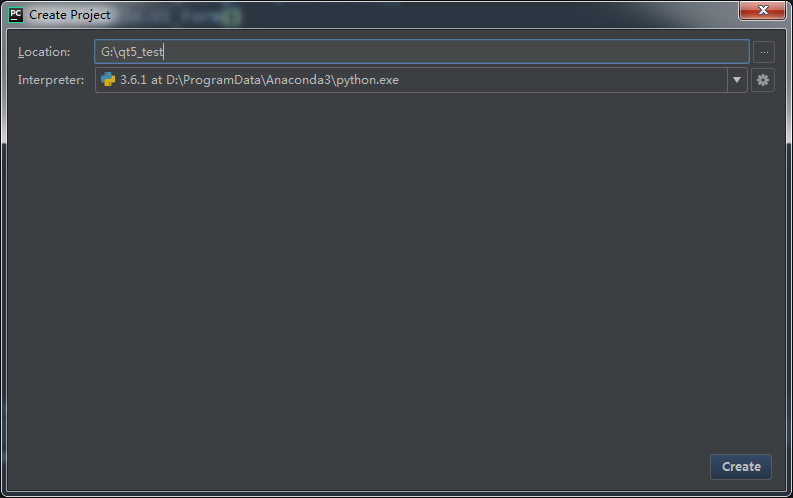
1、新建项目
2、设计界面
使用designer,设计界面生成ui文件。
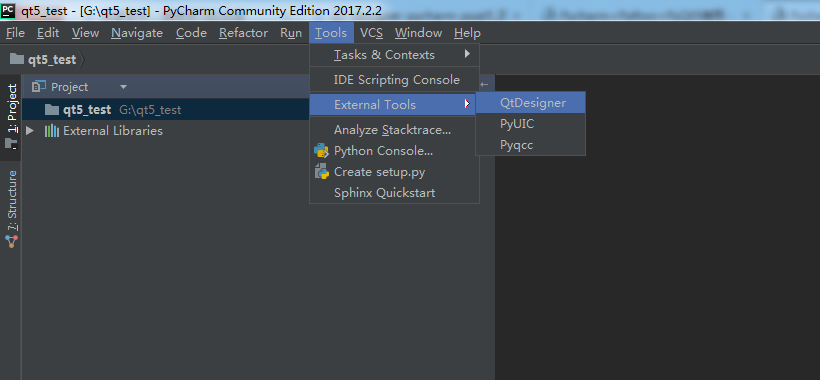
3、文件转换
使用PyUIC将Hello.ui文件转换为Hello.py。
4、主函数
添加main.py,因为ui文件命名为Hello,所以需要使用import引入刚生成的Hello.py。
-
import sys
-
import Hello
-
from PyQt5
import QtCore, QtGui, QtWidgets
-
-
if __name__ ==
‘__main__’:
-
app = QtWidgets.QApplication(sys.argv)
-
MainWindow = QtWidgets.QMainWindow()
-
ui = Hello.Ui_MainWindow()
-
ui.setupUi(MainWindow)
-
MainWindow.show()
-
sys.exit(app.exec_())
5、运行
可以使用PyCharm运行main.py。运行结果如下图(界面很烂,自动忽略。)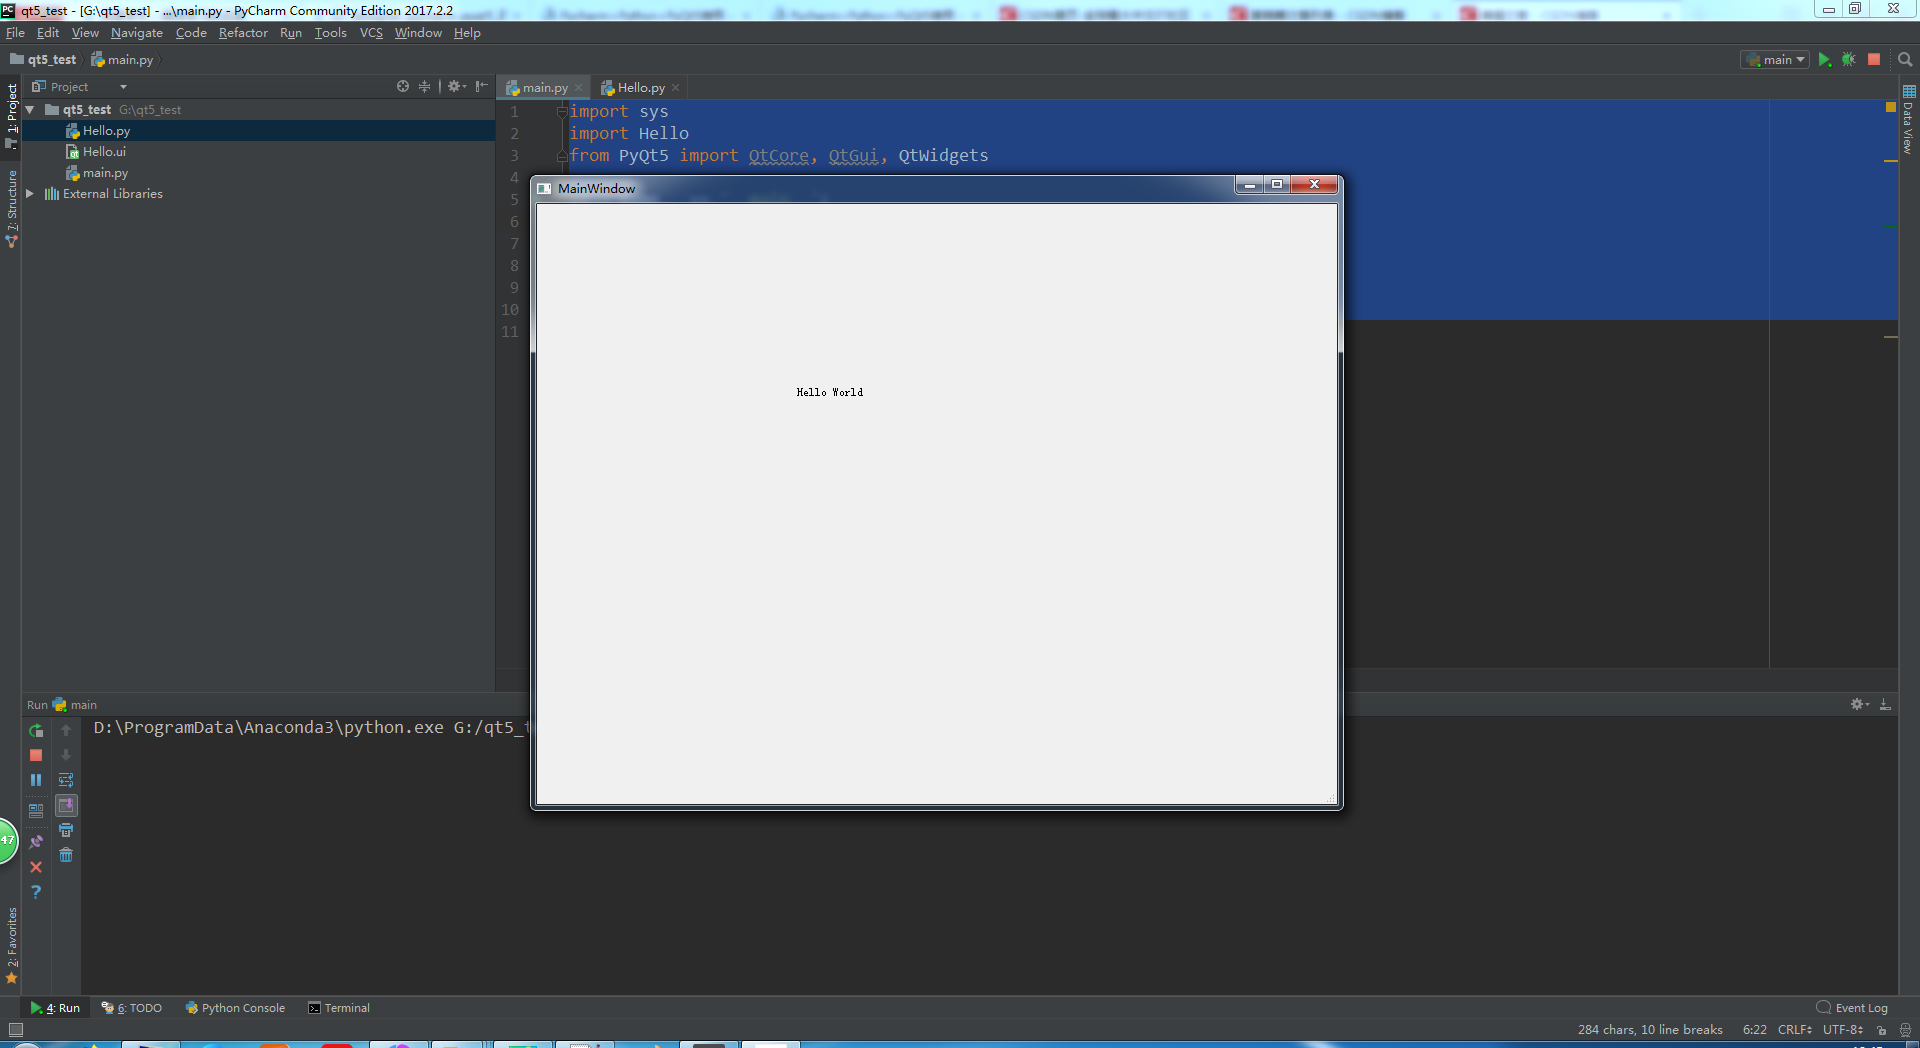
        </div>
            </div>


 6670
6670

 被折叠的 条评论
为什么被折叠?
被折叠的 条评论
为什么被折叠?
 到【灌水乐园】发言


