


中文文档:https://github.com/fatedier/frp/blob/dev/README_zh.md
手机+frp内网穿透搭建随身携带的服务器:https://blog.csdn.net/sinat_27938829/article/details/73604722
软路由 通过 Openwrt 自带的 Frp 插件:https://zhuanlan.zhihu.com/p/367894569
手机搭建个人网站 ( KSWEB+TERMUX+FRP内网穿透 ):https://www.jianshu.com/p/9981d27c0350
玩转内外网互通 ( Ngrok、钉钉、花生壳、frp ):https://www.it235.com/实用工具/内网穿透/pierce.html
内网穿透工具 --- FRP:https://mp.weixin.qq.com/s?__biz=MzI3MTI2NzkxMA==&mid=2247485670&idx=1&sn=df62f2df93f112a7bc0b8d7e843bbc16
关键字:内网穿透 域名映射
内网穿透
什么是内网穿透?
内网穿透,又叫 NET 穿透,是计算机用语。用通俗的说法就是你家里的个人电脑,可以直接被外网的人访问。例如你在公司,不通过远程工具,直接也可以访问到家里的电脑。内网穿透就是把局域网的 端口暴露给 公网,然后通过公网就可以访问局域网暴露端口的服务
通常实现内网穿透,是通过路由器上端口映射来实现的。但是路由器通常不是每个人都有权限可以访问和设置,而且可能存在多级路由器较为复杂的网络结构。端口映射也无法实现。
正常来说我们的个人电脑是无法被别人访问到的(有固定 ip 除外!),而且现在固定 ip 资源稀缺,运营商也不会随便给你分配了,个人申请也挺难。
为什么需要内网穿透?就个人而已,需要用到内网穿透的原因:一是方便访问公司的内网环境,不喜欢使用远程工具,挺麻烦的。二是方便把个人电脑上的应用开放到外网进行访问。
1、Frp 介绍
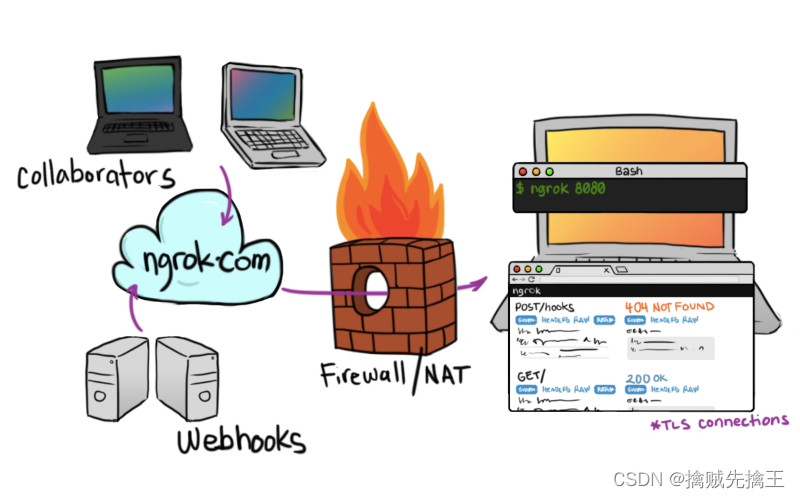
FRP 全名:Fast Reverse Proxy。FRP 是一个使用 Go 语言开发的开源、简洁易用、高性能的内网穿透和反向代理软件,支持 tcp, udp, http, https 等协议。frp 项目官网是:https://github.com/fatedier/frp
使用 frp工具有以下优势:
- 1. 利用处于内网或防火墙后的机器,对外网环境提供 HTTP 或 HTTPS 服务。
- 2. 对于 HTTP, HTTPS 服务支持基于域名的虚拟主机,支持自定义域名绑定,使多个域名可以共用一个 80 端口。
- 3. 利用处于内网或防火墙后的机器,对外网环境提供 TCP 和 UDP 服务,例如在家里通过 SSH 访问处于公司内网环境内的主机。
frp 工作原理
- 服务端运行,监听一个主端口,等待客户端的连接;
- 客户端连接到服务端的主端口,同时告诉服务端要监听的端口和转发类型;
- 服务端fork新的进程监听客户端指定的端口;
- 外网用户连接到客户端指定的端口,服务端通过和客户端的连接将数据转发到客户端;
- 客户端进程再将数据转发到本地服务,从而实现内网对外暴露服务的能力。
2、配置教程
想要配置 frp 穿透,首先必须先要有一台具有外网 ip ( 即:可以外网访问 ) 的服务器。如果没有,接下来的教程就不用看了。
配置教程主要分为两个部分,
- 1:服务器端 (外网服务器) 的配置;服务端通常部署在具有公网 IP 的机器上
- 2:客户端 (内网服务器) 配置。客户端通常部署在需要穿透的内网服务所在的机器上
服务端 ( 外网服务器 ) 配置
linux 版:
下载地址:https://github.com/fatedier/frp/releases
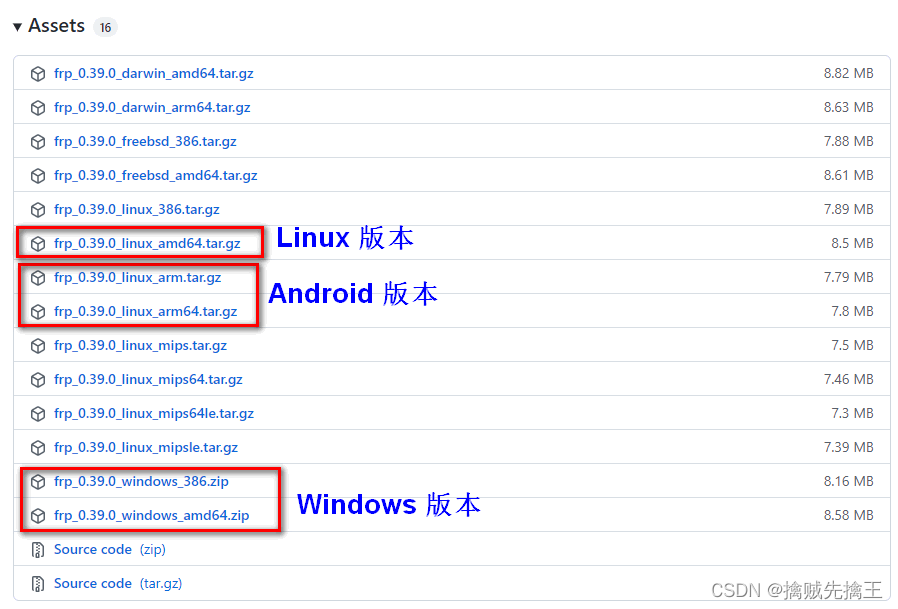
下载好后上传到服务器上:scp frp_0.39.0_linux_amd64.tar.gz 用户名@服务端ip:~/
这样就放到了服务端的家目录了。或者执行命令:wget https://github.com/fatedier/frp/releases/download/v0.39.0/frp_0.39.0_linux_amd64.tar.gz
如果觉得速度很慢,可以使用 mwget 安装:mwget https://github.com/fatedier/frp/releases/download/v0.39.0/frp_0.39.0_linux_amd64.tar.gz
解压 frp 压缩包:tar -zxvf frp_0.39.0_linux_amd64.tar.gz

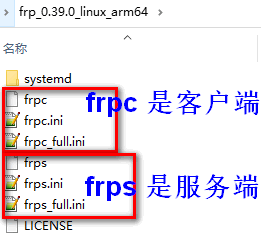
frp 目录下的文件分为两部分:
- frpc 开头的代表着 客户端 使用。
- frps 开头的代表 服务端 使用。
- .ini 结尾的文件是 frp 的配置文件,也是需要进行修改的文件。
frps_full.ini 文件内容:
# [common] is integral section
[common]
# A literal address or host name for IPv6 must be enclosed
# in square brackets, as in "[::1]:80", "[ipv6-host]:http" or "[ipv6-host%zone]:80"
# For single "bind_addr" field, no need square brackets, like "bind_addr = ::".
bind_addr = 0.0.0.0
bind_port = 7000

# udp port to help make udp hole to penetrate nat
bind_udp_port = 7001

# udp port used for kcp protocol, it can be same with 'bind_port'
# if not set, kcp is disabled in frps
kcp_bind_port = 7000

# specify which address proxy will listen for, default value is same with bind_addr
# proxy_bind_addr = 127.0.0.1

# if you want to support virtual host, you must set the http port for listening (optional)
# Note: http port and https port can be same with bind_port
vhost_http_port = 80
vhost_https_port = 443

# response header timeout(seconds) for vhost http server, default is 60s
# vhost_http_timeout = 60

# tcpmux_httpconnect_port specifies the port that the server listens for TCP
# HTTP CONNECT requests. If the value is 0, the server will not multiplex TCP
# requests on one single port. If it's not - it will listen on this value for
# HTTP CONNECT requests. By default, this value is 0.
# tcpmux_httpconnect_port = 1337

# set dashboard_addr and dashboard_port to view dashboard of frps
# dashboard_addr's default value is same with bind_addr
# dashboard is available only if dashboard_port is set
dashboard_addr = 0.0.0.0
dashboard_port = 7500

# dashboard user and passwd for basic auth protect
dashboard_user = admin
dashboard_pwd = admin

# enable_prometheus will export prometheus metrics on {dashboard_addr}:{dashboard_port} in /metrics api.
enable_prometheus = true

# dashboard assets directory(only for debug mode)
# assets_dir = ./static

# console or real logFile path like ./frps.log
log_file = ./frps.log

# trace, debug, info, warn, error
log_level = info

log_max_days = 3

# disable log colors when log_file is console, default is false
disable_log_color = false

# DetailedErrorsToClient defines whether to send the specific error (with debug info) to frpc. By default, this value is true.
detailed_errors_to_client = true

# authentication_method specifies what authentication method to use authenticate frpc with frps.
# If "token" is specified - token will be read into login message.
# If "oidc" is specified - OIDC (Open ID Connect) token will be issued using OIDC settings. By default, this value is "token".
authentication_method = token

# authenticate_heartbeats specifies whether to include authentication token in heartbeats sent to frps. By default, this value is false.
authenticate_heartbeats = false

# AuthenticateNewWorkConns specifies whether to include authentication token in new work connections sent to frps. By default, this value is false.
authenticate_new_work_conns = false

# auth token
token = 12345678

# oidc_issuer specifies the issuer to verify OIDC tokens with.
# By default, this value is "".
oidc_issuer =

# oidc_audience specifies the audience OIDC tokens should contain when validated.
# By default, this value is "".
oidc_audience =

# oidc_skip_expiry_check specifies whether to skip checking if the OIDC token is expired.
# By default, this value is false.
oidc_skip_expiry_check = false


# oidc_skip_issuer_check specifies whether to skip checking if the OIDC token's issuer claim matches the issuer specified in OidcIssuer.
# By default, this value is false.
oidc_skip_issuer_check = false

# heartbeat configure, it's not recommended to modify the default value
# the default value of heartbeat_timeout is 90. Set negative value to disable it.
# heartbeat_timeout = 90

# user_conn_timeout configure, it's not recommended to modify the default value
# the default value of user_conn_timeout is 10
# user_conn_timeout = 10

# only allow frpc to bind ports you list, if you set nothing, there won't be any limit
allow_ports = 2000-3000,3001,3003,4000-50000

# pool_count in each proxy will change to max_pool_count if they exceed the maximum value
max_pool_count = 5

# max ports can be used for each client, default value is 0 means no limit
max_ports_per_client = 0

# tls_only specifies whether to only accept TLS-encrypted connections. By default, the value is false.
tls_only = false

# tls_cert_file = server.crt
# tls_key_file = server.key
# tls_trusted_ca_file = ca.crt

# if subdomain_host is not empty, you can set subdomain when type is http or https in frpc's configure file
# when subdomain is test, the host used by routing is test.frps.com
subdomain_host = frps.com

# if tcp stream multiplexing is used, default is true
tcp_mux = true
# specify keep alive interval for tcp mux.
# only valid if tcp_mux is true.
# tcp_mux_keepalive_interval = 60

# custom 404 page for HTTP requests
# custom_404_page = /path/to/404.html

# specify udp packet size, unit is byte. If not set, the default value is 1500.
# This parameter should be same between client and server.
# It affects the udp and sudp proxy.
udp_packet_size = 1500

[plugin.user-manager]
addr = 127.0.0.1:9000
path = /handler
ops = Login

[plugin.port-manager]
addr = 127.0.0.1:9001
path = /handler
ops = NewProxy
frpc_full.ini 文件内容
# [common] is integral section
[common]
# A literal address or host name for IPv6 must be enclosed
# in square brackets, as in "[::1]:80", "[ipv6-host]:http" or "[ipv6-host%zone]:80"
# For single "server_addr" field, no need square brackets, like "server_addr = ::".
server_addr = 0.0.0.0
server_port = 7000

# if you want to connect frps by http proxy or socks5 proxy or ntlm proxy, you can set http_proxy here or in global environment variables
# it only works when protocol is tcp
# http_proxy = http://user:passwd@192.168.1.128:8080
# http_proxy = socks5://user:passwd@192.168.1.128:1080
# http_proxy = ntlm://user:passwd@192.168.1.128:2080

# console or real logFile path like ./frpc.log
log_file = ./frpc.log

# trace, debug, info, warn, error
log_level = info

log_max_days = 3

# disable log colors when log_file is console, default is false
disable_log_color = false

# for authentication, should be same as your frps.ini
# authenticate_heartbeats specifies whether to include authentication token in heartbeats sent to frps. By default, this value is false.
authenticate_heartbeats = false

# authenticate_new_work_conns specifies whether to include authentication token in new work connections sent to frps. By default, this value is false.
authenticate_new_work_conns = false

# auth token
token = 12345678

# oidc_client_id specifies the client ID to use to get a token in OIDC authentication if AuthenticationMethod == "oidc".
# By default, this value is "".
oidc_client_id =

# oidc_client_secret specifies the client secret to use to get a token in OIDC authentication if AuthenticationMethod == "oidc".
# By default, this value is "".
oidc_client_secret =

# oidc_audience specifies the audience of the token in OIDC authentication if AuthenticationMethod == "oidc". By default, this value is "".
oidc_audience =

# oidc_token_endpoint_url specifies the URL which implements OIDC Token Endpoint.
# It will be used to get an OIDC token if AuthenticationMethod == "oidc". By default, this value is "".
oidc_token_endpoint_url =

# set admin address for control frpc's action by http api such as reload
admin_addr = 127.0.0.1
admin_port = 7400
admin_user = admin
admin_pwd = admin
# Admin assets directory. By default, these assets are bundled with frpc.
# assets_dir = ./static

# connections will be established in advance, default value is zero
pool_count = 5

# if tcp stream multiplexing is used, default is true, it must be same with frps
tcp_mux = true
# specify keep alive interval for tcp mux.
# only valid if tcp_mux is true.
# tcp_mux_keepalive_interval = 60

# your proxy name will be changed to {user}.{proxy}
user = your_name

# decide if exit program when first login failed, otherwise continuous relogin to frps
# default is true
login_fail_exit = true

# communication protocol used to connect to server
# now it supports tcp, kcp and websocket, default is tcp
protocol = tcp

# set client binding ip when connect server, default is empty.
# only when protocol = tcp or websocket, the value will be used.
connect_server_local_ip = 0.0.0.0

# if tls_enable is true, frpc will connect frps by tls
tls_enable = true

# tls_cert_file = client.crt
# tls_key_file = client.key
# tls_trusted_ca_file = ca.crt
# tls_server_name = example.com

# specify a dns server, so frpc will use this instead of default one
# dns_server = 8.8.8.8

# proxy names you want to start seperated by ','
# default is empty, means all proxies
# start = ssh,dns

# heartbeat configure, it's not recommended to modify the default value
# The default value of heartbeat_interval is 10 and heartbeat_timeout is 90. Set negative value
# to disable it.
# heartbeat_interval = 30
# heartbeat_timeout = 90

# additional meta info for client
meta_var1 = 123
meta_var2 = 234

# specify udp packet size, unit is byte. If not set, the default value is 1500.
# This parameter should be same between client and server.
# It affects the udp and sudp proxy.
udp_packet_size = 1500

# include other config files for proxies.
# includes = ./confd/*.ini

# By default, frpc will connect frps with first custom byte if tls is enabled.
# If DisableCustomTLSFirstByte is true, frpc will not send that custom byte.
disable_custom_tls_first_byte = false

# 'ssh' is the unique proxy name
# if user in [common] section is not empty, it will be changed to {user}.{proxy} such as 'your_name.ssh'
[ssh]
# tcp | udp | http | https | stcp | xtcp, default is tcp
type = tcp
local_ip = 127.0.0.1
local_port = 22
# limit bandwidth for this proxy, unit is KB and MB
bandwidth_limit = 1MB
# true or false, if true, messages between frps and frpc will be encrypted, default is false
use_encryption = false
# if true, message will be compressed
use_compression = false
# remote port listen by frps
remote_port = 6001
# frps will load balancing connections for proxies in same group
group = test_group
# group should have same group key
group_key = 123456
# enable health check for the backend service, it support 'tcp' and 'http' now
# frpc will connect local service's port to detect it's healthy status
health_check_type = tcp
# health check connection timeout
health_check_timeout_s = 3
# if continuous failed in 3 times, the proxy will be removed from frps
health_check_max_failed = 3
# every 10 seconds will do a health check
health_check_interval_s = 10
# additional meta info for each proxy
meta_var1 = 123
meta_var2 = 234

[ssh_random]
type = tcp
local_ip = 127.0.0.1
local_port = 22
# if remote_port is 0, frps will assign a random port for you
remote_port = 0

# if you want to expose multiple ports, add 'range:' prefix to the section name
# frpc will generate multiple proxies such as 'tcp_port_6010', 'tcp_port_6011' and so on.
[range:tcp_port]
type = tcp
local_ip = 127.0.0.1
local_port = 6010-6020,6022,6024-6028
remote_port = 6010-6020,6022,6024-6028
use_encryption = false
use_compression = false

[dns]
type = udp
local_ip = 114.114.114.114
local_port = 53
remote_port = 6002
use_encryption = false
use_compression = false

[range:udp_port]
type = udp
local_ip = 127.0.0.1
local_port = 6010-6020
remote_port = 6010-6020
use_encryption = false
use_compression = false

# Resolve your domain names to [server_addr] so you can use http://web01.yourdomain.com to browse web01 and http://web02.yourdomain.com to browse web02
[web01]
type = http
local_ip = 127.0.0.1
local_port = 80
use_encryption = false
use_compression = true
# http username and password are safety certification for http protocol
# if not set, you can access this custom_domains without certification
http_user = admin
http_pwd = admin
# if domain for frps is frps.com, then you can access [web01] proxy by URL http://web01.frps.com
subdomain = web01
custom_domains = web01.yourdomain.com
# locations is only available for http type
locations = /,/pic
host_header_rewrite = example.com
# params with prefix "header_" will be used to update http request headers
header_X-From-Where = frp
health_check_type = http
# frpc will send a GET http request '/status' to local http service
# http service is alive when it return 2xx http response code
health_check_url = /status
health_check_interval_s = 10
health_check_max_failed = 3
health_check_timeout_s = 3

[web02]
type = https
local_ip = 127.0.0.1
local_port = 8000
use_encryption = false
use_compression = false
subdomain = web01
custom_domains = web02.yourdomain.com
# if not empty, frpc will use proxy protocol to transfer connection info to your local service
# v1 or v2 or empty
proxy_protocol_version = v2

[plugin_unix_domain_socket]
type = tcp
remote_port = 6003
# if plugin is defined, local_ip and local_port is useless
# plugin will handle connections got from frps
plugin = unix_domain_socket
# params with prefix "plugin_" that plugin needed
plugin_unix_path = /var/run/docker.sock

[plugin_http_proxy]
type = tcp
remote_port = 6004
plugin = http_proxy
plugin_http_user = abc
plugin_http_passwd = abc

[plugin_socks5]
type = tcp
remote_port = 6005
plugin = socks5
plugin_user = abc
plugin_passwd = abc

[plugin_static_file]
type = tcp
remote_port = 6006
plugin = static_file
plugin_local_path = /var/www/blog
plugin_strip_prefix = static
plugin_http_user = abc
plugin_http_passwd = abc

[plugin_https2http]
type = https
custom_domains = test.yourdomain.com
plugin = https2http
plugin_local_addr = 127.0.0.1:80
plugin_crt_path = ./server.crt
plugin_key_path = ./server.key
plugin_host_header_rewrite = 127.0.0.1
plugin_header_X-From-Where = frp

[plugin_https2https]
type = https
custom_domains = test.yourdomain.com
plugin = https2https
plugin_local_addr = 127.0.0.1:443
plugin_crt_path = ./server.crt
plugin_key_path = ./server.key
plugin_host_header_rewrite = 127.0.0.1
plugin_header_X-From-Where = frp

[plugin_http2https]
type = http
custom_domains = test.yourdomain.com
plugin = http2https
plugin_local_addr = 127.0.0.1:443
plugin_host_header_rewrite = 127.0.0.1
plugin_header_X-From-Where = frp

[secret_tcp]
# If the type is secret tcp, remote_port is useless
# Who want to connect local port should deploy another frpc with stcp proxy and role is visitor
type = stcp
# sk used for authentication for visitors
sk = abcdefg
local_ip = 127.0.0.1
local_port = 22
use_encryption = false
use_compression = false

# user of frpc should be same in both stcp server and stcp visitor
[secret_tcp_visitor]
# frpc role visitor -> frps -> frpc role server
role = visitor
type = stcp
# the server name you want to visitor
server_name = secret_tcp
sk = abcdefg
# connect this address to visitor stcp server
bind_addr = 127.0.0.1
bind_port = 9000
use_encryption = false
use_compression = false

[p2p_tcp]
type = xtcp
sk = abcdefg
local_ip = 127.0.0.1
local_port = 22
use_encryption = false
use_compression = false

[p2p_tcp_visitor]
role = visitor
type = xtcp
server_name = p2p_tcp
sk = abcdefg
bind_addr = 127.0.0.1
bind_port = 9001
use_encryption = false
use_compression = false

[tcpmuxhttpconnect]
type = tcpmux
multiplexer = httpconnect
local_ip = 127.0.0.1
local_port = 10701
custom_domains = tunnel1进入解压后的目录,打开配置文件:vi frps.ini 将文件内容修改为如下:
[common]
bind_port = 7000 # frp 监听的端口,默认是7000,可以改成其他的
token = mytoken_12345 # 授权码,可以改成更复杂,这个token之后在客户端会用到
dashboard_port = 7500 # frp 管理后台端口,请按自己需求更改
dashboard_user = admin # frp 管理后台用户名和密码,请改成自己的
dashboard_pwd = admin
enable_prometheus = true# frp 日志配置
log_file = /var/log/frps.log
log_level = info
log_max_days = 3
- bind_port 表示客户端和服务端连接的端口,客户端也需同样设置并一致(必填)
- token 是用于客户端和服务端连接的口令,客户端也需同样设置并一致(必填)
- dashboard_port 是服务端仪表板的端口,服务端仪表板查看frp服务运行信息。(按需)
- dashboard_user 和 dashboard_pwd 是打开仪表板页面登录用的用户名和密码(按需)
启动 frp 服务
sudo mkdir -p /etc/frp
sudo cp frps.ini /etc/frp
sudo cp frps /usr/bin
sudo cp systemd/frps.service /usr/lib/systemd/system/
sudo systemctl enable frps
sudo systemctl start frps
如果上述命令依次执行完没有任何错误出现,则说明启动成功。
防火墙开放端口
# 添加监听端口
sudo firewall-cmd --permanent --add-port=7000/tcp
# 添加管理后台端口
sudo firewall-cmd --permanent --add-port=7500/tcp
sudo firewall-cmd --reload
注意:
- 1:如果是 ubuntu 或者 centos 6,请使用 ufw / iptables 工具放行端口;
- 2:7000 和 7500 两个端口分别对应 frps.ini 配置中的 bind_port 和 dashboard_port
验证服务端是否启动成功
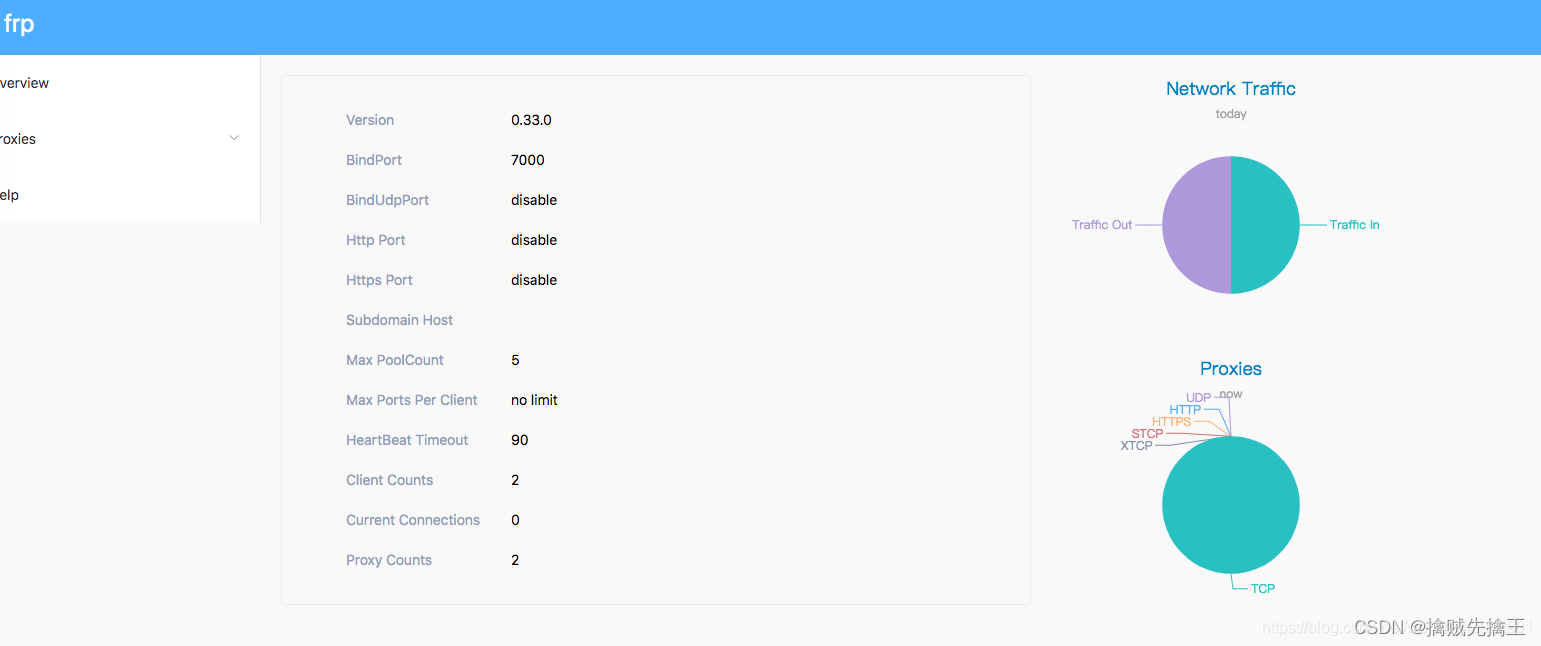
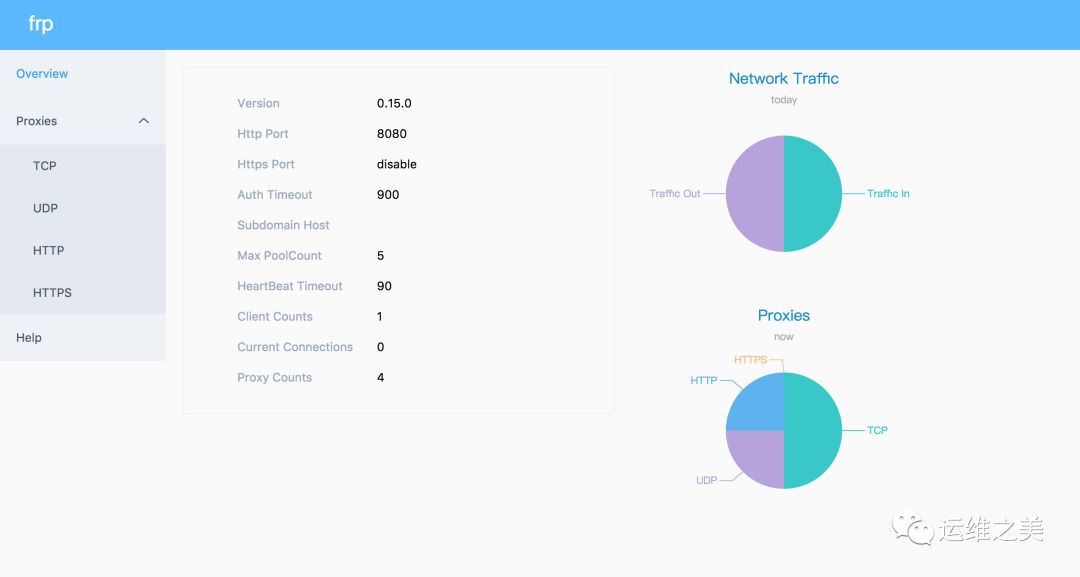
访问:http://服务器IP:后台管理端口 ,输入 用户名、密码 可以查看连接状态。如:http://62.244.114.4:7500/,用户名和密码分别对应 frps.ini 文件中的 dashboard_user 和dashboard_pwd 登录之后界面如下:
客户端 ( 内网服务器 ) 配置
把 frpc 开头的文件复制到内网服务器上( 就是要把内网端口暴露给外网的访问的服务器上 ),
打开配置文件进行配置:vi frpc.ini (注意:不是frps.ini)
将文件内容修改为如下:
# 客户端配置
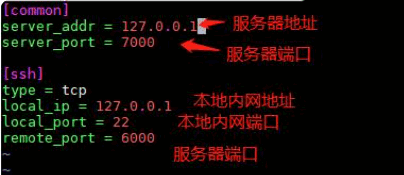
[common]
server_addr = 服务器ip
server_port = 7000 # 与frps.ini的bind_port一致
token = 52010 # 与frps.ini的token一致# 配置ssh服务
[ssh]
type = tcp
local_ip = 127.0.0.1
local_port = 22
remote_port = 6000 # 这个自定义,之后再ssh连接的时候要用[ssh2] # 不同客户端需要不同的名字
type = tcp
local_ip = 127.0.0.1
local_port = 3389 #SSH使用22端口 windows系统使用3389端口
remote_port = 6006 #这个端口是指通过x.x.x.x:6000访问内网机子的转发端口[rdb]
type = tcp
local_ip = 127.0.0.1
local_port = 3389
remote_port = 6000# 配置 http 服务,可用于小程序开发、远程调试等,如果没有可以不写下面的
[web]
type = http
local_ip = 127.0.0.1
local_port = 8080
subdomain = test.hijk.pw # web域名
remote_port = 自定义的远程服务器端口,例如8080
- server_addr 就是服务器的外网IP(必填)
- bind_port 表示客户端和服务端连接的端口,服务端也需同样设置并一致(必填)
- token 是用于客户端和服务端连接的口令,服务端也需同样设置并一致(必填)
- [rdb] 是一个规则名称,可自定义
- type 是转发的协议类型
- local_port 是本地应用的端口号,本例子的3389是远程桌面的默认端口
- remote_port 是该条规则在服务端开放的端口号,在公司电脑win10电脑开始里输入mstsc,调出远程桌面连接,输入服务器 IP 加 remote_port 就可远程家里电脑了
注意:[ssh] 这样的名称必须全局唯一,即就算有多个客户端,也只能使用一次,其他的可以用[ssh2]、[ssh3] 等;意思就是说,如果你要配置多个客户端,必须将另外的客户端的 [ssh] 改为[ssh2]、[ssh3] 等,并且 remote_port 也要变,比如 6002,6003 等
防火墙开放端口
sudo firewall-cmd --permanent --add-port=6000/tcp
sudo firewall-cmd --permanent --add-port=8080/tcp
sudo firewall-cmd --reload
启动客户端:./frpc -c frpc.ini
测试穿透是否配置成功
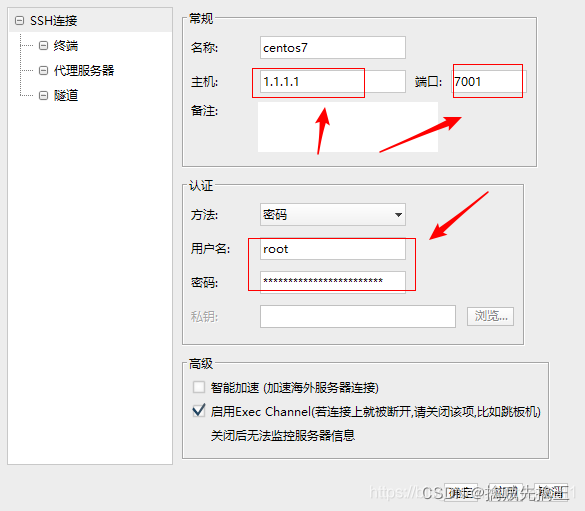
找另外一台不同网段的电脑,在终端执行:ssh 用户名@服务端ip -p 端口号
这里一定要注意,这里用的是服务端的ip和用户名,端口号用的frpc.ini文件中的remote_port。如果你登录成功,那么,恭喜你,你已经学会了利用frc怎么配置内网穿透了!!!
3、frp 应用
ssh 远程访问
由于以上 家里的电脑( frp客户端 )安装在win10系统上,使用 3389 可实现远程桌面,对标 linux 系统,远程访问软件就要用到 FinalShell 或 Xshell,因此在 linux 系统上安装客户端需要在 frpc.ini 加上以下内容:
[ssh]
type = tcp
local_ip = 127.0.0.1
local_port = 22
remote_port = 7001
在 FinalShell 或 Xshell 中输入腾讯云服务器 IP:7001 加上 linux 的账密就可访问
web 服务连接
在 家里的电脑(frp客户端)开启了一个 web 服务,比如启动 tomcat,那么客户端的配置文件frpc.ini 需要填入以下内容
[web]
type = http
local_ip = 127.0.0.1
local_port = 8080
custom_domains = www.youdomain.com
custom_domains 是设置域名,必须要有,www.youdomain.com 可以在腾讯云买最便宜5块钱一年,域名注册-我的域名-注册域名中即可购买,然后解析域名,将腾讯云服务器IP和自定义的域名绑定,以后访问腾讯云服务器就直接输入域名就可以了,比如用百度,就直接输入 www.baidu.com
然后 公司电脑浏览器 输入www.youdomain.com:10080 即可(此处的10080就是服务端设置的vhost_http_port),查看到家里电脑(frp客户端)启动的 web 服务
通过密码保护 Web 服务
由于所有客户端共用一个 FRP 服务端的 HTTP 服务端口,任何知道你的域名和 URL 的人都能访问到你部署在内网的 Web 服务,但是在某些场景下需要确保只有限定的用户才能访问。
FRP 支持通过 HTTP Basic Auth 来保护你的 Web 服务,使用户需要通过用户名和密码才能访问到你的服务。需要实现此功能主要需要在 FRP 客户端的配置文件中添加用户名和密码的设置。
vim frpc.ini
[web]
type = http
local_port = 80
custom_domains = mike.hi-linux.com
# 设置认证的用户名
http_user = abc
# 设置认证的密码
http_pwd = abc
这时访问 http://mike.hi-linux.com:8080 这个 URL 时就需要输入配置的用户名和密码才能访问。
该功能目前仅限于 HTTP 类型的代理。
HTTP 穿透
HTTP 穿透,也就是我们应用层面的通信协议,http协议;穿透它是为了方便我们访问内网的 web 应用,例如我在内网机器,起了一个 tomcat 部署了一个网站,我想让其他人外网的人来访问我,那就需要进行 HTTP 的穿透;
服务端
[common]
bind_port = 7000
vhost_http_port = 80 # 将服务器的 80 端口用作 http 协议的通信
vhost_https_port = 443 # 进服务器的 443 端口用作 https 协议通信
privilege_token = token123456789 # frp的认证,对应的客户也需要配置一样,才可以进行通信
客户端
[common]
server_addr = 云服务器ip
server_port = 7000
privilege_token = token123456789 #frp的认证[web_http]
type=http #通信类型为http
local_ip = 127.0.0.1
local_port = 8080
custom_domains = 二级域名/公网ip[ssh]
type = tcp
local_ip = 127.0.0.1
local_port = 22
remote_port = 6000
http 的穿透,我们看到服务端和客户端的配置文件都进行了改动,我们重点来看下客户单中的配置;type = http : 这个是因为我们想要创建的隧道是进行 http 通信的,也就是用来访问本地 web 应用;custom_domains = 二级域名/公网ip :这个配置一般使用一个二级域名来配置,用于通过域名来访问你的穿透服务器,如果没有域名,那么我们写上一个服务器的公网 ip 也是可以的,用 ip 的话,在外网访问的时候,就只能通过 ip 进行访问了,效果都一样;
文件访问服务
在家里电脑(frp客户端)的frpc.ini添加以下内容
[my_static_file]
type = tcp
remote_port = 6001
plugin = static_file
plugin_local_path = E:\\temp
plugin_strip_prefix = static
plugin_http_user = abc
plugin_http_passwd = 123
plugin 是需要用到的插件
plugin_local_path 是要对外暴露的文件目录
plugin_strip_prefix 访问url携带的前缀
plugin_http_user 访问账号
plugin_http_passwd 访问密码
在 公司电脑 的浏览器输入:http://1.1.1.1:6001/static/
输入账号密码就可查看家里电脑分享的文件,其中1.1.1.1是腾讯云服务器对外的IP
综合 配置
frp 内网穿透,可以使用域名,也可使用IP, 一般来讲,域名比较好记。所以有域名的话尽量使用域名,实在没有域名的话才使用IP。由于 web 服务一般均会使用80端口,如果80端口是否被nginx或其它web 服务占用的话,则要改成其他端口,如8080,也可使用 nginx 的反向代理实现 frp 服务端与 nginx 共用 80 端口。
frp 实现内网穿透(没有公网IP的利器)。以下 frps就是服务器端(server),frpc就是客户端(client)。
1.有自己域名的 FRP 配置
# frps.ini服务端配置
[common]
bind_addr = 0.0.0.0
bind_port = 7000
privilege_token = abcdefghijk
vhost_http_port = 80
vhost_https_port = 443vhost_http_port = 80 和 vhost_https_port = 443
将服务器的80端口做http,443端口做https
原理就像nginx一样,可以多个网站共同使用这两个端口。#frpc.ini客户端配置
[common]
server_addr = 服务端IP
server_port = 7000
privilege_token = abcdefghijk[httpname]
type = http
local_port = 80
local_ip = 127.0.0.1
custom_domains = www.52help.net[httpsname]
type = https
local_port = 443
local_ip = 127.0.0.1
custom_domains = 52help.net这里的 www.52help.net 52help.net两个域名要真实存在,且要在域名解析里将指定域名解析到frps服务端的IP上。
custom_domains = 这里填写你已经解析到frps服务端IP上的域名,自己每个穿透对应服务,都可以绑定一个专属域名用于访问,包括使用tcp和udp协议。
然后就可以通过这个已经自定义域域名访问到自己的对应HTTP服务。
2. 只有IP,没有自己域名的配置
如果自己没有域名,但又想使用 FRP 实现内网穿透到我的 HTTP 服务
frps.ini 服务端配置# frps.ini[common]bind_addr = 0.0.0.0bind_port = 7000privilege_token = abcdefghijk# frpc.ini客户端配置[common]server_addr = 服务端IPserver_port = 7000privilege_token = abcdefghijk[httpname]type = tcplocal_port = 80local_ip = 127.0.0.1remote_port = 8080然后就可以通过 服务端IP地址:8080 来访问访问到对应穿透的服务。
给 Web 服务增加自定义二级域名
在多人同时使用一个 FRP 服务端实现 Web 服务时,通过自定义二级域名的方式来使用会更加方便。
通过在 FRP 服务端的配置文件中配置 subdomain_host参数就可以启用该特性。之后在 FRP 客户端的 http、https 类型的代理中可以不配置 custom_domains,而是配置一个 subdomain 参数。
然后只需要将 *.{subdomain_host} 解析到 FRP 服务端所在服务器。之后用户可以通过 subdomain 自行指定自己的 Web 服务所需要使用的二级域名,并通过 {subdomain}.{subdomain_host} 来访问自己的 Web 服务。
首先我们在 FRP 服务端配置 subdomain_host 参数:
$ vim frps.ini
[common]
subdomain_host = hi-linux.com
其次在 FRP 客户端配置文件配置 subdomain 参数:
$ vim frpc.ini
[web]
type = http
local_port = 80
subdomain = test
然后将泛域名 *.hi-linux.com 解析到 FRP 服务端所在服务器的公网 IP 地址。FRP 服务端 和 FRP 客户端都启动成功后,通过 test.hi-linux.com 就可以访问到内网的 Web 服务。
同一个
HTTP或HTTPS类型的代理中custom_domains和subdomain可以同时配置。需要注意的是如果
FPR服务端配置了subdomain_host,则custom_domains中不能是属于subdomain_host的子域名或者泛域名。
修改 Host Header
通常情况下 FRP 不会修改转发的任何数据。但有一些后端服务会根据 HTTP 请求 header 中的 host 字段来展现不同的网站,例如 Nginx 的虚拟主机服务,启用 host-header 的修改功能可以动态修改 HTTP 请求中的 host 字段。
实现此功能只需要在 FRP 客户端配置文件中定义 host_header_rewrite 参数。
$ vim frpc.ini
[web]
type = http
local_port = 80
custom_domains = test.hi-linux.com
host_header_rewrite = dev.hi-linux.com
原来 HTTP 请求中的 host 字段 test.hi-linux.com 转发到后端服务时会被替换为 dev.hi-linux.com。
该功能仅限于 HTTP 类型的代理。
URL 路由
FRP 支持根据请求的 URL 路径路由转发到不同的后端服务。要实现这个功能可通过 FRP 客户端配置文件中的 locations 字段来指定。
$ vim frpc.ini

[web01]
type = http
local_port = 80
custom_domains = web.hi-linux.com
locations = /

[web02]
type = http
local_port = 81
custom_domains = web.hi-linux.com
locations = /news,/about按照上述的示例配置后,web.hi-linux.com 这个域名下所有以 /news 以及 /about 作为前缀的 URL 请求都会被转发到后端 web02 所在的后端服务,其余的请求会被转发到 web01 所在的后端服务。
目前仅支持最大前缀匹配,之后会考虑支持正则匹配。
通过 UDP 访问内网机器
DNS 查询请求通常使用 UDP 协议,FRP 支持对内网 UDP 服务的穿透,配置方式和 TCP 基本一致。这里以转发到 Google 的 DNS 查询服务器 8.8.8.8 的 UDP 端口为例。
首先修改 FRP 客户端配置文件,并增加如下内容:
$ vim frpc.ini
[dns]
type = udp
local_ip = 8.8.8.8
local_port = 53
remote_port = 6001
要转发到内网 DNS 服务器只需把
local_ip改成对应 IP 即可。
其次重新启动 FRP 客户端:
$ ./frpc -c ./frpc.ini
2018/01/25 14:54:17 [I] [proxy_manager.go:284] proxy removed: []
2018/01/25 14:54:17 [I] [proxy_manager.go:294] proxy added: [ssh web dns]
2018/01/25 14:54:17 [I] [proxy_manager.go:317] visitor removed: []
2018/01/25 14:54:17 [I] [proxy_manager.go:326] visitor added: []
2018/01/25 14:54:17 [I] [control.go:240] [33e1de8a771112a6] login to server success, get run id [33e1de8a771112a6], server udp port [0]
2018/01/25 14:54:17 [I] [control.go:165] [33e1de8a771112a6] [ssh] start proxy success
2018/01/25 14:54:17 [I] [control.go:165] [33e1de8a771112a6] [web] start proxy success
2018/01/25 14:54:17 [I] [control.go:165] [33e1de8a771112a6] [dns] start proxy success
最后通过 dig 命令测试 UDP 包转发是否成功,预期会返回 www.google.com 域名的解析结果:
$ dig @4.3.2.1 -p 6001 www.google.com
...

;; QUESTION SECTION:
;www.google.com.            IN  A

;; ANSWER SECTION:
www.google.com.     79  IN  A   69.63.184.30

...
转发 Unix 域套接字
通过 TCP 端口访问内网的 Unix 域套接字,这里以和本地机器上的 Docker Daemon 通信为例。
首先修改 FRP 客户端配置文件,并增加如下内容:
$ vim frpc.ini
[unix_domain_socket]
type = tcp
remote_port = 6002
plugin = unix_domain_socket
plugin_unix_path = /var/run/docker.sock
这里主要是使用 plugin 和 plugin_unix_path 两个参数启用了 unix_domain_socket 插件和配置对应的套接字路径。
其次重新启动 FRP 客户端:
$ ./frpc -c ./frpc.ini

2018/01/25 15:09:33 [I] [proxy_manager.go:284] proxy removed: []
2018/01/25 15:09:33 [I] [proxy_manager.go:294] proxy added: [ssh web dns unix_domain_socket]
2018/01/25 15:09:33 [I] [proxy_manager.go:317] visitor removed: []
2018/01/25 15:09:33 [I] [proxy_manager.go:326] visitor added: []
2018/01/25 15:09:33 [I] [control.go:240] [f6424f0deb8b6ff7] login to server success, get run id [f6424f0deb8b6ff7], server udp port [0]
2018/01/25 15:09:33 [I] [control.go:165] [f6424f0deb8b6ff7] [ssh] start proxy success
2018/01/25 15:09:33 [I] [control.go:165] [f6424f0deb8b6ff7] [web] start proxy success
2018/01/25 15:09:33 [I] [control.go:165] [f6424f0deb8b6ff7] [dns] start proxy success
2018/01/25 15:09:33 [I] [control.go:165] [f6424f0deb8b6ff7] [unix_domain_socket] start proxy success
最后通过 curl 命令查看 Docker 版本信息进行测试:
$ curl http://4.3.2.1:6002/version

{"Platform":{"Name":""},"Components":[{"Name":"Engine","Version":"17.12.0-ce","Details":{"ApiVersion":"1.35","Arch":"amd64","BuildTime":"2017-12-27T20:12:29.000000000+00:00","Experimental":"true","GitCommit":"c97c6d6","GoVersion":"go1.9.2","KernelVersion":"4.9.60-linuxkit-aufs","MinAPIVersion":"1.12","Os":"linux"}}],"Version":"17.12.0-ce","ApiVersion":"1.35","MinAPIVersion":"1.12","GitCommit":"c97c6d6","GoVersion":"go1.9.2","Os":"linux","Arch":"amd64","KernelVersion":"4.9.60-linuxkit-aufs","Experimental":true,"BuildTime":"2017-12-27T20:12:29.000000000+00:00"}
FRP从 1.5 版本开始支持客户端热加载配置文件,并不用每次都重启客户端程序。具体方法在后文FRP客户端热加载配置文件部分讲解。
FRP 高级进阶
给 FRP 服务端增加一个 Dashboard
通过 Dashboard 可以方便的查看 FRP 的状态以及代理统计信息展示,要使用这个功能首先需要在 FRP 服务端配置文件中指定 Dashboard 服务使用的端口:
$ vim frps.ini

[common]

# 指定 Dashboard 的监听的 IP 地址
dashboard_addr = 0.0.0.0

# 指定 Dashboard 的监听的端口
dashboard_port = 7500

# 指定访问 Dashboard 的用户名
dashboard_user = admin

# 指定访问 Dashboard 的端口
dashboard_pwd = admin
其次重新启动 FRP 服务端:
$ ./frps -c ./frps.ini

2018/01/25 16:39:29 [I] [service.go:96] frps tcp listen on 0.0.0.0:7000
2018/01/25 16:39:29 [I] [service.go:125] http service listen on 0.0.0.0:8080
2018/01/25 16:39:29 [I] [service.go:164] Dashboard listen on 0.0.0.0:7500
2018/01/25 16:39:29 [I] [main.go:112] Start frps success
2018/01/25 16:39:29 [I] [main.go:114] PrivilegeMode is enabled, you should pay more attention to security issues
最后通过 http://[server_addr]:7500 访问 Dashboard 界面,用户名密码默认都为 admin。
给 FRP 服务端加上身份验证
默认情况下只要知道 FRP 服务端开放的端口,任意 FRP 客户端都可以随意在服务端上注册端口映射,这样对于在公网上的 FRP 服务来说显然不太安全。FRP 提供了身份验证机制来提高 FRP 服务端的安全性。要启用这一特性也很简单,只需在 FRP 服务端和 FRP 客户端的 common 配置中启用 privilege_token 参数就行。
[common]
privilege_token = 12345678
启用这一特性后,只有 FRP 服务端和 FRP 客户端的 common 配置中的 privilege_token 参数一致身份验证才会通过,FRP 客户端才能成功在 FRP 服务端注册端口映射。否则就会注册失败,出现类似下面的错误:
2018/01/25 17:29:27 [I] [proxy_manager.go:284] proxy removed: []
2018/01/25 17:29:27 [I] [proxy_manager.go:294] proxy added: [ssh web dns unix_domain_socket]
2018/01/25 17:29:27 [I] [proxy_manager.go:317] visitor removed: []
2018/01/25 17:29:27 [I] [proxy_manager.go:326] visitor added: []
2018/01/25 17:29:27 [E] [control.go:230] authorization failed
2018/01/25 17:29:27 [W] [control.go:109] login to server failed: authorization failed
authorization failed
需要注意的是
FRP客户端所在机器和FRP服务端所在机器的时间相差不能超过 15 分钟,因为时间戳会被用于加密验证中,防止报文被劫持后被其他人利用。这个超时时间可以在配置文件中通过authentication_timeout这个参数来修改,单位为秒,默认值为 900,即 15 分钟。如果修改为 0,则FRP服务端将不对身份验证报文的时间戳进行超时校验。
FRP 客户端热加载配置文件
当修改了 FRP 客户端中的配置文件,从 0.15 版本开始可以通过 frpc reload 命令来动态加载配置文件,通常会在 10 秒内完成代理的更新。
启用此功能需要在 FRP 客户端配置文件中启用 admin 端口,用于提供 API 服务。配置如下:
$ vim frpc.ini

[common]
admin_addr = 127.0.0.1
admin_port = 7400
重启 FRP 客户端,以后就可通过热加载方式进行 FRP 客户端配置变更了。
$ ./frpc -c ./frpc.ini
2018/01/25 18:04:25 [I] [proxy_manager.go:326] visitor added: []
2018/01/25 18:04:25 [I] [control.go:240] [3653b9a878f8acc7] login to server success, get run id [3653b9a878f8acc7], server udp port [0]
2018/01/25 18:04:25 [I] [service.go:49] admin server listen on 127.0.0.1:7400
2018/01/25 18:04:25 [I] [control.go:165] [3653b9a878f8acc7] [ssh] start proxy success
2018/01/25 18:04:25 [I] [control.go:165] [3653b9a878f8acc7] [web] start proxy success
2018/01/25 18:04:25 [I] [control.go:165] [3653b9a878f8acc7] [dns] start proxy success
2018/01/25 18:04:25 [I] [control.go:165] [3653b9a878f8acc7] [unix_domain_socket] start proxy success

$ ./frpc reload -c ./frpc.ini
reload success
等待一段时间后客户端会根据新的配置文件创建、更新、删除代理。
需要注意的是 [common] 中的参数除了 start 外目前无法被修改。
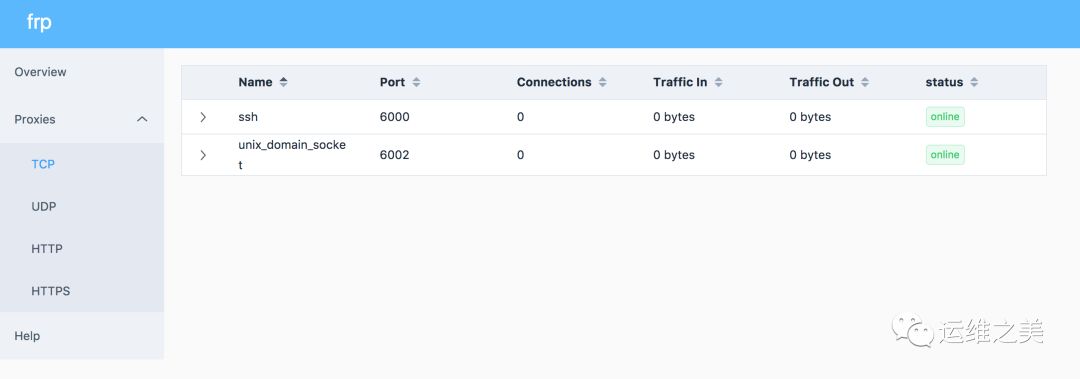
启用 admin_addr 后,还可以通过 frpc status -c ./frpc.ini 命令在 FRP 客户端很方便的查看当前代理状态信息。
$ ./frpc status -c ./frpc.ini

Proxy Status...
TCP
Name                Status   LocalAddr     Plugin              RemoteAddr           Error
ssh                 running  127.0.0.1:22                      4.3.2.1:6000
unix_domain_socket  running                unix_domain_socket  4.3.2.1:6002

UDP
Name  Status   LocalAddr   Plugin  RemoteAddr           Error
dns   running  8.8.8.8:53          4.3.2.1:6001

HTTP
Name  Status   LocalAddr     Plugin  RemoteAddr              Error
web   running  127.0.0.1:80          mike.hi-linux.com:8080
给 FRP 服务端增加端口白名单
为了防止 FRP 端口被滥用,FRP 提供了指定允许哪些端口被分配的功能。可通过 FRP 服务端的配置文件中 privilege_allow_ports 参数来指定:
$ vim frps.ini

[common]
privilege_allow_ports = 2000-3000,3001,3003,4000-5000
privilege_allow_ports可以配置允许使用的某个指定端口或者是一个范围内的所有端口,以 , 分隔,指定的范围以 - 分隔。
当使用不允许的端口注册时,就会注册失败。出现类似以下错误:
$ ./frpc status -c ./frpc.ini
Proxy Status...
TCP
Name                Status       LocalAddr     Plugin              RemoteAddr            Error
ssh                 start error  127.0.0.1:22                      4.3.2.1:60000  port not allowed
unix_domain_socket  start error                unix_domain_socket  4.3.2.1:60002  port not allowed
启用 TCP 多路复用
从 v0.10.0 版本开始,客户端和服务器端之间的连接支持多路复用,不再需要为每一个用户请求创建一个连接,使连接建立的延迟降低,并且避免了大量文件描述符的占用,使 FRP 可以承载更高的并发数。
该功能默认启用,如需关闭可以在 FRP 服务端配置文件和 FRP 客户端配置文件中配置,该配置项在服务端和客户端必须一致:
# frps.ini 和 frpc.ini 中
[common]
tcp_mux = false
FRP 底层通信启用 KCP 协议
FRP 从 v0.12.0 版本开始,底层通信协议支持选择 KCP 协议,在弱网络环境下传输效率会提升明显,但是会有一些额外的流量消耗。
要开启 KCP 协议支持,首先要在 FRP 服务端配置文件中启用 KCP 协议支持:
$ vim frps.ini
[common]
bind_port = 7000
# 指定一个 UDP 端口用于接收客户端请求 KCP 绑定的是 UDP 端口,可以和 bind_port 一样
kcp_bind_port = 7000
其次是在 FRP 客户端配置文件指定需要使用的协议类型,目前只支持 TCP 和 KCP。其它代理配置不需要变更:
$ vim  frpc.ini
[common]
server_addr = 4.3.2.1
# server_port 指定为 FRP 服务端里 kcp_bind_port 指定的端口
server_port = 7000
# 指定需要使用的协议类型,默认类型为 TCP
protocol = kcp
需要注意开放相关机器上的 UDP 端口的访问权限。
给 FRP 服务端配置连接池
默认情况下,当用户请求建立连接后,FRP 服务端才会请求 FRP 客户端主动与后端服务建立一个连接。
当为指定的 FRP 服务端启用连接池功能后,FRP 会预先和后端服务建立起指定数量的连接,每次接收到用户请求后,会从连接池中取出一个连接和用户连接关联起来,避免了等待与后端服务建立连接以及 FRP 客户端 和 FRP 服务端之间传递控制信息的时间。
首先需要在 FRP 服务端配置文件中设置每个代理可以创建的连接池上限,避免大量资源占用,客户端设置超过此配置后会被调整到当前值:
$ vim frps.ini
[common]
max_pool_count = 5
其次在 FRP 客户端配置文件中为客户端启用连接池,指定预创建连接的数量:
$ vim frpc.ini
[common]
pool_count = 1
此功能比较适合有大量短连接请求时开启。
加密与压缩
如果公司内网防火墙对外网访问进行了流量识别与屏蔽,例如禁止了 SSH 协议等,可通过设置 use_encryption = true,将 FRP 客户端 与 FRP 服务端之间的通信内容加密传输,将会有效防止流量被拦截。
如果传输的报文长度较长,通过设置 use_compression = true 对传输内容进行压缩,可以有效减小 FRP 客户端 与 FRP 服务端之间的网络流量,来加快流量转发速度,但是会额外消耗一些 CPU 资源。
这两个功能默认是不开启的,需要在 FRP 客户端配置文件中通过配置来为指定的代理启用加密与压缩的功能,压缩算法使用的是 snappy。
$ vim frpc.ini

[ssh]
type = tcp
local_port = 22
remote_port = 6000
use_encryption = true
use_compression = true
通过 FRP 客户端代理其它内网机器访问外网
FRP 客户端内置了 http_proxy 和 socks5 插件,通过这两个插件可以使其它内网机器通过 FPR 客户端的的网络访问互联网。
要启用此功能,首先需要在 FRP 客户端配置文件中启用相关插件,这里以 http_proxy 插件为例:
$ vim frpc.ini

[common]
server_addr = 4.3.2.1
server_port = 7000

[http_proxy]
type = tcp
remote_port = 6000
plugin = http_proxy
其次将需要通过这个代理访问外网的内部机器的代理地址设置为 4.3.2.1:6000,这样就可以通过 FRP 客户端机器的网络访问互联网了。
http_proxy插件也支持认证机制,如果需要启用认证可通过配置参数plugin_http_user和plugin_http_passwd启用。如需启用
Socks5代理,只需将 plugin 的值更换为 socks5 即可。
通过代理连接 FRP 服务端
在只能通过代理访问外网的环境内,FRP 客户端支持通过 HTTP_PROXY 参数来配置代理和 FRP 服务端进行通信。要使用此功能可以通过设置系统环境变量 HTTP_PROXY 或者通过在 FRP 客户端的配置文件中设置 http_proxy 参数来使用此功能。
$ vim frpc.ini

[common]
server_addr = 4.3.2.1
server_port = 7000
protocol = tcp
http_proxy = http://user:pwd@4.3.2.2:8080
仅在
protocol = tcp时生效,暂时不支持 kcp 协议。
安全地暴露内网服务
对于一些比较敏感的服务如果直接暴露于公网上将会存在安全隐患,FRP 也提供了一种安全的转发方式 STCP。使用 STCP (secret tcp) 类型的代理可以避免让任何人都能访问到穿透到公网的内网服务,要使用 STCP 模式访问者需要单独运行另外一个 FRP 客户端。
下面就以创建一个只有自己能访问到的 SSH 服务代理为例,FRP 服务端和其它的部署步骤相同,主要区别是在 FRP 客户端上。
首先配置 FRP 客户端,和常规 TCP 转发不同的是这里不需要指定远程端口。
$ vim frpc.ini
[common]
server_addr = 4.3.2.1
server_port = 7000

[secret_ssh]
type = stcp
# 只有 sk 一致的用户才能访问到此服务
sk = abcdefg
local_ip = 127.0.0.1
local_port = 22
其次在要访问这个服务的机器上启动另外一个 FRP 客户端,配置如下:
$ vim frpc.ini
[common]
server_addr = 4.3.2.1
server_port = 7000

[secret_ssh_visitor]
type = stcp
# STCP 的访问者
role = visitor
# 要访问的 STCP 代理的名字,和前面定义的相同。
server_name = secret_ssh
# 和前面定义的要一致
sk = abcdefg
# 绑定本地端口用于访问 ssh 服务
bind_addr = 127.0.0.1
bind_port = 6005
最后在本机启动一个 FRP 客户端,这样就可以通过本机 6005 端口对内网机器 SSH 服务进行访问,假设用户名为 mike:
$ ./frpc -c ./frpc.ini
2018/01/26 15:03:24 [I] [proxy_manager.go:284] proxy removed: []
2018/01/26 15:03:24 [I] [proxy_manager.go:294] proxy added: []
2018/01/26 15:03:24 [I] [proxy_manager.go:317] visitor removed: []
2018/01/26 15:03:24 [I] [proxy_manager.go:326] visitor added: [secret_ssh_visitor]
2018/01/26 15:03:24 [I] [control.go:240] [60d2af2f68196537] login to server success, get run id [60d2af2f68196537], server udp port [0]
2018/01/26 15:03:24 [I] [proxy_manager.go:235] [60d2af2f68196537] try to start visitor [secret_ssh_visitor]
2018/01/26 15:03:24 [I] [proxy_manager.go:243] [secret_ssh_visitor] start visitor success

$ ssh -oPort=6005 mike@127.0.0.1
点对点内网穿透
在传输大量数据时如果都经过服务器中转的话,这样会对服务器端带宽压力比较大。FRP 提供了一种新的代理类型 XTCP 来解决这个问题,XTCP 模式下可以在传输大量数据时让流量不经过服务器中转。
使用方式同 STCP 类似,需要在传输数据的两端都部署上 FRP 客户端上用于建立直接的连接。
首先在 FRP 服务端配置上增加一个 UDP 端口用于支持该类型的客户端:
$ vim frps.ini
bind_udp_port = 7001
其次配置 FRP 客户端,和常规 TCP 转发不同的是这里不需要指定远程端口。
$ vim frpc.ini

[common]
server_addr = 4.3.2.1
server_port = 7000

[p2p_ssh]
type = xtcp
# 只有 sk 一致的用户才能访问到此服务
sk = abcdefg
local_ip = 127.0.0.1
local_port = 22
然后在要访问这个服务的机器上启动另外一个 FRP 客户端,配置如下:
$ vim frpc.ini
[common]
server_addr = 4.3.2.1
server_port = 7000

[p2p_ssh_visitor]
type = xtcp
# XTCP 的访问者
role = visitor
# 要访问的 XTCP 代理的名字
server_name = p2p_ssh
sk = abcdefg
# 绑定本地端口用于访问 ssh 服务
bind_addr = 127.0.0.1
bind_port = 6006
最后在本机启动一个 FRP 客户端,这样就可以通过本机 6006 端口对内网机器 SSH 服务进行访问,假设用户名为 mike:
$ ./frpc -c ./frpc.ini

2018/01/26 16:01:52 [I] [proxy_manager.go:326] visitor added: [p2p_ssh_visitor secret_ssh_visitor]
2018/01/26 16:01:52 [I] [control.go:240] [7c7e06878e11cc3c] login to server success, get run id [7c7e06878e11cc3c], server udp port [7001]
2018/01/26 16:01:52 [I] [proxy_manager.go:235] [7c7e06878e11cc3c] try to start visitor [p2p_ssh_visitor]
2018/01/26 16:01:52 [I] [proxy_manager.go:243] [p2p_ssh_visitor] start visitor success
2018/01/26 16:01:52 [I] [proxy_manager.go:235] [7c7e06878e11cc3c] try to start visitor [secret_ssh_visitor]
2018/01/26 16:01:52 [I] [proxy_manager.go:243] [secret_ssh_visitor] start visitor success

$ ssh -oPort=6006 mike@127.0.0.1
目前
XTCP模式还处于开发的初级阶段,并不能穿透所有类型的NAT设备,所以穿透成功率较低。穿透失败时可以尝试STCP的方式。
FRP 管理
FRP 的部署安装比较简单,项目官方也没有提供相应的管理脚本。不过好在开源项目总是有网友热心提供部署和管理脚本。如果你觉得手动部署太麻烦,还可以使用下面的一键安装脚本。
项目地址:https://github.com/clangcn/onekey-install-shell/
下载一键部署脚本
$ wget --no-check-certificate https://raw.githubusercontent.com/clangcn/onekey-install-shell/master/frps/install-frps.sh -O ./install-frps.sh
$ chmod 700 ./install-frps.sh
安装 FRP 服务端
这个一键部署脚本比较好用,为了提高国内用户下载安装包速度还提供了阿里云节点的安装源。整个脚本使用起来也比较简单,对一些常用的 FRP 服务端配置参数都做了交互式选择让用户可以方便的根据自己实际情况进行选择。脚本比较贴心的一点是对默认的公网地址进行了检测,省去了手动输入的麻烦。
$ ./install-frps.sh install

Please select frps download url:
[1].aliyun (default)
[2].github
Enter your choice (1, 2 or exit. default [aliyun]):
---------------------------------------
Your select: aliyun
---------------------------------------
Loading network version for frps, please wait...
frps Latest release file frp_0.15.1_linux_amd64.tar.gz
Loading You Server IP, please wait...
You Server IP:12.34.56.78
Please input your server setting:

Please input frps bind_port [1-65535](Default Server Port: 5443):7000
frps bind_port: 7000

Please input frps vhost_http_port [1-65535](Default vhost_http_port: 80):8080
frps vhost_http_port: 8080

Please input frps vhost_https_port [1-65535](Default vhost_https_port: 443):
frps vhost_https_port: 443

Please input frps dashboard_port [1-65535](Default dashboard_port: 6443):7500
frps dashboard_port: 7500

Please input dashboard_user (Default: admin):
frps dashboard_user: admin

Please input dashboard_pwd (Default: IY0p1bOg):admin
frps dashboard_pwd: admin

Please input privilege_token (Default: 9BqswPpd1R0TfGR5):mike
frps privilege_token: mike

Please input frps max_pool_count [1-200]
(Default max_pool_count: 50):
frps max_pool_count: 50

##### Please select log_level #####
1: info (default)
2: warn
3: error
4: debug
#####################################################
Enter your choice (1, 2, 3, 4 or exit. default [1]):
log_level: info

Please input frps log_max_days [1-30]
(Default log_max_days: 3 day):
frps log_max_days: 3

##### Please select log_file #####
1: enable (default)
2: disable
#####################################################
Enter your choice (1, 2 or exit. default [1]):
log_file: enable

##### Please select tcp_mux #####
1: enable (default)
2: disable
#####################################################
Enter your choice (1, 2 or exit. default [1]):
tcp_mux: true

##### Please select kcp support #####
1: enable (default)
2: disable
#####################################################
Enter your choice (1, 2 or exit. default [1]):
kcp support: true

============== Check your input ==============
You Server IP      : 12.34.56.78
Bind port          : 7000
kcp support        : true
vhost http port    : 8080
vhost https port   : 443
Dashboard port     : 7500
Dashboard user     : admin
Dashboard password : admin
Privilege token    : mike
tcp_mux            : true
Max Pool count     : 50
Log level          : info
Log max days       : 3
Log file           : enable
==============================================

Press any key to start...or Press Ctrl+c to cancel

frps install path:/usr/local/frps
config file for frps ... done
download frps ... done
download /etc/init.d/frps... done
setting frps boot... done

+--------------------------------------------------+
|        Manager for Frps, Written by Clang        |
+--------------------------------------------------+
| Intro: http://koolshare.cn/thread-65379-1-1.html |
+--------------------------------------------------+

Starting Frps(0.15.1)... done
Frps (pid 3325)is running.

+---------------------------------------------------------+
|        frps for Linux Server, Written by Clang          |
+---------------------------------------------------------+
|     A tool to auto-compile & install frps on Linux      |
+---------------------------------------------------------+
|    Intro: http://koolshare.cn/thread-65379-1-1.html     |
+---------------------------------------------------------+

Congratulations, frps install completed!
==============================================
You Server IP      : 12.34.56.78
Bind port          : 7000
KCP support        : true
vhost http port    : 8080
vhost https port   : 443
Dashboard port     : 7500
Privilege token    : mike
tcp_mux            : true
Max Pool count     : 50
Log level          : info
Log max days       : 3
Log file           : enable
==============================================
frps Dashboard     : http://12.34.56.78:7500/
Dashboard user     : admin
Dashboard password : admin
==============================================
配置 FRP 服务端
$ ./install-frps.sh config更新 FRP 服务端
$ ./install-frps.sh update卸载 FRP 服务端
$ ./install-frps.sh uninstallFRP 服务端日常管理
FRP 服务端安装完成后,一键部署脚本还提供了一个日常管理 FRP 服务端的管理脚本来进行日常的启动、重启、停止等操作,非常的方便。
Usage: /etc/init.d/frps {start|stop|restart|status|config|version}
五种永久免费 内网穿透傻瓜式使用
:https://www.cnblogs.com/liyangit-bky/articles/13993007.html
免费的内网穿透
From:https://zhuanlan.zhihu.com/p/339923535
不想付费,又想用大于两个映射,那么花生壳 + NATAPP 也许是一个不错的选择。
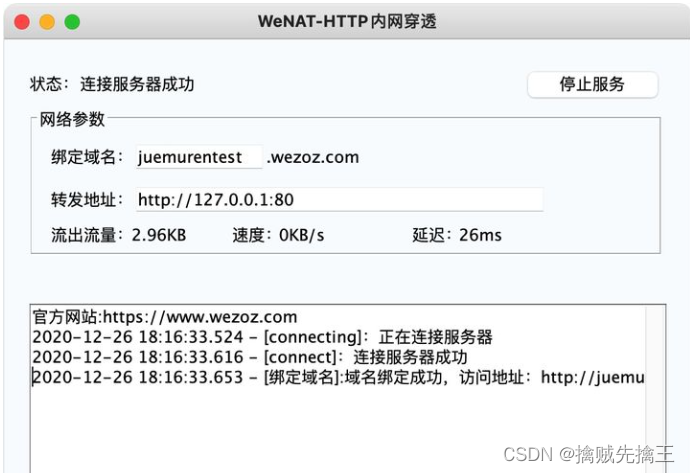
1、WeNAT
优点:
- 无需付费
- 无需注册
- 不限流量
- 开箱即用
官网:https://www.wezoz.com (目前暂时关闭,但不影响内网穿透。)
客户端下载:wenat-client.jar
使用方法:
- 需要安装 Java 环境,可访问 https://www.java.com/zh-CN/download 进行下载安装。
- 打开 WeNAT 客户端,输入域名,设置转发地址。
- 点击启动服务即可。
2、花生壳
优点:
- 赠送一个域名
- 免费两个映射
- 每月免费 1G 流量
客户端下载:https://hsk.oray.com/download
使用方法:
- 注册账号
- 下载并登陆客户端
- 新建映射并保存
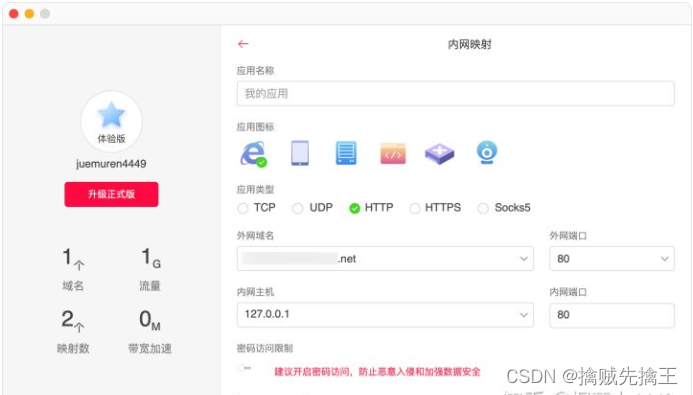
注意事项:
- 如果使用 HTTP 映射需要支付 6 元购买 HTTP 网站认证
- 免费账户无法使用 HTTPS 映射
- 免费账户的映射带宽为 1M
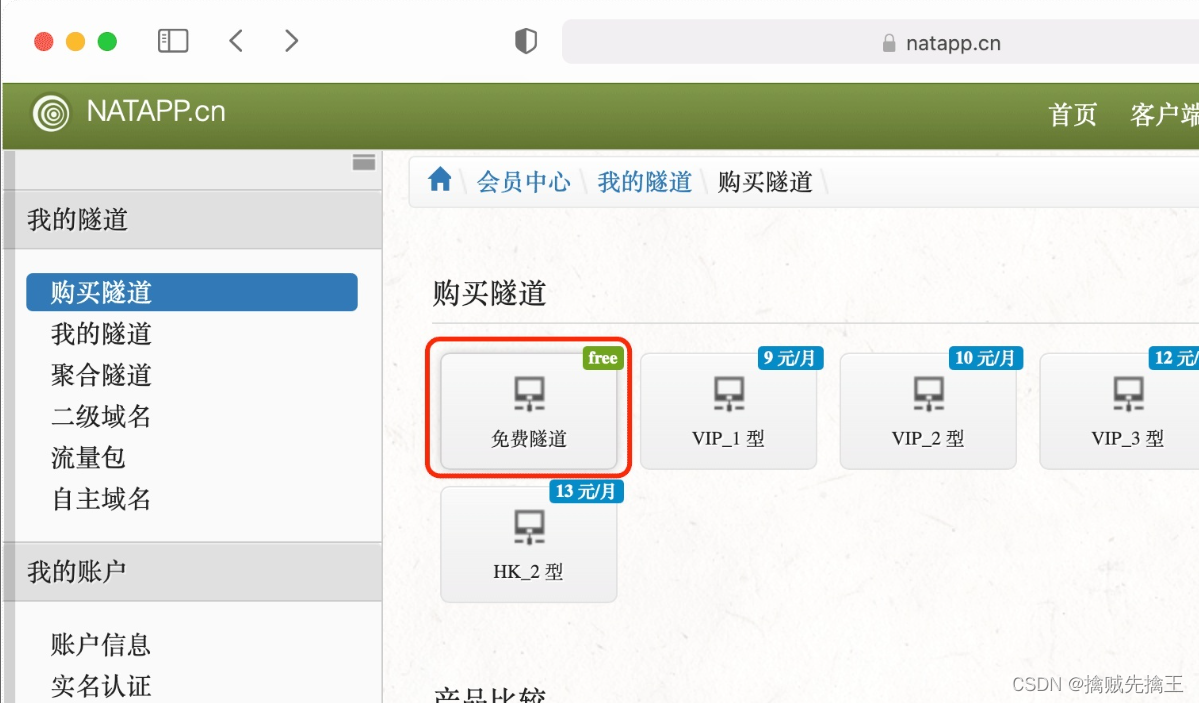
3、NATAPP
优点:
- 最多两条免费隧道
- 可以通过管理后台查看每次请求的具体信息
缺点:
- 客户端不是图形化界面
- 免费隧道会不定时强制更换域名
客户端下载:https://natapp.cn/#
使用方法:
- 进入「购买隧道」页面,购买免费隧道。
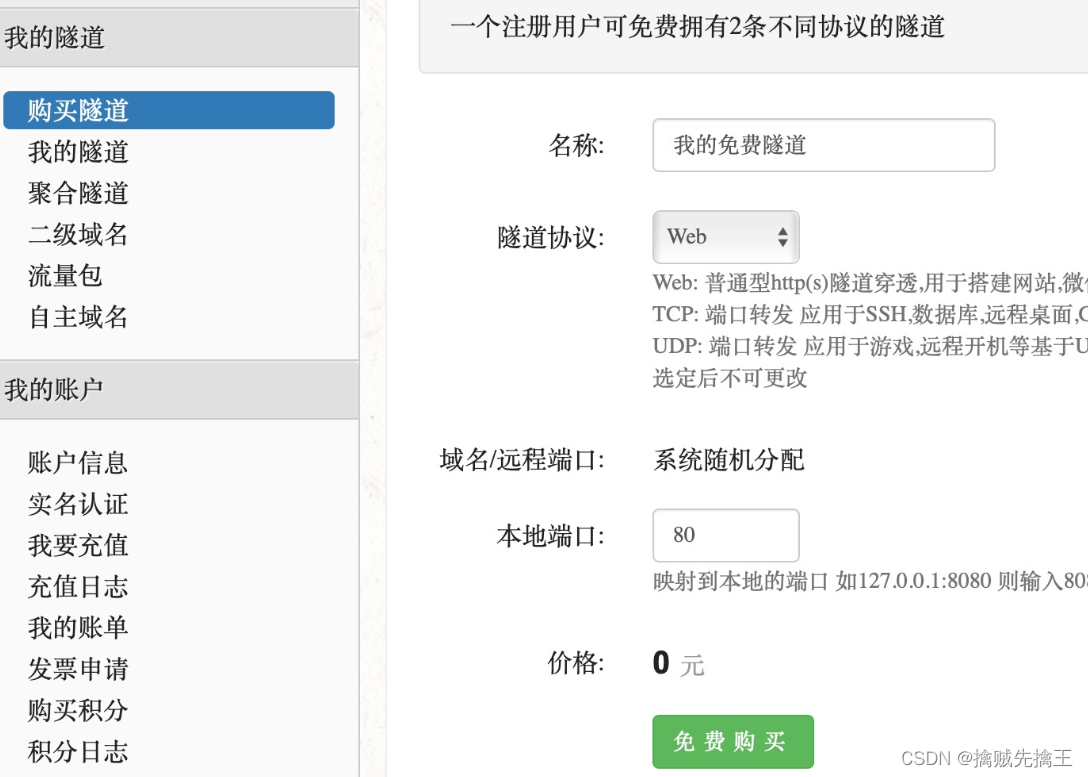
- 进入隧道配置,设置本地地址和端口
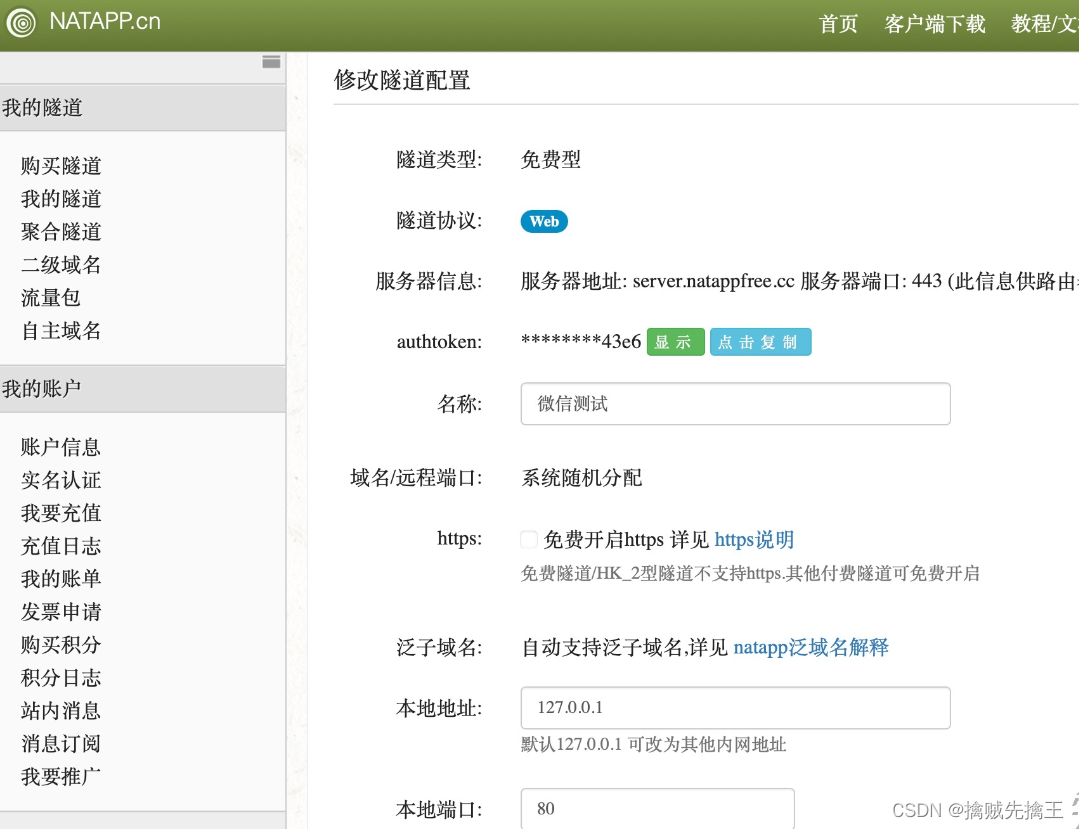
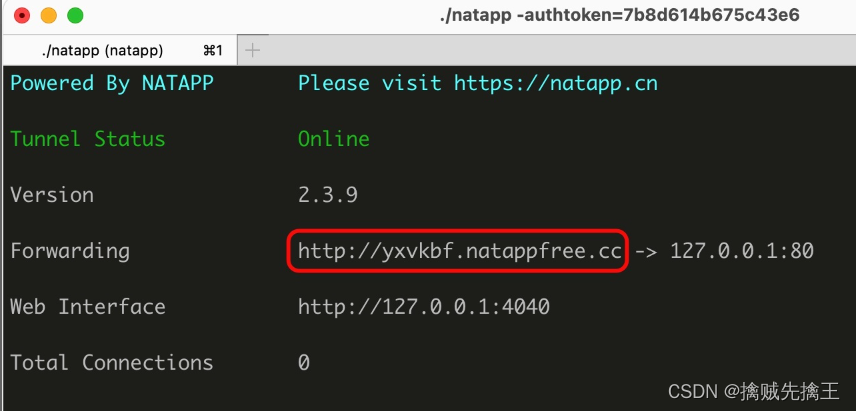
- 查看 authtoken

- 在终端执行 ./natapp -authtoken=上面查看到的 authtoken,然后访问圈住的链接即可。


 773
773


 被折叠的 条评论
为什么被折叠?
被折叠的 条评论
为什么被折叠?
 到【灌水乐园】发言


