


1)为什么使用DLL文件
C语言复用代码有很多的形式,利用动态链接库(DLL)来复用代码也是一种很有效的做法。使用DLL相比利用静态库来复用代码有几点不同:
a. 可以不用写 header File,但是在编译过程中需要在编译器里把文件链接起来;
b. 更加灵活,可以只改动和编译DLL文件的内容,而不用对程序其他部分进行修改;
c. 利用DLL文件可以方便地与其他语言进行链接(比如Python)。
2)创建DLL及C语言调用程序
目前看来,创建 DLL 文件和创建普通c语言文件没有什么不同。创建 C++ 的 DLL 文件要更复杂一些,C 则相对简单。照着 C 代码的格式写一个文件(注:C++ 似乎会不同,微软就有教程,可以查阅VS的帮助文档)。
以下是一个实例,文件名为 TestDll.c
3)编译及运行
测试使用的是 MinGW 下的 gcc 编译器。
a. 编译 DLL 文件
先将 c 文件编译成 o 文件,然后再讲 o 文件编译成为 DLL 文件,在 cmd 里面代码如下:
gcc -c TestDLL.c
gcc -shared -o TestDll.dll TestDll.o
这样就得到了 TestDll.dll 文件,如果文件多的话可以写个Batch文件来搞定。
b. 编译使用文件
gcc -o UseTestDll UseTestDll.c -L./ -lTestDll
这样就得到了 UseTestDll.exe 文件。UseTestDll.exe 和 TestDll.dll 形成了程序的两个部分,缺一不可。
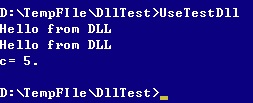
运行一下:
4)在Python中使用已有的Dll文件
DLL文件一样可以在Python中使用。我们可以利用python自带的ctypes模块(python2.5后自带,之前得自己再去下,不过现在也没有人用2.5之前的了吧)。下面是一个示例文件,文件名为UseCDll.py
c_int() 在python下创建c的int类型对象,因为python的数据类型和c的数据类型需要转换
CDLL() 读入DLL文件,并将其转化为一个对象,利用 对象.函数 的形式调用DLL里面的函数
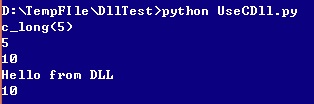
运行一下:
成功实现了在Python下使用DLL文件,这种方法可以减少代码重复开发,同时由于C的速度比Python大很多,还可以用这个方法对Python进行加速。
5)APPENDIX
关于gcc编译命令的一些说明,来自gcc官方文档。
-shared
Produce a shared object which can then be linked with other objects to form an executable. Not all systems support this option. For predictable results, you must also specify the same set of options used for compilation (‘-fpic’, '-fPIC’, or model suboptions) when you specify this linker option.1
1 On some systems, ‘gcc -shared’ needs to build supplementary stub code for constructors to work. On
multi-libbed systems, ‘gcc -shared’ must select the correct support libraries to link against. Failing to
supply the correct flags may lead to subtle defects. Supplying them in cases where they are not necessary
is innocuous
-Ldir
Add directory dir to the list of directories to be searched for ‘-l’.
-o file
Write output to file. This is the same as specifying file as the second non-option argument to cpp. gcc has a different interpretation of a second non-option argument, so you must use ‘-o’ to specify the output file.
-c
Compile or assemble the source files, but do not link. The linking stage simplyis not done. The ultimate output is in the form of an object file for each source file. By default, the object file name for a source file is made by replacing the suffix ‘.c’, ‘.i’, ‘.s’, etc., with ‘.o’.
Unrecognized input files, not requiring compilation or assembly, are ignored.
-llibrary
-l library
Search the library named library when linking. (The second alternative with the library as a separate argument is only for POSIX compliance and is not recommended.) It makes a difference where in the command you write this option; the linker searches and processes libraries and object files in the order they are specified. Thus, ‘foo.o -lz bar.o’ searches library ‘z’ after file ‘foo.o’ but before
‘bar.o’. If ‘bar.o’ refers to functions in ‘z’, those functions may not be loaded. The linker searches a standard list of directories for the library, which is actually a file named ‘liblibrary.a’. The linker then uses this file as if it had been specified precisely by name.
The directories searched include several standard system directories plus any that you specify with ‘-L’.
Normally the files found this way are library files—archive files whose members are object files. The linker handles an archive file by scanning through it for members which define symbols that have so far been referenced but not defined.
But if the file that is found is an ordinary object file, it is linked in the usual fashion. The only difference between using an ‘-l’ option and specifying a file name is that ‘-l’ surrounds library with ‘lib’ and ‘.a’ and searches several directories.
C语言复用代码有很多的形式,利用动态链接库(DLL)来复用代码也是一种很有效的做法。使用DLL相比利用静态库来复用代码有几点不同:
a. 可以不用写 header File,但是在编译过程中需要在编译器里把文件链接起来;
b. 更加灵活,可以只改动和编译DLL文件的内容,而不用对程序其他部分进行修改;
c. 利用DLL文件可以方便地与其他语言进行链接(比如Python)。
2)创建DLL及C语言调用程序
目前看来,创建 DLL 文件和创建普通c语言文件没有什么不同。创建 C++ 的 DLL 文件要更复杂一些,C 则相对简单。照着 C 代码的格式写一个文件(注:C++ 似乎会不同,微软就有教程,可以查阅VS的帮助文档)。
以下是一个实例,文件名为 TestDll.c
//TestDll.c

#include <</font>stdio.h>

int hello()
{
    printf ("Hello from DLL\n");
}

int SumNumbers(int a, int b)
{
    int c;
    c=a+b;
    return c;
}
//UseTestDLL.c

#include <</font>stdio.h>

int main()
{
    hello();
    hello();
    int a=2,b=3;
    int c;
    c=SumNumbers(a, b);
    printf ("c= %d.\n",c);
}3)编译及运行
测试使用的是 MinGW 下的 gcc 编译器。
a. 编译 DLL 文件
先将 c 文件编译成 o 文件,然后再讲 o 文件编译成为 DLL 文件,在 cmd 里面代码如下:
gcc -c TestDLL.c
gcc -shared -o TestDll.dll TestDll.o
这样就得到了 TestDll.dll 文件,如果文件多的话可以写个Batch文件来搞定。
b. 编译使用文件
gcc -o UseTestDll UseTestDll.c -L./ -lTestDll
这样就得到了 UseTestDll.exe 文件。UseTestDll.exe 和 TestDll.dll 形成了程序的两个部分,缺一不可。
运行一下:
4)在Python中使用已有的Dll文件
DLL文件一样可以在Python中使用。我们可以利用python自带的ctypes模块(python2.5后自带,之前得自己再去下,不过现在也没有人用2.5之前的了吧)。下面是一个示例文件,文件名为UseCDll.py
from ctypes import *

# Simple Test on c_int object
i=c_int(5)
print i
print i.value
i.value=10
print i.value

# Import Dll
TestDll=CDLL('TestDll.dll')

# Test Print Function
TestDll.hello()

# Test variable dilivery
a=c_int(4)
b=c_int(6)
c=TestDll.SumNumbers(a,b)
print cc_int() 在python下创建c的int类型对象,因为python的数据类型和c的数据类型需要转换
CDLL() 读入DLL文件,并将其转化为一个对象,利用 对象.函数 的形式调用DLL里面的函数
运行一下:
成功实现了在Python下使用DLL文件,这种方法可以减少代码重复开发,同时由于C的速度比Python大很多,还可以用这个方法对Python进行加速。
5)APPENDIX
关于gcc编译命令的一些说明,来自gcc官方文档。
-shared
Produce a shared object which can then be linked with other objects to form an executable. Not all systems support this option. For predictable results, you must also specify the same set of options used for compilation (‘-fpic’, '-fPIC’, or model suboptions) when you specify this linker option.1
1 On some systems, ‘gcc -shared’ needs to build supplementary stub code for constructors to work. On
multi-libbed systems, ‘gcc -shared’ must select the correct support libraries to link against. Failing to
supply the correct flags may lead to subtle defects. Supplying them in cases where they are not necessary
is innocuous
-Ldir
Add directory dir to the list of directories to be searched for ‘-l’.
-o file
Write output to file. This is the same as specifying file as the second non-option argument to cpp. gcc has a different interpretation of a second non-option argument, so you must use ‘-o’ to specify the output file.
-c
Compile or assemble the source files, but do not link. The linking stage simplyis not done. The ultimate output is in the form of an object file for each source file. By default, the object file name for a source file is made by replacing the suffix ‘.c’, ‘.i’, ‘.s’, etc., with ‘.o’.
Unrecognized input files, not requiring compilation or assembly, are ignored.
-llibrary
-l library
Search the library named library when linking. (The second alternative with the library as a separate argument is only for POSIX compliance and is not recommended.) It makes a difference where in the command you write this option; the linker searches and processes libraries and object files in the order they are specified. Thus, ‘foo.o -lz bar.o’ searches library ‘z’ after file ‘foo.o’ but before
‘bar.o’. If ‘bar.o’ refers to functions in ‘z’, those functions may not be loaded. The linker searches a standard list of directories for the library, which is actually a file named ‘liblibrary.a’. The linker then uses this file as if it had been specified precisely by name.
The directories searched include several standard system directories plus any that you specify with ‘-L’.
Normally the files found this way are library files—archive files whose members are object files. The linker handles an archive file by scanning through it for members which define symbols that have so far been referenced but not defined.
But if the file that is found is an ordinary object file, it is linked in the usual fashion. The only difference between using an ‘-l’ option and specifying a file name is that ‘-l’ surrounds library with ‘lib’ and ‘.a’ and searches several directories.


 1068
1068

 被折叠的 条评论
为什么被折叠?
被折叠的 条评论
为什么被折叠?
 到【灌水乐园】发言


