


我们可能或多或少都对python虚拟机有过一些想象,它其实和CPU执行高级语言编译的机器指令的过程非常类似,python虚拟机是一个软CPU,python代码就是源代码,在执行时python编译器把源代码编译为字节码,再由虚拟机一条一条执行,这个字节码就非常类似硬件上的汇编语言,那么python中同样有编译后的字节码文件,这个文件就是pyc文件。
PyCodeObject对象
python中的字节码对象对应的就是PyCodeObject对象,pyc文件的主要内容也是这个PyCodeObject对象,这个PyCodeObject对象就是python源码的编译结果,那么PyCodeObject中都有哪些内容呢?在Include/cpython/code.h文件中,可以看到PyCodeObject的定义:
// To avoid repeating ourselves in deepfreeze.py, all PyCodeObject members are
// defined in this macro:
#define _PyCode_DEF(SIZE) {                                                    \
    PyObject_VAR_HEAD                                                          \
                                                                               \
    /* Note only the following fields are used in hash and/or comparisons      \
     *                                                                         \
     * - co_name                                                               \
     * - co_argcount                                                           \
     * - co_posonlyargcount                                                    \
     * - co_kwonlyargcount                                                     \
     * - co_nlocals                                                            \
     * - co_stacksize                                                          \
     * - co_flags                                                              \
     * - co_firstlineno                                                        \
     * - co_consts                                                             \
     * - co_names                                                              \
     * - co_localsplusnames                                                    \
     * This is done to preserve the name and line number for tracebacks        \
     * and debuggers; otherwise, constant de-duplication would collapse        \
     * identical functions/lambdas defined on different lines.                 \
     */                                                                        \
                                                                               \
    /* These fields are set with provided values on new code objects. */       \
                                                                               \
    /* The hottest fields (in the eval loop) are grouped here at the top. */   \
    PyObject *co_consts;           /* list (constants used) */                 \
    PyObject *co_names;            /* list of strings (names used) */          \
    PyObject *co_exceptiontable;   /* Byte string encoding exception handling  \
                                      table */                                 \
    int co_flags;                  /* CO_..., see below */                     \
                                                                               \
    /* The rest are not so impactful on performance. */                        \
    int co_argcount;              /* #arguments, except *args */               \
    int co_posonlyargcount;       /* #positional only arguments */             \
    int co_kwonlyargcount;        /* #keyword only arguments */                \
    int co_stacksize;             /* #entries needed for evaluation stack */   \
    int co_firstlineno;           /* first source line number */               \
                                                                               \
    /* redundant values (derived from co_localsplusnames and                   \
       co_localspluskinds) */                                                  \
    int co_nlocalsplus;           /* number of local + cell + free variables */ \
    int co_framesize;             /* Size of frame in words */                 \
    int co_nlocals;               /* number of local variables */              \
    int co_ncellvars;             /* total number of cell variables */         \
    int co_nfreevars;             /* number of free variables */               \
    uint32_t co_version;          /* version number */                         \
                                                                               \
    PyObject *co_localsplusnames; /* tuple mapping offsets to names */         \
    PyObject *co_localspluskinds; /* Bytes mapping to local kinds (one byte    \
                                     per variable) */                          \
    PyObject *co_filename;        /* unicode (where it was loaded from) */     \
    PyObject *co_name;            /* unicode (name, for reference) */          \
    PyObject *co_qualname;        /* unicode (qualname, for reference) */      \
    PyObject *co_linetable;       /* bytes object that holds location info */  \
    PyObject *co_weakreflist;     /* to support weakrefs to code objects */    \
    _PyExecutorArray *co_executors;      /* executors from optimizer */        \
    _PyCoCached *_co_cached;      /* cached co_* attributes */                 \
    uintptr_t _co_instrumentation_version; /* current instrumentation version */ \
    _PyCoMonitoringData *_co_monitoring; /* Monitoring data */                 \
    int _co_firsttraceable;       /* index of first traceable instruction */   \
    /* Scratch space for extra data relating to the code object.               \
       Type is a void* to keep the format private in codeobject.c to force     \
       people to go through the proper APIs. */                                \
    void *co_extra;                                                            \
    char co_code_adaptive[(SIZE)];                                             \
}

/* Bytecode object */
struct PyCodeObject _PyCode_DEF(1);
PyCodeObject各个字段的含义可以从注释中看个大概,本章重要聚焦在pyc文件是怎么来的这个问题上。同时呢,有一个可以访问这些字段的方法,那就是通过Python中的compile内建函数获得一个code对象,通过code对象可以访问这些域,如下,可以参考《Python源码剖析》中的例子做一样的实验:
Python 3.12.3 (main, Feb  4 2025, 14:48:35) [GCC 13.3.0] on linux
Type "help", "copyright", "credits" or "license" for more information.
>>> source = open('demo.py').read()
>>> co = compile(source, 'demo.py', 'exec')
>>> type(co)
<class 'code'>
>>> dir(co)
['__class__', '__delattr__', '__dir__', '__doc__', '__eq__', '__format__', '__ge__', '__getattribute__', '__getstate__', '__gt__', '__hash__', '__init__', '__init_subclass__', '__le__', '__lt__', '__ne__', '__new__', '__reduce__', '__reduce_ex__', '__repr__', '__setattr__', '__sizeof__', '__str__', '__subclasshook__', '_co_code_adaptive', '_varname_from_oparg', 'co_argcount', 'co_cellvars', 'co_code', 'co_consts', 'co_exceptiontable', 'co_filename', 'co_firstlineno', 'co_flags', 'co_freevars', 'co_kwonlyargcount', 'co_lines', 'co_linetable', 'co_lnotab', 'co_name', 'co_names', 'co_nlocals', 'co_positions', 'co_posonlyargcount', 'co_qualname', 'co_stacksize', 'co_varnames', 'replace']
>>> co.co_names
('A', 'Fun', 'a')
>>> co.co_name
'<module>'
>>> co.co_filename
'demo.py'
>>>
demo.py的文件内容如下:
class A:
    pass

def Fun():
    pass

a = A()
Fun()
寻找触发pyc的线索
以上是对python编译过程和python的pyc文件的主要内容PyCodeObject对象的简单了解。通过进一步阅读,我了解到pyc文件实际上由magic_number,创建pyc的时间和PyCodeObject对象组成,而写入PyCodeObject对象的过程其实就是marshal序列化过程,关于这一点python3和python2中有没有差别?我需要一个验证。
生成pyc有很多种方法,比如import方法,py_compile方法等,这里我选择从py_compile方法切入。py_compile是python的标准库模块,其中只有一个方法compile,它包装了内置的compile方法,使用py_compile.compile()方法可以得到一个pyc文件,那么可以想象,py_compile.compile()就是执行了编译加存储两个过程,跟随陈儒大大的脚步,这里同样跳过编译过程,重点关注在存储过程,如下为compile方法的代码:
def compile(file, cfile=None, dfile=None, doraise=False, optimize=-1,
            invalidation_mode=None, quiet=0):
    """Byte-compile one Python source file to Python bytecode.

    :param file: The source file name.
    :param cfile: The target byte compiled file name.  When not given, this
        defaults to the PEP 3147/PEP 488 location.
    :param dfile: Purported file name, i.e. the file name that shows up in
        error messages.  Defaults to the source file name.
    :param doraise: Flag indicating whether or not an exception should be
        raised when a compile error is found.  If an exception occurs and this
        flag is set to False, a string indicating the nature of the exception
        will be printed, and the function will return to the caller. If an
        exception occurs and this flag is set to True, a PyCompileError
        exception will be raised.
    :param optimize: The optimization level for the compiler.  Valid values
        are -1, 0, 1 and 2.  A value of -1 means to use the optimization
        level of the current interpreter, as given by -O command line options.
    :param invalidation_mode:
    :param quiet: Return full output with False or 0, errors only with 1,
        and no output with 2.

    :return: Path to the resulting byte compiled file.

    Note that it isn't necessary to byte-compile Python modules for
    execution efficiency -- Python itself byte-compiles a module when
    it is loaded, and if it can, writes out the bytecode to the
    corresponding .pyc file.

    However, if a Python installation is shared between users, it is a
    good idea to byte-compile all modules upon installation, since
    other users may not be able to write in the source directories,
    and thus they won't be able to write the .pyc file, and then
    they would be byte-compiling every module each time it is loaded.
    This can slow down program start-up considerably.

    See compileall.py for a script/module that uses this module to
    byte-compile all installed files (or all files in selected
    directories).

    Do note that FileExistsError is raised if cfile ends up pointing at a
    non-regular file or symlink. Because the compilation uses a file renaming,
    the resulting file would be regular and thus not the same type of file as
    it was previously.
    """
    if invalidation_mode is None:
        invalidation_mode = _get_default_invalidation_mode()
    if cfile is None:
        if optimize >= 0:
            optimization = optimize if optimize >= 1 else ''
            cfile = importlib.util.cache_from_source(file,
                                                     optimization=optimization)
        else:
            cfile = importlib.util.cache_from_source(file)
    if os.path.islink(cfile):
        msg = ('{} is a symlink and will be changed into a regular file if '
               'import writes a byte-compiled file to it')
        raise FileExistsError(msg.format(cfile))
    elif os.path.exists(cfile) and not os.path.isfile(cfile):
        msg = ('{} is a non-regular file and will be changed into a regular '
               'one if import writes a byte-compiled file to it')
        raise FileExistsError(msg.format(cfile))
    loader = importlib.machinery.SourceFileLoader('<py_compile>', file)
    source_bytes = loader.get_data(file)
    try:
        code = loader.source_to_code(source_bytes, dfile or file,
                                     _optimize=optimize)
    except Exception as err:
        py_exc = PyCompileError(err.__class__, err, dfile or file)
        if quiet < 2:
            if doraise:
                raise py_exc
            else:
                sys.stderr.write(py_exc.msg + '\n')
        return
    try:
        dirname = os.path.dirname(cfile)
        if dirname:
            os.makedirs(dirname)
    except FileExistsError:
        pass
    if invalidation_mode == PycInvalidationMode.TIMESTAMP:
        source_stats = loader.path_stats(file)
        bytecode = importlib._bootstrap_external._code_to_timestamp_pyc(
            code, source_stats['mtime'], source_stats['size'])
    else:
        source_hash = importlib.util.source_hash(source_bytes)
        bytecode = importlib._bootstrap_external._code_to_hash_pyc(
            code,
            source_hash,
            (invalidation_mode == PycInvalidationMode.CHECKED_HASH),
        )
    mode = importlib._bootstrap_external._calc_mode(file)
    importlib._bootstrap_external._write_atomic(cfile, bytecode, mode)
    return cfile
大致浏览一下py_compile.compile()的代码,可以看到其中编译过程已经在loader.source_to_code完成了,经过编译得到了一个code对象,而写入过程在下面的if-else分支中,if-else分支判断是以timestamp还是hash的校验方式写入,这里直接跟随timestamp分支深入走读。来到importlib/_bootstrap_external.py中,在这里就可以清晰看到_code_to_timestamp_pyc函数了,如下所示:
def _code_to_timestamp_pyc(code, mtime=0, source_size=0):
    "Produce the data for a timestamp-based pyc."
    data = bytearray(MAGIC_NUMBER)
    data.extend(_pack_uint32(0))
    data.extend(_pack_uint32(mtime))
    data.extend(_pack_uint32(source_size))
    data.extend(marshal.dumps(code))
    return data
真相大白了,写入code果然是一个marshal序列化过程,而在写入code对象之前还写入了一些头部字段,python3中写入了四个头部字段MAGIC_NUMBER+0+时间戳+源文件大小+code对象,每个字段占用4字节,头部字段共占用了16字节的大小,后面就是code对象。
marshal序列化过程
线索找到了,下面该进入到marshal.dumps方法中了,也就是该到cpython中了,那么cpython中的marshal.dumps方法又在哪里呢?不知道,经过一番搜寻,我找到了marshal模块所有方法定义的地方,在Python/marshal.c文件中:
static PyMethodDef marshal_methods[] = {
    MARSHAL_DUMP_METHODDEF
    MARSHAL_LOAD_METHODDEF
    MARSHAL_DUMPS_METHODDEF
    MARSHAL_LOADS_METHODDEF
    {NULL,              NULL}           /* sentinel */
};
我觉得可以相信,这里所定义的marshal四个方法,就对应python的marshal模块中的四个方法,因为方法名字也对应的上。但是这里如果有人问我怎么找到这个代码的?我只能说,很抱歉,写下这个文字的时候,我也不记得了,可能有时候看源码就是一顿胡乱搜的过程。。。但是没关系,可以发现这个PyMethodDef很可能是一个通用对象,其关联的还有PyModuleDef,这可能对以后有帮助。
既然找到了,那么就来迫不及待的揭开它的面纱,让我也来一睹芳容。往下跟进,代码调用来到了_PyMarshal_WriteObjectToString函数中,同样是在Python/marshal.c文件中,如下:
static PyObject *
_PyMarshal_WriteObjectToString(PyObject *x, int version, int allow_code)
{
    WFILE wf;

    if (PySys_Audit("marshal.dumps", "Oi", x, version) < 0) {
        return NULL;
    }
    memset(&wf, 0, sizeof(wf));
    wf.str = PyBytes_FromStringAndSize((char *)NULL, 50);
    if (wf.str == NULL)
        return NULL;
    wf.ptr = wf.buf = PyBytes_AS_STRING(wf.str);
    wf.end = wf.ptr + PyBytes_GET_SIZE(wf.str);
    wf.error = WFERR_OK;
    wf.version = version;
    wf.allow_code = allow_code;
    if (w_init_refs(&wf, version)) {
        Py_DECREF(wf.str);
        return NULL;
    }
    w_object(x, &wf);
    w_clear_refs(&wf);
    if (wf.str != NULL) {
        const char *base = PyBytes_AS_STRING(wf.str);
        if (_PyBytes_Resize(&wf.str, (Py_ssize_t)(wf.ptr - base)) < 0)
            return NULL;
    }
    if (wf.error != WFERR_OK) {
        Py_XDECREF(wf.str);
        switch (wf.error) {
        case WFERR_NOMEMORY:
            PyErr_NoMemory();
            break;
        case WFERR_NESTEDTOODEEP:
            PyErr_SetString(PyExc_ValueError,
                            "object too deeply nested to marshal");
            break;
        case WFERR_CODE_NOT_ALLOWED:
            PyErr_SetString(PyExc_ValueError,
                            "marshalling code objects is disallowed");
            break;
        default:
        case WFERR_UNMARSHALLABLE:
            PyErr_SetString(PyExc_ValueError,
                            "unmarshallable object");
            break;
        }
        return NULL;
    }
    return wf.str;
}
代码并不长,但是其中的主过程在于w_object函数中,w_object函数执行了code对象的序列化过程,而写入的目的对象则是一个WFILE对象wf,w_object的代码也不长,如下:
static void
w_object(PyObject *v, WFILE *p)
{
    char flag = '\0';

    p->depth++;

    if (p->depth > MAX_MARSHAL_STACK_DEPTH) {
        p->error = WFERR_NESTEDTOODEEP;
    }
    else if (v == NULL) {
        w_byte(TYPE_NULL, p);
    }
    else if (v == Py_None) {
        w_byte(TYPE_NONE, p);
    }
    else if (v == PyExc_StopIteration) {
        w_byte(TYPE_STOPITER, p);
    }
    else if (v == Py_Ellipsis) {
        w_byte(TYPE_ELLIPSIS, p);
    }
    else if (v == Py_False) {
        w_byte(TYPE_FALSE, p);
    }
    else if (v == Py_True) {
        w_byte(TYPE_TRUE, p);
    }
    else if (!w_ref(v, &flag, p))
        w_complex_object(v, flag, p);

    p->depth--;
}
w_object的逻辑很简单,如果是简单对象就直接调用w_byte写入,否则就使用w_complex_object写入,再往下深入,w_complex_object函数就比较长了,但是它的结构也很明了,就是if-else-if结构,根据不同的类型做相应的序列化操作。
关于marshal模块这里还想插一句,marshal是python内部用来序列化的模块,古老而且还有安全漏洞,但是想要弄懂pyc中都写了些什么,我们不得不去研究这个marshal模块,在python2中,marshal模块的关键在于字符串的写入,对于字符串对象使用了引用机制,也就是说相同的字符串对象在字节码文件中只存一份,其它地方存的是它的引用,在python3中,marshal模块同样也有很大变化,这种引用机制扩展到了所有对象,而不只是字符串对象,下面来具体捋顺一下这个逻辑。
大致浏览一下w_complex_object,可以发现每个ifelse分支中与正常的序列化逻辑并无多大差别,都是先使用W_TYPE写入对象标志,再写入具体数据,仔细去看写入字符串的分支,代码如下:
......
else if (PyUnicode_CheckExact(v)) {
        if (p->version >= 4 && PyUnicode_IS_ASCII(v)) {
            int is_short = PyUnicode_GET_LENGTH(v) < 256;
            if (is_short) {
                if (PyUnicode_CHECK_INTERNED(v))
                    W_TYPE(TYPE_SHORT_ASCII_INTERNED, p);
                else
                    W_TYPE(TYPE_SHORT_ASCII, p);
                w_short_pstring(PyUnicode_1BYTE_DATA(v),
                                PyUnicode_GET_LENGTH(v), p);
            }
            else {
                if (PyUnicode_CHECK_INTERNED(v))
                    W_TYPE(TYPE_ASCII_INTERNED, p);
                else
                    W_TYPE(TYPE_ASCII, p);
                w_pstring(PyUnicode_1BYTE_DATA(v),
                          PyUnicode_GET_LENGTH(v), p);
            }
        }
        else {
            PyObject *utf8;
            utf8 = PyUnicode_AsEncodedString(v, "utf8", "surrogatepass");
            if (utf8 == NULL) {
                p->depth--;
                p->error = WFERR_UNMARSHALLABLE;
                return;
            }
            if (p->version >= 3 &&  PyUnicode_CHECK_INTERNED(v))
                W_TYPE(TYPE_INTERNED, p);
            else
                W_TYPE(TYPE_UNICODE, p);
            w_pstring(PyBytes_AS_STRING(utf8), PyBytes_GET_SIZE(utf8), p);
            Py_DECREF(utf8);
        }
    }
......
也并无多大不同,都是在标志位后写入字符串数据,intern和非intern字符串对象的区别也只是标志位不同,仿佛引用机制失效了一样,但是奥秘不在这里,回到w_object函数中来仔细观察这个w_ref函数。w_ref传了三个参数,待写入的对象v,flag,WFILE指针p,在w_ref函数中对待写入的对象进行了缓存和校验,使用了内置的hash_table对象,如果待写入的对象已经在hash_table中,则写入引用标志位TYPE_REF,然后写入引用索引,引用索引就是引入的对象在序列化数据中出现的顺序号,w_ref的具体代码如下:
static int
w_ref(PyObject *v, char *flag, WFILE *p)
{
    _Py_hashtable_entry_t *entry;
    int w;

    if (p->version < 3 || p->hashtable == NULL)
        return 0; /* not writing object references */

    /* If it has only one reference, it definitely isn't shared.
     * But we use TYPE_REF always for interned string, to PYC file stable
     * as possible.
     */
    if (Py_REFCNT(v) == 1 &&
            !(PyUnicode_CheckExact(v) && PyUnicode_CHECK_INTERNED(v))) {
        return 0;
    }

    entry = _Py_hashtable_get_entry(p->hashtable, v);
    if (entry != NULL) {
        /* write the reference index to the stream */
        w = (int)(uintptr_t)entry->value;
        /* we don't store "long" indices in the dict */
        assert(0 <= w && w <= 0x7fffffff);
        w_byte(TYPE_REF, p);
        w_long(w, p);
        return 1;
    } else {
        size_t s = p->hashtable->nentries;
        /* we don't support long indices */
        if (s >= 0x7fffffff) {
            PyErr_SetString(PyExc_ValueError, "too many objects");
            goto err;
        }
        w = (int)s;
        if (_Py_hashtable_set(p->hashtable, Py_NewRef(v),
                              (void *)(uintptr_t)w) < 0) {
            Py_DECREF(v);
            goto err;
        }
        *flag |= FLAG_REF;
        return 0;
    }
err:
    p->error = WFERR_UNMARSHALLABLE;
    return 1;
}
在entry != NULL的分支,也就是说待写入的对象已经在hash_table中的话,就进行引用写入的操作,并返回1,外层循环就会跳过w_complex_object函数,进行下一个域的写入,如果entry == NULL的话,操作也很明了,就是调用_Py_hashtable_set把待写入的对象加入到hash_table中,随后返回0,外层循环就会调用w_complex_object函数去写入具体的数据。
这样一来,在写入过程中,每个对象都要经过w_ref函数,如果没有在hash_table中的话,则在hash_table中缓存该对象,相同的对象在下一次时就会在hash_table中找到,从而就可以直接写入引用了,这样就节省了对象重复写入所占用的内存。
对于字符串来说,这里的intern标志可能更多标识的是它的生命周期属性,至于intern的共享属性则已经依靠marshal的引用机制实现了。在看字节码文件时,就可以把精力放到对象的类型和数据上,而不用放在复杂的共享机制上了。
PyCodeObject的嵌套
在python中,每进入一个新的名字空间,都算是进入了一个新的Code Block,随之都有一个PyCodeObject对象与之对应,那么回顾前述的demo.py文件,它编译完成的结果有三个PyCodeObject对象,也就是模块级别的一个PyCodeObject,class A级别的一个PyCodeObject,和Fun级别的一个PyCodeObject,在进行序列化的时候,看到的只有一个最顶级的code对象,那么另外两个code对象在哪里呢?在《python源码剖析》的描述中,它们应该在顶级code对象的co_consts字段中,这里我们可以进行验证,结果是和书中一致的。使用前述的访问code对象的技巧,可以看到藏身于co_consts字段中的两个code对象,如下所示:
Python 3.12.3 (main, Feb  4 2025, 14:48:35) [GCC 13.3.0] on linux
Type "help", "copyright", "credits" or "license" for more information.
>>> source = open('demo.py').read()
>>> co = compile(source, 'demo.py', 'exec')
>>> co.co_consts
(<code object A at 0x7dfcdd9edb00, file "demo.py", line 1>, 'A', <code object Fun at 0x7dfcdd9ee0b0, file "demo.py", line 4>, None)
>>> type(co.co_consts)
<class 'tuple'>
>>> co.co_consts[0]
<code object A at 0x7dfcdd9edb00, file "demo.py", line 1>
可以看到co_consts是一个元组类型,其中保存着的正是A和Fun的code对象。
python字节码
在python标准库模块dis的官方文档中有对python各个字节码的说明,在Include/opcode_ids.h文件中可以看到字节码的定义,如下:
......
/* Instruction opcodes for compiled code */
#define CACHE                                    0
#define BEFORE_ASYNC_WITH                        1
#define BEFORE_WITH                              2
#define BINARY_OP_INPLACE_ADD_UNICODE            3
#define BINARY_SLICE                             4
#define BINARY_SUBSCR                            5
#define CHECK_EG_MATCH                           6
#define CHECK_EXC_MATCH                          7
#define CLEANUP_THROW                            8
#define DELETE_SUBSCR                            9
#define END_ASYNC_FOR                           10
#define END_FOR                                 11
......
python3的字节码和python2中有很大不同,字节码的个数也多了很多,python2中是有104条字节码指令,而python3.13.2中是224条字节码指令,而且最大值是267,说明字节码中间同样有跳跃。
这个也有一个获取源代码字节码的技巧,那就是利用dis模块,如下所示:
Python 3.12.3 (main, Feb  4 2025, 14:48:35) [GCC 13.3.0] on linux
Type "help", "copyright", "credits" or "license" for more information.
>>> source = open('demo.py').read()
>>> co = compile(source, 'demo.py', 'exec')
>>> import dis
>>> dis.dis(co)
  0           0 RESUME                   0

  1           2 PUSH_NULL
              4 LOAD_BUILD_CLASS
              6 LOAD_CONST               0 (<code object A at 0x7dfcdd9edb00, file "demo.py", line 1>)
              8 MAKE_FUNCTION            0
             10 LOAD_CONST               1 ('A')
             12 CALL                     2
             20 STORE_NAME               0 (A)

  4          22 LOAD_CONST               2 (<code object Fun at 0x7dfcdd9ee0b0, file "demo.py", line 4>)
             24 MAKE_FUNCTION            0
             26 STORE_NAME               1 (Fun)

  7          28 PUSH_NULL
             30 LOAD_NAME                0 (A)
             32 CALL                     0
             40 STORE_NAME               2 (a)

  8          42 PUSH_NULL
             44 LOAD_NAME                1 (Fun)
             46 CALL                     0
             54 POP_TOP
             56 RETURN_CONST             3 (None)

Disassembly of <code object A at 0x7dfcdd9edb00, file "demo.py", line 1>:
  1           0 RESUME                   0
              2 LOAD_NAME                0 (__name__)
              4 STORE_NAME               1 (__module__)
              6 LOAD_CONST               0 ('A')
              8 STORE_NAME               2 (__qualname__)

  2          10 RETURN_CONST             1 (None)

Disassembly of <code object Fun at 0x7dfcdd9ee0b0, file "demo.py", line 4>:
  4           0 RESUME                   0

  5           2 RETURN_CONST             0 (None)
前面通过compile方法可以访问code对象,这里同样使用这个code对象,借助dis模块反汇编这个code对象就可以得到其中的字节码指令信息。在反汇编的结果中,最左边一列是字节码指令在源文件中对应的行号,左起第二列是当前字节码指令在co_code中的偏移位置,第三列显示了当前的字节码指令,最后一列显示了当前字节码指令的参数。
解析pyc文件
在《python源码剖析》的最后提供了一个解析pyc文件的工具,但是那个适用于python2版本,这里我们可以不实现这样的工具,而是直接看一下pyc文件,看一下里面的字段能不能对得上,demo.py的字节码文件内容如下:
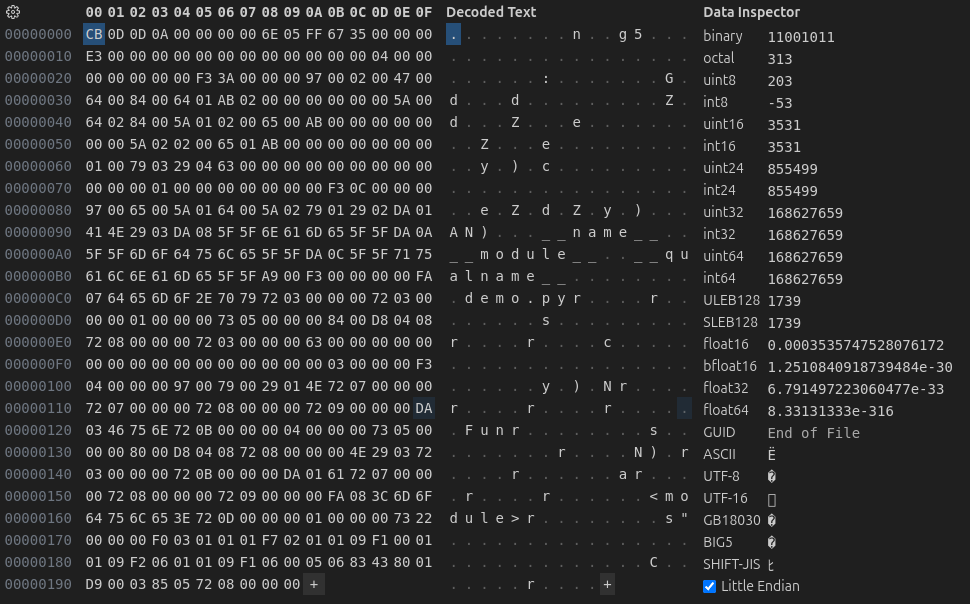
可以看到头部16字节和函数_code_to_timestamp_pyc中的写入是一致的,头部字段正是MAGIC_NUMBER+0+时间戳+源文件大小,每个字段占4字节,在跳过头部16字节后,后面就开始写入code对象了,但是在开始写入之前还会写入一个code对象的标志位c,第二行开始的E3既是这个标志位,c的ascii码是99,为什么这里是E3(227)呢?那是因为marshal在写入新对象时还会对标志位或上一个\x80,这样就得到了E3,随后开始写入code对象,后面可以依次分析。


 被折叠的 条评论
为什么被折叠?
被折叠的 条评论
为什么被折叠?
 到【灌水乐园】发言


