


一、概述
本文的应用场景在于:拥有一个云服务器(以阿里云的轻量服务器为例),在服务器上搭建自己的MYSQL数据库并能随时在本地连接使用。
云服务器的系统:Ubuntu 22
MYSQL版本:8.0
本地连接软件:Navicat
具体流程:MYSQL安装——>MYSQL权限设置——>Navicat下载安装(可破解)——>MYSQL防火墙端口解放——>连接
二、MYSQL安装
首先需要更新一下apt的库,输入以下代码:
sudu apt update
然后就可以直接用apt下载mysql了:
sudo apt install mysql-server
安装完成后mysql服务会自动启动,如果启动报错很可能是你之前安装过其他版本mysql发生了冲突,请先卸载,输入以下代码查看服务器运行状态:
sudo systemctl status mysql
or
/etc/init.d/mysql status
显示如下说明服务正在运行:
● mysql.service - MySQL Community Server
 Loaded: loaded (/lib/systemd/system/mysql.service; enabled; vendor preset: enabled)
 Active: active (running) since Tue 2020-04-28 20:59:52 UTC; 10min ago
 Main PID: 8617 (mysqld)
 Status: "Server is operational"
 ...
首次登陆直接输入mysql就可以登陆并设置密码:
mysql
三、MYSQL权限设置
完成上述操作后我们已经进入了mysql,显示如下:
mysql>
查看当前用户信息(不要忘了分号):
use mysql;
select user, host, plugin from user;
显示如下:
+------------------+-----------+-----------------------+
| user             | host      | plugin                |
+------------------+-----------+-----------------------+
| debian-sys-maint | localhost | caching_sha2_password |
| mysql.infoschema | localhost | caching_sha2_password |
| mysql.session    | localhost | caching_sha2_password |
| mysql.sys        | localhost | caching_sha2_password |
| root             | %         | auth_socked           |
+------------------+-----------+-----------------------+
5 rows in set (0.00 sec)
注意到root用户的plugin类型是auth_socked这样我们外界是无法连接至root用户的,需要在设置密码时将其转化为mysql_native_password,具体如下:
#注意MySQL8.0必须先执行此步骤设置密码,而MySQL5.7可以选择先安装下面的secure。
ALTER USER 'root'@'localhost' IDENTIFIED WITH mysql_native_password BY 'password';

#更新配置信息
flush privileges;

exit;
设置完密码后需要对mysql进行初始化:
mysql_secure_installation
设置步骤如下:
1、重置密码:
Securing the MySQL server deployment.

Enter password for user root:
The 'validate_password' component is installed on the server.
The subsequent steps will run with the existing configuration
of the component.
Using existing password for root.

Estimated strength of the password: 100
Change the password for root ? ((Press y|Y for Yes, any other key for No) :
#输入y可以重置密码,第二步可以选择3种密码强度,第三步输入新密码,最后输入Y确认
2、删除匿名用户,可以提高数据库安全性建议y:
By default, a MySQL installation has an anonymous user,
allowing anyone to log into MySQL without having to have
a user account created for them. This is intended only for
testing, and to make the installation go a bit smoother.
You should remove them before moving into a production
environment.

Remove anonymous users? (Press y|Y for Yes, any other key for No) : y
3、是否禁止远程连接,这里需要直接enter跳过,输入y的话会导致无法连接:
Normally, root should only be allowed to connect from
'localhost'. This ensures that someone cannot guess at
the root password from the network.

Disallow root login remotely? (Press y|Y for Yes, any other key for No) : n
4、是否删除mysql自带数据库,建议否:
By default, MySQL comes with a database named 'test' that
anyone can access. This is also intended only for testing,
and should be removed before moving into a production
environment.


Remove test database and access to it? (Press y|Y for Yes, any other key for No) : n
到此为止mysql就初始化完成了,但为了达到远程连接的效果我们还需要修改以下他的配置文件:
sudo vim /etc/mysql/mysql.conf.d/mysqld.cnf
需要将bind-address这一行注释掉从而解除地址绑定:

到这我们就可以重启mysql服务了:
/etc/init.d/mysql stop
/etc/init.d/mysql start
最后我们需要赋予我们的root用户权限:
use mysql;
update user set host='%' where user='root';
flush privileges;

#赋予root用户最高权限
GRANT ALL PRIVILEGES ON *.* TO 'root'@'%' WITH GRANT OPTION;

flush privileges;
Navicat下载与破解
这里馆主阿牛(膜拜一下大佬)讲得非常清楚,我在这就挂上链接:https://blog.csdn.net/qq_57421630/article/details/120651484
MYSQL防火墙端口解放
这部分因为阿里云这些提供的云服务器大多是自带防火墙的,所以我们需要手动去开放服务器上MYSQL的端口。
首先我们要去检查一下防火墙状态,输入:
sudo systemctl status firewalld
如果显示如下说明防火墙在运行:
● firewalld.service - firewalld - dynamic firewall daemon
     Loaded: loaded (/lib/systemd/system/firewalld.service; enabled; vendor preset: enabled)
     Active: active (running) since Mon 2024-04-08 18:46:21 CST; 3h 6min ago
       Docs: man:firewalld(1)
   Main PID: 22126 (firewalld)
      Tasks: 2 (limit: 986)
     Memory: 24.8M
        CPU: 1.348s
     CGroup: /system.slice/firewalld.service
             └─22126 /usr/bin/python3 /usr/sbin/firewalld --nofork --nopid

Apr 08 18:46:21 iZt4n6cqz9sqg91apxhtx5Z systemd[1]: Starting firewalld - dynamic firewall daemon...
Apr 08 18:46:21 iZt4n6cqz9sqg91apxhtx5Z systemd[1]: Started firewalld - dynamic firewall daemon.
没启动的话输入以下:
sudo systemctl start firewalld
但如果系统提示你找不到防火墙命令,那你就根据提示install一下就好了。
然后我们需要将Mysql的端口加入到防火墙的协议中,mysql的端口默认为3306:
sudo firewall-cmd --permanent --add-port=3306/tcp
重新加载以下防火墙规则:
sudo firewall-cmd --reload
最后我们验证一下端口是否成功开放了:
sudo firewall-cmd --list-ports
若显示:
3306/tcp说明开放成功,接下来我们就可以用破解好的Navicat来连接了
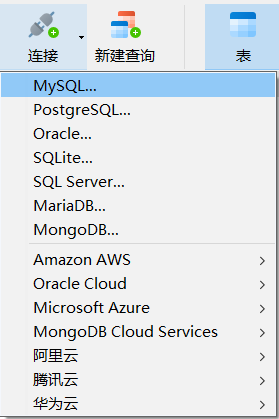
连接
在连接中选择mysql:
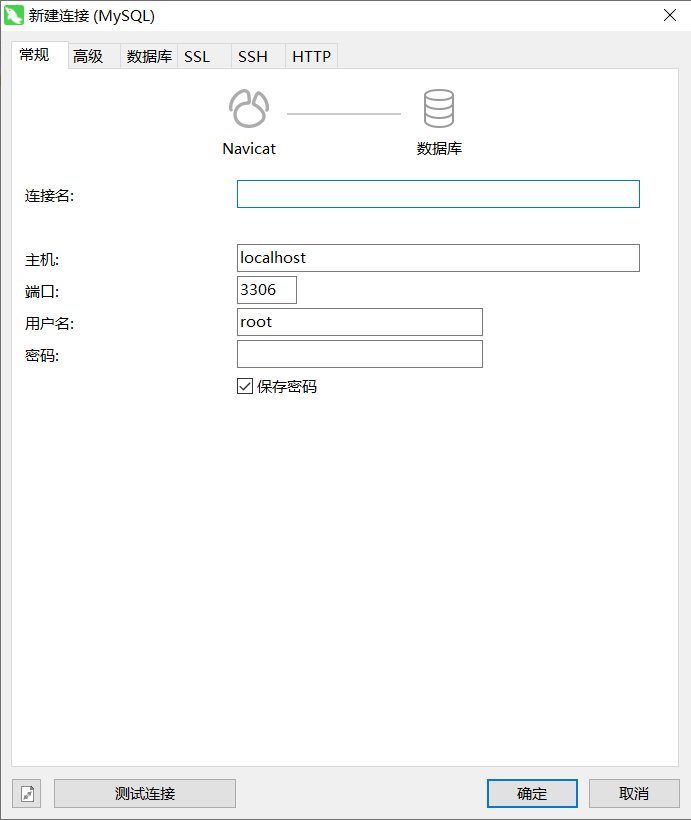
连接名可以随意取,主机就是你服务器的ip地址(注意云服务器需要填你的公有地址),端口是默认的3306,用户名也是默认的root(如果你创建了其他的用户名就跟着改),最后的密码就是你初始化mysql的时候设置的密码了。
Tip
如果这个时候Navicat提示你无法连接到主机,那你可能就需要去你的云服务器平台上面添加3306这个开放端口,以阿里云为例: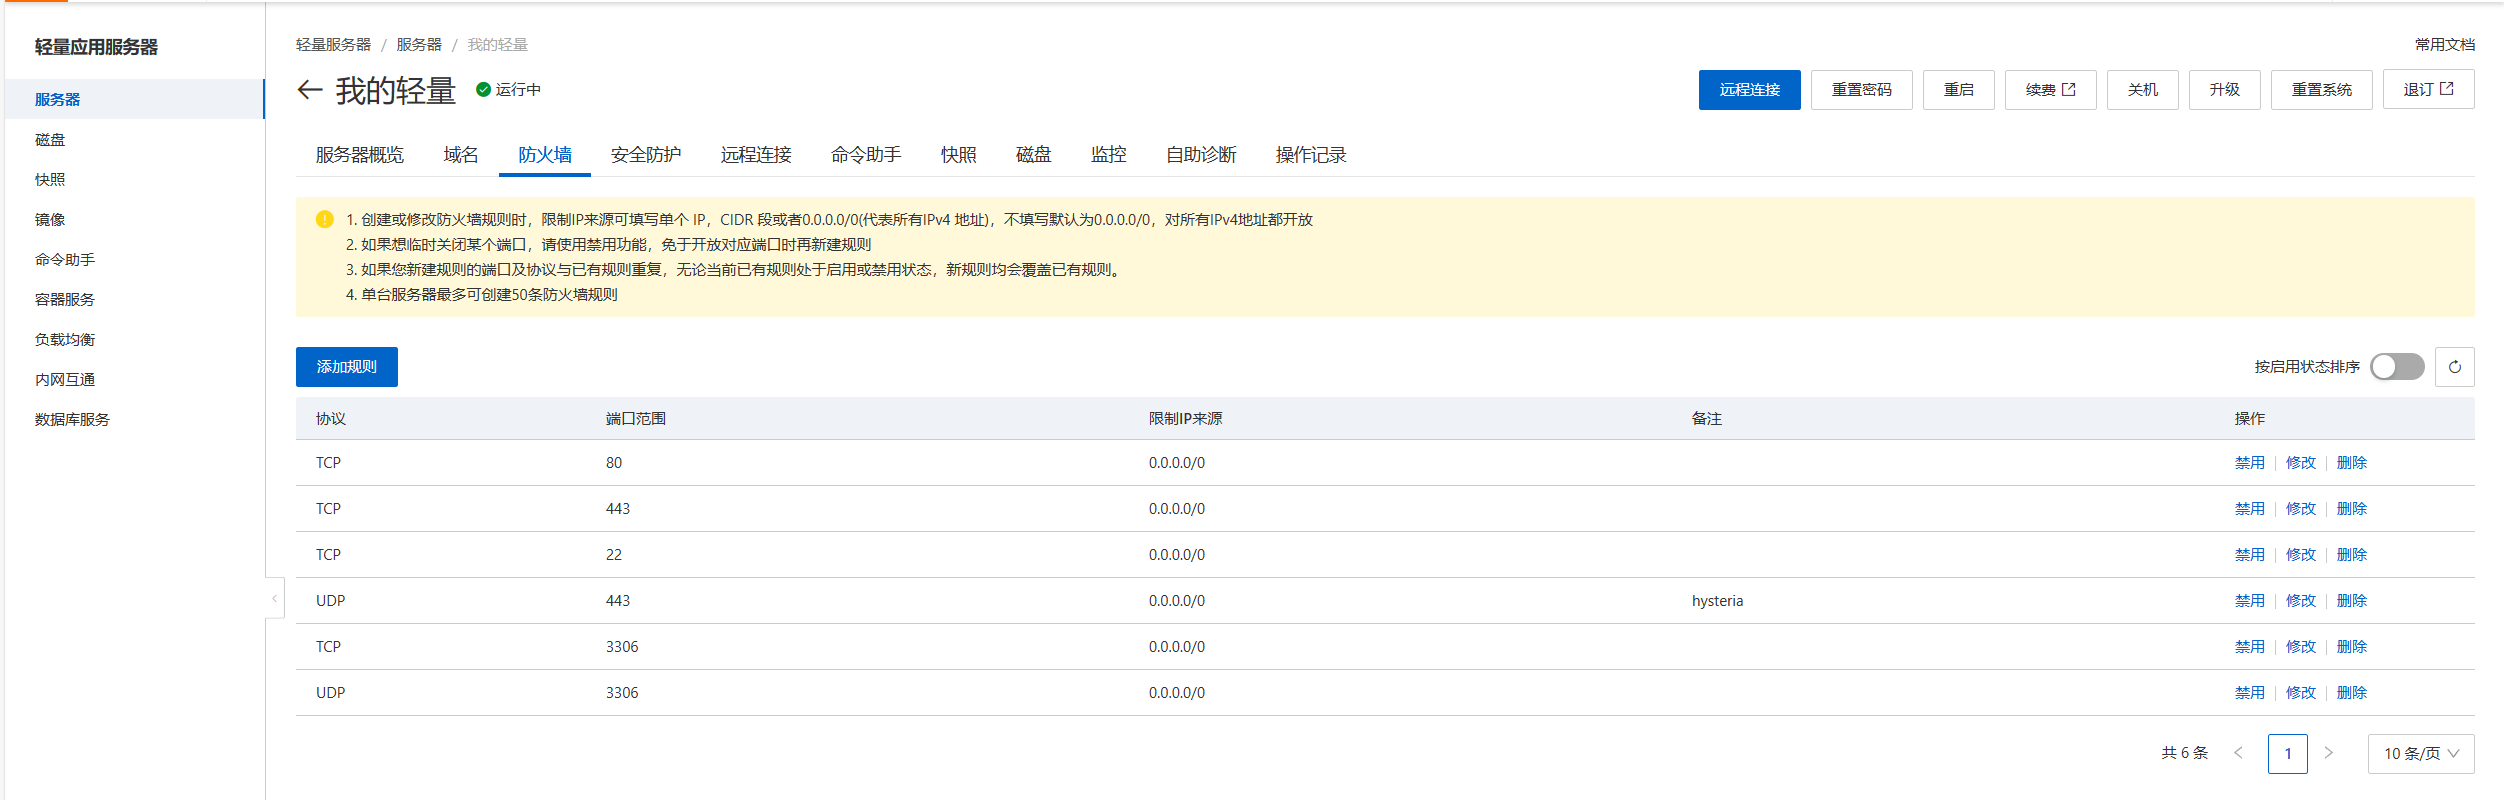
点击这个添加规则就可以开放你的3306端口。


 3551
3551


 被折叠的 条评论
为什么被折叠?
被折叠的 条评论
为什么被折叠?
 到【灌水乐园】发言


