


1,防开源中国的登陆对话框。效果图如下
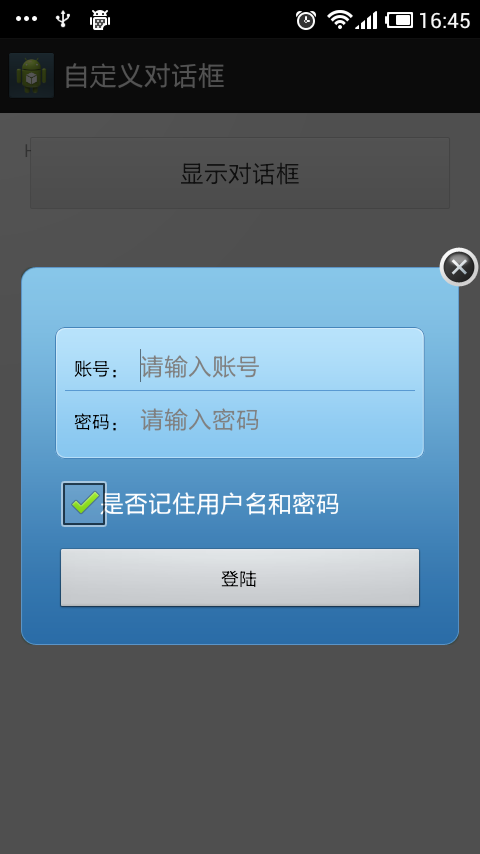
2,该对话继承Activity来实现,只有点击返回和关闭图标才能关闭对话框。
3,主要代码,LoginDialog.java 该类为登陆的相关操作,具体的实现更具自己的业务逻辑来操作。
public class LoginDialog extends Activity{


	@Override
	protected void onCreate(Bundle savedInstanceState) {
		// TODO Auto-generated method stub
		super.onCreate(savedInstanceState);
		setContentView(R.layout.login_dialog);
	}
}
4,点击按钮显示对话框:
public class MainActivity extends Activity {

	@Override
	protected void onCreate(Bundle savedInstanceState) {
		super.onCreate(savedInstanceState);
		setContentView(R.layout.activity_main);

	}


	//显示对话框
	public void show(View view){
		Intent intent = new Intent(this,LoginDialog.class);
		startActivity(intent);
	}

	@Override
	public boolean onCreateOptionsMenu(Menu menu) {
		// Inflate the menu; this adds items to the action bar if it is present.
		getMenuInflater().inflate(R.menu.main, menu);
		return true;
	}

}
<?xml version="1.0" encoding="UTF-8"?>
<RelativeLayout xmlns:android="http://schemas.android.com/apk/res/android"
	android:id="@+id/logindialog_space"
	android:layout_width="fill_parent"
	android:layout_height="fill_parent">
    <ScrollView
    	android:id="@+id/login_scrollview"
    	android:layout_width="fill_parent"
    	android:layout_height="wrap_content"
    	android:layout_centerInParent="true"
    	android:paddingTop="14.0dip"
    	android:paddingLeft="14.0dip"
    	android:paddingRight="14.0dip"
    	android:scrollbars="none" >
        <ViewSwitcher
        	android:id="@+id/logindialog_view_switcher"
        	android:layout_width="fill_parent"
        	android:layout_height="wrap_content">
            <RelativeLayout
            	android:layout_width="fill_parent"
            	android:layout_height="fill_parent"
            	android:background="@drawable/login_bg"
            	android:paddingTop="30.0dip"
            	android:paddingBottom="20.0dip" >
                <TableLayout
	                android:orientation="vertical"
	                android:id="@+id/login_user_table"
	                android:layout_width="fill_parent"
	                android:layout_height="wrap_content"
	                android:layout_marginTop="10.0dip"
	                android:layout_marginLeft="15.0dip"
	                android:layout_marginRight="15.0dip"
	                android:layout_centerHorizontal="true"
	                android:background="@drawable/login_user_table_bg" >
                    <LinearLayout
                    	android:id="@+id/login_uly"
                     	android:layout_width="fill_parent"
                     	android:layout_height="wrap_content">
                        <TextView
	                         android:layout_width="wrap_content"
	                         android:layout_height="wrap_content"
	                         android:layout_marginLeft="8.0dip"
	                         android:layout_marginTop="10.0dip"
	                         android:textStyle="bold"
	                         android:textColor="#ff000000"
	                         android:text="账号:" />
                        <AutoCompleteTextView
	                         android:id="@+id/login_account"
	                         android:layout_width="fill_parent"
	                         android:layout_height="wrap_content"
	                         android:layout_marginTop="10.0dip"
	                         android:layout_marginLeft="8.0dip"
	                         android:layout_marginRight="8.0dip"
	                         android:background="@null"
	                         android:hint="请输入账号"
	                         android:maxLines="1"
	                         android:singleLine="true"
	                         android:selectAllOnFocus="true"
	                         android:inputType="textEmailAddress" />
                    </LinearLayout>
                    <ImageView
	                    android:layout_width="fill_parent"
	                    android:layout_height="wrap_content"
	                    android:layout_marginTop="5.0dip"
	                    android:layout_marginLeft="2.0dip"
	                    android:layout_marginRight="2.0dip"
	                    android:src="@drawable/line_blue"
	                    android:scaleType="fitXY" />
                    <LinearLayout
	                    android:layout_width="fill_parent"
	                    android:layout_height="wrap_content"
	                    android:layout_marginTop="7.0dip">
                        <TextView
	                        android:layout_width="wrap_content"
	                        android:layout_height="wrap_content"
	                        android:layout_marginLeft="8.0dip"
	                        android:textStyle="bold"
	                        android:textColor="#ff000000"
	                        android:text="密码:" />
                        <EditText
	                        android:id="@+id/login_password"
	                        android:layout_width="fill_parent"
	                        android:layout_height="wrap_content"
	                        android:layout_marginLeft="8.0dip"
	                        android:layout_marginRight="8.0dip"
	                        android:background="@null"
	                        android:hint="请输入密码"
	                        android:maxLines="1"
	                        android:password="true"
	                        android:singleLine="true"
	                        android:selectAllOnFocus="true" />
                    </LinearLayout>
                </TableLayout>
                <TableLayout
	                android:orientation="vertical"
	                android:layout_width="fill_parent"
	                android:layout_height="wrap_content"
	                android:layout_below="@+id/login_user_table"
	                android:layout_alignLeft="@+id/login_user_table"
	                android:layout_alignRight="@+id/login_user_table"
	                android:stretchColumns="0,2" >
                    <TableRow
	                    android:gravity="center_horizontal"
	                    android:layout_width="wrap_content"
	                    android:layout_height="wrap_content"
	                    android:layout_marginTop="5.0dip">
                        <CheckBox
	                        android:id="@+id/login_checkbox_rememberMe"
	                        android:layout_width="wrap_content"
	                        android:layout_height="wrap_content"
	                        android:layout_gravity="left|center"
	                        android:paddingLeft="30dip"
	                        android:text="是否记住用户名和密码"
	                        android:checked="true"/>
                    </TableRow>
                    <LinearLayout
	                    android:layout_width="fill_parent"
	                    android:layout_height="wrap_content"
	                    android:layout_marginTop="5.0dip">
                        <Button
	                        android:id="@+id/login_btn_login"
	                        android:layout_width="fill_parent"
	                        android:layout_height="45dip"
	                        android:text="登陆"
	                      />
                    </LinearLayout>
                </TableLayout>
            </RelativeLayout>
            <View
	            android:id="@+id/login_loading"
	            android:layout_width="135.0dip"
	            android:layout_height="135.0dip"
	            android:layout_gravity="center"
	            />
        </ViewSwitcher>
    </ScrollView>
    <ImageButton
	    android:id="@+id/login_close_button"
	    android:layout_width="wrap_content"
	    android:layout_height="wrap_content"
	    android:layout_alignRight="@+id/login_scrollview"
	    android:layout_alignTop="@+id/login_scrollview"
	    android:background="@drawable/login_close_button_nor"  />
</RelativeLayout>
6,在Manifest.xml文件中声明,注意加上主题,否则没有显示效果
 <activity
            android:name="com.qj.foschina.ui.LoginDialog"
            android:theme="@style/Theme.HalfTranslucent"
            >
</activity> <style name="Theme.HalfTranslucent" parent="@android:style/Theme.Translucent">
<item name="android:windowBackground">@color/half_transparent</item>
<item name="android:windowNoTitle">true</item>
<item name="android:windowContentOverlay">@null</item>
</style>
源码下载地址:http://download.csdn.net/detail/lzqjfly/5312162


 1897
1897

 被折叠的 条评论
为什么被折叠?
被折叠的 条评论
为什么被折叠?
 到【灌水乐园】发言


