


Python 读取写入配置文件 —— ConfigParser
Python 读取写入配置文件很方便,可使用内置的 configparser 模块;可查看源码,如博主本机地址: “C:/python27/lib/configparser.py”
Configuration file parser.
A setup file consists of sections, lead by a "[section]" header,
and followed by "name: value" entries, with continuations and such in
the style of RFC 822.
该模块支持读取类似如上格式的配置文件,如 windows 下的 .conf 及 .ini 文件等。
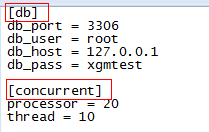
本章节使用如下的配置文件作为示例,可在 D 盘下新建 Pyhton_config 文件夹,创建两个文件 test.config 及 test.ini 内容及示例截图如下:
 View Code

本章节就基础读取及写入配置文件进行具体的说明。
基础读取配置文件
- -read(filename) 直接读取文件内容
- -sections() 得到所有的section,并以列表的形式返回
- -options(section) 得到该section的所有option
- -items(section) 得到该section的所有键值对
- -get(section,option) 得到section中option的值,返回为string类型
- -getint(section,option) 得到section中option的值,返回为int类型,还有相应的getboolean()和getfloat() 函数。


 1 # !/usr/bin/env python
 2 # -*- coding:utf-8 -*-
 3
 4 import ConfigParser
 5 import os
 6
 7 os.chdir("D:\\Python_config")
 8
 9 cf = ConfigParser.ConfigParser()
10
11 # cf.read("test.ini")
12 cf.read("test.conf")
13
14 #return all section
15 secs = cf.sections()
16 print 'sections:', secs, type(secs)
17 opts = cf.options("db")
18 print 'options:', opts, type(opts)
19 kvs = cf.items("db")
20 print 'db:', kvs
21
22 #read by type
23 db_host = cf.get("db", "db_host")
24 db_port = cf.getint("db", "db_port")
25 db_user = cf.get("db", "db_user")
26 db_pass = cf.get("db", "db_pass")
27
28 #read int
29 threads = cf.getint("concurrent", "thread")
30 processors = cf.getint("concurrent", "processor")
31 print "db_host:", db_host
32 print "db_port:", db_port
33 print "db_user:", db_user
34 print "db_pass:", db_pass
35 print "thread:", threads
36 print "processor:", processors
示例代码详见上方,解析如下:
需要实例化为 ConfigParser 对象 cf = ConfigParser.ConfigParser() ;读取文件 cf.read("test.conf")
 secs = cf.sections() 获取sections,返回list
 ![]()
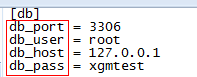 opts = cf.options("db") 获取db section下的 options,返回list
 ![]()
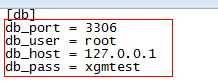 kvs = cf.items("db") 获取db section 下的所有键值对,返回list 如下,每个list元素为键值对元组
![]()
通常情况下,我们已知 section 及 option,需取出对应值,读取方式如下:
#read by type
db_host = cf.get("db", "db_host")
db_port = cf.getint("db", "db_port")
db_user = cf.get("db", "db_user")
db_pass = cf.get("db", "db_pass")
cf.get(...) 返回的会是 str 类型, getint 则返回int类型 
基础写入配置文件
- -write(fp) 将config对象写入至某个 .init 格式的文件 Write an .ini-format representation of the configuration state.
- -add_section(section) 添加一个新的section
- -set( section, option, value 对section中的option进行设置,需要调用write将内容写入配置文件 ConfigParser2
- -remove_section(section) 删除某个 section
- -remove_option(section, option) 删除某个 section 下的 option
需要配合文件读写函数来写入文件,示例代码如下
 1 import ConfigParser
 2 import os
 3
 4 os.chdir("D:\\Python_config")
 5
 6 cf = ConfigParser.ConfigParser()
 7
 8 # add section / set option & key
 9 cf.add_section("test")
10 cf.set("test", "count", 1)
11 cf.add_section("test1")
12 cf.set("test1", "name", "aaa")
13
14 # write to file
15 with open("test2.ini","w+") as f:
16     cf.write(f)
写入的文件如: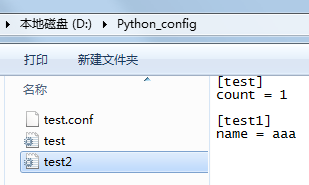
修改类似写入,注意一定要 read 原文件!
 1 import ConfigParser
 2 import os
 3
 4 os.chdir("D:\\Python_config")
 5
 6 cf = ConfigParser.ConfigParser()
 7
 8 # modify cf, be sure to read!
 9 cf.read("test2.ini")
10 cf.set("test", "count", 2)            # set to modify
11 cf.remove_option("test1", "name")
12
13 # write to file
14 with open("test2.ini","w+") as f:
15     cf.write(f)
上述代码执行后: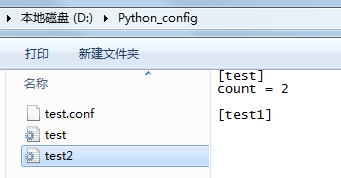 [test] 下 count 的值为2; [test1] 下的 name 键值被删除,若需要删除整个 [test1] section,使用 cf.remove_section("test1")
1.基本的读取配置文件
-read(filename) 直接读取ini文件内容
-sections() 得到所有的section,并以列表的形式返回
-options(section) 得到该section的所有option
-items(section) 得到该section的所有键值对
-get(section,option) 得到section中option的值,返回为string类型
-getint(section,option) 得到section中option的值,返回为int类型,还有相应的getboolean()和getfloat() 函数。
2.基本的写入配置文件
-add_section(section) 添加一个新的section
-set( section, option, value) 对section中的option进行设置,需要调用write将内容写入配置文件。
3.基本例子
test.conf
- [sec_a]
- a_key1 = 20
- a_key2 = 10
- [sec_b]
- b_key1 = 121
- b_key2 = b_value2
- b_key3 = $r
- b_key4 = 127.0.0.1
parse_test_conf.py
- import ConfigParser
- cf = ConfigParser.ConfigParser()
- #read config
- cf.read("test.conf")
- # return all section
- secs = cf.sections()
- print 'sections:', secs
- opts = cf.options("sec_a")
- print 'options:', opts
- kvs = cf.items("sec_a")
- print 'sec_a:', kvs
- #read by type
- str_val = cf.get("sec_a", "a_key1")
- int_val = cf.getint("sec_a", "a_key2")
- print "value for sec_a's a_key1:", str_val
- print "value for sec_a's a_key2:", int_val
- #write config
- #update value
- cf.set("sec_b", "b_key3", "new-$r")
- #set a new value
- cf.set("sec_b", "b_newkey", "new-value")
- #create a new section
- cf.add_section('a_new_section')
- cf.set('a_new_section', 'new_key', 'new_value')
- #write back to configure file
- cf.write(open("test.conf", "w"))
得到终端输出:
sections: ['sec_b', 'sec_a']
options: ['a_key1', 'a_key2']
sec_a: [('a_key1', "i'm value"), ('a_key2', '22')]
value for sec_a's a_key1: i'm value
value for sec_a's a_key2: 22
更新后的test.conf
- [sec_b]
- b_newkey = new-value
- b_key4 = 127.0.0.1
- b_key1 = 121
- b_key2 = b_value2
- b_key3 = new-$r
- [sec_a]
- a_key1 = i'm value
- a_key2 = 22
- [a_new_section]
- new_key = new_value
4.Python的ConfigParser Module中定义了3个类对INI文件进行操作。分别是RawConfigParser、ConfigParser、SafeConfigParser。RawCnfigParser是最基础的INI文件读取类,ConfigParser、SafeConfigParser支持对%(value)s变量的解析。
设定配置文件test2.conf
- [portal]
- url = http://%(host)s:%(port)s/Portal
- host = localhost
- port = 8080
使用RawConfigParser:
- import ConfigParser
- cf = ConfigParser.RawConfigParser()
- print "use RawConfigParser() read"
- cf.read("test2.conf")
- print cf.get("portal", "url")
- print "use RawConfigParser() write"
- cf.set("portal", "url2", "%(host)s:%(port)s")
- print cf.get("portal", "url2")
得到终端输出:
use RawConfigParser() read
http://%(host)s:%(port)s/Portal
use RawConfigParser() write
%(host)s:%(port)s
改用ConfigParser:
- import ConfigParser
- cf = ConfigParser.ConfigParser()
- print "use ConfigParser() read"
- cf.read("test2.conf")
- print cf.get("portal", "url")
- print "use ConfigParser() write"
- cf.set("portal", "url2", "%(host)s:%(port)s")
- print cf.get("portal", "url2")
得到终端输出:
use ConfigParser() read
http://localhost:8080/Portal
use ConfigParser() write
localhost:8080
改用SafeConfigParser:
- import ConfigParser
- cf = ConfigParser.SafeConfigParser()
- print "use SafeConfigParser() read"
- cf.read("test2.conf")
- print cf.get("portal", "url")
- print "use SateConfigParser() write"
- cf.set("portal", "url2", "%(host)s:%(port)s")
- print cf.get("portal", "url2")
得到终端输出(效果同ConfigParser):
use SafeConfigParser() read
http://localhost:8080/Portal
use SateConfigParser() write
localhost:8080


 5607
5607


 被折叠的 条评论
为什么被折叠?
被折叠的 条评论
为什么被折叠?
 到【灌水乐园】发言


